Eco Silent 7584 - Fan Solis - Free user manual and instructions
Find the device manual for free Eco Silent 7584 Solis in PDF.

User questions about Eco Silent 7584 Solis
0 question about this device. Answer the ones you know or ask your own.
Ask a new question about this device
Download the instructions for your Fan in PDF format for free! Find your manual Eco Silent 7584 - Solis and take your electronic device back in hand. On this page are published all the documents necessary for the use of your device. Eco Silent 7584 by Solis.
USER MANUAL Eco Silent 7584 Solis
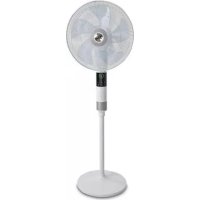
Please read through this user manual thoroughly before using your Solis pedestal fan "Eco Silent", so that you become familiar with your appliance and can use it safely. We thoroughly recommend that you keep these instructions and, if you pass the appliance on, that you also hand these instructions to the new owner.
For your own safety, please observe the following safety measures when using elec trical appliances:
- To prevent electric shock, neither the appliance nor the power cord and the power plug must come into contact with water or other liquids. Danger of electric shock! Should the appliance resp. the power cord or the power plug come into contact with liquid, use dry rubber gloves to immediately pull the power plug out of the socket. Do not use the appliance again until you have had it's ability to function safely checked by Solis or a Solis approved service centre.
- Do not operate the appliance resp. pull or connect the power plug with wet or moist hands or feet.
- Before using the appliance, check that the voltage stated on the type plate of the appliance matches your mains voltage. We do not recommend operating the appliance with a multiway plug adapter.
-
Install the power cord in a way that makes it impossible to trip over it, the appliance might fall over and be damaged resp. cause personal damage. Please make sure that neither the power cord nor the power plug come into contact with hot surfaces like e.g. a stove top or a heater resp. with the appliance itself.
-
Keep the appliance away from hot gas, hot ovens and other heat-emitting appliances or heat sources. Never use the appliance on a hot or wet surface. Never place the appliance near moisture, heat and naked flames. Keep the appliance away from moving parts or appliances. Do not use the appliance in rooms that contain explosive resp. flammable substances or liquids. Do not use the fan in rooms with high levels of humidity, at room temperatures of over 40^ or in dusty rooms.
- Position the appliance so that the distance to the nearest wall or item / furniture piece is at least 30~cm
- Always keep a large enough safety distance to sensitive materials such as textiles, drapes or curtains which are at risk of being sucked in. Make sure that the fan can gyrate freely on all sides. The area around the pedestal fan must be kept clear and the fan must never be covered (risk of fire!). Make sure that the action radius (oscillation angle of max. 120^ ) of the fan is kept clear of any items that might get caught in the fan and block it. The fan must never be unsupervised during use.
- The appliance has to be standing upright on an even, clean, stable and dry surface during use. Do not use the appliance outdoors or in moving vehicles or boats.
- Never carry the appliance by the power cord and do not place anything on the power cord. Never pull on the power cord to disconnect the appliance from the power mains. Only pull on the plug.
-
We recommend that you do not use an extension cable with this appliance. Do not place the appliance directly underneath a power socket.
-
Before disconnecting the power plug of the appliance from the power socket, please make sure that the appliance is not in use.
- Always unplug the appliance if it is not in use or left unattended, and before cleaning. This also applies if you move, assemble, disassemble or store the appliance. We recommend the use of a residual current device (RCD safety switch) to provide additional protection during the use of electrical appliances. It is advisable to use a safety switch with a rated residual operating current of 30mA maximum. For professional advice consult an electrician.
- Do not make any changes to the appliance, the power cord, the power plug, the remote control or the accessories.
- Improper use creates the risk of injury! No liability is assumed in the case of potential damages or injuries.
- Never reach for an appliance that has fallen into water or another liquid. Always use dry rubber gloves to pull the power plug before removing it. Do not start using the appliance again before having it checked for functionality and safety by Solis or a service centre authorized by Solis.
- Never place the appliance in such a way that it might fall into water or come into contact with water or another liquid resp. oil (e.g. next to a swimming pool or in a bathroom).
-
Never submerge the appliance, power cord, power plug or remote control in water, or bring it into contact with water or other liquids.
-
Place the appliance so that it is never exposed to direct sunlight.
- Never insert any objects or tools into the appliance openings or the fan grid or reach into it with hands / fingers The appliance might be damaged resp. risk of electric shock and injuries! Pay special attention to children to prevent them from touching the fan.
- Do not spray anything into the fan - not even insect spray.
- Never move or lift the pedestal fan while it is in use. Always use the appliance while it is standing upright, never while it is tilted or lying flat.
- Only use the appliance as described in this manual. Only use with the provided accessories or accessories recommended by Solis, incorrect accessories or misuse can lead to damage of the appliance, to fire, electric shock or personal damage.
- Never use the appliance with an external timer switch or a different remote control.
- This appliance is only for household use and is not suitable for commercial use.
- Remove and discard all packaging materials and potential stickers or labels (except for the type plate) before using the appliance for the first time.
-
Check the appliance before each use and ensure that the appliance, power cord and plug are not damaged and no parts have come loose.
-
In order to avoid electric shock, do not use the appliance if the power cord or plug are damaged or the appliance is otherwise faulty, dropped or damaged or if parts have come loose. Never attempt repairs yourself but take your appliance to Solis or a Solis approved service centre in order to get it inspected or mechanically and electrically repaired, in order to avoid a hazard.
- People with limited physical, sensorial or mental capabilities as well as unknowing or inexperienced people and children must not use the appliance except when supervised or thoroughly instructed on how to use the appliance by a person responsible for their safety. Additionally, they must be aware of the dangers arising from the appliance and know how to operate it safely. Cleaning and maintenance of the appliance must not be done by unsupervised children. Under no circumstances must the appliance be used or cleaned by children under the age of 8. The appliance and its power cord have to be kept away from children under the age of 8.
- Children must be supervised, so that they do not play with the appliance.
- Always ensure the Solis fan is properly assembled before use.
- Before moving or cleaning the appliance, switch it off and wait for the fan to come to a standstill. Remove the power plug from the socket. This also applies when the appliance is not in use.
-
You should take particular caution when children, elderly persons or animals are nearby to the fan.
-
The air flow from the fan should not be directed on elderly or sick people, resp. children or pets.
- Never leave the fan while the appliance is in use.
- Always keep the appliance and the accessories clean. Please refer to the notes given in the manual.
- Do not place any objects on the appliance.
- Always fully unwind the power cord before plugging the plug into the socket.
- Pull the plug after every use. Only then, the appliance is fully switched off.
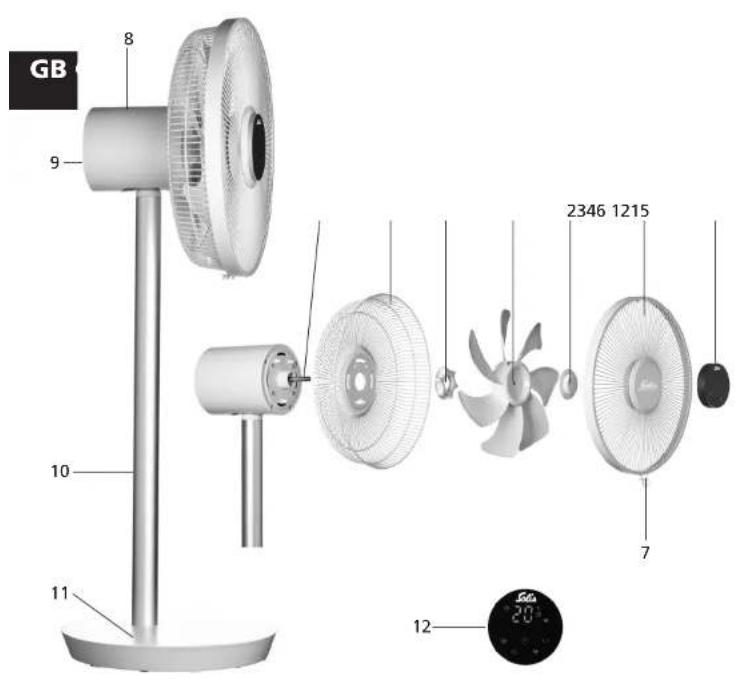
APPLIANCE DESCRIPTION
- Front safety grid with frame ring, the remote control can be mounted to the centre
- Rotor blade nut
3.Rotor blade - Rear nut
- Rear safety grid
- Motor shaft on the motor casing
- Frame ring fastener clip
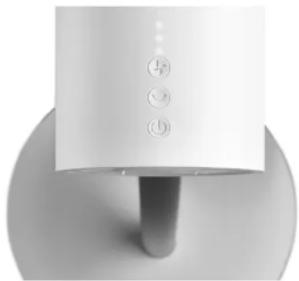
- Control panel with function buttons (On/Off, oscillation, speed)
9.Motor casing - Pillar
- Pedestal with inlying cables
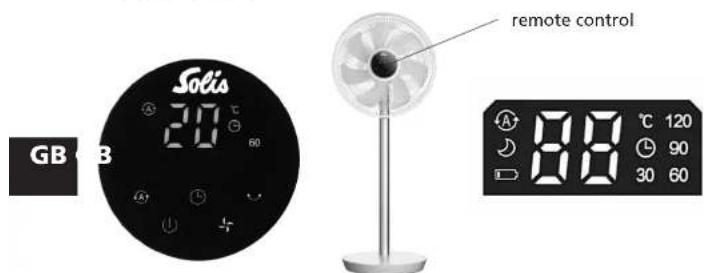
- Remote control
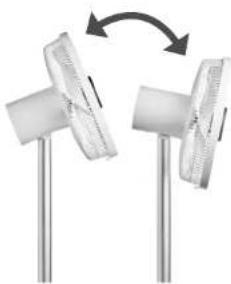
Note: You can manually tilt the fully assembled ventilator at a vertical angle of 35^ .
ASSEMBLY
Take all parts out of the packaging and discard the packaging material, especially the plastic bags (suffocation hazard for children!) and potential advertisement stickers and labels (except for the type plate).
- Place all parts that need to be assembled in front of you. At this time, do not unpack the safety grid.
GB
A. MOUNTING THE PILLAR TO THE PEDESTAL
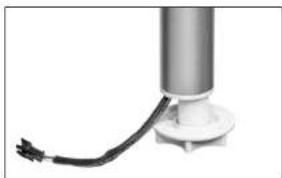
- Unscrew the screw cap on the threaded end of the pillar (turn it towards "Loosen", in a counter clockwise direction). You will later need the screw cap to fasten the pillar to the pedestal.
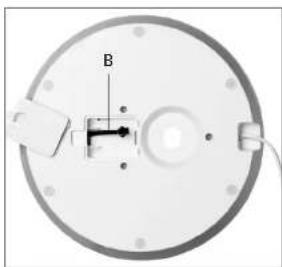
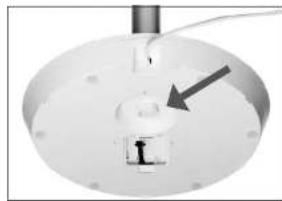
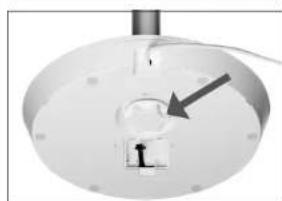
- Turn the pedestal upside down and remove the cable storage cover. A cable (B) is visible underneath.
- Push the connection piece of the pillar into the hole in the pedestal. The other cable (A), which incorporates the connection piece of the pillar, has to be fed through the little sideways opening in the hole in the pedestal. Make sure not to pinch the cable.
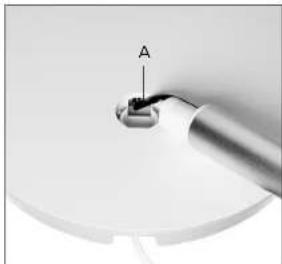
- Now, push the connection piece of the pillar all the way into the hole in the pedestal so that the threads in the bottom of the pedestal become visible.
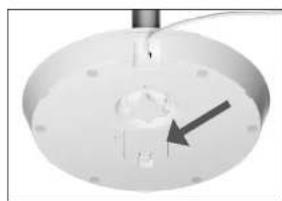
- Screw the screw cap onto the threaded end of the pillar (turn towards "Tighten" in a clockwise direction). Now, the pillar is installed.
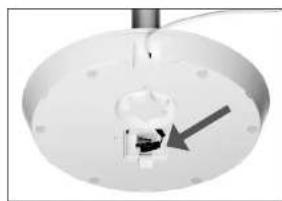
- Now, the two cables with the two connection pieces lie next to each other. Connect the two connection pieces.
- Close the cable storage compartment with the cover.
B. MOUNTING THE SAFETY GRIDS AND THE ROTOR BLADE ON THE MOTOR CASING
-
Unpacking the safety grids
-
Open the transparent fastener clip on the front safety grid by folding it out. The clip stands at a 90^ angle to the safety grid. Make sure not to push the clip to far out and breaking it off.
- Take the front safety grid off of the rear safety grid.
-
Discard the packaging materials and take the rotor blade out of the plastic film.
-
Mounting the safety grids and the rotor blade
-
Unscrew the rotor blade nut (2) from the motor shaft (6). Then, unscrew the rear nut (4) from the motor casing. Unscrew the rotor blade nut by turning it in a clockwise direction (towards "Loosen"). Unscrew the rear nut by turning it in a counter-clockwise direction.
- Push the rear safety grid onto the motor casing and over the threads. Rotate it so that the 3 positioning pins on the motor casing keep the rear safety grid in position (the two small holes are on top). (Fig. 1 and 2)
- Use the rear nut to fasten the rear safety grid (4). To do that, turn the rear nut in a clockwise direction towards "Tighten". (Fig. 3)
- Now, push the rotor blade onto the motor shaft, the 2 pins on the motor shaft have to slide into the two grooves in the rotor blade base. (Fig. 4)
- Fasten the rotor blade with the rotor blade nut (2) by turning it in a counter-clockwise direction towards "Tighten". The rotor blade should be able to spin freely. (Fig. 5)
- To fasten the front safety grid to the rear safety grid, align the little clip on the frame of the front safety grid with the two little notches on the top of the frame of the rear safety grid. Link the two parts together. (Fig. 6 and 7)
- Then, carefully push the frame of the front safety grid against the rear frame so that the fastener clip on the bottom of the front frame can be closed and locks into place. (Fig. 8 and 9)
- When the fan is correctly assembled you can start using the appliance. (Fig. 10)
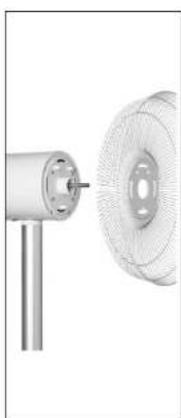
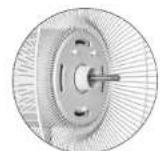
Fig.2
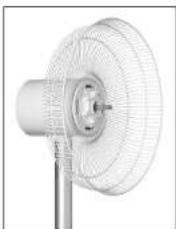

Fig. 4
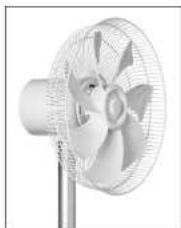
Fig.5
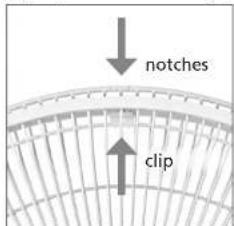
Fig. 6
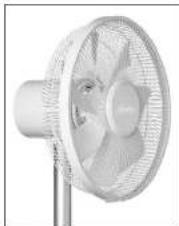
Fig. 7
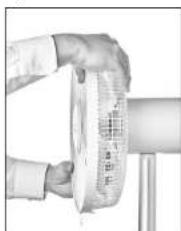
Fig.8Fig.9
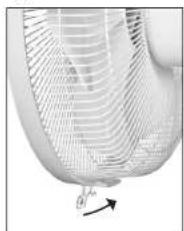
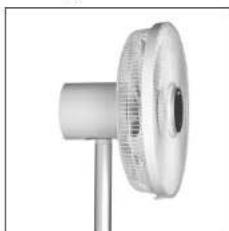
Fig.10
PREPARING THE REMOTE CONTROL FOR USE
- Once you have inserted three AAA batteries (not included) into the battery compartment on the back of the remote control, the remote control can be connected to the pedestal fan and activated. After that, the remote control can be attached to the round surface on the front of the safety grid.
Caution: The remote control is held by magnets on the round surface in the centre of the safety grid. This mechanism requires batteries to be inserted. - Open the battery compartment on the back of the remote control and insert the three AAA batteries. Please mind the stated polarities.
CONNECTING RESP. ACTIVATING THE REMOTE CONTROL
- Connect the power plug to a suitable power outlet and switch the appliance on with the Or/Off button on the control panel on the fan head.
- Touch any button on the remote control to activate the remote control.
- Then, touch the program button on the remote control for approx. 3 seconds. "00" flashes on the display, the four LEDs on the motor casing flash.
- Touch any button on the motor casing within the next 5 seconds. The green LEDs go out.
- The room temperature is displayed in the LED display of the remote control. If no other button is touched within 5 seconds, the display switches off.
- After these activation and connection procedures, you can operate the appliance with the remote control.
Note: If no connection could be made, "88" lights up in the display and the display goes out after 5 seconds if no other button is touched. If that is the case, we recommend repeating steps 2 to 5.
In general:
- You have to connect the remote control to the appliance, thus activating it, before you can control the appliance with the remote control.
If you touch a button on the remote control while the fan is running, you can read successively the ventilation speed, the room temperature, the oscillation angle and - if set - the timer symbol from the display for 5 seconds. There are symbols displayed to the left of the number, indicating the set programs and issuing a warning if the batteries are low. To the right of the number you can see the symbols for the timer setting resp. the oscillation angle. If no button is touched for 5 seconds, all prompts as well as the display on the remote control go out to save the batteries. - The function buttons on the remote control offer further setting options in addition to the buttons on the motor casing of the appliance. This allows you to set the ventilation program, choose among 4 different oscillation angles and activating the timer.
- When not using the remote control for extended periods of time, please remove the batteries and store them away. This increases the lifespan of the batteries.
- Please make sure that the area between the remote control and the receiver is unobstructed.
Please keep the remote control safe. It must not fall down or break.
If the batteries are flat, the corresponding symbol lights up. In that case, please replace all three batteries.
▲ THE FUNCTION BUTTONS
THE FUNCTION BUTTONS ON THE CONTROL PANEL
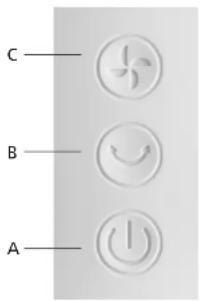
A On/Off button

Once you have switched the appliance on with the On/Off button, the appliance starts up. The speed button (C) on the motor casing allows you to control the speed. The green LED dots above the button indicate the speed.
Touching the On/Off button again switches the appliance back off.
B Oscillation button

Touching the oscillation button on the motor casing makes the fan move horizontally at a 90^ angle.
Note: The ventilator can also oscillate at angles of 30^ , 60^ and 120^ . However, these settings can only be made via the remote control.
Touching the oscillation button again switches the oscillation function back off.
C Speed button

With the speed button, you can choose from 8 different speed settings. Each touch of the button increases the speed setting by one level. The green LEDs indicate the current setting:
Speed 1: 1 faint green LED
Speed 2:1 bright green LED
Speed 3: 1 bright and one faint LED
Speed 4:2 bright green LED
and so on. Please note the following table:
| Speed Green | LED dots |
| 1 | 1 x faint |
| 2 1 x bright | |
| 3 1 x bright, 1 x faint | |
| 4 2 x bright | |
| 5 2 x bright, 1 x faint | |
| 6 3 x bright | |
| 7 3 x bright, 1 x faint | |
| 8 4 x bright |
Touching the button once again switches the appliance back to speed 1.
THE FUNCTION BUTTONS ON THE REMOTE CONTROL
- Caution: The appliance can only be operated via remote control if the remote control has been connected to the appliance and activated as described in the section "Preparing the remote control for use".
You can have the current room temperature displayed by once briefly touching one of the buttons on the remote control.
A On/Off switch

If the fan is connected to the power, it can be switched on and off with this button, which can be found on both the remote control and the motor casing.
Briefly touch the On/Off switch on the remote control twice. The current room temperature and the current setting are displayed, then the rotor blade starts up.
Touch the button again to switch the appliance off.
B Speed button

With the speed button, you can set one out of eight different ventilation speeds. The corresponding number lights up in the display. Touching the button one time increases the speed by one level. After the highest level 8 has been surpassed, the display switches back to 1, the lowest level.
C Oscillation button

With the oscillation button, you can choose one out of four different oscillation angles. Each touch of the button switches the setting to the next angle.
The possible settings are: 30^ , 60^ , 90^ and 120^ . The corresponding number lights up in the right hand side of the display.
After surpassing the highest level 120^ , the appliance switches the oscillation back off if the button is touched again.
D Timer button

With the timer button, you can set an operation time between 1 and a maximum of 12 hours at 1-hour-intervals. After the hours have elapsed, the appliance switches off automatically. Each touch of the button increases the time setting by one hour. If the button is touched again after the highest setting, 12, the timer function switches back off.
If the timer is activated, the timer symbol lights up in the right hand side of the display.
Caution: Even if you have activated the timer, you can switch the appliance off beforehand with the On/Off button. The timer setting is not saved if the appliance is switched back on after that.
E Program button

You can use the program button to choose from 3 different programs:
- Automatic program: The automatic program measures the current room temperature and adjusts the ventilation speed according to this temperature. The symbol lights up in the display.
Depending on the room temperature, the rotor blade rotates at 2 different ventilation speeds, switching between them in 15-second intervals.
Under 25^ , the two speed settings are the lowest ones, 1 and 2. Between 25^ and 28^ the appliance operates at the speed levels 3 and 4, between 29^ and 34^ , it operates at the speed levels 5 and 6 and above 34^ , it operates at the speed levels 7 and 8.
The automatic program is not saved. If the appliance is switched off and back on again, it is reset to the standard program. - Sleep program (Touch the button again): In the sleep program, the speed gradually increases until it reaches the base speed that you have set before decreasing again. The symbol lights up in the display.
The sleep program is not saved. If the appliance is switched off and back on again, it is reset to the standard program. - Standard program (Touch the A button again): In the standard program, the ventilation speed is constantly held. No symbol is lit up in the display.
CLEANING AND MAINTENANCE
- Before cleaning, moving and storing the appliance, please always switch the fan off with the On/Off button and disconnect the power plug from the power socket.
-
The outer parts of the fan should be cleaned once a month with a slightly moist towel. Pay special attention to removing the dust from the rear safety grid to permit uninhibited air circulation.
-
Do not submerge the appliance, the remote control, the power plug or the power cord in water or any other liquid and do not spray water or any other liquid into the appliance!
- Do not use any aggressive or chemical detergents, white gas resp. sharp or coarse sponges and the like. They might damage the surface of the fan.
- Store the appliance in a dry, dark place protected from dust.
Each year, retighten the rotor blade nut (2) and the rear nut (4) to make sure that the rotor blade is safely held in place.
TECHNICAL SPECIFICATIONS
Model-no. FSF-G, Type 7584
Product description Pedestal fan with remote control
Voltage / frequency 220-240V\~/50-60Hz
Output 25 Watt
Measurements approx. 36× 30× 88cm (Motor casing x D x H)
Weight 4,4 kg
Technical changes reserved.
DISPOSAL

EU 2012/19/EU
Information for correct disposal of the product in accordance with the European Directive EU 2012/19/EU.
At the end of its working life this equipment must not be disposed of as an household waste. It must be taken to special local community waste collection centres or to a dealer providing this service. Disposing of electrical and electronic equipment separately avoids possible negative effects on the environment and human health deriving from an inappropriate disposal and enables its components to be recovered and recycled to obtain significant savings in energy and resources. In order to underline the duty to dispose of this equipment separately, the product is marked with a crossed-out dustbin.
Solis of Switzerland Ltd reserves the right to carry out technical and visual changes and modifications to improve the product at any time.
SOLIS HELPLINE
This item stands out due to its long-life cycle and reliability. Despite this though, if a malfunction ever occurs, simply give us a call. Often a breakdown can be easily and quickly remedied with the right tip or technique without having to straight away send off the device for repair. We will give you all the advice and practical support you require. The contact addresses can be found at the end of this manual.
Keep the original packaging in a safe place so that you may use it in the event that transportation or shipping of the product becomes necessary.
APPARAATBESCHRIJVING
Solis customer service
Please contact us in advance of sending in products for return or repair. We will gladly give you the respective address. Alternatively, you can simply visit www.solis.com.
Solis Klantendienst Helpline
Address for return shipment of
goods differs - please refer to:
roductivng
Address for return shipment of
goods differs - please refer
www.solis.com
+41-91-802 90 10
@ support.ch@solis.com
www.solis.com