WK 341 210 S - Wine cellar AMICA - Free user manual and instructions
Find the device manual for free WK 341 210 S AMICA in PDF.
| Brand | Amica |
| Model | WK 341 210 S |
| Product type | Wine cellar |
| Power supply | 220-240 V, 50 Hz, 10 A, grounded plug |
| Climate class | SN (extended temperate): 10°C to 32°C |
| Recommended storage temperature | 13-15°C (optimal), 15-17°C (red wine), 12-13°C (white wine) |
| Bottle capacity | According to product sheet (standard Bordeaux 0.75 L bottles) |
| Number of temperature zones | One zone or two zones depending on model |
| Interior lighting | LED, adjustable brightness, display or economy mode |
| Temperature display | LED, in °C or °F |
| Special functions | Silent Mode, Dynamic Cooling, Weekend Mode, Temperature Alarm, Push to Open |
| Humidity system | Removable water tray for humidity maintenance (on certain models) |
| Door sensitivity adjustment | Screw in the upper central part of the door |
| Cleaning | Baking soda and warm water for interior; avoid abrasive products |
| Defrosting | Automatic (no tools) |
| Spare parts | Available for 7 to 10 years according to EU regulations |
| Reparability | Repairs by authorized service only |
| Warranty | According to warranty card |
| Adjustable feet | Yes, at the front |
| Built-in installation | Yes, with minimum ventilation of 250 cm² |
Frequently Asked Questions - WK 341 210 S AMICA
User questions about WK 341 210 S AMICA
0 question about this device. Answer the ones you know or ask your own.
Ask a new question about this device
Download the instructions for your Wine cellar in PDF format for free! Find your manual WK 341 210 S - AMICA and take your electronic device back in hand. On this page are published all the documents necessary for the use of your device. WK 341 210 S by AMICA.
USER MANUAL WK 341 210 S AMICA
OPERATING INSTRUCTIONS EN
GEBRAUCHSANWEISUNG
NAVOD K OBSLUZE CS
NÁVOD NA OBSLUHU SK
NOTICE D'UTILISATION FR
INSTRUKCJA OBSŁUGI PL
MANUAL DE INSTRUCCIONES ES
NAVODILA ZA UPORABO SL
UPUTSTVO ZA KORISÇENJE SR
GEBRUIKSAANWIJZING,
HASZNÁLATI UTMUTATIO HU
IHCTPYKJI 3 EKCПЛYATAUII UK
DE
NL
Wine cooler / Weinklimaschrank / Vinotéka / Vinotéka / Cave à vin / Chłodziarka do wina / Vinoteca / Hladilnik za vino / Hladnjak za vino / Wijnkoeler / Borhúto / XoIoДиьнК Дя Вина
EN- Table of contents
GUIDELINES CONCERNING THE SAFETY OF USE 15
INSTALLATION AND OPERATING CONDITIONS OF THE APPLIANCE 18
CLIMATE RANGE 19
PRACTICAL EVERYDAY TIPS 19
UNPACKING
DISPOSAL OF OLD APPLIANCE 21
CONTROLS
APPLIANCE CONTROLS- SINGLE AND DUAL ZONE 22
TO SWITCH THE POWER ON/OFF 22
TO CHANGE THE TEMPERATURE 22
OPTIMAL TEMPERATURE SELECTION 23
INTERIOR LIGHTING 23
SETTINGSMODE23
SET THE TEMPERATURE UNIT OF OR ^ C 23
SET THE DISPLAY BACKLIGHT INTENSITY 23
SET THE APPLIANCE INTERIOR LIGHTING INTENSITY. 23
SET SOUNDS. 23
INTERNAL HUMIDITY 23
TEMPERATURE DISPLAY 23
SILENT MODE 24
DYNAMIC COOLING MODE 24
WEEKEND MODE 24
TEMPERATURE ALARM 24
PUSH TO OPEN FEATURE* 24
DOOR PRESSURE SENSITIVITY ADJUSTMENT 24
CARE AND CLEANING
REMOVING THE SHELVES 25
CLEANING 25
TROUBLESHOOTING
IF THE APPLIANCE IS NOT WORKING, CHECK 25
THE APPLIANCE IS WORKING, BUT NOT VERY WELL, CHECK 26
THE APPLIANCE IS NOISY, CHECK 26
THE LIGHT DOES NOT WORK, CHECK 26
THE DOOR WILL NOT CLOSE PROPERLY, CHECK 26
THE DISPLAY SHOWS "E1" OR "E2" 26
EPREL
FITTING THE PLINTH
WARRANTY AND AFTER SALES SERVICE
WARRANTY 28
GARANTIE, NACHVERKAUF-SERVICE 44
GARANTIE 44
CS- Obsah
POKNY TYKAJICI SE BEZPECNOSTI POUZIVANI 46 INSTALACE A PROVOZNIPODMINKY SPOTREBICE 49
KLIMATICKA TRIDA 50
PRAKTICKÉ RADY 50
VYBALENI
LIKVIDACE OPOTREBOVANYCH ZARIZENI 52
OVLÁDACÍ PRVKY 53
OVLADACI PRVKY - JEDNA A DVE ZONY 53
ZAPNUTI/VYPNUTI NAPAJENI 53
ZMENA TEPLOTY 53
VYBER OPTIMALNTEPLOTY 54
VNITRNI OSVETLENI 54
MóD NASTAVOVÁNÍ 54
ZMÉNA JEDNOTKY TEPLOTY ZE OF NA OCA NAOPAK 54
INTENZITA OSVETLENI DISPLEJE 54
INTENZITA PODSVICENI UVNTR ZARIZENI 54
ZMENA ZVUKOVYCH UPOZORNENI 54
VNITRNI VLHKOST
DISPLEJ TEPLOTY
SILENT MODE (TICHY MOD)
REZIM DYNAMICKEHO CHLAZENI
VIKENDOVY REZIM
TEPLOTNI ALARM
FUNKCE PUSH TO OPEN*
NASTAVENÍ CITLIVOSTI DVERÍ NA TLAK
CISTENIA UDRZBA
VYTAHOVÁNÍ POLIC 56
CISTENI
RESENI PROBLEMU
POKUD ZARIZENI NEFUNGUJE, ZKONTROLUJTE
POKUD ZARIZENI NEFUNGUJE DOBRE, ZKONTROLUJTE
POKUD JE ZARIZENI HLUÇNÉ, ZKONTROLUJTE
POKUD NEFUNGUJE OSVETLENI, ZKONTROLUJTE
POKUD DVIRKA NEJSOU DOBRE ZAVRENÁ, ZKONTROLUJTE
POKUD NA DISPLEJI SVITI "E1" NEBO "E2"
EPREL
MONTAZ PODSTAVCE
ZÁRUKA, POPRODEJNÍ SERVIS
ZARUKA
52
SK- Obsah
DOLEZITÉ BEZPECNOSTNÉ POKNY 61 INSTALÁCIA A PREVÁDZKOVE PODMIENKY SPOTREBÍCA 64
KLIMATICKA TRIEDA 65
PRAKTICKÉ RADY 65
ROZBALENIE
LIKVIDÁCIA ZARIADENÍ 67
OVLADACIE PRVKY 68
OVLADACIE PRVKY - JEDNA A DVE ZONY 68
ZAPNUTIE / VYPNUTIE NAPAJANIA 68
ZMENA TEPLOTY 68
VOL'BA OPTIMALNEJ TEPLOTY 69
OSVETLENIE VO VNUTRI 69
REZIM NASTAVENI 69
ZMENA JEDNOTKY TEPLOTY MEDZI ^ F / OC 69
INTENZITA PODSVIETENIA DISPLEJA 69
INTENZITA PODSVIETENIA VO VNUTRI ZARIADENIA 69
ZMENA ZVUKOVYCH SPRÁV
VLHKOST VO VNUTRI
DISPLEJ TEPLOTY
TICHY REZIM (SILENT MODE)
REZIM DYNAMICKÉHO CHLADENIA
VIKENDOVY REZIM
ALARM TEPLOTY
FUNKCIA PUSH TO OPEN*
NASTAVENIE CITLIVOSTI STLACENIA DVIEROK
CISTENIE A UDRZBA
VYBERANIE POLIC
CISTENIE
RIESENIE PROBLEMOV
AK ZARIADENIE NEFUNGUJE
AK ZARIADENIE SICE FUNGUJE, ALE NEFUNGUJE PRILIS DOBRE, SKONTROLUJTE
AK JE ZARIADENIE PRILIS HLUÇNÉ 73
AK NEFUNGUJE OSVETLENIE 73
AK DVERE NIE SU ZATVORENÉ SPRÁVNE, SKONTROLUJTE 73
AK NA DISPLEJI SVIETI "E1" ALEBO "E2" 73
EPREL
MONTAZ SOKLA
ZÁRUKA, POPREDAJNY SERVIS
ZARUKA
KLASA KLIMATYCZNA 97
JESLI NA WYSWIETLACZU SWIECI SIE "E1" LUB "E2" 106
EPREL 106
MONTAZ COKOLO 107
GWARANCJA, OBSŁUGA POSPRZEDAźOWA 108
GWARANCJA 108
ES- Tabla de Contents
IMPORTANT INSTRUCCIONES DE SEGURIDAD 110
INSTALLACION Y CONDICIONES DE TRABAJO DEL APARATO 113
CLASE CLIMÁTÍCA 114
AKO NA DISPLEJU SVETLI "E1" ILI "E2" 156
EPREL
MONTAZA POSTOLJA
GARANCIJA, USLUGE POSLE PRODAJE
GARANCIJA 158
NL-Inhoudsopgave
ALS OP DE DISPLAY "E1" OF "E2" BRANDT
EPREL
172
MONTAGE VAN DE SOKKEL
173
GARANTIE, SERVICE
174
GARANTIE
174
HU- Tartalomjegyzék
BIZTONSAGI UTASITASOK 176
A KESZULEK TELEPITESI ES UZEMELTETESI FELTETELEI 179
KLIMA OSZTÁLY 180
GYAKORLATI TANÁCSOK 180
KICSOMAGOLÁS 182
A HASNZALT KESZULEKEK ELTÁVOLITÁSA 183
VEZERLOELEMEK 184
VEZERLOELEMEK - EGY ES KET ZONA 184
BEKAPCSOLÁS/KIKAPCSOLÁS GOMB 184
HOMERSEKLET MODOSITAS 184
AZ OPTIMÁLIS HÖMÉRSEKLET KIVÁLASZTÁSA 185
BELSOVILAGITAS 185
BEALLITASOK MOD 185
A HOMERSEKLET MERTEKEGYSEGENEK MEGVALTOZTATASA FO/CO-RA ES FORDITVA 185
KIJELZHO HATTERTERVILAGITAS INTENZITASA 185
A MEGVILAGITAS EROSSEGE A KESZULEK BELSEJEBEN 185
HANGUZENETEK MODOSITASA 185
BELSO PARATARTALOM 185
HOMERSEKLET KIJELZO 186
SILENT MODE (NÉMA ÜZEMMÓD) 186
DINAMIKUS HUTESI MOD 186
HÉTVÉGI MÓD 186
HOMERSEKLET RIASZTAS 186
PUSH TO OPEN FUNKCI* 186
AZ AJTO NYOMASERZEKENYSEGENEK BEALLITASA 187
From now on, your daily housework will be easier than ever before. Your appliance Air-conditionally easy to use and extremely efficient. After reading these Operating Instructions, operating the appliance will be easy.
Before being packaged and leaving the manufacturer, the appliance was thoroughly checked with regard to safety and functionality.
Before using the appliance, please carefully read these Operating Instructions. By following these instructions carefully you will be able to avoid any problems in using the appliance. It is important to keep these Operating Instructions and store them in a safe place so that they can be consulted at any time.
Follow these instructions carefully in order to avoid possible accidents.
Sincerely,
Amica
GUIDELINES CONCERNING THE SAFETY OF USE
- To ensure safety and reduce the risk of injury or electric shock, follow all precautions listed below.
- This appliance is intended for household use indoors and similar applications such as:
- farm houses and by clients in hotels, motels and other residential type environments;
- bed and breakfast type environments;
- staff kitchen areas in shops, offices and other working environments;
- catering and similar non-retail applications.
- The appliance must be handled by at least 2 people.
- Make sure the plug is easily accessible to allow disconnection from the mains supply.
- Children aged from 3 to 8 years are allowed to load and unload refrigerating appliances.
- The manufacturer reserves the right to introduce changes which do not affect the operation of the appliance.
- The Manufacturer shall not be held liable for damage arising from the failure to observe the instructions contained in this manual.
- Keep this manual for future reference, or to pass it over to the next user.
- This appliance is not intended for use by persons (including children) with limited physical or mental capabilities and persons who lack experience or familiarity with the appliance.
- Do not allow children to use the appliance. Do not allow them to play with the appliance. They must not climb inside the drawers and swing on the doors.
- The appliance operates properly at the ambient temperature (see product fiche). Do not use it in the cellar, unheated summer cottage during au
turn and winter.
- When placing, moving, lifting the appliance, do not hold the door handles, do not pull the condenser at the rear part of the refrigerator and do not touch the compressor unit.
- Pull the plug out from the mains socket before each maintenance activity. Do not pull on the cord, but hold the body of the plug instead.
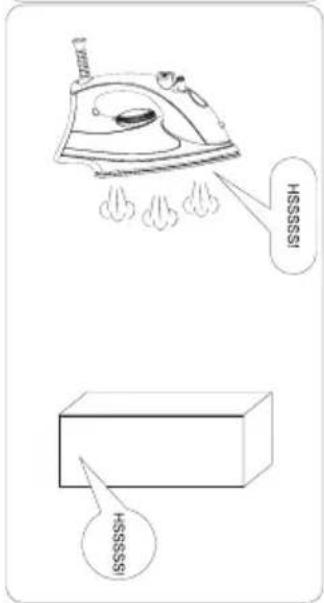
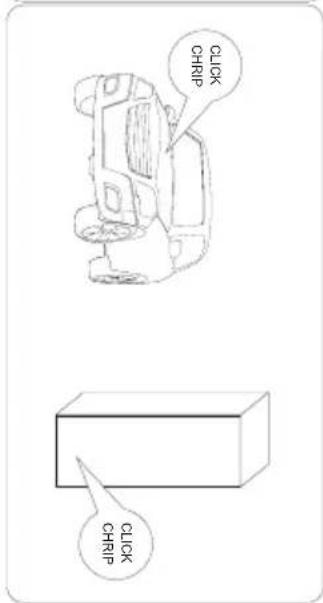
- The "cracking" sound, which the appliance may emit is caused by the expansion and contraction of parts as a result of temperature variations.
- For safety reasons do not repair the appliance yourself. Repairs carried out by persons who do not have the required qualifications may result in serious danger for the user of the appliance.
- Make sure you do not damage the cooling system, by puncturing the refrigerant pipes in the evaporator or breaking the pipes. The refrigerant is flammable. If the refrigerant makes contact with the eyes, rinse them with clean water and call for medical assistance immediately.
- Important! If the power cord is damaged, it should be replaced by the manufacturer or specialist repair centre or a qualified person in order to avoid danger.
- When performing activities, such as cleaning, maintenance or moving, the appliance must be completely disconnected from power supply (by pulling the plug out from the socket)
- This appliance can be used by children aged 8 years and older or by persons with physical, mental or sensory handicaps, or by those who are inexperienced or unfamiliar with the appliance, provided they are supervised or have been instructed how to safely use the appliance and are familiar with risks associated with the use of the appliance. Ensure that children do not play with the appliance. Cleaning and maintenance of the appliance should not be performed by children unless they are 8 years or older and are super
vised by a competent person.
- Do not clean the appliance with steam
- Keep the appliance and its power cord away from children under 8 years old.
- Do not immerse the power cord or plug in water.
- Keep cord away from heated surfaces.
- Do not allow the connection cord hanging over the edge of a table or counter.
- Do not use any electrical appliances inside the chamber
- Do not use any tools to speed up the defrosting process
- Regularly clean the ventilation openings (in case of built-in appliances or those installed under the worktop)
- This appliance is not designed to be controlled by electronic timers or other devices that cut off power directly or remotely.
- In case of accidental spillage of liquids on electrical components, immediately unplug your appliance from the power supply.
- Make sure that the power cord is not crushed or damaged during installation.
- Disable the appliance before disposing of it. Unplug the appliance from the power supply and cut off the power cord. To prevent children or animals from being trapped in the appliance, remove the doors, hinges and locks.
- Note: If the appliance does not have a freezer compartment ( * ), it is not suitable for freezing foodstuffs.
- Pursuant to Commission Regulation (EU) 2019/2019, the minimum availability period for spare parts necessary to repair the appliance is 7 or 10 years depending on the type and purpose of the spare part.
- The list of spare parts and the ordering procedure are available on the websites of the manufacturer, importer or an authorized representative.
INSTALLATION AND OPERATING CONDITIONS OF THE APPLIANCE
- Connect the appliance to the power supply 24 hours after unpacking and setting in the final location.
- Take the product out of the package, remove the scotch tape protecting the door and the equipment. Any remaining adhesive stains may be removed with a mild washing agent.
- Clean the interior surface of the cooler and the elements of the equipment with a washing agent dissolved in lukewarm water, then wipe it dry.
- Place the cooler on an even, flat and stable surface, in dry, aired and shaded room, far from the heat sources such as: oven, hob, central heating radiators, central heating pipes, hot water installation, etc.
- On the exterior surface of the product may be a protective foil, this foils should be removed.
- Make sure the appliance is placed in a horizontal position by screwing in the 2 adjustable front legs (fig. 1)
- Keep free space on the sides and rear of the appliance (see installation drawing)
- When you install your wine cooler inside a furniture cabinet, make sure that the ventilation grille located in the bottom of the appliance is not blocked.
- Odours may be released when you first start your appliance. It will dissipate when the interior of the appliance cools down
- When you first start your wine cooler, the compressor will run continuously until the desired temperature is reached inside the chamber
- When you unplug your appliance from the power supply, it is recommended to wait 5 minutes before you plug it back in. This will reduce the risk of damage to the compressor.
- On selected models, the correct temperature will be shown on the display only a few hours after the wine cooler has been put into operation
- This appliance should be connected to AC 220-240V 50Hz supply socket. The socket must be fitted properly, and must be supplied with an earthing conduit and a 10A fuse.
- It is a legal requirement that the appliance is properly earthed. The manufacturer will not be held liable for any damage or injury which may result from the failure to fulfil this requirement.
- Do not use adapters, multiple sockets and two-wire extension leads. If it is necessary to use the extension lead, it must be equipped with a protection ring and a single socket and must have a VDE/GS safety certificate.
- If an extension lead is used (with a protection ring and safety certificate), its socket must be located at a safe distance, away from the sinks, and must not be in a place where it could be flooded by water or waste water.
- Make sure the appliance can be easily disconnected from the mains, either by pulling the plug out of the mains socket, or by switching the two-pole switch off.
Climate range
The information about the climate range of the appliance is provided on the rated plate. It indicates at which ambient temperature (that is, room temperature, in which the appliance is working) the operation of the appliance is optimal (proper).
Climate class Allowable ambient temperature
| SN | Extended Temperate | This refrigeration appliance is intended for use at an ambient temperature ranging between 10°C and 32°C |
| N Temperate | This refrigeration appliance is intended for use at an ambient temperature ranging between 16 °C and 32°C | |
| ST Subtropical | This refrigeration appliance is intended for use at an ambient temperature ranging between 16 °C and 38 °C | |
| T Tropical | This refrigeration appliance is intended for use at an ambient temperature ranging between 16 °C and 43 °C | |
PRACTICAL EVERYDAY TIPS
- If the light inside the appliance remains turned on, keep in mind that the temperature inside the appliance will be higher
- Temperature inside the appliance depends on the amount and type of stored wine bottles
- To ensure user safety and high quality of stored wine, do not install the appliance in damp rooms
- Store wine bottles in designated spaces
- Your wine cooler has a limited capacity. Do not place more bottles in your wine cooler than recommended in specification
- Do not open the wine cooler door if it is not necessary
- Do not cover the shelves with aluminium foil or other material. This blocks the air circulation inside the appliance
- To avoid damage to the door seal, make sure that the door is completely open before pulling out the shelf. The shelves should be inserted as far as possible, otherwise the shelf may deform and damage the door seal.
- Do not extend the loaded shelves beyond the extension limit (about 1/3 of the shelf length)
- This appliance is designed for storing bottles of wine. Do not use it for any other purpose.
- Temperature stability is very important when storing wine.
- Exposing your wine cooler to sunlight, significant temperature fluctuations, high humidity and vibrations may cause the wine to go bad.
- In periods of high humidity, condensed water vapour may appear on the outer surfaces of the glass door. To prevent this, install the appliance in a dry, adequately ventilated room.
- Selected models have an external handle. You need to install it on your own. Do not use electric tools for this purpose (fig. 3^* ). To do this, pull the door seal slightly to the side and place the screws on the inside of the door. Align the handle with the holes on the outside
of the door and tighten the screws with a screwdriver. Reinstall the door seal.
- The maximum capacity of the appliance is given in the product sheet enclosed with the wine cooler. This capacity applies to standard 0.75 litre bottles of Bordeaux.
- Selected models have an Anti-tip kit. Install it according to the enclosed diagram (fig. 6*).
- This refrigeration appliance is intended for use as a built-in appliance.
- To achieve the most effective food preservation for the longest possible time and to avoid wasting any food, position the products as shown in Figure 12. In addition, this figure illustrates the layout of drawers, baskets and shelves, which allows the most efficient use of energy.
- Optimal temperature and storage conditions will extend product shelf life and optimize electricity consumption. Optimal storage temperature range should be stated on the food product packaging.
UNPACKING

During transportation, protective packaging was used to protect the appliance against any damage. After unpacking, please dispose of all elements of packaging in a way that will not cause damage to the environment. All materials used for
packaging the appliance are environmentally friendly; they are 100 % recyclable and are marked with the appropriate symbol.Important! Packaging materials (bags, polyethylene, polystyrene, etc.) should be kept away from children during unpacking.
DISPOSAL OF OLD APPLIANCE
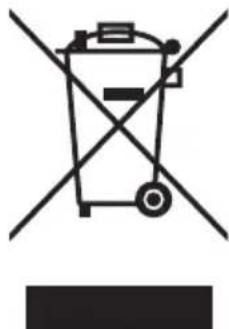
In accordance with European Directive 2012/19/EU and local legislation regarding used electrical and electronic goods, this appliance is marked with the symbol of the crossed-out waste container. This marking indicates that the appliance must not be disposed of together with other household waste after it has been used. The user is obliged to hand it
over to waste collection centre collecting used electrical and electronic goods. The collectors, including local collection points, shops and local authority departments provide recycling schemes. Proper handling of used electrical and electronic goods helps avoid environmental and health hazards resulting from the presence of dangerous components and the inappropriate storage and processing of such goods.
CONTROLS
Appliance controls- single and dual zone
The control panel is shown in figure 4. For reference it is also shown below:
Single zone

Dual zone

- Power button
- Light button
- -" ^+ button
- -"button
To switch the power on/off
Press and hold the power button for one second to switch the wine cooler on. Press and hold the power button for five seconds to switch the wine cooler off.
Note: Turn off your appliance by unplugging the power cord from the wall outlet.
To change the temperature
- Press the "+" or "-" buttons until the required temperature is shown on the display.
The Preset temperature is 12^ / 54^. (for single zone models) - For dual zone models: For the upper/left zone, the default temperature setting is 8^ / 46^ , and for the lower/right zone, the default temperature setting is 12^ / 54^ .
- To view the set temperature, touch the "+" or "-" button at any time and the set temperature will flash in the LED display for five seconds.
- The display shows the current internal temperature when the wine cooler is on.
Note: The temperature in the lower zone must be set either the same as or higher than the temperature in the upper zone.
Optimal temperature selection
Whilst wine is best stored at temperatures between 13 and 15^ , your wine can also be stored at drinking temperature. For red wine this is between 15 and 17^ , and for white wine between 12 and 13^ .
Interior lighting
The wine cooler has two options for the interior lights. To change from one option to the other, press and hold the light button for 5 seconds.
- Display mode - This mode will leave the interior light on constantly, allowing you to see the contents of the wine cooler at a glance at any time. The light indicator will light up in display mode.
- Energy saving mode - This mode only switches on the interior light when the door is opened.
Settings mode
Some settings are available depending on the mode.
Set the temperature unit ^ F or ^ C .
Touch and hold +for 5 seconds, then use and to set the unit. Touch +to confirm. Touch +for 5 seconds to exit.
Set the display backlight intensity
Touch and hold + for 5 seconds, then touch once. Now use + and - to set the display backlight intensity. The default setting is d1. Touch to confirm. Touch +for 5 seconds to exit.
Set the appliance interior lighting intensity.
Touch and hold + for 5 seconds, then touch twice. Now use + and - to set the interior lighting intensity. The default setting is L3 Touch to confirm. Touch +for 5 seconds to exit.
Set sounds.
Touch and hold + for 5 seconds, then touch 0 four times. Now use + and - to set the sounds. The default setting is S1. The possible settings are as follows:
S0: Touch sensor sound ON / Audio alarm OFF
S1: Touch sensor sound ON / Audio alarm ON
S2: Touch sensor sound OFF / Audio alarm OFF
S3: Touch sensor sound OFF / Audio alarm ON
Touch to confirm. Touch for 5 seconds to exit.
Internal Humidity
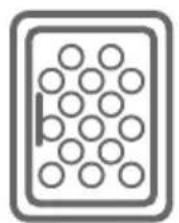
According to the model wine coolers are equipped with a humidity system to maintain optimal humidity within the wine cooler. Fill the humidity reservoir approximately 3/4 full with water. Place the reservoir on the runners on the top shelf as shown in fig. 2. Ensure it is located correctly to prevent water spillage. Check the water level regularly and refill if required.
Temperature display
The temperature display will show the current internal temperature.
The display flashes:
- When a different temperature is being set
- If the internal temperature is + / - 5^ away from the set temperature.
This serves as a warning to prevent damage to the contents of the appliance should the temperature be too high.
Silent Mode
Touch and hold + for 5 seconds, then touch three times. Now use an to set the silent mode (F0). When the required temperature is reached, the appliance operates without the fan. This is the default mode of the wine cooler.
Dynamic cooling mode
Touch and hold + for 5 seconds, then touch 0 three times. Now use + and - to set the dynamic mode (F1- half time, F2- full time). The fan alternately turns on and off to maintain air circulation even when the required temperature is reached. This ensures uniform and stable humidity and temperature in the wine cooler for ideal long-term wine storage conditions.
Weekend mode
This will switch off the displays, interior light and audible alarms. The cooling process will continue.
To switch the Weekend mode on, touch and hold the power and light keys simultaneously for five seconds. The indicator light will flash four times and confirm the mode is on. Mode will switch off automatically after 96 hours, but to switch the mode off at any time, touch and hold the power and light keys simultaneously for five seconds.
Temperature alarm
If the temperature rises or falls outside the set temperature range, an alarm will sound and the display will flash. This may be because:
- The wine cooler has not yet reached the set temperature (when first switched on).
- There has been a power failure.
The wine cooler has been overloaded. - The door is not closed properly.
Push To Open feature*
The function is active when the appliance is connected to the power supply. Push the door slightly toward the appliance, the door will be slightly ajar, then you can open it all the way.
Do not block the door during automatic opening, it may damage the mechanism.
Do not block the pin, it is a small element that opens the door. If the pin is stuck preventing the door from closing, unplug the appliance from the wall power outlet the pin should return to the correct position after about 10 seconds.
The Push To Open feature operates properly after about 3 seconds after the door is closed or opened. If the door does not open immediately after closing it, wait a while.
Door pressure sensitivity adjustment
To change the door pressure sensitivity for Push To Open feature, do the following:
-
Open the door
-
Turn the screw at the top centre of the door counter-clockwise to increase sensitivity and clockwise to decrease sensitivity.
-
Close the door and check that it is properly adjusted
Turning the adjustment screw too far may cause the door to open automatically, or the door may not open even with a strong push.
*according to the model
CARE AND CLEANING
Always disconnect the appliance from the mains electrical supply before any cleaning or maintenance.
Removing the shelves
- To remove a shelf from the wine cooler, first remove all bottles from the shelf, then pull the shelf forwards until the groove on either side of the shelf is level with the plastic peg on either side of the cabinet (as shown in fig 5). Then lift the shelf up and pull forwards.
- To replace the shelves, follow the steps above in reverse order.
Cleaning
- Do not use abrasive products or detergents. After washing, rinse and dry thoroughly.
- The exterior of the appliance and the door seal should be cleaned using mild soapy water and dried thoroughly.
- The interior cabinet should be cleaned using a solution of bicarbonate of soda and lukewarm water.
- Clean the shelves separately by hand using soap and water. Do not put them in the dishwasher.
- Ensure that the cloth is only moist when cleaning the control panel and electrical parts, and that all water is thoroughly dried off before reconnecting the power.
- Once cleaning is complete, reconnect the mains electrical supply.
- If the appliance is not to be used for prolonged periods of time, unplug and clean the appliance thoroughly. The door should be left slightly ajar to prevent the formation of odours or condensation
TROUBLESHOOTING
If you have any problems with your appliance, you should check the troubleshooting guide prior to calling Call Center to prevent unnecessary service calls and potential cost.
If the appliance is not working, check
There is power to the appliance
- The house fuses or circuit breakers are intact and the fuse in the plug has not blown.
- The plug socket is functioning correctly. To check this, plug another electrical appliance in to see if the socket is working.
- The ambient temperature is between 16^ to 32^ .
The appliance is working, but not very well, check
The appliance is not overloaded.
- The thermostat is set to an appropriate temperature.
The door is closing properly.
- The door gasket is sealing properly
- There is enough ventilation at the side and rear walls.
- The ambient temperature is between 16^ to 32^ .
The appliance is noisy, check
The appliance is level and stable.
- The cooling gas will make some noise, even when the compressor is not running.
- During operation, it is normal for the fan to run, even when the compressor is not running.
The light does not work, check
There is power to the appliance.
- The house fuses or circuit breakers are intact and the fuse in the plug has not blown.
- The light button is not set to off.
Please note:
The LED lighting cannot be replaced without a service call
The door will not close properly, check
- The appliance is level and stable.
- If the door has been removed, it may not have been correctly refitted.
The door seal is dirty. - The shelves are not positioned correctly.
The display shows "E1" or "E2"
- The temperature sensor has failed. Please contact Call Center
EPREL
For more information about the product, please refer to the EU EPREL Product Database at https://eprel.ec.europa.eu. For more information, please use your mobile device to scan the QR code on the energy label or enter the product model listed on the energy label in the EPREL search engine https://eprel.ec.europa.eu/
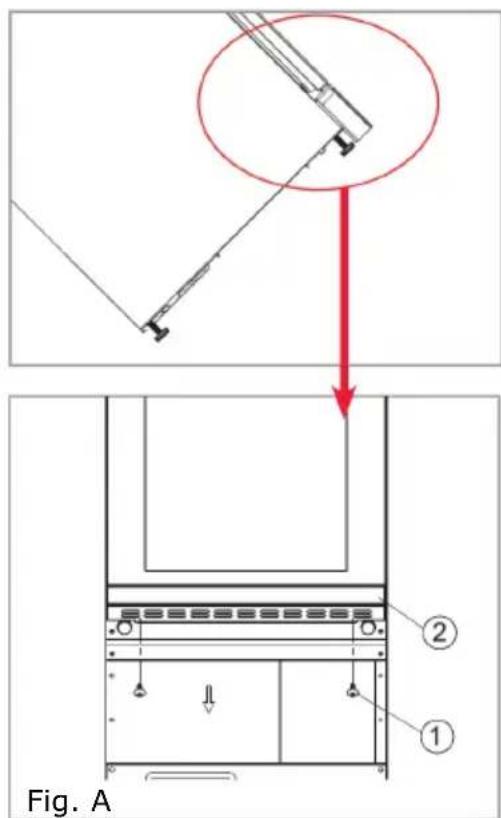
FITTING THE PLINTH
We recommend the help of at least one other individual throughout this process. Protect the area beneath the door and plinth with several clean towels or similar protective means. Do not tilt the appliance further than 45^ during this process. Allow the cooler to settle for at least 8 hours before switching on after tilting.
- Unscrew and remove the two screws that are used to fix the plinth and bottom bracket (Fig. A).
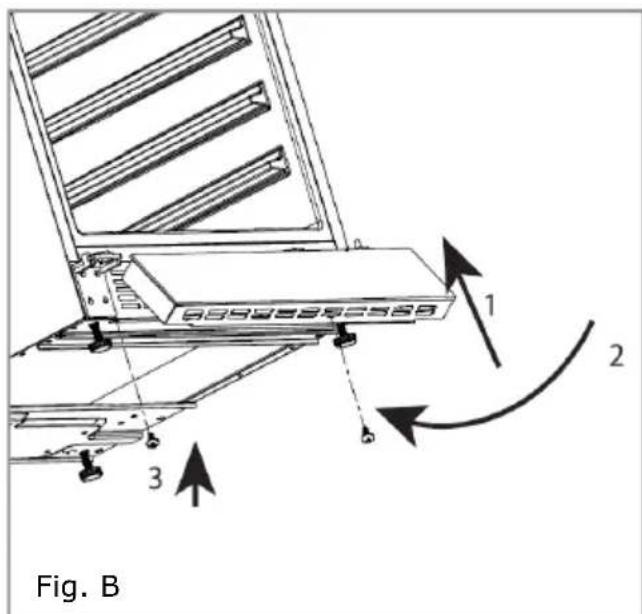
- Insert the tabs on the glass fronted plinth section into the top slots of the metal plinth, as per part 1 of Fig. 14. Manoeuvre the plinth so that the holes in the inner lip of the glass fronted plinth section are level with the holes in the metal plinth (2 in Fig, B).
WARRANTY AND AFTER SALES SERVICE
Warranty
The manufacturer shall not be held liable for any damage caused by improper use of the product.
Service
- The manufacturer recommends that all repairs and adjustments be carried out by the Factory Service Technician or the Manufacturer's Authorized Service Point. For safety reasons, repairs should be referred to professionals.
- Repairs carried out by unqualified persons may seriously endanger the appliance user.
The minimum warranty period for the appliance offered by the manufacturer, importer or authorized representative is given in the warranty card. - The warranty shall be void if you make any independent adaptations or alterations, tamper with seals or other appliance safety devices or its parts or interfere with the appliance contrary to operating instructions.
In the event of appliance malfunction, request assistance or repair.
If your appliance needs repair, please contact the service centre. Please see website for address and contact details of our service centre. Before contacting us, please have ready the appliance serial number, which can be found on the identification sticker: For your convenience, please write it down below:

Certificate of compliance CE and UKCA
The Manufacturer hereby declares that this product complies with the general requirements pursuant to the following European Directives and analogous UK requirements:
The Low Voltage Directive 2014/35/EC / Electrical Equipment (Safety) Regulations 2016.
- Electromagnetic Compatibility Directive 2014/30/EC / Electromagnetic Compatibility Regulations 2016.
ErP Directive 2009/125/EC / The Ecodesign for Energy-related Products Regulations 2010 (as amended) for the applicable implementing measures which apply in Great Britain and Northern Ireland, respectively.
and therefore the product has been marked with C and symbols and the Declaration of Conformity, the Manufacturer has drawn up the declaration and is available to the competent authorities regulating the market.
DÔLEŽITÉ BEZPEČNOSTNÉ POKNY
Zmena zvukovych sprav
Stlacte a na 5 sekund podrzte snimac +a potom styrikrat stlacte snimac Teraz stlacanim snimacov naystavte pozadované zvukové spravy. Predvolene je nastavené S1, dostupné su nasledovné varianty:
S0: Zvuk snimačov ZAP. / Zvukový alarm VYP.
3MiHa 3ByKOBnX NOBIDOMJIeHb
HaTnCHiB i yTpmyIte DaTunK+ npotraGM 5 cekyHd, noTIM TOpKHITbcra DaTUnKa OHTnpu pa3n. TeNep BnKOpNCTOByIte DaTUnKn Ho6 3MiHHTN 3ByKOBI NOBIDOMJIeHHa. 3a 3aMOBcYBaHHaM BCTaHOBJeHO S1, MoXJIbI BapiaHTN:
S0: 3Byk DaTUnkiB YBIMK. / 3BykoBn CnHaJ BUMK.
S1: 3BykДaTUnKIB YBIMK. / 3BykoBn cnHaJYBIMK.
S2: 3Byk Датунka BUMK. / 3BykoBи сигнал BUMK.
S3: 3Byk DaTUnka BIMK. / 3BykoBn cnHaJyBIMK.
IooB nITBVEpDnTn 3mIHy, TOPKHITbcra daTcNka UyTpmyTe OTaROM 5 CEkyHd, IooB BNHTn 3 peXkMMy.
BolorictycepeHHI
Dejki MoJI XoIoJNbHKnIB DnBnHa OChaSeHi CnCTeMoIO NiITpIMKn ONTmAlbHOI BOIOrOCTi B XoIoJNbHKnKY. 3aIOBHITb KOHTeHep CnCTeMn BOIOrn Do 3/4 06cary BoIOIO. NOMictITb KOHTeHep Ha peIKN Ha BepXHIO NOIuIO, k NOKa3aHO Ha MaIIOHky 2. NOMictITb KOHTeHep npabNlbo, 106 He npolnlacr BODa. PeryIapHNo nepeBipraTe pIBeHb BODn i npn Heo6- XIDHOCTi DOINBaIte.
Дистел Tempepatур
Ha dincpnlei Tempepatyn Biio6paKaetbca NotoUHa Tempepatya BCEpeNiHi.
Dncnne6JnMae:
- Пи НалаштуванHi iHwoi TemnépaТури
-Якwo BnytrpiiHЯ TemnepaTypa BiDpi3HЯETbCra Ha +/- 5° BiD 3aDaHOI TemnepaTypn.
Ie 3anobira'noWKoJKeHHIO Bmicty XOJOniNbHnka, kIto TeMnepaTpya 3aHaADTO CINbHO 3pOCTaE
Silent Mode (Tnxn pekm)
HaTnCHiB i yTpmyTe DaTynK npoTAROM 5 cekyH, NOTIM TOPKHITbC RAaTaYkna Tnxoro pexnMy (F0).PiCraDocrHeHH Heo6xIDHOI TempeaTyPi npncptpi npaTOe 6e3 BeHTnJIaTOPa. 3a 3amOBcYBaHHaM XoIoNDNbHK dNRA BnHa MaE BCTaHOBLeHn Ie ne peXm.
PexkIM DnHaMiuHOrO OxolokHeHHa
HaTnCHiB i UTPmUyIe DaTunK+ npotraRom 5 cekyn, notim TopKNItbcr DaTUnKa BX. Tenep BnKOpNCTOByIe DaTUnKn Fa IJRA BCTaHOBJIeHHN DInHAMiHOrO pexmMy (F1- noOBHHN qac, F2- nobHn qac). BeHTnJIaTOP nonepemHHo npaioe i BiDMKAeTbCn dIyPiTrPMKn uNPkylaqii NOBITpy HabITb npn DoCaryHHeHi 6aXaHoI TeMnepaTyprn. Ze 3a6e3neuye noctiHy i PIBHomipHy BOlorictb i Tempepatpy B XoIoAnlBuHnky i CTBOPIO e IdeaIbHi yMOBN dIy TpNBaloro 36epirAHNBA HnHa.
Pexim BnXiDiHi
B cybomy pexnmi dincnnei, BHyTpiiuHc OCBiTJeHHa i 3ByKoBi cnHaJIi BId- kIIOUeHi. OxolodxgeHHa NOCTiINHO nIDTPMMyETbcra.
Ioo6akTNByBaTnpeKIM,ODHouacHOHaTNCHTb i yTpMMyTe KHOKNJKB- IeHHraTa OCBITNeHHn npOTaROM 5 ceKyHd.IHdNkatOp 6yde 6JIIMaTHuOHTnp Pa3n i nIDTBepDnTb, zo peKIM aKTNUBOBAHn. PeKIM aBTOMaTHUHO BIdMNKaETbcraYepe3 96 rOHN;Ira BiKDJIHOueHHnpeKIMyB 6yDb-IAKn Yac,ODHouacHO HaTNCHTb i yTpMMyTe KHOKNJXNBLeHHn i OCBITNeHHn npOTaROM 5 ceKHyd.
TeMpnepaTpyhN cnHraJ TpNbOrgn
Якwo TempepaTypa nIDBnUyETbca 60 naDaE HIXue neBHorO diAna3OHy, npolyHae 3ByKOBn cnHaN, i dinCnIe noUHe 6JImMaTn. PpunHOIO MoKe 6yTu:
XoIounIbHnK ige He Iocr 3aHaHOI TeMnepaTpyn (nicra nepworo 3a-nycky).
- Byla nepepbBa B eJeKtpoNocTaayHHi.
XoIooJIbHnK IaBnHa nepeBaHTaKeHn.
- Дерцая He заунеши Налекни сином.
Функциа Push To Open*
ФункцяakTNbHa, kOJn npncptiiniklHoydoXNBHeHHa.3JeRka WTOBXHITb DBepaTa BCEpeDInHy, DBepaTa TPOxN BiDUnHrTbcra, ToDi BV 3MOKeTe BilbHO ix BIDKpNTn. He 6lokyte DBepaTa NiJ qac aBTomatuHoro BIDKpBaHHa, ce MoKe npn3BecTu Do N0WKoJKeHHaMexaHi3My. He 6LOkyTe wTOBxaJIbHN noPWeHb - ce MaIIN eMeENT, BiNobIaJIbHN 3a BIDKpBaHHa DBepaT. KaIO npweHb uee3 6LOKYBaHHa YHEMOJINBVtB 3aKpTTA DBepaT, BIDKluOHTb npncTpiB iD JXNBleHHa I npn6Jln3Ho uee3 10 cekynd nopweHb NobHHen nobepHyTncsdo npabNbHO noloxHHa. CnCTema BIDKpBaHHa DBepaT npauOe npabNbHO niCJa cnIbBy 6JIn3bKO 3ceyni nicra 3akpTTA abo BIDKpTTA DBepaT. KaIO DBepaTa He BdAETbcra BIDKpNTn Odpa3y nicra ix 3akpTTA, 3aueKaai Te TPOxN uacy.
*w3anexkHOCTi BID MoDeJI
PeryliobaHHa UytlinBOCTi DBepcaT Ha HATNCK
Ioo6 3mHnTn ChyTnBicTb DBePcT Ha HATnCK npn FyHKci Push To Open, BnKoHaTe HaCTynHi dii:
BidkpniTe DBepuTa
- IOBepHITb TBnHT y BepxHiy ceHTpaIbHiy qactnHi DBepT npOTn rOHNHnKoBOi cTpIKn, 36IbIbIuNTn uytIuNBiCTb, i 3a rOdnHHNKoBOIO CTpiIkoI, 06 3MeHunr uytIuNBiCTb
3akpiTe DBePraTa i npeBipTe, uN BOH npaBnIbHO BiDpeRyIbObaHi
HaTo CnIbHe OBeptaHnR rBnHTa B ODHomy 3 HaPpMkIB MoKe CnpuHnHTn aBTOMaTnUHe BiKpnTTa DBepzrT HABiTb 6e3 ix StTOBXaHHa 6o CnIbHoro 3aKpNBaHH, a60 MoKe CnpuHnHTn Te, 9O DBepzra He BiDkpnHtbcr HaBiTb npn CnIbHomy StTOBXaHHi.
UCYHEHRA HECPAPBHOCTE
y pa3i BnHKHeHHa 6yDb-yaKnx npo6IeM, nepeB BnKInkom cepBicHOcnyk6n nepeBipTe nopadn 3 caMoOnomOrn, uO6 yHnKHyTH HeNoTpi6HbX BiDByBaHb cepBicHOi cLyK6n i BVtpaT Ha o6ClyroBvBaHHa.
MoHTaX NOBHHI BnKOHyBaTn PpHaNMI DBi KBaJIΦIKOBaHI Oco6N. 3aXnCTiTb MlCue NiD DBepMa pyuHNKOM a60 KapToHOM NiD Yac MoHTaKy. NiD Yac BCTaHOBLeHHr He HaxnJIeTe npncTpIi 6IbIh HIX Ha 45^ .PiCJHaxnIy npncTpO 3aueKaIte 1oHaIMMeHwe 8 rOdn, nCJra YOrO MoKeTe BBIMKHyTu npncTpIi.
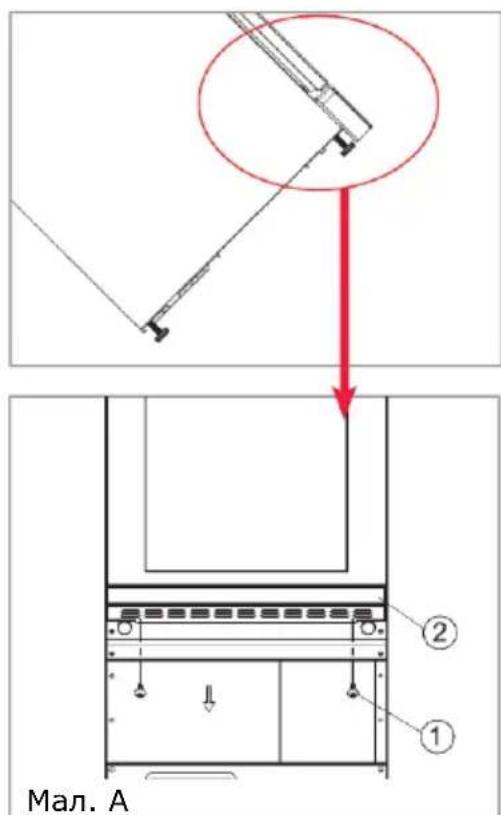
- BiДКpyTiTb ГИNTи, со КріпЯТь цOKоль i НЖній КрОшTeин (MaI.A).
- BCTaBTe 3auiKn B cKJHni YactnHi OOKoJI B OTBOpN y BepxHi YactnHi MeTaeBOrO OOKoJI. Po3TaUyIe OOKoJIb TaKIM YINOM, 06 OBOPN y BHyTpIiShbOMy KpaI cekci OOKoJIa 3i CKJHm facadom 6yIn Ha ODNOMy pIBHI 3 OTBopAMn B MetaJeBOMy OOKoJI. IOBTOPHO BKpyTiB rBHTn (2) (MaI.B)
TAPAHTIA, OBCJIYROBYBAHNAI PIICJI PPODAJKU
TapaHTiA
RapaHTiHi nocnyr 3riIDHO 3 rapaHTiHm TaIohom. Bnpo6HnK He BiDIOBidae 3a JODHI 3bNTKn, BnKJIHKaHI HnPaBnIbHm BnKOpNCtAHHnM Bnpo6y.
Cepbic
Bupo6HnK yCTaTKyBaHHpeKomeHdye, 06 Bci peMOHTHI peryIIOBAJIbHi pOoTn BIKOHyBaJINc3aBOJcKOHO cepBICHO Clyx6oHO a60 ABTOIN3OBaHO CepBICHO Cnyx6oIO BUPo6HnKa. 3 MIPkyBaHb6e3neKn He Do3BOJRAETbcra CamOCTInHO peMOHTyBaTH npNCtPII.
- PemOHn, BnKOHaHI OcO6aMn, 0o He MaIOb Tb BiINOBiDHNK KBaJIiΦiKaui, MoKyTb CTAHOBHTN cepNo3Hy He6e3neky dIЯ KopNCtYBaaynpicTPOIO.
MiHimalbHn rapaHTiHn TepmiH Ha npicTpi, npoHOBaHn Bnpo6HnKOM, imnopTePOM aO yNOBHOaXeHm ppeCTaBHnKOM, 3a3HaueHn Y rapaHTiHOMy TaIOHI.
- PnnctpiB BtpaueCBOIO rapaHTIO B pe3yIbTaTI caMOBIbHOI aADanTaIi, 3MiH, NopyuweHHra IIO6 a60 iHNx 3axOdiB 3axNCTy O6laHaHn H a60 Ioro YactnH, a TaKox iHNx caMOBIbHNX BtpyuHaB B yCTaTkyBaHHra, kI He BiIDNOBIAIOTB IHCTpyKci3 eKcnnyataui.
3aINT Ha peMOHT i Donomora B pa3i HecnpabHocti
Якшо писстрийnotpe6ye pemoHTy,ЗвернITьсьВ сервicHи ceHTp. Aдраca cepBichoro ueHTpy i KOHTaKTHn TelefoH Bka3aHi B rapaH-TiINHomy TaIohi.Ipeed 3BepHeHHam Heo6xIDHO nIdrToTyBaTu cepiHn HOMep npICSTpoIO,BIH Bka3aHn B 3aBOdcbKIn TabInuCi.IДЯ 3pyHocTi 3aПИшITb IORO HIXKue:
Декларачия вробнka
LIM Bnpo6Hk 3aBna, 10 Bnpi6 3aOBOJbHae OCHOBHI BmOrn nepeliiueHnx Hxue cBpOeNcbKnx dIpeKTNB:
-ДиpeKTHBa ΜΟDo Hn3bKOBoJbTHOrO o6laHaHHe 2014/35/EC
-Директуюеелктpondисумichocti2014/30/EC
-ДирекTNbN npo ekoloriy KoHctpyKciO 6laHaHHa 2009/125/EC
-Диuropeктува RoHS 2011/65/EC
TOMY Bnpi6 Mapkyetbca 3HaKOM BiINOBiHocTi C6TpmuB deKnapaio BIINOiHocTi, kY MoJHa nped'YBnTn OpraHaM, kI KOHTpOIOHOt b PnHOK.


S002T&K M /8dss+Z/1+2bRkM
S1-00T8+EKM/S00T8+EKM S027 T+EKM
S 2-OTI TVEK/2'8909ZCNMSOITVX /BQ0904VBM/1'04809RDM
WCF2K30B16.1
WCF1K30B20.1 / WFBA 2030 DL / WK 341 115 S
91∠BBM/ε∠BSTKTM/2∠BSTKTM/SZ -00TtEKM/SI-00TtEKM/S00TtEKM /BDST∠BBM/BDST∠EM/T∠BSTKTM
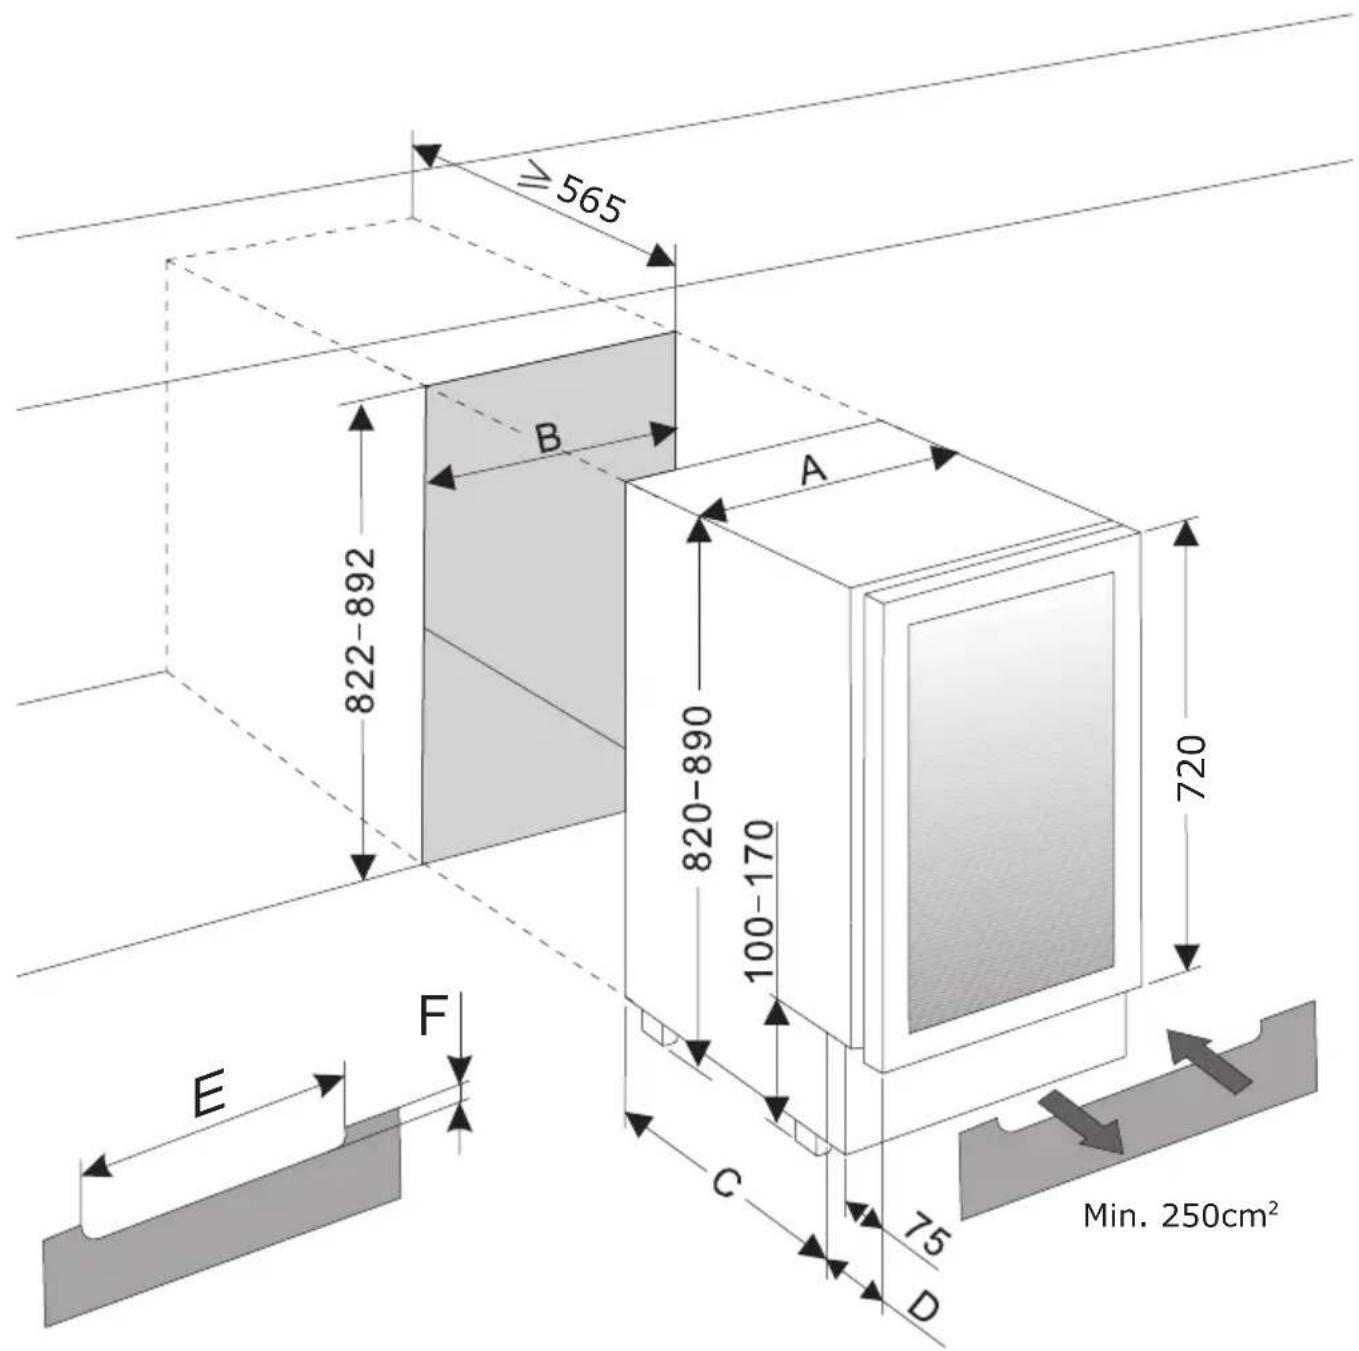
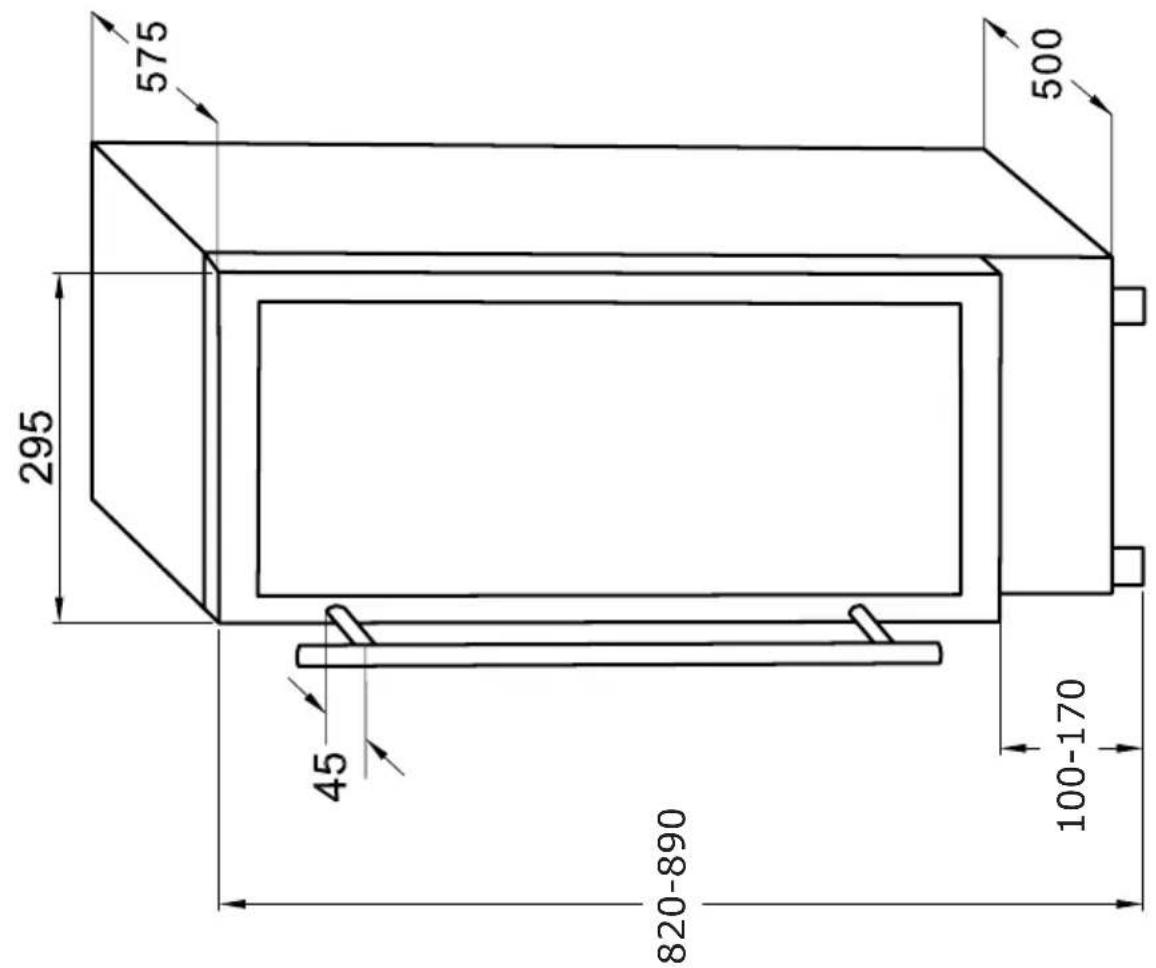
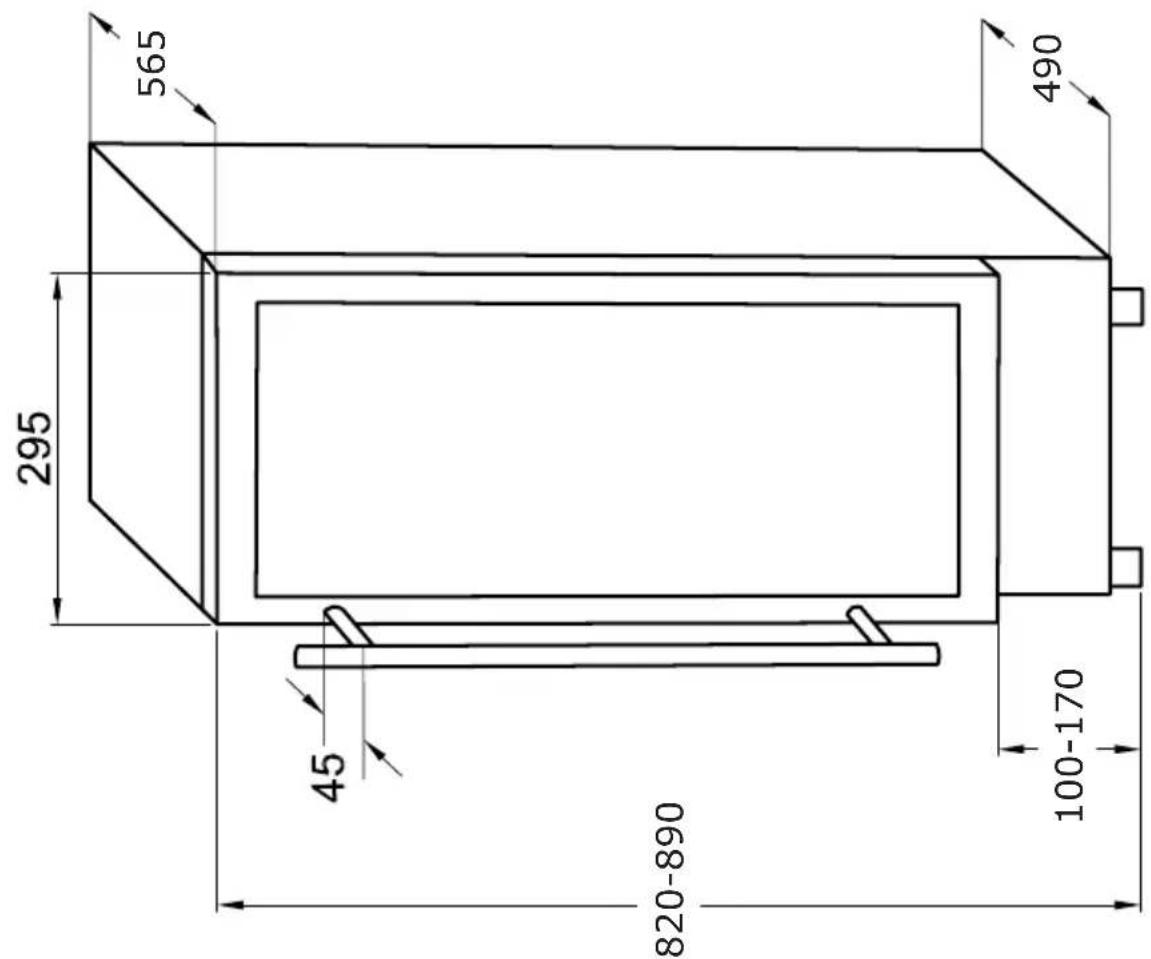
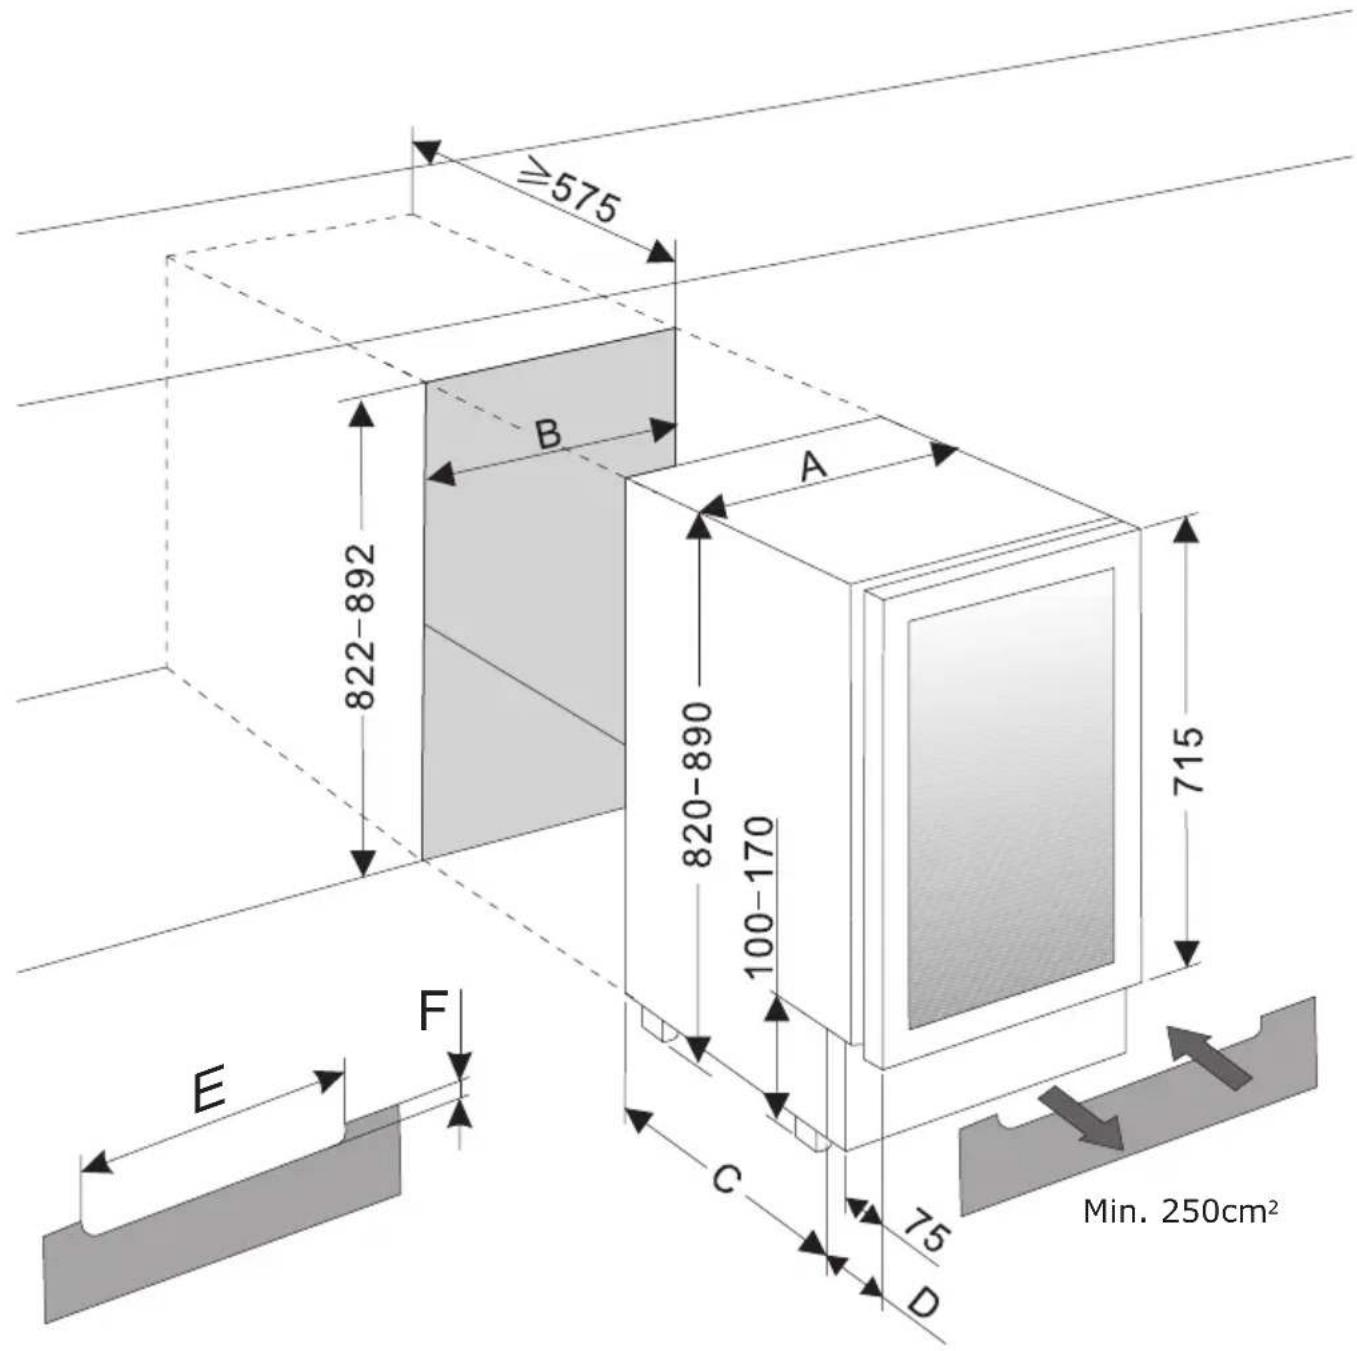
| A [mm] | B [mm] | C [mm] | D [mm] | E [mm] | F [mm] | |
| WK 341 100-1 S / WCF1K15B7.3 / WFBB 716 GDB | 148 | 150 | 455 | 105 3 | 00 60 | |
| WCF1K30B20.1 / WFBA 2030 DL / WK 341 115 S | 295 | 300 | 460 | 105 4 | 50 60 | |
| WK 341 110-2 S 595 600 460 105 500 60 |
| A [mm] | B [mm] | C [mm] | D [mm] | E [mm] | F [mm] | |
| WK 341 100 S / WCF1K15B7.2 148 150 455 105 | 300 | 60 | ||||
| WCF2K30B16.1 295 300 460 115 450 60 | ||||||
| WCU2K60B45.1 / WBB 4660 DZB / WK 341 110-1 S / WBB 4661 ADB | 595 | 600 | 460 | 15 5 | 00 60 |
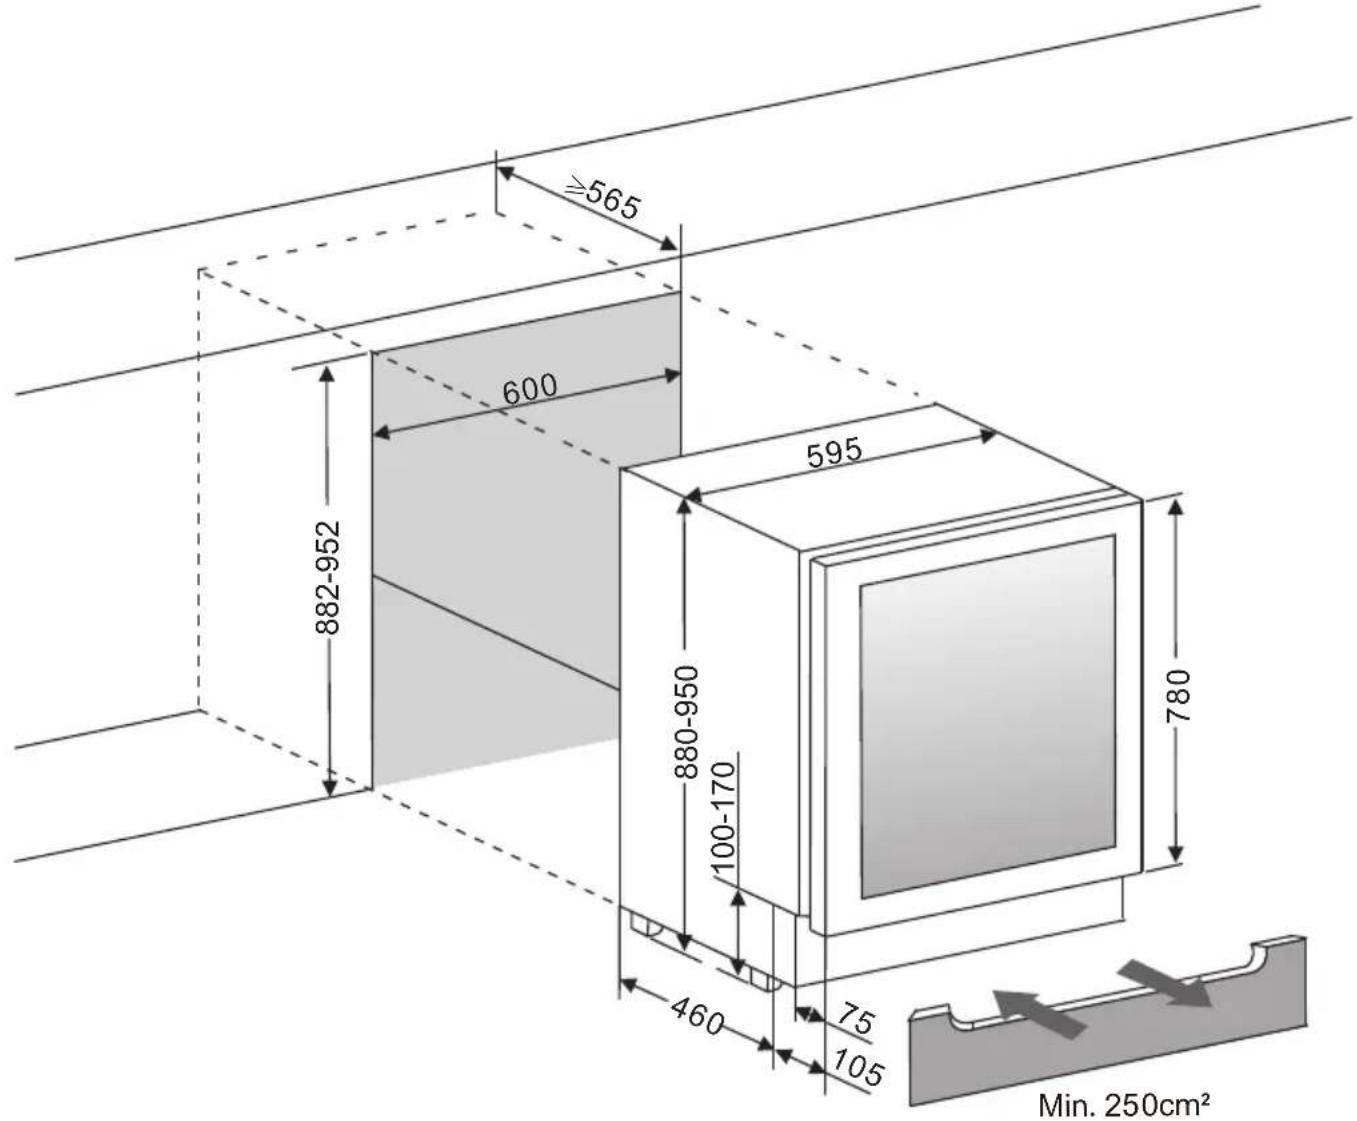
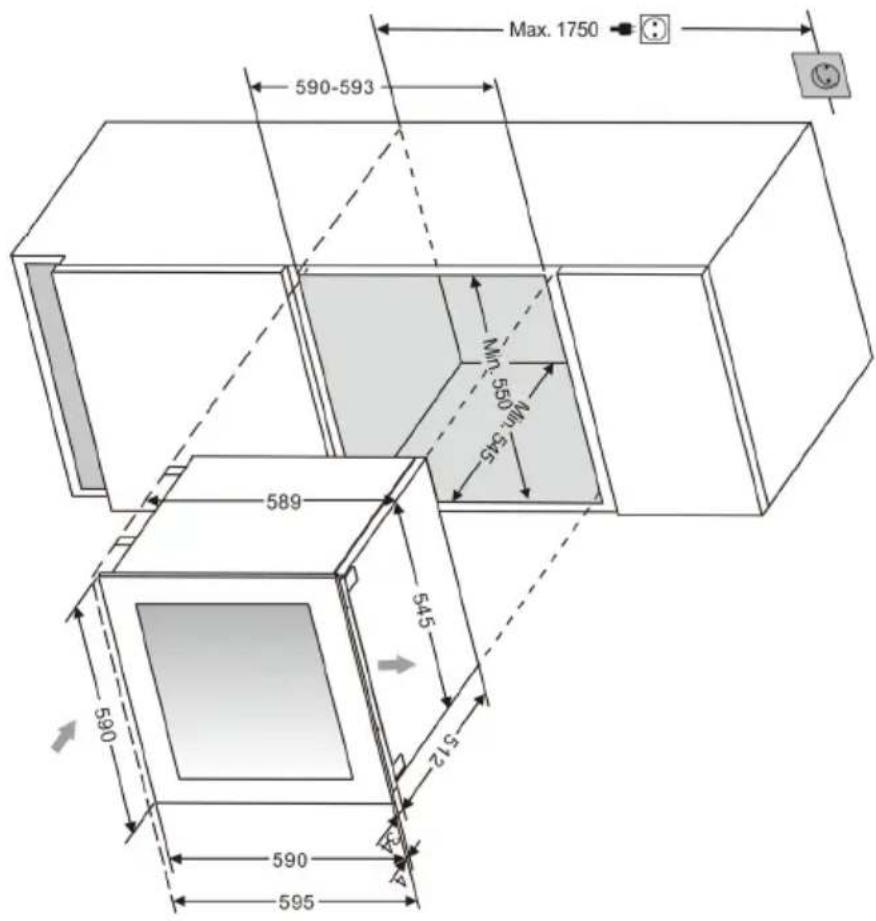
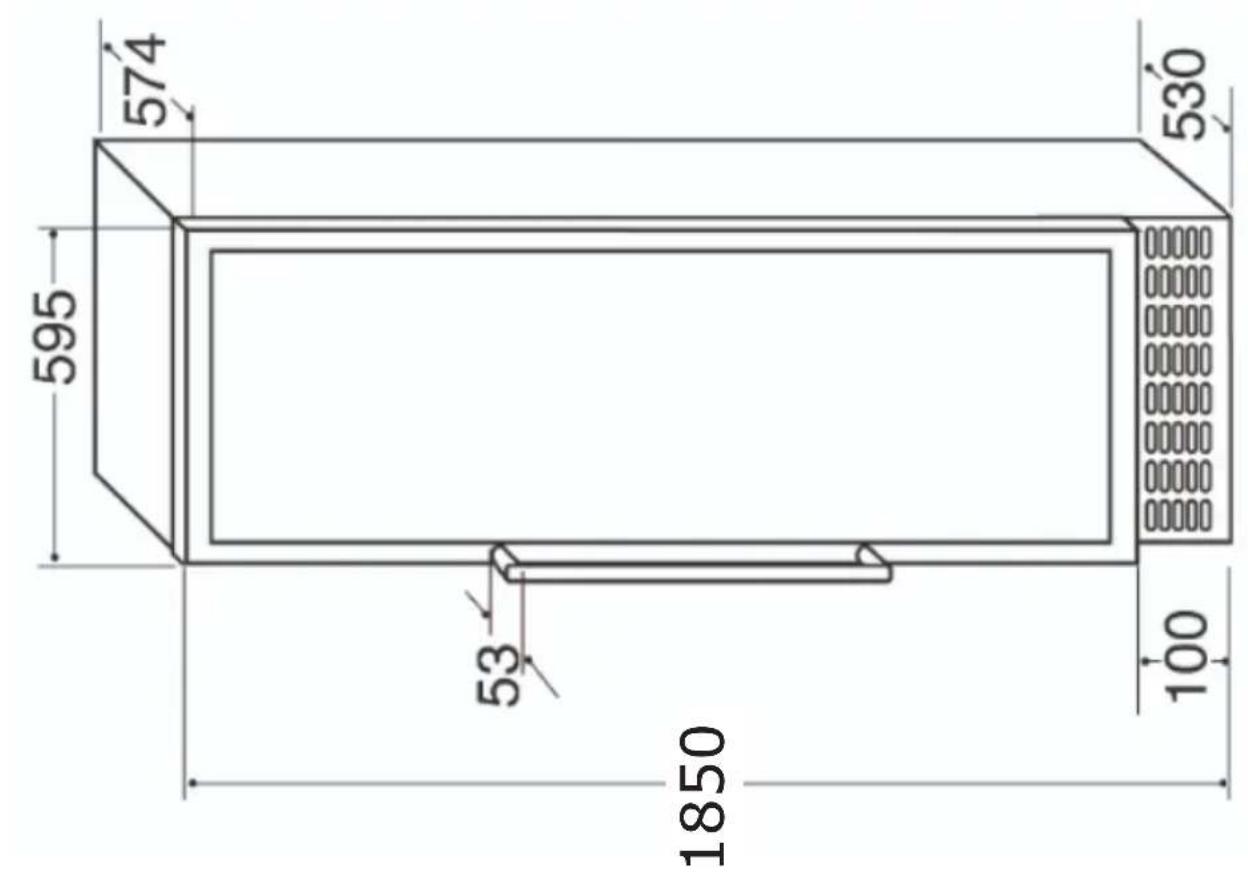
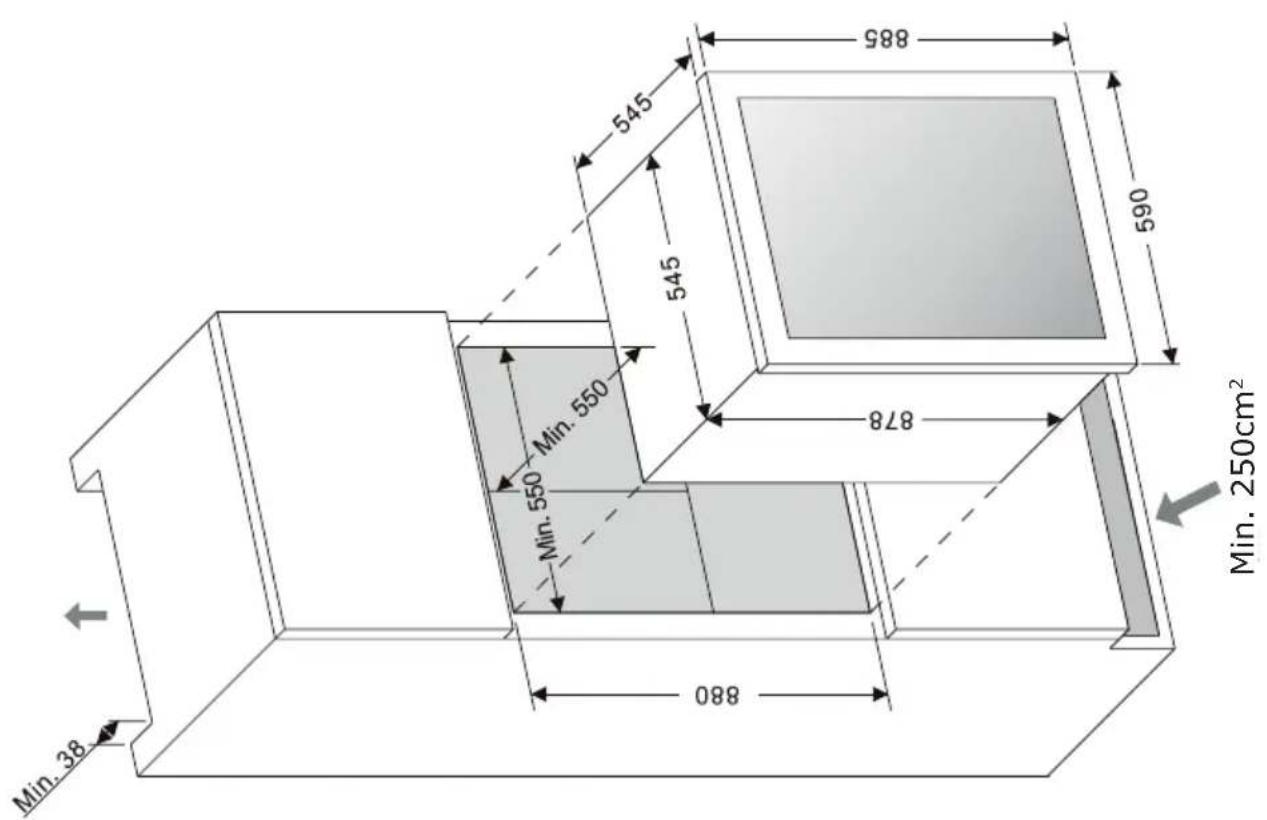
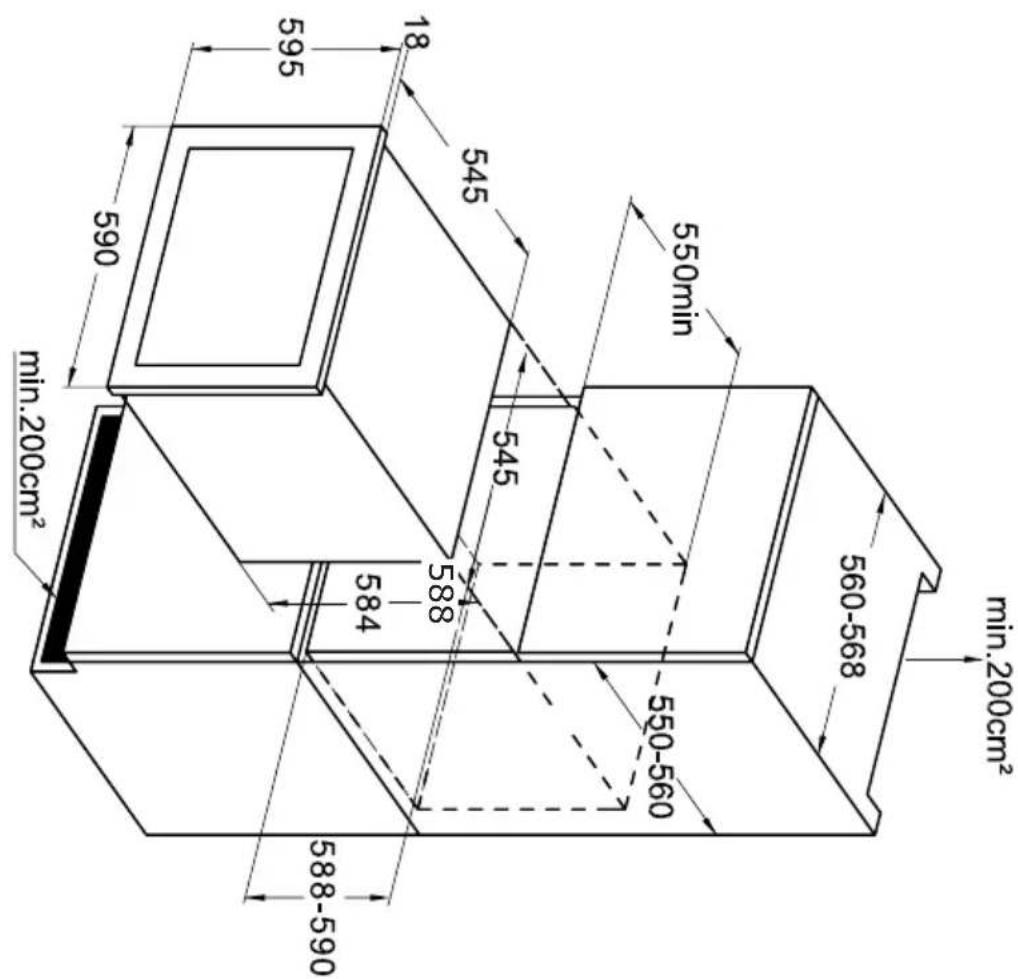
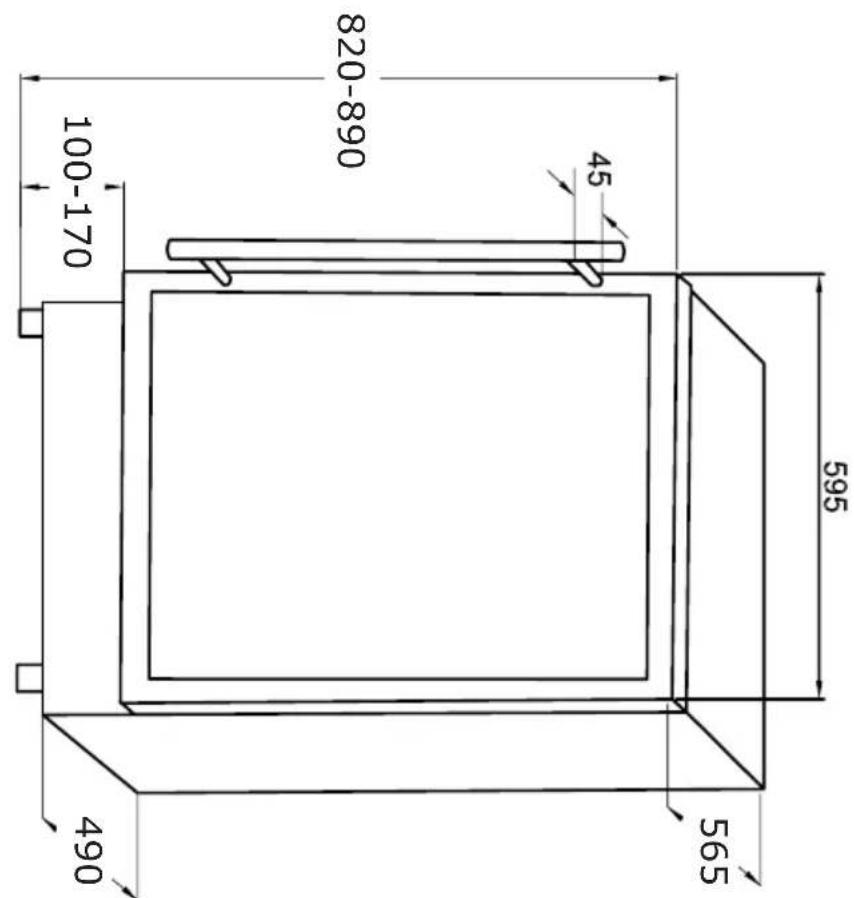
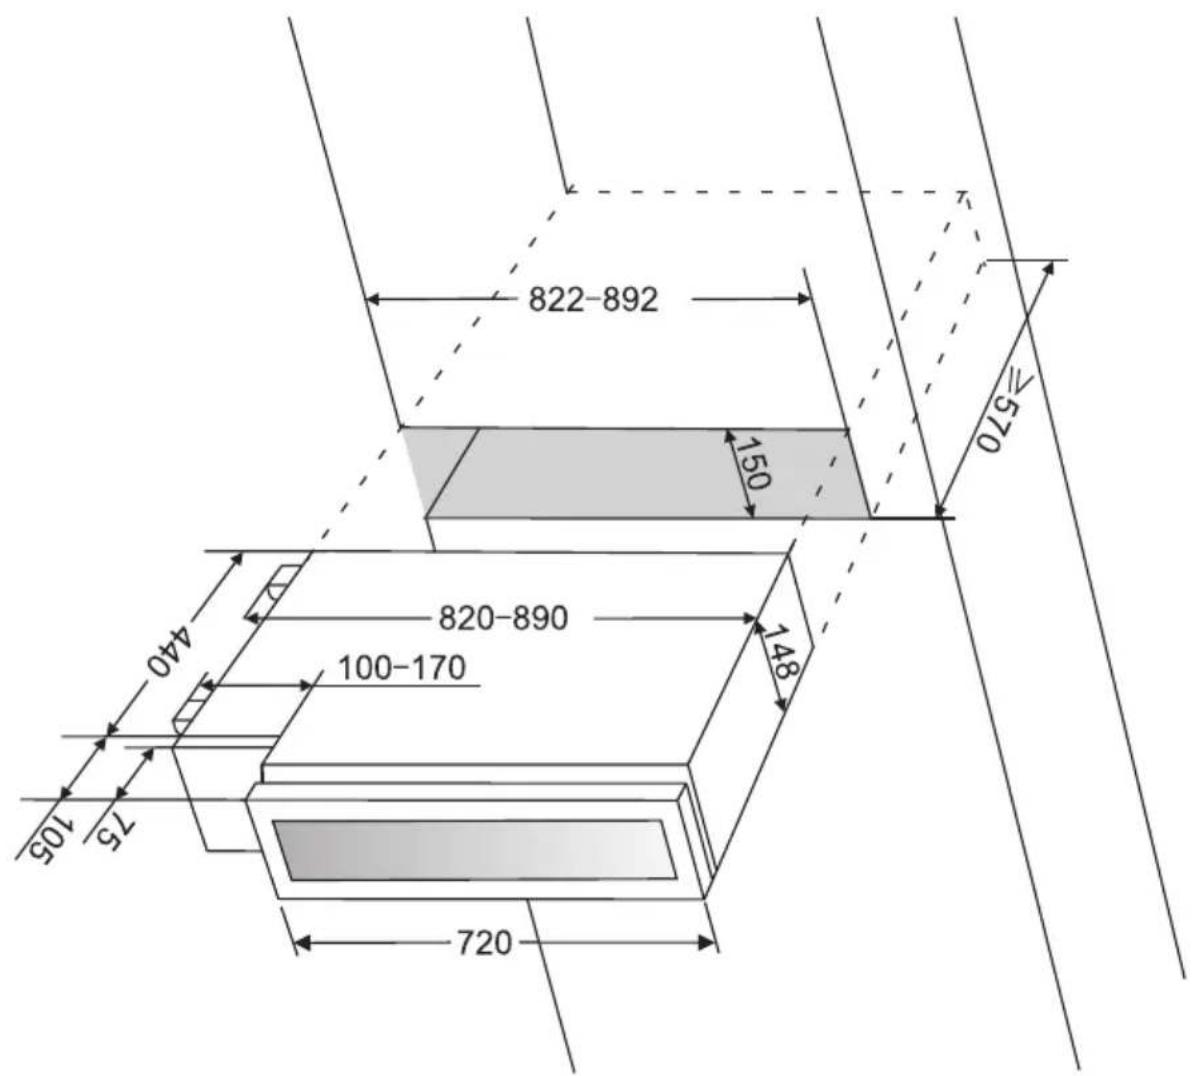
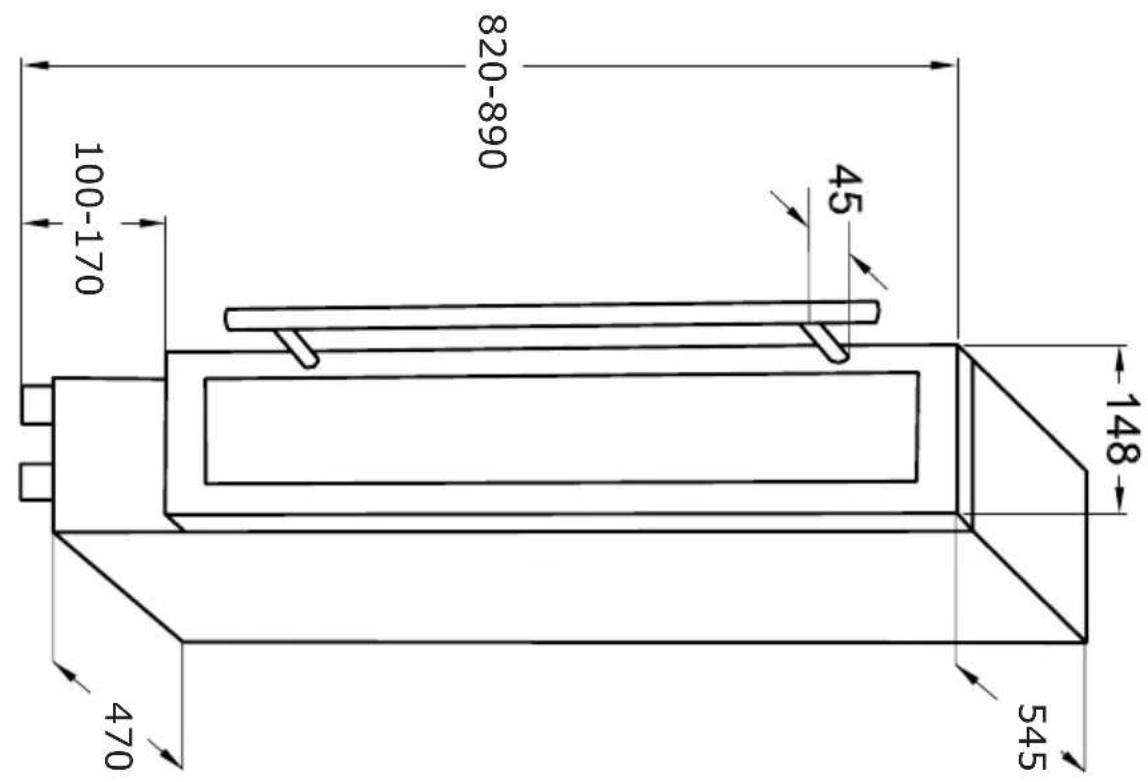
EN: The plinth must be cut out in order to ensure ventilation. In order to position the appliance, the glass door should be even with the furniture front. To ensure stability the adjustable feet should be screwed out until they appliance is touching the work top. This appliance is designed to fit under worktops between 820 - 890mm in height, using the adjustable plinth plate to ensure that the feet are concealed from view.
-
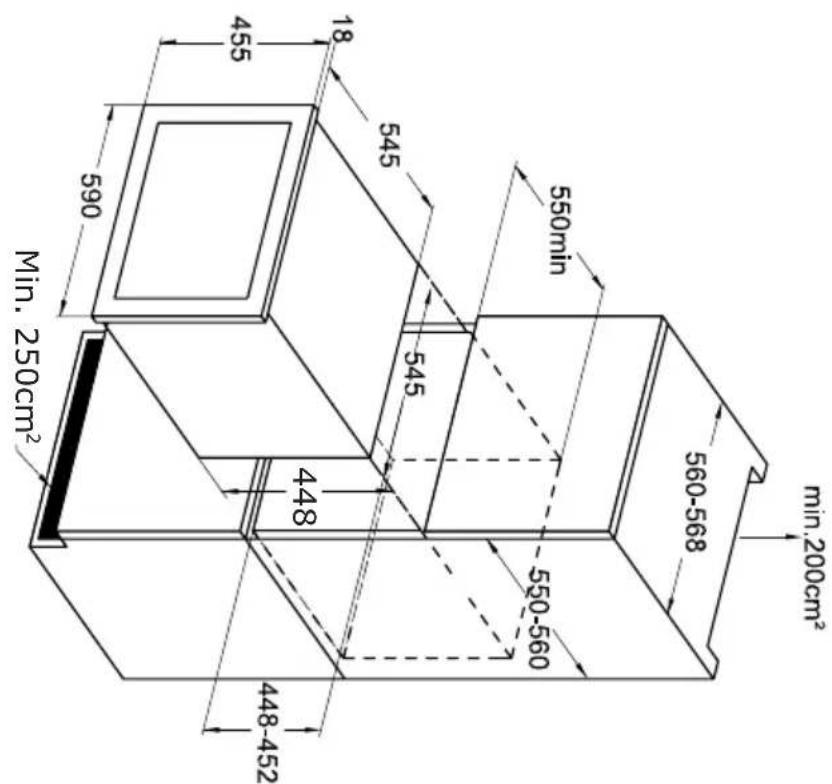
Since the appliance will be built into a furniture unit, before installing the appliance, prepare a ventilation duct behind the appliance running from the floor to the top of the furniture unit. Ensure there is free space between the back of the appliance and the wall, which is not blocked by furniture. The area of ventilation grille should be at least 250~cm^2
-
To ensure correct appliance operation never cover any ventilation openings. Regularly clean the ventilation grille.
DE:
EN - Auto Ventilation (according to the model)
The unit has an integrated ventilation system that automatically distributes the warm air generated at the back. The air inlet is located under the appliance door, while the warm air escapes at the top of the door. To ensure optimal functionality, the inlets and outlets must never be blocked or covered. Regular cleaning of dust deposits is also important.
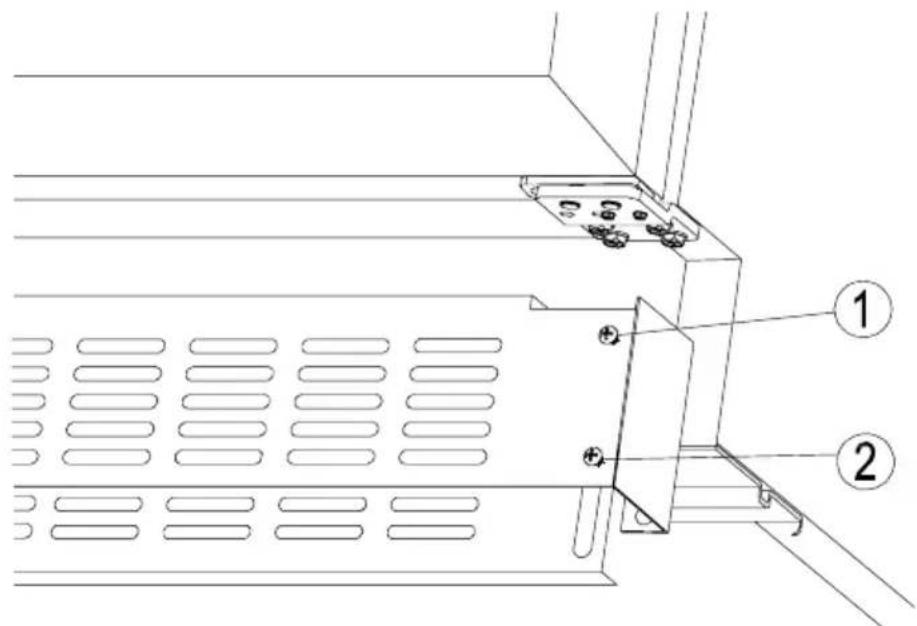
EN- Adjusting the plinth (according to the model)
The pre-fitted plinth for some appliance comes with an adjustable lower section that is initially seated behind the upper section. The process for adjusting the plinth trim is simple and is achieved by following the image and steps below.
- Remove the screws (1) from both the top left and top right hand sides.
- Loosen or remove the screws (2) from the bottom left and bottom right hand sides. Failure to sufficiently loosen the bottom screws may cause damage to the lower trim when adjusting it.
- Carefully guide the lower trim down until the desired height is achieved.
- Reinsert screws (1) and tighten them. Then, tighten or reinsert screws (2).
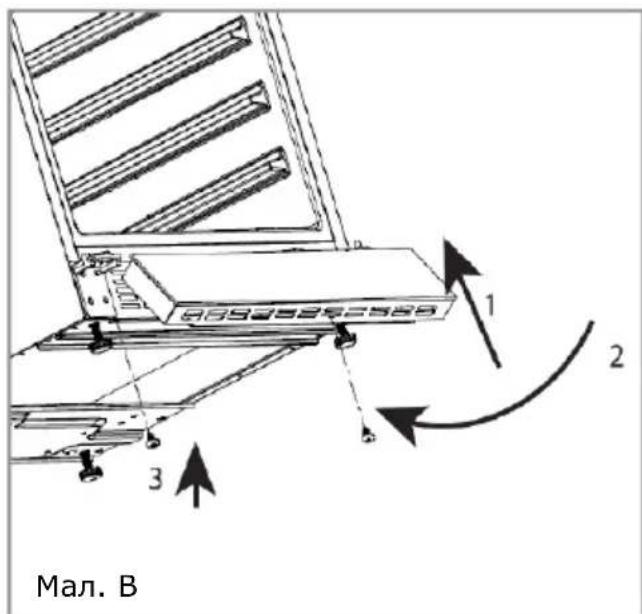
UA-PerylIOBaHHaOKoJIaBaeKHOCTi BID MoJeI)
Bn6paHmOdeJI npncTpoIB MaIOb NonepeHbO BMOHTOBaHn OOKoJIb. CnoaTky OHa YactInHa 3NaXODntbcra 3a DpyroIO. Ppoec peYIIOBaHHr He cCKlaADHM, DoTPMMyTEcB KpOKiB, ONuCAHN HxKue:
- BnkytiB BepxHi rBnHTi (1), po3taoBaHi 3 o60x 60kIB ozokJra
- Ocna6te a6o BnMIb HxHHi TBnHTn (2) 3 o6ox 60kIB zuKoJr. HeoCTaTHe BiIKpyUyBaHH MoKe npN3BecTn DO NOWKOJXeHHr zuKoJIr
- ObepejHo onyctnTu 0kOJIb Ha BiIDNoBIDHy BnCOTy
- BkpytItb BepxHi rBnHTn (1) i 3aTgHITb ix. 3aTgHITb HxKHi rBnHTn (2).
EN- CHANGING THE DIRECTION OF THE DOOR OPENING
DE- WECHSEL DES TURANSCHLAGS
CS-ZMENA SMERU OTEVIRANI DVIREK
SK-ZMENA SMERU OTVÁRANIA DVIEROK
FR- INVERSION DE SENS D'OUVERTURE DE PORTE
PL-ZMIANA KIERUNKU OTWIERANIA DRZWI