
WCFU1VB19.1 - Wine cellar AMICA - Free user manual and instructions
Find the device manual for free WCFU1VB19.1 AMICA in PDF.

| Product Type | Wine Cellar |
| Brand | Amica |
| Model | WCFU1VB19.1 |
| Number of Temperature Zones | 2 zones (upper and lower) |
| Upper Zone Temperature Range | 5 °C to 12 °C |
| Lower Zone Temperature Range | 12 °C to 20 °C |
| Capacity | 19 bottles (Bordeaux 0.75 L) |
| Interior Lighting | LED |
| Display Type | Digital Screen |
| Parental Control (Lock) | Yes, activation by long press of 3 seconds on both touch keys |
| Number of Shelves | 5 removable shelves |
| Climate Class | SN (10 °C to 32 °C) |
| Power Supply | 220-240 V, 50 Hz, 10 A |
| Temperature Unit Change | °C/°F (long press of 5 seconds on the + keys) |
| Removal of Shelves | Yes, by notches and pins |
| Recommended Cleaning | Baking soda solution and warm water, no abrasive products |
| Door Seal Maintenance | Clean with water and mild soap |
| Availability of Spare Parts | 7 to 10 years depending on part type |
| Warranty | According to warranty card (minimum period indicated on card) |
| Operating Ambient Temperature | 10 °C to 32 °C (SN class) |
| Refrigerant Type | Not specified |
Frequently Asked Questions - WCFU1VB19.1 AMICA
User questions about WCFU1VB19.1 AMICA
0 question about this device. Answer the ones you know or ask your own.
Ask a new question about this device
Download the instructions for your Wine cellar in PDF format for free! Find your manual WCFU1VB19.1 - AMICA and take your electronic device back in hand. On this page are published all the documents necessary for the use of your device. WCFU1VB19.1 by AMICA.
USER MANUAL WCFU1VB19.1 AMICA
KLASA KLIMATYCZNA 21
INSTALLATION AND OPERATING CONDITIONS OF THE APPLIANCE 34
CLIMATE RANGE 35
PRACTICAL EVERYDAY TIPS 35
UNPACKING 37
DISPOSAL OF OLD APPLIANCE 37
CONTROLS 38
CONTROLS - ONE AND TWO ZONES 38
POWER ON/OFF 38
CHILD LOCK 38
INTERIOR LIGHTING 38
DISPLAY 39
ADJUST TEMPERATURE 39
CHANGE THE TEMPERATURE UNIT 39
CARE AND CLEANING 40
REMOVING THE SHELVES 40
CLEANING 40
TROUBLESHOOTING 40
IF THE APPLIANCE IS NOT WORKING, CHECK 40
THE APPLIANCE IS WORKING, BUT NOT VERY WELL, CHECK 41
THE APPLIANCE IS NOISY, CHECK 41
THE LIGHT DOES NOT WORK, CHECK 41
THE DOOR WILL NOT CLOSE PROPERLY, CHECK 41
EPREL 41
WARRANTY AND AFTER SALES SERVICE 42
WARRANTY 42
CS - Obsah
POKYNY TÝKAJÍCÍ SE BEZPEČNOSTI POUŽÍVÁNÍ 44 INSTALACE A PROVOZNÍ PODMINKY SPOTŘEBIČE 47
KLIMATICKÁ TRÍDA 48
PRAKTICKÉ RADY 48
VYBALENI 50
LIKVIDACE OPOTŘEBOVANÝCH ZAŘÍZENÍ 50 OVLÁDACI PRVKY 51
OVLÁDACÍ PRVKY - JEDNA A DVĚ ZÓNY 51
ZAPNUTÍ/VYPNUTÍ NAPÁJENÍ 51
RODIČOVSKÁ BLOKÁDA 51
VNITŘNÍ OSVĚTLENÍ 51
DISPLEJ 52
ZMĚNA TEPLOTY 52
ZMĚNA JEDNOTKY TEPLOTY 52
ČISTĚNÍ A ÚDRŽBA 53
VYTAHOVÁNÍ POLIC 53
ČISTĚNÍ 53
ŘEŠENÍ PROBLÉMŮ
POKUD ZAŘÍZENÍ NEFUNGUJE, ZKONTROLUJTE 53
POKUD ZAŘÍZENÍ NEFUNGUJE DOBŘE, ZKONTROLUJTE 54
POKUD JE ZAŘÍZENÍ HLUČNĚ, ZKONTROLUJTE 54
POKUD NEFUNGUJE OSVĚTLENI, ZKONTROLUJTE 54
POKUD DVÍRKA NEJSOU DOBŘE ZAVŘENÁ, ZKONTROLUJTE 54
EPREL
ZÁRUKA, POPRODEJNÍ SERVIS
ZÁRUKA 55
SK - Obsah
DÔLEŽITÉ BEZPEČNOSTNÉ PÓKYNY 57 INSTALÁCIA A PREVÁDZKOVÉ PODMIENKY SPOTREBIČA 60
KLIMATICKÁ TRIEDA 61
PRAKTICKÉ RADY 61
ROZBALENIE 63
LIKVIDÁCIA ZARIADENÍ 63
OVLÁDACIE PRVKY 64
OVLÁDACIE PRVKY - JEDNA A DVE ZÓNY 64
ZAPNUTIE / VYPNUTIE NAPÁJANIA 64
DETSKÁ ZÁMKA 64
VNÚTORNÉ OSVETLENIE 64
DISPLEJ 65
ZMENA TEPLOTY 65
VÝMENA TEPLOTNEJ JEDNOTKY 65
ČISTENIE A ÚDRŽBA 66
VYBERANIE POLÍC 66
ČISTENIE 66
RIEŠENIE PROBLÉMOV 66
AK ZARIADENIE NEFUNGUJE 66
AK ZARIADENIE SÍCE FUNGUJE, ALE NEFUNGUJE PRÍLIŠ DOBRE, SKONTROLUJTE 67
AK JE ZARIADENIE PRÍLÍŠ HLUČNĚ 67
AK NEFUNGUJE OSVETLENIE 67
AK DVERE NIE SÚ ZATVORENÉ SPRÁVNE, SKONTROLUJTE 67
EPREL 67
ZÁRUKA, POPREDAJNÝ SERVIS 68
ZÁRUKA 68
HU - Tartalomjegyzék
BIZTONSÁGI UTASÍTÁSOK 70
A KÉSZÜLÉK TELEPÍTÉSI ÉS ÜZEMELTETÉSI FELTÉTELEI 73
KLÍMA OSZTÁLY 74
GYAKORLATI TANÁCSOK 74
KICSOMAGOLAS 76
GARANTIE, NACHVERKAUF-SERVICE 150
GARANTIE 150
natural_image
Simple line drawing of a three chasing recycling symbol (no text or labels)natural_image
Symbol of a trash bin crossed with two crossed lines, representing waste or discharge (no text or labels)
natural_image
Pure electrical circuit lines without any symbolsFrom now on, your daily housework will be easier than ever before. Your appliance Air*optionally easy to use and extremely efficient. After reading these Operating Instructions, operating the appliance will be easy.
Before being packaged and leaving the manufacturer, the appliance was thoroughly checked with regard to safety and functionality.
Before using the appliance, please carefully read these Operating Instructions. By following these instructions carefully you will be able to avoid any problems in using the appliance. It is important to keep these Operating Instructions and store them in a safe place so that they can be consulted at any time.
Follow these instructions carefully in order to avoid possible accidents.
Sincerely,
Amica
GUIDELINES CONCERNING THE SAFETY OF USE
- To ensure safety and reduce the risk of injury or electric shock, follow all precautions listed below.
- This appliance is intended for household use indoors and similar applications such as:
- farm houses and by clients in hotels, motels and other residential type environments;
- bed and breakfast type environments;
- staff kitchen areas in shops, offices and other working environments;
-
catering and similar non-retail applications.
-
The appliance must be handled by at least 2 people.
- Make sure the plug is easily accessible to allow disconnection from the mains supply.
- Children aged from 3 to 8 years are allowed to load and unload refrigerating appliances.
- The manufacturer reserves the right to introduce changes which do not affect the operation of the appliance.
- The Manufacturer shall not be held liable for damage arising from the failure to observe the instructions contained in this manual.
- Keep this manual for future reference, or to pass it over to the next user.
- This appliance is not intended for use by persons (including children) with limited physical or mental capabilities and persons who lack experience or familiarity with the appliance.
- Do not allow children to use the appliance. Do not allow them to play with the appliance. They must not climb inside the drawers and swing on the doors.
- The appliance operates properly at the ambient temperature (see product fiche). Do not use it in the cellar, unheated summer cottage during au-
tumn and winter.
- When placing, moving, lifting the appliance, do not hold the door handles, do not pull the condenser at the rear part of the refrigerator and do not touch the compressor unit.
- Pull the plug out from the mains socket before each maintenance activity. Do not pull on the cord, but hold the body of the plug instead.
- The “cracking” sound, which the appliance may emit is caused by the expansion and contraction of parts as a result of temperature variations.
- For safety reasons do not repair the appliance yourself. Repairs carried out by persons who do not have the required qualifications may result in serious danger for the user of the appliance.
- Make sure you do not damage the cooling system, by puncturing the refrigerant pipes in the evaporator or breaking the pipes. The refrigerant is flammable. If the refrigerant makes contact with the eyes, rinse them with clean water and call for medical assistance immediately.
- Important! If the power cord is damaged, it should be replaced by the manufacturer or specialist repair centre or a qualified person in order to avoid danger.
- When performing activities, such as cleaning, maintenance or moving, the appliance must be completely disconnected from power supply (by pulling the plug out from the socket)
- This appliance can be used by children aged 8 years and older or by persons with physical, mental or sensory handicaps, or by those who are inexperienced or unfamiliar with the appliance, provided they are supervised or have been instructed how to safely use the appliance and are familiar with risks associated with the use of the appliance. Ensure that children do not play with the appliance. Cleaning and maintenance of the appliance should not be performed by children unless they are 8 years or older and are super-
vised by a competent person.
- Do not clean the appliance with steam
- Keep the appliance and its power cord away from children under 8 years old.
- Do not immerse the power cord or plug in water.
- Keep cord away from heated surfaces.
- Do not allow the connection cord hanging over the edge of a table or counter.
- Do not use any electrical appliances inside the chamber
- Do not use any tools to speed up the defrosting process
- Regularly clean the ventilation openings (in case of built-in appliances or those installed under the worktop)
- This appliance is not designed to be controlled by electronic timers or other devices that cut off power directly or remotely.
- In case of accidental spillage of liquids on electrical components, immediately unplug your appliance from the power supply.
- Make sure that the power cord is not crushed or damaged during installation.
- Disable the appliance before disposing of it. Unplug the appliance from the power supply and cut off the power cord. To prevent children or animals from being trapped in the appliance, remove the doors, hinges and locks.
- Note: If the appliance does not have a freezer compartment ( ^* **), it is not suitable for freezing foodstuffs.
- Pursuant to Commission Regulation (EU) 2019/2019, the minimum availability period for spare parts necessary to repair the appliance is 7 or 10 years depending on the type and purpose of the spare part.
- The list of spare parts and the ordering procedure are available on the websites of the manufacturer, importer or an authorized representative.
INSTALLATION AND OPER- ATING CONDITIONS OF THE APPLIANCE
- Connect the appliance to the power supply 24 hours after unpacking and setting in the final location.
- Take the product out of the package, remove the scotch tape protecting the door and the equipment. Any remaining adhesive stains may be removed with a mild washing agent.
- Clean the interior surface of the cooler and the elements of the equipment with a washing agent dissolved in lukewarm water, then wipe it dry.
- Place the cooler on an even, flat and stable surface, in dry, aired and shaded room, far from the heat sources such as: oven, hob, central heating radiators, central heating pipes, hot water installation, etc.
- On the exterior surface of the product may be a protective foil, this foils should be removed.
- Make sure the appliance is placed in a horizontal position by screwing in the 2 adjustable front legs (fig. 1)
- Keep free space on the sides and rear of the appliance (see installation drawing)
- When you install your wine cooler inside a furniture cabinet, make sure that the ventilation grille located in the bottom of the appliance is not blocked.
- Odours may be released when you first start your appliance. It will dissipate when the interior of the appliance cools down
- When you first start your wine cooler, the compressor will run continuously until the desired temperature is reached inside the chamber
- When you unplug your appliance from the power supply, it is recommended to wait 5 minutes before you plug it back in. This will reduce the risk of damage to the compressor.
- On selected models, the correct temperature will be shown on the display only a few hours after the wine cooler has been put into operation
- This appliance should be connected to AC 220-240V 50Hz supply socket. The socket must be fitted properly, and must be supplied with an earthing conduit and a 10A fuse.
- It is a legal requirement that the appliance is properly earthed. The manufacturer will not be held liable for any damage or injury which may result from the failure to fulfil this requirement.
- Do not use adapters, multiple sockets and two-wire extension leads. If it is necessary to use the extension lead, it must be equipped with a protection ring and a single socket and must have a VDE/GS safety certificate.
- If an extension lead is used (with a protection ring and safety certificate), its socket must be located at a safe distance, away from the sinks, and must not be in a place where it could be flooded by water or waste water.
- Make sure the appliance can be easily disconnected from the mains, either by pulling the plug out of the mains socket, or by switching the two-pole switch off.
Climate range
The information about the climate range of the appliance is provided on the rated plate. It indicates at which ambient temperature (that is, room temperature, in which the appliance is working) the operation of the appliance is optimal (proper).
Climate class Allowable ambient temperature
| SN | Extended Temperate | This refrigeration appliance is intended for use at an ambient temperature ranging between 10°C and 32°C |
| N Temperate | This refrigeration appliance is intended for use at an ambient temperature ranging between 16 °C and 32°C | |
| ST Subtropical | This refrigeration appliance is intended for use at an ambient temperature ranging between 16 °C and 38 °C | |
| T Tropical | This refrigeration appliance is intended for use at an ambient temperature ranging between 16 °C and 43 °C | |
PRACTICAL EVERYDAY TIPS
- If the light inside the appliance remains turned on, keep in mind that the temperature inside the appliance will be higher
- Temperature inside the appliance depends on the amount and type of stored wine bottles
- To ensure user safety and high quality of stored wine, do not install the appliance in damp rooms
- Store wine bottles in designated spaces
- Your wine cooler has a limited capacity. Do not place more bottles in your wine cooler than recommended in specification
- Do not open the wine cooler door if it is not necessary
- Do not cover the shelves with aluminium foil or other material. This blocks the air circulation inside the appliance
- To avoid damage to the door seal, make sure that the door is completely open before pulling out the shelf. The shelves should be inserted as far as possible, otherwise the shelf may deform and damage the door seal.
- Do not extend the loaded shelves beyond the extension limit (about 1/3 of the shelf length)
- This appliance is designed for storing bottles of wine. Do not use it for any other purpose.
• Temperature stability is very important when storing wine. - Exposing your wine cooler to sunlight, significant temperature fluctuations, high humidity and vibrations may cause the wine to go bad.
- In periods of high humidity, condensed water vapour may appear on the outer surfaces of the glass door. To prevent this, install the appliance in a dry, adequately ventilated room.
- Selected models have an external handle. You need to install it on your own. Do not use electric tools for this purpose (fig. 3*). To do this, pull the door seal slightly to the side and place the screws on the inside of the door. Align the handle with the holes on the outside
of the door and tighten the screws with a screwdriver. Reinstall the door seal.
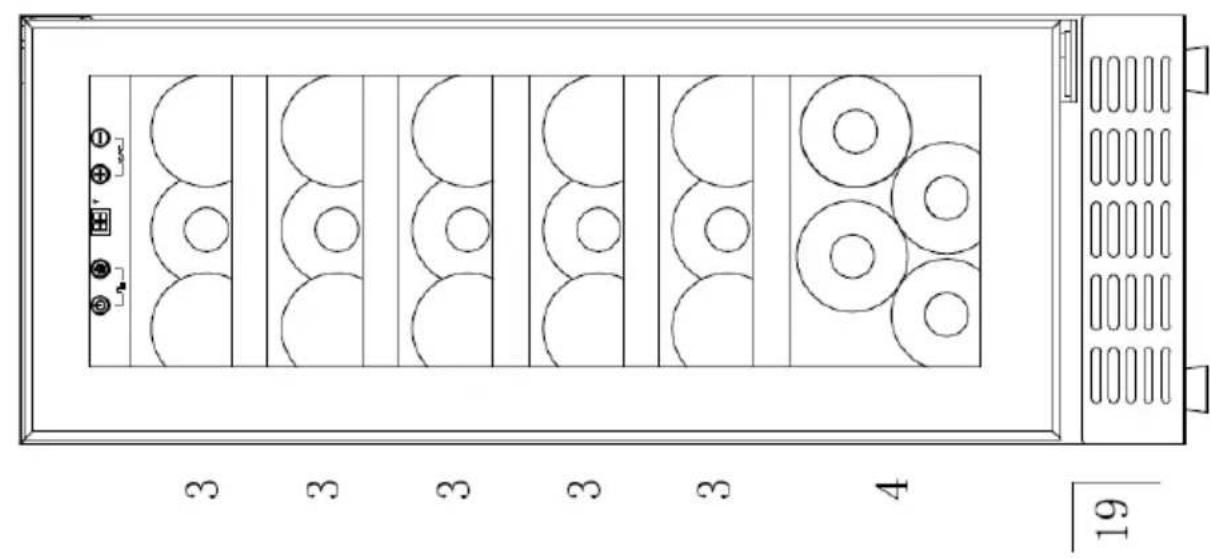
- The maximum capacity of the appliance is given in the product sheet enclosed with the wine cooler. This capacity applies to standard 0.75 litre bottles of Bordeaux.
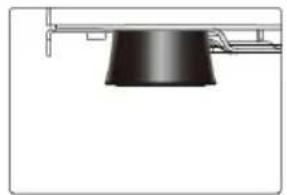
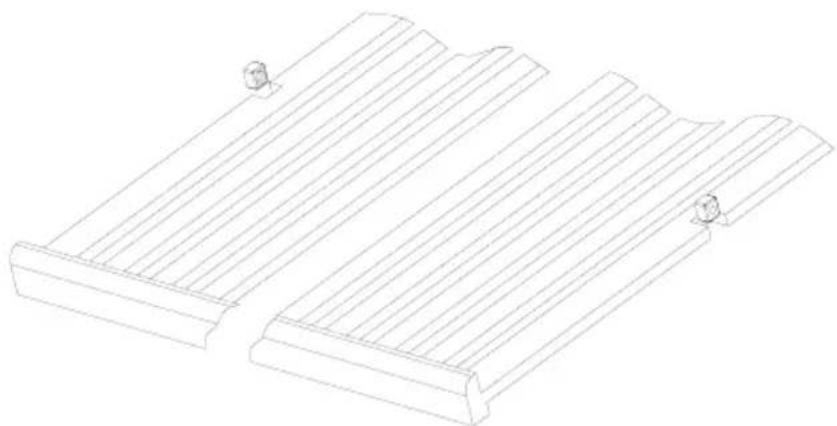
- Selected models have an Anti-tip kit. Install it according to the enclosed diagram (fig. 6*).
- This refrigeration appliance is intended for use as a built-in appliance.
- To achieve the most effective food preservation for the longest possible time and to avoid wasting any food, position the products as shown in Figure 12. In addition, this figure illustrates the layout of drawers, baskets and shelves, which allows the most efficient use of energy.
- Optimal temperature and storage conditions will extend product shelf life and optimize electricity consumption. Optimal storage temperature range should be stated on the food product packaging.
UNPACKING

natural_image
Recycling symbol composed of three chasing arrows forming a triangle (no text or labels)During transportation, protective packaging was used to protect the appliance against any damage. After unpacking, please dispose of all elements of packaging in a way that will not cause damage to the environment. All materials used for
packaging the appliance are environmentally friendly; they are 100% recyclable and are marked with the appropriate symbol. Important! Packaging materials (bags, polyethylene, polystyrene, etc.) should be kept away from children during unpacking.
DISPOSAL OF OLD APPLIANCE
natural_image
Symbol of a trash bin crossed with two crossed lines, no text or labels presentIn accordance with European Directive 2012/19/EU and local legislation regarding used electrical and electronic goods, this appliance is marked with the symbol of the crossed-out waste container. This marking indicates that the appliance must not be disposed of together with other household waste after it has been used. The user is obliged to hand it
over to waste collection centre collecting used electrical and electronic goods. The collectors, including local collection points, shops and local authority departments provide recycling schemes. Proper handling of used electrical and electronic goods helps avoid environmental and health hazards resulting from the presence of dangerous components and the inappropriate storage and processing of such goods.
CONTROLS
Controls - one and two zones
The control panel is shown in Figure 4. It is also shown below:
Single zone

Dual zone

natural_image
Pure electrical circuit lines without any symbols- Power on/off
- Lighting
⊕ - " + "
- " - " - Temperature unit changing
- Zone changing
Power on/off
After connecting the appliance to the power supply, touch and hold for 10 seconds for one of the zones to turn appliance on. Each zone has a separate control panel. Regardless of the lock control panels, touch and hold for 10 seconds.
When you turn off any zone, wait at least 5 minutes before turning it back on. Turning it on early may damage the compressor.
Child Lock
To enable or disable the Child Lock, touch and hold two sensors for 3 seconds. You will hear a beep. Child lock automatically switch on after 5 seconds after touching the panel.
Interior lighting
If active, disable the Child Lock and then touch to turn the light on / off. The effect will be visible after closing the door. The light is always on when you open the door.
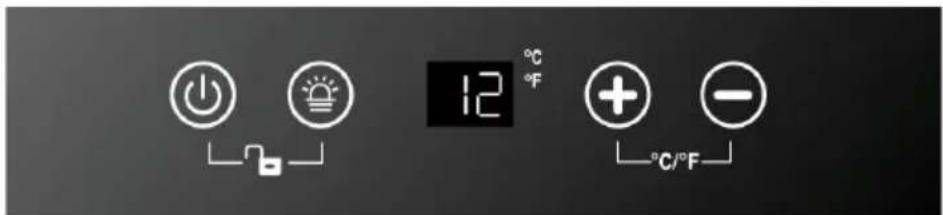
Display
While adjusting the temperature, the display shows the set temperature. The display will show the current temperature measured inside the appliance after about 10 seconds.
Note: If the temperature sensor malfunctions, the display may show "HH" or "LL" and you will hear a beep. Even if the temperature sensor malfunctions, the appliance will continue to operate periodically in order to maintain the correct temperature. Contact the manufacturer's service department to repair the appliance as soon as possible.
Adjust temperature
- You can set the temperature individually for each zone in the range from 5-12°C (Upper zone) and 12-20°C (lower zone) and 5-20°C (single zone).
- If active, disable the Child Lock, then touch to select zone (upper or lower).
- Touch ☑ to set the desired temperature.
Note: When you connect the appliance to power for the first time, or after it was not used for an extended period, it may take longer to reach the set temperature.
Change the temperature unit
Touch and hold two sensors ⊕ for 5 seconds to switch between °C and °F.
Note: Blinking of the temperature unit means the compressor is operating. This is normal device operation.
CARE AND CLEANING
Always disconnect the appliance from the mains electrical supply before any cleaning or maintenance.
Removing the shelves
- To remove a shelf from the wine cooler, first remove all bottles from the shelf, then pull the shelf forwards until the groove on either side of the shelf is level with the plastic peg on either side of the cabinet (as shown in fig 2). Then lift the shelf up and pull forwards.
- To replace the shelves, follow the steps above in reverse order.
Cleaning
- Do not use abrasive products or detergents. After washing, rinse and dry thoroughly.
- The exterior of the appliance and the door seal should be cleaned using mild soapy water and dried thoroughly.
- The interior cabinet should be cleaned using a solution of bicarbonate of soda and lukewarm water.
- Clean the shelves separately by hand using soap and water. Do not put them in the dishwasher.
- Ensure that the cloth is only moist when cleaning the control panel and electrical parts, and that all water is thoroughly dried off before reconnecting the power.
- Once cleaning is complete, reconnect the mains electrical supply.
- If the appliance is not to be used for prolonged periods of time, unplug and clean the appliance thoroughly. The door should be left slightly ajar to prevent the formation of odours or condensation
TROUBLESHOOTING
If you have any problems with your appliance, you should check the troubleshooting guide prior to calling Call Center to prevent unnecessary service calls and potential cost.
If the appliance is not working, check
• There is power to the appliance
- The house fuses or circuit breakers are intact and the fuse in the plug has not blown.
- The plug socket is functioning correctly. To check this, plug another electrical appliance in to see if the socket is working.
- The ambient temperature is between 16^ to 32^ .
The appliance is working, but not very well, check
- The appliance is not overloaded.
- The thermostat is set to an appropriate temperature.
- The door is closing properly.
• The door gasket is sealing properly - There is enough ventilation at the side and rear walls.
- The ambient temperature is between 16^ to 32^ .
The appliance is noisy, check
- The appliance is level and stable.
- The cooling gas will make some noise, even when the compressor is not running.
- During operation, it is normal for the fan to run, even when the compressor is not running.
The light does not work, check
- There is power to the appliance.
- The house fuses or circuit breakers are intact and the fuse in the plug has not blown.
- The light button is not set to off.
Please note:
The LED lighting cannot be replaced without a service call
The door will not close properly, check
- The appliance is level and stable.
- If the door has been removed, it may not have been correctly refitted.
• The door seal is dirty. - The shelves are not positioned correctly.
EPREL
For more information about the product, please refer to the EU EPREL Product Database at https://eprel.ec.europa.eu. For more information, please use your mobile device to scan the QR code on the energy label or enter the product model listed on the energy label in the EPREL search engine https://eprel.ec.europa.eu/
WARRANTY AND AFTER SALES SERVICE
Warranty
The manufacturer shall not be held liable for any damage caused by improper use of the product.
Service
- The manufacturer recommends that all repairs and adjustments be carried out by the Factory Service Technician or the Manufacturer's Authorized Service Point. For safety reasons, repairs should be referred to professionals.
- Repairs carried out by unqualified persons may seriously endanger the appliance user.
- The minimum warranty period for the appliance offered by the manufacturer, importer or authorized representative is given in the warranty card.
- The warranty shall be void if you make any independent adaptations or alterations, tamper with seals or other appliance safety devices or its parts or interfere with the appliance contrary to operating instructions.
In the event of appliance malfunction, request assistance or repair.
If your appliance needs repair, please contact the service centre. Please see website for address and contact details of our service centre. Before contacting us, please have ready the appliance serial number, which can be found on the identification sticker: For your convenience, please write it down below:
Certifi cate of compliance CE and UKCA
The Manufacturer hereby declares that this product complies with the general requirements pursuant to the following European Directives and analogous UK requirements:
- The Low Voltage Directive 2014/35/EC / Electrical Equipment (Safety) Regulations 2016.
• Electromagnetic Compatibility Directive 2014/30/EC / Electromagnetic Compatibility Regulations 2016. - ErP Directive 2009/125/EC / The Ecodesign for Energy-related Products Regulations 2010 (as amended) for the applicable implementing measures which apply in Great Britain and Northern Ireland, respectively.
and therefore the product has been marked with C€ and UK symbols and the Declaration of Conformity, the Manufacturer has drawn up the declaration and is available to the competent authorities regulating the market.
Vážený kliente,
natural_image
Recycling symbol composed of three chasing arrows forming a triangle (no text or labels)natural_image
Symbol of a trash bin crossed with no text or numbers, representing waste sorting or disposal (no text present)DÔLEŽITÉ BEZPEČNOSTNÉ POKYNY
natural_image
Recycling symbol composed of three chasing arrows forming a triangle (no text or labels)natural_image
Symbol of a trash bin crossed with a diagonal line and a horizontal bar below (no text or labels)natural_image
Pure electrical circuit lines without any symbolsnatural_image
Simple line drawing of a three chasing recycling symbol (no text or labels)natural_image
Symbol of a trash bin crossed out by two diagonal lines (no text or labels)
natural_image
Simple line drawing of a three chasing recycling symbol (no text or labels)Uređaj je za vreme transporta zaštićen od oštećenja. Posle vađenja uređaja iz pakovanja molimo Vas da elemente ambalaže uklonite na način koji ne ugrožava prirodnu sredinu.
Svi materijali korišteni za ambalažu nisu štetni za prirodnu okolinų, 100% je moguća reciklaža i označeni su
odgovarajućim simbolom.
Pažnja! Ambalažne materijale (polietilenske kesice, komadiće stiropora itd.) prilikom uklanjanja ambalaže držati daleko od dece.
ODLAGANJE ISTROŠENIH UREĐAJA
natural_image
Symbol of a trash bin crossed out by two diagonal lines (no text or labels)
Ovaj uređaj je označen u skladu sa evropskom direktivom 2012/19/EU. Ujedno je označen simbolom precrtanog kontejnera za otpatke. Oznaka na proizvodu pokazuje da ovaj proizvod posle njegovog životnog veka ne može da buđe biti tretiran kao ostali kućni otpad.
Korisnik ima obavezu da ovaj' proizvod pređa na odgovarajuće sabirno mesto za reciklažu potrošene električne i elektronske opreme. Institucije za prikupljanje ovakvog otpada, uključujući lokalne sabirne tačke, kupovna mesta, opštinske jedinice, sačinjavaju odgovarajući sistem koji omogućava zbrinjavanje ove opreme. Pravilno odlaganje potrošene električne i elektronske opreme sprečava potencijalne negativne posledice za okolinu i ljudsko zdravlje koje inače mogu da budu uzrokovane neodgovarajućim odlaganjem ovog proizvoda.
UPRAVLJAČKI ELEMENTI
Upravljački elementi - jedna i dve zone
Komandna tabla je prikazana na crtežu 4. Pokazana je i niže:
Jedna zona

Dve zone

natural_image
Pure electrical circuit symbols without any text or labels- Taster napajanja
- Taster osvetljenja
⊕ - Taster "+" - Taster "-"
- Gumb za promjenu jedinice temperature
- Gumb za promjenu zone
natural_image
Simple line drawing of a three chasing recycling symbol (no text or labels)natural_image
Symbol of a trash bin crossed with no text or numbers, representing environmental restriction (no text present)natural_image
Pure electrical circuit lines without any symbols- Gumb napajanja
- Gumb osvetlitve
⊕ - Gumb "+"
⊖ - Gumb “-” - Gumb za spremembo enote temperature
- Gumb za spremembo cone
natural_image
Simple line drawing of a three chasing recycling symbol (no text or labels)natural_image
Symbol of a trash bin crossed with no visible text or labelsnatural_image
Pure electrical circuit lines without any symbolsnatural_image
Recycling symbol composed of three chasing arrows forming a triangle (no text or labels)natural_image
Symbol of a trash bin crossed with a diagonal line, representing waste sorting or disposal (no text or labels)
natural_image
Pure electrical circuit lines without any symbolsnatural_image
Recycling symbol composed of three chasing arrows forming a triangle (no text or labels)natural_image
Symbol of a trash bin crossed with a diagonal line and a horizontal bar below (no text or labels)GARANTIE, NACHVERKAUFSERVICE
Garantie
natural_image
Recycling symbol composed of three chasing arrows forming a triangle (no text or labels)natural_image
Symbol of a trash bin crossed with no visible text or labelsnatural_image
Pure electrical circuit lines without any symbolsnatural_image
Recycling symbol composed of three chasing arrows forming a triangle (no text or labels)natural_image
Symbol of a trash bin crossed with no visible text or labelsnatural_image
Simple line drawing of a three chasing recycling symbol (no text or labels)natural_image
Symbol of a trash bin crossed with a diagonal line, representing no waste or discharge (no text or labels)
EN Since the appliance will be built into a furniture unit, before installing the appliance, prepare a ventilation duct behind the appliance running from the floor to the top of the furniture unit. Ensure there is free space between the back of the appliance and the wall, which is not blocked by furniture.
To ensure correct appliance operation never cover any ventilation openings. Regularly clean the ventilation grille.
SR S obzirom na potpunu ugradnju aparata u nameštaj pre instalacije pripremiti kanal za ventilaciju koji vodi od poda, iza aparata, do samog vrha nameštaja. Između zida prostorije i aparata ne sme da se nalazi stenka nameštaja (treba ostaviti slobodni prostor).
EN Adjust masking frame (depending on the model)
Selected device models have a fitted masking frame. Initially, the masking frame is aligned with air vent directly behind it. Adjusting the masking frame is easy, follow the steps below:
- Remove the upper bolts on both sides of the masking frame.
- Undo or remove the lower bolts on both sides of the masking frame. Make sure screws are undone sufficiently to avoid damaging the masking frame.
- Carefully lower the masking frame to the correct height
- Replace and tighten the top bolts. Tighten the lower bolts.
SR Regulacija podne lajsne (zavisno od modela)
Izabrani modeli aparata su isporučeni s delomično ugrađenom podnom lajsnom.
Početno se jedan deo lajsne nalazi iza drugog dela. Proces regulacije nije komplikovan, obaviti niže navede korake:
- Odvrnuti gornje šrafove koji se nalaze s obe strane lajsne.
- Popustiti ili odvrnuti donje šrafove sa svake strane lajsne. Nedovoljno popuštanje šrafova može da ošteti lajsnu.
- Oprezno spustiti lajsnu na odgovarajuću visinu.
- Umetnuti gornje šrafove i pričvrstiti. Zavrnuti donje šrafove.
natural_image
Technical diagram of a ventilation system with cooling fans and air ducts, showing airflow direction (no text or labels)1
natural_image
Pure diagram of a black cylindrical object suspended from a horizontal bar, no text or symbols present
natural_image
Mechanical assembly diagram showing a piston-like component with an upward arrow indicating motion (no text or symbols)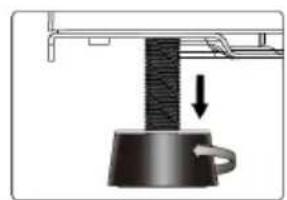
natural_image
Mechanical assembly diagram showing a press or lifting device with a downward arrow indicating force or motion (no text or symbols present)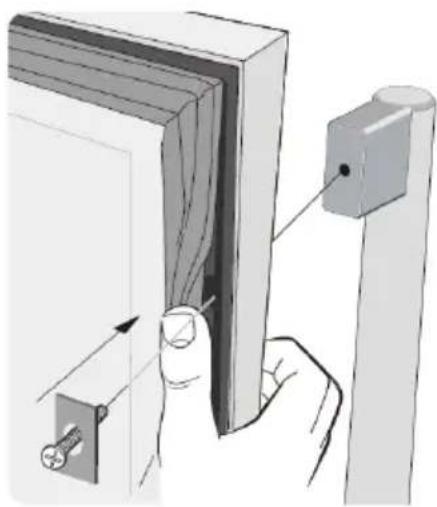
natural_image
Illustration of a hand holding a door with a lock and a wall-mounted switch (no text or symbols)3

natural_image
Pure electrical circuit lines without any symbols4
natural_image
Technical line drawing of two rectangular metal profiles with fluted bases and mounting holes (no text or symbols)5

natural_image
Top-down schematic of a server rack with circular and rectangular compartments, no text or symbols present12
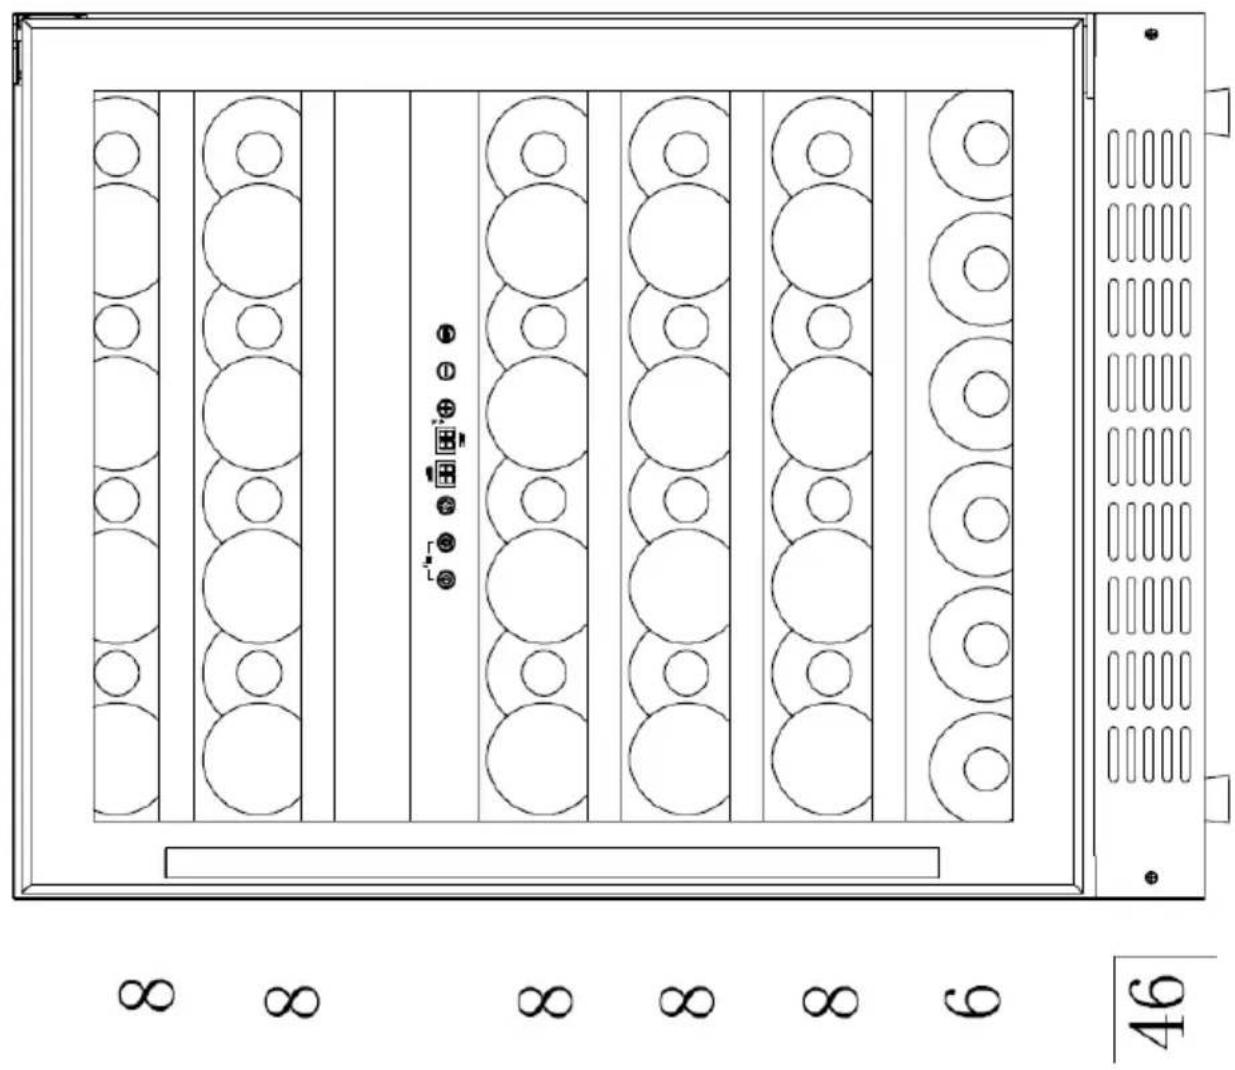
natural_image
Technical line drawing of a rectangular electronic device with multiple circular components and ventilation slots (no text or symbols)12
Amica S.A.
ul . Mickiewicza 52 / 64-510 Wronki tel. 67 25 46 100 / fax 67 25 40 320
www.amica.pl
Amica International GmbH
Lüdinghauser Str. 52
D-59387 Ascheberg
Tel: 0 25 93 - 95 67-0
www.amica-group.de

- INSTALLATION AND OPERATING CONDITIONS OF THE APPLIANCE 34
- PRACTICAL EVERYDAY TIPS 35
- UNPACKING 37
- DISPOSAL OF OLD APPLIANCE 37
- CONTROLS 38
- CARE AND CLEANING 40
- TROUBLESHOOTING 40
- EPREL 41
- WARRANTY AND AFTER SALES SERVICE 42
- CS - Obsah
- POKYNY TÝKAJÍCÍ SE BEZPEČNOSTI POUŽÍVÁNÍ 44 INSTALACE A PROVOZNÍ PODMINKY SPOTŘEBIČE 47
- PRAKTICKÉ RADY 48
- VYBALENI 50
- LIKVIDACE OPOTŘEBOVANÝCH ZAŘÍZENÍ 50 OVLÁDACI PRVKY 51
- ČISTĚNÍ A ÚDRŽBA 53
- ŘEŠENÍ PROBLÉMŮ
- EPREL
- ZÁRUKA, POPRODEJNÍ SERVIS
- SK - Obsah
- DÔLEŽITÉ BEZPEČNOSTNÉ PÓKYNY 57 INSTALÁCIA A PREVÁDZKOVÉ PODMIENKY SPOTREBIČA 60
- PRAKTICKÉ RADY 61
- ROZBALENIE 63
- LIKVIDÁCIA ZARIADENÍ 63
- OVLÁDACIE PRVKY 64
- ČISTENIE A ÚDRŽBA 66
- RIEŠENIE PROBLÉMOV 66
- EPREL 67
- ZÁRUKA, POPREDAJNÝ SERVIS 68
- HU - Tartalomjegyzék
- GARANTIE, NACHVERKAUF-SERVICE 150
- Amica
- GUIDELINES CONCERNING THE SAFETY OF USE
- INSTALLATION AND OPER- ATING CONDITIONS OF THE APPLIANCE
- Climate range
- PRACTICAL EVERYDAY TIPS
- UNPACKING
- DISPOSAL OF OLD APPLIANCE
- CONTROLS
- Controls - one and two zones
- Power on/off
- Child Lock
- Interior lighting
- Display
- Adjust temperature
- Change the temperature unit
- CARE AND CLEANING
- Removing the shelves
- Cleaning
- TROUBLESHOOTING
- If the appliance is not working, check
- The appliance is working, but not very well, check
- The appliance is noisy, check
- The light does not work, check
- The door will not close properly, check
- WARRANTY AND AFTER SALES SERVICE
- Warranty
- Service
- Certifi cate of compliance CE and UKCA
- Vážený kliente,
- DÔLEŽITÉ BEZPEČNOSTNÉ POKYNY
- ODLAGANJE ISTROŠENIH UREĐAJA
- UPRAVLJAČKI ELEMENTI
- Upravljački elementi - jedna i dve zone
- GARANTIE, NACHVERKAUFSERVICE
- Garantie
- EN Adjust masking frame (depending on the model)
- SR Regulacija podne lajsne (zavisno od modela)
Brand : AMICA
Model : WCFU1VB19.1
Category : Wine cellar