
AKM1600S - Food Processor BESTRON - Free user manual and instructions
Find the device manual for free AKM1600S BESTRON in PDF.
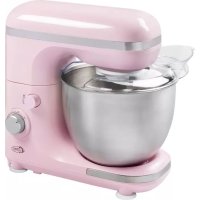
| Brand | Bestron |
| Model | AKM1600S |
| Type | Food processor |
| Power supply | 220-240 V ~ 50 Hz |
| Main bowl capacity | 2.5 L for dough, 500 g for bread dough |
| Mixing jug | Glass, capacity 1 L |
| Speed | 6 positions + Pulse function |
| Functions | Mix, beat, knead, blend, grate, slice, chop, make sausages |
| Included accessories | Beater, dough hook, mixing arm, splash-proof lid, mixing bowl, mixing jug with blades, fine grater, coarse grater, slicer, meat grinder with fine/medium/coarse discs, sausage maker attachment |
| Warranty | 60 months (5 years) |
| Maintenance | Clean with warm soapy water, do not immerse the appliance, some accessories not dishwasher safe |
| Safety | Do not immerse, safety system on the blender, use under supervision |
| Weight | Approximately 5 kg |
| Dimensions | Approximately 30 x 25 x 40 cm |
Frequently Asked Questions - AKM1600S BESTRON
User questions about AKM1600S BESTRON
0 question about this device. Answer the ones you know or ask your own.
Ask a new question about this device
Download the instructions for your Food Processor in PDF format for free! Find your manual AKM1600S - BESTRON and take your electronic device back in hand. On this page are published all the documents necessary for the use of your device. AKM1600S by BESTRON.
USER MANUAL AKM1600S BESTRON
natural_image
Exterior view of a modern stainless steel stand mixer (no visible text or symbols)


AKM1600S INSTRUCTION MANUAL
DE
Bedienungsanleitung
The image is too blurry to recognize any text content.
Mode d'emploi
NL
Handleiding
EN
Instruction manual
IT
R. Neyman
Quality control
BETRIEB – Allgemein
natural_image
Line drawings of a kitchen mixer with three different views showing the blade, handle, and lid (no text or symbols present)natural_image
Line drawing of a kitchen mixer with component assembly and directional arrows indicating motion (no text or symbols)DÉCLARATION DE CONFORMITÉ CE
R. Neyman
Contrôle qualité
FONCTIONNEMENT - Général
natural_image
Line drawings of a kitchen mixer with three different views showing the process (no text or symbols present)natural_image
Line drawing of a kitchen mixer with component assembly and directional arrows indicating motion (no text or symbols)WAT U MOET WETEN OVER DIT APPARAAT
natural_image
Line drawing of a kitchen mixer with rotating components and directional arrows indicating rotation (no text or symbols)LET OP:
natural_image
Line drawings of a kitchen mixer with three different designs, showing step-by-step assembly and rotation (no text or labels)natural_image
Line drawing of a kitchen mixer with component assembly (no text or symbols)Congratulations with the purchase of this Bestron product. These instructions tell you how the product works and how to use it. Read the instructions carefully before you start using the appliance. Only use the appliance in the manner described in the instructions. Keep these instructions in a safe place for future reference.
Defects:
If the appliance is defective, do not try to repair it yourself. Always have a qualified mechanic carry out any repairs.
Children:
- This device may not be used by children and persons with reduced physical, sensory or mental capabilities or lack of experience and know-how.
• Children are not allowed to clean or maintain the appliance. - Keep the appliance and the cable out of reach of children.
- Keep an eye on children to ensure that they do not play with the appliance.
WHAT YOU SHOULD KNOW ABOUT ELECTRICAL APPLIANCES
- Check that the mains voltage corresponds with that shown on the rating plate of an electrical appliance before you use it.
• Always install electrical appliances on a stable and level surface where it cannot fall over. - Certain parts of an electrical appliance may become warm or sometimes hot. Do not touch them as you may burn yourself.
• Make sure your hands are dry when you touch an electrical appliance, a cord or a plug. - Electrical appliances must be able to lose their heat to avoid fire hazards. Therefore, make sure that the appliance has sufficient clearance around it and that it does not come into contact with flammable materials. Electrical appliances must never be covered.
- Make sure that electrical appliances, cords or plugs do not come into contact with water.
- Never immerse electrical appliances, cords or plugs in water or any other liquid.
- Do not touch electrical appliances if they have fallen in the water. Immediately pull the plug out of the socket. Stop using the appliance.
• Make sure that electrical appliances, cords and plugs do not come - into contact with heat sources, such as a hot hob or open fire.
- Never let cords hang over the edge of the sink, a worktop or a table.
• Always remove plug from the socket when you are not using the electrical appliance.
- Remove the plug from the socket by pulling the plug itself and not the cord.
- Regularly check if the cord of the electrical appliance is not damaged. Do not use the electrical appliance if the cord shows signs of damage. If the cord is damaged, it should be replaced by the manufacturer, a technical service provider or a person with an equivalent qualification, to avoid any danger.
- The appliance may not be switched on with the aid of an external time switch, or by a separate system with remote control.
WHAT YOU SHOULD KNOW ABOUT THIS APPLIANCE
- Be careful when using the appliance outdoors.
- Never use the appliance in damp or wet locations.
- Thoroughly clean the appliance after use (see Cleaning and Maintenance).
- Keep your fingers clear of all moving parts While the appliance is in operation.
- Do not switch on the appliance unless the accessories and the bowl are fitted properly.
- Do not switch on the appliance unless the mixer head is locked in position.
- Do not switch on the appliance with the mixer head in the raised position.
• Always switch off the appliance before changing the accessories. - Never insert objects in the mixer bowl While the appliance is in operation.
ENVIRONMENT

- Dispose of packaging material such as plastic and cardboard boxes in the designated containers.
- Do not dispose of this product as normal domestic waste at the end of its life, but hand it in at a collection point for the reuse of electric and electronic equipment. Look for the symbol on the product, the user instructions or the packaging showing the type of waste.
- The materials can be used as indicated. By helping us reuse and process the materials or otherwise recycle the old equipment, you will be making an important contribution towards the protection of the environment.
- Your municipality can tell you where to find the designated waste collection point in your neighbourhood.
CE DECLARATION OF CONFORMITY
This product meets the requirements of European guidelines.

R. Neyman
Quality control
OPERATION - General
The appliance is intended only for domestic use, not for professional use.
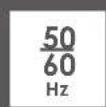
- Closing plug
- Lid
- Glass mixing jug
- Blades
- Cover
- Mixer head
- Connection
- Connection unlocker
- Anti-splash lid with refill opening
- Mixing bowl
- Blender cover
- Blender connection
- 'PULSE' button
- Lift button
- Speed switch
- Power cord and plug
- Pusher grater/cutter
-
Filling funnel grater/cutter
-
Drum fine grater
- Drum coarse grater
- Drum slicer
- Pusher meat grinder
- Filling tray
- Filling funnel meat grinder
- Grinding spiral
- Knife
- Grinding disc fine
- Grinding disc medium
- Grinding disc coarse
- Inner sausage attachment
- Outer sausage attachment
- Locking ring
- Whisk
- Kneading hook
- Mixing arm
OPERATION - Before first use
- Take the appliance out of the packaging.
- Clean the appliance (see 'Cleaning and maintenance').
OPERATION - Use
The kitchen machine comes with three different attachments and an anti-splash lid.
• The mixing arm (35) is used to mix batter for foods like cake, biscuits, bread, pastry and cookies.
• The whisk (33) is used to whisk ingredients, like egg whites, mayonaise and whipped cream.
• The Kneading hook (34) is used to knead bread dough and other dough using yeast.
• The anti-splash lid (9) prohibits messiness and has an easily used refill opening.
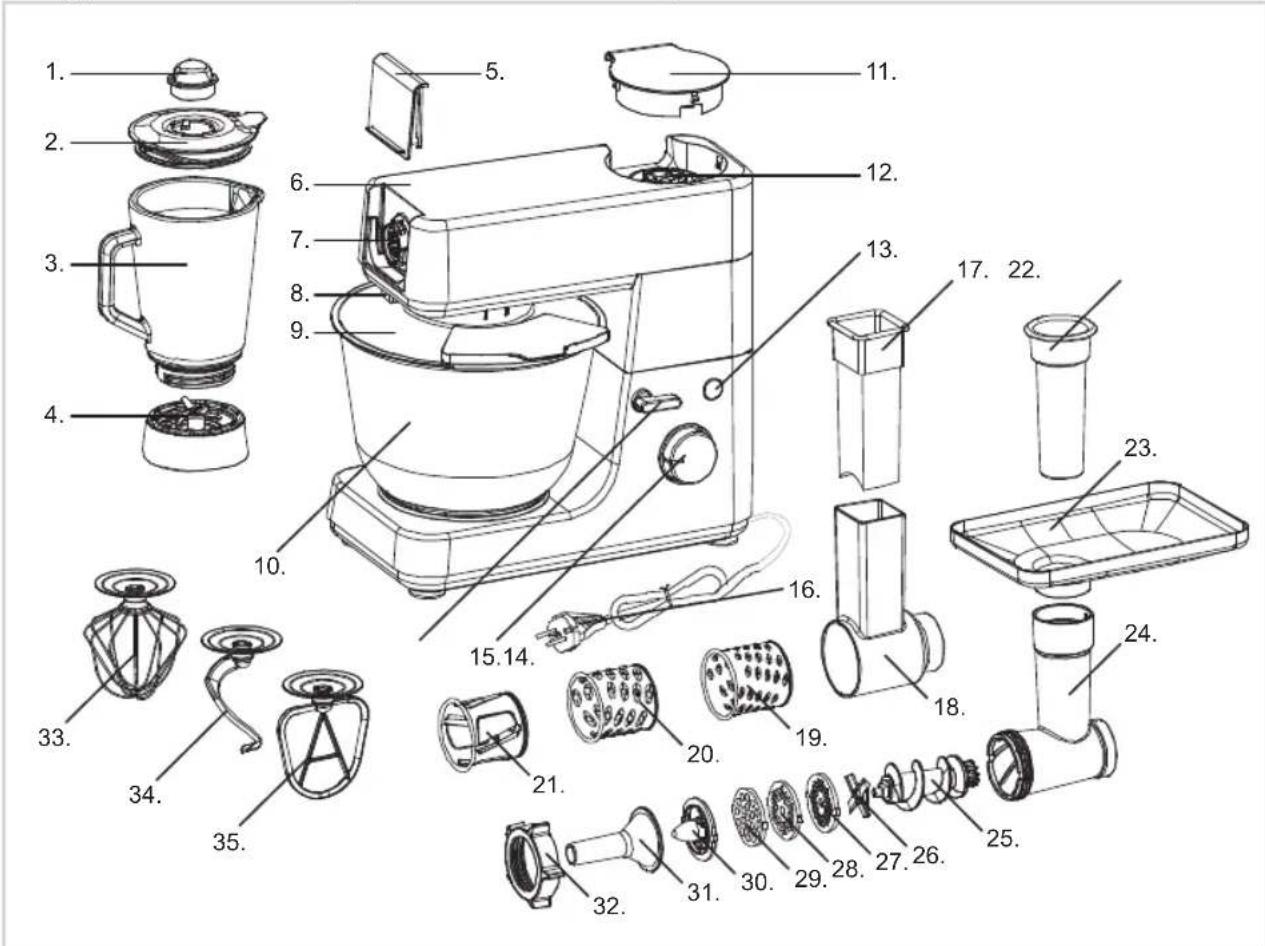
- Press the lift button (14) with one hand and push up the mixer head (6) with your other hand until it locks in place.
- Press the anti-splash lid onto the mixing head from below until it locks, making sure it fits exactly into the crevices. The filling opening should be angled towards the front.
- Place the ingredients in the mixing bowl.
- Place the mixing bowl (10) onto the appliance. Note that the bowl fits exactly into the crevices. Turn the bowl clockwise until it can't be turned further. The mixing bowl has now been locked into place.
- Place the desired attachment onto appliance. Press it onto the axis and turn it counter-clockwise. De pins of the attachment should fit into the crevices of the axis.
- Press the lifting button with one hand and press the mixer head down with your other until it locks into place.
- Put the appliance's plug into the socket.
- Turn the speed switch (15) to the desired setting. Start on the lowest setting. Press the 'PULSE' button (13) if you wish to shortly mix in the highest setting possible.
- When finished mixing, turn the speed switch to 'OFF' to switch off the appliance.
- Pull the plug from the socket.
- Press the lift button with one hand and push up the mixer head with your other hand until it locks in place.
- Turn the mixing bowl counter-clockwise until it unlocks and take it from the appliance.
- Remove the attachment from the appliance by turning it to the right and pulling it off the axis.
ATTENTION:
• Whenever the mixer is in use, you can add ingredients though the refill opening in the anti-splash lid.
- You can use the appliance at the highest speed for a short while by pressing the 'PULSE' button (13). The 'PULSE' function only works as long as you keep the button pressed down.
- Never use the device for longer than 10 minutes. Then wait 20 minutes before switching the device on again.
• The three fittings are not dishwasher-suitable.
TIPS - Mixing ingredients
• Make sure that the ingredients are at room temperature.
- Warm the mixer bowl and mixing arm by filling the bowl with hot water, fitting it to the appliance, and then lowering the mixing arm into the water. Dispose of the water before you use the appliance.
- While you are mixing the ingredients pause occasionally to scrape the sides of the mixing bowl. Always make sure the appliance is switched off before you do so!
- Never use the device for longer than 10 minutes. Then wait 20 minutes before switching the device on again.
TIPS - Mixing batter for cakes, pie crusts, and biscuits
- Cool the mixing bowl and mixing arm as much as possible by placing them in the refrigerator for a period of time.
- Begin mixing the ingredients by setting the dial to position 1. Then beat the ingredients to a light batter at the highest speed (see 'Recommended speeds').
TIPS - Mixing dough for bread, and other fermenting doughs
Never knead the dough for an excessive time, since it will not rise.
TIPS - Beating whipped cream and egg white
• Make sure that the mixing bowl and whisk are thoroughly clean before you start.
- Do not beat whipped cream for an excessive time, otherwise it will become fluid and is no longer suitable for piping.
USE - Maximum quantities
- Dough: 500gr
- Batter: 2,5 L
OPERATION - Recommended speeds
| Accessory | Posilinr | |
| Mixing blade | butter and sugar | position 1, gradually increasing to position 4 |
| batter | p position 1 | |
| dough | position 1, gradually increasing to position 4 | |
| Whisk | position 1, gradually increasing to position 6 | |
| Dough hook | position 1, gradually increasing to position 2 | |
OPERATION - Using the blender
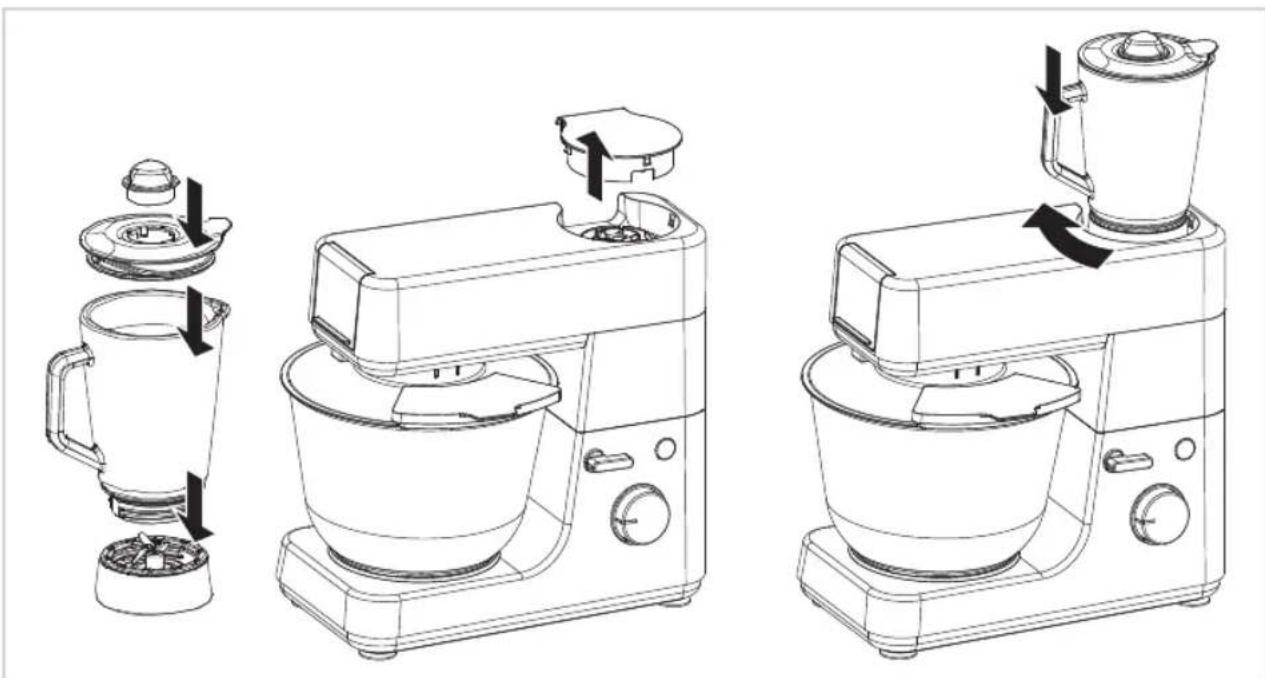
natural_image
Line drawings of kitchen appliances with arrows indicating rotation and component changes (no text or symbols)- Place the mixing jug (3) onto the connection (12) and turn it sturdily. The blender has a safety system. Whenever it has not been placed properly onto the motor housing, the blender will not turn on.
- Cut solid ingredients into pieces.
- Fill the mixing jug with the solid ingredients. If there are any, add the liquid ingredients (1L max.)
- Place the lid (2) onto the mixing jug
- Place the closing plug (1) onto the lid.
- Put the plug (16) into the socket.
- Turn the speed switch (15) onto the desired setting. The longer the blender is in use (180 seconds max.), the finer the ingredients are ground.
- Turn off the blender (setting 'OFF').
- Do not remove the jug from the connection until the blades (4) have once again turned completely still.
ATTENTION:
- Do not use the blender and kitchen machine simultaneously, this overloads the motor.
• Never remove the mixing jug lid when the blender is still running
TIPS
- Whenever the blender is in use, you can add ingredients though the refill opening in the anti-splash lid by removing the closing plug.
- You can use the appliance at the highest speed for a short while by pressing the 'PULSE' button (13). The 'PULSE' function only works as long as you keep the button pressed down.
- Prepare crushed ice by filling the blender jug with ice cubes and repeatedly pressing the 'PULSE' button until desired consistency of the ice is obtained.
• Cut meat and other solid ingredients into small pieces before adding them to the blender jug. - To prepare tomato juice, cut the tomatoes into four pieces and insert them through the filling opening in the blender jug's lid while the blender is in operation.
• If the blender does not operate at the required speed switch off the appliance ('OFF') and:
a. press 'PULSE', or
b. stir the ingredients with a spatula, or
c. remove some of the ingredients in the blender jug.
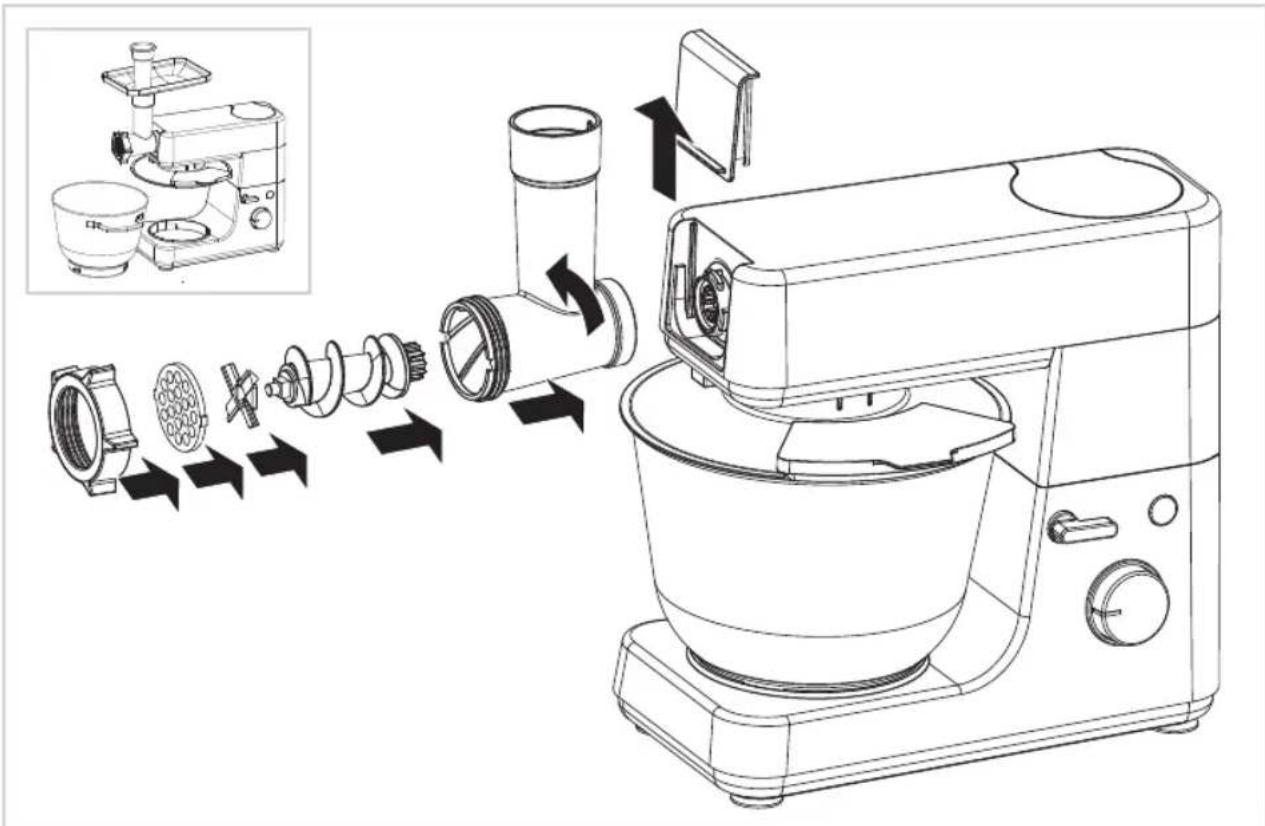
OPERATION - Using the grater/cutter

natural_image
Line drawing of a kitchen mixer with component assembly and directional arrows indicating motion (no text or symbols)The grater/cutter (18) has three drums: the fine grater (19), coarse grater (20) and slicer (21).
- Remove the cover (5) from the mixer head (6).
- Place the filling funnel (18) of the grater in a 45° angle onto the mixer head connection (7).
- Turn the filling funnel upwards until it clicks into place.
- Place the desired drum into round opening of the funnel.
- Place a bowl, plate or tray underneath the round opening of the filling funnel to catch the foods.
- Turn the speed switch (15) to the desired setting. The drum will begin to spin.
- Insert the foods through the filling and into the opening of the funnel and press it with the pusher (17). Do not push it harder than strictly necessary.
- Switch off the appliance by turning the speed switch onto the 'OFF' position.
- Remove the funnel by pressing the connection unlocker (8) forward en twisting the funnel clockwise in a 45° angle.
ATTENTION:
- Do not use the grater/cutter and kitchen machine simultaneously, this overloads the motor.
• The high speed grater and drums are not dishwasher suitable.
TIPS
- Use only the supplied pusher (17) to push food into the appliance.
- Do not use the appliance consecutively for more than 10 minutes. Wait a 20 minutes before switching on the appliance again.
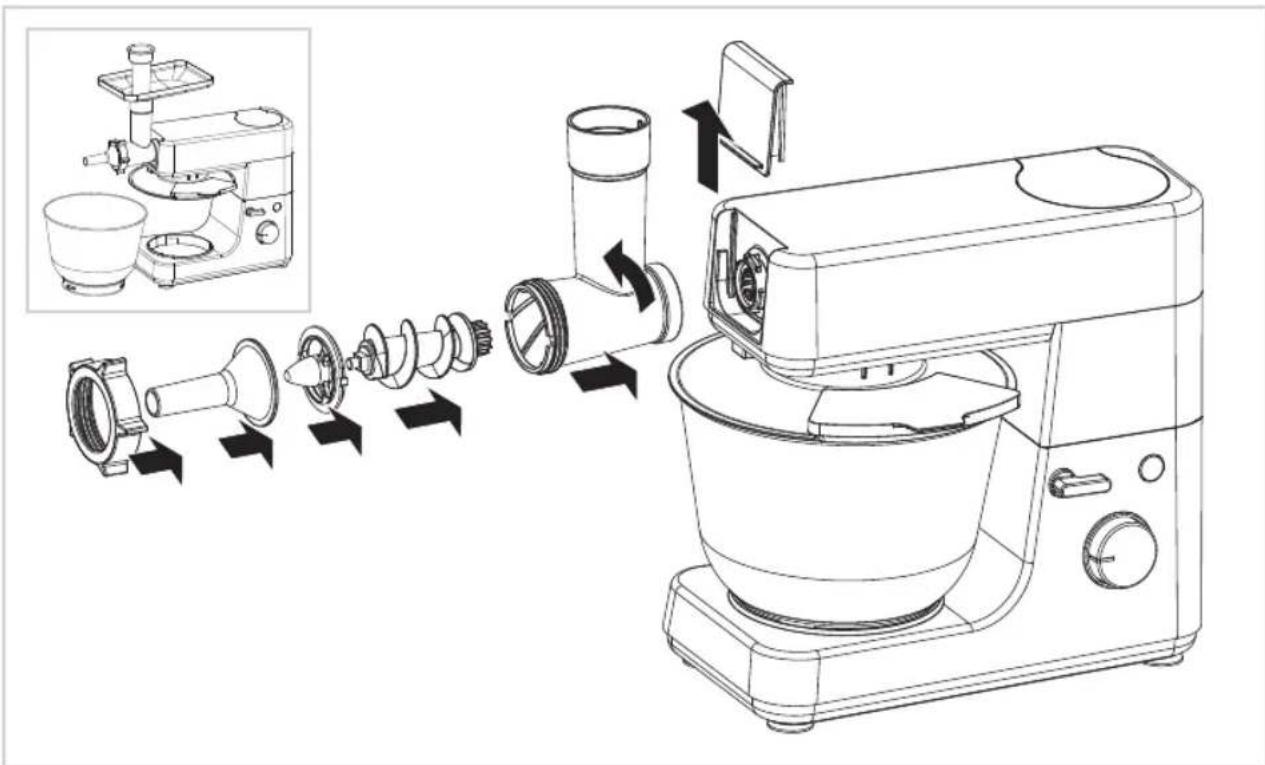
OPERATION - Using the grinder to grind meat
- Remove the cover (5) from the mixer head (6).
- Place the filling funnel (24) of the meat grinder in a 45° angle onto the mixer head connection (7).
- Turn the filling funnel upwards until it clicks into place.
- Select the desired grinding disc: fine (27), medium (28) or coarse (29).
- Assemble the parts of the meat grinder in the appropriate order and as illustrated above.
- Place a bowl, plate or tray underneath the filling funnel to catch the ground meat.
- Place the filling tray (23) onto the funnel.
- Turn the speed switch (15) to the desired setting. The grinding spiral (25) will begin to turn.
- Insert the meat through the filling and into the opening of the funnel and press it with the pusher (22). Do not push it harder than strictly necessary.
- Switch off the appliance by turning the speed switch onto the 'OFF' position.
- Remove the funnel by pressing the connection unlocker (8) forward en twisting the funnel clockwise in a 45^ angle.
ATTENTION:
- Do not use the grinder and kitchen machine simultaneously, this overloads the motor.
TIPS
- Use only the supplied pusher (22) to push food into the appliance.
• Cut all foods into pieces that fit into the opening. Meats without bones, tendons and fat are recommended. - Do not use the appliance consecutively for more than 10 minutes. Wait 20 minutes before switching on the appliance again.
OPERATION - Using the grinder to make sausage
- Remove the cover (5) from the mixer head (6).
- Place the filling funnel (24) of the meat grinder in a 45° angle onto the mixer head connection (7).
- Turn the filling funnel upwards until it clicks into place.
- Select the desired grinding disc: fine (27), medium (28) or coarse (29).
- Assemble the parts of the meat grinder in the appropriate order and as illustrated above.
- Place a bowl, plate or tray underneath the filling funnel to catch the sausage.
- Place the filling tray (23) onto the funnel.
- Place a sausage casing onto the sausage attachment in case you wish to use it.
- Turn the speed switch (15) to the desired setting. The grinding spiral (25) will begin to turn.
- Insert the meat through the filling and into the opening of the funnel and press it with the pusher (22). Do not push it harder than strictly necessary.
- Switch off the appliance by turning the speed switch onto the 'OFF' position.
- Remove the funnel by pressing the connection unlocker (8) forward en twisting the funnel clockwise in a 45^ angle.
ATTENTION:
- Do not use the grinder and kitchen machine simultaneously, this overloads the motor.
• The meat grinder and associated parts are not dishwasher-suitable.
TIPS
- Tie off the sausage casing (for instance, by using the clip for a sandwich bag) and twist a knot at the desired length.
- Use only the supplied pusher (22) to push food into the appliance.
• Cut all foods into pieces that fit into the opening. Meats without bones, tendons and fat are recommended. - Do not use the appliance consecutively for more than 10 minutes. Wait 20 minutes before switching on the appliance again.
CLEANING AND MAINTENANCE
- Remove the plug from the wall socket.
- Press the lift button with one hand, and lift the mixerhead with your other hand until the head locks in the raised position.
- Remove the accessory. The accessories may be washed only in lukewarm water. After washing, rinse the accessories to remove all soap residues, and dry them thoroughly.
- Remove the mixing bowl. The mixing bowl may be washed only in lukewarm water. After washing, rinse the mixing bowl to remove all soap residues, and dry thoroughly.
- Clean the housing of the appliance with a damp cloth. After cleaning, dry the housing thoroughly.
ATTENTION:
- Verify that the appliance is not connected to the power supply before you clean it.
- Never use corrosive or scouring cleaning agents or sharp objects (such as knives or hard brushes) to clean the appliance.
- Do not immerse the appliance in water, or in other liquids.
- Never clean the accessories using a dishwasher.
WARRANTY CONDITIONS
Bestron offers a 60-month warranty on this equipment against defects resulting from manufacturing and/or material errors, subject to the following conditions.
- No labour or material costs will be charged during this warranty period.
- Any repairs carried out under the warranty will not extend the warranty period
- Faulty parts, or in the event of exchange, the faulty equipment itself, will automatically become the property of Bestron.
- The warranty is valid for the first buyer only and is non-transferable.
- The warranty is not valid for damage caused by:
- Accidents
- Improper use
- Wear and tear
- Neglect
- Faulty installation
- Connection to a different mains voltage than indicated on the type plate
• Unauthorised changes
• Repairs carried out by unqualified third parties
- Use in violation with the applicable statutory, technical or safety standards
- Careless transport without suitable packaging or other protection
- Warranty cannot be claimed:
- For damage during transport
- If the serial number of the appliance is removed or changed
-
Items excluded from warranty are:
-
Cords
- Lamps
- Glass parts
- The warranty does not entitle the purchaser to compensation for any damage other than replacement or repair of the faulty parts. Bestron cannot in any event be held liable for any indirect or consequential losses caused by or in relation to the equipment it has provided.
- Claims under a warranty may only be submitted to your (online) retailer or directly to the Bestron Service Department. Never send items without being asked to. We may refuse the parcel and you will be liable for the costs. Contact us first and we tell you how the appliance should be packaged and sent. Each claim under a warranty must be accompanied by the relevant receipt.
SERVICE
If an unexpected problem occurs, please contact the BESTRON service department:
www.bestron.com/service
COMPLIMENTI!
natural_image
Line drawing of a kitchen mixer with a bowl and fan, showing mechanical components and directional arrows (no text or symbols)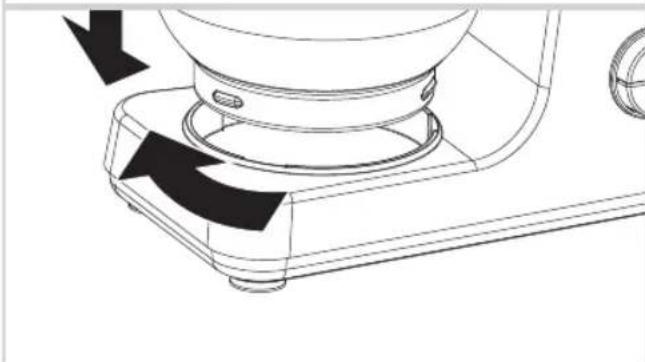
natural_image
Technical line drawing of a kitchen appliance with a lid and base, showing directional arrows indicating motion (no text or symbols)ATTENZIONE:
natural_image
Line drawings of kitchen appliances with arrows indicating rotation and component changes (no text or symbols)natural_image
Line drawing of a kitchen mixer with component assembly and directional arrows indicating motion (no text or symbols)R. Neyman
Control de calidad
natural_image
Line drawing of a kitchen mixer with rotating cup and side arm (no text or symbols)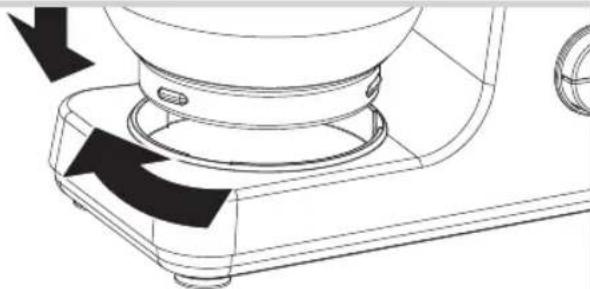
natural_image
Technical line drawing of a mechanical component with directional arrows indicating motion (no text or symbols)ATENCIÓN:
natural_image
Line drawings of kitchen appliances with arrows indicating rotation, showing a blender and fan assembly (no text or symbols)natural_image
Line drawing of a kitchen mixer with component assembly and directional arrows indicating motion (no text or symbols)NEED HELP? CHAT WITH US! WHATSAPP CUSTOMER SERVICE

BESTRON.COM/WHATSAPP

- AKM1600S INSTRUCTION MANUAL
- BETRIEB – Allgemein
- DÉCLARATION DE CONFORMITÉ CE
- FONCTIONNEMENT - Général
- WAT U MOET WETEN OVER DIT APPARAAT
- LET OP:
- Defects:
- Children:
- WHAT YOU SHOULD KNOW ABOUT ELECTRICAL APPLIANCES
- WHAT YOU SHOULD KNOW ABOUT THIS APPLIANCE
- ENVIRONMENT
- CE DECLARATION OF CONFORMITY
- OPERATION - General
- OPERATION - Before first use
- OPERATION - Use
- ATTENTION:
- TIPS - Mixing ingredients
- TIPS - Mixing batter for cakes, pie crusts, and biscuits
- TIPS - Mixing dough for bread, and other fermenting doughs
- TIPS - Beating whipped cream and egg white
- USE - Maximum quantities
- TIPS
- OPERATION - Using the grater/cutter
- OPERATION - Using the grinder to grind meat
- OPERATION - Using the grinder to make sausage
- CLEANING AND MAINTENANCE
- WARRANTY CONDITIONS
- SERVICE
- COMPLIMENTI!
- ATTENZIONE:
- ATENCIÓN:
Brand : BESTRON
Model : AKM1600S
Category : Food Processor