WD7101CKC - Washing machine SAMSUNG - Free user manual and instructions
Find the device manual for free WD7101CKC SAMSUNG in PDF.
| Features | Details |
|---|---|
| Product type | Washing machine |
| Washing capacity | 10 kg |
| Spin speed | 1400 rpm |
| Energy class | A+++ |
| Washing programs | Multiple programs including cotton, synthetic, delicate, quick |
| Additional features | Delayed start, foam control, overflow protection |
| Dimensions (W x D x H) | 600 x 600 x 850 mm |
| Control panel | LED screen with touch buttons |
| Weight | 70 kg |
| Maintenance | Filter cleaning, regular drum maintenance |
| Safety | Door lock system, leak protection |
| Warranty | 2 years |
Frequently Asked Questions - WD7101CKC SAMSUNG
User questions about WD7101CKC SAMSUNG
0 question about this device. Answer the ones you know or ask your own.
Ask a new question about this device
Download the instructions for your Washing machine in PDF format for free! Find your manual WD7101CKC - SAMSUNG and take your electronic device back in hand. On this page are published all the documents necessary for the use of your device. WD7101CKC by SAMSUNG.
USER MANUAL WD7101CKC SAMSUNG
Washing Machine user manual
CE
imagine the possibilities
Thank you for purchasing a Samsung product.
To receive a more complete service,
please register your product at
www.samsung.com/global/register
SAMSUNG
features
1. Air wash
Air wash can remove any bad smells from the laundry or reduce the need for dry cleaning.
Mite sterilization: Sterilizes any bacteria or mites in the bedding where the water-wash is not effective.
2. Silver nano (Ag + ) anti-bacteria, sterilization system
Samsung's silver Nano feature uses silver nano particles to sanitize and disinfect your laundry and your machine's drum. Delicates as well as smelly socks will get odor-free from human sweat at temperature as low as 30^ That saves energy and protects color and shape of your clothes.
The lifetime of the silver plates decrease with each use. They can be used for ten (10) years when used three times a week in the Standard course. The silver plates can be replaced by a service technician. Customers will pay a fee when they are replaced.
3. Washing to drying with one button
We can select the drying time manually. The machine features an auto sensor of the optimal dry state that enables you to perform the whole wash cycle including the drying cycle using one button.
4. Child Lock
The Child Lock function keeps curious little hands out of the washer. This safety feature ensures, that children do not toy with the operation of the washer. It also alerts you when it is activated.
5. Energy-Saving
The Economy cycle allows the large washing machine to act like a smaller version and uses less water, detergent and electricity when handling lighter loads.
6. Delay End
This function enables uses to delay the washing machine's starting time for up to 24 hours.
2_Features
safety information
Throughout this manual, you'll see Warning and Caution notes.
These warnings, cautions, and the important safety instructions that follow do not cover all possible conditions and situations that may occur.
It's your responsibility to use common sense, caution, and care when installing, maintaining, and operation your washer. Samsung is not liable for damages resulting from improper use.
IMPORTANT SAFETY SYMBOLS AND PRECAUTIONS
What the icons and signs in this user manual means:
| WARNING | Hazards or unsafe practices that may result in severe personal injury or death. |
| CAUTION | Hazards or unsafe practices that may result in minor personal injury or property damage. |
| CAUTION | To reduce the risk of fire, explosion, electric shock, or personal injury when using your washer, follow these basic safety precautions: |
BEFORE USING THE APPLIANCE

Packing materials can be dangerous to children; keep all packing material (plastic bags, polystyrene, etc.) well out of the reach of children.
The appliance is designed for home use only.
Make sure that water and electrical connections are made by qualified technicians, observing the manufacturer's instructions (see "Installing the Washing Machine") and local safety regulations.
All packaging and shipping bolts must be removed before the appliance is used. Serious damage may occur if they are not removed. See "Removing the shipping bolts".
Before washing clothes for the first time, you must run a complete cycle without clothes. See "Washing for the first time".
SAFETY INSTRUCTIONS

Before cleaning or carrying out maintenance, unplug the appliance from the electrical outlet to the fan, or set the Power button to Off.
Make sure that the pockets of all clothing to be washed are empty.
Hard, sharp objects, such as coins, safety pins, nails, screws, or stones can cause extensive damage to the appliance.
Always unplug the appliance and turn off the water after use.
Before you open the door of the appliance, check that the water has drained. Do not open the door if you can still see water.
Pets and small children may climb into the appliance. Check the appliance before each use.
Safety information
safety information
The glass door becomes very hot during the washing cycle. Keep children away from the appliance while it is in use.
Do not attempt to repair the appliance yourself. Repairs made by inexperienced or unqualified persons may cause injury and/or make more serious repairs to the appliance necessary.
If the plug (power supply cord) is damaged, it must be replaced by the manufacturer or its service agent or a similar qualified person in order to avoid a hazard.
This appliance should only be serviced by an authorized service center, and only genuine spare parts should be used.
This appliance is not intended for use by young children or infirm persons unless they have been adequately supervised by a responsible person to ensure that they can use the appliance safely. Young children should be supervised to ensure that they do not play with the appliance.
If this appliance is supplied from a cord extension set or an electrical portable outlet device, the cord extension set or electrical portable outlet device must be positioned so that it is not subject to splashing or ingress of moisture. Additionally, the cord extension set or electrical portable out let device must be of a current rating suitable for the appliance.
This appliance has to be connected to the plug endurable to proper power consumption.
This appliance has to be positioned so that the plug is accessible after installation.
Do not use processed water containing oil, cream or lotion, which is usually found in skin-care shops or massage clinics.
- Otherwise this will cause the packing to be deformed, which causes a malfunction or water leak.
A stainless washing tube does not usually rust. However if some metal such as a hair pin is left in the tube for an extended time, the tube could rust. - Do not leave water or bleach containing chlorine in the tube for an extended period of time.
- Do not regularly use or leave water containing iron in the tube for an extended period of time.
- If rust starts appearing on the surface of the tube, apply a cleansing agent (neutral) to the surface and use a sponge or soft cloth to clean it. (Under no circumstances use a metal brush)
For washing machines with ventilation openings in the base, that a carpet must not obstruct the openings.
Use the new hose-sets and old hose-sets should not be reused.
The dryer is not to be used if chemicals have been used for cleaning.

This marking shown on the product or its literature, indicates that it should not be disposed with other household wastes at the end of its working life. To prevent possible harm to the environment or human health from uncontrolled waste disposal, please separate this from other types of wastes and recycle it responsibly to promote the sustainable reuse of material resources.
Household users should contact either the retailer where they purchased this product, or their local government office, for details of where and how they can take this item for environmentally safe recycling. Business users should contact their supplier and check the terms and conditions of the purchase contract. This product should not be mixed with other commercial wastes for disposal.
4_Safety information
contents
INSTALLING THE WASHING MACHINE

WASHING A LOAD OF LAUNDRY

MAINTAINING THE WASHING MACHINE

TROUBLESHOOTING

PROGRAMME CHART

APPENDIX

6 Unpacking the Washing Machine
6 Overview of the washing machine
6 Selecting a location
7 Adjusting the leveling feet
7 Removing the shipping bolts
8 Connecting the water supply hose
9 Connecting the water supply hose (Option)
10 Positioning the drain hose
11 Washing for the first time
11 Putting detergent in the washing machine
12 Overview of the control panel
13 For the Silver Wash washing
14 Childlock (button lock function)
14 Washing clothes manually
15 Washing clothes using Fuzzy Logic
16 Using Dry course
16 Using Delay End
17 To Add Laundry
17 Using Clean Tub
18 Performing Air Wash
19 Washing tips and hints
20 Draining the washing machine in an emergency
20 Repairing a frozen washing machine
20 Cleaning the exterior
21 Cleaning the detergent drawer and recess
21 Cleaning the debris filter
22 Cleaning the water hose mesh filter
23 Problems and solutions
24 Understanding error messages
25 Programme chart
26 Fabric care chart
26 Electrical warnings
26 Protecting the environment
27 Declaration of conformity
27 Specification
Contents_5

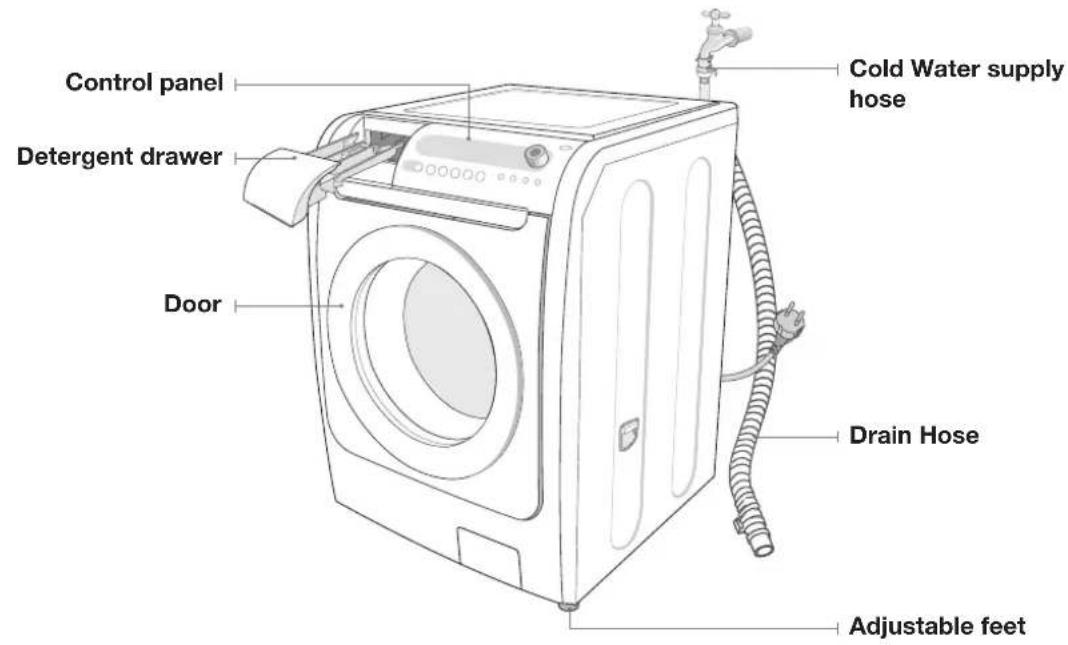
installing the washing machine
UNPACKING THE WASHING MACHINE
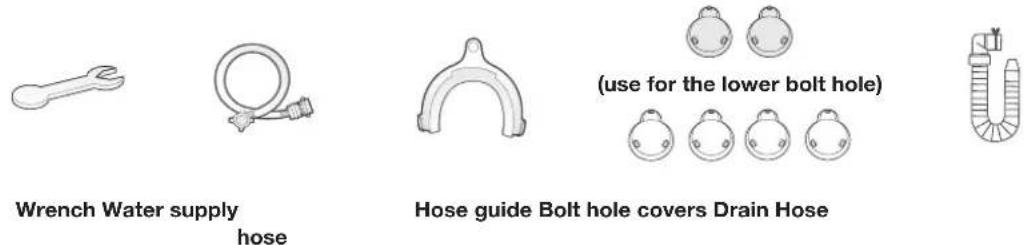
Unpack your washing machine and inspect it for shipping damage. Also make sure that you have received all of the items shown below. If the washing machine was damaged during shipping or you do not have all of the items, contact your Samsung dealer immediately.
OVERVIEW OF THE WASHING MACHINE
SELECTING A LOCATION
Before you install the washing machine, select a location with the following characteristics:
- A hard, level surface (if the surface is uneven, see "Adjusting the leveling feet," below)
- Away from direct sunlight.
- Adequate ventilation
- Room temperature that will not fall below 0^
- Away from sources of heat such as coal or gas
Make sure that the washing machine does not stand on its power cord.
Ventilation openings must not be obstructed by carpeting when the washing machine is installed on a carpeted floor.
6_Installing the washing machine
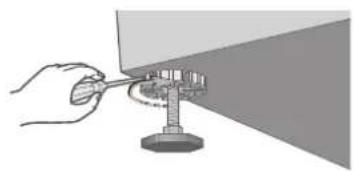
If the floor is uneven, adjust the feet (do not insert pieces of wood or any other objects under the feet):
- Loosen the leg bolt by turning it with your hand until it is at the desired height.
- Tighten the locking nut by turning it with a (-) screwdriver. If the washer is placed on an uneven or weak surface, noise or vibration occurs.
(Only a 1 degrees angle is allowed.)

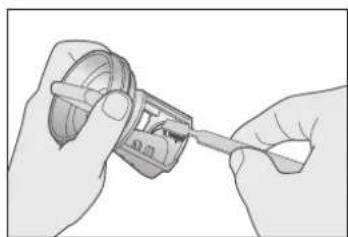
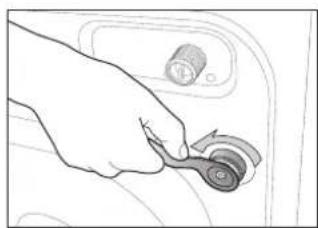
REMOVING THE SHIPPING BOLTS
Before installing the washing machine, you must remove the five shipping bolts from the back of the unit.
- Loosen all the bolts with the supplied wrench.

- Hold the bolt with the spanner and pull it through the wide section of the hole. Repeat for each bolt.
- Fill the holes with the supplied plastic covers.
- Store the shipping bolts away safely in case you have to move the washing machine in the future.

Packaging materials can be dangerous to children; keep all packaging material (plastic bags, polystyrene, etc.) well out of the reach of children.
installing the washing machine
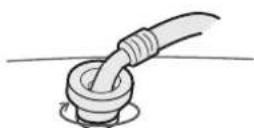
CONNECTING THE WATER SUPPLY HOSE
The water supply hose must be connected to the washing machine at one end and to the water faucet at the other. Do not stretch the water supply hose. If the hose is too short replace the hose with a longer, high pressure hose.
To connect the water supply hose:
-
Take the L-shaped arm fitting for the cold water supply hose and connect to the cold water supply intake on the back of the machine. Tighten by hand.
-
Connect the other end of the cold water supply hose to your sink's cold water faucet and tighten it by hand. If necessary, you can reposition the water supply hose at the washing machine end by loosening the fitting, rotating the hose, and retightening the fitting.
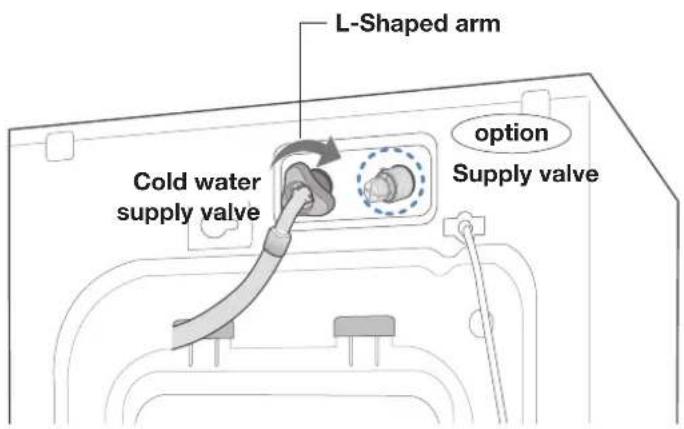
Option :
- Take the red L-shaped arm fitting for the hot water supply hose and connect to the red hot water supply intake on the back of the machine. Tighten by hand.
- Connect the other end of the hot water supply hose to your sink's hot water faucet and tighten it by hand.
8_Installing the washing machine
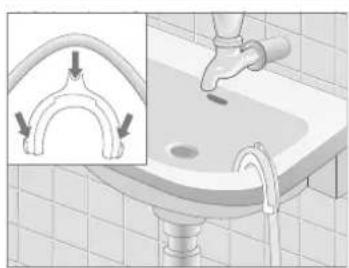
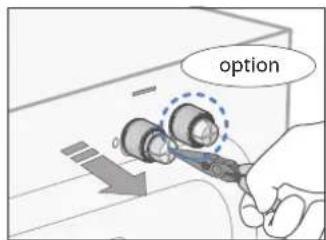
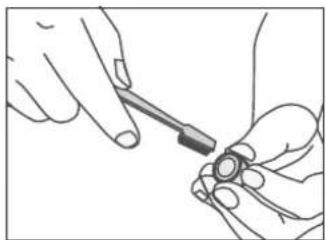
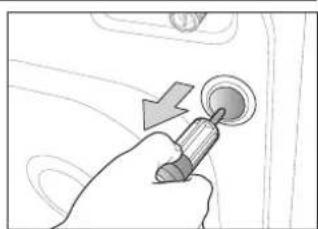
CONNECTING THE WATER SUPPLY HOSE (OPTION)
- Remove the adaptor from the water supply hose.
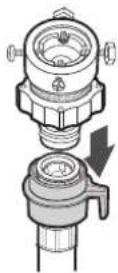
- First, using a +^ type screw driver, loosen the four screws on the adaptor. Next, take the adaptor and turn part(b) following the arrow until there is a 5mm gap.

- Connect adaptor to the water tap by tightening the screws firmly. Then, turn part (b) following the arrow and put(a) and (b) together.
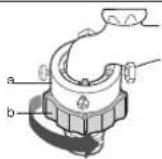
- Connect the water supply hose to the adaptor. Pull down part (c) of the water supply hose. When you release part (c) the hose automatically connects to the adaptor making a 'click' sound.
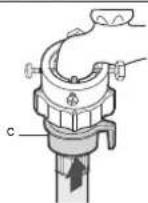
- Connect the other end of the water supply hose to the inlet water valve at the top of the washer. Screw the hose clockwise all the way in.
- If the water tap has a screw type faucet, connect the water supply hose to the tap as shown.

- After completing connection, if water leaks from the hose, then repeat the same steps. Use the most conventional type of faucet for water supply. In case the faucet is square or too big, remove the spacing ring before inserting the faucet into the adaptor.
- The appliance is to be connected to the water mains using new hose-sets and that old hose-sets should not be used.
installing the washing machine
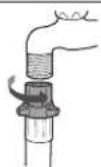
POSITIONING THE DRAIN HOSE
The end of the drain hose may be positioned in three ways:
Over the edge of a wash basin
The drain hose must be placed at a height of between 60 and 90~cm . To keep the drain hose spout bent, use the supplied plastic hose guide. Secure the guide to the wall with a hook or to the faucet with a piece of string to prevent the drain hose from moving.
In a sink drain pipe branch
The drain pipe branch must be above the sink siphon so that the end of the hose is at least 60~cm above the ground.
In a drain pipe
Samsung recommends that you use a 65 cm high vertical pipe; it must be no longer than 90 cm.

10_Installing the washing machine
washing a load of laundry
WASHING FOR THE FIRST TIME
Before washing clothes for the first time, you must run a complete cycle without clothes.
To do this:
- Press the Power button.
- Pour a little detergent into compartment (the detergent drawer.
- Turn on the water supply to the washing machine.
- Press the Start/Pause button.
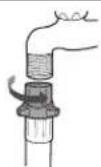
- This will remove any water from the manufacturer's test run remaining in the machine.
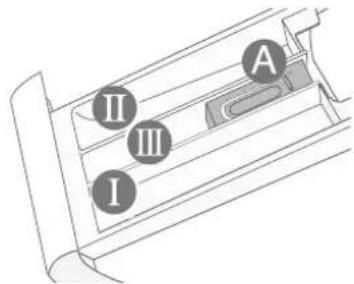
Dispenser ① Detergent for prewash or starch.
Dispenser Detergent for main wash, water softener, pre-soaking agent, bleach and stain removal product.
Dispenser: Additives, e.g. fabric softener or former (fill no higher than lower edge of insert "A")
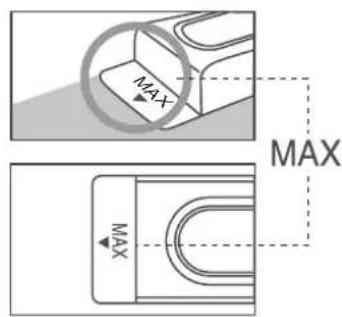
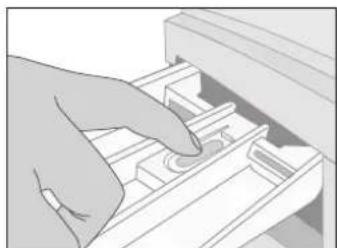
PUTTING DETERGENT IN THE WASHING MACHINE
- Pull out the detergent drawer.
- Add laundry detergent into compartment (M)
- Add softener into compartment (If you desire).
- Add prewash detergent into compartment (If you desire).

Concentrated or thick fabric softener and conditioner must be diluted with a little water before being poured into the dispenser (prevents the overflow from becoming blocked.)
washing a load of laundry
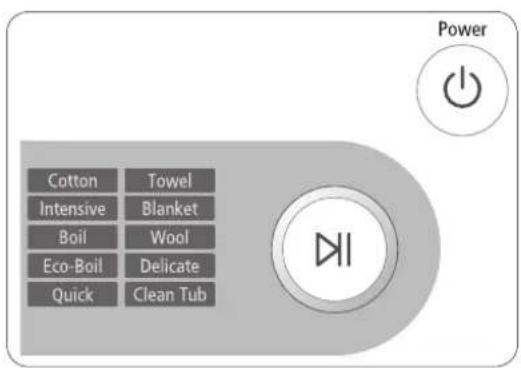
OVERVIEW OF THE CONTROL PANEL

| 1 Display panel | Displays the remaining wash cycle time, all of washing information and error messages. |
| 2 Air Wash button | Use to remove bad smells. Selected in the sequence: Suit/Jumper → Knit → Coat → Bedding → Cancel |
| 3 Wash selection button | Use this to only perform washing or prewash. Selected in the sequence: Main Wash → Prewash + Main Wash → Main Wash. The washing time cannot be adjusted (for the Cotton course). Prewash can only be selected for Cotton, Intensive, Boil, Eco-Boil, Blanket and Towel. |
| 4 Temperature selection button | Selected in the sequence. : 30°C → 40°C → 60°C → 95°C The water temperature varies depending on the course. ※ Do not allow only hot water to be supplied. |
| 5 Rinse selection button | Select this to add a rinse cycle or only perform the rinse cycle. You can select this up to 5 times. |
| 6 Spin selection button | You can select the spin speed, if necessary. If only the spin cycle is selected and Start/Pause is pressed in the middle of the spin cycle, the machine starts spinning from the beginning. ※ The spin speed can vary, depending on the course. ※ No Spin means no spinning is performed after the drain. |
| 7 Dry selection button | Selected in the sequence: Cupboard → Extra → Iron → Light → Time (30min → 1:00min → 1:30min → 2:00min → 2:30min) → Cupboard. |
| 8 Silver Wash button | Silver water is supplied in the wash cycle as well as the last rinse, featuring sterilization and antibacterial coating. |
| 9 Stop&Add selection button | Select this to add the laundry amid the process. |
| 10 Delay End selection button | Press the button repeatedly to cycle through the available delayed end options (up to 24 hours maximum in one hour increments). Displayed hours means the time of finished washing-cycle. |
12_Washing a load of laundry
| 11 Energy Saving | The temperature will be reduced by 10 degrees more than initially specified. The reduced temperature does not deteriorate the washing performance greatly, and saves 25% electricity. This feature is available for at least 40°C. |
| 12 Fuzzy Control dial | Turn the dial to select one of the 10 available wash programs. |
| 13 Start/Pause selection button | Press to pause and restart programs. |
| 14 Power selection button | Press once to turn the washing machine on, press again to turn the washing machine off. If the washing machine power is left on for longer than 10 minutes without any buttons being touched, the power automatically turns off. |
FOR THE SILVER WASH WASHING
The Ag + water is added during the washing, and then a sanitary, sterilizing washing will be performed. During the rinse, the Ag + water is added at the last time of rinse. It treats clothes with silver antibiotic coating and functions to protect the propagation of bacteria.
- Open the door, put in the clothes and close the door again.
- Press Power button.
- Select a course by turning the course selection dial.
- Press Silver Wash button.
- Put suitable amount of detergent and fiber softener in the detergent tray, and close it again. : Put a suitable amount of detergent in the detergent tray for main washing, and put in fiber softener to the lower level than the marked line. For Prewash, put a supplementary detergent in the detergent tray.
Silver Wash: If it is used together with fibre softener, its effect may be decreased.
- Press Start/Pause button.
: It automatically performs an optimal washing with sensing the weight of clothes.
washing a load of laundry
CHILDLOCK (BUTTON LOCK FUNCTION)
Is a function for children not to handle the washing machine.
Setting/Release
If you want to set up or release that function, press both Temperature and Rinse buttons at the same time in 3sec.
How to Set up:
- It can be set up during the power-on or operation of the washing machine.
- If you set up the "CHILDLOCK" function during the laundry operation, no button except for Power button can be controlled until you release that function.
-
The CHILDLOCK lamp will be lighted.
-
In case the power is on again, the "CHILDLOCK" function remains unchanged.
-
In case of releasing that function, follow the way of release mentioned above.
- When the other buttons, except for the Power button, are not controlled after you turn on the Power, check CHILDLOCK LAMP, please.
WASHING CLOTHES MANUALLY
You can wash clothes manually without using the Fuzzy Logic feature.
To do so:
- Turn the water supply on.
- Press the Power button on the washing machine.
- Open the door.
- Load the articles one at a time loosely into the drum, without overfilling.
- Close the door.
- Put the detergent and, if necessary, softener or prewash detergent, in the appropriate compartments.
- Press the Temperature button to select the temperature. [Cold, 30^ , 40^ , 60^ , 95^ ]
- Press to Rinse button to select the required number of rinse cycles. Maximum number of rinse cycles is five. The washing duration will be prolonged accordingly.
- Press the Spin button to select the spin speed.
- Press the Delay End button repeatedly to cycle through the available delayed end options (up to 24 hours maximum in one hour increments.). Displayed hours means the time of finished washingcycle.
- Press the Start/Pause button and the machine will begin the cycle.
14_Washing a load of laundry
WASHING CLOTHES USING FUZZY LOGIC
Your new washing machine makes washing clothes easy, using Samsung's "Fuzzy Logic" automatic control system. When you select a wash program, the machine will set the correct temperature, washing time, and washing speed.
To wash clothes using the Fuzzy Logic programs:
- Turn on your sink's water faucet.
- Press the Power button.
- Open the door.
- Load the articles one at a time loosely into the drum, without overfilling.
- Close the door.
- Add the detergent, softener, and prewash detergent (if necessary) into the appropriate compartment.

Prewash is only available when washing Towel, Cotton, Boil, Eco-Boil, Intensive, Blanket. It is only necessary if your clothing is heavily soiled.
- Turn the Fuzzy Control dial to select the appropriate program for the type of clothes Cotton, Intensive, Boil, Eco-Boil, Quick, Towel, Blanket, Wool, Delicate, Clean Tub. You will see the indicators light up on the control panel.
- At this time, you can control the wash temperature, rinsing times, spin speed, delay time, silver wash and dry button by pressing the appropriate option button. (delay time, silver wash and dry button can be selected optionally by user.)
- Press the Start/Pause button on the Fuzzy Control dial and the wash cycle will begin. The process indicator will light up and the remaining time for the cycle will appear in the display.
Pause Option
Until water supply is completed after starting operation, it is possible to put in the laundry or take out.
If push Start/Pause button, the door is unlocked immediately.
In case of too hot or too much water in washer, the door can not be opened.
After closed the door, one more push Start/Pause button to make washing process going on continuously.
When the cycle is finished:
After the total cycle has finished, the power will turn off automatically.

- Open the door.
The door will not open until the machine stops or the power turns off. - Remove laundry.
washing a load of laundry
USING DRY COURSE
Refer to the label of drying capacity and be sure to put in the clothes to the lower level than the marked line for the dried clothe of 5.0kg.
- Open the door, put in the clothes and close the door again.
- Press the Power button and then press the Dry button. : The standard course will be selected automatically. Drying is availably selected only at the courses such as Towel, Cotton, Boil, Eco-Boil, Intensive and Quick.
- Select Dry button as follows. : Every press of this button will select drying type repeatedly in the following order: Cupboard Extra Iron Light Time[30 min 1:00 min 1:30 min 2:00 min 2:30 min] Cupboard
- It automatically displays Drying Time by sensing the weight of clothes before drying for increasing the drying effect.
- Put suitable amount of detergent and fiber softener in the detergent tray and close it again.
- Press Start/Pause button. : It automatically performs an optimal function from washing to drying.
The selected course can't be altered after the start of drying. - If you select Drying function, the intensity of SPIN will be set up as High in default for increasing the drying effect.
- If cold water is not supplied, drying will not be performed.
- If you do not take out clothes from the tub after the end of drying, a function of wrinkle protection will be performed for about 30 minutes with the display of [End]. In order to take out the clothes: press firstly Start/Pause or Power button and take them out.
- In case you wish to dry after hand washing, select both Spin and Dry at the same time.
USING DELAY END
You can set the washing machine to finish your wash automatically at a later time, choosing up to 24 hours maximum (in one hour increments). Displayed hours means the time of finished washing-cycle.
To do this:
- Manually or automatically set your washing machine for the type of clothes you are washing.
- Press the Delay End button repeatedly until the delay time is set.
- Press the Start/Pause button. The Delay End indicator will light, and the clock will begin counting down until it reaches your finish time.
- To cancel "Delay End", press the Power button, then turn the washing machine on again.
16_Washing a load of laundry
TO ADD LAUNDRY
- Press the Stop&Add button.
- The washing machine will automatically pause to operate.
- Wait about 30 seconds and check the Stop&Add button for the lamp state.
- Blinking: the machine drains water down to the safety level so it can get an additional quantity of laundry (displayed in pause mode)
- Off: adding the laundry is possible.

The washing machine detects the internal quantity of laundry about 30 seconds before deciding whether it could get more laundry.
3.Add the laundry.
4. Press the Start/Pause Button.
- Avoid adding the laundry when the machine has foamed up or is filled with water. Otherwise, the foam or water may leak out of the door. So check it first before opening the door.
USING CLEAN TUB
Is a course for washing the tub.
- Press Power button.
- Select the Clean Tub Course by turning the dial of Course Select.
- Put an adequate amount of bleaching agent in the detergent tray (or Main Laundry. (See "Washing for the first time".)
: You'd better use a powder-type detergent for more efficient washing.
If you want to wash it lightly: You may wash it just by selecting the 40^ -Water without bleaching agent.
- Press Start/Pause button.

About one time a month is enough for the tub-washing.
washing a load of laundry
PERFORMING AIR WASH
Air-wash can remove any bad smells from the laundry owing to its powerful airing system. Clothing that can be deodorized includes woolen coats, cotton or down jumpers, sweaters and suits. (Two suits or less)
- Open the door, place the laundry inside and close the door.
- Press the Power button.
- Press the Air Wash button.
Each time the button is pressed, the operating mode cycles through the following
sequence:
Suit/Jumper Knit Coat Bedding Cancel.
-
When one of these is selected, no other button can be selected or run and you can only select the delay end function from between 1:00 - 24:00.
-
Close the door and press the Start/Pause Button.

- If you do not remove the laundry immediately after the Air Wash is performed, the machine performs an additional wrinkle protection process for 30 minutes.
- Press the Start/Pause or Power button to remove the laundry.
- The 'insecticide' process can kill bacteria living in 'unwashable' materials such as blankets, pillows, cushions and needlework dolls.

-
Avoid Air Washing the following clothes
-
Sensitive clothes made of leather, mink, fur, silk, etc.
- Underwear trimmed with lace, 'glued' doll cushions, and dress suits can loosen their decorations.
- Clothes trimmed with buttons can cause them to break.
-
Starchy clothes can become deformed.
-
Avoid using the following clothes for the insecticide process
1) Hard bedding such as a wooden pillow (neck-rest)
- Pillows or blankets filled with plastic or starch rather than cotton.
- Electric blankets
2) Furry blankets
3) Bulky blankets
18_Washing a load of laundry
WASHING TIPS AND HINTS
Sorting your laundry: Sort your laundry according to the following characteristics:
- Type of fabric care label symbol: Sort laundry into cottons, mixed fibers, synthetics, silks, wools and rayon.
Colour: Divide whites and colours. Wash new, coloured items separately. - Size: Placing items of different sizes in the same load will improve the washing action.
- Sensitivity: Wash delicate items separately, using the Wool wash program for pure new wool, curtains and silk articles. Check the labels on the items you are washing or refer to the fabric care chart in the appendix.
Emptying pockets: Coins, safety pins and similar items can damage linen, the washing machine drum, and the water tank.
Securing fasteners: Close zippers and fasten buttons or hooks; loose belts or ribbons should be tied together.
Prewashing cotton: Your new washing machine, combined with modern detergents, will give perfect washing results, thus saving energy, time, water and detergent. However, if your cotton is particularly dirty, use a prewash with a protein-based detergent.
Determining load capacity: Do not overload the washing machine or your laundry may not wash properly. Use the chart below to determine the load capacity for the type of laundry you are washing.
| Fabric Type Load Capacity | |
| Cotton / Intensive | 10 kg |
| Boil / Eco-Boil | 7 kg |
| Towel / Quick / Blanket | 1sheet [Within 3kg] |
| Wool | 3 kg |
| Dry | 5 kg |
Detergent tips: The type of detergent you should use is based on the type of fabric (otton, synthetic, delicate items, wool) colour, wash temperature, degree and type of soiling.
Always use "low suds" laundry soap, which is designed for automatic washing machines.
Follow the detergent manufacturer's recommendations based upon the weight of the laundry, the degree of soiling, and the hardness of the water in your area. If you do not know how hard your water is, ask your water authority.

Keep detergents and additives in a safe, dry place out of the reach of children.
maintaining the washing machine
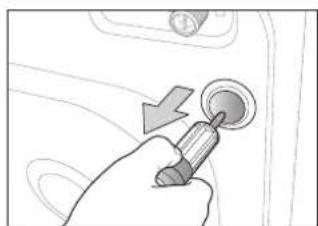
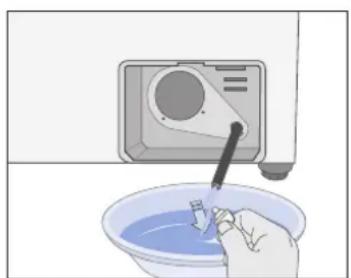
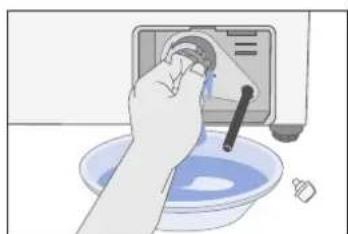
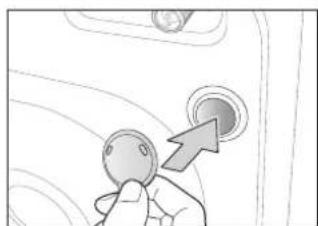
DRAINING THE WASHING MACHINE IN AN EMERGENCY
- Unplug the washing machine from the power supply.
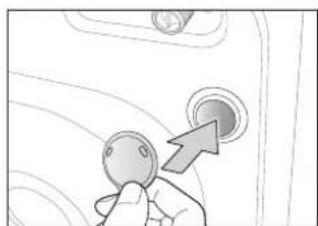
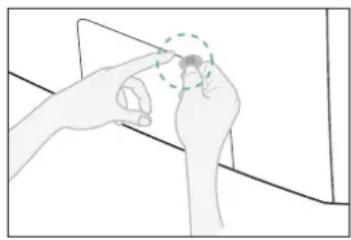
- Open the filter-cover by using a coin or a key.
- Unscrew the emergency drain cap by turning left. Grip the cap on the end of the emergency drain tube and slowly pull it out about 15cm
- Allow all the water to flow into a bowl.
- Reinsert the drain tube and screw the cap back on.
- Replace the filter-cover.
REPAIRING A FROZEN WASHING MACHINE
If the temperature drops below freezing and your washing machine is frozen:
- Unplug the washing machine.
- Pour warm water on the source faucet to loosen the water supply hose.
- Remove the water supply hose and soak it in warm water.
- Pour warm water into the washing machine drum and let it sit for 10 minutes.
- Reconnect the water supply hose to the water faucet and check if the water supply and drain operations are normal.
CLEANING THE EXTERIOR
- Wipe the washing machine surfaces, including the control panel, with a soft cloth and nonabrasive household detergents.
- Use a soft cloth to dry the surfaces.
- Do not pour water on the washing machine.
20_Maintaining the washing machine
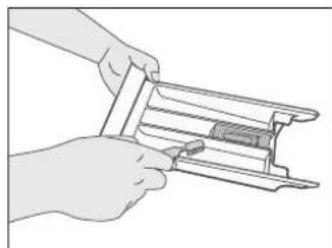
CLEANING THE DETERGENT DRAWER AND RECESS
- Press the release button inside the detergent drawer and pull it out.
- Clean the drawer recess and wipe off hardened detergent, fiber softener and water inside.
- Remove any detergent residue inside.
- Push the drawer back into place.

- Do not use the water hose to spray water inside, as this may cause electric shock or fire.
- Remove any coins or buttons, as these may obstruct the drain hose.
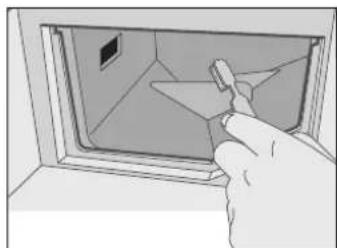
CLEANING THE DEBRIS FILTER
Clean the debris filter 5 or 6 times a year, or when you see the following error message on the display:


- Open the filter-cover, see "Draining the washing machine in an emergency".
- Unscrew emergency drain cap by turning left and drain off all the water. See "Draining the washing machine in an emergency".
- Unscrew the filter cap and take it out.
- Wash any dirt or other material from the filter. Make sure the drain pump propeller behind the filter is not blocked. Replace the filter cap.
- Replace the filter-cover.
maintaining the washingmachine
CLEANING THE WATER HOSE MESH FILTER
You should clean the water hose mesh filter at least one time per year, or when you see the following error message on the display:

To do this:
- Turn off the water source to the washing machine.
- Unscrew the hose from the back of the washing machine.
- With a pair of pliers, gently pull out the mesh filter from the end of the hose and rinse it under water until clean. Also clean the inside and outside of the threaded connector.
- Push the filter back into place.
- Screw the hose back onto the washing machine.
- Turn on the faucet and make sure the connections are watertight.

22_Maintaining the washing machine
troubleshooting
PROBLEMS AND SOLUTIONS
| PROBLEM SOLUTION | |
| The washing machine will not start | ·Make sure the door is firmly closed. ·Make sure the washing machine is plugged in. ·Make sure the water source faucet is turned on. ·Make sure to press the Start/Pause button. |
| No water or insufficient water supply | ·Make sure the water source faucet is turned on. ·Make sure the water source hose is not frozen. ·Make sure the water intake hose is not bent. ·Make sure the filter on the water intake hose is not clogged. |
| Detergent remains in the detergent drawer after the wash program is complete | ·Make sure the washing machine is running with sufficient water pressure. ·Put the detergents in the inner parts of the detergent drawer(away from the outside edges). |
| Washing machine vibrates or is too noisy | ·Make sure the washing machine is set on a level surface. If the surface is not level, adjust the washing machine feet to level the appliance. ·Make sure that the shipping bolts are removed. ·Make sure the washing machine is not touching any other object. ·Make sure the laundry load is balanced. |
| The washing machine does not drain and/or spin | ·Make sure the drain hose is not squashed or bent. ·Make sure the water hose mesh filter is not clogged. |
troubleshooting
UNDERSTANDING ERROR MESSAGES
| ERROR CODE SOLUTION | |
| dE | • Close the door. |
| 4E | • Make sure the source water faucet is turned on. • Check the water pressure. |
| 5E | • Check if the water in the drain hose is frozen. • Press the Start/Pause button to resume operating. |
| UE | • Laundry load is unbalanced; loosen any tangled laundry. If only one item of clothing needs washing, such as a bathrobe or jeans, the final spin result might be unsatisfactory and an “UE” error message will be shown in the display window. |
| Hot | • It appears when the internal temperature of the drum is high. The fan will automatically function, so just wait until “Hot” indication disappeared. |
| cE | • This is when the internal temperature does not go down below a certain degree in washing or dehydrating. Press the Start/Pause button to try again. |
| 3E | • Call after-sales service. |
Before contacting After-Sales service:
- Try to remedy the problem (See "Troubleshooting" on this page).
- Restart the programme to see if the fault is repeated.
- If the malfunction persists, call after-sales service and describe the problem.
24 Troubleshooting
programme chart
PROGRAMME CHART
( user option)
| Program | Max load (kg) | Detergent and additives | Temperature (MAX) °C | Spin rpm (max) | Delay end | Water (l) | Electricity (kWh) | |||
| Pre-wash | Wash | Softener | Default Max | |||||||
| Cotton | 10 | ● | yes | ● | 60 60 | 1100(1100) | ● | 95 1.90 | ||
| Intensive | 10 | ● | yes | ● | 40 60 | 800(1100) | ● | 100 0.85 | ||
| Boil | 7 | ● | yes | ● | 95 95 | 800(1100) | ● | 110 2.75 | ||
| Eco-Boil | 7 | ● | yes | ● | 95 95 | 800(1100) | ● | 100 1.76 | ||
| Quick | 5 yes | ● | 40 40 | 800(1100) | ● | 60 0.67 | ||||
| Towel | 5 | ● | yes | ● | 40 95 | 800(800) | ● | 120 0.86 | ||
| Blanket | 1sheet (Within 3kg) | ● | yes | ● | Cold 40 | 800(800) | ● | 100 0.15 | ||
| Wool | 3 yes | ● | 40 40 | 800(600) | ● | 70 0.70 | ||||
| Delicate | 3 yes | ● | Cold 40 | 800(600) | ● | 68 0.34 | ||||
| Clean Tub | yes 40 | 40 600(600) | 55 0.90 | |||||||
| Program Type of wash | |
| Cotton | Average or lightly soiled cottons, bed linen, table linen, underwear, towels, shirts, etc. |
| Intensive | This course is appropriate to wash underwear we change everyday, strong dirt removal and sterilization is performed simultaneously. |
| Boil | This course is appropriate to wash underwear we change everyday, strong dirt removal and sterilization is performed simultaneously. |
| Eco-Boil | Delicate curtains, dresses, skirts, shirts and blouses. |
| Quick | Lightly soiled cottons or linen blouses, shirts, dark coloured terry cloth, coloured linen articles, jeans, etc. |
| Towel | This course is appropriate to wash towels effectively. |
| Blanket | Cotton bedding, bed linen, bed sheet, duvet cover, pillow cover etc. |
| Wool | Only wash machine washable woolens with pure new wool label. |
| Delicate | For sensitive laundry that is easily damaged. |
| Clean Tub | Use this function to maintain wash tub clean and sanitary. |
- Programme with prewash lasts approx. 15 minutes longer.
- The programme duration data has been measured under the conditions specified in Standard IEC 60456/EN 60456.
- Consumption in individual homes may differ from the values given in the table due to variations in the pressure and temperature of the water supply, the load and the type of laundry.
Programme chart
appendix
FABRIC CARE CHART
| Resistant material Can be ironed at 100℃ max | ||
| Delicate fabric Do not iron | ||
| 95 95 | Item may be washed at 95℃ Can be dry cleaned using any solvent | |
| 60 60 | Item may be washed at 60℃ | P |
| 40 40 | Item may be washed at 40℃ | F |
| 30 30 | Item may be washed at 30℃ Do not dry clean | |
| Item may be hand washed Dry flat | - | |
| Dry clean only Can be hung to dry | III | |
| Can be bleached in cold water Dry on clothes hanger | ||
| Do not bleach Tumble dry, normal heat | ||
| Can be ironed at 200℃ max Tumble dry, reduced heat | ||
| Can be ironed at 150℃ max Do not tumble dry |
ELECTRICALWARNINGS
To reduce the risk of fire, electrical shock, and other injuries, keep these safety precautions in mind:
- Operate the appliance only from the type of power source indicated on the marking label. If you are not sure of the type of power supplied to your home, consult your appliance dealer or local power company.
- Use only a grounded or polarized outlet. For your safety, this appliance is equipped with a polarized alternating current line plug having one blade wider than the other. This plug will fit into the power outlet only one way. If you are unable to insert the plug fully into the outlet, try reversing the plug. If the plug still doesn't fit, contact your electrician to replace your outlet.
- Protect the power cord. Power supply cords should be routed so that they are unlikely to be walked on or pinched by items placed on or against them. Pay particular attention to cords at plugs, convenience receptacles, and the point where they exit from the unit.
- Do not overload the wall outlet or extension cords. Overloading can result in fire or electric shock.
PROTECTING THE ENVIRONMENT
- This appliance is manufactured from recyclable materials. If you decide to dispose of this appliance, please observe local waste disposal regulations. Cut off the power cord so that the appliance cannot be connected to a power source. Remove the door so that animals and small children cannot get trapped inside the appliance.
- Do not exceed the detergent quantities recommended in the detergent manu-facturers' instructions.
- Use stain removal products and bleaches before the wash cycle only when strictly necessary.
- Save water and electricity by only washing full loads (the exact amount depends upon the program used).
26 APPendix
DECLARATION OF CONFORMITY
This appliance complies with European safety standards, EC directive 93/68 and EN Standard 60335.
SPECIFICATION
| TYPE FRONT LOADING WASHER | ||
| DIMENSION | W 650 mm X D 765 mm X H 940 mm | |
| WATER PRESSURE | 50 - 780 kPa | |
| WEIGHT | 96 kg | |
| WASH and SPIN CAPACITY | 10.0 kg [DRY LAUNDRY] | |
| DRY CAPACITY | 5.0 kg | |
| POWER CONSUMPTION | WASHING | 150 W |
| WASHING AND HEATING | 2200 W | |
| DRYING | 1900 W | |
| WATER VOLUME | 110 l | |
| SPIN REVOLUTION | MODEL | WD7101CKC / WD7101CKW |
| rpm | 1100 rpm | |
The appearance and specifications of the product are subject to change without prior notice for purposes of enhancement.
SAMSUNG
QUESTIONS OR COMMENTS?
| Country CALL OR | VISIT US ONLINE AT | |
| AUSTRIA 0810 - SAMSUNG(7267864, € 0.07/min) www.samsung | com/at | |
| SWITZERLAND 0848 - SAMSUNG(7267864, CHF 0.08/min) www.samsung.com/ch |
Code No. DC68-02502D-03_EN
WD7101CKC
WD7101CKW
- Ako KpaHbT Ha BOdaTa e BnHTOB TIN, CBpbXeTe KpaHa Ha MapkyHa 3a noDaBaHe Ha BOda, KaKTo e nOKa3aHO.

CleI KaTO n3TbJHInTe cBeDHeHHeTo, aKO OT MapkyHa NMa I3TNaHe Ha BOJa, NOBTOpe TcBtNKe. 3a NoDaBaHe Ha BOJa I3NoJ3BaIe Hau-06nKHOBeHN BID KpaH. B Clyuay, Ye KpaHbTe KBaDpaTe HIN TBbpDe rOJAM, CBaJIeTe pa3daneHHTeHnIg PpbCTeH, Ppei Da noCTaBITE KpaHa B aanTepe.a
- YpeBt Tpr6Ba Da ce CBpXke KbM BoOpPBOHaTa MpeKa NocpeDCTBOM HOBn yIbTHHeHr - CTapu yIbTHHeHr He Tpr6Ba Da ce n3NON3BaT.
HCTaIpaHe Ha nepaHaTa MaunHa_9
Yaca (Ha CTbIKN OT eINH Yac). Ioka3aHITe Ha dncnner YacoBE O3HaHaBaT BpMeTo Ha 3aBbPbBaHe Ha UKbIHa npaHe.
3a da HappaBte ToBa:
- PbHNO INN ABOTMATNUHO HAcTPOTe nepaHata MaunHa 3a BnDa npexn, KOnTO npete.
- HatncHeTe 6yToHa Delay End (KpaH a 3a6abAHeTo) HeKoIkoKpaTHO,doKaTO ce 3aJaTe BpeMeTo Ha 3a6abAHe.
- Hatnche 6yToHa Ctap/nay3a. INHnKaTOpBt Ha Delay End ue CBetHe uacOBnKbT ue 3anOHe da OTbPOBa,doKaTO DoCTnIe HDo BpeMeTo BN Ha 3aBbPWBaHe.
- 3a da OTMeHTe Delay End (KpaH Ha 3a6aBHeTO), HATNCHe Te 6yToHa Power (3axpaHbAHe), a nocJe OTHOBO BKIOUeTe nepaJIHATA MaUNHa.
16_Пане Ндрени
3A IOBABRHE HA IPAHE
-
Hatnche6ytoHa Stop&Add (CToI n doabAraHe).
-
PepaHaTa MaunHa aBToMaTHNo Ue cPiPe da pa6oTu.
2.ИЗчakай Te OKOLO 30 cekyHn n npOBepTe CBCTOaHcTo Ha JAMNkata Ha 6yToHa Stop&Add (CtoN ndoabAhe).
Mura: MaunHaTa N3TOBa BOda IIO HIBOTO Ha 6e3oNaCHoc, TaKa Ye da MoKe da NoEme DOnbJIHHTeHNO KOJIYeCTBO npaHe (noka3aHa B peKIM nay3a)
- N3KIOUeHa:doBaBHeTo Ha npaHe e Bb3MOxHO.

Ha nepaHaTa MaunHa ca HeoXoUmM OkOIO 30 cekyHn, 3a da yctaHOBn nocTaBeHTo KOJIueCTBO npaHe, ppei Da peu nn MoKe da noe Me OSe npaHe.
3.Добавete npaheTo.
-
HatncheTe 6yToHa Ctap/nay3a.
-
IV368BaIte Do6aBHeTo Ha npaHe, KOrATo MaunHaTa e o6pa3yBaIa PnHa NIIe HAnbJIHeHa C BODa. B nPoTINBeH cnyaH Ha NOda MoKe Da n3TeHe PnHa NIIu BOda. 3aTOBa IpoBepraBHe, ppei Da OTBOpHTe BpaTnKaTa.
N3ПОЛ3BAHE HA CLEAN TUB (ПОЧИCTBAHE HA БAPАБАHA)
ToBa e nporpama 3a n3MnBaHe Ha 6apabaHa.
-
HatncheTe 6yToHa Power (3axpaHbAHe).
-
136epete nporpamata Clean Tub (Nochctbahe Ha 6apa6aHa), kato 3aBbptnte Dncka 3a n36op.
-
NocTabeTe cBtBtHO KOnHecTBo n36eJIbAù npenapat B YekMeJxKeTo 3a nepnIeH npenapat (Ba OCHOBHO npaHe.
(Bk. "Ppane 3a npBb mT".)
:3a no-epnKacHO n3MnBaHe e do6pe da ce n3non3Ba npax 3a npahe.
Ako nckate da na 13mneTe neko: Moke da na 13mneTe kaTo npocTo n36peTe Boda n3nnaKbahe npaHe npn 40^ 6e3 da doabare n36enitEn.
- HatncHeTe 6yToHa Start/Pause (CTapT/nay3a).

OoctaTbHNO e da ce n3MnBa 6apabHbT OKONOBeHbX MeceHHO.
Пране на дреки
I3IIHEHNE HA Bb3dUWHO IPAHE
Bb3dyuHOTo npaHe MoKe Da OTcTpaHn BCNUKn ILOU MNIPN3Mn OT npaHeTO, 6laOdapeHne Ha CBOrTa MOUHa CNCTema 3a npOBeTpRaBe. IpexNTe, KOHTo MORaT da ce oBe3MnpNCrT, BKIOHbAT BbJIHeHn NaTTa, nAMyHN NIN NyXeHN DkEMtbpN, NIOBepn KOCTHOMn. (He NOBEHe OT Dba KOCTHOMa)
- OTbopete BpaTnHKata, noCTaBeTe npaHTo n 3aTBopete BpaTnHKata.
- Hatnchete 6ytoHa Power (3axpaHbahe).
- HatncheTe 6yToHa Air Wash (Bb3dyuHn npaHe).
Bcekn nT, koraTo ce haTnche 6yToHbT, pexnmbT ha paOta ce cMeHr LKnnHOB CneHnpe: Suit/Jumper (Kocthom/Jeemntbn) Knit (PiTeHn) Coat (PaTa) Bedding (CnaIHO 6eBo) Cancel (OTka3).
Korato ce n36pe eEDHO OT TIX, He MOKe Da CE HaTINcH HnKaKB Dpyr 6yToH mOKeTe da n36puPe cAmo dyHKUraTa 3a KpaH Ha 3abAByHeTo Mekdy 1:00 u 24:00.
- 3aTbOpTe BpaTuKhata N HaTuChHete 6yToHa "CtApT/nay3a".

Ako He 3BaIte npaHTo He3a6abHo CneI n3TbJIHeHHeTO Ha B3dyuHOTo npaHe, MaunHaTa N3nBJIHReBa DOnbJIHHTeJIHa 3aUHTa IPOTNB HAmayKBaHe B PPODbJXKeHHe Ha 30 MInHyTu.
- HatncheTe 6yToHa "CTapr/nay3a" n nn 6yToHa Power (3axpaHbAne) n nn 3BaTe.
IpoceBt Ha "HcKtuu"MOKe Ja ybNa 6aKTePnTE, KOTo JkBert B MaTePnaJITe, KOINTo "He Ce nepa", HApIMep OeJa, Bb3rNaBHnN INrJIeHnN.

-
1368BaIe Tb3yUHnO npaHe Ha CneHNITe Dpexn:
-
4yBCTBNTENH npexn OT rnaKa KOka KocbM, KOpnHa n dp.
JaHTeNEHO6BbO,3aJIeEHN KyKJIeHN Bb3rJAbHnU KOCTIOMN, KOITOMRAT Pa3BaIANT OUBETBAHETO cN.
-Дрexnte,ykpaceHcKOnyeta,MOrTdaIpeTbpnTcUynBaHeHaKOnyeta.
-KoIocaHnte npexn moKe da ce oBe3ΦopMrt. -
1368BaIe n3n03BaHe Ha cIeHNHTe Ipexn 3a npOceCa Ha INHcEKNiDn:
1) TBbpDcnaHIO 6eIbO, HapnpMep DbpBeHa B3rNaBnua (3a Onopa Ha BpaTa)
-Bb3rnaBnHnI nnOedra,HaBnHeH C nlaactMa cnn HnWeCTe,a He C namyK.
- EneKtpnueckn Oeera
2) Odejna c pechn
3)O6eMnCTn OeJana
18_Пане Ндрени
YKA3AHNIA CbBETNI PNU IPAHE
CoptnpaHe Ha npaHTo: CoptpauTe npaHTo cn no cJeHnTe nokaatEni:
BuaHa CnMBOHa Ha eTKeTa 3a rpnKu 3a TbKaHHe: CopTpauTe npaHTo Ha naMyK, CMEcEH BJaKHa, KOnpHa, BbHa N3KyCTBeHa KOnpHa.
LbT:Pa3dEJIyTe 6eJInTe n CBETHnTe dpexn. Ipepe HOBnTe cBETH npexn OTdeHo.
Pa3Mep: NocTabraHTo Ha dpexn C pa3nueH pa3Mep B eHNo n cbuO 3apeKdaHe Ie npoobpn H3npaTO DeIcTBne.
- UyBCTBnteHIOCT: NpeTe fHHTe Ipexn OToIeHNO, KaTO n3NoJI3BaTe npOrpaMaTa 3a npaHe Wool (BbJHa) 3a YnCTa HOBa BbJHa, nepTe a KOnpInHeH dpExn. IpOBePraBte ETKeTHe Ha IpexnTe, KOTo nepeTe, IIn IpOBepTe B TaJIuCaTa 3a rpnKn 3a TbKaHITe B npNJooKeHneTO.
I3npa3BaHe Ha JxO6OBete: MoHETn, 6eONacn HrJIn NIOo6Hn IpeDMeTn MOraT Da NOBpeAHTbKaHHTe OT JeH, 6apabHa Ha nepaHnata MaunHa n pe3epBoapa Ha BOData.
3aKoNHaBaHe: 3aTbapnTe LInOBeTe N3aKoNHaBaBnTe KOnyEtTa NIN KyKNyKTe; CBO6OHNTE KOJIaHn NJI NaHdJIkN Tpr6Ba Da ca 3aBp3BaT 3aeNo.
IpeepnapeHa namyk: Baata HOBa nepaHa MaunHa, B cbyeTaHne CbC bBpeMeHHTe npuHn npenapatn, daBa OTJUHy pe3yTAtn ot npaHETo, KaTO npu TOBa neCTNejEeKtpoeHepnra, Bpeme, BOa n nepuHn npenapat. Ako obae naMykBT Bu e Oco6eHO 3aMbpceH, n3NoJ3BaIte npednpaHe c nepuJeH npenapat Ha 6eNtBuHa ochoBA.
OnpeJHe Ha MakcmaHTo 3apeKdaHe:He npTeOBpaIte nepaHaTa MaunHa, 3aOTo Hnaue npaHTo MoKe Da He ce n3nepe Iobpe. Nsno3BaTe TaBncaTa no-dony, 3a da OnpedeJIte MAcKmuaHTo 3apeKaHae 3a CbOTBeTHnTIN npaHe, KOITo nepete.
DEKJIAPAU3A CbOTBETCTBNE
To3n ypeI cboTBcTbHa Ha eBpOeNCKnTe CTAHapTn 3a 6e3oNacHOCT, INpeKtNbA 93/68 Ha EO n CTaHapT EN 60335.
CNEUΦUKALUN
| ТП ПЕРAJИС П佩Дно 3АPEЖДАНЕ | ||
| PA3MEР | 650 MM (Л) X 765 MM (Д) X 940 MM (В) | |
| HAJIЯГАЕ HA BOДATA | 50 ~ 780 kPa | |
| TEГЛО | 96 кг | |
| КАПАЦТET HA ПРАЕ И ZEHTPOФУГИРАЕ | 10,0 к [СУХО ПАНЕ] | |
| КАПАЦТET HA CSUŞЕНЕ | 5,0 кг | |
| ПOTРЕБЛECHЕ HA ЕЛЕKTPOЕHRПЯ | ПРАНЕ | 150 W |
| ПРАНЕ И HAFРЯBAHЕ | 2200 W | |
| CSUŞЕНЕ | 1900 W | |
| ОБЕМЕНЕ VA ОБОРOTи HA ZEHTPOФУГATA | MOДЕЛ | WD7101СКС / WD7101СKW |
| об./Min. | 1100 ob.MIN. | |
BbHnHrT Bn n CneuKaUte Ha ypeHa noNexKaT Ha npomHa 6e3 npedn3BeCTme, C cen YcBbPseHCTBaHe.
PpIIOxKeHne_27
SAMSUNG
BbPiPOcN INJIN KOMEHTAPN?
| Стара OBАДЕТЕ SE Или НИ NOСЕТЕ OНLAйн HA | |
| AUSTRIA 0810 - SAmsUNG(7267864, € 0.07/min) www.samsung.com/at | |
| SWITZERLAND 0848 - SAMSUNG(7267864, CHF 0.08/min) www.samsung.com/ch |
KoД N2 DC68-02502D-03_BG
- EoepEe oec tic biEc me to npexoxevkAeiδi.
- KpatnoTe Tn Biδa μe To kλeidi Ooσφiεnc kai TpaβneTyn aoTo μeyalo avoiμa Tc onnc. EnavaalaeTye kaθε Biδa.
- KaIuTE TIC ONc ME TA NAAOTiKa KaUμaTaNou UApxOv OTo OoKEuaia.
- DuáéTe TIC Bièc, ouakeuaiaoc OE aopaaec, hepoc OE nepiTwn Nou xpeiaotei va μetakivnoete to nauvtipio oTo μeAov.

Ta uIkα oukeuaiac μopei va εival eikivduva yia Ta naδi - kpatnoTe oλa Ta uIkα oukeuaiac (nλaotikec oakouε, uIkα ano nolouotpévi κλπ.) μakpiä ano ta naδi.

PpOeIbOoiNoEic yia 0Emuata nEkTpiou
Tia va μειωeTE TOV KIVUVO φωTiAc, ηΑΚΤροπληξIaç KAI ἀλλων τραυματιμών, θα πέπει VA TnpeIe TIC napakatw npoφuλεξIc:
Suvdeote Tn oukeun movov me nV npoxn peuatoC nou unoideikvctai otn ouokeuaia. Eav dev iote Baequi viy taon oeuatoc oTo oini qac, quououeuteTnv tonk uinoepoiq nektoiou.
Xpnoiopoie anokleiotkayewn noawevn npia. ta n dknaac aoapaleia, autn nooukeundeltateevanolwepic evaalaooevou pemuoc nou o evac akpoedekntc tou eivai nautepoc ano tov allov.Auto to kalwio npoei va ouvdeei otnv npica tou toixou movov eevav tpoAo. Av dev mopeite vo elayete tvnpca nnpoc otuv unobxhnc, avtippeyte tnv.Eav npica Eaakoloue i mayn epapmocei, aenuuvthegeevaynektpoloyo.
Ipooataeote to kalwiopeuato, Ta kalwio npoxnc peuatoC 0 npenei va tonoetouvtai etoi wate va unapxei niaovotna kanoiooc va nathoei enaw touc h va tonoetn0ei kanoio avtikejevo enaw touc. IpooETE ibaitepa ta kalwioia otic npiec, tic unoboxeckai to onueio onou EEpxovtai an to ouokeun.
Mny uepopotwete n npia tou toixou kai ta kalwa enektaonc. H unepoopptwn npopei va npokaie i npokavia n naektoannla.
PpOoTaia Tou nepiBaAovToC
Autn n ouakeun kataokeuaetai an ovakukwiau ulika.Av anopaoiete va anoppipiete autyn tno ouokeun,tnpntouc katotouc kavoviaouc diaoecanoppiaptuv. KoTE to kalwdio peuatoC wote n ouakeun va mnu mnpoei va ouvdethetaepi cpeuatoc.Apaipote Tnv npota, wote va anopeuxei n thavotnta naividevoanc owky kikowny ndowy mea otn ouakeun.
Mny npootheTete meyautepec noootntec anoppunavtkou ano autc nou ouviotwtai ano touk
XpoaiooieI npoiovta apaipeocn kekewkauvtiknpiv tov kukno uoc, movov otav eiva aaouucagaaqajnto
- Eoikovounoe vepo kai peuua, nEvovtac movov u e npn optia (n akpihnc noootnta esaptatai ano to npoypmaa nou xonguonoeitai).
26_napaptnma
Δnλωσιμύρωσης
Autn ouakeun akoolouthetai ta eupwnaiikpota aqaaiaic, EK odnyia 93/68 kai EN npotuno 60335.
PpOdeltaqpaqec
Activation/Désactivation
QUESTIONS OU COMMENTAIRES?
| Pays APPELEZ LE OU RENDEZ-VOUS SUR LE SITE | |
| AUSTRIA 0810 - SA | MSUNG(7267864, € 0.07/min) www.samsung.com/at |
| SWITZERLAND 0848 - | SAMSUNG(7267864, CHF 0.08/min) www.samsung.com/ch |
Code No. DC68-02502D-03_FR
Perilica za rubljekorisnički prisučnik
WD7101CKC
WD7101CKW
CE
zamislite mogucnosti
UPOTREBA PROGRAMA SUŠENJA
INSTRUCTIONS PENTRU SIGURANTA

Inainte de a curata masina sau a realiza operatiuni de intretinere, deconnectati echipamentul de la sursa de alimentare sau treceti butonul Power (Alimentare) in positia Off (Oprit).
SPÁLAREA MANUALA RUFELOR
Puteti spala rufe manual fara a utilizes functia Fuzzy Logic.