
AIR 192|14 - DJ Equipment M-AUDIO - Free user manual and instructions
Find the device manual for free AIR 192|14 M-AUDIO in PDF.

| Product Type | USB-C Audio Interface 14 inputs / 4 outputs |
| Brand | M-Audio |
| Model | AIR 192|14 |
| Max. Sampling Frequency | 192 kHz |
| Resolution | 24 bits |
| XLR/TRS Combo Inputs | 4 (1-4) with +48V phantom power per pair |
| Instrument Inputs (TS 6.35mm) | 2 (5-6) |
| Line Inputs (TRS 6.35mm) | 2 (7-8) |
| Main Outputs (TRS 6.35mm) | 2 (1-2) |
| Additional Line Outputs (TRS 6.35mm) | 2 (3-4) |
| Headphone Outputs (TRS 6.35mm) | 2, with source selector (1/2 or 3/4) |
| MIDI Input/Output | Yes (via included 3.5mm adapters) |
| Computer Connectivity | USB-C (USB 2.0 or higher) |
| Power | Included power adapter (12V DC) |
| Direct Monitoring | Yes, with Stereo/Mono selector and Monitor Mix knob |
| LED Indicators | VU meters for each input, power indicator |
| Software Compatibility | Pro Tools | First M-Audio Edition, Ableton Live Lite (included) |
| Operating Systems | Windows (ASIO driver), macOS (Core Audio) |
| Maintenance and Cleaning | Wipe with a dry, lint-free cloth. Do not use abrasive cleaners or solvents. |
| Safety | Do not expose to moisture, extreme temperatures, or shocks. Disconnect the adapter during thunderstorms or extended non-use. |
| Spare Parts and Repairability | Power adapter, USB and MIDI cables included. For repairs, contact M-Audio support. |
Frequently Asked Questions - AIR 192|14 M-AUDIO
User questions about AIR 192|14 M-AUDIO
0 question about this device. Answer the ones you know or ask your own.
Ask a new question about this device
Download the instructions for your DJ Equipment in PDF format for free! Find your manual AIR 192|14 - M-AUDIO and take your electronic device back in hand. On this page are published all the documents necessary for the use of your device. AIR 192|14 by M-AUDIO.
USER MANUAL AIR 192|14 M-AUDIO
User Guide (English)
Introduction
Thank you for purchasing the AIR 192|14. At M-Audio, we know how serious music is to you. That's why we design our equipment with only one thing in mind—to make your performance the best it can be.
Box Contents
AIR 192|14
Power Adapter
USB-C to USB-C Cable
USB-C to USB-A Cable
(2) 1 / 8'' (3.5 mm) to MIDI Adapters
Software Download Cards
User Guide
Safety & Warranty Manual
Support
For the latest information about this product (documentation, technical specifications, system requirements, compatibility information, etc.) and product registration, visit m-audio.com.
For additional product support, visit m-audio.com/support.
Setup
Audio Setup
Windows users: Before connecting AIR 192|14 to your computer, install the driver:
- Go to m-audio.com/drivers and download the latest AIR 192|14 driver for your operating system.
- Open the file you downloaded and double-click the driver installer file.
- Read the End-User License Agreement, then check the box to Agree and click Next to continue.
- Click Install to begin the installation. You may be asked to connect AIR 192|14 to your computer during the installation process. Click Install on any further system messages during the installation.
- Once the installation is complete, click Finish.
To use the Windows driver, open the M-Audio AIR 192|14 Control Panel. Here, you can set your Preferred Buffer Size and Sample Rate.
To set AIR 192|14 as your default playback device, follow the directions below based on your computer's operating system.
Windows:
- Use the included USB cable to connect the AIR 192|14 to your computer. Press the power button to power on AIR 192|14.
- In the Taskbar, locate the Volume Control "speaker" icon. Right-click the speaker and selectPlayback Devices.
Alternatively, go to Start Menu > Control Panel (or Settings > Control Panel in Classic View) > Hardware and Sound > Sound.
- In the Windows Sound control panel select the Playback tab and select AIR 192|14 as the default device.
- Click the Recording tab and select AIR 192|14 as the default device.
- Click Properties in the lower right-hand corner.
- In the new window, click the Advanced tab and select 2-channel, 24-bit, 48000 Hz (Studio Quality) as the default format.
- Uncheck both boxes under Exclusive Mode.
- Click OK to close the Properties window.
- Click OK to close the Sound control panel.
macOS:
- Use the included USB cable to connect the AIR 192|14 to your computer. Press the power button to power on AIR 192|14.
- Go to Applications > Utilities > Audio MIDI Setup.
- In the Audio Devices window, select AIR 192|14 in the left column.
- Right-click AIR 192|14, and select Use this device for sound input.
- Right-click AIR 192|14, and select Use this device for sound output.
- Quit Audio MIDI Setup.
Setting Up AIR 192|14 with Your Software
Setting Up AIR 192|14 with Pro Tools | First M-Audio Edition
- Use the included USB cable to connect the AIR 192|14 to your computer.
- Open Pro Tools | First M-Audio Edition.
- Go to Setup > Playback Engine....
- Open the Playback Engine dropdown menu and select M-Audio AIR 192|14.
Note: You may need to save and restart your project.
- Select your Sample Rate and then click OK to close the Setup window.
- Go to the Setup > I/O and select M-Audio AIR 192|14 for the Input and Output devices.
You can now add tracks to send and receive audio and MIDI from sources connected to AIR 192|14 inputs and stream recorded audio back through the AIR 192|14 outputs.
Setting Up AIR 192|14 with Ableton Live Lite
- Use the included USB cable to connect the AIR 192|14 to your computer.
- Open Ableton Live Lite.
- Go to Preferences > Audio tab.
- Click on Driver Type to select CoreAudio (Mac) or ASIO (Windows).
- Select AIR 192|14 in the Input and Output Config section.
- Select your Sample Rate and then close the audio preferences window.
You can now add tracks to send and receive audio and MIDI from sources connected to AIR 192|14 inputs and stream recorded audio back through the AIR 192|14 outputs.
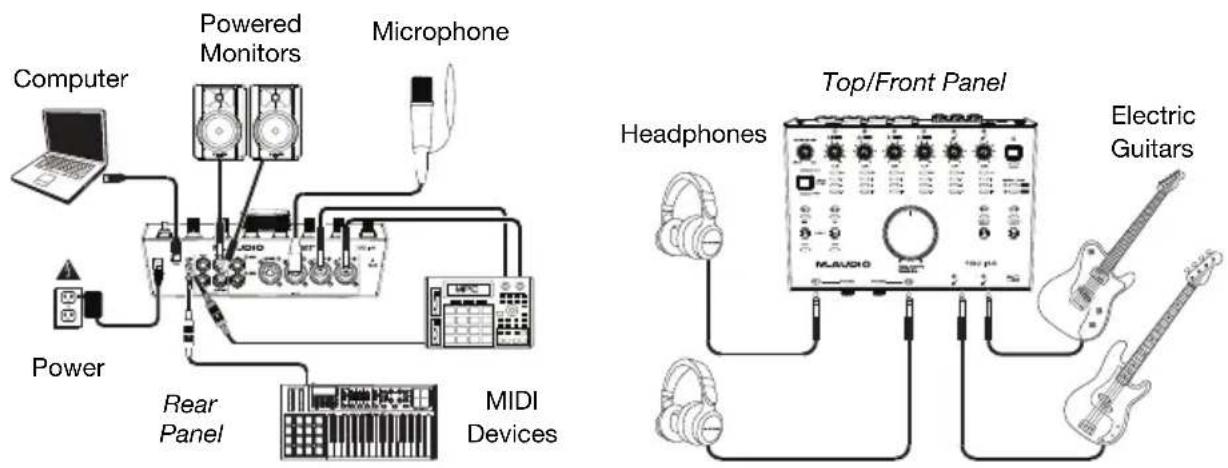
Connection Diagrams
Items not listed under Introduction > Box Contents are sold separately.
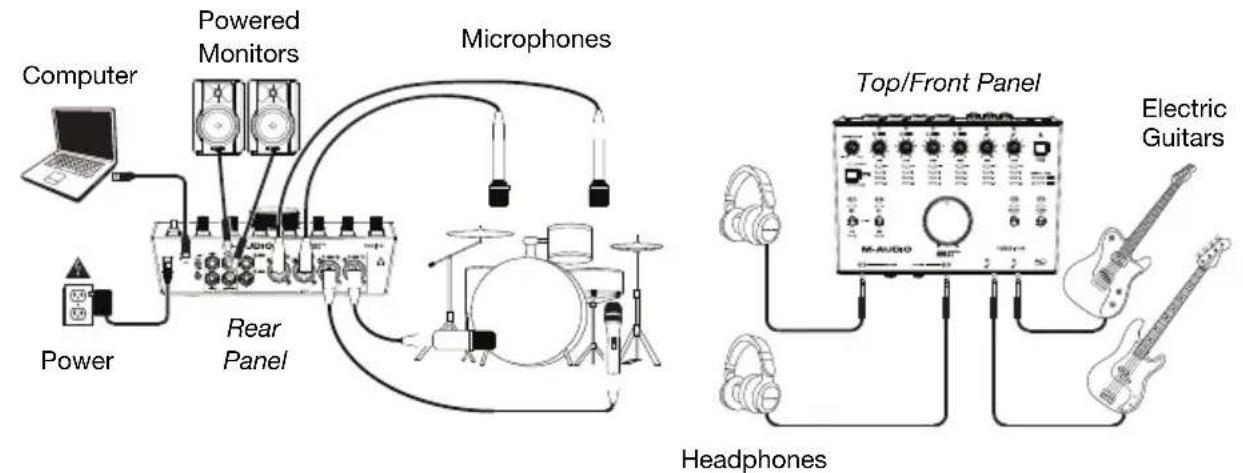
Example 1
Example 2

Example 3
Features
Top Panel
-
Power Button: Press this button to power the AIR 192|14 on or off. The Power LED below this button lights up when the unit is powered on.
-
Input Gain: Adjusts the input's gain level. Set this knob so the corresponding LED Meter (located below the knob) displays a "healthy" level (yellow LED is lit) during performance—but not so high that the meter frequently "clips" or peaks (red LED is lit), causing distortion in the audio.
-
LED Meters (Inputs 1-6): Indicates the input signal level from the Combo Inputs and Instrument Inputs.
-
LED Meters (Inputs 7-8): Indicates the input signal level from the Line Inputs. These LEDs are green when a signal above -20 dBFS is present, and turn red when the signal "clips" or peaks.
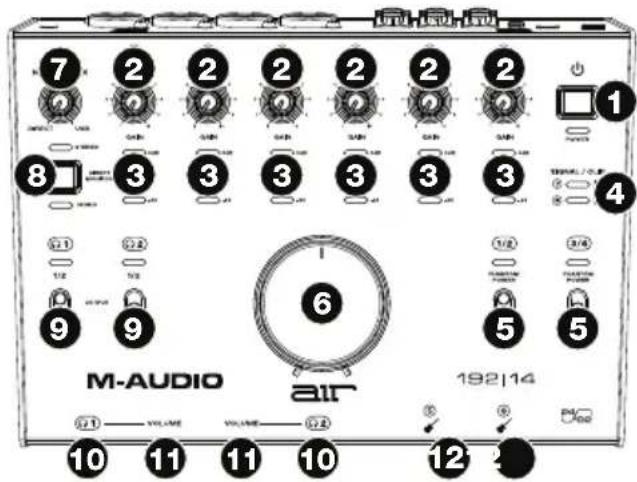
- +48 V (Phantom Power) Switches: These switches activate and deactivate phantom power for Combo Inputs 1-2 or 3-4. When activated, phantom power supplies +48 volts to the selected inputs. Please note that most dynamic microphones and ribbon microphones do not require phantom power, while most condenser microphones do. Consult your microphone's documentation to find out whether it needs phantom power.
- Monitor Level: Adjusts the output volume of Main Outputs, which should be connected to your powered monitors or amplifier system.
- Monitor Mix: Adjusts the mix of the audio signal from your inputs (Direct) and the audio output of your computer (USB) that will be sent to the Main Outputs and Headphone Outputs.
Note: When set to Direct, the left channel will be a sum of Inputs 1, 3, 5, and 7 and the right channel will be a sum of Inputs 2, 4, 6, and 8. You can sum these left and right channels (to hear all inputs as a single summed mono signal) by putting the Direct Monitor button in its depressed position.
This knob is useful for dealing with "latency" when you are recording in your DAW. Latency is a delay in sound that may occur between the incoming sound (playing your instrument, singing, etc.) and outgoing sound (when you hear it in the DAW).
Latency is often the result of the "buffer size" setting, which is usually located in your DAW's Preferences, Options, or Device Setup menu. Higher buffer sizes generally result in higher latency. In some cases, lower buffer size settings can consume a lot of your computer's CPU and cause audio glitches. To prevent these audio glitches, you will need to use a higher buffer setting, and this may result in latency.
If you are experiencing latency when recording, adjust the knob towards the Direct position to increase the blend of unprocessed audio from your inputs directly to your Main Outputs and Headphone Outputs. This will let you hear the incoming audio from your inputs without latency while still being able to hear the audio from your DAW. When listening to the playback, adjust the knob all the way to the USB position.
If your computer is powerful enough, you may be able to set the buffer size setting in your DAW low enough such that you may never need to listen to the direct audio signal from your inputs. In this case, set the Monitor Mix knob all the way to the USB position to monitor only the audio output of your DAW.
- Direct Monitor Selector: Leave this switch in the raised position (blue Stereo LED is lit) to monitor the direct input signal with Inputs 1, 3, 5, and 7 in the left channel and Inputs 2, 4, 6, and 8 in the right channel. This is useful if you want to directly monitor a stereo mic setup such as a stereo signal from a keyboard, or overhead drum mics. Put this switch in its depressed position (green Mono LED is lit) to monitor the direct input signal with all inputs summed and heard equally on each side. This is useful for monitoring a guitar or vocal mic signal. This switch does not affect the DAW playback or how your sound is recorded into your DAW; it affects only how you hear the input signal in the Headphone Outputs (when the Headphone Source Selector is set to 1/2, and the Monitor Mix is set to anything besides USB) and Monitor Outputs.
- Headphone Source Selector: These switches select which outputs (on the rear panel) are also sent to the Headphone Outputs: Main Outputs 1-2 (1/2) or Outputs 3-4 (3/4).
- Headphone Outputs (front panel): Connect 1/4'' (6.35 mm) TRS headphones to these outputs. The mix you hear from these outputs will be determined by the Headphone Source Selector, Monitor Mix knob, Direct Monitor Selector, and associated Headphone Volume knob.
- Headphone Volume (front panel): Adjusts the output volume of the Headphone Outputs.
- Instrument Inputs (5-6) (front panel): Connect a guitar with a passive pickup or other high-impedance signal to these inputs with a 1/4'' (6.35 mm) TS cable. View the input signal levels with the LED Meters (Inputs 5-6).
Rear Panel
- Power: Connect the included power adapter to this input. Use the Power Button to turn AIR 192|14 on or off.
- USB Port (Type C): This connection will allow you to send audio and MIDI data to and from a computer. Use the included USB-C-to-USB-C or USB-C-to-USB-A cables to connect the AIR 192|14 to a computer. The AIR 192|14 requires a USB 2.0 connection (or higher).
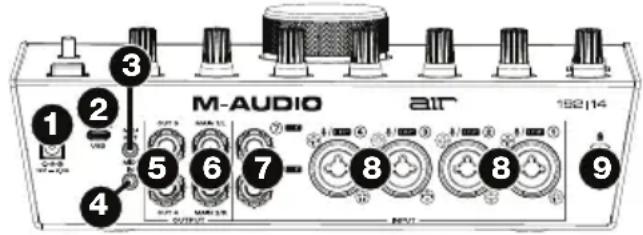
- MIDI Out: Use the included 1/8'' (3.5 mm)-to-MIDI adapter and a standard five-pin MIDI cable to connect this MIDI Out to the MIDI In of an external MIDI device (e.g., a synthesizer, sequencer, drum machine, etc.).
Important: Do not connect audio devices (e.g., headphones, monitors, etc.) to this jack. Use the included 1/8"-to-MIDI adapter to connect MIDI devices only.
- MIDI In: Use the included 1/8'' (3.5 mm)-to-MIDI adapter and a standard five-pin MIDI cable to connect this MIDI In to the MIDI Out of an external MIDI device (e.g., a MIDI controller).
Important: Do not connect audio devices (e.g., headphones, monitors, etc.) to this jack. Use the included 1/8"-to-MIDI adapter to connect MIDI devices only. - Outputs (3-4): Use standard 1/4'' (6.35 mm) TRS cables to connect these line outputs to a headphone amplifier, external signal processors like a compressor, etc. Their levels are automatically +4 dBu.
- Main Outputs (1-2): Use standard 1/4'' (6.35 mm) TRS cables to connect these outputs to your powered monitors, amplifier system, etc. The mix you hear from these outputs will be determined by the Monitor Mix knob and Direct Monitor button. The level of these outputs is controlled by the Monitor Level knob.
- Line Inputs (7-8): Connect mixers and other line-level devices to these inputs using standard 1/4" (6.35 mm) TRS cables. View the input signal levels with the LED Meters (Inputs 7-8).
- Combo Inputs (1-4): Connect microphones, a guitar or bass with an active pickup, or line-level devices to these inputs. For microphones, use an XLR or 1/4'' (6.35 mm) TRS cable. For a guitar or bass with an active pickup, use a standard 1/4'' TS cable. For line-level signals, use a 1/4'' TRS cable. View the input signal levels with the LED Meters (Inputs 1-4).
- Kensington Lock Slot: You can use this Kensington lock slot to secure AIR 192|14 to a table or other surface.
Technical Specifications
All specifications are measured at 20kHz bandwidth.
| Mic Inputs 1-4 (balanced XLR) | |
| Dynamic Range | 113 dB (A-weighted) |
| THD+N | 0.001% (1 kHz, +4 dBu, -1 dBFS) |
| Frequency Response | 20 Hz - 20 kHz (+/-0.2 dB) |
| Preamp EIN | -137 dBu (40 Ω source, A-weighted) -129 dBu (150 Ω source, unweighted) |
| Max Input Level | +14 dBu |
| Gain Range | 62 dB |
| Line Inputs 1-4 (balanced 1/4" TRS) | |
| Dynamic Range | 113 dB (A-weighted) |
| THD+N | 0.001% (1 kHz, +4 dBu, -1 dBFS) |
| Frequency Response | 20 Hz - 20 kHz (+/-0.1 dB) |
| Max Input Level | +30 dBu |
| Gain Range | 61 dB |
| Inst Inputs 5-6 (unbalanced 1/4" TS) | |
| Dynamic Range | 110 dB (A-weighted) |
| THD+N | 0.001% (1 kHz, +4 dBu, -1 dBFS) |
| Frequency Response | 20 Hz - 20 kHz (+/-0.1 dB) |
| Max Input Level | +16 dBu |
| Gain Range | 59 dB |
| Input Impedance | ~1 MΩ |
| Fixed Line Inputs 7-8 (balanced 1/4" TRS) | |
| Dynamic Range | 113 dB (A-weighted) |
| THD+N | 0.001% (1 kHz, +4 dBu, -1 dBFS) |
| Frequency Response | 20 Hz - 20 kHz (+/-0.1 dB) |
| Max Input Level | +17 dBu |
| Line Outputs 1-2 (balanced 1/4" TRS) | |
| Dynamic Range | 112 dB (A-weighted) |
| THD+N | 0.002% (1 kHz, -1 dBFS) |
| Frequency Response | 20 Hz - 20 kHz (+/-0.2 dB) |
| Maximum Output Level | +17 dBu |
| Fixed Line Outputs 3-4 (balanced 1/4" TRS) | |
| Dynamic Range | 113 dB (A-weighted) |
| THD+N | 0.002% (1 kHz, -1 dBFS) |
| Frequency Response | 20 Hz - 20 kHz (+/-0.2 dB) |
| Maximum Output Level | +17 dBu |
| Headphone Outputs (stereo 1/4") | |
| Dynamic Range | 111 dB (A-weighted, 32 Ω loa) d |
| THD+N | 0.002% (1 kHz, -1 dBFS, 10 mW/channel into 32 Ω loa) d |
| Frequency Response | 20 Hz - 20 kHz (+/-0.2 dB) |
| Maximum Power Delivered | 160mW (<1% THD, 32 Ω loa) d |
| Maximum Output Level | +15 dBu (unloaded) |
| Impedance Range | 32 Ω - 600 Ω |
| General | |
| Other Connectors | (1) 1/8” (3.5 mm) MIDI input (1) 1/8” (3.5 mm) MIDI output (1) USB Type-C port (1) Power adapter input |
| Power Adapter | 12 VAC, 2 A, center-positive (included) |
| Dimensions (width x depth x height) | 10.2" x 7.3" x 3.6" 259 x 186 x 91.4 mm |
| Weight | 3.9 lbs. 1.8 kg |
Specifications are subject to change without notice.
Trademarks & Licenses
M-Audio and AIR Music Tech are registered trademarks of inMusic Brands, Inc., registered in the U.S. and other countries.
Ableton is a trademark of Ableton AG.
Kensington and the K & Lock logo are registered trademarks of ACCO Brands.
macOS is a trademark of Apple Inc., registered in the U.S. and other countries.
Windows is a registered trademark of Microsoft Corporation in the United States and other countries.
All other product names, company names, trademarks, or trade names are those of their respective owners.
m-audio.com


- User Guide (English)
- Introduction
- Box Contents
- Support
- Setup
- Audio Setup
- Windows:
- macOS:
- Setting Up AIR 192|14 with Your Software
- Setting Up AIR 192|14 with Pro Tools | First M-Audio Edition
- Setting Up AIR 192|14 with Ableton Live Lite
- Connection Diagrams
- Features
- Top Panel
- Rear Panel
- Technical Specifications
- Trademarks & Licenses
- m-audio.com
Brand : M-AUDIO
Model : AIR 192|14
Category : DJ Equipment