
J687 Executive - Wristwatch JAGUAR - Free user manual and instructions
Find the device manual for free J687 Executive JAGUAR in PDF.


| Product type | Quartz wristwatch |
| Brand | Jaguar |
| Model | J687 Executive |
| Movement | Quartz |
| Display | Analogue: hours, minutes, seconds, date, day of week, chronograph (60-second counter and 30-minute counter) |
| Functions | Time, date, day of week, chronograph (start/stop/reset, totalization, split times), quick date correction |
| Time setting | Via crown in position III (stop seconds) |
| Calendar | Date and day of week, with quick correction |
| Chronograph | Push buttons A (start/stop) and B (reset); ability to measure intermediate times |
| Adjustment of chronograph hands | In zero position: pull crown to position III, press A and B for 2 seconds, then adjust individually |
| Power | Button cell battery (type not specified) |
| Estimated battery life | Approximately 2 to 3 years depending on use |
| Case material | Stainless steel (estimated) |
| Case diameter | Approximately 42 mm (estimated) |
| Case thickness | Approximately 12 mm (estimated) |
| Approximate weight | 80 to 100 g (estimated) |
| Strap | Leather or metal strap depending on version |
| Glass | Mineral (estimated) |
| Water resistance | Not specified – avoid immersion, splash resistant |
| Maintenance | Clean with a soft, dry cloth; avoid chemicals |
| Battery replacement | Entrust to a professional watchmaker |
| Repairability | Spare parts available from Jaguar after-sales service |
| User manual | Available in PDF format at notice-facile.com |
Frequently Asked Questions - J687 Executive JAGUAR
User questions about J687 Executive JAGUAR
0 question about this device. Answer the ones you know or ask your own.
Ask a new question about this device
Download the instructions for your Wristwatch in PDF format for free! Find your manual J687 Executive - JAGUAR and take your electronic device back in hand. On this page are published all the documents necessary for the use of your device. J687 Executive by JAGUAR.
USER MANUAL J687 Executive JAGUAR
- Description of the display and control buttons. 17
- Setting the time 18
-Setting the date (quick modc) 19
-Setting the date,weekday and time 20
-Chronograph 22

By virtue of the regulations pursuant to the handling of waste products deriving from electronic and electrical equipment, end of life cycle watch making products must
be selectively collected for processing. You may therefore dispose of your quartz watch making products at any of our retail outlets or any other authorized collection point. The selective collection, processing, rating and recycling of these products helps contribute to safeguarding the environment and protecting our health.
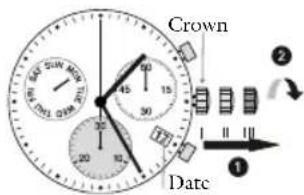
Description of the display and control buttons

Setting the time
Setting the date (quick mode)
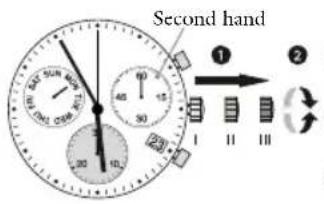
① Pull out the crown to position III (the watch stops).
Turn the crown until you reach the correct time 8:45.
* Push the crown back into position I.
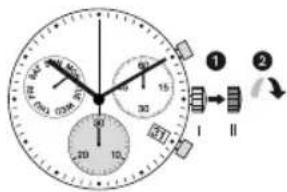
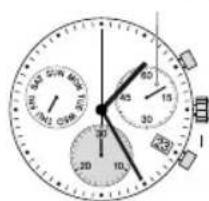
Pull out the crown to position II (the watch continues to run).
Turn the crown anticlockwise until the correct date 1 appears.
Push the crown back into position I.
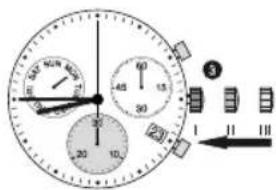
Please note:
- In order to set the time to the exact second, ① must be pullet out when the second hand is in position "60" (I). Once the hour and minute hands have been set, ③ must be pushed back into position 1 at the exact second.
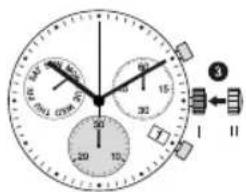
Please note:
During the date changing phase between 9:45 PM and 12 PM; the date must be set to the date of the following day.
Setting the date, weekday and time
Example:
- Date/time on the watch: 17/1:25 MON
- Present date/time: 23/20:35 THU
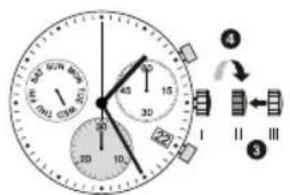
Pull out the crown to position III (the watch stops).
Turn the crown anticlockwise until yesterday's weekday WED appears.
③ Push the crown to position II.
④ Turn the crown until yesterday's date appears: 22.
Second hand


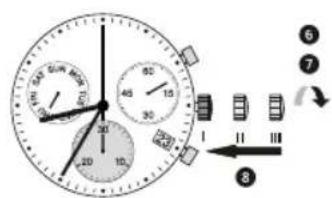
^ 念 Pull out the crown to position III (the watch stops).
Turn the crown anticlockwise until the correct date 23 and weekday THU appears.
⑦ Continue to turn the crown anticlockwise until the correct time 8:35 PM appears.
Push the crown back into position I.

Please note:
- To set your watch to the exact second please refer to the chapter entitled "setting the time".
- Please observe the AM/PM clock rhythm.
Chronograph: Basic function
START/STOP/RESET
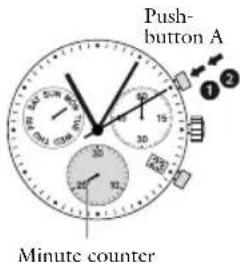
Example:
① Start: Press push-button A.
Stop: to stop the timing, press pushbutton A once more and read the three chronograph hand: 20min / 10sec
Zero positioning: Press push-button B. (The 2 chiorograph hands will be reset to their zero positions).

Chronograph: Accumulated timing

Example:
① Start: (start timing)
② Stop: (e.g. 15 min 5 sec following ①)
③ Restart: (timing is resumed)
-4*Stop:c.g.13 min 5 scc following ③ = 28 min 10 scc (the accumulated measured time is shown).
Reset: The three chronograph hands are returned to their zero positions

Please note:
- Following 4, the accumulation of the timing can be continued by pressing push-button A (Restart / Stop, Restart/ Stop,...)
Chronograph
Intermediate or interval timing

Minute counter
Example:
① Start: (start timing)
Display interval: c.g. 10 minutes, 10 seconds (timing continues in the background).
3 Making up the measured time: (the 3 chronograph hands are quickly advanced to the ongoing measured time).
④ Stop: (Final time is displayed)
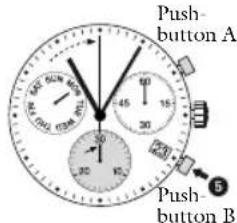
Reset: The 2 chronograph hands are returned to their zero position.
Please note:
- Following ③, further intervals or intermediates can be displayed by prcessing push button B (display interval/make up measured time,...)
Adjusting the chronograph hands to zero position
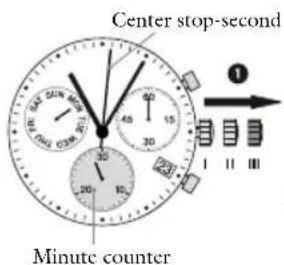
Example:
One or several chronograph hand are not in their correct zero positions and have to be adjusted (e.g. following a battery change).
Pull out the crown to position III (all 2 chronograph hands are in their correct or incorrect zero position).
2 Keep push Buttons A and B depressed simultaneously for at least 2 seconds (the centre stop second rotates by 360^ -corrective mode is activated)


Adjusting the centre stop second: Single step A1 x short
Continuous Along Adjusting the next hand B
Adjusting the minute counter (position 6h) Single step A1 x short Continuous long
Returning the crown to position I Termination of the chronograph hands adjustment (can be carried out at any time)
Mode d'emploi
Chronograph: Accumulated timing
Pulsante A
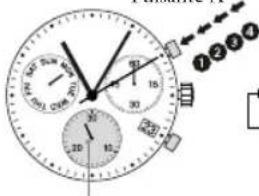
Contatore minuti
Esemblio:


- Description of the display and control buttons
- Setting the time
- Setting the date (quick mode)
- Please note:
- Setting the date, weekday and time
- Example:
- Chronograph: Basic function
- START/STOP/RESET
- Chronograph: Accumulated timing
- Chronograph
- Adjusting the chronograph hands to zero position
- Mode d'emploi
- Esemblio:
Brand : JAGUAR
Model : J687 Executive
Category : Wristwatch