USER MANUAL 10030415 Klarstein
natural_image
Row of white kitchen and appliance icons including blender, blender, kettle, refrigerator, washing machine, fan, air conditioner, microwave, and oven (no text or symbols)

natural_image
Modern white handheld device with a perforated circular top and stem base (no visible text or symbols)
Standventilator
10030415
KLARSTEIN

natural_image
Four-step diagram showing a device being processed from a base to a fan-shaped stand, with no visible text or symbols.
Bedienung
natural_image
Diagram showing a device with a rectangular housing and a circular component, both with an arrow indicating direction (no text or symbols present)
natural_image
Symbol of a trash bin crossed with a diagonal line, no text or numbers present
Congratulations on purchasing this equipment. Please read this manual carefully and take care of the following hints to avoid damages. Any failure caused by ignoring the mentioned items and cautions mentioned in the instruction manual are not covered by our warranty and any liability.
Contents
Technical Data 8
Safety Instructions 8
Product Description 9
Use and Operation 10
Cleaning and Care 12
Hints on Disposal 13
Declaration of Conformity 13
Technical Data
| Item number 10030415 | |
| Power supply 220-240 V ~ 50-60 Hz | |
| Power consumption 65 W | |
Safety Instructions
- In the event of appliance failing to operate, all repairs must be undertaken by service center. Do not touch the power cord with wet hands. Risk of electric shock!
- Do the sticks, metal sticks and other objects into the inlet and outlet. Will lead to leakage, short circuit and possible damage to the product.
- Do not spray pesticides and flammable sprays around the product. May cause product damage
- Avoid prolonged product outlet, air directly to young children. Can cause illness or affect the health of children.
- When unplugging the power cord, do not pull on the cord. Will cause the power cord is damaged, leakage and other dangers. Make sure the power cord is not sticking foreign objects, and the plug is fully inserted Can cause dangerous leakage. When the product has unpleasant smell, abnormal sound in use, stop using it immediately and disconnect the power.
- If the power lines are exposed or damaged, do not use. Will result in a short circuit and cause leakage fire.
- If the power cord is damaged, in order to avoid dangerous, must be replaced by professionals in their maintenance department or similarly be replaced by the manufacturer.
- Do not fold or place heavy objects on the power cord. Can cause dangerous leakage
- Do not rinsed with water body. Will lead to leakage, short circuit and possible damage to the product
- Do not use the machine around the tub, sprinkler or the pool. Never leave the machine placed directly below a power outlet using. Keep the unit away from the walls, curtains and other combustible materials when using to avoid fire·If go out for a long time or do not use, the machine must be shut down and unplug the power cord from the outlet.
- When you have children, animals or the mobility of people present lack of self-control and unattended, you should avoid using the machine. Power outlet should meet the requirements of eligibility by checking. Must ensure that the supply voltage and the voltage specified on the nameplate is consistent.
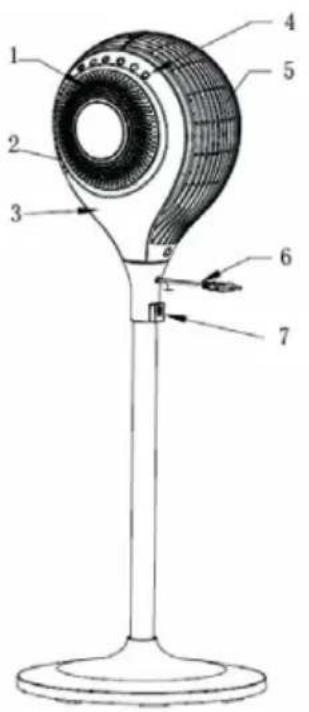
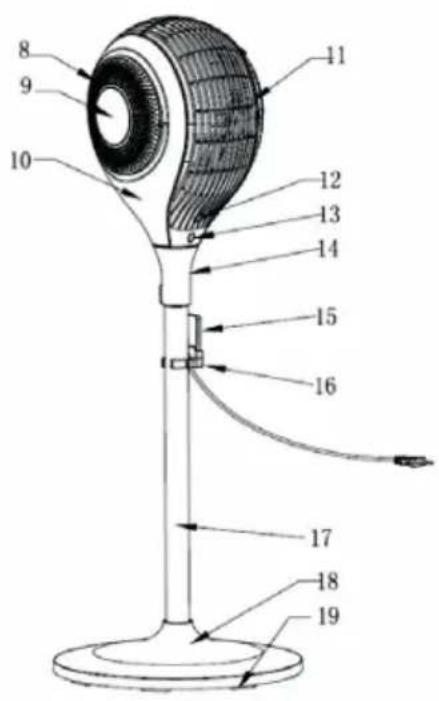
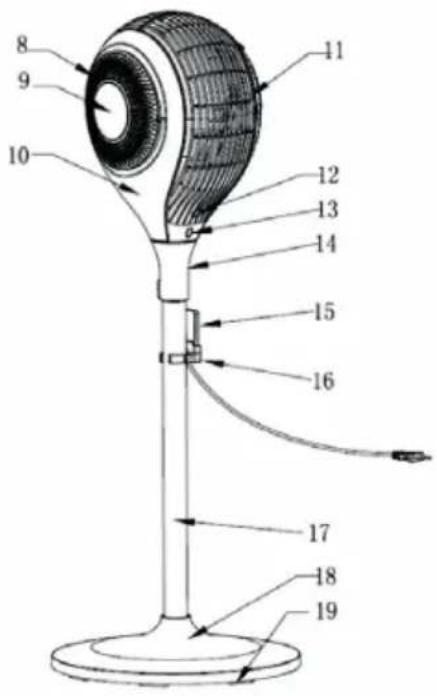
Product Description
1 Right Wind Inlet
2 LED Indicator Light
3 Right Side Panel
4 Touch Control Panel
5 Back Housing
6 Power Cord
7 Nut Support
8 Left Wind Inlet
9 Decoration Cover
10 Left Side Panel
11 Front Housing
12 Body Sensor
13 Remote Control Receiver
14 Oscillation Base
15 Remote Control
16 Remote Control Holder
17 Column
18 Base
19 Weight Balance of Base

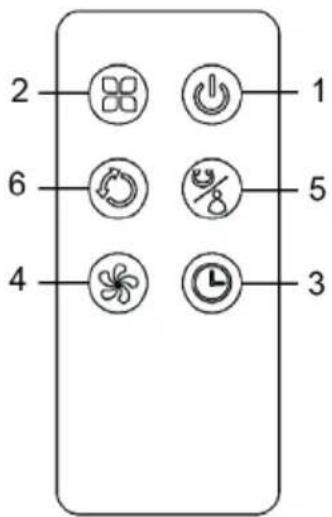
Control Panel and Remote Control
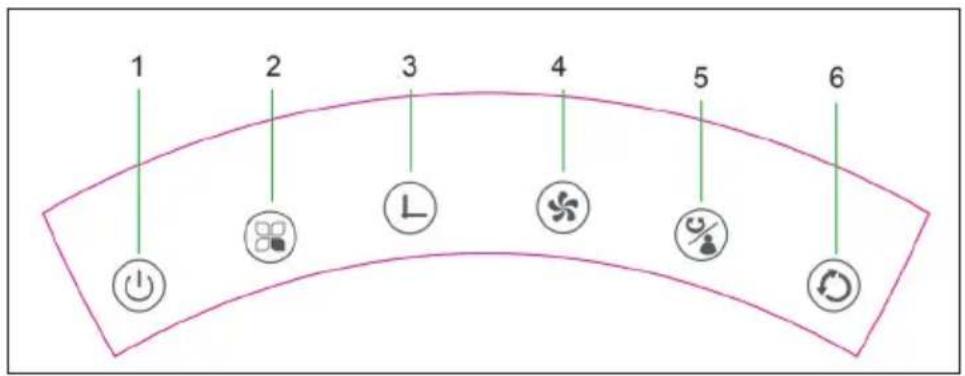
| 1 On/Off/Standby 2 Mode 3 Timer | |
| 4 Speed 5 Horizontal Oscillation/Body Sensor | 6 Vertikal Oscillation |
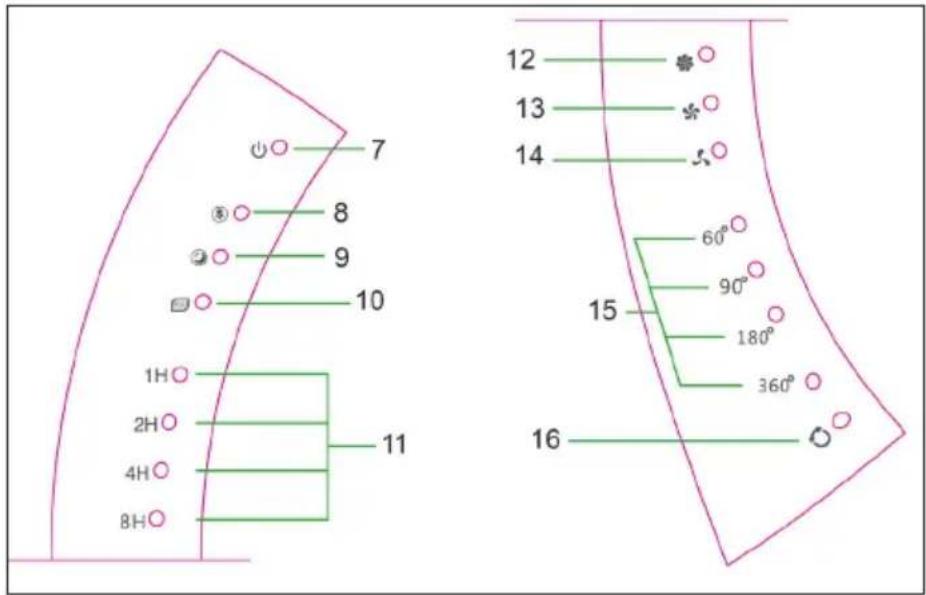
Display and Indicator Lights
7 On/Off/Standby
8 Natural Mode
9 Sleep Mode
10 ECO Mode
11 Timer
12 HI Speed
13 MED Speed
14 LOW Speed
15 Horizontal Oscillation
16 Vertikal Oscillation
Use and Operation
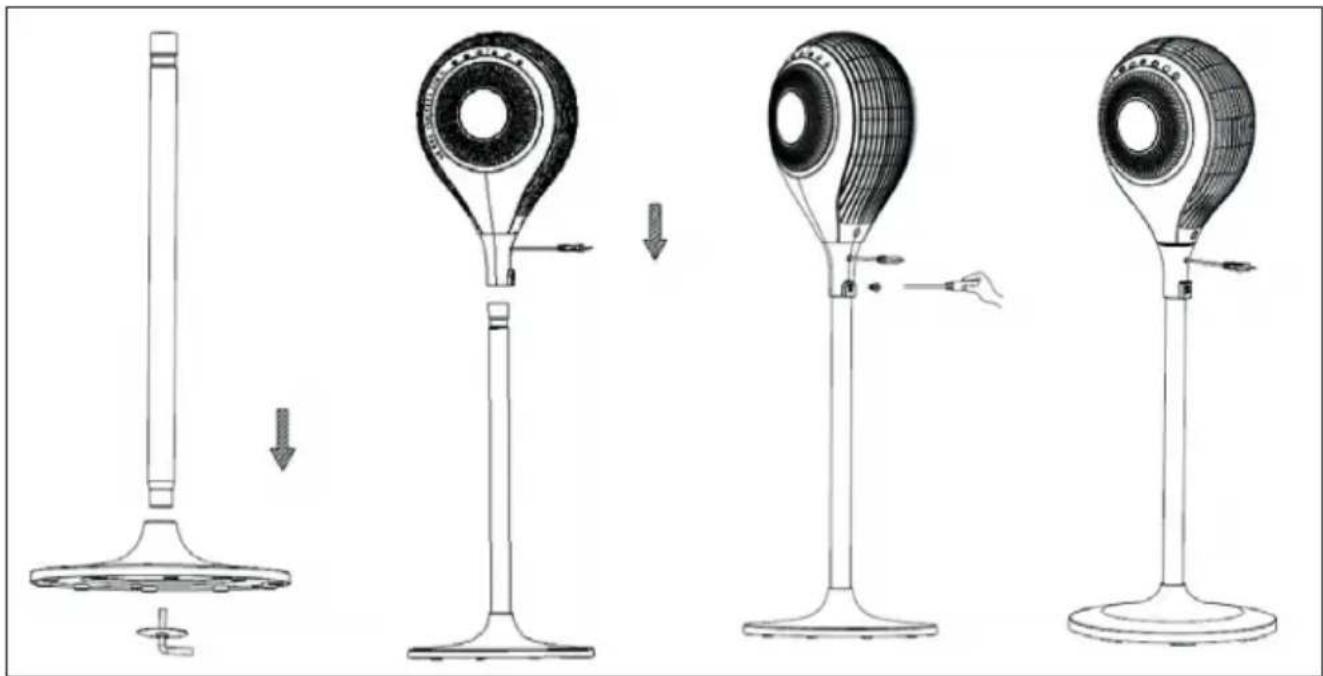
Installation
- Take out parts for assembling.
- Put the power cord through the hole of base, stand the support on the base and fix them tightly by screw (Picture 1).
- Place the machine body into the tube-shape pillar (Picture 2).
- Then, take out the grub screw and cross screwdriver to fix the body on the tube-shape pillar (Picture 3).
- After the below installation, plug in and operate according to the following instructions when placing on the flat ground (Picture 4).
natural_image
Four-step diagram showing a device being processed from a base to a fan-shaped stand, with no visible text or symbols.
Operation
Touch screen control technic has been used in this unit, all of unit's function can be operated by touch the display window signs slightly. NOTE: When plug in, the machine shows proper insert on the condition that all LED lights turn on for 2 seconds and BIBI sounds; then, all LED lights turn off and leave it on Standby; besides the STAND-BY, no button is workable.
Standby Mode
Under standby state, no button is workable but STAND-BY; The machine starts to work by press STAND-BY, which shows the initial wind mode as “Normal” and wind speed stays on “Low”, having accordingly LED light show; without timer and swing function.
On the other hand, under standby state, when plug in for the first time, the body sensor function is available; the working instructions like wind speed-mode and oscillation for the last time will all be conserved on the condition that the power is on and the machine starts for at least for the second time. (Timing hours will not be conserved under sleeping mode)
Speed
While working, press this button for LOW, MIDDLE and HIGH speed selection. The indicators show on the display accordingly.
Timer
There is no timer and related display show under the initial conditions. Press the TIMER button, you can set the running time for this fan, Time setting as: 1H-2H-4H-8H. When setting, the indicator and the figure shows on the display.
Horizontal Oscillation / Body Sensor
- Press this button for horizontal oscillation selection, with the following set rules: 0 represents no horizontal oscillation and 60^ · 90^ · 180^ · 360^ show accordingly horizontal oscillation angle, The indicators show on the display according. Press this button for 2.5 seconds to start infrared body sensor function, with two "BI" sounds.
- Infrared body sensor function: 360^ horizontal oscillation once starts, to figure out the suitable angle for people stand and swing according to this angle for the following work; on the other hand, the machine would restart to search angle if the human signal is changed.
Vertical Oscillation
To set the vertical angle by pressing this button; Press once to start the 90^ vertical oscillation and stop it for on the second time.
Mode
The initial wind mode remains on “Normal”, press MODE button to switch between “Normal” – “Natural” – “Sleeping” – “ECO”, the LED indicator changes accordingly. All mode have its accordingly LED indicator on the panel, but the Normal mode:
Running conditions for different modes
| Normal HI Speed | |
| MED Speed |
| LOW Speed |
| Natural Oscillogram for 3 natural wind (HI, MED, LOW). |
| Sleep HI: 30 min | nutes “HI” natural wind–30 minutes “MED” natural wind–Remain “LOW” natural wind speed |
| MED: 30 minutes “MED” natural wind–Remain “LOW” natural wind |
| LOW: Remain “LOW” natural wind speed |
| ECO | Under this mode, the machine works in Low speed when ambience temperature < 25; in Hi speed when > 29; in Med speed when 25~29. (“Speed” button and the indicator for speed will not work under this mode.) |
| Connervation | When in standby mode, wind speed·mode and oscillation will all be conserved. (But timing and sleeping mode will not be conserved) |
| Auto dimming The | indicator would dim automatically if no operation for above 1 minute; showing 30% of original Brightness.If press the button at this moment,the indicator will light up again. |
Usage for remote control
One button battery (CR2032 3V) has been used in our remote control. Please insert the battery to remote control tightly based on the direction of the polarity. If it does not use for a long time, please pull the battery out from the remote control.
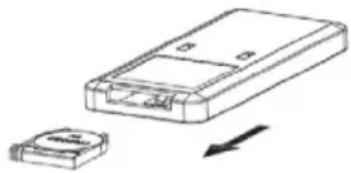
natural_image
Diagram showing a device with a rectangular housing and a small electronic component, both with an arrow indicating direction (no text or symbols present)
Cleaning and Care
If there is too much dust or dirt on the front grid cover of the fan, the performance of air-out would be affected, so we suggest clean the fan once per month at least.
• Always remember unplug the fan before cleaning, or may cause electric shock or product damage.
- Wipe all parts with a soft cloth. Do not use any of the following as a cleaner: gasoline, thinner, benzine.
Unit surface cleaning
- Do not allow water and steam to drip on.
- Do not use corrosive detergent or solvent cleaning
• Always unplug the fan before cleaning.
Product storage
- Unplugged and packed to prevent dust from entering the body if not use for a long time.
- Placed in a dry well ventilated place after packed.
Hints on Disposal
natural_image
Symbol of a trash bin crossed with a diagonal line, no text or numbers present
According to the European waste regulation 2002/96/EG this symbol on the product or on its packaging indicates that this product may not be treated as household waste. Instead it should be taken to the appropriate collection point for the recycling of electrical and electronic equipment. By ensuring this product is disposed of correctly, you will help prevent potential negative consequences for the environment and human health, which could otherwise be caused by inappropriate waste handling of this product. For more detailed information about recycling of this product, please contact your local council or your household waste disposal service.
Your product contains batteries covered by the European Directive. 2006/66/EG, which cannot be disposed of with normal household waste. Please check local rules on separate collection of batteries. The correct disposal of batteries helps prevent potentially negative consequences on the environment and human health.
Producer: Chal-Tec GmbH, Wallstraße 16, 10179 Berlin, Germany.
CE
This product is conform to the following European Directives:
2004/108/EC (EMC)
2011/65/EU (RoHS)
2006/95/EC (LVD)
Estimado cliente,
natural_image
Four-step diagram showing a device being processed from a base to a fan-shaped stand, with no visible text or symbols.
Utilización
natural_image
Diagram showing a device with a rectangular housing and a small circular component, both with an arrow indicating direction (no text or symbols present)
Limpieza y cuidado
natural_image
Symbol of a trash bin crossed with a diagonal line, no text or numbers present

natural_image
Line drawings of a vintage air conditioner fan with base, showing step-by-step assembly from stand to neck (no text or symbols)
Utilisation
Oscillation verticale
natural_image
Diagram showing a device with a rectangular housing and a small electronic component, both without any text or symbols.
natural_image
Symbol of a trash bin crossed with a diagonal line, no text or numbers present
natural_image
Line drawings of a vintage air conditioner fan with base, showing step-by-step assembly from top to side (no text or symbols)
Utilizzo
natural_image
Diagram showing a device with a rectangular housing and a small circular component, both with an arrow indicating direction (no text or symbols present)
natural_image
Symbol of a trash bin crossed with a diagonal line, no text or numbers present