
MXPIP2199 - Cooker Mx Onda - Free user manual and instructions
Find the device manual for free MXPIP2199 Mx Onda in PDF.
| Product Type | Portable double induction hob |
| Brand / Model | Mx Onda / MXPIP2199 |
| Dimensions (L × W × H) | 605 × 365 × 65 mm |
| Weight | 5.36 kg |
| Power Supply | 220-240 V ~ 50/60 Hz |
| Total Power | 3500 W |
| Left Cooking Zone | 2000 W max (6 power levels, 10 temperature levels) |
| Right Cooking Zone | 1500 W max (6 power levels, 10 temperature levels) |
| Temperature Range | 60 °C to 240 °C (each zone) |
| Compatible Pan Diameter | 12 to 26 cm |
| Timer | 5 to 180 minutes per zone, automatic shut-off and alarm |
| Cooking Surface | High-resistance ceramic glass |
| Controls | Touch controls with mode selection (power/temperature), MAX/MIN keys |
| Safety Features | Panel lock, overheat protection, pan detection, automatic shut-off |
| Ventilation | Two fans at the base, automatic operation, delayed shut-off 3 min |
| Display | LED screens for power, temperature and timer |
| Care and Cleaning | Clean after cooling with specific induction products, avoid abrasives |
| Repairability | Do not open; contact MX ONDA technical service for any repair |
| Standards | CE, RoHS (2011/65/EU), EMC and Low Voltage directives |
Frequently Asked Questions - MXPIP2199 Mx Onda
User questions about MXPIP2199 Mx Onda
0 question about this device. Answer the ones you know or ask your own.
Ask a new question about this device
Download the instructions for your Cooker in PDF format for free! Find your manual MXPIP2199 - Mx Onda and take your electronic device back in hand. On this page are published all the documents necessary for the use of your device. MXPIP2199 by Mx Onda.
USER MANUAL MXPIP2199 Mx Onda
MANUEL D'INSTRUCTIONS
Mx Onda
PLAQUE D'INDUCTION DOUBLE PORTABLE
MODELE: MX-PIP2199
CE
AVANT D'UTILISER CE MANUEL DE LIRE ATTENTIVEMENT
ATTENTION
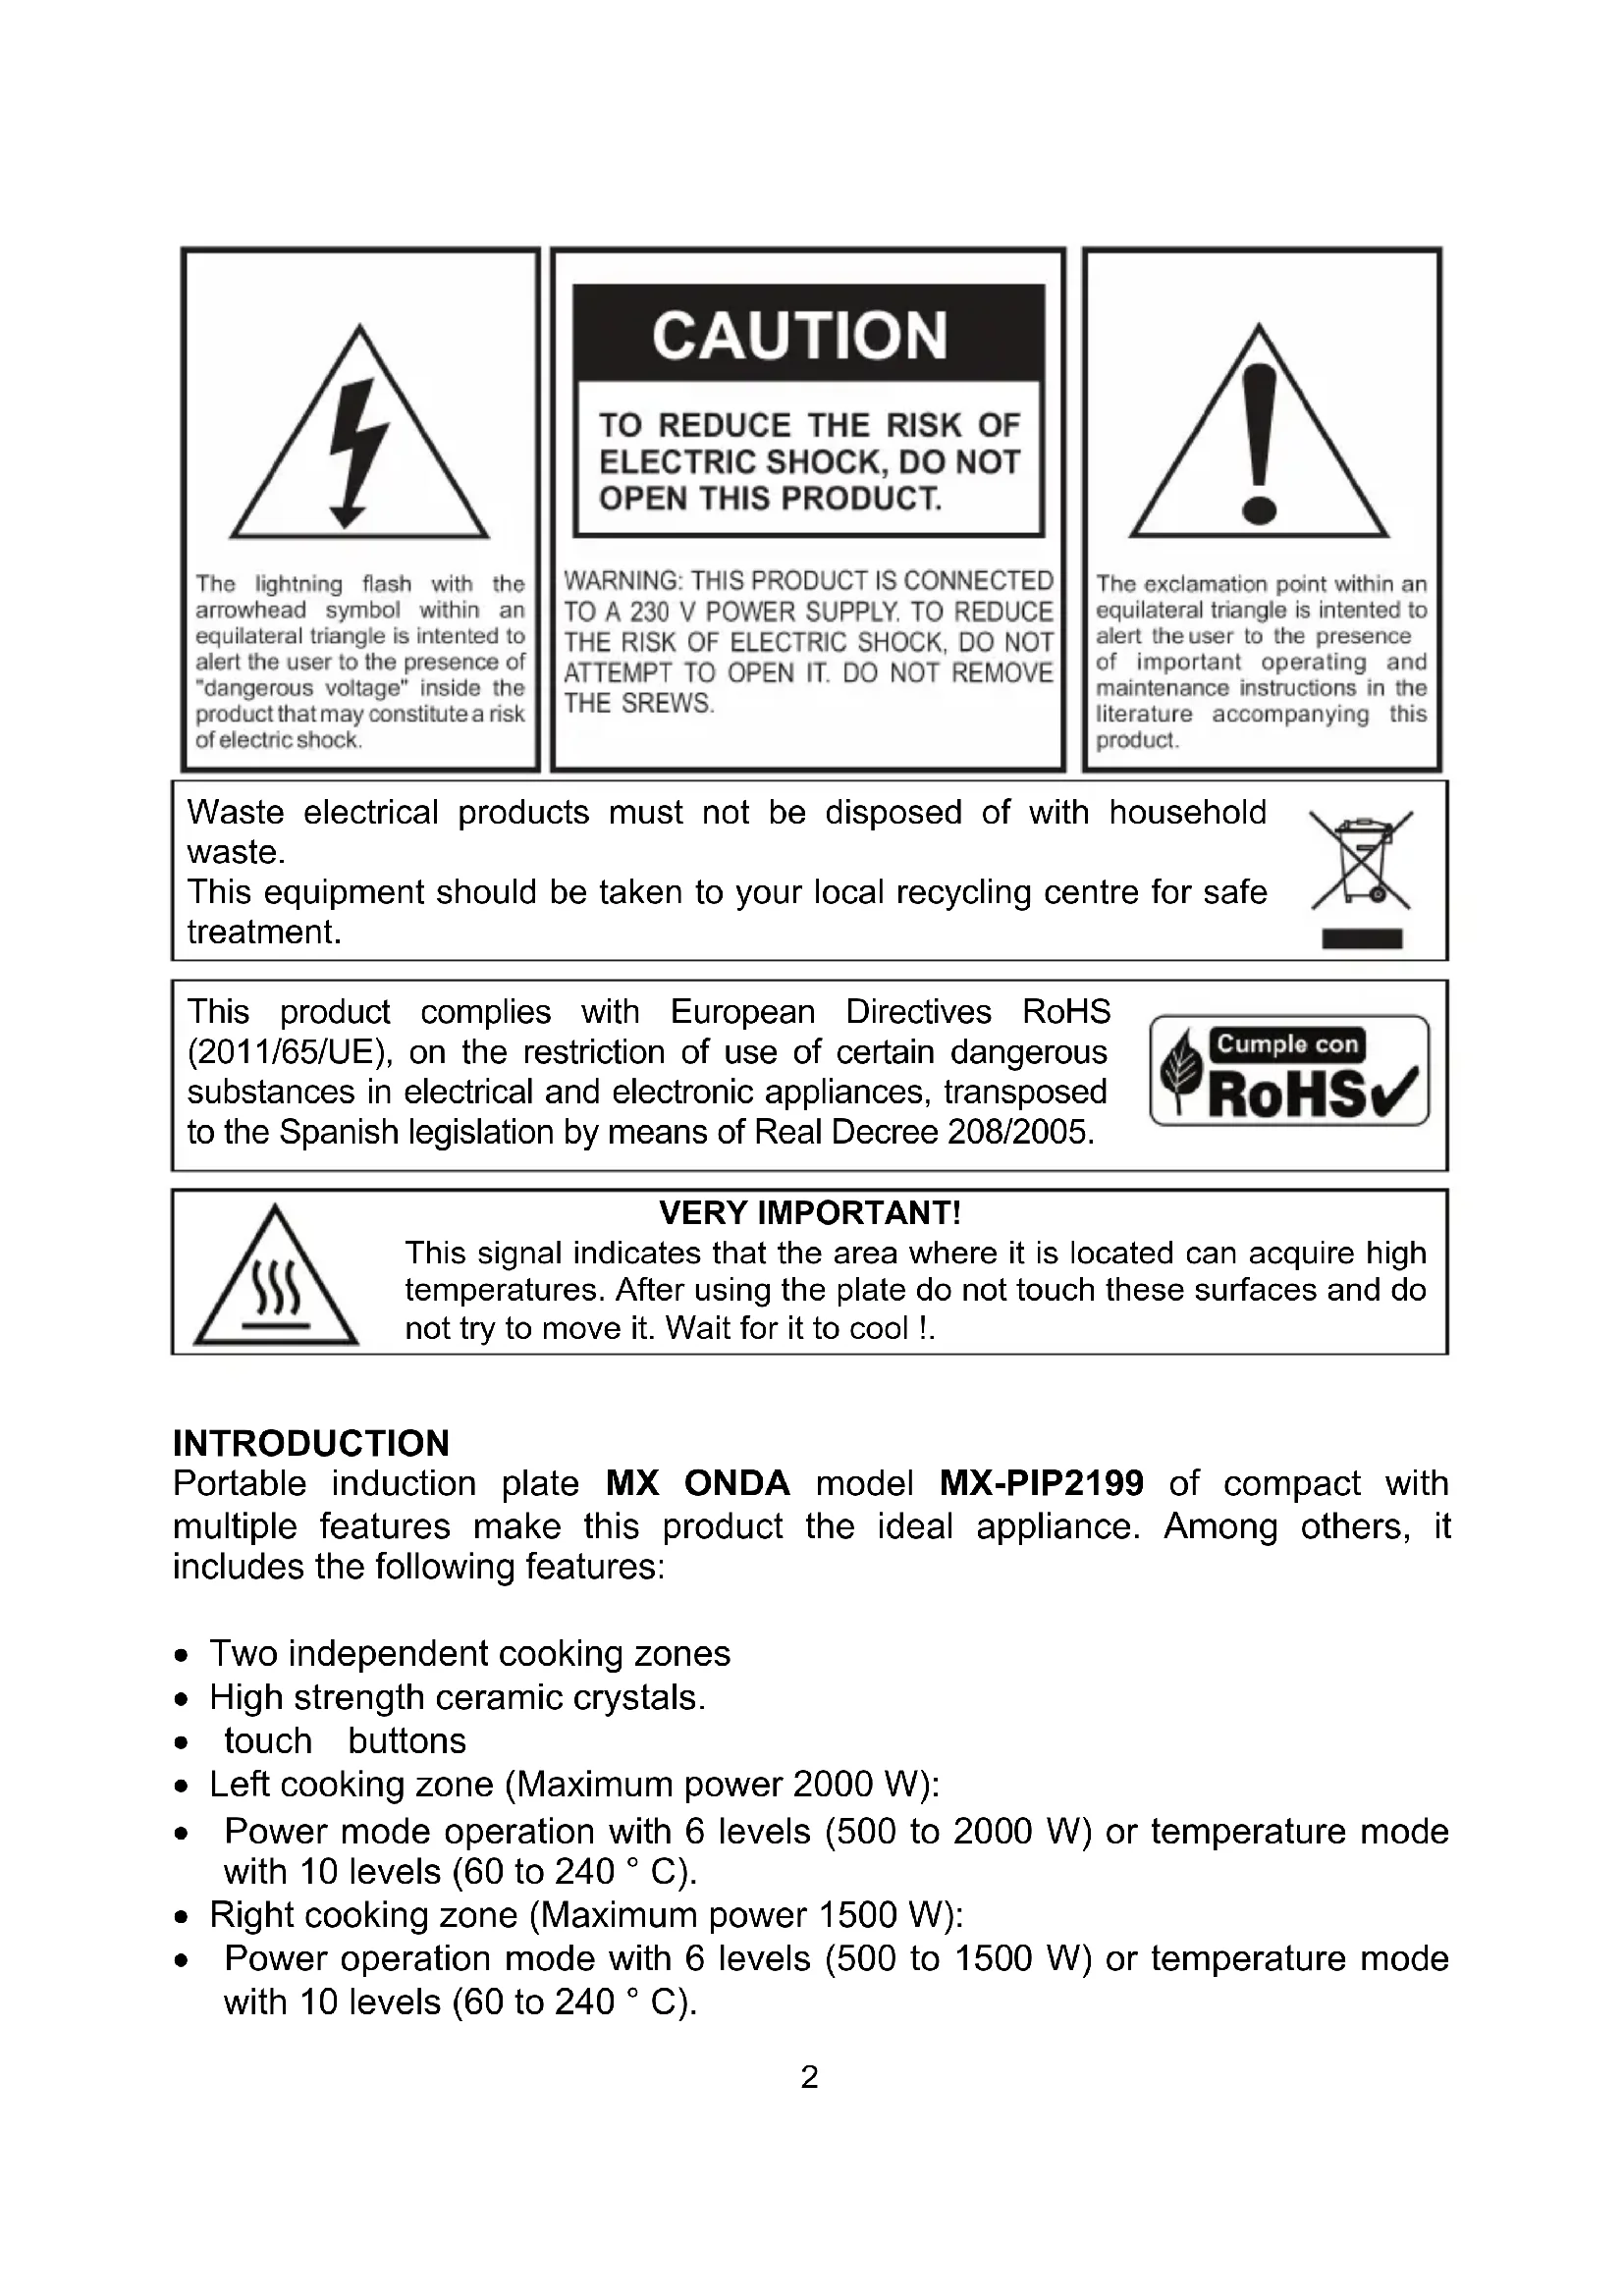
The lightning flash with the arrowhead symbol within an equilateral triangle is intended to alert the user to the presence of "dangerous voltage" inside the product that may constitute a risk of electric shock.
CAUTION
TO REDUCE THE RISK OF ELECTRIC SHOCK, DO NOT OPEN THIS PRODUCT.
WARNING: THIS PRODUCT IS CONNECTED TO A 230 V POWER SUPPLY. TO REDUCE THE RISK OF ELECTRIC SHOCK, DO NOT ATTEMPT TO OPEN IT. DO NOT REMOVE THE SREWS.

The exclamation point within an equilateral triangle is intended to alert the user to the presence of important operating and maintenance instructions in the literature accompanying this product.
Waste electrical products must not be disposed of with household waste.
This equipment should be taken to your local recycling centre for safe treatment.
This product complies with European Directives RoHS (2011/65/UE), on the restriction of use of certain dangerous substances in electrical and electronic appliances, transposed to the Spanish legislation by means of Real Decree 208/2005.

Cuple con
RoHSV
VERY IMPORTANT!
This signal indicates that the area where it is located can acquire high temperatures. After using the plate do not touch these surfaces and do not try to move it. Wait for it to cool!.
INTRODUCTION
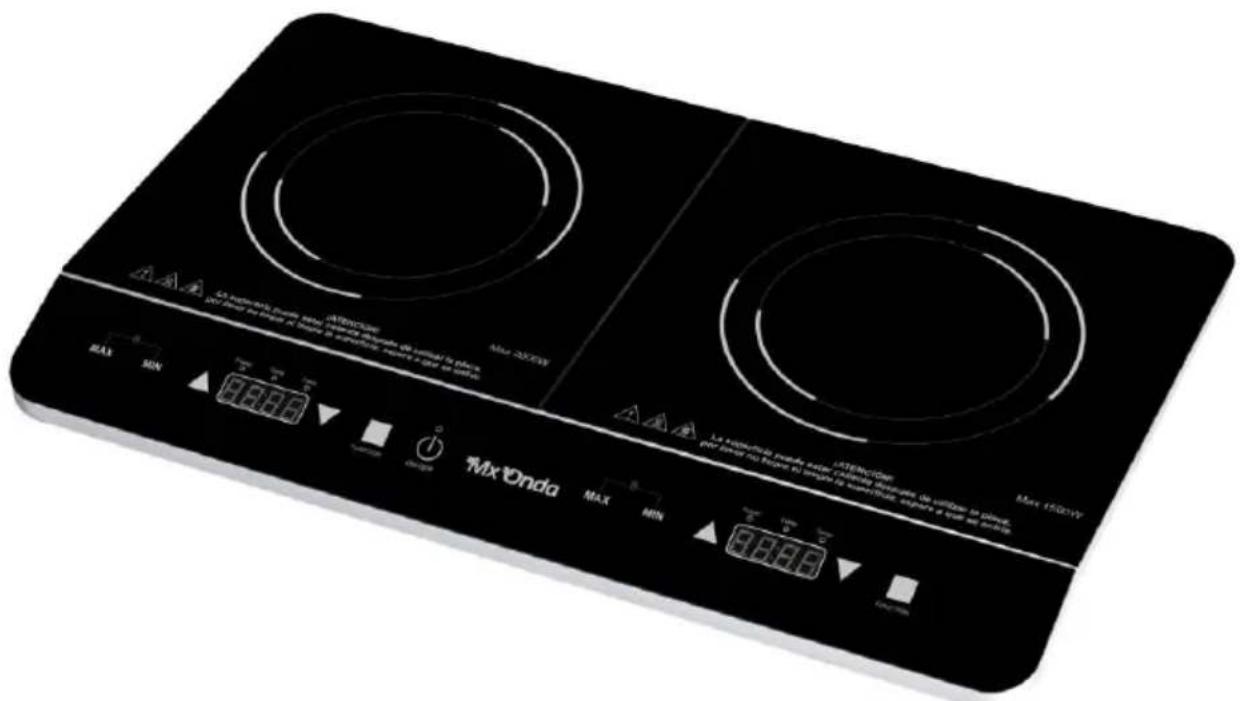
Portable induction plate MX ONDA model MX-PIP2199 of compact with multiple features make this product the ideal appliance. Among others, it includes the following features:
- Two independent cooking zones
High strength ceramic crystals. - touch buttons
- Left cooking zone (Maximum power 2000 W):
- Power mode operation with 6 levels (500 to 2000 W) or temperature mode with 10 levels (60 to 240^ C ).
- Right cooking zone (Maximum power 1500 W):
-
Power operation mode with 6 levels (500 to 1500 W) or temperature mode with 10 levels (60 to 240^ ).
-
Suitable for containers of 12 to 26 cm in diameter.
- Detection of small or unsuitable for induction containers.
- LED display indicating power, temperature or timer.
- Independent timer for each cooking zone with automatic shutoff and audible warning (adjustable time between 5 and 180 minutes).
- LED indicators and audible selected functions.
Overheating protection. - Function security lock
BEFORE CONNECTING THE APPLIANCE
- Read these instructions and save them for later use carefully.
- Check that the voltage of your outlet is 230V .
- The power cord is relatively short, to prevent accidents caused by tripping or entanglement.
- If you need to use an extension cord, use only an extension cord that is in good condition and is suitable for the power of the appliance.
- Do not leave the power cord below the plate, which comes into contact with hot surfaces as you risk damaging the insulating sheath of the cable network.
- To protect against risk of electric shock and personal injury, do not insert the cable, plug or plate in water or any other liquid.
- After removing the packaging, check that the appliance is not damaged. If in doubt do not use it and contact the technical support staff.
- Keep out of reach of children packaging materials (bags, polystyrene parts, etc.), as they are a potential source of danger.
- Place the plate at least 30~cm from the walls of other appliances, furniture or anything that could be damaged by heat.
- The manufacturer declines any liability for damages resulting from improper, incorrect or careless use of the appliance.
SECURITY MEASURES
Children should not play with this device.
- Cleaning and maintenance by the user can not be done by children unless they are older than 8 years and are supervised.
- Failure to follow these safety warnings could result as a result burns or serious injury.
- This device can not be used by children (under the age of 8 years) or persons with or without experience and knowledge reduced physical, sensory or mental capabilities, unless they have received appropriate on using the appliance instructions and be supervised by an adult or person responsible.
- This appliance is designed only for domestic use, not professional. MX ONDA not accept any responsibility and the guarantee will not apply in case of misuse or failure to follow instructions.
- Do not use this device near flammable materials (curtains, net curtains, etc)
- To reduce the risk of fire, electric shock or personal injury, do not block or insert objects into the ventilation slots.
- This plate is designed for indoor use not use outdoors. Avoid exposure to rain, moisture or other atmospheric phenomena.
- This device operates at high temperatures, so during handling DO NOT touch the glass surface. Before cleaning or moving the plate wait for it to cool. If necessary, use gloves or oven mitts.
- Keep out of reach of children, the surface of the plate and containers, can reach high temperatures.
- Unplug the plate when not in use for a long period of time, when a power outage occurs, or "skip" a fuse or circuit or during the cleaning process.
- Make sure the outlet where the device is connected is easily accessible. To disconnect the board from mains pull the plug from the socket. you do never pull on the cable.
- Do not place the plate above cookers, microwave ovens or other plates.
- Never move the plate during use, remove the plate and let it cool before moving it.
- While the unit is connected and the plate is still hot, do not neglect their vigilance and keep it out of reach of children.
- The use of accessories not recommended by the appliance manufacturer may cause fire, electric shock or injury.
- Use only containers suitable for induction and whose bottom is completely flat. The containers with slightly curved bottom or dished not be used.
- Avoid accumulation of grease or food scraps on the surface of the plate, as it decreases performance and can cause odors and even fire the remains of grease or food.
- Do not attempt to cook on the surface of the plate.
- Do not attempt to cut foods that are inside the container while the plate is in operation.
- Do not leave containers with oil or grease unattended in case of overheating can inflame. In case of fire, never try to extinguish the flames with water. Close the lid and smother the flames with a damp cloth.
- In case of liquid between the container base and plate vapor pressure may occur, so the container could jump. Always keep the surface of the plate clean and dry.
- Do not place metal objects on the surface of the plate, as these can be heated quickly.
- People with implanted pacemakers should refrain from approaching manipulate the induction cooktop. Although this product meets all current safety regulations and electromagnetic compatibility, it is possible that some device not meet 100% and produce interference to these devices.
- In case of failure, anomalies, if the glass plate is cracked, cracks, etc., the plug or other parts have impaired, or the cord is damaged, unplug the appliance and do not attempt to repair it yourself. Contact our Customer Service nearest MX ONDA.
INDUCTION COOKING
Advantages of induction cooking
Induction cooking involves a radical change in the traditional way to cook food, heat is generated directly in the container so that the heat loss between the various elements (container, glass ceramic plates, etc.) is removed the advantages are:
- Decreased time to cook: the container is heated faster.
- Energy savings: by reducing the time for cooking and / or frying. When the container of the cooking area is removed, automatically stops supplying heat if within 30 seconds it repositions the container will supply heat and with the same level previously set.
- easy cleaning; not being so hot surface spilling food do not burn so quickly.
Appropriate containers for induction
Ferromagnetic containers
Suitable for induction cooking, containers are those made of ferromagnetic material. They can be enamelled steel, cast iron or special dishes for induction stainless steel. To find out if a container is suitable for induction cooking, check that they are attracted by a magnet.
Special containers
Other types of containers whose base is not entirely ferromagnetic. Before use check the diameter of the base and that these containers are detected by the induction plate.
Containers not suitable for induction
Never use normal stainless steel containers, glass, clay, copper, or aluminum.
Features of the container base
The base of a container can influence heat distribution and consequently the result of cooking. Choosing a container with a higher quality base (eg sandwich) will save us time and energy cooking.
Pay special attention to the shape of the base, since it must be completely flat. If you have a small curvature or bulge, heat losses and therefore produce more cooking time and a considerable increase in energy expenditure.
Empty containers or very thin base
Never place an empty container on the plate and turn it, as it can cause overheating of the container (excess heat) and damage the ceramic glass or the plate itself. If the container base is very thin it can also overheat, do not use this type of containers.
Detection of the container
The plate has a minimum detection limit of the cooking zone and is 12cm . For this reason, you should refrain from using containers whose base is less than 12cm in diameter. If you turn the plate without any container with a container whose base is less than 12cm or unfit for induction container, the plate will not work in the display "EO" will appear, notify acoustically and after 50 seconds will turn off automatically.
fans
In the base plate there are two fans which aims to maintain a stable temperature inside the induction plate.
Each time the board goes on and the power or temperature setting, fans will also be put into operation. When the plate is turned off, the fans remain in operation and will shut off automatically after 3 minutes.
At the base of the plate should NEVER put tea towels, dishcloths or other objects that may obstruct the holes in the fan, thus preventing proper ventilation and cause overheating of the circuits, so act security protections.
Note:
Remember that the fans remain in operation for 3 minutes after turning off the plate. This is normal and does not indicate a malfunction.
INSTALLATION
- Place the plate on a stable, level surface, away from hot areas with high humidity or near flammable materials (oil, curtains, cloths, etc.).
- To ensure adequate ventilation allow at least 30~cm on each side of the plate. DO NOT obstruct the ventilation slots on both sides and in the back of the plate and how the holes in the fan (located at the base of the plate).
- Fully unroll the cord and plug the appliance plug into the mains. The buzzer will "beep" to warn that the board has been plugged into the power outlet.
CONTROLS AND ELEMENTS
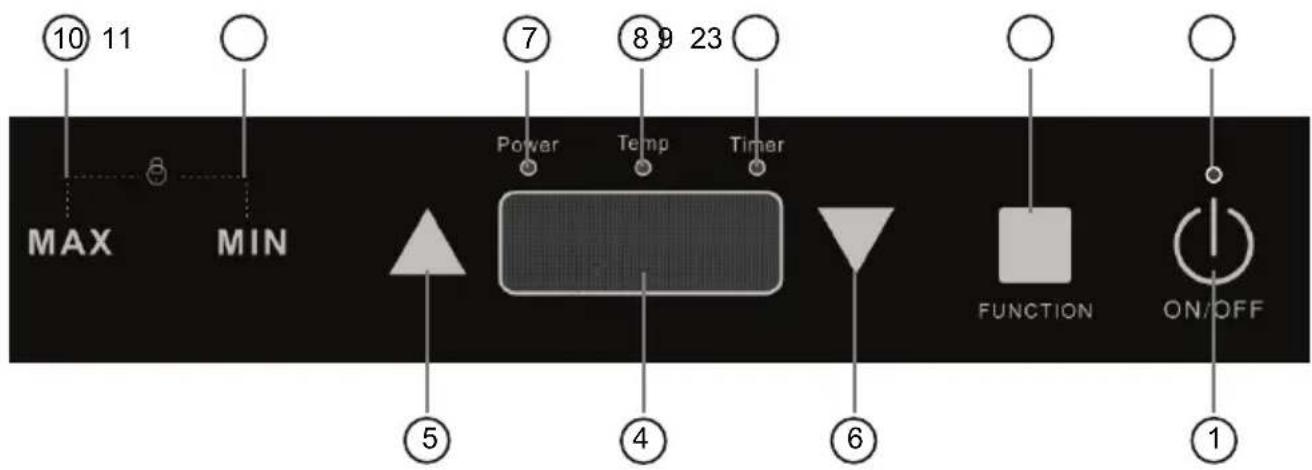
Controls left cooking zone (2000 W max.)
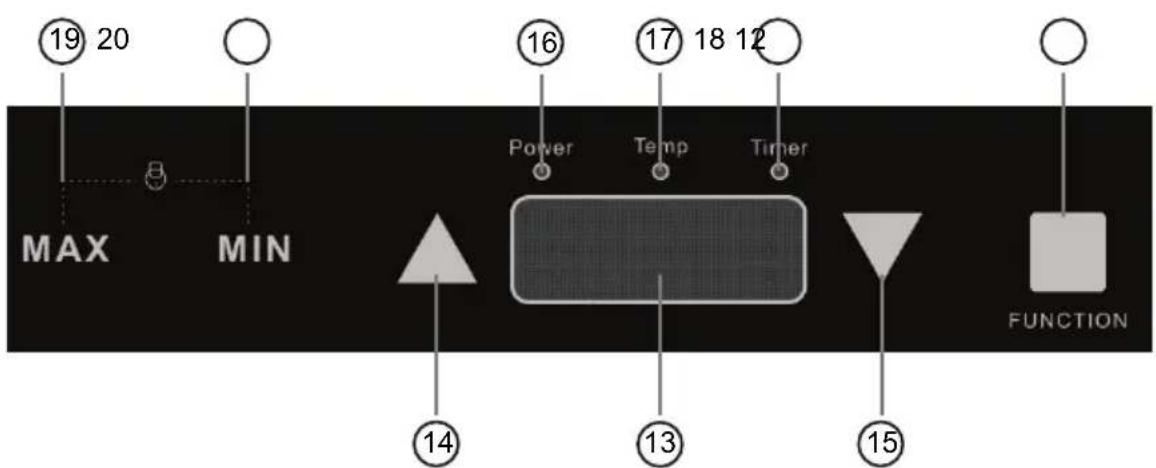
Controls right cooking zone (1500 W max.)
- Touch button on / off
- Power LED indicator
Left cooking zone
- Touch button function selector
- LED screen
- Touch up button
- Touch down button
- LED power mode selected
- LED temperature indicator of the selected mode
- LED indicator activated timer mode
- Touch Jump button at maximum power or temperature
- Touch Jump button at minimum power or temperature
Right cooking zone
- Touch button function selector
- LED screen
- Touch up button
- Touch down button
- LED power mode selected
- LED temperature indicator of the selected mode
- LED indicator activated timer mode
- Touch Jump button at maximum power or temperature
- Touch Jump button at minimum power or temperature
TURNS ON AND OFF
- Place one or two containers on the cooking zones.
- To turn the plate, touch and hold the contact with fingertip for two seconds the touch button 1 (①), the LED power indicator light 2 and the buzzer will sound a "beep".
- By the function selector 3 or 12 (■) select the desired mode for the cooking area left or right respectively
- To turn off the plate again play with fingertip touch button 1 (①) LED power indicator 2 off and the buzzer will sound a "beep".
Note:
If you turn on the plate and do not select any function, automatically turns off after about 10 seconds.
LEFT COOKING ZONE (2000 W max.)
Function selector
By the function selector you can choose the mode of working in power (500 W to 2000 W) at temperature (60 °C to 240 °C) or set the timer.
To select the operating mode in power or temperature follow the steps below to adjust the timer, see the following section.
Power operating mode
- With the power plate and a container in the left cooking, tap once with fingertip touch button 3 (■) display 4 shows the power level default and the LED power mode 7 will light.
- Touch with your fingertip on the touch button 5 (▲) or 6 (▼) to increase or decrease power respectively. The display 4 will show the selected power.
- Touch with fingertip touch knob 10 (MAX) or 11 (MIN) to directly select the maximum or minimum power of the plate.
- At any time during cooking you can increase or decrease the power switch to temperature or set the timer.
Temperature operating mode
- With the power plate and a container in the cooking area, tap three times with fingertip touch button 3 (■) display 4 shows the temperature level default and the LED mode indicator temperature 8 will light.
- Touch with your fingertip on the touch button 5 (▲) or 6 (▼) to increase or decrease the temperature respectively. The display 4 will show the selected temperature.
- Touch with fingertip touch knob 10 (MAX) or 11 (MIN) to directly select the maximum or minimum temperature of the plate.
- At any time during cooking you can increase or decrease the temperature, changing the power mode or set the timer.
Timer
The timer allows you to set a time for automatic shutdown, this time can vary between 5 and 180 minutes. For the timer setting you must first select an operating mode (power or temperature) and a power level or temperature respectively.
For the timer setting, follow these steps:
- With the power plate and a container in the left cooking zone, select an operating mode and a power level or temperature.
- Momentarily touch with fingertip touch button 3 (■), the display will show "O" and the LED flashing timer 9 mode.
- Touch with your fingertip on the touch button 5 (▲) or 6 (▼) to increase or decrease the time in steps of 5 minutes respectively. The display 4 shows the time in minutes.
- Once the time selected display 4 alternately show the power or selected temperature and the remaining time for automatic shutdown. The timer mode LED indicator 9 will remain lit to alert you that the timer is activated.
- At any time during cooking you can increase or decrease the power or temperature, using the buttons 5 (▲) or 6 (▼).
- To cancel the timer touch with fingertip touch button 3 (■) and then choose a mode and a power level or temperature.
Note:
If activating the timer and when the display shows the time "0" if within 5 seconds to select the time for shutdown, timer mode is automatically deactivated.
RIGHT COOKING ZONE (1500 W max.)
Function selector
By the function selector you can choose the mode of working in power (500 W to 1500 W) at temperature (60 °C to 240 °C) or set the timer.
To select the operating mode in power or temperature follow the steps below to adjust the timer, see the following section.
Power operating mode
- With the power plate and a container in the right cooking, tap once with fingertip touch button 12 (■) display 13 shows the power level default and the LED power mode 16 will light.
- Touch with your fingertip on the touch button 14 (▲) or 15 (▼) to increase or decrease power respectively. The display 13 will show the selected power.
- Touch with fingertip touch knob 19 (MAX) or 20 (MIN) to directly select the maximum or minimum power of the plate.
- At any time during cooking you can increase or decrease the power switch to temperature or set the timer.
Temperature operating mode
- With the power plate and a container in the cooking area, tap three times with fingertip touch button 12 (■) display 13 shows the temperature level default and the LED mode indicator temperature 17 will light.
- Touch with your fingertip on the touch button 14 (▲) or 15 (▼) to increase or decrease the temperature respectively. The display 13 will show the selected temperature.
- Touch with fingertip touch knob 19 (MAX) or 20 (MIN) to directly select the maximum or minimum temperature of the plate.
- At any time during cooking you can increase or decrease the temperature, changing the power mode or set the timer.
Timer
The timer allows you to set a time for automatic shutdown, this time can vary between 5 and 180 minutes. For the timer setting you must first select an operating mode (power or temperature) and a power level or temperature respectively.
For the timer setting, follow these steps:
- With the power plate and a container in the right cooking zone, select an operating mode and a power level or temperature.
-
Momentarily touch with fingertip touch button 12 (■), the display will show "O" and the LED flashing timer 18 mode.
-
Touch with your fingertip on the touch button 14 (▲) or 15 (▼) to increase or decrease the time in steps of 5 minutes respectively. The display 13 shows the time in minutes.
- Once the time selected display 13 alternately show the power or selected temperature and the remaining time for automatic shutdown. The timer mode LED indicator 18 will remain lit to alert you that the timer is activated.
- At any time during cooking you can increase or decrease the power or temperature, using the buttons 14 (▲) or 15 (▼).
- To cancel the timer touch with fingertip touch button 12 (■) and then choose a mode and a power level or temperature.
Note:
If activating the timer and when the display shows the time "0" if within 5 seconds to select the time for shutdown, timer mode is automatically deactivated.
CONTROL PANEL LOCK
The induction plate incorporates a locking device that disables operation of the buttons function selection (■) and buttons to increase (▲) and decrease (▼) power / temperature, both cooking zones to time.
When the control panel is locked, you can turn the board to unlock it but you can not operate the cooking zones.
If the induction hotplate is in operation, by blocking the control panel is prevented by mistake, carelessness or error on the power or the selected temperature is varied.
Lock control panel affects both cooking zones to lock the control panel you have to play both the two touch buttons jump MAX and MIN, area left cooking 10 (MAX) and 11 (MIN) or right cooking zone 14 (MAX) and 15 (MIN) when the control panel is locked both screens 4 and 13 show the display "LOC".
To unlock the control panel with the plate lit touch at a time and for 2 seconds the two touch buttons jump MAX and MIN, area left cooking 10 (MAX) and 11 (MIN) or the cooking zone right 14 (MAX) and 15 (MIN) when the control panel is unlocked indication "LOC" disappears from the two screens.
MAINTENANCE AND CLEANING
Before cleaning disconnect the unit from the mains power supply. And make sure the plate is completely cold. Do not use alcohol or abrasive products and not allow the appliance to contact volatile agents such as gasoline, solvents, insecticides, etc.
Cleaning the cooking plate
- After each use you should clean the plate, thus it will prevent burning remains attached.
- Do not clean the plate until it is cold enough.
- Use only specific products for cleaning induction plates, failure to do so could damage the cooking surface.
- Never use scouring pads that may scratch the surface, nor should use abrasive cleaning fluids how sprays for furnaces.
Cleaning the plastic surface
- Clean the plastic surface with a damp cloth and then with a dry one. Avoid water from the vents.
If you see the holes in the fan has accumulated a lot of dirt, remove it with a brush.
PROBLEM SOLVING
If there is any abnormality or problem in the operation of the induction hotplate, the display 4 or 13 show the detected error of the corresponding cooking zone.
Error messages appear on the screen with the letter "E" followed by a number, see the table below to identify the error and solution.
| Message | Description | Solution |
| EO | No container, the container is not suitable for induction or the diameter of its base is less than 12 cm | Place a container on the cooking zone or replace the container that is invalid. |
| E2 | The NTC sensor is defective | Contact our Customer Service nearest MX ONDA. |
| E3, E4 | Undervoltage protection or overvoltage portection | If the voltage at the outlet network is less than or greater than that specified, consult a qualified electrician. |
| E5 | The glass or ceramic plate has overheated | Unplug the induction plate and allow to cool. |
| E6 | It is activated overheating protection | Failure in the ventilation system, check that the fan is not clogged and functioning properly. Unplug the induction plate and allow to cool. |
TECHNICAL SPECIFICATIONS
Supply voltage 220-240 V ~ 50/60 Hz
Maximum consumption 3500 W
Cooking surface Glass ceramic high resistance
Cooking diameter 12 to 26~cm (for the two cooking zones)
Left cooking zone
Power levels 6 levels
Temperature levels 10 levels
Power range 500 W to 2000 W
Temperature range 60^ to 240^
Right cooking zone
Power levels 6 levels
Temperature levels 10 levels
Power range 500 W to 1500 W
Temperature range 60^ to 240^
Timer 5 to 180 minutes
Dimensions 605× 365× 65mm (L, W, H)
Weight 5.36 Kg
Specifications subject to change without notice.
This product complies with the European Directives 2004/108/EC (EMC - Electromagnetic Compatibility) and the 2006/95/EC (LVD - Low Voltage Directive) relative to Low Tension Security.
"MX, MX ONDA" and its logos are trademarks of MX ONDA, S.A.
Telephone of information and Technical Service: +34 902 551 501
MX ONDA, S.A.
Isla de Java, 37
28034 - MADRID (SPAIN)

Manual de instrucciones Instruction manual
- MANUEL D'INSTRUCTIONS
- Mx Onda
- PLAQUE D'INDUCTION DOUBLE PORTABLE
- ATTENTION
- CAUTION
- VERY IMPORTANT!
- INTRODUCTION
- BEFORE CONNECTING THE APPLIANCE
- SECURITY MEASURES
- INDUCTION COOKING
- Advantages of induction cooking
- Appropriate containers for induction
- Ferromagnetic containers
- Special containers
- Containers not suitable for induction
- Features of the container base
- Empty containers or very thin base
- Detection of the container
- fans
- Note:
- INSTALLATION
- CONTROLS AND ELEMENTS
- Controls left cooking zone (2000 W max.)
- Controls right cooking zone (1500 W max.)
- Left cooking zone
- Right cooking zone
- TURNS ON AND OFF
- LEFT COOKING ZONE (2000 W max.)
- Function selector
- Power operating mode
- Temperature operating mode
- Timer
- RIGHT COOKING ZONE (1500 W max.)
- For the timer setting, follow these steps:
- CONTROL PANEL LOCK
- MAINTENANCE AND CLEANING
- Cleaning the cooking plate
- Cleaning the plastic surface
- PROBLEM SOLVING
- TECHNICAL SPECIFICATIONS
Brand : Mx Onda
Model : MXPIP2199
Category : Cooker