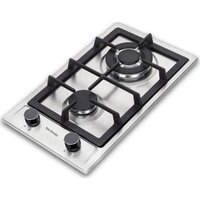
MX-PG2202X - Cooker Mx Onda - Free user manual and instructions
Find the device manual for free MX-PG2202X Mx Onda in PDF.


| Product Type | Built-in Gas Hob |
| Brand | Mx Onda |
| Model | MX-PG2202X |
| Number of Burners | 2 (1 semi-rapid, 1 triple ring) |
| Semi-rapid burner power (medium) | 1.8 kW |
| Triple ring burner power (large) | 3.4 kW |
| Compatible Gas Types | Natural gas (G20) and butane gas (G30) |
| Natural gas supply pressure | 20 mbar |
| Butane gas supply pressure | 30 mbar |
| Appliance dimensions (W x D x H) | 290 x 500 x 94 mm |
| Worktop cutout dimensions (W x D) | 270 x 480 mm |
| Electrical supply | 220-240 V ~ 50 Hz |
| Ignition | Integrated electric |
| Safety device | Thermocouple (automatic gas shut-off if flame goes out) |
| Surface material | Stainless steel 304 (thickness 0.6 mm) |
| Burner and grate material | Cast iron |
| Recommended pan diameter for semi-rapid burner | 16 to 20 cm |
| Recommended pan diameter for triple ring burner | 24 to 26 cm |
| Conversion from butane to natural gas | Injectors provided, replacement by certified installer |
| Recommended cleaning | Warm water and soap, avoid abrasive products |
| Estimated net weight | Approximately 8 kg |
Frequently Asked Questions - MX-PG2202X Mx Onda
User questions about MX-PG2202X Mx Onda
0 question about this device. Answer the ones you know or ask your own.
Ask a new question about this device
Download the instructions for your Cooker in PDF format for free! Find your manual MX-PG2202X - Mx Onda and take your electronic device back in hand. On this page are published all the documents necessary for the use of your device. MX-PG2202X by Mx Onda.
USER MANUAL MX-PG2202X Mx Onda
natural_image
Exterior view of a modern gas stove with four stoves and control knobs (no text or symbols visible)CE 2575-22
ANTES DE SU USO LEA ATENTAMENTE ESTE MANUAL
ATENCIÓN
natural_image
Cross-sectional technical drawing of a mechanical assembly (no visible text or labels)Encimera de 20 mm de grosor
natural_image
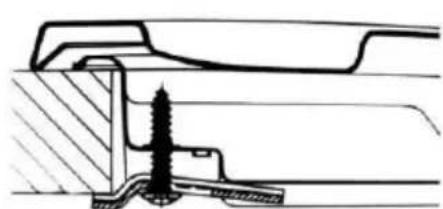
Technical cross-section diagram of a mechanical assembly (no text or labels)Encimera de 30 mm de grosor
natural_image
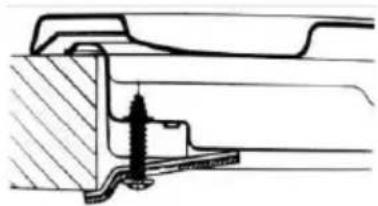
Cross-sectional technical drawing of a mechanical assembly (no text or symbols visible)Encimera de 40 mm de grosor
natural_image
Illustration of a hand holding a tool above a white tool, with no visible text or symbols.natural_image
Exterior view of a modern gas stove with four stoves and control knobs (no text or symbols visible)CE 2575-22
ANTES DE SEU USO LEIA ATENTAMENTE ESTE MANUAL
ATENÇÃO
natural_image
Diagram showing a door frame and a vertical structure with an arrow indicating direction (no text or symbols)Fig.4
natural_image
Simple line drawing of a room with a door, cabinet, and chimney (no text or symbols)natural_image
Technical cross-sectional diagram of a mechanical assembly (no text or labels)natural_image
Technical cross-section diagram of a mechanical assembly (no text or labels)natural_image
Technical cross-sectional diagram of a mechanical assembly (no text or labels)natural_image
Illustration of a mechanical device with a foot and lever assembly (no text or symbols)USER AND INSTALLATION MANUAL
Mx Onda
BUILT-IN GAS HOB
MODEL: MX-PG2202X
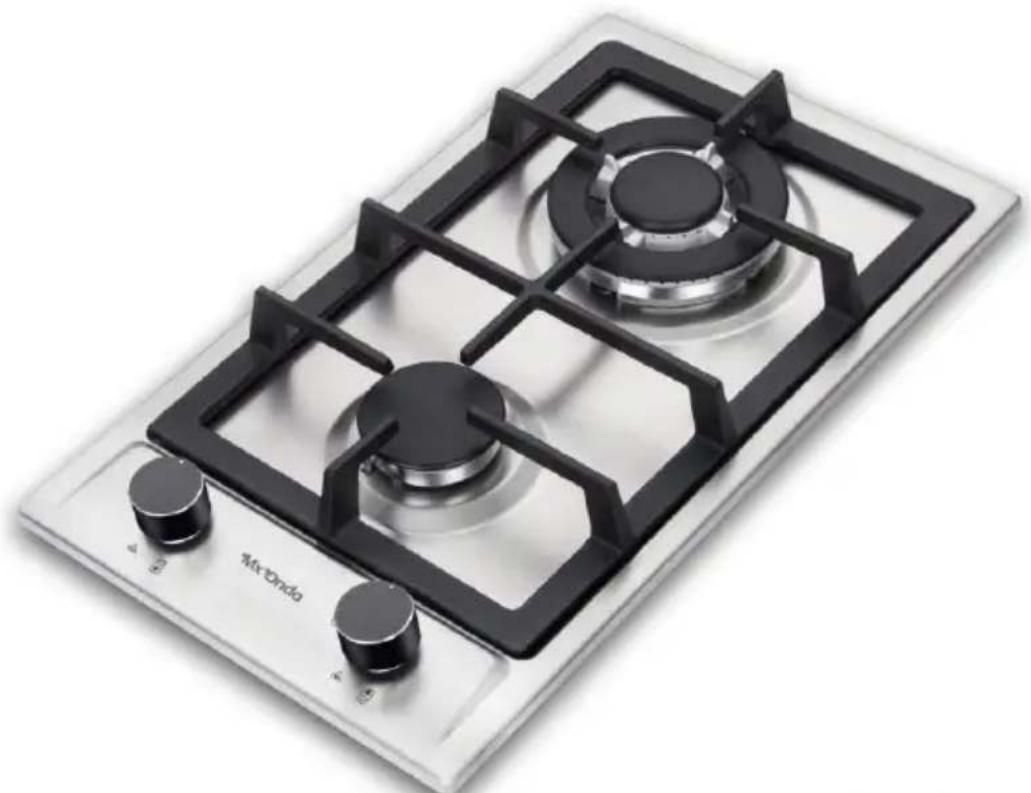
natural_image
Exterior view of a modern gas stove with four stoves and control knobs (no text or symbols visible)CE 2575-22
PLEASE READ THESE INSTRUCTION MANUAL BEFORE USE
WARNING
This unit operates with a voltage of 220/240 V, to avoid a possible electrical shock not try to open it. This equipment does not have part some that could be repaired by your, in the event of a wrong operation not manipulate it, and attend to an Official Technical Service MX ONDA.
Waste electrical products must not be disposed of with household waste.
This equipment should be taken to your local recycling centre for safe treatment.

This product complies with European Directives RoHS (2011/65/UE), on the restriction of use of certain dangerous substances in electrical and electronic appliances.

INTRODUCTION
MX ONDA thanks you for the deference you have had when purchasing this product. The gas hob model MX-PG2202X has been manufactured with high quality materials, its design makes it suitable for any type of kitchen. Among others it has the following characteristics:
- Base in 304 # stainless steel with 0.6 mm thickness.
- 2 cooking zones:
Semi fast: For containers of 16 to 20 cm ∅ / calorific value: 1.8 kW
Triple ring: For containers of 24 to 26 cm ∅ / calorific value: 3.4 kW
- Compatible with butane gas (G30) and natural gas (G20)
• Electric ignition system - Burner and bracket in cast iron
BEFORE CONNECTING THE HOB
- Read these instructions carefully and keep them for later use.
- After removing the packaging, check that the appliance is not damaged. If in doubt, do not use it; Contact the technical support staff.
- All operations related to the electrical installation and gas supply must be carried out by a specialized and authorized installer.
- Check that the voltage of your outlet is 220/240 V \~ 50 Hz and that it is equipped with an earth connection.
- The manufacturer declines any responsibility for damages resulting from improper, incorrect or reckless use of the device.
- Packaging materials such as plastic bags, Styrofoam, etc., should not be left within reach of children, as they are a potential source of danger.
- The electrical safety of this device is guaranteed only if it is connected to an effective earth ground, as provided by current safety regulations. The manufacturer declines any responsibility for damages resulting from the lack of grounding of the installation. If in doubt, consult a qualified electrician.
SECURITY MEASURES
Failure to follow these safety precautions or warnings could result in burns or serious injury.
- Children should not play with this device. Cleaning and maintenance to be performed by the user can not be done by children, unless they are over 8 years old and are supervised.
- Make sure that in the room where the gas hob is installed, have proper ventilation, according to the regulations in force
- This device can not be used by children (under 8 years old) or people with reduced physical, sensory or mental abilities or without experience and knowledge, unless they have received appropriate instructions on the use of the device and are supervised by an adult or responsible person.
- This device is designed only for domestic, non-professional use. MX ONDA will not accept any liability and the guarantee will be invalid in case of improper use or failure to comply with the instructions.
- This appliance has been designed for indoor use, do not expose this appliance to rain or moisture and do not use it outdoors.
• Gas supply connection:
- The connection of the gas supply must be made by an authorized installer in accordance with the regulations in force.
- Check that the plate is adapted to the type of gas used.
- Verify that the gas supply pressure is within the values specified in the corresponding section of the manual.
- To prevent damage to the inside of the plate, connect the gas inlet so that it is not forced.
- If you need to use the 90 ° elbow or the adapter for the flexible hose, do not forget to place the insulation joints as well as the subsequent verification of absence of gas leaks.
- In case of failure, anomalies, if the hob, burners or supports have fallen and deteriorated, do not use the device and do not try to repair it on your own. Contact the nearest MX ONDA Official Technical Service.
CONTROLS AND FUNCTIONS
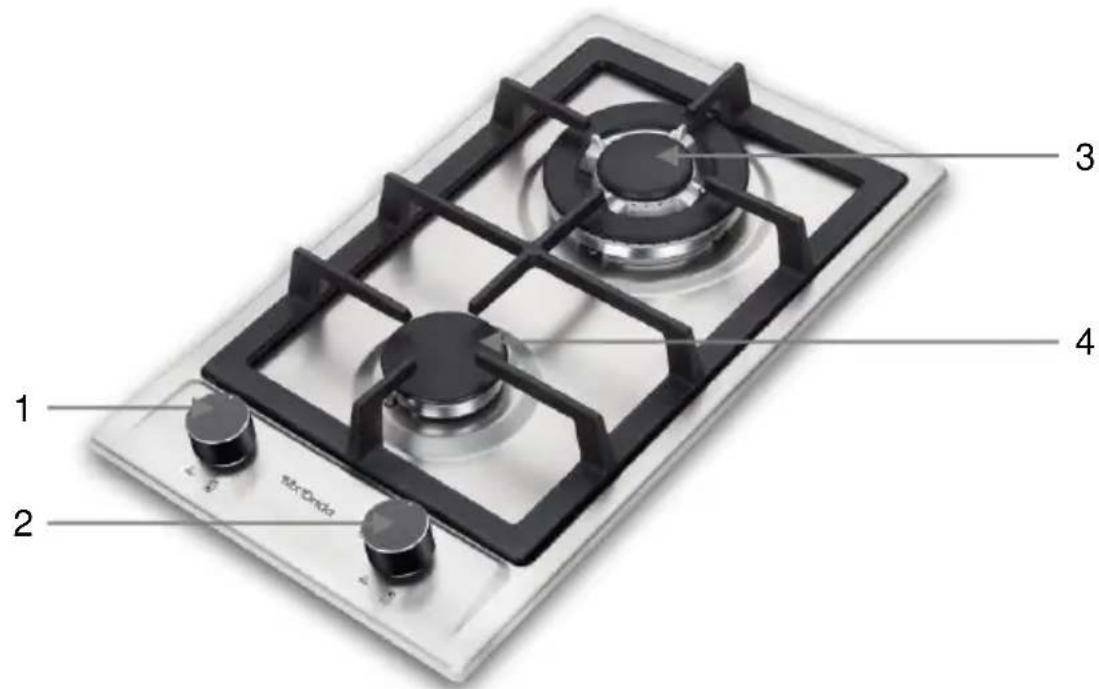
-
Control lower cooking zone
-
Control of higher cooking zone
-
Large cooking zone (Triple ring)
-
Medium cooking zone (Semi fast)
-
Electric ignition
-
Safety sensor: Activated if the flame is accidentally off (spills, drafts, etc.), interrupting the gas supply to the burner.
USE OF THE GAS HOB
The position of each cooking zone is indicated in the right part of the corresponding control, medium cooking zone and large cooking zone. The cooking zones are different in size and power. Choose the most suitable area for the diameter of the container used, and adjust the flame or heat power according to your taste or preference.
Turning ON/OFF a cooking zone
Press and hold for approximately 6 seconds the button corresponding to the chosen cooking zone (the electric start will start to work) and turn it counterclockwise to the maximum flame level ( ), after this time stop pressing the button and the flame will stay lit in the position of maximum flame level or maximum heat power.
To decrease or increase the level of the flame or heat output, turn the knob counterclockwise to the position ( 🔒) minimum flame level or to the position ( 🔒) maximum flame level.
To switch off a cooking zone, turn the corresponding button clockwise to the ● position.
SECURITY DEVICE
The gas plate is equipped with a safety device, which interrupts the supply of gas in the event that the flame goes out. In each burner there is a sensor that checks the state of the flame, and if for any reason the flame goes out, the gas supply of the burner is interrupted.
If the flame is accidentally switched off and the safety device operates, switch off the cooking zone using the corresponding control button and try to switch it on again after approximately 1 minute.
PRACTICAL TIPS
To obtain the best results and save energy, we recommend that you follow the following tips:
- Use containers with a flat bottom and as far as possible keep the container lid on.
- Choose the cooking zone appropriate to the diameter of the base of the container (see table) in order to prevent the flame from leaving the edge of the container, save energy and avoid damage to the container.
- When the content of the container is boiling (boiling), reduce the flame or calorific power, since it only needs to maintain the temperature of boiling, with a smaller flame it will be enough.
| Cooking zone | Diameter of the container base |
| Large (triple ring) | 24 ~ 26 cm ∅ |
| Medium (Semi fast) | 16 ~ 20 cm ∅ |
MAINTENANCE AND CLEANING
Before cleaning the plate, disconnect it from the mains socket and make sure that the gas plate is completely cold. Do not use alcohol or abrasive products and do not allow the appliance to come into contact with volatile agents such as gasoline, solvents, insecticides, etc.
To prolong the life of the gas plate, it is essential that it be carefully cleaned, thoroughly, and please take into account the following:
- Burners and cast iron supports should be washed with warm water and soap or an anti-grease product. Do not use alcohol or abrasive products. Be sure to remove any traces of grease, to prevent them from burning. Once clean, use a cloth to dry them, making sure they are completely dry before placing them.
- Pay special attention to the aluminum gas distributors, which should be washed with hot water and soap or an anti-grease product, making sure that the gas circulation slots are completely clean and that there is no grease or impurities to obstruct them. Do not use alcohol or abrasive products. Once clean, use a cloth to dry them, making sure they are completely dry before placing them.
- For the stainless steel surface use hot water and soap or an anti-grease product. Do not use scouring pads that can scratch the surface, nor should you use abrasive products such as spray stain removers for ovens.
- After each use you should clean the plate, in this way you will avoid that the adhered residues burn.
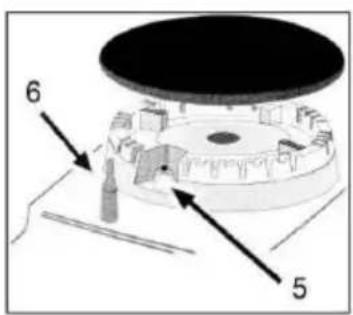
- The pivots for the electric ignition 5 and the safety sensors 6, must be carefully cleaned so as not to damage them, use a paper towel or a slightly moistened cloth, then dry them very carefully.
PROBLEM SOLVING
If the gas cooker does not work properly or you notice an anomaly, before calling the Official Technical Service or an Authorized Installer, perform the following basic checks:
First, check and verify that there are no interruptions in the supply of gas and electricity, in particular, if the gas cock is open.
The burner can not be ignited or the flame is not even around the burner.
Make sure that:
- The gas holes in the burner are not obstructed.
- All the moving parts of the burners are fixed correctly.
- There is no strong air current around the gas plate.
The flame does not stay lit.
Make sure that:
- It keeps the button pressed when it is rotating to position 🔊.
- Continue pressing the button long enough for the flame to warm the safety sensor (thermocouple).
- The gas holes are not blocked in the area corresponding to the safety sensor (thermocouple).
The flame goes out when the button is turned to the minimum position 🔒.
Make sure that:
- The gas holes are not clogged.
- There is no strong air current around the gas plate.
- The minimum level has been adjusted correctly (see section Adjusting valves).
The containers are not stable or do not sit well on the supports.
Make sure that:
- The bottom of the kitchen containers are perfectly flat.
- The containers are correctly centered in the support.
- The supports are correctly placed and fitted on the gas plate.
The control buttons of the cooking zones do not turn smoothly
Over time, gas control valves can become dirty due to grease and accumulated dust. In this case it will be necessary to access the valves to clean and grease them, this cleaning and lubrication work must be carried out only by an authorized Technician or the Official Technical Service.
Note:
If after these checks, observe anomalies or that the gas plate does not work properly, contact the Official Technical Assistance Service or consult an Authorized Installer.
INSTALLATION OF THE GAS HOB
¡Very important!
The installation of the gas hob must only be carried out by an authorized installer. MX ONDA will not accept any liability and the guarantee will be invalid in case of incorrect or incorrect installation.
The following instructions are for the authorized installer, installation and maintenance must always be carried out by qualified personnel and / or authorized technicians.
Warning: Unplug the gas hob from the electrical outlet before carrying out any maintenance work.
Ventilation of the room
This gas hob must be installed and used in rooms with permanent ventilation and adequate to current regulations. The following requirements must be considered:
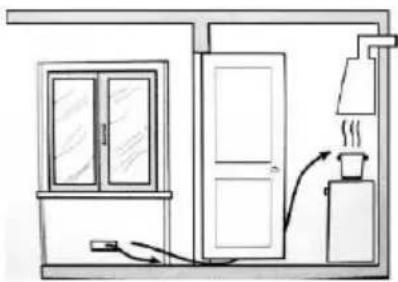
a) The room must be prepared with a ventilation system that facilitates the exit of smoke and combustion gases to the outside. In specific cases it is possible to resort to electric hoods or extractors to force ventilation.
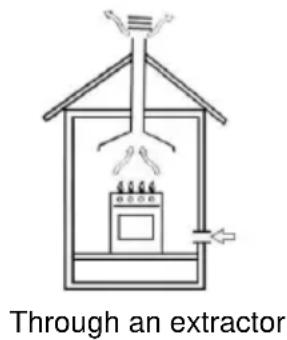
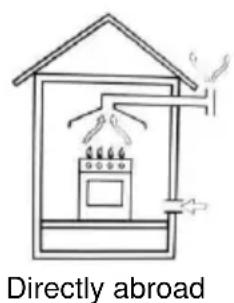
b) The air inlet hole for ventilation must be large enough to allow an air flow of at least 2 m^3/h per kW of installed heat capacity.
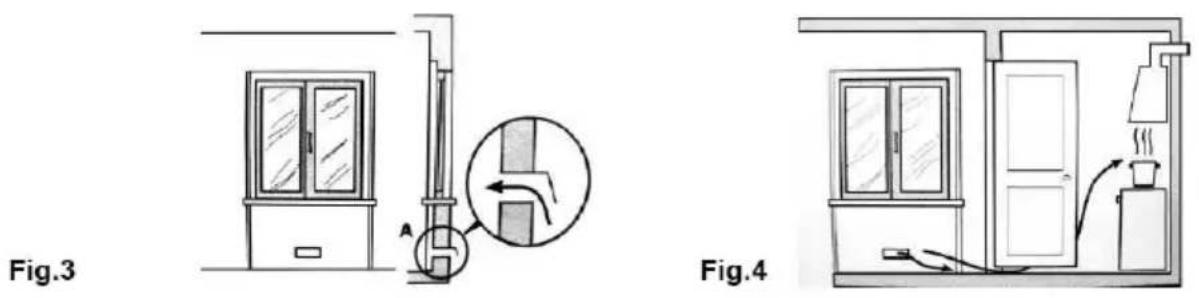
The outside air inlet duct for ventilation must have a minimum of 100 cm^2 and should not be able to be blocked or obstructed easily.
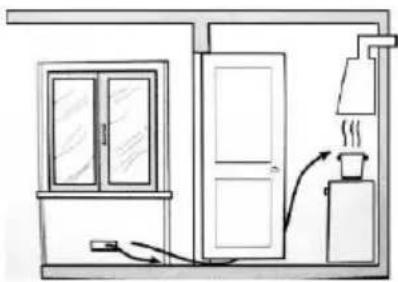
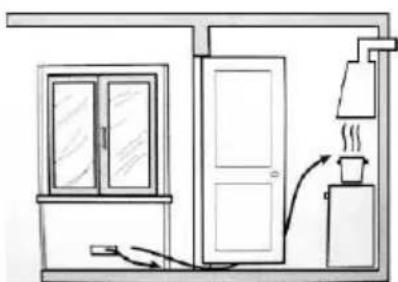
Gas equipment without safety devices must have a ventilation twice the volume of a protected equipment. For example, a minimum of 200 cm^2 (Fig.3), another option (less advisable) would be to use an adjacent room with ventilation inlet (Fig.4) in this case the door has to have enough slack in the lower part to allow ventilation even if it is closed.
c) If you are going to make a prolonged and continuous use of the gas plate, we recommend that you increase the ventilation system of the room where the gas plate is installed.
Location of the gas hob
The gas plate is designed to withstand high temperatures, so it can be installed above the oven, (leaving a small gap to facilitate proper ventilation of the oven).
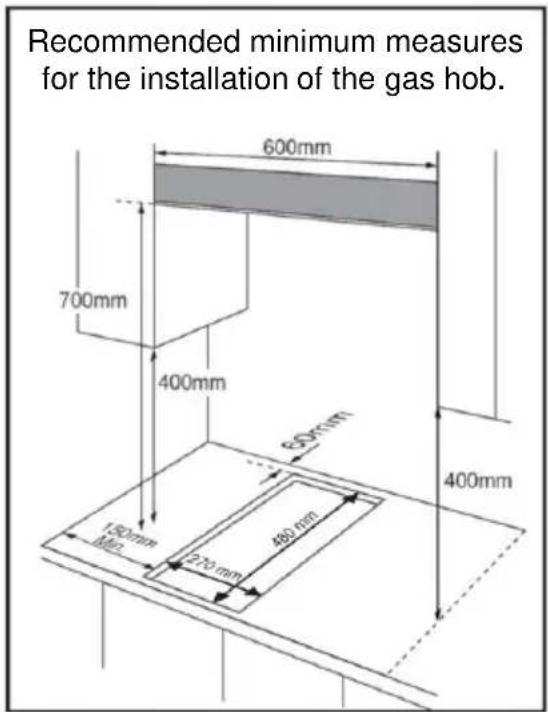
For proper installation and ventilation, the minimum distances between the gas plate and the different furniture and / or appliances must be respected, follow the following recommendations:
a) The hob can be installed in any room, as long as it has sufficient ventilation and does not have excess humidity.
b) It is necessary to leave a lateral separation of at least 150 mm between the plate and the nearest piece of furniture or household appliance
c) The height from the gas hob to the furniture must have a minimum of 400 mm in height.
d) The height from the gas hob to the hood must have a minimum height of 700 mm.
e) At the back of the gas hob, a gap between the plate and the wall of at least 60 mm must be left to facilitate connection and manipulation of the gas inlet of the plate.
f) Along with the packaging of the gas hob there is a cardboard template for cutting the countertop, this template has the dimensions and shape of the bottom of the gas hob, use it to mark on the countertop the lines for cutting or draft of it.
g) Before attaching the gas hob, you must glue the sealing gasket (supplied) to the bottom of the gas hob.
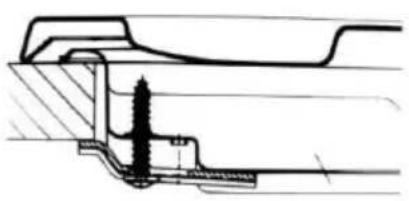
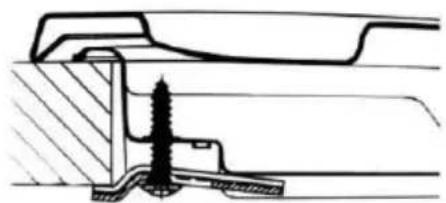
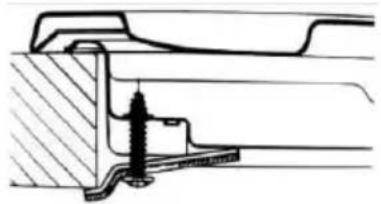
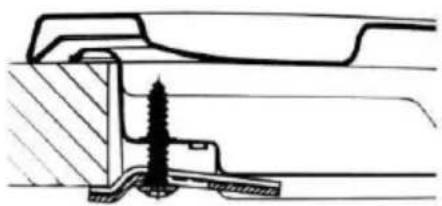
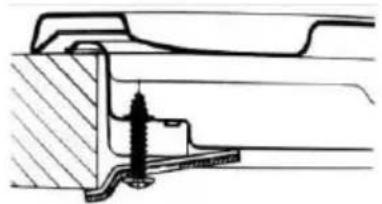
h) The fixing accessories (hooks and screws supplied) are used to fix the gas hob on a countertop from 20 to 40 ~mm thick, the following illustration shows the three different options.
natural_image
Cross-sectional technical drawing of a mechanical assembly (no text or symbols visible)Countertop 20 mm thick
natural_image
Technical cross-section diagram of a mechanical assembly (no text or labels)Countertop 30 mm thick
natural_image
Technical cross-sectional diagram of a mechanical assembly (no text or labels)Countertop 40 mm thick
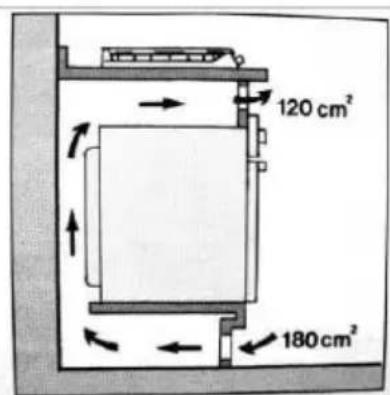
i) In the case of installing an oven to fit under the gas plate, it is recommended to improve the ventilation around the oven, to avoid excessive heating, place a grid for the air intake from the bottom of the oven and another grid in the oven. upper part of the hob (Fig. 5) or in the front-upper part of the oven (Fig. 6).
Fig. 5
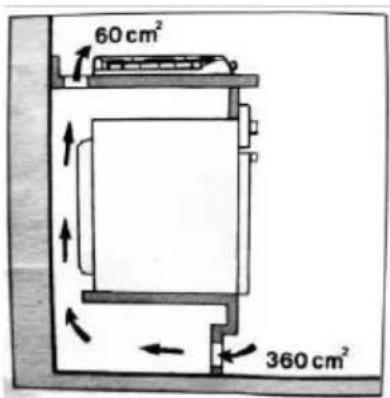
Fig. 6
Connection of gas supply by rigid or flexible tube
¡Very important!
- The connection of the gas outlet for both rigid and flexible pipes must be carried out by an authorized installer.
- The gas plate comes from the origin with the injectors for butane gas (G30), in the case of using natural gas (G20) the injectors (supplied) must be changed suitable for natural gas (NG).
- Make sure that the pressure of the gas supply is within the values specified in table 3.
Connection of the gas supply by rigid tube
The gas outlet must have a key to cut the gas supply to the plate, if you need to use the elbow adapter, remember to insert the gaskets. After the installation, check that there are no gas leaks.
Connection of the gas supply by flexible tube
Use the elbow adapter together with the adapter for the flexible hose with the corresponding sealing gaskets. The flexible tube must be approved and its length can not exceed 2 meters in length. After the installation, check that there are no gas leaks and that the hose is not crushed or deformed.
Electric connection
Connect the plug to a mains socket of 220/240 V \~ 50 Hz and that is provided with an earth connection.
Position the power cable in such a way that it does not touch any surface that may acquire high temperatures (the chassis of an oven, for example).
CHANGE OF THE TYPE OF GAS ON THE PLATE
The gas plate comes from the factory with the injectors for BUTANE GAS (G30), if you want to change it to GAS NATURAL (G20) you must use the injectors supplied in the accessory bag.
The injectors are marked with the diameter of the hole of the outlet for the gas, and it is very important that you pay close attention when placing them since if you get confused you can have a very large flame in the small burner or a very small flame in the the big burner.
Install the injectors as indicated in the following table:
| Burner size | NATURAL GAS (G20) | BUTANE GAS (G30) |
| Injector marking | Injector marking | |
| Semi fast (medium) | 0.97 | 0.67 |
| Triple ring (large) | 1.25 | 0.93 |
| Supply pressure | 20 mbar | 30 mbar |
ADJUSTING THE VALVES
If the pressure in the gas supply (natural gas or butane gas) differs from that specified for the gas plate, it may happen that the flame is irregular or goes out, in which case the adjustment of the valve would have to be regulated, to do this, follow the following process:
-
Turn on the cooking zone you wish to adjust and wait approximately 10 minutes for the safety sensor to be completely hot.
-
Turn the knob counterclockwise to the position ( ) minimum flame level.
-
The flame must not be switched off or moved to the burner, if it is switched off or moves towards the burner it will be necessary to readjust the valve.
-
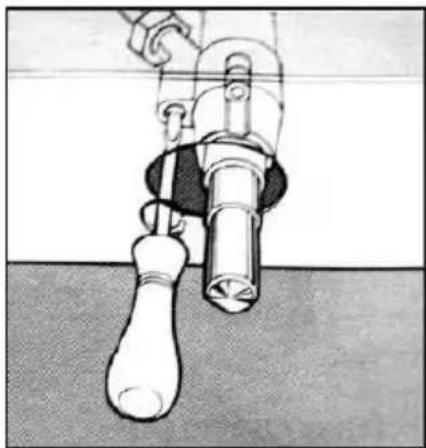
To access the valve reset screw, remove the button corresponding to the cooking zone you wish to adjust by pulling it upwards.
-
Using a fine flat-blade screwdriver, readjust the screw on the top left of the valve.
-
Repeat steps 1 to 5 with the other cooking zones.
natural_image
Illustration of a mechanical device with a lever and base, no visible text or symbolsAdapting to different types of gas
Appliance category: I2H I2E I2E+ I2L I2HS I2ELS I2ELW I3+ I3B/P I3P I2H3+ II2E3B/P I2HS3B/P II2ELWLS3B/P II2ELL3B/P
| Size of the burner | Type of gas | Pressure mbar | Nozzle diameter | Nominal charge | Reduced charge | ||||
| g/h | l/h | kW | Kcal/h | kW | Kcal/h | ||||
| Semi fast (Medium) | Natural G20 | 20 | 0.97 | - | 171 | 1,8 | 1548 | 0,6 | 516 |
| Butane G30 | 30 | 0.67 | 130,8 | - | 1,8 | 1548 | 0,6 | 516 | |
| Triple ring (Big) | Natural G20 | 20 | 1.25 | - | 323 | 3,4 | 2924 | 1,5 | 1290 |
| Butane G30 | 30 | 0.93 | 247 | - | 3,4 | 2924 | 1,5 | 1290 | |
TECHNICAL SPECIFICATIONS
Operating Voltage 220-240 V \~ 50 Hz.
Compatible with Natural gas and butane
Gas category II 2H3B / P
Natural gas heat power (NG)
Triple ring (large) 3.4 kW / 323 l / h
Semi fast (medium) 1.8 kW / 171 l / h
Butane gas calorific power (LPG)
Triple ring (large) 3.4 kW / 247 g / h
Semi fast (medium) 1.8 kW / 130.8 g / h
Nominal pressure Natural gas: 20 mbar
Butane gas: 30 mbar
Diameter of the container base
Triple ring (Large) 24 \~ 26 cm ∅
Semi fast (Medium) 16 \~ 20 cm ∅
Dimensions 290 x 500 x 94 mm (l, a, height)
Dimensions hollow fit 270 x 480 mm (l, a)
Specifications subject to change without notice.
This product complies with the European Directives:
- 73/23/EEC de 19/02/73 (Low voltage) and subsequent modification;
- 89/336/EEC de 03/05/89 (Electromagnetic compatibility and subsequent modification;
- 90/396/EEC de 29/06/90 (Gas) and subsequent modification;
- 93/68/EEC de 22/07/93 and subsequent modification;
"MX, MX ONDA" and its logos are trademarks of MX ONDA, S.A.
Telephone of information and Technical Service: +34 902 551 501
MX ONDA, S. A.
C / Matabueyes, 7 nave 1A
19171 - Cabanillas del Campo (Guadalajara)
E-MAIL: mxsat@mxonda.es
http://www.mxonda.es
natural_image
Exterior view of a modern gas stove with four stoves and control knobs (no text or symbols visible)CE _2575-22
PRIMA DI UTILIZZARE IL MANUALE DI LEGGERE ATTENTAMENTE
ATTENZIONE
natural_image
Simple line drawing of a house interior with a stove, roof, and heating elements (no text or symbols)natural_image
Simple line drawing of a house with a stove and appliances, no text or symbols presentnatural_image
Diagram showing a door frame and a vertical structure with an arrow indicating direction (no text or symbols)Fig.4
natural_image
Simple line drawing of a room with a door, cabinet, and chimney (no text or symbols)natural_image
Technical cross-section diagram of a mechanical assembly (no text or labels)Tavola spessa 20 mm
natural_image
Technical line drawing of a mechanical assembly with a screw and mounting bracket (no text or symbols)Tavola spessa 30 mm
natural_image
Cross-sectional technical drawing of a mechanical assembly (no text or symbols visible)Tavola spessa 40 mm
natural_image
Illustration of a hand holding a tool above a mechanical component (no text or symbols visible)natural_image
Exterior view of a modern gas stove with four stoves and control knobs (no text or symbols visible)CE _2575-22
AVANT D'UTILISER CE MANUEL DE LIRE ATTENTIVEMENT
ATTENTION
natural_image
Technical line drawing of a door with a side panel and a close-up inset showing internal components (no text or symbols)Fig.4
natural_image
Simple line drawing of a room interior with a door, cabinet, and chimney (no text or symbols)natural_image
Cross-sectional technical drawing of a mechanical assembly (no text or symbols visible)natural_image
Technical cross-section diagram of a mechanical assembly (no text or labels)natural_image
Cross-sectional technical drawing of a mechanical assembly (no text or symbols visible)natural_image
Illustration of a mechanical device with a foot and lever assembly (no text or symbols)natural_image
Exterior view of a modern gas stove with four stoves and control knobs (no text or symbols visible)CE _2575-22
VOR GEBRAUCH SORGFÄLTIG LESEN SIE DIESE
ACHTUNG
natural_image
Technical cross-sectional diagram of a mechanical assembly (no text or labels)natural_image
Technical cross-section diagram of a mechanical assembly (no text or labels)natural_image
Cross-sectional technical drawing of a mechanical assembly (no text or symbols visible)natural_image
Illustration of a hand holding a mechanical device with a foot and legs, no text or symbols presentnatural_image
Icon of a person reading a book inside a circle (no text or symbols)E-MAIL: mxsat@mxonda.es
http://www.mxonda.es
- ATENCIÓN
- ATENÇÃO
- USER AND INSTALLATION MANUAL
- Mx Onda
- BUILT-IN GAS HOB
- WARNING
- INTRODUCTION
- BEFORE CONNECTING THE HOB
- SECURITY MEASURES
- USE OF THE GAS HOB
- Turning ON/OFF a cooking zone
- SECURITY DEVICE
- PRACTICAL TIPS
- MAINTENANCE AND CLEANING
- PROBLEM SOLVING
- The burner can not be ignited or the flame is not even around the burner.
- Make sure that:
- The flame does not stay lit.
- The flame goes out when the button is turned to the minimum position 🔒.
- The containers are not stable or do not sit well on the supports.
- The control buttons of the cooking zones do not turn smoothly
- Note:
- INSTALLATION OF THE GAS HOB
- ¡Very important!
- Ventilation of the room
- Location of the gas hob
- Connection of gas supply by rigid or flexible tube
- Connection of the gas supply by rigid tube
- Connection of the gas supply by flexible tube
- Electric connection
- CHANGE OF THE TYPE OF GAS ON THE PLATE
- ADJUSTING THE VALVES
- Adapting to different types of gas
- TECHNICAL SPECIFICATIONS
- ATTENZIONE
- ATTENTION
- ACHTUNG
Brand : Mx Onda
Model : MX-PG2202X
Category : Cooker