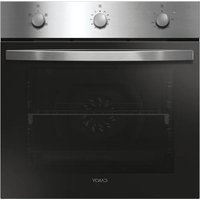
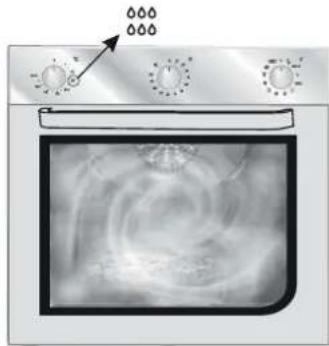
FCP502N - Built-in oven CANDY - Free user manual and instructions
Find the device manual for free FCP502N CANDY in PDF.
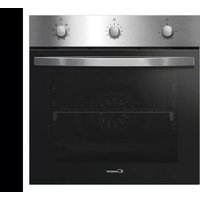
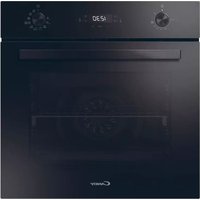
| Product type | Built-in oven |
| Brand | Candy |
| Model | FCP502N |
| Dimensions (W x H x D) | 595 x 595 x 568 mm (approx) |
| Net weight | 35 kg (approx) |
| Supply voltage | 230 V |
| Frequency | 50 Hz |
| Maximum power | 3000 W |
| Capacity | 70 L (approx) |
| Control type | Electronic with programmer |
| Display | Touch control clock |
| Cooking functions | Natural convection, Forced air, Soft Cook, Bottom heat, Grill, Super Grill, Turbo Grill, Pizza, Cook Light, Sprinter, Defrost |
| Cooking system | U-COOK with variable speed fan (Vario Fan) |
| Lighting | U-SEE system with 14 LEDs |
| Cleaning | Aquactiva function (steam), catalytic panels option |
| Safety | Child lock, auto shut-off, grid locking |
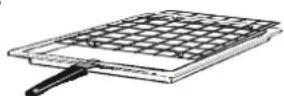
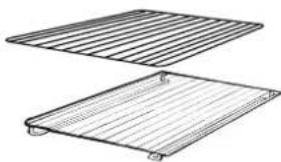
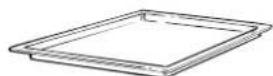
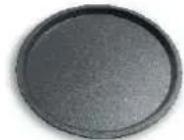
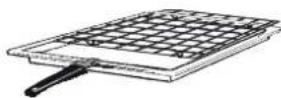
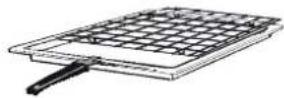
| Supplied accessories | Simple grid, dish grid, sauce pan, pizza set, flat grill, handle |
| Door type | WIDE DOOR (double glazing) |
| Self-cleaning | Catalysis (optional) |
| Timer | Audible and power cut-off |
| Warranty | 2 years |
| Repairability | Spare parts available via after-sales service |
| Manual | Available in PDF at notice-facile.com |
Frequently Asked Questions - FCP502N CANDY
User questions about FCP502N CANDY
0 question about this device. Answer the ones you know or ask your own.
Ask a new question about this device
Download the instructions for your Built-in oven in PDF format for free! Find your manual FCP502N - CANDY and take your electronic device back in hand. On this page are published all the documents necessary for the use of your device. FCP502N by CANDY.
USER MANUAL FCP502N CANDY
1.1 Declaration Of Compliance
1.2 Safety Hints
1.3 Installation
1.4 Fitting The Oven Into The Kitchen Unit
1.5 Important
1.6 Connecting To The Power Supply
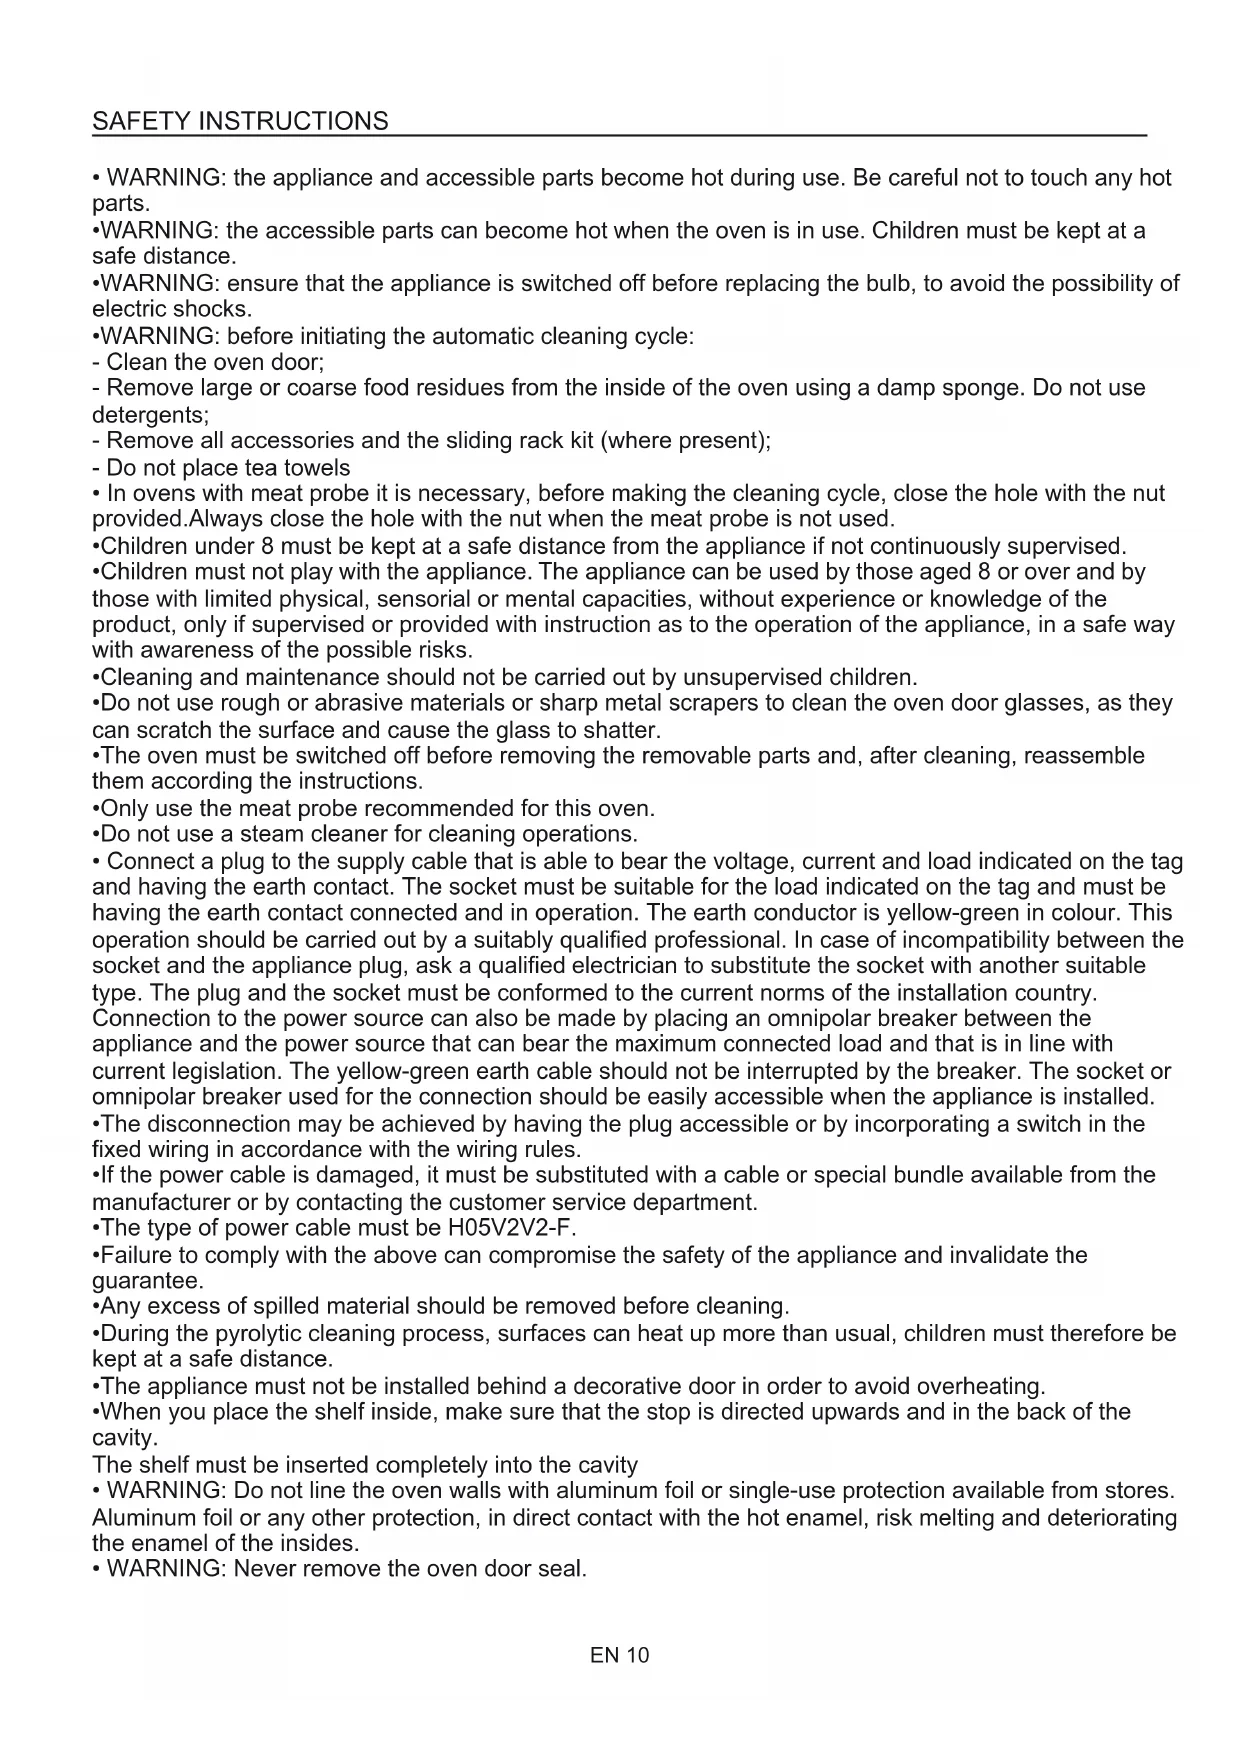
1.7 Oven Equipment (according To The Model)
Useful Tips
12
2.1 Shelf Safety System
2.2 Grilling
2.3 The U-Cook Models
2.4 U-See
2.5 Self-cleaning Oven With Catalytic
2.6 AQUACTIVA Function
2.7 Cleaning And Maintenance
2.8 Service Centre
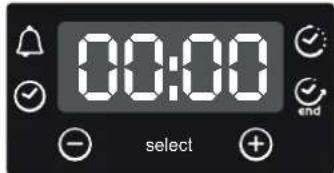
Timer
13
3.1 Using The Minute Timer
3.2 Using The End Of Cooking Timer
3.3 Setting The Correct Time
3.4 Use Of The Electronic Programmer
Operating Instructions
15
- WARNING: the appliance and accessible parts become hot during use. Be careful not to touch any hot parts.
-WARNING: the accessible parts can become hot when the oven is in use. Children must be kept at a safe distance.
-WARNING: ensure that the appliance is switched off before replacing the bulb, to avoid the possibility of electric shocks.
-WARNING: before initiating the automatic cleaning cycle: - Clean the oven door;
- Remove large or coarse food residues from the inside of the oven using a damp sponge. Do not use detergents;
- Remove all accessories and the sliding rack kit (where present);
- Do not place tea towels
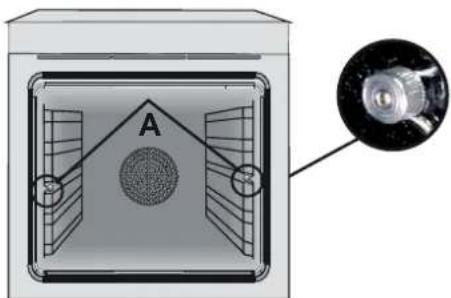
- In ovens with meat probe it is necessary, before making the cleaning cycle, close the hole with the nut provided. Always close the hole with the nut when the meat probe is not used.
Children under 8 must be kept at a safe distance from the appliance if not continuously supervised.
Children must not play with the appliance. The appliance can be used by those aged 8 or over and by those with limited physical, sensorial or mental capacities, without experience or knowledge of the product, only if supervised or provided with instruction as to the operation of the appliance, in a safe way with awareness of the possible risks. - Cleaning and maintenance should not be carried out by unsupervised children.
- Do not use rough or abrasive materials or sharp metal scrapers to clean the oven door glasses, as they can scratch the surface and cause the glass to shatter.
The oven must be switched off before removing the removable parts and, after cleaning, reassemble them according the instructions.
-Only use the meat probe recommended for this oven.
-Do not use a steam cleaner for cleaning operations. - Connect a plug to the supply cable that is able to bear the voltage, current and load indicated on the tag and having the earth contact. The socket must be suitable for the load indicated on the tag and must be having the earth contact connected and in operation. The earth conductor is yellow-green in colour. This operation should be carried out by a suitably qualified professional. In case of incompatibility between the socket and the appliance plug, ask a qualified electrician to substitute the socket with another suitable type. The plug and the socket must be conformed to the current norms of the installation country. Connection to the power source can also be made by placing an omnipolar breaker between the appliance and the power source that can bear the maximum connected load and that is in line with current legislation. The yellow-green earth cable should not be interrupted by the breaker. The socket or omnipolar breaker used for the connection should be easily accessible when the appliance is installed.
- The disconnection may be achieved by having the plug accessible or by incorporating a switch in the fixed wiring in accordance with the wiring rules.
- If the power cable is damaged, it must be substituted with a cable or special bundle available from the manufacturer or by contacting the customer service department.
The type of power cable must be H05V2V2-F. - Failure to comply with the above can compromise the safety of the appliance and invalidate the guarantee.
Any excess of spilled material should be removed before cleaning. - During the pyrolytic cleaning process, surfaces can heat up more than usual, children must therefore be kept at a safe distance.
The appliance must not be installed behind a decorative door in order to avoid overheating. - When you place the shelf inside, make sure that the stop is directed upwards and in the back of the cavity.
The shelf must be inserted completely into the cavity - WARNING: Do not line the oven walls with aluminum foil or single-use protection available from stores. Aluminum foil or any other protection, in direct contact with the hot enamel, risk melting and deteriorating the enamel of the insides.
- WARNING: Never remove the oven door seal.
1. GENERAL WARNINGS
Thank you for choosing one of our products. To get the most out of your oven we recommend that you:
-
Read the notes in this manual carefully: they contain important instructions on how to install, use and service this oven safely.
-
Keep this booklet in a safe place for easy, future reference.
All accessible parts are hot when the appliance is in operation, take care to not touch these elements.
When the oven is first switched on it may give out acrid smelling fumes. This is because the bonding agent for insulating panels around the oven has been heated up for the first time.
This is a completely normal, if it does occur you merely have to wait for the fumes to clear before putting the food into the oven.
An oven by its very nature becomes very hot. Especially the glass of the oven door.
1.1 DECLARATION OF COMPLIANCE
The parts of this appliance that may come into contact with foodstuffs comply with the provisions of EEC Directive 89/109.
By placing the C mark on this product, we are confirming compliance to all relevant European safety, health and environmental requirements which are applicable in legislation for this product.
When you have unpacked the oven, make sure that it has not been damaged in any way. If you have any doubts at all, do not use it: contact a professionally qualified person. Keep packing materials such as plastic bags, polystyrene, or nails out of the reach of children because they are dangerous for children.
1.2 SAFETY HINTS
-
The oven must be used only for the purpose for which it was designed: it must only be used for cooking food. Any other use, e.g. as a form of heating, is an improperuse of the oven and is therefore dangerous.
-
The manufacturers cannot be held responsible for any damage caused by improper, incorrect or unreasonable use. When using any electrical appliance you must follow a few basic rules.
-
Do not pull on the power cable to remove the plug from the socket.
-
Do not touch the oven with wet or damp hands or feet.
-
Do not use the oven unless you are wearing something on your feet.
-
It is not generally a good idea to use adapters, multiple sockets for several plugs and cable extensions.
-
If the oven breaks down or develops a fault switch it off at the mains and do not touch it.
-If the cable is at all damaged it must be replaced promptly.
When replacing the cable, follow these instructions. Remove the power cable and replace it with one of the H05RRF, H05VV-F, H05V2V2-F type.
The cable must be able to bear the electrical current required by the oven.
Cable replacement must be carried out by properly qualified technicians. The earthing cable (yellow-green) must be 10mm longer than the power cable.
Use only an approved service centre for repairs and ensure that only original parts are used. If the above instructions are not adhered to the manufacturers cannot guarantee the safety of the oven.
- Do not line the oven walls with aluminium foil or single-use protection available from stores. Aluminium foil or any other protection, in direct contact with the hot enamel, risks melting and deteriorating the enamel of the insides.
1.3 INSTALLATION
Installation is the customer's responsibility. The manufacturers have no obligation to carry this out. If the assistance of the manufacturer is required to rectify faults arising from incorrect installation, this assistance is not covered by the guarantee.
The installation instructions for professionally qualified personal must be followed. Incorrect installation may cause harm or injury to people, animals or belongings. The manufacturer cannot be held responsible for such harm or injury.
1.4 FITTING THE OVEN INTO THE KITCHEN UNIT
Fit the oven into the space provided in the kitchen unit; it may be fitted underneath a work top or into an upright cupboard. Fix the oven in position by screwing into place, using the four fixing holes in the frame. (Fig.on last page).
To locate the fixing holes, open the oven door and look inside. To allow adequate ventilation, the measurements and distances indicated in the diagram on last page must be adhered to when fixing the oven.
Note: For ovens that are combined with a hob unit the instructions contained in the manual for the hob unit must be followed.
1.5 IMPORTANT
If the oven is to work properly, the kitchen housing must be suitable. The panels of the kitchen unit that are next to the oven must be made of a heat resistant material. Ensure that the glues of units made of veneered wood can withstand temperatures of at least 120^ . Plastics or glues that cannot withstand such temperatures will melt and deform the unit. Once the oven has been lodged inside the unit, the electrical parts must be completely insulated. This is a legal safety requirement. All guards must be firmly fixed into place so that it is impossible to remove them without using special tools.
Remove the back of the kitchen unit to ensure an adequate current of air circulates around the oven. The hob must have a rear gap of at least 45mm .
1.6 CONNECTING TO THE POWER SUPPLY
Plug into the power supply. Ensure first that there is a third contact that acts as earthing for the oven. The oven must be properly earthed. If the model of oven is not fitted with a plug, fit a standard plug to the power cable. It must be able to bear the power supply indicated on the specifications plate. The earthing cable is yellowgreen. The plug must be fitted by a properly qualified person. If the socket and the plug are incompatible the socket must be changed by a properly qualified person.A properly qualified person must also ensure that the power cables can carry the current required to operate the oven.
An ON/OFF switch may also be connected to the power supply. The connections must take account of the current supplied and must comply with current legal requirements. The yellow-green earthing cable must not be governed by the ON/OFF switch. The socket or the ON/OFF switch used for connecting to the power supply must be easily accessible when the oven has been installed.
Important: During installation, position the power cable in such a way that it will not be subjected to temperatures of above 50^ at any point. The oven complies with safety standards set by the regulatory bodies. The oven is safe to use only if it has been adequately earthed in compliance with current legal requirements on wiring safety. You must ensure that the oven has been adequately earthed.
The manufacturers cannot be held responsible for any harm or injury to persons, animals or belongings caused by failure to properly earth the oven.
WARNING: the voltage and the supply frequency are showed on the rating plate (fig. on last page).
The cabling and wiring system must be able to bear the maximum electric power required by the oven. This is indicated on the specifications plate. If you are in any doubt at all, use the services of a professionally qualified person.
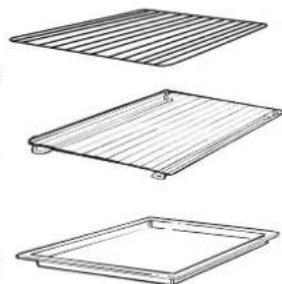
1.7 OVEN EQUIPMENT (according to the model)
It is necessary to do an initial cleaning of the equipment before the first use of each of them. Wash them with a sponge. Rinse and dry off.
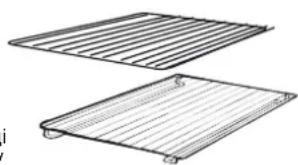
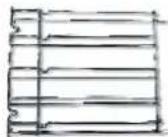
The simple shelf can take moulds and dishes.
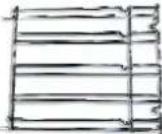
The tray holder shelf is especially good for grilling things. Use it with the drip tray.
The special profile of the shelves means they stay horizontal even when pulled right out. There is no risk of a dish sliding or spilling.
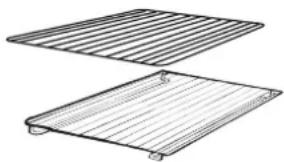
The drip tray catches the juices from grilled foods. It is only used with the Grill, Rotisserie, or Fan Assisted Grill; remove it from the oven for other cooking methods.
Never use the drip tray as a roasting tray as this creates smoke and fat will spatter your oven making it dirty.
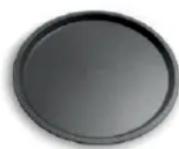
The pizza set is designed for pizza cooking. In order to obtain the best results the set must be used together with Pizza function.
The tray holder
The tray holder shelf is ideal for grilling. Use it in conjunction with the drip tray. A handle is included to assist in moving the both accessories safely. Do no leave the handle inside the oven.
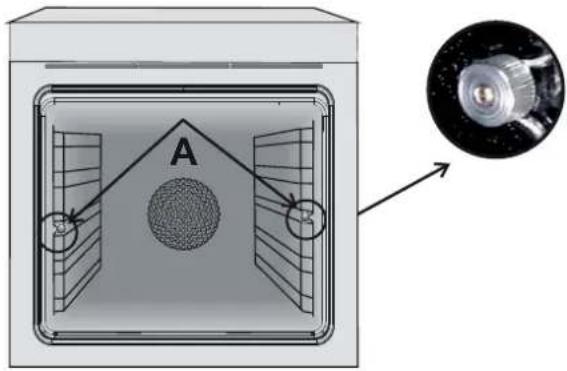
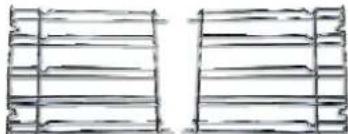
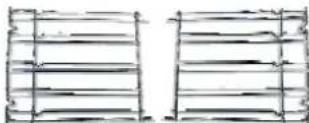
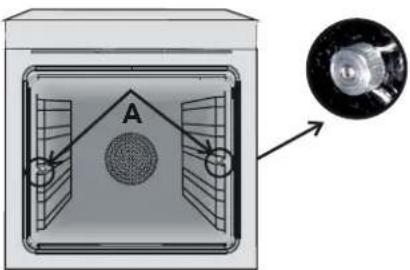
Lateral wire grids if included.
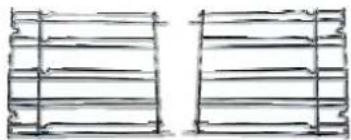
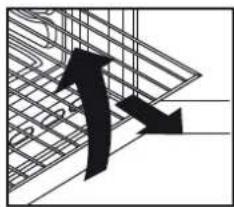
Removing and cleaning wire racks
1- Remove the knurled nuts by turning them counter clockwise.
2- Remove the wire racks by pulling them towards yourself.
3- To clean the wire racks either put them in the dishwasher or use
a wet sponge, ensuring that they are dried afterwards.
4- After the cleaning process install the wire racks in reverse order.
5-Replace the knurled nuts.
2. USEFUL TIPS
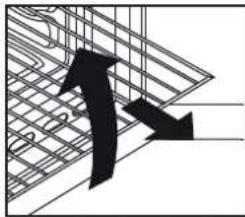
2.1 SHELF SAFETY SYSTEM
The oven features a new shelf safety system.
This allows you to pull out the oven shelves when inspecting the food without danger of food spillages or shelves falling accidentally out of the oven.
To remove the shelves pull out and lift.
2.2 GRILLING
Grilling makes it possible to give food a rich brown colour quickly. For browning we recommend that you insert the grill onto the fourth level, depending on the proportions of the food (see fig. page 7).
Almost all food can be cooked under the grill except for very lean game and meat rolls.
Meat and fish that are going to be grilled should first be lightly doused with oil.
2.3 TheU-COOK MODELS
U-COOK Ovens have an electronic control of the fan speed, called and patented VARIOFAN. During the cooking, this system changes automatically the speed of the fan (in multifunction mode) in order to optimize the air flow and the internal temperature in the cavity of the oven.

All derivatives are the function.

This allows a management of the distribution of moisture and temperature. It reduces the loss of humidity of the 50 %, which guarantees the food remains tender and tastes better. This a delicate cooking is recommended for the baking of the bread and pastry.

It reduces the time of preheating of ovens: only 8 minutes to reach 200 degrees Celsius.

It gives the possibility of setting level and intensity of grilling, up to 50% more power in comparison with a traditional multifunction oven.
Some ovens are equipped with the new door "WIDE DOOR" which has a bigger window area, this allows better maintenance and a improved thermal insulation.
2.4 According to the model U.S∈E
Is an illumination system which replaces the traditional « light bulb ». 14 LED lights are integrated within the door. These produce white high quality illumination which enables to view the inside of the oven with clarity without any shadows on all the shelves.
Advantages :
U-See System, besides providing excellent illumination inside the oven, lasts longer than the traditional light bulb its easier and to maintain and most of all saves energy.
Optimum view
- Long life illumination
- Very low energy consumption, -95% in comparison with the traditional illumination High
"Appliance with white light LED of the 1M Class according to IEC 60825-1:1993 + A1:1997 + A2:2001 (equivalent to EN 60825-1:1994
+A1:2002+A2:2001); the maximum light power emitted A459nm < 150uW.
Not observed directly with optical instruments.

2.5 SELF-CLEANING OVEN WITH CATALYTIC
Special self-cleaning panels covered in a micro-porous coating are available as optional extras for all models. If they are fitted, the oven no longer needs to be cleaned by hand.
The fat that is splattered onto the sides of the oven during roasting is eliminated by the microporous coating which breaks the fat down by catalysis and transforms it into gas.
Excessive splattering may nevertheless block the pores and therefore hinder self-cleaning. The self-cleaning capacity may be restored by switching on the empty oven to maximum for about 10-20 minutes.
Do not use abrasive products, metal cleaning wads, sharp objects, rough cloths, or chemical products and detergents that may permanently damage the catalytic lining.
It is a good idea to use deep roasting trays to roast fatty foods such as joints of meat etc. and to put a tray underneath the grill to catch surplus fat. If the walls of the oven are so thickly coated in grease that the catalytic lining is no longer effective remove surplus grease with a soft cloth or sponge soaked in hot water.
The lining must be porous for self-cleaning to be effective.
N.B.: All catalytic linings currently on the market have a working life of about 300 hours. They should therefore be replaced after about 300 hours.
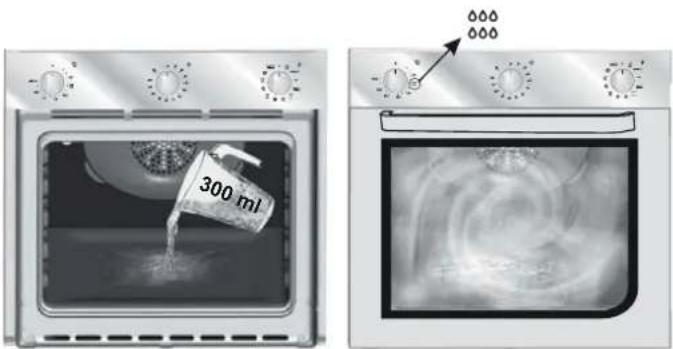
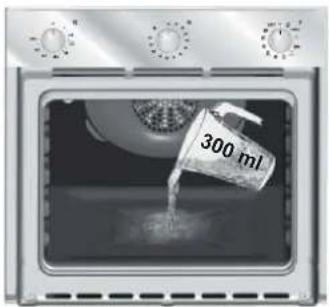
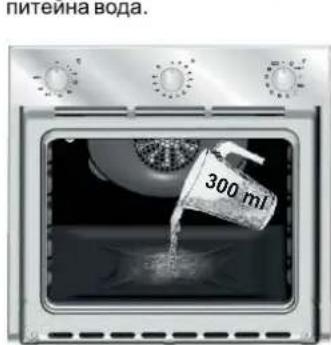
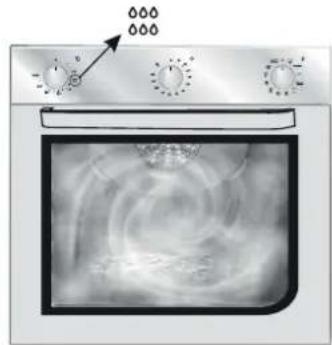
2.6 AQUACTIVA FUNCTION
The Aquactiva procedure uses steam to help remove remaining fat and food particles from the oven.
- Pour 300ml of water into the Aquactiva container at the bottom of the oven.
- Set the oven function to Static ( ) or Bottom ( ) heater
- Set the temperature to the Aquactiva icon
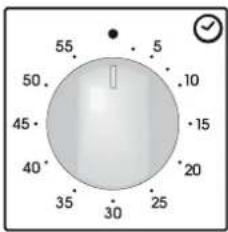
- Allow the program to operate for 30 minutes.
-
After 30 minutes switch off the program and allow the oven to cool down.
-
When the appliance is cool, clean the inner surfaces of the oven with a cloth.
Warning:
Make sure that the appliance is cool before you touch it. Care must be taken with all hot surfaces as there is a risk of burns. Use distilled or drinkable water.
2.7 CLEANING AND MAINTENANCE
Never use abrasive cleaners, wire wool or sharp objects to clean the glass oven door.
Clean the stainless steel and enamelled surfaces with warm, soapy water or with suitable brand products. On no account use abrasive powders that may damage surfaces and ruin the oven's appearance. It is very important to clean the oven each time that it is used. Melted fat is deposited on the sides of the oven during cooking. The next time the oven is used this fat could cause unpleasant odours and might even jeopardise the success of the cooking. Use hot water and detergent to clean; rinse out thoroughly.
To make this chore unnecessary all models can be lined with catalytic self-cleaning panels: these are supplied as an optional extra (see the section SELF-CLEANING OVEN WITH CATALYTIC LINING).
Use detergents and abrasive metal pads like «brillo pads» for the stainless steel grills.
The glass surfaces as the top, oven door and warming compartment door must be cleaned when they are cold. Damage that occurs to them because this rule was not adhered to are not covered by the guarantee. To replace the interior light:
- switch off the mains power supply and unscrew bulb. Replace with an identical bulb that can withstand very high temperatures
2.8 SERVICE CENTRE
Before calling the Service Centre
If the oven is not working, we recommend that: you check that the oven is properly plugged into the power supply.
If the cause of the fault cannot be detected:
disconnect the oven from the mains, do not touch the oven and call the after sales service.
Before calling the Service Centre remember to make a note of the serial number on the specifications plate (see fig. On last page).
The oven is supplied with a guarantee certificate that ensures that it will be repaired free of charge by the Service Centre
This appliance is marked according to the European directive 2012/19/EU on Waste Electrical and Electronic Equipment (WEEE). WEEE contains both polluting
substances (which can cause negative consequences for the environment) and basic components (which can
be re-used). It is important to have WEEE subjected to specific treatments, in order to remove and dispose properly all pollutants, and recover and recycle all materials. Individuals can play an important role in ensuring that WEEE does not become an environmental issue; it is essential to follow some basic rules:
WEEE shall not be treated as household waste.
- WEEE shall be handed over to the relevant collection points managed by the municipality or by registered companies. In many countries, for large WEEE, home collection could be present.
- When you buy a new appliance, the old one may be returned to the retailer who has to collect it free of charge on a one-to-one basis, as long as the equipment is of equivalent type and has the same functions as the supplied equipment.
ENERGY SAVING AND RESPECTING THE ENVIRONMENT
Where possible, avoid pre-heating the oven and always try to fill it. Open the oven door as infrequently as possible, because heat from the cavity disperses every time it is opened. For a significant energy saving, switch off the oven between 5 and 10 minutes before the planned end of the cooking time, and use the residual heat that the oven continues to generate. Keep the seals clean and in order, to avoid any heat dispersal outside of the cavity. If you have an electric contract with an hourly tariff, the "delayed cooking" programme makes energy saving more simple, moving the cooking process to start at the reduced tariff time slot.
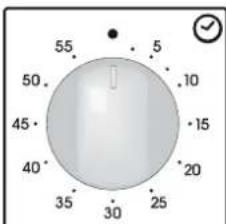
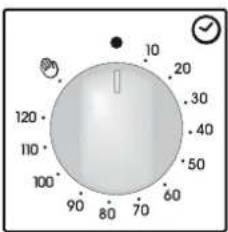
3. TIMER
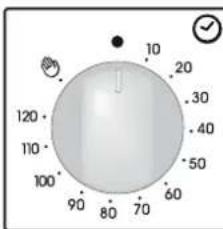
3.1 USING THE MINUTE TIMER
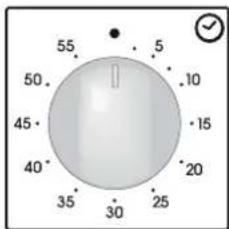
To set the cooking time, turn dial one complete revolution and then position the index to the required time. When the time has lapsed, the signal will ring for a few seconds.
3.2 USING THE END OF COOKING TIMER
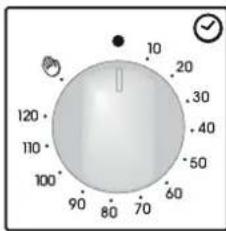
This control enables to set the desired cooking time (max. 120 min.) the oven will automatically switch off at the end of the set time.
The timer will count down from the set time return to the O position and switch off automatically.
For normal use of oven set the timer to the position.
To set the oven ensure the timer is not on the O position.
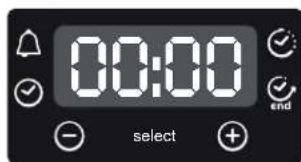
3.3 SETTING THE CORRECT TIME
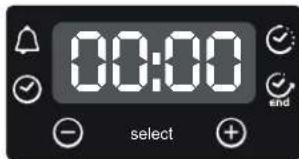
WARNING: the first operation to carry out after the oven has been installed or following the interruption of power supply (this is recognizable the display pulsating and showing) is setting the correct time. This is achieved as follows.
- Push the central button.
-Set time with-"" 平 buttons. - Release all buttons.
ATTENTION: The oven will only operate providing the clock is set.
| FUNCTION | HOW TO ACTIVATE IT | HOW TO SWITCH ITOFF | WHAT IT DOES WHAT IT IS FOR | |
| KEY LOCK | ·Child Lock function is activated by touching Set (+) for a minimum of 5 seconds. From this moment on all other function are locked and the display will flash STOP and preset time intermittently. | ·Child Lock function is deactivated by touching touchpad Set (+) again for a minimum of 5 seconds. From this moment on all functions are selectable again. | ||
| MINUTE MINDER | ·Push the central button 1 times ·Press the buttons "+" " " + to set the required time ·Release all the buttons | ·When the set time as elapsed an audible alarm is activated (this alarm will stop on its own, however it can be stopped immediately by pressing the button) SELECT. | ·Sounds an alarm at the end of the set time. ·During the process, the display shows the remaining time. | ·Allows to use the oven as alarm clock (could be activated either with operating the oven or with out operating the oven) |
| COOKING TIME | ·Push the central button 2 times ·Press the buttons "-" or "+" to set the lenght of cooking required ·Release all buttons ·Set the cooking function with the oven function selector | ·Push any button to stop the signal. Push the central button to return to the clock function | ·It allows to preset the cooking time required for the recipe chosen. ·To check how long is left to run press the SELECT button 2 Times. ·To alter/change the preset time press SELECT and "-" "+" buttons. | ·When the time is elapsed the oven will switch off automatically. Should you wish to stop cooking earlier either turn the function selector to 0, or set time to 0:00 (SELECT and "-"+" buttons) |
| END OF COOKING END | ·Push the central button 3 times ·Press the buttons "-" " " to set the time at which you wish the oven to switch off ·Release the buttons ·Set the cooking function with the oven function selector | ·At the time set, the oven will switch off. To switch off manually, turn the oven function selector to position O. | ·Enables you to set the end of cooking time ·To check the preset time push the central button 3 times ·To modify the preset time press buttons SELECT + "-" "+" | ·This function is typically used with "cooking time" function. For example if the dish has to be cooked for 45 minutes and needs to be ready by 12:30, simply select the required function, set the cooking time to 45 minutes and the end of cooking time to 12:30. ·At the end of the cooking set time, the oven will switch off automatically and an audible alarm will ring. ·Cooking will start automatically at 11:45 (12:30 minus 45 mins) and will continue until the pre-set end-of-cooking-time, when the oven will switch itself off automatically. WARNING. If the END of cooking is selected without setting the length of cooking time, the oven will start cooking immediately and it will stop at the END of cooking time set. |
| Function dial | Temperature pre-set and setting. (Model with electronic programmer) (Type A) | Thermostat dial | Function |
| Turns on the oven lightThis will automatically activate the cooling fan (on fan cooled models only) | |||
| DefrostingWhen the dial is set to this position, The fan circulates air at room temperature around the, frozen food so that it defrosts in a few minutes without the protein content of the food being changed or altered. | |||
| Sprinter\(\mathbf{\Phi}\) | MAX | MAX | Super GrillThis function allows to set food crunchiness. The Super Grill function is characterized by a 50% power increase in comparison to the standard grill. |
| 22050÷240 | 50÷MAX | Natural convectionBottom and top oven elements are used. This is the traditional form of baking and roasting. It is ideal for roasting joints of meat and game, baking biscuits and apples and making the food nice and crunchy. | |
| 20050÷230 | 50÷MAX | Fan cookingBoth top and bottom heating elements are used with the fan circulating the air inside the oven.We recommend you use this method for poultry, pastries, fish and vegetables. Heat penetrates into the food better and both the cooking and preheating times are reduced. You can cook different foods at the same time with or without the same preparation in one or more positions.This cooking method gives even heat distribution and the smells are not mixed. Allow about ten minutes extra when cooking foods at the same time. | |
| 20050÷230 | - | Soft Cook (a)Soft Cook is the function for the confectionery and the bread. Thanks to its reduced fan speed, this function increases oven internal damp. The increased damp creates the ideal conditions of cooking for those foods that need to maintain an elastic consistence while they are cooking (ex. cakes, bread, biscuits) avoiding surface breakages. | |
| 16050÷220 | 50÷MAX | Fan plus lower elementThis function is ideal for delicate dishes (pies-souffle). | |
| Level 41÷4 | 50÷MAX | GRILL: use the grill with the door closed.The top heating element is used alone and you can adjust the temperature. Five minutes preheating is required to get the elements red-hot. Success is guaranteed for grills, kebabs and gratin dishes. White meats should be put at a distance from the grill; the cooking time is longer, but the meat will be tastier. You can put red meats and fish fillets on the shelf with the drip tray underneath. | |
| Supergrill\(\mathbf{\Phi}\) | Level 41÷4 | 50÷MAX | SUPER GRILL: the oven has two grill positionsGrill: 2200 W Grill SUPER: 3000 W |
| 190180÷200 | 50÷200 | FAN ASSISTED GRILL (a): use the turbo-grill with the door closed.The top heating element is used with the fan circulating the air inside the oven. Preheating is necessary for red meats but not for white meats. Ideal for cooking thick food items, whole pieces such as roast pork, poultry, etc. Place the food to be grilled directly on the shelf centrally, at the middle level. Slide the drip tray under the shelf to collect the juices. Make sure that the food is not too close to the grill. Turn the food over halfway through cooking. | |
| Level 41÷4 | 50÷200 | Grill/spit element.This is used for roasting on the spit. | |
| 220 | 50÷MAX | Function PizzaThis function with hot air circulated in the oven ensure perfect result for dishes such as pizza or focaccia. | |
| 190180÷200 | 50÷200 | The "COOK LIGHT" function allows you to cook in a healthier way, by reducing the amount of fat or oil required. Thanks to the use of the grill and fan combined with a pulsating cycle of air, it will retain the moisture content of the food, grilling the surface and using a shorter cooking time, without compromising on taste.It is particularly suitable for cooking meat, roasted vegetables and omelettes. The cycle of pulse air keeps the humidity inside the oven and the moisture content of the food, preserving the nutritional values and ensuring a rapid uniformcooking processTRY all your recipes and reduce the amount of dressing you usually use and experience the lightness of this new function! |
(a) on some models : function with "Vario Fan" is the exclusive system developed by Candy to optimize the cooking results, temperature management and damp management. The Vario Fan system is a self-activating system that changes automatically fan speed when a fan function is chosen: the fan functions are the one inside the outlined area on control panel.
* Tested in accordance with the CENELEC EN 60350-1 used for definition of energy class.
1.1 DECLARATION DE CONFORMITE:
1.4 MISE EN PLACE DU FOUR DANS SON MEUBLE
2.7 LIMPEZA E MANUTENÇAO
1.1 DEKJIAPAUIN COOTBETCTBNA
Данhoe obopydoBaHne, DeTaN KOTOPOro BCTynaIOT B KOHTaK T C NIIeN, OTBeuayet Tpe6oBaHnA M EBponeckOДиpeKTHBbI 89/109/EEC.
Pa3meuHa MapKnOBky CHa 3ToI npOdykU, Mbl 3aBJIeM, NOHaUY OTBeTCTBeHHOCb, O COOTBeTCTBUN BCEM Ebponeckm HOpMaM63oNaCHcTN, OxpaHb 3dOpOByN 3KOJOnrueckm TpeBoAHmN3IOKeHHbIM B 3aKOHDoTeNbCTBe Dn DaHHORO BNda npOdykU.
3To H3dJIeNHe COOTBeTCTByeT TEXHmecKIM perJAmeHTaM TaOxKeHHOro CoU03a: TP TC 004/2011 «O COOTBeTCTBnH N3KOBJbTHOro 6obpydoBaHn
- TP TC 020/2011 «Злес耗费могиншаг COBmecTUMOCb TExHnuecknx CpeDCTB»
- HAIHHE ABTOMATUeCKKOrO BbIKIOuHaTeIa
3a3emnHOHn npoBD (XeJIto-3eHehB) DxyOBKn DOJKeH 6bITb COeINHeH K 3a3emnIOUcEMy yCTPONCTBY 3NEKTPOOObpyOBAHNr DOMa. HadeKHOCTb 3a3emnHOUcero YCTPOINCTBa 3NEKTPOOObpyOBAHNr DOMa DOJHKHO 6bITb npoBepeHO KBANHnDnnpoBAHbIM 3NEKTPKNOM NpeEd 3NEKTPnueckm NOkNIOUeHMe.
PnmeaHne: He 3abTe, Yo MoKet BO3HNKHyb Heo6xOIMocTb B TexHueCKOMObcNyBAnHHINpnpBa, KOTOpoe DoJXeH pOn3BOHTbC cepBNCbIe NTOpMY CNeDyET OBeceNHT leKKn DOCTYKN BlKe. 3aMeHa Hypa NtAHn DOJXHa POn3BOIDhCBc CoTpYNKOM CepBNCHOeHTpa IIN KBANHfNpOABAHbIM CneMaJIACNTom. Pn3 aMeHe CneDyET pyKOBDCTBoBAcB yKa3AHHm XapakTepeNtKamn np60ba. IKnac 3aunltb OT npApkeHHN TOKOM.
1.7ДОПОЛНТЕЛБЕОБОДOBAHNEДУХОВКIN
PepednepbIMNCNIOB3OBAHHEMpeMDeTobDOIOJIHTeBHOO6OBpyoBaHmHX CNEyET NOMITb,NCN0Ib3yRy6K.3aTEMkCneyET ONONOCHTeHX YMCTOB BODIN BBLPTPE HAcxYO.
Ipocta peuTeKa cnyKNT dNpa3MeueHn foPM dN BbIeKm Nocybl.
PeWETKa C HnPaBnIIOUIMM DnA NODHOOB NCNOb3yeTcB, B AcCTHOCTN, DnA pRnroTOBHeNMa MCA Ha RpnE, TaK K K HeN KpeNTcN I NODCH NnC6Opa BbldHrOuTeoCBA npoceCE XapKn Xnpa.
CneuanaBhIe Teleckonueckne Hapabnoune oecneuBaOT rOp30HaTbnHoe NOJooHeNepeTeoK npBbHMaHN IX N3 DyXOBKN, YTO npedotBpaauet ONpOKMbIaHme nocdybl.
Nooh cnkykum dna c6opa coka, bdeIeauoeo8o epema npu2omoeHua apune.
2. NOJE3HbIE COBETbl
2.1 CNTCTEMA BE3ONACHOCTN IIOJOK
DyXOBo WkaΦ obOpYOBaH CnCTeMoN 630NaChOCTn NOnK. OHa No3BOJraT BbIDBnRaT bONKn IIN PNOBepKn 6IIOda 6e3 PNCKaERO COCKaJIb3bIbAHn INN CNyAHIHO RbIaNAdENH NONKN I3 DxyOBoro WkaΦa. 4TO6bl NOIHOCTBbO BbHyTb NOKy NOTAHNTe eK Ce6e N BBepx.
2.2 PUNTOBOBNEHNE HA TPNJI E
Pnncno30BaHnnpnnaMOxHO6bICTPO npnroTOBnTb 6NHO CpyMaHOKOPOOKo. nNoDpymaHbAHnpeKOMeHnyETcRyCTaHOBnTb peWetky HaYETBeTb yPoBeHb, B 3aBNCmOCTn OT pA3Mepa 6NHOa (CM. cTp. 65). PpaTneckn JIO6bIe IpOdyKTb MOxHO rTOBnTb Ha rPnne, KpOME OHeh NOCTHO DNHN MRCbIX PyNETOB.
Mco npb6y nepeipnpiroTOBnHem Ha rpnIe CneJeYeT Cma3aTb MacNoM.
2.3 MODELIN
U-COOK
MoJenn U-COOK OCHaueHbI 3NEKtpOHbIM ynpabHeHemcKOpOCTn KOHBeKUHN, 3anaTeHTOBaHHoe Ha3BaHne KOToporo Vario Fan. Bo Bpemr npriTOOBJIeHnra 3Ta CNTema ABToMaTHeCKn MEHReT cKOpOCTb KOHBeKUHN (B MHOrofoHKUHOHaBJHOH MoJeN), YTO6bl ONTMm3nPoBaTb NtOK BO3dyxa N BHYTpEHNO TEMpepaTy DxOBKn.

Bce DxyOBKn U-COOK OchaueHb FyHKnnei Soft BlaIarOapra 3OTMy MOxHO ynpabTb pacnPpeJeHMeB BlaXHoCTn N TemnepaTpyb. 3TO CHNkaet NOTePHIO BnaXHOCTHa 50%, qTo 06ecNEHBAET HeKHOCTb N OTNIHbIK BKc 6NIOd. 3TO DeJIHKaTHbIN CnOCo6 pnproTOBHeHn, peKOMeHDoBaHHb I nA BInEeKN XJNe6a N KOHNTEpCKNX 3dJIeNl.
Oh ucnonb3yemc monbko npu npueomoehhu Ha epune,Ha eepene,unu
ha apune c eehmuaue (e 3aeucumocmu om modenu); npu ucnonb3oehaH
ocmanbHbx pekmu6 e20 cneedyem bihumamb u3 dyoxoku.
He ucnonb3yime nodoo dnBcopa coka eKaeecehmnpomueh dna xkapu,
nckoIbky npu 3om o6paeyemc dbim u jup ocqem Ha cmehkax dyoxoku.
HABOPJNINUcBpa3pa6oTahnnpinrTOBNEHnINUcB.4TO6bI NOnyUnTBHaNNyUWne pe3yNbTaB1ero Heo6xOIMNOHCNOJIb3OBaTB BmecTe CpyHKMee "Ntua
BokobIe npoBOJOnHyO ceTky, ecIN BkHoueHbI.
Demohmax u ouucmka Memannuueckux Hanpaennoux.
1-OTBepHHeΦHKcnpyIOUne BnHTbI, NOBopauHBaNX npoTUB YacBOB CTpeKN.
2-CHMnTe MeTaJIuueckne HAnpaBIAUOUINE,NotAHyB INx Ha Ce6y.
3- Ppoun3BvTeOuCTky MeTaNJUeCKNX HnPaPbIaOxN NOMbIB IN B NOcyDnOMoeYHO MaUNHe IN OuCTNB pN NOMoN BlaxKHOy6Kn.
PocyuTe MeTaNJIuYeCKne HnPaBraIouuInocne OunCTKn.
4-Pocne OunchknyctahOBnTe MeTaNIIueckne HappaBIAOJIe BduXOBoWkaΦ,NOBTOPINyHKTb1 12B o6paTHOM npraKe.
5-3aФнкуTe BnHTbI.
Ecn npEmTeI dononHnTeBHorO 6OpydoBaHn He nCnoNb3yOTc, Hx CneDyeT BbHyTb N3 DxyOBKn.

YmehbIuAeT Bpemr npedBapntelbHoro HarpBa DxyOBKn: 200 rpaDCOB No Cenbcno DoCTnraTOc Bcero 3a 8 MmHyT.

Jaet Bo3MOXHbIM yCTaHaBnBaTbYPOBeHb INHTEHCBHOCt bnoJxapnBaHmHa rPnne,do 50 % npoceHToB 6oJIbe MOuHOCTn NO cpaBHeHIO C TpaDnUHOHmMHOFOyHKUHOHaBJHO dyXOBKoI.
HekotopbIe IyXOBK OCSaueHb IDBepu HOBO KOHCTpyKU WIDE DOOR, CTKIO KOTOPB 60JIbIeRo pa3Mepa, YTO N03BOJrE T LyUHe yxaxNBAtb 3a IyXOBKIO EOCNEuHBAe T LyUHy TOpeMOUN3OJIaNIO.
2.4 U.SEE
B DxyOBKe BMeCTO 06bIuHOJ NaMIOUKN HaKANBaHnN CNOJIb3yETcCBeTOnIOHNA CNTema OCBeJeHn. B DBepuy DxyOBKn BCTpoEHO14 CBeToNDoOB (DЯ NMOeNe 6e3 CNTEmbl NIpOJIInTuCeCKO ONUCTKN) INN 10 MOUhBX CBeTONDoOB (DN MOpEn c CNTEmoN NIpOINTuCeCKO ONUCTKN). 3TO 06ecneuBaET BHyTpN DxyOBKn BbICOKOKaYeCTBeHHoe OCBeSeHHe 6enBIM CBetOM 6e3 TeHn OT NOJOK.
PpeMmyeCTBa:
DAnHaa CnCTema, KpMe TOrO, YTo OHa 0eScneuBaet npeBOxCoJHOE OCBeUeHHe BHyTpN DxyOBKn, NMeet BoJe e DInTeBbHbI CpOK CnyKbI, Yem ObBuHaN lamNoouKa HakaINBaHn I NoTpe6nreT Ropa3Do MeHbWe 3NeKtpo3Heprnn.
-ONTImaJIbHoeOCBeueHne
-Болшосрксужбы
-OueHb Hn3Koe nOtpe6IeHHe 3NeKtpo3Hepnn (Ha 95% MeHbWe Yem O6bUHra JAMNOvKa HakaJIINBaHn)

2.5ФУHKLДАQUACTIVA
ФункцьAquactivancnoь3уетпap,
YTObIINOMOyBcTpaHHTbXnpoBbIeOTNOxKeHn I KycOKN NUIU, OCTaBUnecR B KaMepe DxyoBOrO uKaFa nocne npriGTOBHeHn.
- HaneIte 300 mNbOdbbcneuaNbHyto
noJocTBAquaivapacnoOnoKeHHyHO HaDHe KaMepbI npiroTOBneHnnyXOBOrO ukaopa.
2.YCTaHOBtpepeXMMCTaTnueckoro(HnHKeRo()HaRpeBa

3.YctaHOBtpepeyTOpTempeatpyHa peKIMAquactivaoo
4.OctaBbTe nporpamMy BkIouyHHO B TeueHne 30 MNHT.
5. No nCTeHn 30 MNyT BbIKIOHTe nporpAMMy I daTe ocTbIb DxyOBomy kkafo.
6. Korda dxyoboi kkaocbHeT, npo3BeTe OCHcy BHytpEHnx NOBepxHOCTe KamepbI npuROTOBHeHr TpnoOcKo N3 MmKo TKaHN. PEPDYNPEXKDEHNE:
Y6eHNTecb, YTO npN6Op OCTbIIN, IpexJe Yem npKacatbC K Hemy. Heo6xOIMO co6blnOaTb OCTopoxHOCTb CO BcEMn ropAHHN noBepXHOCTAM, TAK KAK cyueCTByET PNCK NOyueHNA OXOROB. IcnoJb3yTe ToIbKO nCTnIIINPOBaHHy IO INI NITbeByIO BODY.
2.6 YXODI N OYNCCTKA
-
Ipei TEM KAK npicctynatb K Ouchte npnbopa, cneyet nooKdaTb, noka OH OCTbHET.
-
Henb3a nCnObl30aBt6 abpa3NBlbIe MOUHne cpeDCTBa, MoaJIKn N3 MeTaNIIueckO npBOLOkN IN mEpxyUe pPeDMtBi, KOToPbIE MOrTy NOBpeBtMbAInPOBaHHyO nCTaBHyO NOBepxHOCTM.
-
NcnoB3yIe MblbHpaCTbOp HnCpeCTBa Ha OCHOBaMMHaKA. DYXOBKA-OYeH BAAKHO BBIMbTb DYXOBKY NOCEKaJZDO NcNoB3OBAHN. Bo BpemrnpriroTOBHeHn HA CTehkA XyOBKn OceaeT KAp. PnNocElyoMe MCNOB3OBAHN 3OT KAp MOKeT N3dABaTB HnepnTbH 3aJax NMOKeT NOBNIbTa H KaHeCTBO 61HOb. JAn OChTKn DxyOBKn NCNOB3yIe BOy MoIOUee CpeCTBO, TtateJIbHO pOMbIBaTe YHCTOn BOIOJ.
CTEKJIARHHBIE DETAJIN
Nocne kaxdofo nCnObl30BaHnny dYxOBKn BbITPte CTeKNO DBePcB 6yMaXhHbIM NOOTENHEc. Ecnn Ha nobEpxHOCTn OCTaIncb cnNtukom Bonblune nTnHa OT Knpa,cmOHTe npn NmOoU Hry6Kn MHOUe OpeCTBA. PpOMOte YHCTO BDOH N BbITPte Hacyxo. HeB3r nCnObl30aTa b6pa3NBbIe cpeCTBA nn pexky npeMeTb. IpoknAky DBePcB 1cNeYEt OOnuAtb pnN NOMOu rgy6Kn MoOHIOero cpeCTBA.
IIOJINHHTENbHOE OOBYIOBAHNE
Cneyet Ounatb npn NOMOu ng6Kn, CMOeHHoB BMbHOM pactBope, 3aTEM BBmbTb YNCTO BDOJ N BItepTehAcxO.
IIOIOH
Iocne npirotoBnEHa rPIne BbHbTe nOdoH n3 dyXOBKn. BblneTe er0 coepKmoe B kakyHO-H6yNb NocSyD, NOMoTE ropaeH BODo nCMoehHO MOOHcpeCTBOM y6KOB, B 3AKIOHcHHe BBMOITE ropaeH BODo n BblrTHe Hacyxo. IpyTO T06bY ydaNtB npiropeBwme octATKn NnU, 3AMoHTe NOdoH B BoJe, Do6aBnM MoIOoee cpeCTBO. NoDOH MOxHO MItb B nocydoMoEOH MaunHe INn pni NMOuCn CNEuaHBx cpeCTB, IMeIOUHXCR B npodaKe. HkORDa He ocTabnre Tp3hBn NOdoH B dyXOBKe. IODCBETKA DYXOBKn
IpeK KaJIOI ONEpaUNI NO ONUCTKe IINI 3aMeHE NaMNOcIK BbIHMaIte BnIKy n3 po3ETKn. NaMIOUka N 3aUHTbI K0JIaK IN3rTOBJIeHb I N3 MaTePnaIIOB, yCTOHNBBIX K BbICOKIM TempePaTypAM.
TexHueckne XapakTepeNtKn JAmnoKn
230 B~ - 25 BT - zuokonb E 14 - TemnepaTpya 300^
ECNI Heo6xOIMO 3aEMHbHe HcnpabHyIaMNOky, CLeJeT ChyTB 3aUHTBbI CTekJIaHHbI KOIIaK, BbIKpyTNb IaMNOky, 3aMeHbTe Ha aHaONuHYO HOByIO yCTaHOBtB Ha MecTo 3aUHTbI CTekJIaHHbI KOIIaK.
2.7 CEPBNUCHOE OBCJYKINBAHNE
IpeepTeM kak 6paataBcepnchbIeHTp.
B cnyae ecn nyxOBka he pa6oTaet, pekomeHdyem Bam:
- npoBepntb, npabnblho JIN BCTaBneHa Bnka B po3eKy; Ecn He ydaTcR o6HapxNtB npuHny HncnpaBHOctn:
BbIKHOnTe np6Op, He npEepnPHMaTe NnonbTOK caMoCToTeNbHO OTpeMOHTpOBaBte Ero N03BOHTE B aBTOP3OBAHHb CEpBNCbHc ueHtp. Pnp 06paueHN B aBTOP3OBAHHb cEPBNCbHc ueHtp 063aTeNbHO cneJeYET COo6uNTb H3BaHHe MDoMeN CepnHbHm HOMep H3dJIeN, KOTopBe Bb MoKeTe HAIn B rapaHTHMOM CBIeTeBCTBE NIN Ha MapKIOPOBOHON TaJNUKe. K 3dJIeNO ppiNarAeTc rapaHTMHOe CBIeTeBCTBO, Ha OCHOBAHN KOTOPORO OHO 6ydt E6CnIaTHO OTpeMOHTpOBaHO B aTOp3OBAHHom CepBNCHOM eHTpe B TeueHHe rapaHTNHOrO Cpoka.
CepnHbH HOpE cOcTOn 16 uΦp. NepBbE 8 uΦp KoMDeHN. CneDyUoHne 4 uΦpbl DaTa npOn3BOcCTBa (rO, HeJe).PocJeHHe 4 uΦpbl 3aBOdCKne Homepa.
DAnHHbI pInbOp IMeET MapKIpOBKY B COOTBeTCTBm C EBypOEnckoI DupeKTHBOB 2012/19/EC o6 OTxOaX npOn3BOCTBa 3NeKtpUcECKOrO n 3NeKtpOHoro OobpyOBoHnra (WEEE). OToXoDbI npOn3BOcTBA 3NeKtpUcCKOrO n 3NeKtpOHoro OobpyOBoHnra CoepKaT 3aRp3HNOUHe BeUeCTBa (KOtOpBie MOrY HeraTHBHO BNMy TB (KJAtIOUyO cpey) I OCHOBHbIe KOMNoHEtBi (KOtOpBie NOJIeXaT (MOHy NcONlbZOBAHIO). BaxHo, YTObI OTOXoDbI npOn3BOcTBA 3neCKOrO n 3NeKtpOHoro OobpyOBoHnra NOBepranncb TbHOI Obpa6Otke C cTeIbHO ydaJeHn r yTNlN3aUN BCEx HIOUHX BeUeCTB, A tako peReHepaunn IN NOBtphORO OBaHnRA BCEMATEpMaIOB.
KaJdb MoKet CcEnaTb CyueCTBeHHb BknaB B npedotBpaueHne KONIOMHECKHX NpOeM, Bbl3lbAeMbIX OTODAmN PNO3BODCTBa 3NEkpHeHecO IN EKTPoHORO OOBpyOBAHIN; IIN 3TOI BAHO HPOEKPXBATCB HEKOTOpBX OCHOBHIX pABNJ:
HeIb3aOobpaauTaBcCOTXoAMN PPOIN3BODCTBa 3NEKTPueckoro 3NEKTPoHHORO OOBpyoBaHn, KAK C6blTOBBIMOn OTXoAMN.
- OTxOdbI npOn3BOcTbA 3neKtpueckoro n3neKtpoHHoro
obopyoBaHncrenyet nepeDaBt B nyHKtb c6opa, KOHTpOnpuPyemble opraHaMn MeCTHO Bnactn nn
3apeRcTnpoBaHbIMn KOMPnHaMM.Bo MHOrNX cTpaHn pHi HANm
6onbUroKOJIHeCTBA OTOxOB npOn3BOcTbA 3neKtpueckoro n
3neKtpoHHoro obopyoBaHncrebop OTOxOB ocUeCTBnEraTcna DoMy.
- Ppi noknyke HOBORo npnbopa cTapbI npnbop MOxHO Bo3BpaNTb po3HnHOMO TOPROBMynpdnpnTNO, KOTOPOE 68a3HO npnHrtb e0eCnPaTHo HA OCHOBE B3aAMHO-OHO3HaHOTOCOETCBTMB, ECIN 3TO npnbop bAHAONHOrO Tnna, N Bo3BpaUaEMbI np6Op IMeET Te Jx E yHKUN, CTO I npOdaBaEMbI.
3HEPTOCBEPEXEHN 3AUNTA OKPYXAIOLCEI CPEbl
IIO BO3MOXHOCTn CNEyET N36eTbNpeBapntenHoro HarpBa
DyXBOrO uKaFa a BcerDa 3aONHHTB eTO NOnHocTbO.OTKpbBAITE
DBepUy DxyBOrO uKaFa Ka KMOxPeKe, TAK KaN PkN KaXDM ee
OTKpBTIN TeIPO paccEBAeTc. IIN cyUeCTBeHHoJ KOHOMM
3JIeKTPO3HePrrn BIKNUOaHTe DxyBOB uKaF 3a 5-10 MInYT DO
PiHpyEMOrO OKOHuaHRApeMeHN pNiroTOBHeHNA, TAKIM ObaPzOM
UCNOb3yETC OCTatoCHoe TENIO, BbpAbaTbBAeMoE DxyOBbIM
uKaΦOM. YIINTHOITn CNEyET COePkaTbB U NCTOTE N B
HaNDNeBXaEM CoCtHOH BO M36ExAHaePacNPocPTaHEHn TENPa 3a
IpeDeIb KaMepb. B cIyuee ecIN B BaWem DorOBope Ha
3JIeKTOPOCHABKeHnpeDyCMATpNBaETcN ONUACOB TAPnФ,TO npOTpAMMa "OTCPoKa npIroTobHeHn"ynPpoaet npOcecc 3KOHOmn 3JIeKTOPeHRePNBlaROpApaOTcPoKe Hauana npOceca pnpiroToBHeHndoHauHaJeCTBnIbROTHOroTAPnFa.
3. TAIMEP
3.1 INCNOJIb3OBAHNE TAIMEPA
IyctahOBKn BpeMeHH npHrOBoHnnc OBmecTeYkA3aTeJIb pyKn C Tpe6yEmbl BpeMeH, No IcTeeHHN yCTaHOBHeHORo nepNoa B TeYEHHNECKJbKnx MmHyT 6yDet 3ByHaTb 3ByKOBO CNHAI.
3.2 INCIOJIb3OBAHNE TAIIMEPA OKOHUAHNBAPEMEHNI PNIIGOTOBJEHNIA
Pn NOMOUN30J FyHKUMMOKHOYCTAHOBNTB Tpe6yemoe BpEm npriroTOBNEHnRA (MaKc.120 MHN),NO nCTeueHHN KOToPOr DOxvOBKa ABTomATnHECKN BIKIOHTCn. TaMepOTCHNTaER BpEMoT OYCTAHOBNEHHO DNOJNOXeHHO NABtOMATnEeCKN BIKHOHTCn. IINNCNlB3OBAHHN DYXOBKN BO6bIHHom PEXKIMe, YCTAHOBNTe NOJoxEHne
IINBKNIOOeHnIINbI pOBepeTe, YTO6bI TaHMeP He HaxoDInCBA NINOKeHn0.
3.3 YCTAHOBKA TOUHOFO BPEMEHIN
PNEyPEXKHEHc: yCTaHOBb BpeMeHN pOn3BOmTcBnepBbIe NocJIe yCTaHOBKN dyXOBKn nNn NocJIe OTKnIOueHnE 3JNeKtpuYeCTBa (Heo6xOIMOCtB B 3OM 6yTe OTO6paKeHa B BnDE npbcnpuyoero dncnnr 12:00).
YcTaHOBKa BpeMeHHIOCTnraeTcCJIeHICuM NITyTEM
-HaxMnte ueHtpaBHyIO KHOIIky 4
p3a
-HactpoIka BpeMa KHOIIkAMN "-"
" ^+ .a BpeMa KHOIIkAMN "-" " ^+ OTnyCTnTe KHOIIK
BHIMAHNE: DyXOBka 6yder pa6oTaTb TOnbKO nOcne yCTaHOBKn YacOB
3.4 TAIMEPC CEHCOPHBIM YNPABJIENHEM
CbIeCTBvBaIuTE ONaCHOCTN.
- He pa3peuwaBaiTe Ha deca da irpaarT c cyphata.
-Почиствано Иоблухваны На битов rat ypeд He Трябвда се ИзБьшвот Deца 6e3 NaДзор. ВьзpacTHN.
-5ntobnT ypei, no Bpeme Ha cBorTa pa6oTa ce HarpBa Do Bucoka TemnepaTypa. BbDeTe BHMAtenHn Hne DOKOCBaIte HarpeBaTeJIHNTe eJeMeHTu, pa3NOJKeHN BbB BbTpEWHOCCTTa Ha cyphata.
-IPPEyIPEXJDEHNE: BntOBnT eNeKtpOpyeN HcRObNT OKpTN uactN, no BpeMe Ha pa6oTa Moat Da ce HarpeYa Do BvCoka TemnepaTypa. He pa3peWabaiTe do Hero da Ce DOKOCBaT MaIKN Deua. - He n3noJ3BaIte3 a noUcTbaHe Ha cTBKJIeHaTa NOBbpxHocT Ha bpaTata abpa3nBHN noUcTbAun npenapatn m Tb6n C MetaJIHn YacTnCn INn CTbprAkn. Te MoT aHaIpaKAT NOBbpxHOCTTa, KOEt Da DoBeDe Do HanyKBaHe INn DOpN CyIbAHe Ha cTBKnOTo.
- Ppei Da NoCTte Cyphata Tpa6Ba Da MaxHete peWetkata, np3aBJIKnteHIO n3KJIouen ypei. Cnei NOCTBAHeTo, NOCTabeTe OTHOBo peWetkata No HauHa ONIcAH B INHCTpyKunTe.
-Изпольваite carmo TaKbB TemnepaTypeHдатчК, KaKbВTo e npeInopbUah OT ПОИЗБODINTEJIЯ.
He n3no3BaIte npouchTaUkpn nouchTbaHn ypeHa - Cbpxte 3eKm 3axpaHbaun Ka6en, KOTo e B cbctOHe da noHece HnpeXeHneTO, TOKa n HatOBapBaHeto, yka3aHn Ha Tabekata n Ima KOtAcT 3a3aemBaHe. 3eCenbT Tp8Ba Da e noxOJa 3a ToBapa, nocoueh Bbpy etiketa a Tp8Ba Da nIma CbP3AH KbM 3a3emBaU KoTAcT, KOTo da pa60tn. 3a3emBaun npoBODnK e XbIto-3eneH Na CBRT. Ta3n onepaun Tp8Ba Da ce n3BbpWBA OT BaIINphiupan cneuaJnt. B cnuyah Ha HeCBMeCTIMOCt MeKdy KOtAKTa n UencenaHa ypeDa, noniTae KBaIIINphiuapan eNEKTpoTeHHK, KOTo Da 3ameH N KOtAKTa CDPYr NOxDyA TIN. UencelbT N KOtAKTbT Tp8Ba Da otROBapRt Ha DeNCTBaUnTE HopMN Ha DpbKabata Ha IHCTaJaunra. CbP3BaHTo KbM INTOCHNA Ha 3axpaHBAhe MoKe da Ce INBpWiN Upe3 NoCTABnHE Ha YHNBepcaJeH PekbcBau MekDy ypeDa N INTOHKA Ha 3axpaHBAHe, KOTo MOKe Da NOHece MAKcImaHNO CbP3aHO HATOBAPBaHe N KOTo E B CbOTBeTCTBne C DeNCTBaIoTO 3aKHOdaTeNCTBO. KbIto-3eNeHnT 3a3emBaU Ka6en He Tp8Ba Da ce PpeKbcBAOT PpeKbcBau. THe3doto nn CBpb3kata, INON3BaHa 3a Bpb3kata, Tp8Ba Da ca JncHo DoCTbnH, KOrato ypeDbTe MOHTnpaH.
- PpeKbCBAHeTo Ha Bpb3kata MoKe Da ce NoCTnHrte Upe3 DocTbNHOCT Ha IeIeCeHa IIN Upe3 BKIOUbaHe Ha PpeBKnIOuBaTeB HEnoDbNkHOTo OKa6eJRABe B CbOTBeTCTBne C npabNJtA 3a OKa6eJRAbe.
Ako 3axpaHbauT Ka6e n e NobpeDeH, ToT Tp8Ba Da 6bJe 3aMeHeH c Ka6e HnN CneuaHeH NaKeT, PpeIOCTaBeH OT PPOIN3BOIDTeJRA, INN KATo CE CBbpKeTe COTDeJa 3a OBCnyKBAHe Ha KIneHTN.
BnTHa3axpanBaunKa6eTp8Ba dae H05V2V2-F. - Hecna3BaHTo Ha rophoto MoKe Da 3acTpaun 6e3OnaNCHoCTTa Ha ypea n da oBe3CnJr rapaHcIyra.
-Преши поствано Трабва д ce ИЗвади ИЗлишькт OT pa3летmaTeрпаЛ. - IIO BVPeMe Ha nIPOJIN3HnI pOuEc Ha NoUcTBAHe, NOBbPxHOCTNte MOraT Da ce HArpeT NObYe OT O6NuHaHOTo, IopaDi TOBa DeCaTa TpR6Ba Da ce DbPjKAT Ha 6e3OnaCHO pa3CTOHNHe.
- YpeBt He Tp86Ba Da Ce MOHTnpa 3aD JeKopaTnBHa BpTa, 3a Da Ce N36erHe nperp8BaHe.
Korato noctabnte pafta BbTpe, yBepTe ce, che tonepeH haoen HaOpe n 3aHaTa Yact Ha KyxHaTa.
PaΦTbT Tp8Ba Da 6bJe nBXHaT n3qJNo B KkyxHaTa - PNEUYPKJEHNE: He obuocBaTe cteHne Ha cyphata c aIyMnHeBO fOnIO nn Dpyr MaTePnAaN 3a eHOKpaTHa ynotpe6a, konTO ce npOdaBAT B mara3HNITE. Korato Bnra3aT B npRk DoCer C haropeueHna emai, CbueCTByBa pNCK aIyMnHBeBOTo fOnIO nDpyr IIOo6Hn MaTePnAaN Da ce pa3TONr N da nobpejrt EmaJInpHaTa BbTpESha NOBbpxHOCT.
- INPEДУПЕЖДEHNE: НИКORA He CBАЯТeу yINьТHEнETo Ha BpaTаHa Φурнatura.
1.ObuIN MEPKN 3A BE3OINACHOCT
Bnaoradapm Bn,ye n36paxte eINH OTHaunTe npOyKTn. 3a da IMate Bb3MOxHO Hau-dO6bppeyIaTAT npn i3no3BaHeTo Ha cypHaTa, BHIMATEJHO npOHTe TOBa pKOBODCTBO.IpeOpbYBaMe Bn da 3aapa3NTe HactoIto pKOBODCTBO 3a MOHTax N EKCIIIOatauia N npn Hykda Da ce o6pbUaTe KbM Hero.
Korato ypeBb E bcknnoataa BcunkdoctbnHuaCTn ca ropeu. BnBaIte da He ce doKocBaTe Do Te3n enemEnTH.
Pn npBnT nck Ha cypHaTa, MoKe Da ce ycetn HnnpnTn MmPn3Ma. ToBa cTaba 3aIooTo n3oNaCIOHnTe enemeHTn Ce 3arpaBt 3a PbpBn T. ToBa e abcOIOTHo HopmaHIO n Hma nOBd 3a npTEcHeHne. N3yakaTe ypeDa na n3CTnHe n ro 3a6bpwe Te do6pe. CJeD TOBa e roTOB 3a HopmaHn EKcnnoatauia.
EHa ypHa no CbOra Ta cbUHoc H a paBoTa cTaba MHoro ropeua. OcoBeHo CTbKlNoTo Ha BpaTaHa fypHaTa.
1.1ДeКларачnia3a cBOTBeTCTBHe
Yactte Ha To3n Upei, KOIO MoRAT Da BJIa3T B KOHTaKT C XpaHn, CbOTBeTCTBa H pa3Nope6bTe Ha DInpeKtNa ENO 89/109.
IocTabRn C n MapKpaRn To3n npOyKT, Hne DeKnaprAme Ha Ha7a OTROBOpHocT, Ye Toe B CbOTBeCTBne Cbc BCNUE Ebponeckn 3nCKBaHna 3a 6e3oNactHOCT, 3dpABH n EKOLOrHuH HopMN.
Cne kaTO pa3OAnKoBaTe cypHaTa, yBepTe ce, ye THe e 6nla NOBpeHa No HkaKaBb Haun. Ako mATE HkaKbN CbMHeHna, He aH3non3BaIte: cBpbXeTe Ce KBAINΦmUpaH YOBek. CxbpaHraBaIte ONAKOBbYHInTE MaTePnAJI KATO HaJIOHOBn TOP6uKn, NOnIcTIpOJI, INI INPOHn I3BbH Obcera Ha Deua, 3aIoTO Te ca ONaCHn 3a TReX.
1.2CbBETn 3a 6e3oNaCHOCT
TaznФунгТрбВаДБбдиИЗNON3BAna Camo no npraKOpneHa3HauYeHne, T. e. Camo 3a npiroTBHe Ha xpaHa. Bcko DpyronpinloXeHne Ha ypeDa, Hanpimep 3a OTOnIeHne Ha NOMEuEHeTo, e 3a6paHeNo.
- PpOu3BOUntenT He HOCN OTROBOPHoc 3a uetn, npoDeneH O T HenpabunHa ynoTppe6a Haypeda. Korato n3non3BaTe eJeKTPnueckypeDu Tp86Ba Da cna3BaTe HAKON OCHOBHN npabuna:
-He dbpnaTe Ka6ena,3a da n3BaDnTe 5eencena OKTakTa.
-HeDOKOCBaIeΦypHa C MOKPn INN BnaJHn Pbue INN KpaKa.
-He n3no3BaIte fypHaT, aKo cTe 6ocn.
- No npnHcH He e XeJatEnHo da ce n3non3BaT npexoHNu, pa3KnOHTeEN 3a HkONKO uenceN K6eHN pa3upeHn.
-AkoФурнata ce noBpei nnn DeΦeKtnpa, n3KnIyOteЯ ot Mpekata He nnaTne.
AkoKa6eBt e noBpeDeH Tpr6Ba Da ce 3aMeHn.
PnnoMnaHa Ka6ena, cneBbIte Te3n HNCTpyKuun. N3BaIeTe 3axpaHbaaia Ka6en n da ro 3aMeHN C eINH oH05RRF, H05VV-F, H05V2V2-F Tnn. Ka6enbT pr86Ba Da 6bDe B cbctOraHHe da n3dbpxn enEkeTpnueeckn TO k3nCKbAHOT FyphATA. 3aMaHATA Ha Ka6eNITe Tpr86Ba Da ce hBbPbWBA OT KBAInnPhuPaHH TeXHnU.
3a3emraheo Ha ka6ena (XbIto-3eH) Tp8Ba da e 10 mm noDbblr ot 3axpaHbaunn Ka6en. H3non3BaIte camo oOo6peh cepBn3e HcETbp 3a peMOHT n ce yBepeTe, ye ca H3non3BAHN cAmo opRnHaHn pe3epBHN qactn.Ako rOpHnTe NHCtpyKuH He ce CnA3BaT npOn3BOHNTeHne Me Morat Da rapaHTnpat 6e3onacHOCTTa Ha cyphata.
He nokpnaTe cTeHnTe Ha cyphhata c anymnnheBO fOJNO ToBa moKe da DOBeDe do pa3TAnrHe nn nobpeHa ypeDa.
1.3 MoHTaX
MOHTaKbTe OTOROBOPHOCT Ha KIneHtA. PpOn3BODnTEeNtE He ca 3aDbJIkeHN da OcbUeCTBraBAT Ta3N DeHocT.
HCTpyKUInTe 3a MOHTaX Ha npocecnoHaHNo KBaIINuNpuH
nepcoHAn Tpr6Ba Da ce CnaBat. HnpaBnHHrT MOHTaX MoKe da
npuHN BpeDa nn HapaHbAHe Ha Xopa, XJBOTH Nn BeuN.
PpO3BODInTeJr He MoKe Da HOCN OTROBOPHOCT 3a Te3n UETn NN
HapaHbAHn.
1.4 MoHTnpaHe Ha cypHa B KxHrTa
NocTaBeteFpyHATA BnpocTpaHCTBOTo, BkyXnraT,TOMOKe da 6bDe MOHTupaHO NOEIN PAboTeH Nnot INB EeIN WkaΦ. FHKCupaTe FpyHATA HA MrcTOTO I, KATO CE N3NOI3BAT YeTupTe FHKCupaUN OTBOPA B pAMkTA.(fMr.Ha NocneHATA CTPAHua). 3a Da HAmepuTE OTBOpUte 3a zakpenBaHe,OTBopTe BpTaTaHa FpyHATA NnOIIeHNETe BbTpE.3a Da ce No3BOIn NDOxOJaBa BEHTnlaun, N3MEpbAHnra T naPcTOrHnra, nOCoEHN B dIarpaMaTa Ha NocJeHATA CTPaHnca Tpr6Ba Da Ce cna3BaT. 3aBeNexKha:3aFpyHn, KOINTCa KOMbHnpanC KOTIOHN IHCTpyKUnTe, CbIbpxaunCe B PbKOBoDCTBOTo 3a IINoOyTa Tpr6Ba Da ce cna3BaT.
1.5 BaJxHo
Ako nckate fpyhata Bn da pa6otn HOpmaHIO, Tpr6ba Kopnyca Ha KxHrTa Bn da e noJXoJua. NaHeJIte Ha KxHHeHCKn 6NOK, KOTo ca B HENOCpeDCTBeHa 6IIN3OCT do neuTatpr6Ba da 6bDe HanpabeHOTepmoYcTOuMATEpna. Y6eTe ce ye BCNUKm MATEpnaMorat da nIbPkaHt Ha HarpBaHe do 120 rpaDyca. B npOTnbE CnUaMooJa ce pa3TONT i Da NOBpeJyeda. Cnei kato cyphata ce moHTnpa, eNEKTPnuecknTE KomHOHTn Tpr6Ba da ce n3Onipat. ToBa e 3akoHOBO uNCKBaHe 3a 6e3onachocT. BcnKn ppeNaNTen Tpr6Ba da 6daT 3dpBo FkncupanHa macto, Taque He HeB3MOXHo da 6daT OTCTpAHEn, 6e3 NOMUHa cNeuMaJHn INCTpymENTn. PnoYATA 3a rotBeHe Tpr6Ba da hma O3ad pa3Nka ot nohe 45 mm, 3a da hma Do6po oxJaXdAhe.
1.6 Cbbp3BaHe KbM 3AXPAHBAHETO
BkIouhe B 3axpaHbAHeto. YBepeTe ce, ye nbpBO mHa n TpeTn KOHTaK, KOTo DeNCTBa Kato 3a3emBAHe Ha yphata. FypHata Tp6Ba Da 6bDenpabunHo 3a3EmeHa.AKO MoJeNbHa yphata He e O6OpyDbaH c quencen, cNoXete cTaHdapTe H quencen KbM 3axpaHbAunKa6en. Tp6Ba Da 6bDe B CbCToHne Da noHce 3axpaHbAHeto NocOeHO Ha Ta6enata C TexHueckn daHHN. 3a3emBAHeTo e C XbNTo 3eHn Ka6en. UencenbT Tp6Ba Da 6bDe cNoXeHOT NaHnEXHO KBAnuNpuHn Niue. AKO KOHTaKbT n QuencenbT caHeCBBMecttMM,
JcBbT Tpa6Ba da 6bde CMeHeH OT HaIeXHO KBaINΦnupan
nepcohan. AnpabunHKnBauHnPhiuHaNoIue Tp86Ba cbtoTaka da ce rapaHTnpa,Ye 3axpaHbaunte KaBenMorat Da n3bpxkata H TOK, Heo6xOIMa 3 pa60tata Ha cyphata. ON / OFF npBknUcbaten Moje da B6de Cbpb3an KbM enEketpuceckata Mpeka. PnP CBp3BAHeTo Tp86Ba da OHTeTe, CnNata HA KOHCmpanha.
Baxho: No Bpeme Ha MOnTaK, No3uOnHpaTne 3aXpaHbAunna Ka6en no TaKbHaun, ye da He ce nOpnara Ha TemnepaTpyn H50° C BB BCaKa TOka. Fyphata OTTOBapra HA CTAndaptnte 3a 6e3oNacHOCT, ONpeDeneHn O TPERynatopHnTE oPRAHn. Fyphata e 6e3oNACHO Da Ce N3NONBa Camo Ako E 3aMeHa B CbOTBeTcBHe C DeIctBAUHTne PpABn N3NCKBaHn 3a Oka6eBnBaHE 6e3oNACHOt. Tpa6Ba Da Ce rapaHTnpa, ye Fyphata e 6nla npabnHo 3a3eMeHa.
Ppoun3BODNTENTE He Morat Da 6bDat NOdBExdHn NOD OTROBOPHOCT 3a Bpeu Nnn UeTH Ha Xopa, XNBOTHN NNN BeU, npnuHHeH Nt HnnpaBnHTO 3a3EmBaHe Ha cyphata.
BHIMAHHE: HanpexeHHeTo N yecToTa Ha 3axpaHHeTo ca noka3aHHHa Ta6eJkata (fHr. HnocneHATA cTpaHua).
OkaBnBaHTo n CNTeMaTa 3a OkaBnBaHe Tp6Ba Da MoRat Da Hocr MaKcMajHaT eNEKtpuYecka MoUHOCT, KOrTO Ce N3NCKBa OT cyPhata. ToBa e yKa3aHo Ha TaBeNaT a CTexHnueckn daHH.
Ako IMATE HRAKBN CbMHeHn, 06bpHETe Ce KbM KBaINpHupaH eJIeKTPoTeXnK.
1.7OBOPUYDBAHE3AΦYPHA(B3aBnCmOcTOTMoJeJa)
Heo6xoJMo e da ce Hapabn PbPBOHaJHNOuHCTBaHe Ha 06OpyDbaHeto, npEdu PbBoto n3non3BaHe Ha BCEKn OT T. N3MnTe r c Tb6a. N3nnakHete n noDCyweTe.
Ha ckapata MOKe da ce cnaraTcHHHn CbdoBe.
Oco6eHo do6pa e 3a neueHe Ha rpnI. N3non3BaIte r 3aeHNO C TaBnKATA 3a Ma3HHN.
Cneuannn m npoun Ha padmoeeme 03haea, ye me cmoxopuzohmanho dopu kozamo ce eadm. He cbuecmeyea puck om paanuehe Ha rcmuemo.
TabnKaTa ynaBc cokoBeTe ot XpaHnTe, KOnTo ce rotBrt Ha ckapata. N3non3Ba ce camo C rpn, ckapa nn Fan Grill Assisted; N3BaTee ako n3non3Bate npyrn nporpamn.
Huko2a He u3non3aeume maama 3a ynaeHe Ha cokoe Kamo maba 3a Ma3HuH, mbu kamo moea cb3daea dum u Ma3HuHume ue u3npbckam u 3aMbpcramyphama.
Nua KOMnIeKr.3a Da ce noLyuat Hau-Do6pn pe3yIaTn ot KOMIIeKrTa Tp8Ba Da ce n3non3Ba 3aeHNO C cyHKunra "Nua".
Taba 3a Ma3HHH
IdeaHa e 3a neueHe Ha rpn.
HnONBaIe T a3aeNHO C peWetKaTa . BKnIOUeHa e n DpbXka 3a No-IEcHOTo N3BaxDaHe Ha 2Ta enEmHa.
HE OCTABYNE DpBXKATA BbB FYPHATA!!!
Bokobie npoBOnoyu cTKy, ecN BkIIOHeHbI.
Ceanhe u noucmbaHe Ha MemanHume cmenaxu

1-Cbanete raiknte kato pa3BneTe 6paTHo Ha yacOBHKOBaTaCTpenka.
2- 13BaTeTeTeneHnTe paTBoTe Kato Tn DbPnHeTe KbM Ce6e Cn
3-3 a da noocntte ctenaxknte rnoCTaBeTe BcbdomnnaHata MaunHa nnNn3noJ3BaIte Bnaxka Ra6a, KaTo rnoNDcywete CneTobA.
4-Cne npoeca Ha nouchtahe HnCTanpate teneHte paTOBete B
6bpeH pei.
5-3aBnTe 06paTHo rainKeTte.
2.1 CnCTema 3a 6e3onactHOCT Ha padTOBete
Фурнata pa3nonara c HOBA cnCTema 3a 6e30anachocT ha pafta. Toba Bn no3BONBA DA n3BaDn paTOBETe npn npOBepkata Ha xpaHATA, 6e3 onacHOCT OT XpAHITENH pa3NMB INI paTOBe, nonaDau cnyaHNOOT cyphHATA. 3a Da n3BaDnTE paTOBETe n3BaTe e I NOBUNHHeTe.
2.2 rnn
IeheHTo No3BOLRA Da Ce DaHe Ha XpaHaTa 6bp30 KaFBAUBT.3a npenuHaNE Bn npenOpbVbAme Da noCTaBNTe CKapATA Bbpxy YETBbPTOTo HNBO, B 3aBNCUMOcT OT nponopCmnte HaXpHa (Bk. qnr. Ctp.7).
NoTn BCuKm Meca Morat Da ce npiroTBaH Ha rpnI.
N3KIOUeHHe npABrM HORO NOCTHIne XpaHN u POJIKeTe MeCO.
PpnpiroTBHe Ha Meco n P6bA, TpR6Ba IpeDN NOCTaBReHTo
IM BvB Fpyhata Da Do6abNTe NOpPaBKn mMa3HnHa.
2.3 U·COOK Modenume
U-COOK ΦypHnTe HmAT eNEKtpoH eKHTpOHa CKOPoCTTa Ha BeHTnIaTopa, NaTeHToBAH VARIOFAN. No BpeMe Ha rotBeHe, Ta3N CNTema IpOMeHr ABtOMaTHuHO CKOpOCTTa Ha BeHTnIaTopa (BMHOHrKcHMOHaJIHHra pExHM), 3a Da ce ONTMMn3npa Bb3dyHnA NOTOK N BbTpewHATA TEmnepaTypa B cyPhata.

BcKa cyprnna cyHKnna.
Toba daba Bb3MOXHcct 3a ynpabHeHne Ha pa3npdeIeHnTo H bNarata n TempePaTypata. Toba hAmanBa 3ary6bTa H bNar a c 50%, Koeto rapaHTnpaYe xpaHata octaba HeKHa n C no-do6bp Bkyc. PpenopbHuBa ce 3a neueHe Ha XnB n CnaKapckn N3dieny.

ToBaHAMaJIbBA BpeMeTo 3aNoIgPraBaHe Ha neUInTe:CaMo 3a8MnHyTu,3a DaNoCTuHrE 200 rpaUycaNoLcN3n.

Aba B3MOXHOCT 3a ONpeJeHHe HHBOTn INTeH3NBOCCTTHa NeHe Ha rpn,do 50% NOBcE MOHOC T CpaBHeHcC TpaMIOHHata FpyHa.
HkyoHcO6OpDbAHnCHOBA BpTa WIDE DOOR KOTIO HMA NO-TOJMA NIOU HA NPO3Opea, KOETNO3BOJRA BO-do6pa NoDpbjKnaN NOO6peHa TOnNo3Olaun.
2.4 B 3aBnCIMoCT OT MoJeJa
U·S∈E
ImaocBETnTeHa CNTema, KOrTO 3aMeHr TpaDnUHOHaTa «Kpyka》.14LED CBETnHn Ca NHTerpnpaHn B pamKnte Ha Bpata.Tepo3BExkDat 6nOOCBtneHne,KoToNo3BOJBA da nperrnEkdte BbTpeHnA cTpaHaHa cyphatac rCHOT a.
PpeDnMcTBa:
U:seCnCTemata,OCBHeYe OCNHyPRABa OTNNUHO OCBETJeHne BBB cyPhata,JINBEe NO-DbIIO B CpaBHeHne C TpaDNIuOHHTe KpyUka n eNo-NeCHO N Da Ce NoDlbpKa HnH-BeHe NeCTnEHePnra.
- No-do6po oCBeTBAHe
-ⅡbIbIgJBOT Ha OCBtIeHHe
MHOro HnCKa KOHcyMaunHa eHepTna, 95% No-HnCKa OT KOHcyMaun
"Ypeda c 6nna ceemnuha LED ha 1M Class cnoped IEC 60825
1:1993 + A1: 1997 + A2: 2001 (ekeueaneHmeHa EN 60825-1:
1994 + A1: 2002 + A2: 2001); MaKcUmaIHO ceemJluHama,
U3nByeaHaMoHocmA459nm<150uW
He ce na6nloada c onmuHu ypeDu.
2.5 Bpeme 3a roTbeHe
3a npenopbHTenHTo BpeMe 3a npiroTBAHe n TemnepaTyPiNbPBnBnT, KOrato N3NON3BaTe cyphata, BNKT Ta6aNtne Ha cTp.87,88.CJeI TOBa MoKe Da npoDbJnxTe ChopMaHa yNOTpe6a.
2.6 CamononuCTBaUa ce FYPHA cKaTaJn3aTop
CneuaJIHcAMOnOuHCTBaUcCe NaHeN,0xbHaHTB MKNpONOpEcTO NOKPITHe Ce npEaIarAT KATO DOnbJIHHTeINHO 6OBpyDbaHe 3a BCNUKMOdeIN.AKO Te ca MoHTnpAHn,ФурHATA He Tpr6Ba Da ce NoHcTBA Ha pbKa.
Ma3HHn, KOnTo ca npbchAnBbpx CyTeHnTe Ha cyPhnTa No BpeMe Ha neHe CE OCTpaHraBt OT MKNpONoPeCTOT NOKPHTne.
Ppekaneho HacnoBaHe BCE NaK MoKe Da 6nOKnpa Nopnte n CneIOBATEHDo a npEn Ha cAmOnOuHCTBaHeto. CaMOnOHCTBaUa cnOCo6HOCT MoKe Da 6bJe Bb3CTaHOBeHa Ype3 BKNIOUBAHe Ha npa3Ha FpyHaTo Do MaKcIMAnHa TeMnepaTpya 3a Okono 10-20 MNHyTu. He n3NoI3BaTe a6pa3NBI npOdykTN, ocTp npeDMtN, rpanabN KpInn INm XmMHnHn npOdykTN n PpenapATn, KOITo MOrat TpaHNO da NOBpeyT kataJIIN3Atopa.
Korato roTbTe No-Ma3Hn XpaH e npenopbYnteNo da n3non3BaTe no-DbIbOKn CbIOBe N da cNOXHTe TaBnUkata 3a cb6npaHe Ha Ma3HnHa.
BAXHO BcHKn KaTaNITuHn O6NtOBKn B MometHa Na3apa NMa TpyoB XnBOT Ha OKONo 300 Yaca. 3aTOba Te Tp8Ba Da ce CMeHr cneD OKoNo 300 Yaca.
2.7 AQUACTIVA yHKUIA
PpoeIpypata no Aquactiva n3non3Ba npap, 3a da ce noDnOMorHe npemaxbaHTo Ha Ma3HHn XpaHNTenHn YactnO T cyphata.
1.ИЗпeTe 300 mI BOa B KOHTeHepa 3a Aquactiva Ha ДьHOTo Ha
ФунATA.
2.3aaiTe yHkunraTAt Static()nJn Bottom(00)HarpaBaHe.
3. HactpoTe TemnepaTpaAquaactiva icon.
4.OctabeTe nporpaMaTa da pa6oTN B npOdbJxKeHHe Ha 30 MNHyTN.
5.Cne30 MNHyTN H3KNHcHete nporpaMaTa N da no3BOJn Ha cyphata Da ce Oxna.
6. Korato ypeDbTe nCTnHaI, noHCTe Te BbTpewHInTe NOBbpxHOCTNa Ha cyphata cKbpna.
PepdynpexdeHue:
YBepete ce,ye ypeBt e nCTHnA1, npDn da ro DOKOCheTe. Tpa6Ba da ce BHMaba C BCNUROpeuIN NOBbPxHOCTN, Tb KaTO cbueCTByBa pCK OT N3rapHe. N3non3BaIte DecTHnnpaHa NN INTEeHa BOda. 000
2.8 NocntBaHe n noDpBkKa
IOnHCTBaIte HepbXdaema CTOMHa I eMaIINpAHN NOBbpxHOCTn C TOnla canyHea BODa NnC NoDxOJaMn MapKOBn npOyKTH. B HNKaKB CnyaH He N3NON3BaIte a6pa3NBn npaxOBe, KOtO Morat Da yBpeJrT NOBbPXHOCTNe Ha FpyHATA. MHoro BaxHo e da NOcHCTBaTe FpyHATA BCEKNbT, KOrato Tc E n3NON3BA. Pa3TONeHITe Ma3HNH Ce OTnarT no CTeHNTe Ha FpyHATA no BPeme Ha rotBeHe. CneDaunrTbT, Korato FpyHATA ce n3NON3Ba Ta3N Ma3HNHa MOKe Da npedn3BnKa HEnpnaTHm MPn3MN MoKe DOpN da 3acTpAaN roTBeHTo. nON3BaJIte TOnla BODa npenapat 3a NOcHCTBaHe; n3nnakHete O6uHNo.
3a da Hapabnte Ta3n CkyuHa pa6ota n3nnuHa, Bcyn Moen Morat Da 6bDat obnucobHn C kataNTnHn CAMONOHTBaun Ce naHEn: Te ce doCTabT Kato onu (BnxTe pa3deNa CAMOIOUHCTBAUA AYPHA c kataNTnHn naHEn).
N3no3BaIte npnHn npenapatn n a6pa3nBn cpeCTBa MetaJIHn KaTO 《Brillo noTIOKKN》 3a HepbXdaemn CTomAHeHn peWetKn.
CTbKJEnHte NOBbpxHocTn TpR6Ba Da ce NoCHCTBat KOrato Ca n3CTnHaHn. NOBpeDn no TReX He ce NOKPbBAT OT rapaHcNtA 3a Da CMeHIne INHTepnOpHTo OCBeTneHHe N3KNIOyTe 3axpaHbAHeto n pa3BmTE Kpykata . CMeHete C NDeHTuHa Kpyka, KOrTO MOKe da N3DbPxKa Ha MHORO BUCOKI TemNepaTypn
2.9 CepBn3eH ueHTbP
Ppeu da ce o6aune Ha Service Centre
Ako cyphata He pa6oTN, Hne npenopbVame:
Da npoBepuTe, Ye cyphHata e npaBnHbKJIIOueHa B 3axpaHbAheTo.
Ako npuHnHaTa 3a Heu3npaBHOCTTa He MoXe da Ce yCTaHOBN:
H3KIOUHeTe cyphata OTENEKTPnueckata MPeka, He DOKOCBaIte cyphata nCe oBaTe Ha cneNpOdoX6eHo 06cIyKBAhe.
Ipein da ce 6aInte Ha cHbpa 3a ycnyr He 3abpaBnTe da cn 3annuete cepnnnna Hoomep Ha Ta6enata C TExnueckn daHHn (Bnx Kn. Ha NoceHa nata cTpanua). FypHata ce Doctabc r rapaunnoe HcptnnKAT, KOIO rapaHTnpa, ye Tne 6bJe pemontnpaHa 6e3nnaTHo O CepBn3nna CEHTbp.
3. TAIMEPA
3.1 N3noJ3BaHe Ha TaIMepa
3a da HactponTe BpemTo 3a rotBehe, 3abptete BpBTKaTa Do eHNO NbIHO 3abptane CneT TOBA NO3nIOHnpaTe INHeKcbT Ha Heo6XoMIMO To BpEme. Korato BpEMe e NTKeN0, CNHAn Iue 3BbHn B npOdbJxHHe Ha HxKONKOceHyHn.
3.2 IV3noJ3BaHe Ha TaIMepa 3a KpaI Ha roTBeHTo
To3n KOHTpon No3BOJRA Da Hactponte JKeJahOTO BpeMe 3a roTBeHe (MaKc.120 MIn.) yphata ue Ce n3KnHOnn ABTomatuHo B KpaHa 3aadaEHO BpeMe.
TaHMePbT 贝OT6pOBA O6paTHO3a4aHeHO BpeMoNo3uNraTa O N3KIOHOBBAABTOMATuHO.
3a HopMaHHTO H3N0J3BaHe Ha cyphHATA HAcTPOTe TaMepa Ha No3nUra.
3a Da HactponTe Fyphata ce yBepete, TaHMePbT He eHaNo3nua O.
3.3 HactpoBaHe Ha ToUHoTo BpeMe
BHIMAHHE: npbbaTonepaun 3a nBbPwBaHe cneKato fyphatae6nlaMHCTannpaHa nn cnpeNpekbcBaH e Ha 3axpaHbAHeTo (TOBa ce pa3no3HABAOTMraHeto Ha dncnner) e 3aDaBaHeto Ha npabHnHoto Bpeme. TOBa ce
NoCTHra, KaKTo CNeDBA:
Hattchete zentpaHnna 6ytoh
AD = AC = 1
-OCB6oBeTe BcNCH6byToHn
BHIMAHNE: Fyphata ue pa60n caMo npu ycNoBne YacOBHKnbTe HAcTpoeH.
3.4 I3noJ3BaHe Ha eNeKtpoHHn nporpaMaTop
| Функция | Кakда akтувирамe | Кakда полочиte | Кakbo пави | 3a kakBO ce n3noJ3Ba |
| Зakluчанe | ·Функцията"Зakluчанe"ce akтувира като 3адьржпe 6byToN. Set (+) заим-малко5 секунд. OT тоз мочent нататьк BCNUKДугУФункци и садыншь ДугУФункци ca Зakluчени и на диспец Залоче за мига STOPи празварNTENHо зада徳о Врeme на посекулк.. | ·Функцията"Зakluчанe"ce deakтувира като 3адьржпe 6byToN Set(+) заим-малко5 секунд. OT тоз мочent нататьк BCNUKДугУФункци morat за bdyat ИЗбиран OTНБО. | ||
| Таймер | ·Натинete цentralнia 6byToN 1 nbT "..."+"+ "Hathinete 6byToN 3a за ИЗбөрete Врeme "ocboбдete BCNUK6byToN | ·Korato 3ададеното Врeme ИЗTEЧ, ce akтувира 38уков СИнан (тasi anapma如期) OT сaramо себс, об悔 можда с оре He3a6abHc C hATSCaH ha 6byToN) SELECT. da ce cnpe He3a6abHc c hATSCaHа Na 6byToN) SELECT. | ·По Врeme Ha pa6oTa ce noka3Ba OCT. Врeme | ·Позвлгва ддзрлэвларма Фурнatura като anapmen часовник (при ВКлUCуна и ИЗКЛUCуна Фурн). |
| Врeme 3a Hathinete OYTOH ROTBENE | ·Hathinete цentralнia 6byToN 2 nbTn. "YIN"++" 3a за ИЗбөрete празьлЖитELHOC "ocboбдete BCNUK6byToN "ИЗбөрete Функция сьс салтора | ·Hathinete Hяков 6byToN Зддсе сгнела. Hathineteцentraлнia 6byToN Зддсе вьр themselves do quacOBHnka. | ·Позвлгва Bддзадетe ВрemeTo 3a 70tBHe 3a ИЗбранata pecenta. ·3a за робerte octabaцо Врeme HATSCHETe SELECT 2 n btyn. ·3a ромая Na 3adakdhenotо Врeme HATSCHETe SELECT n"- "++"6byToN. | ·При ИЗчане Na Вретето Ф урнatura се сizзкюч авTomatuHNo. АкоInskaTe Ддзретe rotBeHETO no-paHO 3aBpTeTe canelkTopa Na 0,пли задзete Вретето Na 0:00 (SELECT ":"+"+"6byToN) |
| Край na rotBeHETO end | ·Hathinete цentralнia 6byToN 3 nbTn. "Hathinete 6byToN"-""+" , за заэндente Вретето, в Коету Жетае邮件 Фурнata, за с ИЗКЛUCH "ocboбдete 6byToNite "Задаile Функцията 3a rotBeHe c салтора за ИЗбop | ·В заэндото Вретe, фурната се сizзкюч. Зддсe вьр themselves O. Фурнatura поставete салтора в поstuzио O. | ·Позвлгва Bддзадетe Края Na Вретето 3a 70tBHe 3a за робerte празварNTENH Зддсe hovtOK 3blTN Зддсe hovtOK 3blTN Натинete Фурнatura Na 38tBvOBA anapma sze 38bHn. ·Тогонему сe сemapmua aemomamunho 8 11:45 (12:30 mnyC 45 mnymU) u сe поьлжу do празьрumenho 3ada deHomo epe Me Na Край Na zamebeNe, koamto Фурнama Na сe сizзкюч aemomamunho. BHIMAHNE. А ко заэндe " Край Na rotBeHETO" Be3 da 3adaDEte Краян сac, rotBeHETO 3anOyBa Bedhara. |
WEEE He Tp6Ba Da 6bDaT TpeTnpAH KaTO DomaknHcN OTnAdbu.
WEEE Tp6Ba 7a 6Bat npdaan B CBTOBTHNE CB6paTENH NYHKTOE, ynpabnBAH N O6UHa Hn PnpeHCTPnA H KOMNAHn B MHO DpXbA, 3raONeMn WEEE, Moke Da cepeNa 6bnaphe O TDMoBe.
KOrato KpyBaTe HOB ypei, CTapnT MoKe Da 6bDe BbPnat Ha TbProeua, KOTo Da r npnbepete 6e3nnaTHo Ha 6a3a eHNO EEDHO, DOKaTO o6OpyDbaHeTo eOT CbIIN HA cblnte cyHKuN KaTO DoCTaBeHOTO O6OpyDbaHe
CNECTRABAHE HA EHEPIN I ONA3BAHE HA OKONHATA CPEDA
KoratoeB3MOKHO h65RBAIte PpndBAPnENTHOTa 3arpBaHe Ha pypHata. Np BpeHa HO TReBe HOTBapnTe BpaTaHa HpyHata B3MOHO HA-MaIKO, 3auTo npN BCKo OTBAPnHE c tybN ToTINHa. 3a 3uHTe HIOHOMHn HA eHepn I3KNHOpTe pypHata 5-10 MmHTy npeDnPiHApnHnRT KpA H BPMeTO a RotBEHe H3NtON3AteOCTbTAHnToTINHa. KOrto FpHnata PnpDlbNkBaJa da ReHepnPra. 3a Da NsBeHote 3aryBa H TO nnTHnO NODbpKaJne CNTu N b peD yNtBHeHHa H cyphHata. Ako IMate pa3nnHn TaPnOHa 3a enektpnueeckata eHepn I3N03BaIte OTNOKeHN CTapt, 3a Da CTapTpNaTe rOToBHeHo H No-HnCKATA TaPnHa
3araJIbHI 3aCTepeKeHHr
64
1.1Дeкларacia BiinobiHocti
1.2 Kopischi Iopadni Odo Boe3neke
1.3 MoHTax
1.4 B6ydoBvBaHnI DuxoBoI IaΦn B Ky XoHni Me6nI
1.5 BaXJIINBO
1.6ПiДКЛHоЧЕнгДоЖиВЛeнг
1.7 OchaueHHyXOBKn (BIDNOBIDNo Do MoDeni)
Kopuchinopadn
65
CnCTema HaDiHocTi POnu2.1
22.CMAXEHHHAIPIJI
3 U-COOK2. MoDéji
2.4 BiinobiHo Do MoJIeI
2.5 DuyxOBka 3 PeknMOM CamooNueHHa Ta KaTaNITuHMM NOKpTTAM
2.6Функця Aquactiva
2.7 OunuHn Ta ObnyBaHHa
2.8 CepBicHn LcHtp
Taimep
66
3.1 BnKOpncTaHHXBnJIHHHOro TaMepa
3.2 ABToMaTuNHe BiKnUoyeHHa Nicn 3akHcHnB BiNiky TaMepa
3.3 BCTAHOBHeHHIpaBnIbHoro Yacy
3.4 Cechophe ПporpamyBaHnI ГоиннИka
Ihctpykci 3 EKcnnyataci
68
- YBAGA: npnilad ta noro doctyni qactnHm MOxyt b harpiBaTncr piac po6oTn. BybTe obepeKHMn Ta He TopkaTec8 6yDb-ayknx Harpitux Detanei.
- YBAΓA: Достунни частино можут haipiBaTnca nД пac po6OTn duXOBKn.ДiTu He NOBHHI Ha6JInxKaTnca do npuNaDy.
- YBAΓA: nepei 3amHIO JAMnnepeKoHaTecra, lo npnaD BmKHeHO, o6 yHKHyTm MOXINBOCTI ypaKeHHeNEKTPnuHm CTpyMOM.
- YBAΓA: nepeД NOaTkom aBtOMaTHORO ZIKIy OUHHeHHa:
- OuHCTiB IBePci DyXOBKn;
- BndaJIbB eNki a6o rpy6i 3aIIuKn iXi BCEpeHInI dYxOBKn 3a DOnomOrO BoNoroI r6Kn. He BnKOpNCToBvIe MmHi 3ac06n;
- Ycyhhe BCE DoataKOBe oBnaHaHH Ta BucyBHy noIinIO (pnp HaaBHocTi);
-He po3miuTyTe kyxohHi pyuHnKn - Persh Hix BKohyBaTHu CnKl OunSeHHa DxyOBok i3 3OHDOM dIe M'raCHeo6xIDHO 3akpTNOTBip BIDNOBIDHO raIKOIO. RaKIO 3OHd IINe M'raCa He BnKOpNCTOByEcR, 3ABXdn 3akpNBaTe NOrO 3a DonOMORO raIKN.
-Дити ВIKOMdo8pOKIBHe NOBUNHHi H6JIINKATnCЯdo npuJaIyaboJxpe6yBaTnNiIDnoCTiHIMHaTIAOM.
He 03BOJnTe dITaTm rpaTncs3 npnaDom. BkOpNCtAHn npnaLy oc6amn BiKOM Bi8 pOKIB, a TAKOX Oc6aMn 3 06mExeHIMN f3uHUMN, ceHCOPHMN uN PO3yMOBIMN MOXINBOCTaMn, 6e3 DocBiDy a6o 3HaHb IPO npNAI NOBHHO 3dIiCHIOBATncs JIWe NID HARJADOM a6O X NiCJI ONPMAHn HAeHX INCTpyKci 3 ekCnlyataqii. Take BkOpNCtAHn NOBHHO 6ytN 6e3neHIM Ta 3diINCHOBATncs 3 YCBiDOMNEHHM MOXINBUX PUNIKIB.
OuHHeHH Ta o6cnyroBvBaHH He NOBnH0 3dIiChOBaTnc dItbM 6e3 Hargy.
He BnKOpNCToBnyTe 1oOpCTKi a6o a6pa3nBHi MaTepiAIn a6o roCTpi MeTaJIeBi 1kpe6Kn, 1o6 ouHCTNTCKNo DBePcT LyXOBKn, OckIbKn BOH MoKyTB NOpJPaTN NOBepxHIO Ta npN3BecTu Do pO3K0Ny Ckna.
BumkhItb dYxOBky nepu Hix yCyHyTu 3HIMHi Detani, a nicra ouHsEHHa 36epitb ix BiINOiDHO do IHCTpykui.
BukopncToByTe NlIe 30Hd nIa M'raCa, peKOMeHDoBaHn dIyI dyXOBKn.
He cnid BnKOpncTOBvBaTn napoouchnK dIy OUYeHH npnilaNy.
-ПдклочьВИКуДоЗa3eMнeHOrO Ka6eJIO JxNBJeHHЯKIN BuTPmUe HAnpyry,CTpym Ta HabaHTaxKeHHa Bka3aHI HaApnky. Po3etka nobuHa 6yTu HAlexHo 3a3emNeHOU, a TAKoX npndaTHOIO dIra HabaHTaxKeHHa 3a3NaueHoro Ha apnky. IpoBid 3a3eMneHHa03NaueHO XOBTO-3eJIeHHM KObOpom.LpaPoueDpya NOBHHa npobodntnc BIDNOiDnH KMaJIiΦIKOBAHm PpaizIBHKOM. Y pa3i HecymichocTi po3ETKn Ta BnKN npnady, nonpocitb eNeKtpnka 3amHHTn po3ETKy Ha IHsy, kya BiINOiDaTIme Heo6xIHOMy Tnny. BnKa Ta po3ETKa NOBHHI BIDNOiDaTn DIOOHMM HopMaB BCTaHOJIeHHB KpaIH. PdKloueHHa Do DxepeNa JxNBHeHH TaKox MOKe 3diChOBaTcR ShJXOM PO3MiueHHB CSeONpHoro BIMNKaHa MIX npnlaDom Ta DxepeLOM XNBHeHH, kmy MoKe BNTpIMyBaTN MaKcImaIbHe pIckIoUeH He HabaHTaxKeHHa I kyn BiINOiDae YHHOMy 3akHOdaBCTBy. XOBTO-3eJIeHH Ka6eJb 3a3eMneHHa He NOBHeH NepePBAtnc BIMNKaueH. Po3ETKa YN BcENOnpHm N BIMNKauch, 1O BkOPNCOTBOYtbcr dI pyPiKIOUeHHA, NOBHHI 3aIIuATnc JERKOIOCTYNHMM NiCJBACTAOHBJeHHN pnpnaDy.
BiiKJIIOUeHH MoKe 3diIcHIOBaTnCra 3a paxyHOK IOCTynHOcti BUNK a6o BKIOueHHaM nepemikaya y oikcoBAHy npOBdKy BiINOBIDHO Do npabN MOHTaKy.
JaKIO KaBEnb JKNBHeHH NOWKoDKeHO, Ioro NOTpi6HO 3aMInTu KaBEnem Cn CneuaJIbHIM KOMnNEKTOM npOboiB, HAdaHm Bnpo6HnKOM, a60 3BepHyTnc Do BiDiny OcbCyroByBaHH KJIeHTIB.
TnKabEnIO nobHHeN 6yTN H05V2V2-F. - HeIoTpImaHnB BnIe3a3HaueHnx Bka3iBOK MOKe HeraTnBHO BnIInHyTu Ha 6e3neKy npuJaTy Ta anyIIOBaTu rapaHTIO.
- Pape ouiueHH noTpi6Ho ycyHyTu 6ydb-aki 3aJnUkno po3nntx peOBnH.
-Пд ус порлітунчого очицьгп NOВЕРХИ можут b HarpiBaTиСя 6iЛьшe, HIX 3a3BvuaH, TOMy DiITN NOBUNHI nepe6yBatn Ha 6e3neuHi BIDCTaHI. - Пилад He сдд BCTaHOBJIIOBaTn 3a DeKOpaTHBHNM ДВeрцЯТМN, OCKIЛьКИ ZeпиЗБЕDEdo nepeHarpiBaHHa.
- Po3miuoyu noiucu BCEpeunH, nepekoHaTecra, 0o o6mexyBauchpmaBOHO Bropy Ta B 3aHIO qactnHy npoxHHn. Noiucu notpi6Ho nobHicTH NOMICTHTN B npoxHHny.
- YBAΓA: He BnKOpNCToBMyTe aIiOMHicBy fOJIbIy uN OdHopa3OBI 3axnChi 3ac06n, DoCTyNI Hi B Mara3nHax, dIra 3axnCTy CTiHOK dYxOBKn. AIIOMHiEBA fOJIbIra yN 6yIb-aki iHwi 3axnChi 3ac06n, pni KOtAKTi 3 HarpITOEO eMaJIbOBAHOIO NOBepXHeO, MOJyTb PO3PiABNTUCRA Ta NOWKOJNTI II.
- YBAΓA: Hikōnne 3HimaTe yüiJIbHeHHa DBepaT dYxOBKn.
1.3AΓΑJIbHI 3ACTEPEXKEHHRA
JaKyEMO,IO Bn O6pani Odn H 3 Haunx Bnpo6ib. Ipa Hau6inbwepeKTHBHO BVkOpNCTAHRAa0oi dXyOBoI paHIMo:
- yBaxHo npoaHTaN Li HCTpykui, BOH MiTb BaxnBi npabnA
6e3neHOrO BcTaHOBJeHHB, BnKOpNCaHH Ta o6CnyroBaHH dyXOB0i
waPhi;
TpMaTHuIeB6yKnTe B DoCTynHOMy Micui, Uo6 3BePTaTnc DO HbOTo Mm6yThbMy. Bc DoctynHi cactHn II lac poBOTN nIepTOPO HarpBaIObC, 6yIbeYbAKHI I He ToPkAteCux EnEMeHTB.
Pm nepuomy yBIMKHeHHi dyXoBOI uaΦn 3 HeM oKe BUXOHTN dM 3 p3kM 3anaxOM. Ie noB'3aHO 3 Tm, Uc KneI iOJIauiHx NaHeJe HABKONo dyXoBOI uauHpBaTbC BnpeJue.
LcuiKOM HopMaIbHo, i kIO Take TpaIINIEbCRA, Heo6xIDHO 3aueKaTIN DOKI dIM He 3NkHE, nepu HIX CTABNTN CTpAIN B DYXOBy IaFy. DYXOBA IaFa HarpBaTeBc DO bVBCOKX TemepaTy 3IgHO 3 II npn3HaYeHnM. Ooc6bNo rapaHMMoKe 6tyn CNO DBepaT dyXBOI iaFNI.
1.1 DEKJIAPALI BIDIOBIDHOCTI

DeTani Ubo npntpoIO, 0 MoKyb KOHTaKyBaTN 3 XapOOBIM npOyKtAMn BiNObiaOTb NOJoxEHm DInpeKTINB CEC 89/109.
1.4 BByOByBAHHJ DxyXOBOI UAΦN B KY XOHHI MEBJI
BctaHObITb DxyOBky Ha Micu, nepe6bauHomy B kyoHOMy raphIpyi; MoXHa BCTaHOBNTn NiD CTInbHneOe A60 Jy BEptKanbHni Wa. 3aikcyte DxyOBky 3a donomoro TBNrTt. BnkopncToByte ToTnpn OTbOpn dNp KpInnHeHHBa pAm. (Pnc. Ha octaHn cToPiH).
Дя ВИЗHAЧЕНЯ MИСЕЗHAХОЖECHENHY OТВOPIB ДЯ КПINNEHNY BДКРИТЕ DBERPUТАДУХБКТа 3агл�п ТЕ BCEPДИИ.ДЯ 3абе3neHNY HANEXHOI BEHTNIAJI NID YACФICYBAHNY DXYOBKN NOTI6H0 DOTPMYBaTNCRA BUMIPIB I BIDCTAHe, 3a3HAчEHNX HA CXEMI HA OCTAHHH CTOPIHJI.
PnIMtKa:BnKOpNCTOBYOuHyDxOBKn 3 B6yDobaHOBapunbHOHO NOBepXHeO, cnDtoptmyBaTmC HcTpkyi, 3a3NaueEHx y Noc6Hnky dA BapunbHOt NOBepXHi.
1.5BAJKJINBO
Ira hanekoio p oobn dyxoyofo w aphi i c n iB 6y dobybataB m e6ni, kpi npiaatdi nla boro. Panaenki k yoxonhnx m6bn, uo 3n axoarbno pyu 3 d y xoHOO wa fo, maotb 6ytn BnroTOBneH 3 T ennoctiKnM aTepeianib. YneBHbCBA, uo KI eN, kyn BnKOpNC-TOByeTcBd n Ia O6knEOBaHnA n anenl W noHOM, CTIKN do Te mepatypn He MeH 120°C. Pnaactnk A 60 KJei, kyn H eBnTpye Ta KI Te MnpaTpyn, MOKe po3 nnabn-TncTa Ta dedopmyBatm E6nI. KonD I yXOBA w aPb CA TOABnEHa BC epeDnHi wa fKn, enektpnH detani n OBHH 6 ytn n ObHCtIO is OJbOBaHNm. Lbe Bu mora tex Hik663 -NeK, uo B cTAHOBHeA 3 AOKOH.MBC 3a xnci de tani Ma ToB 6 ty Nco pCTKO ak pinienHa CBOIX Micux, uo6 I X HemoknNo 6 yto 3Bn KopcctAHNA cn euaJIbNHx IHCPymeHTB.
3HRTN 3aDIO C TIKHY u aFKn, uo6 3 aE63neHTn HA JIeKHy BE HTNIJIaIO I u pKy-JIaIO NOBITR H ABOKO I yXOBI u aHn. BapInbHa no BepxHa no BHHHa Ma Tn N03aDy n PoCtB H e M eHlue 4 5 MM.
1.6ПДКЛIOUeyHЯДОЖИВJIeHHЯ
PiKIOHHTb npnIaD IO eNkTpOmepeXi. HacamnepeIepeKoHaNTecB HABHOCTI TpeTbOro KOtAKTy, kYIM Die JIK 3a3EmNEHH NIN DnyDyXOBKNY DYOBKIA NOBHNA 6ytN 3a3EMHeNAHEKHM YINOHM
Kkuo moeB nyxobKn He ochahe H BNkoO, nie'edHaHte cTahapThy BNky do Ka6eIIO XbJIbHn.BoHa NobINHa BnPmYbATn HAppyr, 3a3aHeHy Ha TabNuiC 3TexHcHm DaHmN. Ka6eNb 3a3emHeHH Na3aHeHO XOBTO-3eJeHm KOBpOpm. BnKy NObiHeh NiD'EDhyBatn TiBkn KBaIipikOBaHm PhaxibeB. KaKoo po3eTKa Ta BNka E HeCymicHMn, TOni KbAnipikOBaHm PhaxibeB noBNHe H 3amHInu PO3eTKy. KbAnipikOBaHm PhaxibeB NobHEH TAKOK nepeKoHaTnc, Oo Ka6eni JbBnEHn 3daTH nponyckatn CTPM, He06xihn dnn p06To DYXOBKn.
BmNkay (ON/OFF) MoKHa TaKoN iNkHouHTn Do nOdauyi KINBneHH. Pn iNkHIOeHn CnD BpaxOBaTHn NToCHN CTpym i HNH3 aKoHOabHi BmOri. KOBTO-3eHnKabEJI 3aEIMNEHH He NOBHN KepyBaTnc BmNkaeyem ON/OFF). Po3eTKu YbnMkay (ON/OFF), kI BOKOPCTOByOTbCJ IINKHIOeHHDo eEKeTpomepeXi, NobHH6yTN JERKOCTUHMMNICJN BCTAHOBNeHH dyXOBKn.
Baxnbo:Piac BcTaHOBHeHPO3MicTbKa6eJbKHNHeH TaKHM HOM,06BH y KOHOMpya He NIDabABCBnNBy BnCOKNX Temepatyp (noHa50°C).DyXOBKa BiNDObAe HopMaM 6e3NeKN, BCTaHOBHeHmpeYIOIOHmOprAmu. DxyOBky MoxHa 6e3neHo BVOpNCBOyBaTNiNEo NICNA HaneXHOro 3aEmNeHHB iDnOBiHO do YHHNX 3AKOHDoBHX BMURIoo 6e3NeKN IpOBoKn. BN NobHHH nepecBiHTncB HaJeXHOMy 3aEMneHHi dyXOBKn.
Bnpo6HnK He Hece BiDnObiAnbHocTi 3a 6yIb-ky WKOdy YN TpaBM, 3anOdiHi Oo6aM, TBAPINHAM a60 MaHy BhaclIDOK HENpABInbHoro 3a3EMHeHH dyOBKM.
YBAGA: yactota i XINBJIeHHI eNEKTpOmepeXi BkazHI Ha Ta6nHcI 3 TexHiHMN daHMI (PNC. HA OCTaHHI CTOpIHcI).
Kabeni Ta npoBoka NOBHHi BnTpmyBaTm MaKcImaIbHy eNeKtpHHy HanpyHy, Noe6xHJy DnyOxBKu. Lc BkA3aHO Ha TaBnHcyi 3 TexHcHIMn daHIMy. Y pa3i BnHKHeHHy 6Byb-kynx CymHBiB, CKOpNCTaTEcra NocnYram KBAJIipKOBAHORo faxIBz.
1.7 OCHAUEHHJ DYXOBKN (BIDIOBIOHO DO MOJEI)
Ipeep BnKOpncTahHm 6ydb-koRo oChaueHH Noro notpi6Ho
nopeHbO ouChTHn. POMNte HOro 3a Donomoroo ry6Kn.
Cnonochtb I BCyUHTb.
Ha MoXHa po3MCTnTnnpocTIN nonuI fopMn DnA BnNtKn Ta NocyD.
Ponuq dnnotkib ideanbho nixoNtB DnA CmxeHHa rpnH. Binkopictobyte ii 3 iDOnHom dnn 36Opy pidiHn.
3aBdKn CneiaIbHOM npoCfIO nONiHi 3aJIuIaTMHybc B rOpN0HTaNbHOM NOJoxeHH, HABITb kAIO xPiKO BNTRrHyTN.
Biccyh6ydb-kynnp3nK KO3aHHNocdyu npo3nBaHHNoro Bmcty.
PnDn360py pinnn 36npac cik, 10ckanye nIyac CmakeHH IxHa rpnni.Bin BnKOpNCOBYeBcRnnePiYac npiroTyBaHnHa rpni, WauNmHnui a6o rpniB NoeDnHaHi 3 BEHTNIaTOpOM; nIyac IHnx cnocobir rotyaHnBuIMtB no 3 dyXOBKn.
Hikon He BnKOpNCTOByIte nIDOn DnIg 36Opy pIDHH, kN OIIIOu IaI 3aIkaHnO, oKiIbKn Ie MoKe cPnHnHTn IOBy dIMy Ta 3aBpN3KaTIN dXOBky.
Ha6ip nna niu BnKOpNCTOByeTbcra nnpiroTuBaHHn iui.
Дя ONТIMANьHORO pe3yNbTaty H6ip cnIg BYNOKPNCTOBByATN B NOcDAHHI 3 ΦYHKJIeHO DЯ NpRNTORYBAHHI PIu.
Ponmua dna notkib
PonuIaIOTKIB iEanbHO nIXoAnTb
IIN CMAKeHnHa rpnni.
BukopncToByte II 3 nIDOnOM dna
36opy piDHH. Y KOMnneKT TaKoX
BXOAnTb pyuKa dna 6e3neHoro
BnMaHHHe 3aHnAaTe pyky BCEpeHi dYxOBKn.
BiuHIpOty ciKn, kUo BKnIOueHn.
BudaneHHma ouuueHH naheenu
1.BnMItb pnpneHraKn, NOBepTaOCh IX npOTu rOUnHHNKOBOI cTpINK.
2.3HIMtB naHeni,notrHyBwn ix Ha ce6e.
3.卍oountnnaheni, nomictbixB nocydommyaunhy a0 npotpiMOKPOIry6KOIO Ta BNCuWitb.
4.ПсЯ Oчишен,пOMICTITb NaHeJI Ha CBOE MICe y 3BOPOTbOMy npaKy.
5.3amHITb npDJIeHI raIKN.
2. KOPUCHINOPAДN
2.1 CNTCTEMA HADIINHOCTI NOJINCb
DyXOBKa OCHaSeHa HOBOH CNTeMOHOHaiHocTI NOHb.
Lcdo3BONITb Bam BnMmatn nonu3 dyXOBKn NiD Yac ornAry Kki Be3 pn3Kny npoNBaHHaOx paToboro BnadaHn nonu3 3 dyXOBKn.
UoB BuHHTn nonuI notarHITb Ta npunidHIMITb ix.
2.2 CMAXKEHHH HATPNIJI
3aB4n npirotybaHHo Ha rpii xka WbNko Habyae anetntHOCKOpHKn. 106 otprmatn ckopnHy, Mn peKomeHyEmo nomictn rpnBa HA cheTBPOTMY pIBi, 3aneXHO bID KINbKOci Ixki (DINB. PNC. HA cTOpHci7).Ha rpii moKHa roTybaTu npakTuHoo Byb-aki cTpaBN, 3a BnHRTKom DykehIKHOI NmHnMnM nAeHsOvDyNETB
M'aco Ta p6y, kki BN 36npaTeCra roTyBaTH Ha rpiNl, noTpiHo cnepuy 3nerka nonnnoiio.
2.3 MODEJI
UCOOK
UCOOK DuyoxBKn OcHaeHi CnCTeMoO eJeKTPoHOrO ynpabInHH WbNdkicto BEHTnIaTOpA, kA BiDOMa Ta 3anaTeHToBaHa Nid Ha3BOO VARIOFAN. Pd cac rotyBaHHra CnCTeMa ABOTMATuHO 3MIHO E WbNdkictb BeHTnIaTOpA (B 6aratoФyHKioHaNbHomy pexkmi) dna ONtIMi3aII NOTKY NOBITpTa BHYtpHb0I TemnepaTyPn B nopoXHHI duxOBKn.

YciDyXOBKnIeOoKHi cyHkUieJo Lc

D03BONIE KepyBaTIN NoHUPeHHAM BONi I TEMnepaTyPi.
Lc FyHkU3 3HNKye BTPATy BONn Ha 50% 10raPahYrE
HIXNtcbI kpaun CMAK XIt. Take denikaThe roTyBaHnBb
peKOMEHOBaHE DnBnIKaHnXnIbTa t HWOI BNUnKm.

Lc3MeHuyc Hac Ha nonepaHHe HarpiaHHyDxyOBKn: notpi6HO nIe 8 XBnHH, 0o6 DocraHyTn TempepaTyPn 200 rpaDyci CJIbci.

Lc dae moxmbicb BCTaHOBnHnPBnTa iHTeHCNBHOCTc CMAxehnHa rpnni, a TAKoK Do 50% Binbue NOyXHOCTi B nopIBHHI 3 TpaunuHIO 6araTOpyHKioHaNbHOIO DYXOBKO.
Ieaki DxyOBKn OCHAeHIOBMM DBeepaTAMWIDEOORkiMiCTA 6iNbwe BIKOHue,IO Do3BOJnE 3dInCHOBaTH Kpaue ObcnyoByBaHH Ta 3abe3neye nokpaenHy Tepmoizonuio.
2.4 BiinobiHo do MoJeJI
U·SEE
DyXOBKa OChaSeHa CnCTeMoO OCBITNeHHa, Ka3aMIHOc TpaIIMHny lammy. 14 CbTIIOIOHNX NAMN B6yIDoBAHI y DBepuTAta. Ce 3a6e3neueyBUCOKKICHe OCBITNEHHa, IO DO3BOJNRE YIKTO ORIaTN BMICT DxyOBKn 6e3 6yb-RAHX TiHe H a NoIIINx.
PepeBarn:
U-SE CnCTeMa, OKIM TORO, 03a6e3neuey 63doraHHe oCBITIeHHB BCEpeiHi dyoxoK, E TAKO DOABROHHIoo B nopIBHNHI 3 TpaNuiHOI NaMIO, npocTIoHO B OcNpyROBaBHAI Ta ekOHOMHIIO.
-OnTmAbHnOrJr
-ДовrobivheocBITNeHHA
Ha3BnuaHn H3bKni pBeHc cnoXnBaHH eneKTpoeHeprii, -95% y nopIBHHI 3 TpauiuHm OCBITneHHM
"PpHnAd 3 6iHMM CBTIOIOHMM OCBITNeHHM KNaCy 1M BiINOBiHO Do cTahdapTy IEC 60825-1:1993 + A1:1997 + A2:2001 (ekBIBaENTHO EN60825-1:1994 + A1:2002 + A2:2001); MAKcHmAbha NotyXhIcTb CBITNa, 0U BnPOMIHHOCTbC, CTAHOBtB 459 H < 150 MKBT.
He cnoctepiraetbca 6e3nocepedhbo 3 ONTHHMMn IHCTpymehTAMN.
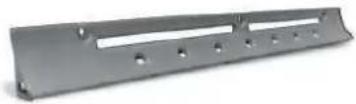
2.5 IYXOBKA 3 PEXKIMOM CAMOQUHIEHHA TA KATAJITUHIM NOKPITTRM
Дя BCIX MODENE B JAKOCTI DoaTkoBOrO 06NaHnHH OocTyNH CneJIaJIbHI CamOoUChI hAHeI 3 MkPOnOpNCTM NOKPITTM. IPrn IX HABHcOT, DxyOBKY 61bIe He NoTpi6HO NCHITN BpyHy.
XKnp,po36pn3kAHn Ha CTIHkax dYxOBK nID Yac 3aJIKAHn, yCyBaεTbCn MIKpONOPCTM NOKPITTM, RKe pyHye Horo JIJXOM KaTani3y Ta nepetBTOpe B rA3.
IpoTe HaDmipHe po36pn3kyBaHH MoKe 3abNOKyBaTH npi i,OTKe, nepeWkoKDaTc CAMOoHueHIO.3aTHICTb DO camooHueHn MOKe 6Byt BIDHOBHeHa IJXOM BKNIOUeHH NPOoKHBoI NeHi MaKCMym Ha 10- 20 XBNHn.
He BnKOpncTObyIte abpa3uBHI Bnpo6, Metaneai dpotnki, roctpi npedmetm, wopctKI TkaHNI ao ximHi npOpyKTn Ta MmHi 3acob, kmi MOxYb 3aBdAnTI WkODI KaTaniTuHNI NOBepXHi.
Haikpaae BnKopocToByaTn rN60kI NotKn d3a1iKaHHx KnpHnx npOyKTB, TAKNX Jk CTPaBIM 3 M'ca TOIO, I NOCTaBtIN NOTOK NID rpNb DnA 3abOpy HAdnnuKOBOro Xnpy. Raio CTInKN DxyOBKn HAcTIbKn CNbHO BkPNTI KnpOM, 50 KaTaNITUHa NOBepXH BKe HE e efpeKTNBHOIO, BuaNITb HAdnnuKOBn Knp M'raKO OraHIpKO aBO rSyko, 3MOHeHO B rapaH BOi.
Дя efeKTNBHOrO cAmOoUHHeHH, NOBepXHa NOBnHHa 3aNMaTnCn nopncToIO.
3anaM'atane: Tepmih ekcnnyataui Bcix Docyhnx Ha pMHky kataiHTNHN NOBEXHOCKnAe 6n3bko 300 roHn. Tomy ix cnid 3aHHoBt np6bnHoYepe3 KooHi 300 roHn.
I06B BCTAHOBHT NAC npriroTyBaHH, 3pOiBtOBnHOBn OePT peryJrTOpOM I BCTAHOBITbNOKa3HKn Ha Notpi6hN Yac. NcIy TOrO, RaC CnIIIBE, BnpoD8K DeKlBkoC KeYHd NyHaTmE 3ByKOBN CnHAn.
3.2 ABTOMATUNHE BIDKJIIOUeHHI NICJI 3AKIHueHHBIDIKY TAIMEPA

UepepyIaTOpdo3BONRe3a4aTNnOToPi6Hm 卅pnproTOyBaHHra(MaKc.120XB.).Duxoba 5a4aABTomATNHO BmmKaTebC, KOJI 3a4aHNHcAocnNBAc
TaMepBIDpaxOBye Yac Haaad BiD BCTaHOBeHoro Cacy i NOpeTaTeBcR B NoIOxEHHaA OTOI ABOTAMUHOO BMNKAeTbC.
HOPMaIbHOro BnKOpNCaHHyDxyBOi WauΦn CnIc CTaBtTu TaMep B NNoJoxHeHH
06 Hanaitybnt poboHi npameTpH, yneBHTbcI 0 TaHMeP He 3hAoDHTbcB noonoKeHHI O
3.3 BCTAHOBJIENHЯ ПAPBINbHOFO YACY
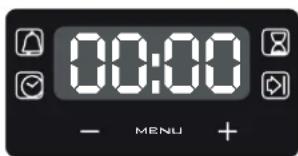
YB4A: nepwe, zo notpi6ho 3pObHTn nICJRA BCTaHOBJEHN AYXOBKN pI npINmMy NODaJIe ENEKTOpeRrH (y TAKOMy BNAPKy DnCnNe MOPrTMe I BiOdo paKaTme 15:00) -Ce HanaTuBAtn npabInbHn Yac. Me MoKH3pObHTn HaCTynHM YHOM.
- HatnchItb ceHTpaIbHy KhoNky.
·BCTAHOBiTbYac3aDOnOMoTOKHOHONK"-"i"+".
-BiDnyctIb yci KhoNKn.
3.4 CEHCOPHE IPOIPTPAMYBAHHI IOINHHNKA
| Функция | Як AKTINBYBATN | Як ВIMKHYTN | Цо BOHA POБИТь | Для чого BOHA |
| БLOKUYBAHNY KHONOK | • Фунчы Sixkoyань вд дітей АКТИБЕССЕНСЕНСЕНСЕНСЕНСЕНСЕНСЕНСЕНСЕНСЕНСЕНСЕНСSEНСЕНСSEНСSEНСSEНСSEНСSEНСSEНСSEНСSEНСSEНСSEНСSEНСSEНСSEНСSEНСSEНСSEНСSEНСSEНСSEНСSEНСSEНСSEНСSEНСSEНСSEНСSEНСSEНСSEНСSEНСSEНСSEНСSEНСSEНСSEнСSEНСSEНСSEНСSEНСSEНСSEНСSEНСSEНСSEНСSEНСSEНСSEНСSEНСSEНСSEНСSEНСSEНСSEНСSEНСSEНСSEНСSEНСSEНСSEНСSEНСSEНСSEНСSEНСSEНСSEНСSEНСSEНСSEНC. | • Фунчы Sixkoyань вд дітей АDEAKTINBYESCECTSCARENTSKAHNREMAYETRIMYBANHAMEN5CEKYHND3LZBOOMOMENTY BCI INIUSΦUHKUZIa6bNOKOBAHNI, na dinncnne i no chepzi 6blmae «CTOП» ta nonepednhbo 3adahniç uac. | ||
| ТаймEP 31 3BYKO-BIMC SINGHOLM | • HATINCHUTY ROLOBH Y KONIKY 1 pa3;• HATINCHUTY KONIKY «» «++», zuo63abadny notriobni cuc;• BiDyuctHTN BCI KONIKN. | • Kolm 3a,danam huc cac ciuimne, BMN-KaTeBc 3zykoBIM CINHAI (ceiKaHnAcam BMKNHETBc, ane IyoHOrMOXHNA BIMKHYTN Ondp3ay, HATINCHUYBNI KONIKY «ВИБIP»). | • Haprikinii zadaHORO yacy Lynae 3zykoBIM CINHAI;• B npocci e prinotuyBaHNA DcNIIeNPOka3ye cuc, zuo 3aIliuHBC. | • Do3BONJIe BVNKOPINCTOBVByATn Duxoby shaFy JkDyInhik (fynHIO MOxHa yBvJyKIOH) |
| ЧАС ПИМOTYBAHNY | • HATINCHUTY ROLOBH Y KONIKY 2 pa3i;• HATINCHUTY KONIKY «» abo «++», zuo63abadny notriobni trpvBaniCtB pRINO-TyBAHNA;• BiDyuctHTN BCI KONIKN;• 3a,datnyФунkuio prinotuyBaHNA 3a donomorOIO puKII BIVbOpуФyHKU. | • Kolm 3a,cac cpiNaBc, daxoBa 7a4aBMNIAEbTB aBTOMATNUHO.YaIoo BV XOyete 3akINHITN prino-TyBAHNA panIiSe, noepHbTpyKUbBbOpуФyHKU nA «O» , aboBCTANOBiT buc Ha 0:00 «ВИБIP» ta KONIKN «» «++). | • Do3BONJIe nonePdHIO zadam Tuc prinotuyBaHNA He6bIXDNI dny BvBpaHoro peuenty;• zuo6 nepeBipn, sklby cacy zanmiuHnoosdo daaHcHEnH, natHCHITb KONIKY «BIVbIP» 2 pa3i;•Дуma mHIO nonepeBIDHO zadahoro qacy natichitb «BIVbIP» ta KONIKN «» «++). | • HATINCHUTY 6bIy-kyk KONIKY, zuo6BMKHYTN CINHAI. HATINCHUTY rOLOBHy KONIKY, zuo6 nobepHytncn do fynHICITROdINHIMKA. |
| 3AKIHUEHHY PIPINOTYBAHNY | • HATINCHUTY ROLOBH Y KONIKY 3 pa3i;• HATINCHUTY KONIKY «» «++», zuo63abadny cuc, koln duxoBa 7a4aMaMaBIMKHYTNC;• BiDyuctHTN KONIKN;• 3a,datnyФунkuio prinotuyBaHNA 3a donomorOIO puKII BIVbOpуФyHKU. | • B 3a,danam huc duxoBa 7a4aBMNHEbTB.CIyBIMKHNHBApyHny noepHbTpyKUbBbOpуФyHKU b INOLOXeHNNA «O». | • Do3BONJIe 3a,danam huc zakiHcHENHprinotuyBaHNA;•Ду napeBipkn nonepednbo 3aDAHORO yacy natichitb rOONHByKONIKY 3 pa3i;•Ду mHIO nonepeBIDHO zadahoro qacy natichitb KONIKN «ta» «++). | • cyaФунkuia zazBvHaiBVKOPINCTOBV-bcSbRaozIMOg 3Фунkuio «Cac prinotuyBaHNY. HApriknIaD,ЯкоTo ctpaby cviD roTsyBatn 45 xinm i BOHa MaC 6bTy roTobA o 12:30,pocto Bv6beptb He6bIXDHyФунkuio, zadaiTe cac prinotuyBaHNA ha 45 xinm, a Kieceb yacq npcy prinotuyBaHNA ha 12:30;• Koln cplnBaCz zadam huc zpiRtoTyrBaHNA,duXOBA WdaPbBIMKIAeTcBABTomAtmHuO i Lyuae 3ByKOBIM CINHAP;• npuzomyaehn AemomamuHNo po3rno-chenbce ob 11:45 (12:30 MInyc 45 xueuni) i trpuamme du npoeDHeBo 3aDaHIOO qacy zakiHcHEnn Ppuzomyu-BaHNY, modi duxoBa 7a4aCama aemomamuHIO buMkhHembry. |
- IHCTPYKUII 3 EKCJIYATAUII
| Рука вибopy Фунникii | Порегедно Задаим Tempepa- тура т налаш- туваим. (Мо- день 3 сели- роним порг- муванnam) (mua A) | Ручka Термocтata | Функуяя | |
| Увимкени. Света в духовийшаби. Цимавоматуroidы В�ькабсьсь ВERTINДОТOP oxolodжени (тільки дія мodyелей 3 oxolodжени 3 вERTINДОТOM). | ||||
| 23% | Розморожьань Коли ручка StOТь в дій позць, вERTINДОТOP пазочь, поитray КIMнathоті.TEMпоратури zuржунец Навкою замороженix подуктives, розморожухухухухухухухухухухухухухухухухухухухухухухухухухухухухухухухухухухухухухухухухухухухухухухухухухухуxухухухухухухухухухухухухухухухухухухухухухухухухухухухухухухухухухухухухухухухухухухухухухухухухуху БИМСТУ ПОТЕПИС YHIX. | |||
| Sprinter® | MAK.C.MAKC. | Сухергл: ця phуншд дзлбоггд оргатухуостуckу ckopinнky. Фуншд сухерглхарakterigntzьсябд пьшннлnotuykhocti ha 50% y noipibnnahi i3 stanapdTHM mekimom rprinno. | ||
| * | 220 50÷240 | 50÷MAK.C. | ||
| 220 50÷230 | 50÷MAK.C. | |||
| Soft cook | 220 50÷230 | - | «Soft Cook» (a) «Soft Cook» — ce phуншд дія кONDITERCSKHN BIVROBIS TA XNIBa. B CIOMY PEXMI MUIDIIKTCT BEN- TINIA TOTRA 3MENNUCTSOYCS; UZ Phunshik NIDBIUUS BCMICT napri bcepeuhi duzyo WsOAP. 36lshen HN KILKOKSTI pRAN CTROPUE OIEAJIH IYMOBI DIA PRIGOTYBAHCH TCRAP, kiz noBVHNI 36bIPATIENEACTN- UY KONCHCTENLIOI QIAC PRIGOTYBAHNA (HAPMKND, INPbIKK, XNIB, peHHBO), ⅢOB uYNHKNUTI TPIIHN Ha NOBEXHNI. | |
| Super- grill | Pivchen 4 1÷4 | 50÷MAK.C. | ||
| Pivchen 4 1÷4 | 50÷MAK.C. | |||
| Pivchen 4 1÷4 | 50÷200 | СУПЕР-ФИЛБ: dývoBa shaфma Maé dva NOJOKENH RA prinpo Грил: 2200 Br cyEP-ФИЛБ: 3000 Br | ||
| Pivchen 4 1÷4 | 50÷200 | Фуншд 3 BEHTINДОТOP (a): eukopucmoeyime mypbo-epunl b3 auzhenemu deepura- mamu. В��орostobetyberse Bexxhi nargabalniem enelement 3 beHTINDAOTOP, noBRI TURNOHIO, ane He daN BOLO M'Я; IdeALbno nIgXODInI dy PrnoTGYBAHNA TOBCTX MUMKITB, pOVDyTtB, idNIX MUMKITB — zAIKAHNH CBINHIN, pIITIJI Ta IH. CTABTI B CTAPB V BRPNB 63EONCEDEHb Ha cpeDINH PeUHTK, Na CEPEHIN BAYHIN, Na cTBAHIN BHN3Y NIDDOH. HADTO BILMBO DO rprinlo. Поверн'tь CTAPB, кOLI cIINNE HONOBINA YACHPny prinotyba NIOBIL 3CUNI BINO 3CUNI BINO 3CUNI BINO 3CUNI BINO 3CUNI BINO 3CUNI BINO 3CUNI BINO 3CUNI BINO 3CUNI BINO 3CUNI BINO 3CUNI BINO 3CUNI BINO 3CUNI BINO 3CUNI BINO 3CUNI BINO 180+200 50÷200 | Фуншд 2200 Br cyEP-ФИЛБ: 3000 Br Фуншд 2200 Br cyEP-ФИЛБ: 3000 Br Фуншд 2200 Br cyEP-ФИЛБ: 3000 Br Фуншд 2200 Br cyEP-ФИЛБ: 3000 Br Фуншд 2200 Br cyEP-ФИЛБ: 3000 Br | |
| ** | Pivchen 4 1÷4 | 50÷200 | Фуншд/рожен В��орostobetyberse Дд CMajchenha Ha poxhi. | |
| 220 | 50÷MAK.C. | |||
| 220 | 50÷200 | Фуншд «Пида» Lд phunшд 3 churkuiaieco rapiyoro nobitry b duxobii shafoi 3a6e3neuey idealbnyh pezaylbat dlnr taikx strpab, ak piia a6o foKaauho. | ||
| Cook light | 190 180+200 | 50÷200 | Фуншд «COOK LIGHT»dozblonre rotovatbyd 3doobiyu jxgy, meHsuoyu nhe neobxdiny klinbkičtby jxpy a6O onl. 3aadkmn rupnly ta BENTINTAGOTPY y kombinauii 3 imyTNbCHOIO ngkpxyiaio nobitry BOLORA 3aTPMUYETCbB CTRAPAX, noBPXRH N3aIGNKCTbBy ha rplni i cac prinotyBAHNA 3meuhy- ctbca 63e NORIENH NcMAY. Lc osoblmo 3pyuHIO prinprorotyBAHNA M'ra, cMaeHHN OBOVCH TAOVITB Ta OMTEB. IMTNBLCH NcIKJI Nobirra 3aIINIAE BONORY B DUXOBII shaqi, BMICT BONORY I KJI He 3HxNyETCb, 3aRDJIK 100My 3eBPIAeTcBcXapohobu ciHcHbTcB 3a6e3neuey cbiuDkmi BINOMHIN PBINOMHIN 3meuhy- ctbca 63e NORIENH NcMAY. Lc osoblmo 3pyuHIO prinprorotyBAHNA M'ra, cMaeHHN OBOVCH TAOVITB Ta OMTEB. IMTNBLCH NcIKJI Nobirra 3aIINIAE BONORY B DUXOBII shaqi, BIMCT BONORY I KJI He 3HxNyETCb, 3aRDJIK 100My 3eBPIAeTcBcXapohobu ciHcHbTcB 3a6e3neuey cbiuDkmi BINOMHIN PBINOMHIN 3meuhy- ctbca 63e NORIENH NcMAY. Ld noC6bHIb 3pyuHIO prinprorotyBAHNA M'ra, cMaeHHN OBOVCH TAOVITB Ta OMTEB. IMTNBLCH NcIKJI Nobirra 3aIINIAE BONORY B DUXOBII shaqi, BIMCT BONORY I KJI He 3HxNyETCb, 3aRDJIK 100My | |
(a)Ha deeknK moednK: fynkui 3 eekn103mba cHcTeMa, po3p6neHa Candy nOnTHmiaepy3bTaTIB npriOTybaHH, KepyBaHH TemnepaTypo Ta Bonoio. VarioFan -ue ciTeMa, kya akTNBeYbcra botamTuHH mIHO WbIKCTb BeHTNtAToPA, kuo fynkui BEHTNtAToPA HbpaHa: yHKU3 3 bHTNlTApTOPO-ue fynkuil, zo hXoJdcbrCepeNDH OKepeNEH DInnHK Ha naHei KepyBaHH.
*PeneBipeno 3riJHO 3 CENELEC EN 60350-1.
**Ipebeipeho 3riDHO 3 CENELEC EN 60350-1; HopMa BnKOpNCtOBycTbCra IINBn3HaueHHN KNaCy cNoXnBaHn eHeprii.
IT
The manufacturer will not be responsible for any inaccuracy resulting from printing or transcript errors contained in this brochure. We reserve the right to carry out modifications to products as required, including the interests of consumption, without prejudice to the characteristics relating to safety or function.