
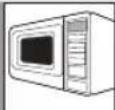
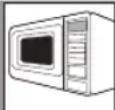
R270SLM - Microwaves SHARP - Free user manual and instructions
Find the device manual for free R270SLM SHARP in PDF.
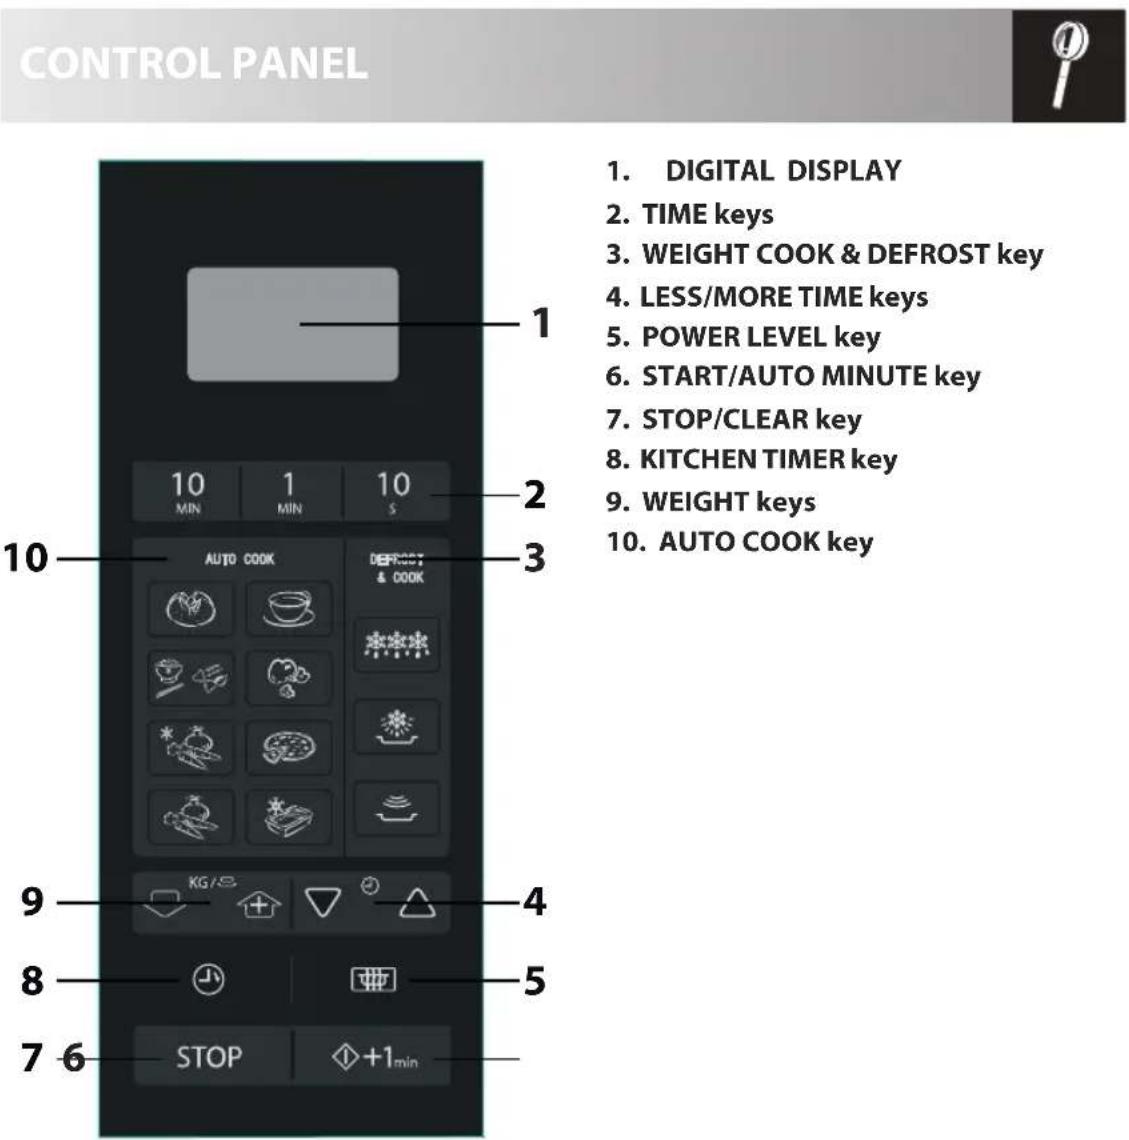
| Product Type | Microwave |
| Brand | Sharp |
| Model | R270SLM |
| External Dimensions (W x H x D) | 450 x 260 x 342 mm |
| Internal Dimensions (W x H x D) | 315 x 210 x 329 mm |
| Capacity | 20 liters |
| Net Weight | Approx. 12 kg |
| Power Supply | 230-240 V ~ 50 Hz, single phase |
| Power Consumption (microwave) | 1200 W |
| Output Power (microwave) | 800 W (IEC 60705) |
| Microwave Frequency | 2450 MHz |
| Turntable Diameter | 245 mm |
| Power Levels | 10 levels (P10 to P100) |
| Automatic Programs | Weight cooking, Weight defrost, Quick defrost, Auto cook (potatoes, beverages, rice/pasta, popcorn, frozen/fresh vegetables, pizza, frozen meat) |
| Special Functions | Kitchen timer, Sequence cooking (2 stages), More/Less time |
| Safety | Door locks, automatic stop on opening, overheat protection |
| Cleaning and Maintenance | Clean after each use with mild detergent; turntable is dishwasher safe |
| Cavity Material | Metal |
| Installation Type | Countertop (not built-in) |
| Included Accessories | Turntable, roller ring |
Frequently Asked Questions - R270SLM SHARP
User questions about R270SLM SHARP
0 question about this device. Answer the ones you know or ask your own.
Ask a new question about this device
Download the instructions for your Microwaves in PDF format for free! Find your manual R270SLM - SHARP and take your electronic device back in hand. On this page are published all the documents necessary for the use of your device. R270SLM by SHARP.
USER MANUAL R270SLM SHARP
This operation manual contains important information which you should read carefully before using your microwave oven.
Important: There may be a serious risk to health if this operation manual is not followed or if the oven is modified so that it operates with the door open.

Site Web: www.sharphomeappliances.com/support

Vestal UK Waterside Drive, Langley, Berkshire, SL3 6EZ, UNITED KINGDOM
Cne KaTo roTBeHeTo npKluOuH, fypHaTa aBtOMaTuHc Cnnpa Da npou3BexKa MKNPOBbJHn.
BpemeTo 3a npctoBaHe CneI croTBaHe e Heo6xoIMMo, 3a Da MoKe ToPImHaTa Da Ce pa3npedeJn paBHOMepHO B xpaHaTata.
HNBHA MANKPOBbJIHOBA MOUHOCT
HnBoto Ha MoUHOCT Ha MKNPOBbHata Ce npomeHa OT MKNPOBbHOBaTa eHeprna PpN BKJIIOUbaHe N3KJIIOUbaHe.
Korato n3nON3BaTe HbHa MoUHcT, pa3nUHn ot P100 ue moKeTe da yyeTe nyncpaHeto Ha MKNpOBbJHOBaTa eHeprna No BpeMe Ha rotBeHe nn pa3Mpa3raBaHe Ha xpaHata.
-Пюоверka Ha HNBOTo HA MOUHOCT
3a da npOBepuTE HNBOTo HA MOUHOCT NO BpeMe HA rotBHe, HaTNCHTe 6yTOH HNBO HA MOUHOCT. JOKATO 6yToHbTe HaTNCHaT, HNBO To HA MOUHOCT 6bJe NOKa3BaHO Bbpx DcCnner. Bbnpekn TOBa, Fyphata npOblJXaba OTOpOraBaHeto.
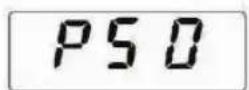
P60/50-(CPEHMAOuHCT=480/400W)n3non3BaCe 3a TbCTn XpaHn, KOnTO n3NCKBat npoDbJXnTeHOBpeMe Ha npuroTBHe, KaTo TpaDnUHOHNrActn (Haep.robexdo Meco).N3no3BaHeto HaTa3n eHepnHa MOuHcT e npenopbHTeHNo, 3a Da CTe CnrypHn, Ye MeCOTO ue 6bnde Kpexko.
P40/30 - (CPEIHO HNCKA MoHOCT = 320/240W, Pa3mpa3BaHe) n3no13Ba ce 3a pa3mpa3BaHe. n36peTe Ta3n HAcToPKa, 3a Da Cte cnryPhN, ye RCTneTo Ie ce pa3mpa3n paBHomepHo. T e nJealHa 3a BapeHe Ha OpN3, MaKapOHeHn N3DeJIy, KHeJIn I JYueH Kpm.
P20/10-(HICKA MoUHOCT=160/80 W)3a neko pa3mpa3BaHaHe,Ha npMep Ha CMeTaHa Nn cnaKnIuN.
ПЕДИ ДА СЕЗANOЧЕ PABOTA
Bklioute Φyphata. 1.
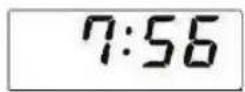
1.Bbpxy dncnnpe ue ce n3nne:

3ABENEXKA: MoJIa, mMaTe npeBnD, ye To3n MoDen HE pa3noJa r C fYHKJra YacOBHnK.

ДА ПАБOTИТЕС BALWATA ФУРHA
OTbapHe Ha BpaTaTa:
3a da OTBOPNTe BpaTnukata Ha cypHaTa, HATNCHEte 6yToHa 3a OTBaPnHe.
CtaptnpaHe Ha yypHaTa:
PnuroTBete n noctabete xpaHaTb NOxOJaCb nn HnnpBO Bbpxy Bbptaata ce uHHra. 3aTbopete Bpata NaHATNChe6yTOH CTAPT/ AB-TOMATUHA MNHYTA.
CnnpaHeHaΦypHata:
Ako Jenaete da cnpete fypHaTn NO BpeMe Ha rotBeHe, HATNCHe BeHbX 6yToH CTOn/IM3YNUCTBAHE nn OTBopTe BpaTata. B cnuyaJ ue Jenaete da OTMeHnTE nporpaMaTa 3a rotBeHe, HATNCHe 6yToH CTOn/IM3YNUCTBAHE Dba nTn.

+1min
STOP
Baata cypha Bn no3B0JbRa da rotBnte n pa3mpa3BaTe, n3no3BaIKn ABTomatuHn nporpaMn nn pbuHO.
ABTomatnHOTo roTBeHe n pa3mpa3raBaHe Bn no3-BOJRA Ba rotBnte n pa3mpa3raBaTe C NOMOuTa Ha npedbapnteHNo 3aJaadenHte nporpamn, npn KOnTO BpeMeHaTa ca n3quncIe H 3a Bac - ABtOMATUHO TOTBEHE CNPRAMO TEGIO, bP30 PA3MPA3RABAHE, ABtOMATUHO PA3MPA3RABAHE CNPRAMO TEGIO.
PbYHO TOTBEHE
PbHOTOrOTBeHe npa3Mpa3raBaHe Bu nO3BOLraBa da rotBnTe/pa3Mpa3raBaTe xpaHn KOnuYeCTBa, KOINTo He ca BKNIOUeHN B aBTOMaTHuHnTe npo-rgpAM.
CneBbT npImepn 3a pbUHO rotBeHe n pa3Mpa- 3raBaHe.
3a aBtOMaTnUHO rotBeHe n pa3Mpa3BaHe pa3- rIeJaTe CTpaHnU 5Γ-19-22.
BbBeTe BpeMeTo 3a rotBeHe n 3nO13BaHOTo HnBO Ha MoUHocT ot P10 do P100 (norneHete ctpaHua 6-16).
Pa36bpbKaBte n 06pbuaTe xpaHaTa, KOraTo e Bb3MOxHo, No 2-3 nbTu NO BpeMe Ha rotBeHe.
CneI roTBeHe, nOKpNBaIe XpaHaTa I a octabYte da npecToN, KOraTO ToBa ce npenOpbUba.
Празмер:
3a da roTbnte 2 MmHytn n 30 ceKyHn npu MoUHOCT Ha MmKpOBbJIHaTa P70.
-
BbBeJeTe HNBO Ha MOUHOCT, HAuCKaIKu 4 Nt6yToH HNBO HA MOUHOCT Do OCTnraHe Ha P70.
-
BbBeTe BpeMeTaPeHe Ha TOTBeHTo, KaTo HATnCHeTe DbPiBtN 6yTOH 1 MHN CNeI TOBa 3 NbTn 6yTOH 10 CEK.
-
HataChete 6yToH CTAPT/ ABTOMATUHA MInHyTA BeHNbK, 3a Da CTapTnpaTe rotBeHeTo.

P70
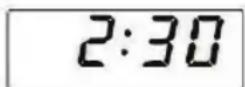
2:30
Ha dncnneJe ce neokaBa HamaJInteHOr OTo6poRaHe, CbrnaCHO HaCTpoEHOTo BpeMe 3a rotBeHe.
KAKДАРABOTITECBALATAФΥPHA

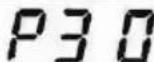
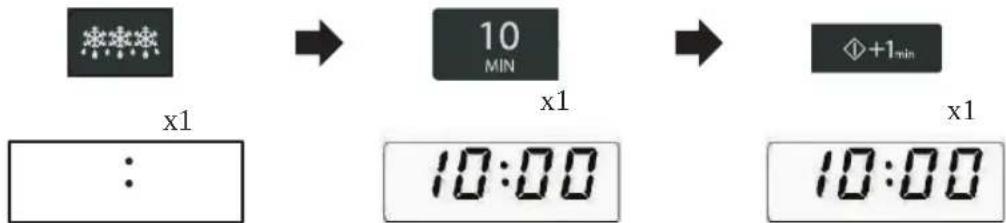
Pb4HOPA3MPA3RABAHE
BbBeTe BpeMeTo 3a pa3Mpa3BaHe n 3nOJ3BaHOTo HnBO Ha MoUHocT P10 nn P30 3a pa3Mpa3BaHe (norIeJeHeTe cTpaHua b-16).
Pa36bpkBaIte n o6pbuaIte xpaHaTa, KOraTo e Bb3MoXHo, No 2 - 3 nbTn no BpeMe Ha pa3-Mpa3BaHe.
Cne pa3mpa3raBaHe, nokpmbaTe xpaHaTa C fONIO I a OCTaBnTe Da npeCTOn Do nblnHO pa3mpa3raBaHe.
PpMep:
3a 10-MnHyTHo pa3Mpa3BaHe Ha MmKpObblHOba MoUHoc P30.
- BbBeTe HNBO Ha MOUHOCT, HAtNCKaIKu 8 nbTu 6yToH HNBO HA MOUHOCT.

x8
- BbBeTeBpeMeTpaHe 3a pa3Mpa3BaHe ue3 eHOKpaTHo HaTnCKaHe Ha 6yToH 10 MmH.


x1
- HatncheTe 6ytoh CTAPT/ ABTOMATUHA MmHyTA BeHbX, 3a da CTapTpupaTe pa3Mpa3BaHeTo.


x1
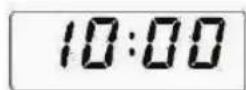
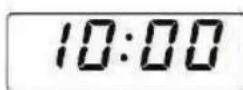
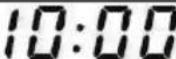
P30
10:00
10:00
Ha dincnneJe ce nokaBa HamaJntenHO OT6pOraBaHe, CbrnaCHO HaCTpoEHOT BpeMe 3a rotBeHe.
BENEKKN:
Korato fyphata 3anouhe pa6ota, BbTpeshoto oCBteHne Ha yphata ue CBeTHe N BbtpaTa ce uHHnue 3anouhe da ce BbpTu no nocoka Ha yacobHKOBaTa CTpeJIka nn O6paTHo Ha He.
- Baшата Фурна може за се поррамира до 99 мнуну и 90 секунд (99.90).
- Ako BpaTata ce OTbOpn IIO BpeMe Ha rotBeHe, OT6pOraBaHTo Ha BpeMeTo 3a rotBeHe Bbpxy DnCnIeA BtOMaTnUHO ige cnpe. HamaJIteJIHTo OTe6pOraBaHe ige 3aIOuHe OTHOBO, KOraTO BpaTata ce 3aTbOpn Ic He HAtncHE 6yToH CTAPT/ABTOMATnUHA MNHYTA.
- Ako nckaTe da pa36epete HnBOTO Ha MOUHOCT NO BpeMe Ha rotBeHe,HaTnCHeTe 6yTOH 3a HNBO HA MOUHOCT. DOKATO npbctbT BN DOKOCBa TO3N 6yTOH, HNBOTo Ha MOUHOCT 6bJe Noka3BaHO Bbpx DnCnneJ.
MATUHOTBEHE/PA3MPA3RABAHE CIPRMO TEGIO
ABTOMATUHOTO TOTBEHE / PA3MPA3RABAHE CIPRMO TEIIO NO3BOJRA BA TOTBEHe IIN pa3mpa3raBaHe Ha npeBapuTeHNO nporpaMpaHnTE ACTN B cnncbKa. CneBaTe npi-Mepnte No-dony 3a NOBeue INphiOpMaunr OTHOCHO ynotpe6aTa Ha TezN FyHKcIn.
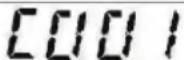
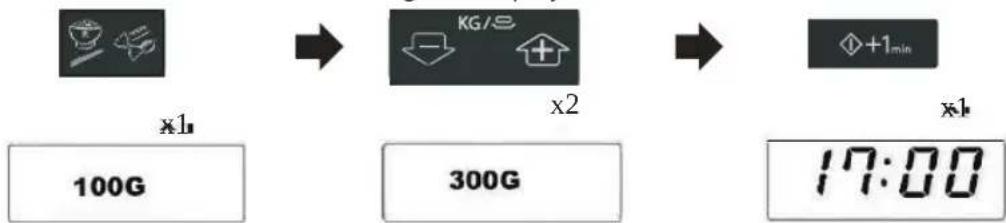
ABTOMATUHOTO FOTBEHE CIPRAMO TEIIO Bu no3BOLNA Da npuroTBnTe 3 nonyIapHm MeHToA.
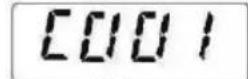
3a npuroTBaHe Ha roBeKdo MeCo,HaTnCHeTe BeHbX 6yToH ABTONUHO FOTBEHE CnPAMO TERIO,Bbpxu dncnpeJe ce neokaxe Coo1.
3a npnroTBaHe Ha arHeuKo Meco, HATncHeTe Dba NbTu 6yToH ABTOMATUHO TOTBEHE CnPAMO TERIO, Bbpxu DcncnJe Iue ce nokaxe Coo2.
3a npuroTBaHe Ha CBNHcKO MeCO, HATNCHeTe TpN PbTn 6yToH ABTOMATUHO FOTBEHE CIPRAMO TETNO, Bbpxu Dncnpe Ie ce nokaxe Coo3.
Ipumep 1:3a npnroTbHe Ha oxlaedeHo roBexdo Meco c Terno 1.2 K, n3non3Baikn ABTO MATNUHO TOTBEHE CNPRAMO TERIO.
-
HattncheTe BeHbX 6yToH ABTOMATuH O TOTBE- HE CnPRAMO TEJIO.
-
BbBeTe TERIOTo, HATNC KaIKn 6yToH TEIIO, DOKATO JKeJHaHaTc CTOHOC Ce NOBn BbpxDINCNIIe.
-
HatncheTe 6ytoh CTAPT/ ABTOMATUHA MNHYTA BeHbK, 3a da CTapTnpaTe rotBeHeTo.

x1

x12

x1
Ha nciinie ige ce noka3ba HamaJIInTeJHO OT6pOBAHe, CbINaCHO HaCTpoEHOT BpeMe 3a RotBeHe.
Ppumep 2:3a pa3Mpa3AbaHe Ha MecO C o6o TerIoo 1,2 Kr, c nOMouTa Ha ABTOMATUHOPA3MPa3RABAHE CNPRMO TERIO.
1.И36epeTe HxKHOTo MeHIO,HaTnCKaIKu BeHbX 6yTOH ABTOMA-TUHO PA3MPA3RAHE CINPMOTERIO.
-
BbBeTe TernTo, HATNC KaIKn 6yToH TERIO, DOKATO KeJaHaTa CToHOCCT Ce NOBn BbpxDncnJe.
-
HaTnchete 6byToH CTAPT/ ABTOMATuHa MmHyTA BeHbK, 3a Da CTapTpupaTe pa3Mpa3BaHeTo.

x1


x12


x1
Ha dncnneJe ce noka3Ba HamaJIInTeHNO OTo6pOraBaHe, cbrnaCHO Ha-CTpoEHOTOBpeMe 3a pa3mpa3raBaHe.
TPAФИKA HA ABTOMATUHOGOTBEHE CINPЯMOTERILO
ГРАнцHA TEGЛOTO:
Ternoto Ha xpaHata Tp6Ba da 6bJe 3akpbrrnHO Harope nn HadoJy do Han-6nn3Kna 0,1 Kr, Hapnpme 0.65 Kr do 0.7 Kr, 0.34 Kr do 0.3 Kr.
Heo6xOIMo e BbBexKaHOTeTnO Da Ce HAMpa B Dnana3OHa Ha rpaHnIte (norneHete CneBaata DnaFpaMa).
BENEXKN:
Korato e Heo6xOIMo DeiCTBne (Ha npimep 6pbuane Ha xpaHata), yphata cnnpa np03ByaBA 3ByOB CNrHAn, OCTaBaUTo BpeMe n HnDnKaTopa 3anoUbaT da npemnRbAT Bbpxy dncnJe. 3a da npodblknte rotBeHeTo, HATNCHEte 6yTOH CTAPT/ABTMATNUHA MNHYTA.
KpaHaTa TemnepaTpa 3aBNCMOCTOT bPBOHauHaTa TEmnpaTpa Ha xpaHte. POBepete daJIn xpaHata e doCTaTHo TOIJa cNeI rOTBeHe. Ako e Heo6xOdIMO, MOKeTe Da YdbJHKTE rOTBeHETo pBuHO.
ABTOMATNUHO TOTBEHE CIPRAMO TEJIOTO
ABTOMATUHATA MHyTA Bn daBa Bb3MOxHOCT:
-Да roTbIte Ha MInKpoBbIHOBa MoUHocT P100 B uHTepBaJn OT no 1 MNHyTa.
Ja ynbIkaBaTe BpeMeTpaHeTo 3a rotBeHe B nHTepBaHn OT NO 1 MNHyTa No BpeMe Ha pa6OTo B pbYeH peXIM.
Ppimep: 3a roTBeHe Ha p100 3a 2 MInHyTu HaTnChTe 6yToH CTAPT/ ABTOMATuHa MNHyTA DBa NbTu.
Птумер:

x2

2:00
BENEKKA:
BpeMeTpaeHeTo 3a roTbeHe MoKe da 6bJe yIbLnKeHo HaH-MHO do 99 MInHyTu n 90 cekyHn.
yIDOBHnΦYHKcN
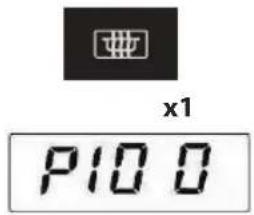
3. IO-MAJIKO () u NIOBEUE () BPEME:
BToHnTe 3a NO-MALKO (V) n NOBEUe (A) BPEME Bu no3BOJBAt:
- HamaJIaBaHe IIN yBéJIuYaBaHe Ha BpeMeTpaeHTo Ha rotBeHTo/pa3Mpa3RaHaTe, dokaTTO fypHaTa pa6OTn (cAmO npn pBHyO rotBeHe).
3A N3IIOJI3BAHE HA IIO-MAJIKO I NOBEYCE C PbYHO TOTBEHE
HaTnchete 6yToH IO-MAJIKO (▼) nnn IIOBEUe (▼) BPEME 3a HamaIraBaHe nn yBeneuhahe BpeMeTpaeheto 3a rotBeHe nn pa3mpa3raBaHe Ha nHTepBaJn Ppe3 1 MNHyTa, DOkaTo npHaTa pa6OTn. O6to BpeMeTpaehe 3a rotBeHe MoKe da 6bJe yBeneuHcO Do MaKcMym 99 mHyTu n 90 cekyHdi.
Ppme:ToTBeHe 3a 10 MHyTu npu P50 nocJeBaUo HaMaJIbaHe HaMaJIbaHe Ha BpeMeTpaeHTo C 2 MHyTu:
-
BbBeJeTe HNBO Ha MOUHOCT,HaTNCaIKN 6yTOH HNBO HA MOUHOCT 6 TbTN.
-
BbBeTe BpeMeTpaeHe 3a rotBeHe ype3 eHOKpaTHo HaTnCKaHe Ha 6yToH 10 MmH.
-
HATNCHETe 6byToH CTAPT/ ABTOMATnHa MNHyTA BeHbX, 3a da CTapTnpaTe ROTBeHeTO.

x6


- HamaIeTe BpeMeTpaeHTo 3a rotBeHe, KaTo HaTnCHeTe 6yToH IO-MAJIKO BPEME IBa IIbTu.
BpeMeTo 3a roTbeHe ce HamaJIbBa c 2 MInHyTu n npOdbJkaBa HamaIteHNO O6pOraBaHe, HanpImep:

告
6Γ-24
БНИ ΦУнКЦИN
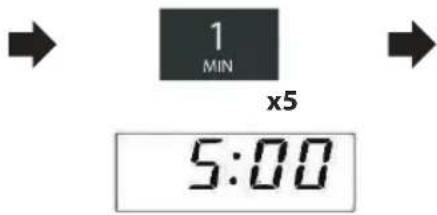
4.KYXHEHCKN TAIMEP
I3noJ3BaTe KYXHECKNA TAIMEK KaTO MUNHyTeH TaIMep, INN 3a Da CJIeDnTe TeKyIOTo BpeMe Ha rotBeHe/pa3mpa3raBaHe.
Птумер:
3a 3aabaHe Ha TaIMepa 3a 5 MInHyTN.
-
HATINCHETe BeINbX 6yTOH KYXHEHCKI TAIMEP.
-
BbBeTe XeHaHOTo BpeMeTpaeHe, KaTo HaTn- ChTe 6yToH 1 MHH net TbTN.
-
HATUCHETE eHOKpaTHO 6yToH CTAPT/ABTO- MATuHa MmHyTA 3a CTapTupaHe.

x1


x5x1


IncnneT 3aOnue He a ot6pOraHaMaHntenHo. Pn DoCTnraHe Ha Hya, e np03Byu 3ByKOB CnHaJ.
5:00
MokTe Da BBeTe BpeMe Do 99 MInHyTn, 90 ceKyHdN. 3a da aHyInpate KYXHEHCKNA TAIMEP, OOKaTO OT6pOraBa HamaJInteHNO, HATNCHeTe 6yToH CTOn/M3UHCTBAHE.
BENEKKA:ФункцятakKXYHEHCKTANMEP He moxe da 6bnde n3noI3BaHa no BpeMe Ha rotBeHe.
ПЕПОРьКИЗМИКPOВьЛHOBО ГOTBEHE
MnKpOBbHOBOTO roTBeHe npnroTBxaPAnHTe NO-6bp3O OT TpaNtioHHOTo roTBeHe.CneIOBaTeHNO e MHO Bo BaxHo Da ce Cna3BaT onpeJeHn TexHNKn 3a NoCTnraHe Ha Do6pn pe3yIytAu.
MHorO O T CneBaunTe TexnKn ca nOobHn Ha Te3N, n3NON3BaHn npTpaDnUHOHOTo rotBehe.
BEJEXKNI CbBETN 3A TOTBEHE:
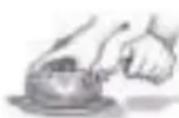
Ako 3aToPnIe XpaHa B IJIaCTMaOBu IIN XapTneHOnaKOBKn,Ha6NIODaBaIte FypHata NopadOnaCHOCT O3anaIbAhe.
- YBepete ce, ye cBdoBeTe ca noDxOJaun 3a ynoTpe6a B MmKpOBbHOBa fypHa. (Pa3rIeJaTe "PiDxOJaun CbDOBe" Ha cTpaHnua bF-28).
He nocTaBnTe ropeuXpaHa/cbDoBe Bbpyx CTyDeHa BbPraUca Ce YHnHa NnI cTsyDeHa XpaHa/cbDoBe Bbpyx RoPeUca BbPraUca Ce YHnHa.
BnHaHn Ha6IIOdaBaIte fypHaTa,doKaTo pa6OTn.
TeuhoCTn XpaHn He Tp6Ba da 6bDat 3aTOnnnB 3aTBOpEn CbDObe nn 6ypKaHN/CbDOBe C KanaU, Tb KATO e Bb3-MoXHO Da eKcNIOupa BCJeDCTBne OT Bb3HkBAuOTo HaJraHe.
- 13no3BaIte cmo NykaHKn 3a MInKpObIhHOBA C npenopbuaHaTa OnakOBKa (CneBaNTe INHCTpyKuI nTe Ha npOn3BODnTeJ. HnKora He n3no3BaIte Ma3HHa,OCBeH ONpeJeHeTAt OT npOn3BOIDnTeJ HnKORA He RotBete No-DJIro Bpeme OyKa3aHOTo.

BHIMAHHE:
BnHa nCleBaIte HNCTpyKuHnTe OT HapbYHnka 3a ekcnnoaTaun Ha SHARP. Ako NaBnWite npenopbYHTeHnOTo BpeMeTpaHe 3a rotBeHe u N3NoJ3BaTe HnBa Ha MoUHoc, KOnTO ca ppeKaJIeHO BVcOKn, XpaHaTa MOKe da Ce ppeTONnn, N3ropu IN BekCTpemHn CNTyaUnn Da ce Bb3PnAmEn N da NOBpeDn Fyphata.
TexHnKHa rotBeHe
PpexKaHe Pa3nO.
raTe Hau-nde6eJIte qactn OT xpaHaTa OT BbHsHaTa CtpaHa Ha YHHa, HApN. NIIeUKN KblKn. XpaHHe, pa3NoJoxKeHN OT BbHsHaTa CtpaHa Ha YHHa TOnyuaBAt NOBeue MmKpOBoHHOBA eHeprna, T.e. Ce npiroTbTn-6bp3o OT Te3N BcpeDaTa.
NokpmbaHe Pn HArO
IxpaHn NOKpNBaHeTo NO BpeMe Ha MmKpoBbNHO BO rOTBeHe e cNoMaAzo. CneBaIte daeHntE HnCTpyKcunn.
I3noJ3BaIte BeHTuNIPAHO TepMOyctOuHBO FOJIIO 3a MmKPOBbNHO BO rOTBeHe IIN IOxOJa, KanaK.
PpO6mBaHEnXpaHnC
epeynka, koxa nnn Mem6paHa Tpr6Ba da
6bDat npo6nBaHn Ha HAKOJIPO pa3JNUHm MecTa Ppe
dn rotBeHe nn npTeONJHRe, Tb KATO ce 6pa3yBa
napa, HATpyNBaHETo Ha KOrTO e Bb3MOxHO da npuHn
HekcNIOupaHne Ha xpaHata.
Hanp. KapToOn, p6a, nne, HadeHNKn.
Pa36bpkBaHe, 06pbuane H npeHapeKdahe
3A6EJIEXKKA: RaCa B YepynKn N TBbpO/MeKO CBapeHn Rnca He Tpr6Ba Da 6bDaT 3aTOIJaHN B MmKpOBblHOBa yPha, Tb KaTo e Bb3MOxHo da EKcNIOJnpaT, DOpN n Cne npNKlIOUbaHe Ha RotBeHeTo.
3a do6po roTBeHe e do6pe da pa36bPKBaTe xpaHaTa, da y o6pbuatae n npehapekdaTe no BpeMe Ha roTBeHe. BuHaHn pa36bPKBaTe n npehapekdaTe OT BbH Ha BbTpE.
NoCTaBka
Bpemeto 3a npctoBaHe cneCROTBHe e Heo6xoIIMO, 3a da MoKe ToNnHaTa Da Ce pa3npedeHn paBHOMepHO B xpaHaTa.
TOPbKN 3A MINKPOBbJIHOBO FOTBEHE
| Xapaktepustnik ha xpañata | |
| Cbctab | XpañITE, 60rati Na Ma3HnHn IiI 3axap (Hanp. KoJeDen PnyInr, na- mObe c KaIma) n3NCKBaT NO-MaLKO BpeMe 3a npRTOBHe. BHNMaBaJ- Te Da He HndBnUHTe BpeMeTo, Tb' Kato npRperPraBaHe e Bb3MOx- Ho Da Bb3HnKHe NpKap. KocTIte B xpañATA CnyJat KaTo npROoDnHK Ha TOnPiHa a 6NaIaOda- peHne Ha TEx Ta Ce npRTOBnNo-6bPr3o. BbDeTe BHNMaTeJHn 3a paB- HomepHOTo n3PiuChHe Ha Xpañata. |
| ΠbTHOcT | ΠbTHOCCTTa Ha xpañATA OkazBa BnIaHnE Bbpxy BpeMeTo, Heo6XoDi- mo 3a HeiHOTo npRTOBHe. Πek i NopeCTn XpaHn, KaTo cnAdkUns i XlaJ6, ce n3PiuCat no-6bPr3o B crpABHeHne C TeKKTite, ΠbTHN XpaHn, KaTo Meca i rIobEuH. |
| KolnueCTBO | BpoT MInKPOBbLIHn BbB BawaT a PhyPha Octaba HnnpOMeHn, HezABNCi- MO OT KOLnueCTBOTO npRTOBHa XpaHn. Ako B'vB PhyPha T bDe NoCTa- BeHa nobEcYe XpaHn, BpeMeTPaeheto 3a roTBeHe Tpr6Ba Da ce yVeJIuHn. Hanp. 3a cheTpri KaTfoΦa 3e 6bDe Heo6XoDiMo nobEcYe BpeMe 3a npRTOBHe, OTKoJIKOTo 3a Dba. |
| Pa3mep | MaIKITE xpaHn i MaIKITE napceta Ce npRTOBnT NO 6bPr3o OT rOlEMnTE, 3aIoTO MInKPOBbLIHnTE Morat Da np6bMnT OBCKbDe KbM CEHTbPa. 3a npRABIIHO npRTOBHe HnnpaBeTe Napcetata np6bln3ITenHn edHaKBrN. |
| ΦopMa XpañITE, Koi | Ca pa3nUHn No φOpMa, KaTo pNiLeuKn TbRpn Ili KbIKn, OTHEmat NobecYe BpeMe 3a npRTOBHe Ha NO-PILbTHnTE Cn QuCTn. 3a paBHomepHo n3PiuChHe, NoCTabYte De6eJIte qactn OT BbNHShAta QuCT Ha CbDa, KbDeTo 3e npHEmat NobecYe eHeprN. Pru MInKPOBbLIHBO RotBeHe KpbTlnte φOpMn Ce npRTOBnT no- paBHomepHo OT KBaDpaTHnTE. |
| Temnepatypa Ha xpañata | HauaJIHATA Temnepatypa Ha xpañATA OkazBa BnIaHnE Bbpxy BpeMe- TPaeheto, Heo6XoDiMo 3a HeiHOTo npRTOBHe. OxlaJeHnTE xpaHn 6bXa OThEn l NobecYe BpeMe 3a npRTOBHe B CpaBHeHne C Te3n Ha CtaiHa Temnepatypa. Hanp. TopTa, npRTOBHeA OT OxlaJeHn CbCTaBKn, KaTo MaprapHn, 6n OTHeLa No-DbJIro BpeMe 3a npRTOBHe, B cpABHeHne C TopTa, npRTOBHeA OT CbCTaBKn Ha CstaiHa Temnepatypa. TemnepatypaHa Ha CbDa He e BepEN IHnDKaTOp 3a TemnepatypaHa Xpañata Ili HapNTkata. HapZBaIte XpañITE c PbJIeHx, Happ. No- HnUck C KOHΦntHp, 3a da ce ocB6OodT TOnLIHnata i napata. |

Jnue & Pbue: Pnp n3BaXdaHe Ha xpaHata nn CbdoBeTe ot fypHaT BnHaRn n3no13BaIte pbkabu. Pnp OTbapraHe Ha Bpatata ce OTpbnBaIte, 3a da He ce n3ropute ot napata. Pnp CBanHe Ha kanaun (nnn oNo), OTbaprHe Ha nyKaHNu T.H., DnpeKTHaTa npa Tpr6Ba Da 6bJe daJeU OTnuceto npbce.

PpOBepeBaIe TemnepaTpata Ha XpaHata N HAnNTKInTe, n rN pa36bPKaIte npEn cepBupane. 06pbuaite CneuHaNo BHMaHne, KOrato noHaCte xpaHa nn HAnNTKn Ha 6e6eta, daeau nn Bb3pactnXopa. CbDbpkAHeMo Ha 6yTuKn nn 6ypKaHueTa Tp86Ba da 6bde pa36bPKaHO nn pa3TbpcHo, a TemnepaTpata Da ce npOBepn npEdu KOHCymaun, 3a da c npedOTbPaTt N3rapHn.
IODXOJaCbIOBE3A TOTBEHE

3a da rotbnte/pa3mpa3raBate xpaHa B MKNPOBbJIHObata ypha, MKNPOBbJIHObata eHepnra Tp6Ba da moKe da npemHe ppe3 cbda n da bIe3e B xpaHata. 3aTOBa e BaXHo da ce n3noJ3-BaT NOxOJaN CbdoBe.
Kpbfln/ObaHn CbOBe ca 3a npednoHTaHe nped KBaDpaTHNe/npabOBrHInTe, 3aIoTO xpaHata no bTInTe MoKe da n3ropn. MoKeTe da n3NoI3BaTe cbDoBe OT n36poEHInTe no-dony.
BbTPEUHOCT HA DYPHATA
Baxho e da nouchte BbtpewHocTt ha fypHaTa CneD BCaKO nol3BaHe.
- 136bpcbaTe BbHnHaTa Yact Ha φyphata C MeK NOUcTBaT Teue Hnpapat, C NOMOHTa Ha TOnla BODa N MEKa Kbpna.
XpaHn n npbckn OT TeuHocTn Ce HATpyNBaT NO CTeHNTE Ha yphHaT. He No3BOLBaIte TOBa da CTAHe, TbN KaTO e Bb3MOxHO pni CneDbaUO non3BaHe Ha yphHaT da ce 3anaJrT.
- Na3ete Kanaka Ha BbIHOBOda BnHaHr NcCT. Toe n3rpaJeH OT yyninB MaTePnA n Tp6Ba da 6bJe NOuNCBaH BnMaTeJHo. (CneBaIte INHCTpyKUnnte 3a NOUcTBAHe No-rope). 3A6EJIEXKA: PpeKaIeHOTo HAKcBaHe MoKe Da npEdn3Bnka pa3npaHa He KaNaka Ha BbIHOBOda.
KanaKbT Ha BblHObOda e HeBb3ctaHOBMa qact N 6e3 peoBHO NOUcTBaHe, ue Tpa6Ba Da ce CMeH.
- No Bpeme Ha rotBeHe XpaHata N3nycka napa, KOeTo BOJn DO cb6npaHe Ha KOHJeH3 BvB BbTpewHocTTa Ha cyphHata N IO Bpata. OT cbIeCTBeHa BaKHOCT e Da N3CyUbaTe cypHata. C TeueHHe Ha Bpemeto HATpyINBaHTo HA KOHJeH3 ige npuHHN Kopo3n.
He no3B0JIaIe HaTpynBaHe Ha Ma3HnHa I MpbCOTnNo yNtBTHHeNa HbPaTa n OkOIO He. TOBa MoKe da nonpeuHa nTbTHOTO 3aTBapAne da CtaHe npuHa 3a n3TuHa He Ma NKPOBbLnH. (cJeBaTe mHCTpyKUnTe 3a NOUcTbaHe).
YBepaTeCe,Ye BbptTaaTa Ce YHn H NoCTBaCa ce NouctBaT cneBcKa ynoTpe6a C MEK TeueH npenapat 3a NouctBaHe, n CneT TOBa ce NocCyuBaT. Toba 6n PpeoTbpatnlo HaTpynBaHe Ha Ma3HnHa N OCTaTbU O T XpaHa.
BbptraataceHHn e noxOJa3a noCCTBaHe B cDOMnHa MaHnHa.
- NOUHCTBAIHTE OYPHATA PEOOBHO IOTCTPAHRAIITE BCRAKBAIOCTbOITXPAHA. IuncaTHa 1o6po nOaBpKaHe MoKe Da IOBeDe Do BNoBaHe Na NobbpxHOCTTa, KOeTo MoKe Da NoBnRe He6NaoropnTHO Ha KINBOTa Ha ypeDa N da IOBeDe do onacHa cnTuauia.
BbHsHA Kytna
- 36bpcbaTe BbHnHaTa Yact Ha fypHaTc MeK NOuCTBaU TeueH npenapat, C NOMOHTa Ha TOnla BODa N MEKa Kbpna.
- Панелтза упраьени Тразба за SFDE постван Добpe и посушави npи OTBOpeHa Bpata (TOBa DeakTUBIPA Фурнanta).
3A6ELEKKN:
Hukora He n3no13BaIte cnpeIObe 3a nooNCTBaHe, r6n 3a fypHa nn CTbprAJIKN, KOUTo MORat Da nobpeIANT NOBbpxHOCTTa Ha fypHaTata.
He nouchTbaIte c nOmoIa Ha npa.
BHMabaiTe da He NOKaIe TcanyHeHa BOda B MaKInTe OTBOpn Ha CTEnHte Ha yPHaTa H a DbHOT. Bb3MOxHO e TOBa Da npuHH NoBpeDa BB BbTpEwHaTa YaCT Ha yPHaTa.
OTCTPAHЯBAHE HA HEN3ПРABHOCTN
Ako IMate CbMHeHn, ye cypHata He fHyKUIOHnp npabINHO, HapPabeTe HKOIO npocTn npOBepKn, npdN da ce 6bPheK bCneuaIIm3npaHa nOMOu. Bb3moXHo e TOBa da npedOpBpATn 3NIuHN NOBKBAHn Ha TexHn.
I3nHHeTe cIeHHaTa eIemEmTapHa npOBepKa:
IocTabeH HAnOBoHnHa TbHnHa YaHa C BoHa BbpXy BbpTtAata Ce YHHn H 3aTbOpTe BpaTata. N36epTe BNCOKA MoHocN nporpamipai Te cyhata Ha 1 MmHyta.
- BtpeHnOTo OCBtIeHnE Ha cyPhaTc CBtBa JIN IO BpEme Ha rotBeHeTo?
- BbptTaaTce cHnB bptn n ce?
- BeHTnlaTOpbT 3a oxnaXdHaene BkHIOvBa IIN ce? (IpoBepete noCTabRKn PbKa BbPxy BeHTnlaZIOHHTE OTBOpN.)
4.Cnei n3TnuaHeto Ha 1 MNHyTa IPO3Byuaba JIN 3ByKOB CnHaJ? - Bɔdata B yəwata ropeza li n e?
B cnyaH e OTRObOpbTa HnKoIOT rOpHMe Bbnpocn e "HE", npOBepe DaHn FyPhaTa E BKnIOueHa Do6pe B enektpuueckata Mpeka, kaTOn n daHn PneKbCBAHT He e n3rOpaJ. Ako n DbTe o6cToTcTBa ca Hapei, npOBepe Ta6NuaT aNo-dony.
3ABeJEKKA:
Ako rotbnte xpaHa No-ipoDbJnxIteJIHO OT cTaNdaprTHo BpeMeTpaeHe (BnKTe Ta6nUaTaNo-dony), n3nO3BaIKn eINn CbU pexm Ha rotBeHe, MexAHn3MbT 3a 6e3OpacHcHCT Ha ypHaT aJe ce AKTNbIpa ABTomAtuHOb. ToBa Je HAAMIN MKNPOBbIHObATA MOHcHCT.
| Рек imm Ha rotbehe Ctahdaptho BpeMeTpaene | |
| ГotbeHe Na BICOKA MmKpOвьлнOBa Moциоct 20 МИнутI |
BHIMAHHE:
HnKora He n3TbJIHraBaIte Kopekun, pEmoTHn Hm MoHnKauu Bbpx yphata camOCTaTeNo. 3BbPbBaHeTo h BAeKaBnpeMOHTn DeHocT e onAcho, OCBEN Ako He 6bDe N3BbPbBAHO OT TexHtK, oByen ot SHARP. TOb a E MHO R BaxHo, TbN KaTO e B3MoXHO Te3N DeHOCTH Da BKNIOUcBAT CBaIHe Ha npEpa3HIne NOKpHTN, npdeOCTabu 3aunTa Cpeuy MMKPOBbHOBaTa eheprna.
- YnIbTHHeHrTa Ha BpaTAt Ba3npenrCTBa n3TuHa He MmKpO8bHn, Ho He npEOCTABRT xepMeTuaHn H0raHnHO e da BxJdTe KaIuNtBODa, CBETINHa, INI da yUByCTBaTe TOBbI B3dyx OKOIO BpaTATA Ha cyphata. XpaHIne C BUCOKo CbDtpKaHHe Ha BOda I3NcKAT npa I cb3DaBt KOHNH3 BBB BbTpEWHOCHTA Ha BpaTata. To3N KOHNHe3 MOKe Da KANE OT cyphata.
PemOHn mOndnKauHn: He ce onntBaIte da paobOTte c cyphata, ako 3abeJeKe, ye He yHKmOHnp npabINHO.
BbHnEHN KANAK IN DOCTBn D0 BbTpeHHOTOCBETHe: HNKORA He CBAJrTe BbHUNHNAK. TObA e MHORo ONaCHO, 3apAnuCHTne Ipe3 KOITIO pOITUa BVcOKO HApexHeN, IN KOITIO HNKORA He 6bMa Da 6bTaD JOKOCBaHn, NopAIN BePOARHOCT OT aTaNHN OcNECTBn. Opyhata He pa3noIarac KaNak 3a DOCTBn D0 BbTpeHHOTOCBETHeN. AKO Kpykata n3ropn, He ce ONNTBaNTe da a CMeHrTe camocToTEnHO, a Ce CBpKte Cbc cepBn3e UENTp, oO6peH ot SHARp.
Website: www.sharphomeappliances.com/support
- Accesorile de inlocuire pot fi obtinute de la distribuitorul nostru de piese principal:
Charles Hyde & Son Ltd
Telefon 01759303068
Email sales@charleshyde.co.uk
Web www.chsinteractive.co.uk
GARANTIE
Website: www.sharphomeappliances.com/support
Telefon: 0333 014 3055
Vestel UK este o companie inregistrata i n Anglia sub numarul 4771550
cu sediul social la
Vestel UK, Vestel House, Waterside drive, Langley, Berkshire SL3 6EZ Regatul Unit
RO
RO-34
SPECIFICATI
EMBNA VARNOSTNA NAVODILA
POZORNO PREBERITE IN SHRANITE ZA REFERENCO V BODOČNOSTI.
Attention: Your product is marked with this symbol. It means that used electrical and electronic products should not be mixed with general household waste. There is a separate collection system for these products.
A. Information on Disposal for Users (private households)
1. In the European Union
Attention: If you want to dispose of this equipment, please do not use the ordinary dust bin!
Used electrical and electronic equipment must be treated separately and in accordance with legislation that requires proper treatment, recovery and recycling of used electrical and electronic equipment.
Following the implementation by members states private households within the EU states may return their used electrical and electronic equipment to designated collection facilities free of charge*.
In some countries* your local retailer may also take back your old product free of charge if you purchase a similar new one.
*) Please contact your local authority for further details.
If your used electrical or electronic equipment has batteries or accumulators, please dispose of these separately beforehand according to local requirements.
By disposing of this product correctly you will help ensure that the waste undergoes the necessary treatment, recovery and recycling and thus prevent potential negative effects on the environment and human health which could otherwise arise due to inappropriate waste handling.
2. In other Countries outside the EU
If you wish to discard this product, please contact your local authorities and ask for the correct method of disposal.
For Switzerland: Used electrical or electronic equipment can be returned free of charge to the dealer, even if you don't purchase a new product. Further collection facilities are listed on the homepage of www.swico.ch or www.sens.ch.
B. Information on Disposal for Business Users
1. In the European Union
If the product is used for business purposes and you want to discard it: Please contact your SHARP dealer who will inform you about the takeback of the product. You might be charged for the costs arising from take-back and recycling. Small products (and small amounts) might be taken back by your local collection facilities. For Spain: Please contact the established collection system or your local authority for take-back of your used products.
2. In other Countries outside the EU
If you wish to discard of this product, please contact your local authorities and ask for the correct method of disposal.
CONTENTS
P
oVEN AND ACCESSORIES 3
CoNTRoL pANEL. 4
IMpoRTANT SAFETY INSTRUCTIoNS. 5-12
INSTALLATION 13-14
HoW YoUR oVEN WoRKS 15
MICROWAVE poWER LEVELS 16
BEFORE opERATIoN 16
HoW To opERATE YoUR oVEN 17-18
AUTOWEIGHT CooK/DEFRoST 19
AUTOWEIGHTCooKCHART 20
SpEEDDEFRoST 21
AUTo CooK 21
AUTo CooK CHART 22
CoNVENIENT FUNCtioNS 23-25
MICRoWAVE CooKING ADVICE 26-27
SUITABLE CooKWARE 28
DEFRoSTING ADVICE 29
REHEATING ADVICE 30
CLEANING & MAINTENANCE 31
TROUBLESHooTING 32
SpECIFCATIONS 35
SERVICE ADDRESSES
告
GB-2

EN AND ACCESSORIES
12
OVEN
- Oven lamp
- Control panel
- Door opening button
- Waveguide cover (DO NOT REMOVE)
- Oven cavity
- Coupling
- Door latches
- Door hinges
- Door seals and sealing surfaces
- Power cord
- Ventilation openings
- Outer cabinet
ACCESSIONS:
Check to make sure the following accessories are provided:
- Turntable
- Roller stay
- Place the roller stay in the coupling on the oven floor, then place the turntable on to the roller stay, ensuring it is located firmly.
- To avoid turntable damage, ensure dishes or containers are lifted clear of the turntable rim when removing them from the oven.
NOTES:
- The waveguide cover is fragile. Care should be taken when cleaning inside the oven to ensure that it is not damaged.
- Always operate the oven with the turntable and roller stay fitted correctly. This promotes thorough, even cooking. A badly fitted turntable may rattle, may not rotate properly and could cause damage to the oven.
- The turntable rotates clockwise or anti-clockwise. The rotary direction may change each time you start the oven. This does not affect cooking performance.
- When you order accessories, please quote both the PART NAME and MODEL NUMBER to your dealer or SHARP approved service facility.

WARNING:
The door, outer cabinet, oven cavity, turntable and dishes will become very hot during operation. To prevent burns, always use thick oven gloves.
GB-4

PORTANT SAFETY INSTRUCTIONS
READ CAREFULLY AND KEEP FOR FUTURE REFERENCE
- This oven is designed to be used on a countertop only. It is not designed to be built into a kitchen unit. Do not place the oven in a cabinet.
- The oven door may become hot during cooking. Place or mount the oven so that the bottom of the oven is 85 cm or more above the floor. Keep children away from the door to prevent them burning themselves.
- WARNING: Do not touch the turntable directly after cooking as t maybe hot.
- Ensure there is a minimum of free space above the oven of 30~cm .
- This appliance can be used by children aged from 8 years and above and persons with reduced physical, sensory or mental capabilities or lack of experience and knowledge if they have been given supervision or instruction concerning use of the appliance in a safe way and understand the hazards involved. Children shall not play with the appliance. Cleaning and user maintenance shall not be made by children unless they are older than 8 and supervised
- Keep the appliance and its cord out of reach of children less than 8 years.
- WARNING: Only allow children to use the oven without supervision when adequate instructions have been given so that the child is able to use the oven in a safe way and understands the hazards of improper use.
- WARNING: Accessible parts may become hot during use. Young children should be kept away.
- WARNING: If the door or door seals are damaged, the oven must not be operated until it has been repaired by a competent person.
- WARNING: Never adjust, repair or modify the oven yourself. It is hazardous for anyone other than a com
IMPORTANT SAFETY INSTRUCTIONS

petent person to carry out any service or repair operation which involves the removal of a cover which gives protection against exposure to microwave energy.
- If the power supply cord of this appliance is damaged, it must be replaced with a special cord. The exchange must be made by an authorised SHARP service agent.
- WARNING: Liquids and other foods must not be heated in sealed containers since they are liable to explode.
- Microwave heating of beverages can result in delayed eruptive boiling, therefore care must be taken when handling the container.
- Do not cook eggs in their shells, and whole hard boiled eggs should not be heated in microwave ovens since they may explode even after microwave cooking has ended. To cook or reheat eggs which have not been scrambled or mixed, pierce the yolks and the whites, or the eggs may explode. Shell and slice hard boiled eggs before reheating them in the microwave oven.
- Utensils should be checked to ensure that they are suitable for use in the oven. See page GB-28. Use only microwave safe containers and utensils on microwave modes.
- The contents of feeding bottles and baby food jars must be stirred or shaken and the temperature checked before consumption, in order to avoid burns.
- The door, outer cabinet, oven cavity, dishes, accessories will become very hot during operation.
- Care should be taken to avoid touching these areas. To prevent burns, always use thick oven gloves. Before cleaning make sure they are not hot. When heating food in plastic or paper containers, keep an eye on the oven due to the possibility of ignition.
- If smoke is emitted, switch off or unplug the appliance and keep the door closed in order to stifle any flames.
- Clean the oven at regular intervals and remove any
G

PORTANT SAFETY INSTRUCTIONS
food deposits.
- Failure to maintain the oven in a clean condition could lead to deterioration of the surface that could adversely affect the life of the appliance and possibly result in a hazardous situation.
- Do not use harsh abrasive cleaners or sharp metal scrapers to clean the glass on the oven door since they can scratch the surface, which may result in shattering of the glass.
- Steam cleaner is not to be used.
- See instructions for cleaning door seals, cavities and adjacent parts on page GB-31.
-
This appliance is intended to be used in household and similar applications such as:
-
staff kitchen areas in shops, offices and other working environments;
- by clients in hotels, motels and other residential type environments;
-farm houses; -
bed and breakfast type environments.
-
WARNING: The appliance and its accessible parts become hot during use. Care should be taken to avoid touching heating elements. Children less than 8 years of age shall be kept away unless continuously supervised.
- During use the appliance becomes hot. Care should be taken to avoid touching heating elements inside the oven.
- Accessible parts may become hot during use. Young children should be kept away.
To avoid the danger of fire:
- The microwave oven should not be left unattended during operation. Power levels that are too high, or cooking times that are too long, may overheat foods resulting in a fire.
- The electrical outlet must be readily accessible so that
IMPORTANT SAFETY INSTRUCTIONS

the unit can be unplugged easily in an emergency.
- The AC power supply must be 230-240V\~, 50Hz with a 13A distribution line fuse, or a 13A distribution circuit breaker.
- A separate circuit serving only this appliance should be provided.
- Do not place the oven in areas where heat is generated. For example, close to a conventional oven.
- Do not install the oven in an area of high humidity or where moisture may collect.
- Do not store or use the oven outdoors.
- Clean the waveguide cover, the oven cavity, the turntable and turntable support after use. These must be dry and free from grease. Built-up grease may overheat and begin to smoke or catch fire.
- Do not place flammable materials near the oven or ventilation openings.
- Do not block the ventilation openings.
- Remove all metallic seals, wire twists, etc., from food and food packages. Arcing on metallic surfaces may cause a fire.
- Do not use the microwave oven to heat oil for deep frying. The temperature cannot be controlled and the oil may catch fire.
- To make popcorn, use only special microwave popcorn makers.
- Do not store food or any other items inside the oven.
- Check the settings after you start the oven to ensure the oven is operating as desired.
- To avoid overheating and fire, special care must be taken when cooking or reheating foods with a high sugar or fat content, for example, sausage rolls, pies or Christmas pudding.
- See the corresponding hints in the operation manual.
To avoid the possibility of injury

PORTANT SAFETY INSTRUCTIONS
1. WARNING:
Do not operate the oven if it is damaged or malfunctioning. Check the following before use:
a) The door; make sure the door closes properly and ensure it is not misaligned or warped.
b) The hinges and safety door latches; check to make sure they are not broken or loose.
c) The door seals and sealing surfaces; ensure that they have not been damaged.
d) Inside the oven cavity or on the door; make sure there are no dents.
e) The power supply cord and plug; ensure that they are not damaged.
- Do not operate the oven with the door open or alter the door safety latches in any way.
- Do not operate the oven if there is an object between the door seals and sealing surfaces.
- Do not allow grease or dirt to build up on the door seals and adjacent parts. Clean the oven at regular intervals and remove any food deposits. Follow the instructions for "Care and Cleaning" on page GB-31.
- Individuals with PACEMAKERS should check with their doctor or the manufacturer of the pacemaker for precautions regarding microwave ovens.
To avoid the possibility of electric shock
- Under no circumstances should you remove the outer cabinet.
- Never spill or insert any objects into the door lock openings or ventilation openings. In the event of a spill, turn off and unplug the oven immediately, and call an authorised SHARP service agent.
- Do not immerse the power supply cord or plug in water or any other liquid.
- Do not let the power supply cord hang over the edge of a table or work surface.
IMPORTANT SAFETY INSTRUCTIONS

- Keep the power supply cord away from heated surfaces, including the rear of the oven.
- Do not attempt to replace the oven lamp yourself or allow anyone who is not an electrician authorised by SHARP to do so. If the oven lamp fails, please consult your dealer or an authorised SHARP service agent.
To avoid the possibility of explosion and sudden boiling:
- Never use sealed containers. Remove seals and lids before use. Sealed containers can explode due to a build up of pressure even after the oven has been turned off
- Take care when microwaving liquids. Use a wide mouthed container to allow bubbles to escape.
Never heat liquids in narrow necked containers such as baby bottles, as this may result in the contents erupting from the container when heated and cause burns.
To prevent sudden eruption of boiling liquid and possible scalding:
- Do not use excessive amount of time.
- Stir liquid prior to heating/reheating.
- It is advisable to insert a glass rod or similar utensil (not metal) into the liquid whilst reheating.
-
Let liquid stand for at least 20 seconds in the oven at the end of cooking time to prevent delayed eruptive boiling.
-
Pierce the skin of such foods as potatoes, sausages and fruit before cooking, or they may explode.
To avoid the possibility of burns
- Use pot holders or oven gloves when removing food from the oven to prevent burns.
- Always open containers, popcorn makers, oven cooking bags, etc., away from the face and hands to avoid steam burns and eruption of boiling.
GB-10

PORTANT SAFETY INSTRUCTIONS
-
To avoid burns, always test food temperature and stir before serving and pay special attention to the temperature of food and drink given to babies, children or the elderly. Temperature of the container is not a true indication of the temperature of the food or drink; always check the food temperature.
-
Always stand back from the oven door when opening it to avoid burns from escaping steam and heat.
- Slice stuffed baked foods after heating to release steam and avoid burns.
To avoid misuse by children
- Do not lean or swing on the oven door.
- Children should be taught all important safety instructions: use of pot holders, careful removal of food coverings; paying special attention to packaging (e.g. self-heating materials) designed to make food crisp, as they may be extra hot.
Other warnings
- Never modify the oven in any way.
- Do not move the oven while it is in operation.
- This oven is for home food preparation only and may only be used for cooking food. It is not suitable for commercial or laboratory use.
To promote trouble free use of your oven and avoid damage:
- Never operate the oven when it is empty except where recommended in the operation manual. Doing so may damage the oven.
- When using a browning dish or selfheating material, always place a heatresistant insulator such as a porcelain plate under it to prevent damage to the turntable and turntable support due to heat stress. The preheating time specified in the dish's instructions must not be exceeded.
- Do not use metal utensils, which reflect microwaves
IMPORTANT SAFETY INSTRUCTIONS

and may cause electrical arcing. Use only the turntable and the turntable support designed for this oven. Do not operate the oven without the turntable.
- Do not place anything on the outer cabinet during operation.
NOTE:
If you are unsure how to connect your oven, please consult an authorised, qualified electrician. Neither the manufacturer nor the dealer can accept any liability for damage to the oven or personal injury resulting from failure to observe the correct electrical connection procedure. Water vapour or drops may occasionally form on the oven walls or around the door seals and sealing surfaces. This is a normal occurrence and is not an indication of microwave leakage or a malfunction.
BUILT-IN KIT
No built-in kit is available for this oven.
This oven is designed to be used on a countertop only.

INSTALLATION
- Remove all packing materials from the inside of the oven cavity and remove any protective film found on the microwave oven cabinet surface. Check the oven carefully for any signs of damage.
- Place the oven on a secure, level surface, strong enough to take the oven weight, plus the heaviest item likely to be cooked in the oven. Do not place the oven in a cabinet.
-
Select a level surface that provides enough open space for the intake and/or outlet vents. The rear surface of appliance shall be placed against a wall.
-
A minimum space of 20cm is required between the oven and any adjacent walls.
- Leave a minimum space of 30 cm above the oven.
- Do not remove the feet from the bottom of the oven.
- Blocking the intake and/or outlet openings can damage the oven.
- Place the oven as far away from radios and TV as possible. Operation of the microwave oven may cause interference to your radio or TV reception.
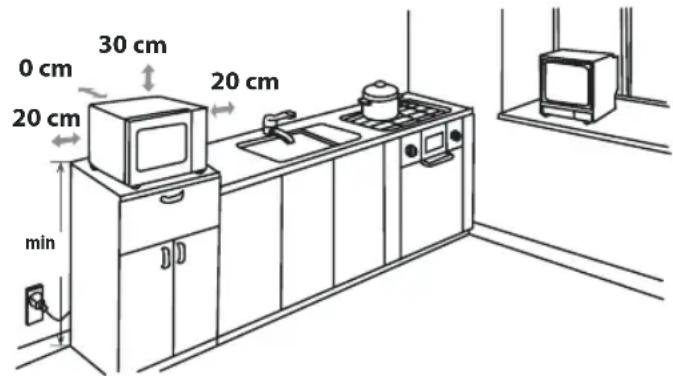
- The oven door may become hot during cooking. Place or mount the oven so that the bottom of the oven is 85cm or more above the floor. Keep children away from the door to prevent them burning themselves.
- Securely connect the plug of the oven to a standard earthed (grounded) household electrical outlet.
INSTALLATION

WARNING: Do not place the oven where heat, moisture or high humidity are generated, (for example, near or above a conventional oven) or near combustible materials (for example, curtains).
Do not block or obstruct air vent openings.
Do not place objects on top of the oven.
ELECTRICAL CONNECTION
- Do not allow water to come into contact with the power supply cord or plug.
- Insert the plug properly into the socket.
- Do not connect other appliances to the same socket using an adaptor plug.
- If the power supply cord is damaged, it must be replaced by a Sharp approved service facility or a similarly qualified person to avoid a hazard.
- When removing the plug from the socket always grip the plug, never the cord as this may damage the power supply cord and the connections inside the plug.
If the plug fitted to your oven is a rewireable type in the event of the socket outlet in your home not being compatible with the plug supplied, remove the plug properly (do not cut off). - If the plug fitted to your oven is a nonrenewable type and in the event of the socket outlet in your home not being compatible with the plug supplied, cut-off the mains plug.
- Refit with a suitable type, observing the wiring code given in 'To replace the mains plug' on page GB-33.

WARNING: THIS APPLIANCE MUST BE EARTHED To wire an appropriate plug, follow the wiring code given in 'To replace the mains plug' on page GB-33.
5
GB-14

HOW YOUR OVEN WORKS
Microwaves are energy waves, similar to those used for TV and radio signals.
Electrical energy is converted into microwave energy, which is directed into the middle bottom of the cavity via a waveguide. Then the microwave stirrer distribute the microwave energy to every corner of the cavity evenly.
Microwaves cannot pass through metal, because of this the oven cavity is made of metal and there is a fine metal mesh on the door.
During cooking the microwaves bounce off the sides of the oven cavity at random.

Microwaves will pass through certain materials, such as glass and plastic, to heat the food. (See 'Suitable Ovenware' on page GB-28).
Water, sugar and fat in food absorb microwaves which cause them to vibrate. This creates heat by friction, in the same way your hands get warm when you rub them together.
The outer areas of the food are heated by the microwave energy, then the heat moves to the centre by conduction, as it does in conventional cooking. It is important to turn, rearrange or stir food to ensure even heating.
Once cooking is complete, the oven automatically stops producing microwaves.
Standing time is necessary after cooking, as it enables the heat to disperse equally throughout the food.
- Your oven has 10 power levels, as shown.
- To change the power level for cooking, enter the required time and then press the POWER LEVEL key until the display indicates the desired level.
- Power level
The microwave power level is varied by the microwave energy switching on and off. When using power levels other than P100 you will be able to hear the microwave energy pulsing on and off as the food cooks or defrosts.
Check the power level
To check the microwave power level during cooking, press the POWER LEVEL key. As long as your finger is pressing the POWER LEVEL key the power level will be displayed. The oven continues to count down although the display will show the power level.
Generally the following recommendations apply:
P100/90 - (HIGH output = 800/720W) used for fast cooking or reheating e.g. for casserroles, hot beverages, vegetables etc.
P80/70 - (MEDIUM HIGH output = 640/560W) used for longer cooking of dense foods such as roast joints, meat loaf and plated meals, also for sensitive dishes such as sponge cakes. At this reduced setting, the food will cook evenly without over cooking at the sides.
P60/50 - (MEDIUM output = 480/400W) for dense foods which require a long cooking time when cooked conventionally, eg. beef casserole, it is advisable to use this power setting to ensure the meat will be tender.
P40/30 - (MEDIUM LOW output = 320/240W Defrost setting) to defrost, select this power setting, to ensure that the dish defrosts evenly. This setting is also ideal for simmering rice, pasta, dumplings and cooking egg custard.
P20/10 - (LOW output = 160/80W) For gent le defrosting, eg. cream gateaux or pastry.
BEFORE OPERATION
Plug in the oven. 1.
- The oven display will show:
NOTE: Please note that this model does NOT have a clock function.
To open the oven door, push the door opening button.
Starting the oven:
Prepare and place food in a suitable container onto the turntable or place directly onto the turntable. Close the door and press the START/AUTO MINUTE key.
Stopping the oven:
If you want to stop the oven during cooking press the STOP/CLEAR key once or open the oven door. If you want to cancel the cooking programme, press the STOP/CLEAR key twice.

+1min
STOP
Your oven enables you to cook and defrost food using the automatic programmes, or to cook and defrost food manually.
Automatic cooking and defrosting allows you to cook and defrost using preset programmes where the timings have been calculated for you, e.g AUTO WEIGHT COOK,SPEED DEFROST, AUTO WEIGHT DEFROST.
Manual cooking and defrosting allows you to cook/defrost foods and weights which are not included in the automatic programmes.
Following are examples of manual cooking and defrosting.
For automatic cooking and defrosting refer to pages GB-19 - 22.
MANUAL COOKING
- Enter the cooking time and use microwave power levels P10 to P100 to cook (refer to page GB-16).
- Stir or turn the food, where possible, 2 - 3 times during cooking.
After cooking, cover the food and leave to stand, where recommended.
Example:
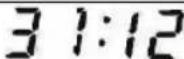
To cook for 2 minutes and 30 seconds on P70 microwave power.
-
Input the power level by pressing the POWER LEVEL key 4 times for 70P.
-
Enter the cooking time by pressing the 1 MIN key twice and then the 10 SEC key 3 times.
-
Press the START/AUTO MINUTE key once to start cooking.

x4


x2 x3
x1
P70
2:30
2:30
The display will count down through the set cooking time.
- Enter the defrosting time and use microwave power levels P10 or P30 to defrost (refer to page GB-16).
- Stir or turn the food, where possible, 2 - 3 times during defrosting.
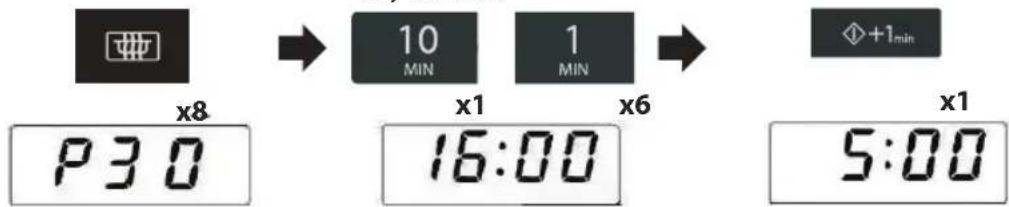
After defrosting, cover the food in foil and leave to stand until thoroughly defrosted.
Example:
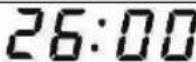
To defrost for 10 minutes on P 30 microwave power.
-
Input the power level by pressing the POWER LEVEL key 8 times.
-
Enter the defrosting time by pressing the 10 MIN. key once.
-
Press the START/ AUTO MINUTE key once to start defrosting.

x8


x1


x1

The display will count down through the cooking time.
NOTES:
- When the oven starts, the oven lamp will light and the turntable will rotate clockwise or anticlockwise.
- Your oven can be programmed up to 99 minutes, 90 seconds (99.90).
- When the door is opened during cooking, the cooking time on the display stops automatically. The cooking time starts to count down again when the door is closed and the START/ AUTO MINUTE key is pressed.
- If you wish to know the power level during cooking, press the POWER LEVEL key. As long as your finger is touching the key the power level will be displayed.
OWEIGHT COOK/DEFROST
AUTO WEIGHT COOK/DEFROST enables you to cook or defrost pre-programmed meals listed. Follow the example below for details on how to operate these functions.
AUTO WEIGHT COOK allows you to cook 3 popular menus.
When cooking beef, press the AUTO WEIGHT COOK key x 1 COO1 will appear on the display. When cooking lamb. press the AUTO WEIGHT COOK key x2 COO2 will appear on the display. When cooking pork, press the AUTO WEIGHT COOK key x 3 COO3 will appear on the display.
Example 1: To cook beef weighing 1.2kg from chilled using AUTO WEIGHT COOK.
-
Press the AUTO WEIGHT COOK key once.
-
Enter the weight by pressing the WEIGHT keys until the desired weight is displayed.
-
Press the START/AUTO MINUTE key once to start cooking.

x1


x12


x1
The display will count down through the cooking time.
Example 2: To defrost a Meat Joint weighing 1.2kg using AUTO WEIGHT DEFROST.
-
Select the menu required by pressing the AUTO WEIGHT DEFROST key once.
-
Enter the weight by pressing the WEIGHT keys until the desired weight is displayed.
-
Press the START/AUTO MINUTE key once to start defrosting.
x1


x12


x1
The display will count down through the defrosting time.
AUTOWEIGHTCOOKCHART
WEIGHT RANGE:
- Food weight should be rounded up or down to the nearest 0.1kg , for example, 0.65kg to 0.7kg or 0.34kg to 0.3kg .
- You are restricted to enter a weight within the range (see the following charts).
NOTES:
- When action is required (example, to turn food over), the oven stops, the audible signals sound, the remaining cooking time and an indicator will flash on the display. To continue cooking, press the START/AUTO MINUTE key.
- The final temperature will vary according to the initial food temperature. Check food is piping hot after cooking. If necessary, you can extend the cooking manually.
AUTO WEIGHT COOK
This function quickly defrosts food while enabling you to choose a suitable defrost period, depending on the food type. Follow the example below for details on how to operate this function.
Example: defrost the food for 10 minutes.
-
Select the menu required by pressing the SPEED DEFROST key once.
-
Enter the cooking time by pressing the 10 MIN key once.
-
Press the START/AUTO MINUTE key start cooking.
NOTE: During the defrosting process the system will pause and bleep to remind you to turn the food over to ensure even defrosting. When this is complete, press START/AUTO MINUTE pad to resume defrosting.
O COOK
AUTO COOK enables you to cook foods listed on the control panel and the chart on page GB-22. Follow the example below for details on how to operate this function.
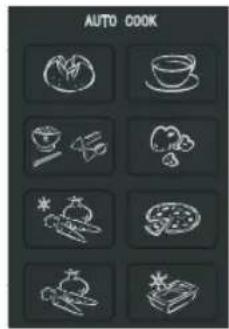
Example: To cook 0.3kg rice using Auto Cook RICE PASTA.
-
Select the menu required by pressing the RICE PASTA key once.
-
Enter the weight by pressing the WEIGHT keys until the desired weight is displayed.
-
Press the START/AUTO MINUTE key to start cooking.
AUTO COOK CHART
SELECTING MENU: You can select the Menu directly on the Key Sheet by pressing the relevant key.
Auto cook menus:
| Food Note | |
| Jacket Potato (each 230g) 1. For beverage and potatoes, parameters on display are not weight but number of servings. Reheat tea/Coffee (200ml /cup) | |
| Rice Pasta (g) | |
| Popcorn (default, 100g) | |
| Frozen Vegetable (g) | |
| Pizza (g) | |
| Fresh Vegetable (g) | 3. For Rice Pasta and Frozen Meal, during cooking, the system will pause and sound beeps to remind user to take operation, then touch START/AUTO MINUTE to resume cooking. |
| Frozen Meal (g) |
WEIGHT RANGE:
- Food weight should be rounded up or down to the nearest 0.1kg , for example, 0.65kg to 0.7kg or 0.34kg to 0.3kg .
NOTES:
- If there is a requirement to stir the food during the auto cook process the oven will stop and the audio signal will sound, at the same time the remaining cook time will show on the display. To continue cooking once the food has been stirred press the START/ AUTO MINUTE key.
- The final temperature will vary according to the initial food temperature. Check food is piping hot after cooking. If necessary, you can extend the cooking manually.
The results when using auto cook depend on variances such as the shape and size of the food and your personal preference as regards cooking results. If you are not satisfied with the programmed result, please adjust the cooking time to match your requirement.
VENIENT FUNCTIONS
1. SEQUENCE COOKING:
This function enables continued and uninterrupted operation for 2 different stages.
Example:
To cook for: 5 minutes on P100 power (Stage 1)
16 minutes on P30 power (Stage 2)
STAGE 1
-
Input the power level by pressing the POWER LEVEL key once.
-
Enter the cooking time by pressing the 1 MIN key 5 times.
STAGE 2
-
Input the power level by pressing pressing the POWER LEVEL key 8 times.
-
Enter the cooking time by pressing the 10 MIN key once and then the 1 MIN key 6 times.
-
Press the START/AUTO MINUTE key once to start.
The oven will begin to cook for 5 minutes on P100 and then for 16 minutes on P30.
NOTE: If P100 is selected as the final power level, it is not necessary to input the power level.
2.AUTO MINUTE:
AUTO MINUTE enables you:
- To cook on PI 00 microwave power in multiples of I minute.
- To extend the cooking times in multiples of 1 minute when using manual cook mode.
Example: To cook on P100 for 2 minutes, press the START/AUTO MINUTE key twice.
Example:

x2

2:00
NOTE:
- The cooking time may be extended to a maximum of 99 minutes, 90 seconds.
CONVENIENT FUNCTIONS

3.LESS () and MORE () TIME:
The LESS () TIME and MORE () TIME keys enable you to:
- Decrease or increase cooking/defrosting time whilst the oven is in use (manual cooking only).
TO USE LESS AND MORE WITH MANUAL COOKING
Press the LESS (▼) or MORE (▼) TIME key to decrease or increase the cooking or defrosting time in multiples of 1 minute whilst the oven is in use. The overall cooking time can be increased to a maximum of 99 minutes, 90 seconds.
Example: cook on P50 for 10 minutes and then decrease the cooking time by 2 minutes:
-
Input the power level by pressing the POWER LEVEL key six times.
-
Enter the cooking time by pressing the 10 MIN key once.
-
Press the START/AUTO MINUTE key once to start cooking.

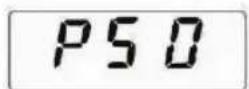

- Reduce the cooking time by pressing the LESS TIME key twice.
Cooking time is reduced by 2 minutes and continues to count down, for example:

x2

VENIENT FUNCTIONS
4. KITCHEN TIMER:
Use the KITCHEN TIMER as a minute timer or to monitor the standing time for cooked/defrosted food.
Example:
To set the timer for 5 minutes.
-
Press the KITCHEN TIMER key once.
-
Enter the desired time by pressing the 1 MIN key 5 times.
-
Press the START/AUTO MINUTE key once to start.

x1


x5 x1


The display will count down. When the display reaches zero, the audible signal will sound.
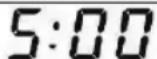
You can enter any time up to 99 minutes, 90 seconds. To cancel the KITCHEN TIMER whilst counting down, simply press the STOP/CLEAR.
NOTE: The KITCHEN TIMER function cannot be used whilst cooking.
Microwaves cook food faster than conventional cooking. It is therefore essential that certain techniques are followed to ensure good results.
Many of the following techniques are similar to those used in conventional cooking.
COOKING ADVICE NOTES:
- When heating food in plastic or paper containers, keep an eye on the oven due to the possibility of ignition.
- Ensure that the utensils are suitable for use in a microwave oven. (See "Suitable Cookware" on page GB-28).
- Do not place hot foods/utensils cold turntable or cold foods/utensils on a hot turntable.
Always attend the oven when in use.
- Liquids and foods must not be heated in sealed containers or jars/ containers with lids on, as pressure will build up inside and may cause the container/jar to explode.
on Only use microwave popcorn within the recommended packaging (follow the manufacturers instructions). Never use oil unless specified by the manufacturer and never cook for longer than instructed.

WARNING:
Fol low instructions in the SHARP operation manual at all times. If you exceed recommended cooking times and use power levels that are too high, food may overheat, burn and in extreme circumstances, catch fire and damage the oven.
Cooking Techniques
Arrange Place the thi
Chest parts of food towards the outside
of the di sh. e.g. Chicken drumsticks.
Foods that are placed towards the outside of the dish will receive more energy, so cook quicker, than those in the centre.
Cover Certain foods
benefit from being covered during microwave cooking, follow recommendations where given.
Use vented microwave ding film or a suitable lid.
Pierce Foods with a
shell, skin or membrane must be pierced in several places before cooking or reheating as steam will build up and may cause food to explode.
e.g. Potatoes, Fish, Chicken, Sausages.
Stir, turn and rearrange
NOTE: Eggs in their shells and hard/soft boiled eggs should not be heated in the microwave oven as they rny explode, even after cooking has ended.
Stand Standing time
For even cooking it is essential to stir, turn and rearrange food during cooking. Always stir and rearrange from the outside towards the centre.
s necessary after cooking as it enables the heat to disperse equally throughout the food.

| Food Characteristics | |
| Composition | Foods high in fat or sugar (e.g. Christmas pudding, mince pies) require less heating time. Care should be taken as overheating can lead to fire.Bones in food conduct heat, making the food cook more quickly.Care must be taken so that the food is cooked evenly. |
| Density Food density | will affect the amount of cooking time needed.Light, porous foods, such as cakes or bread, cook more quickly than heavy, dense foods, such as roasts and casseroles. |
| Quantity | The number of microwaves in your oven remains the same regardless of how much food is being cooked. The cooking time must be increased as the amount of food placed in the oven increases.e.g. Four potatoes will take longer to cook than two. |
| Size | Small foods and small pieces cook faster than large ones, as microwaves can penetrate from all sides to the centre. For even cooking make all the pieces the same size. |
| Shape Foods which are irregular in shape, such as chicken breasts or drumsticks, take longer to cook in the thicker parts. For even cooking, place the thickest parts to the outside of the dish where they will receive more energyROUND shapes cook more evenly than square shapes when microwave cooking. | |
| Temperature of food | The initial temperature of food affects the amount of cooking time needed.Chilled foods will take longer to cook than food at room temperature.e.g. A cake made with chilled ingredients, (i.e. margarine) will take longer to cook than a cake made with ingredients at room temperature.The temperature of the container is not a true indication of the temperature of the food or drink. Cut into foods with fillings, for example jam doughnuts, to release heat or steam. |

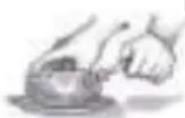
Face & Hands: Always use oven gloves to remove food or cookware from the oven. Stand back when opening the oven door to allow heat or steam to disperse. When removing covers (such as cling film), opening roasting bags or popcorn packaging, direct steam away from face and hands.

Check the temperature of food and drink and stir before serving. Take special care when serving to babies, children or the elderly. The contents of feeding bottles and baby food jars are to be stirred or shaken and the temperature is to be checked before consumption to avoid burns.


SUITABLE COOKWARE
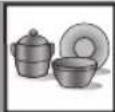
To cook/defrost food in a microwave oven, the microwave energy must be able to pass through the container to penetrate the food. Therefore it is important to choose suitable cookware.
Round/oval dishes are preferable to square/ oblong ones, as the food in the corners tends to overcook. A variety of cookware can be used as listed below.
| Cookware Microwave | Safe | Comments |
| Aluminium foil Foil containers | ✓ / × | Small pieces of aluminium foil can be used to shield food from overheating. Keep foil at least 2cm from the oven walls, as arcing may occur. Foil containers are not recommended unless specified by the manufacturer, e.g. Microfoil®, follow instructions carefully. |
| Browning dishes | ✓ | Always follow the manufacturers instructions. Do not exceed heating time given. Be very careful as these dishes become very hot. |
| China and ceramics | ✓ / × | Porcelain, pottery, glazed earthenware and bone china are usually suitable, except for those with metallic decoration. |
| Glassware e.g. Pyrex® | ✓ | Care should be taken if using fine glassware as it can break or crack if heated suddenly. |
| Metal | × | It is not recommended to use metal cookware as it will arc, which can lead to fire. |
| Plastic/Polystyrene e.g fast food contain-ers | ✓ | Care must be taken as some containers warp, melt or discolour at high temperatures. |
| Cling film | ✓ | It should not touch the food and must be pierced to let the steam escape. |
| Freezer/Roasting bags | ✓ | Must be pierced to let steam escape. Ensure bags are suitable for microwave use. Do not use plastic or metal ties, as they may melt or catch fire due to the metal 'arcing'. |
| Paper - plates, cups and kitchen paper | ✓ | Only use for warming or to absorb moisture. Care must be taken as overheating may cause fire. |
| Straw and wooden containers | ✓ | Always attend the oven when using these materials as overheating may cause fire. |
| Recycled paper and newspaper | × | May contain extracts of metal which will cause 'arcing' and may lead to fire. |

WARNING:
When heating food in plastic or paper containers, monitor the oven due to the possibility of ignition.
GB-28

ROSTING ADVICE
Defrosting food using your microwave oven is the quickest method of all.
It is a simple process but the following instructions are essential to ensure the food is thoroughly defrosted.
| Rearrange | Foods that are placed towards the outside of the dish will defrost quick- er than foods in the centre. It is therefore essential that the food is rear- ranged up to 4 times during defrosting. Move closely packed pieces from the outside to the centre and rear- range over-lapping areas. This will ensure that all parts of the food defrosts evenly. |
| Separate | Foods may be stuck together when removed from the freezer. It is im- portant to separate foods as soon as it is possible during defrosting. e.g. bacon rashers, chicken fillets. |
| Shield Some areas | of food being defrosted may become warm. To prevent them becoming warmer and starting to cook, these areas can be shielded with small pieces of foil, which reflect microwaves. e.g. legs and wings on a chicken. |
| Stand Standing time | is necessary to ensure food is thoroughly defrosted. Defrosting is not complete once the food is removed from the micro- wave oven. Food must stand, covered, for a length of time to ensure the centre has completely defrosted. |
| Turn over It is essental that all foods are turned over at least 3 - 4 times during defrosting. This is important to ensure thorough defrosting. | |
NOTES:
- Remove all packaging and wrapping before defrosting.
- To defrost food, use microwave power levels MEDIUM LOW or LOW.

REHEATING ADVICE
For the reheating of foods, follow the advice and guidelines below to ensure food is thoroughly reheated before serving.
| Plated meals | Remove any poultry or meat portions,reheat these separately,see below. Place smaller items of food to the centre of the plate,larger and thicker foods to the edge.Cover with vented microwave cling film and reheat on MEDIUM,stir/ rearrange halfway through reheating. NOTE:Ensure the food is thoroughly reheated before serving. |
| Sliced meat Coverwith vented microwave cling film and reheat on ME-MEDIUM.Rearrange at least once to ensure even reheating. NOTE:Ensure the meat is thoroughly reheated before serving. | |
| Poultry portions | Place thid<est parts of the portions to the outside of the dish,cover with vented microwave cling film and reheat on MEDIUM HIGH.Turn over halfway through reheating. NOTE:Ensure the poultry is thoroughly reheated before serving. |
| Casseroles Coverwith vented microwave cling film or a suitable lid and reheat on MEDIUM.Stir frequently to ensure even reheating. NOTE:Ensure the food is thoroughly reheated before serving. | |
To achieve the best results when reheating, select a suitable microwave power level appropriate to the type of food. e.g.A bowl of vegetables can be reheated using HIGH, while a lasagne which contains ingredients that cannot be stirred, should be reheated using MEDI UM.
NOTES:
- Remove food from foil or metal containers before reheating.
- Reheating times will be affected by the shape, depth, quantity and tern perature of food together with the size, shape and material of the container.

Never heat liquids in narrow-necked containers, as this could result in the contents erupting from the container and may cause burns.
- To avoid overheating and fire, special care must be taken when reheating foods with a high sugar or fat content, e.g. minee pies or Christmas pudding.
- Never heat oil or fat for deep frying as this may lead to overheating and fire.
- Canned potatoes should not be heated in the microwave oven, follow the manufacturer's instructions on the can.

The contents of feeding bottles and baby food jars are to be stirred or shaken and the temperature is to be checked before consumption to avoid burns.
ANING & MAINTENANCE
OVEN INTERIOR
It is important to clean the interior of your microwave oven after each use.
To clean the oven interior, use a mild detergent solution, such as washing-up liquid, with warm water on a soft cloth.
- Food and liquid splashes will build-up on the oven walls and ceiling. If grease, fat and food debris is allowed to build-up in the oven interior it may overheat, smoke or even catch fire when next using the oven.
- Keep the waveguide cover clean at all times. The waveguide cover is constructed from a fragile material and should be cleaned with care (follow the cleaning instructions above). NOTE: Excessive soaking may cause disintegration of the waveguide cover. The waveguide cover is a consumable part and without regular cleaning, will need to be replaced.
- Food will release steam during cooking and cause condensation inside the oven and door. It is important to wipe the oven dry. A buildup of condensation will eventually lead to rust forming on the oven interior.
- Do not allow grease or dirt to build-up on the door seals or areas around the door. This may prevent the door from closing correctly and may cause a leakage of microwaves (follow the cleaning instructions opposite).
- Ensure the turntable and roller stay are cleaned after every use with a mild washing-up liquid solution and dried. This will prevent the build-up of grease and food debris. The turntable is dishwasher safe.
- CLEAN THE OVEN AT REGULAR INTERVALSAND REMOVE ANY FOOD DEPOSITS.
Failure to maintain the oven in a clean condition could lead to a deterioration of the surface that could adversely affect the life of the appliance and possibly result in a hazardous situation.
OUTER CABINET
- Wipe the outside of the microwave oven with a mild detergent solution, such as washing-up liquid, with warm water on a soft cloth.
- The control panel must be wiped clean and dried with the door open, therefore inactivat ing the oven.
NOTES:
- Never use spray cleaners, oven pads or abrasive scourers as these damage the surface of the oven.
A steam cleaner should not be used.
Take care not to let soapy water drip through the small holes in the oven walls and the cavity floor. Excess water spillage through these holes will cause damage to the oven interior.
If you think the oven is not working properly there are some simple checks you can carry out yourself before calling an engineer. This will help prevent unnecessary service calls if the fault is something simple.
Follow this simple check below:
Place half a cup of water on the turntable and close the door. Select HIGH and programme the oven to cook for 1 minute.
I. Does the oven lamp come on when it is cooking?
2. Does the turntable rotate?
3. Does the cooling fan work? (Check by placing your hand above the air vent openings.)
4. After I minute does the audible signal sound?
5. Is the water in the cup hot?
If you answer "NO" to any question first check that the oven is plugged in properly and the fuse has not blown. If there is no fault with either; check against the chart below.
NOTE:
If you cook food for more than the standard time (see chart below) using the same cooking mode, the oven's safety mechanisms automatically activate. The microwave power level will be reduced.
Cooking Mode Standard Time
Microwave HIGH cooking 20 Minutes
WARNING:
Never adjust, repair or modify the oven yourself. It is hazardous for anyone other than a SHARP trained engineer to carry out servicing or repairs.
This is important as it may involve the removal of covers that provide protection against microwave energy.
- The door seal stops microwave leakage during oven operation, but does not form an airtight seal. It is normal to see drops of water, light or feel warm air around the oven door. Food with a high moisture content will release steam and cause condensation inside the door which may drip from the oven.
- Repairs and Modifications: Do not attempt to operate the oven if it is not working properly.
- Outer Cabinet & Lamp Access: Never remove the outer cabinet. This is very dangerous due to high voltage parts inside which must never be touched, as this could be fatal.
Your oven is not fitted with a lamp access cover. If the lamp fails, do not attempt to replace the lamp yourself, call a SHARP approved service facility.
QUERY ANSWER
Draught circulates around the door.
Condensation forms in the oven, and may drip from the door.
When the oven is working, air circulates within the cavity.
The door does not form an airtight seal so air may escape from the door.
The oven cavity will normally be colder than the food being cooked, and so steam produced when cooking will condense on the colder surface.
The amount of steam produced depends on the water content of the food being cooked. Some foods, such as potatoes have a high moisture content. Condensation trapped in the door glass should clear after a few hours.
Flashing or arcing from within the cavity when cooking.
Arcing will occur when a metallic object comes into close proximity to the oven cavity during cooking. This may possibly roughen the surface of the cavity, but would not otherwise damage the oven.
Arcing potatoes. Ensure all "eyes" are removed and the potatoes have been pierced, place directly onto the turntable or in a heat resistant flan dish or similar.
The display is lit but the control panel will not work when pressed.
Check the door is closed properly.
Oven cooks too slowly. Ensure correct power level has been selected.
Oven makes a noise. The microwave energy pulses ON and OFF during cooking/defrosting.
Outer cabinet is hot. The cabinet may become warm to the touch - keep children away.
SPECIFICATIONS
Model name: R-270
AC Line Voltage: Single phase 230-240V, 50Hz
Power Consumption: Microwave : 1200W
Input Current: Microwave : 5.2A
Output power: Microwave: 800W (IEC 60705)
Heating Category : E
Microwave Frequency: 2450MHz^* (Group 2/Class B)
Outside Dimensions (W) x (H) x (D) mm : 450 x 260 x 342
Cavity Dimensions (W) x (H) x (D)** mm : 315 x 210 x 329
Oven Capacity : 20 litres**
Cooking Uniformity: Turntable diameter 245mm
Weight: Approx. 12 kg
- This product fulfils the requirement of the European standard EN55011.
In conformity with this standard, this product is classified as group 2 class B equipment. Group 2 means that the equipment intentionally generates radio-frequency energy in the form of electromagnetic radiation for the heat treatment of food.
Class B equipment means that the equipment is suitable to be used in domestic establishments.
** Internal capacity is calculated by measuring maximum width, depth and height.
Actual capacity for holding food is less.
As part of a policy of continuous improvement, we reserve the right to alter design and specifications without notice.
No part of this publication may be reproduced, stored in a retrieval system or transmitted in any form, electronic, mechanical, photocopying, recording, translating or other means without prior permission from SHARP Vestel UK
The illustrations, technical information and data contained in this publication are, to our best knowledge, correct at the time of going to print. The right to change specifications, at any time, without notice, is reserved as a part of our policy of continuous development and improvement.
CALLING FOR SERVICE
KUNDEN-SERVICE · ONDERHOUDSADRESSEN · ADRESSES DES SAV · CENTRI DI ASSISTENZA · DIRECCIONES DE SERVICIO
www.sharphomeappliances.com


SHARP
Vestel UK
London, United Kingdom
www.sharphomeappliances.com/support
