
CDXG3300UV - Car stereo SONY - Free user manual and instructions
Find the device manual for free CDXG3300UV SONY in PDF.
| Product Type | Car Radio |
| Brand | Sony |
| Model | CDXG3300UV |
| Dimensions (W x H x D) | Approx. 178 mm x 50 mm x 176 mm |
| Weight | Approx. 1.2 kg |
| Power Supply | 12 V DC battery (negative ground) |
| Rated Current | 10 A |
| Maximum Output Power | 55 W x 4 (at 4 Ω) |
| FM Tuning Range | 87.5 - 108.0 MHz (EUROPE) / FM1/FM2: 87.5-108.0 MHz, FM3: 65-74 MHz (RUSSIA) |
| MW/LW Tuning Range | MW: 531 - 1602 kHz, LW: 153 - 279 kHz |
| CD Player | CD, CD-R, CD-RW; MP3, WMA files |
| USB Port | High-speed USB, max current 1 A, compatible with AOA 2.0, MSC, MTP |
| Auxiliary Input | AUX jack (3.5 mm mini-jack) |
| RDS Functions | AF, TA, PTY, REG, EON |
| Equalizer | Preset and customizable EQ10 (10 curves) |
| Sound Settings | Balance, fader, subwoofer (level, phase, filter), high-pass filter |
| Detachable Face | Yes, with anti-theft alarm |
| Remote Control | Compatible with wired steering wheel remote control |
| Display | Customizable RGB backlight (buttons and screen) |
| Maintenance | Clean connectors with a cotton swab; clean the face with a soft cloth |
| Repairability | Replaceable fuse; reset possible (DSPL+EQ buttons) |
| iPod/iPhone Compatibility | iPhone X to 4s, iPod touch 5th/6th gen., iPod nano 7th gen. |
| Supported Audio Codecs | MP3, WMA, FLAC (USB) |
Frequently Asked Questions - CDXG3300UV SONY
User questions about CDXG3300UV SONY
0 question about this device. Answer the ones you know or ask your own.
Ask a new question about this device
Download the instructions for your Car stereo in PDF format for free! Find your manual CDXG3300UV - SONY and take your electronic device back in hand. On this page are published all the documents necessary for the use of your device. CDXG3300UV by SONY.
USER MANUAL CDXG3300UV SONY
FM/MW/LW CD Car Audio
FM/MW/LW CD ABTOMO6nJIbHoe Aydno
Operating Instructions
GB
Bedienungsanleitung
DE
Mode d'emploi
FR
To cancel the demonstration (DEMO) display, see page 12.
For the connection/installation, see page 22.
HCTpyKuIN NO yCTaHOBKe/NoKJIIOueHENIO CM. Ha cTp.26.

For safety, be sure to install this unit in the dashboard of the car as the rear side of the unit becomes hot during use. For details, see "Connection/Installation" (page 22).
Made in Thailand
This product is classified as a Class 1 Laser product under IEC/EN 60825-1:2007 and IEC/ EN 60825-1:2014.
- Emission Duration: Continuous
- Laser Output: Less than 55.8 W
Wavelength: 775 nm to 800 nm
The nameplate indicating operating voltage, etc., is located on the bottom of the chassis.
The validity of the CE marking is restricted to only those countries where it is legally enforced, mainly in the countries EEA (European Economic Area).
CE
Hereby, Sony Corporation declares that this equipment is in compliance with Directive 2014/53/EU.
The full text of the EU declaration of conformity is available at the following internet address:
http://www.compliance.sony.de/
This equipment is intended to be used with the approved version(s) of software that are indicated in the EU Declaration of Conformity.
The software loaded on this equipment is verified to comply with the essential requirements of the Directive 2014/53/EU.
The software version can be checked in the firmware setup item of the general setup menu.
Notice for customers: the following information is only applicable to equipment sold in countries applying EU Directives
This product has been manufactured by or on behalf of Sony Corporation.
EU Importer: Sony Europe B.V.
Inquiries to the EU Importer or related to product compliance in Europe should be sent to the manufacturer's authorized representative, Sony Belgium, bijkantoor van Sony Europe B.V., Da Vincilaan 7-D1, 1930 Zaventem, Belgium.

Disposal of waste batteries and electrical and electronic equipment (applicable in the European Union and other countries with
separate collection systems)
This symbol on the product, the battery or on the packaging indicates that the product and the battery shall not be treated as household waste. On certain batteries this symbol might be used in combination with a chemical symbol. The chemical symbol for lead (Pb) is added if the battery contains more than 0.004% lead. By ensuring that these products and batteries are disposed of correctly, you will help to prevent potentially negative consequences for the environment and human health which could be caused by inappropriate waste handling. The recycling of the materials will help to conserve natural resources. In case of products that for safety, performance or data integrity reasons require a permanent connection with an incorporated battery, this battery should be replaced by qualified service staff only. To ensure that the battery and the electrical and electronic equipment will be treated properly, hand over these products at end-of-life to the appropriate collection point for the recycling of electrical and electronic equipment. For all other batteries, please view the section on how to remove the battery from the product safely. Hand the battery over to the appropriate collection point for the recycling of waste batteries. For more detailed information about recycling of this product or battery, please contact your local Civic Office, your household waste disposal service or the shop where you purchased the product or battery.
CAUTION
The following frequency 65 - 74 MHz range is not allocated to sound broadcasting in the European Common Allocations table and cannot be used in Europe.
Warning if your car's ignition has no ACC position
Be sure to set the AUTO OFF function (page 12). The unit will shut off completely and automatically in the set time after the unit is turned off and the clock is displayed (i.e. press and hold OFF for 1 second), which prevents battery drain. If you do not set the AUTO OFF function, press and hold OFF until the display disappears each time you turn the ignition off.
Disclaimer regarding services offered by third parties
Services offered by third parties may be changed, suspended, or terminated without prior notice. Sony does not bear any responsibility in these sorts of situations.
Table of Contents
Guide to Parts and Controls. 5
Getting Started
Detaching the Front Panel 7
Resetting the Unit. 7
Setting the Clock. 7
Checking the Battery Voltage 8
Connecting a USB Device. 8
Connecting Other Portable Audio Device 8
Listening to the Radio
Listening to the Radio 9
Using Radio Data System (RDS). 9
Playback
Playing a Disc 10
Playing a USB Device 10
Searching and Playing Tracks 11
Settings
Canceling the DEMO Mode 12
Basic Setting Operation 12
General Setup (GENERAL) 12
Sound Setup (SOUND) 13
Display Setup (DISPLAY). 14
Additional Information
Updating the Firmware 15
Precautions 15
Maintenance 16
Specifications 17
Troubleshooting 18
Messages. 20
Connection/Installation
Cautions 22
Parts List for Installation. 22
Connection 23
Installation. 25
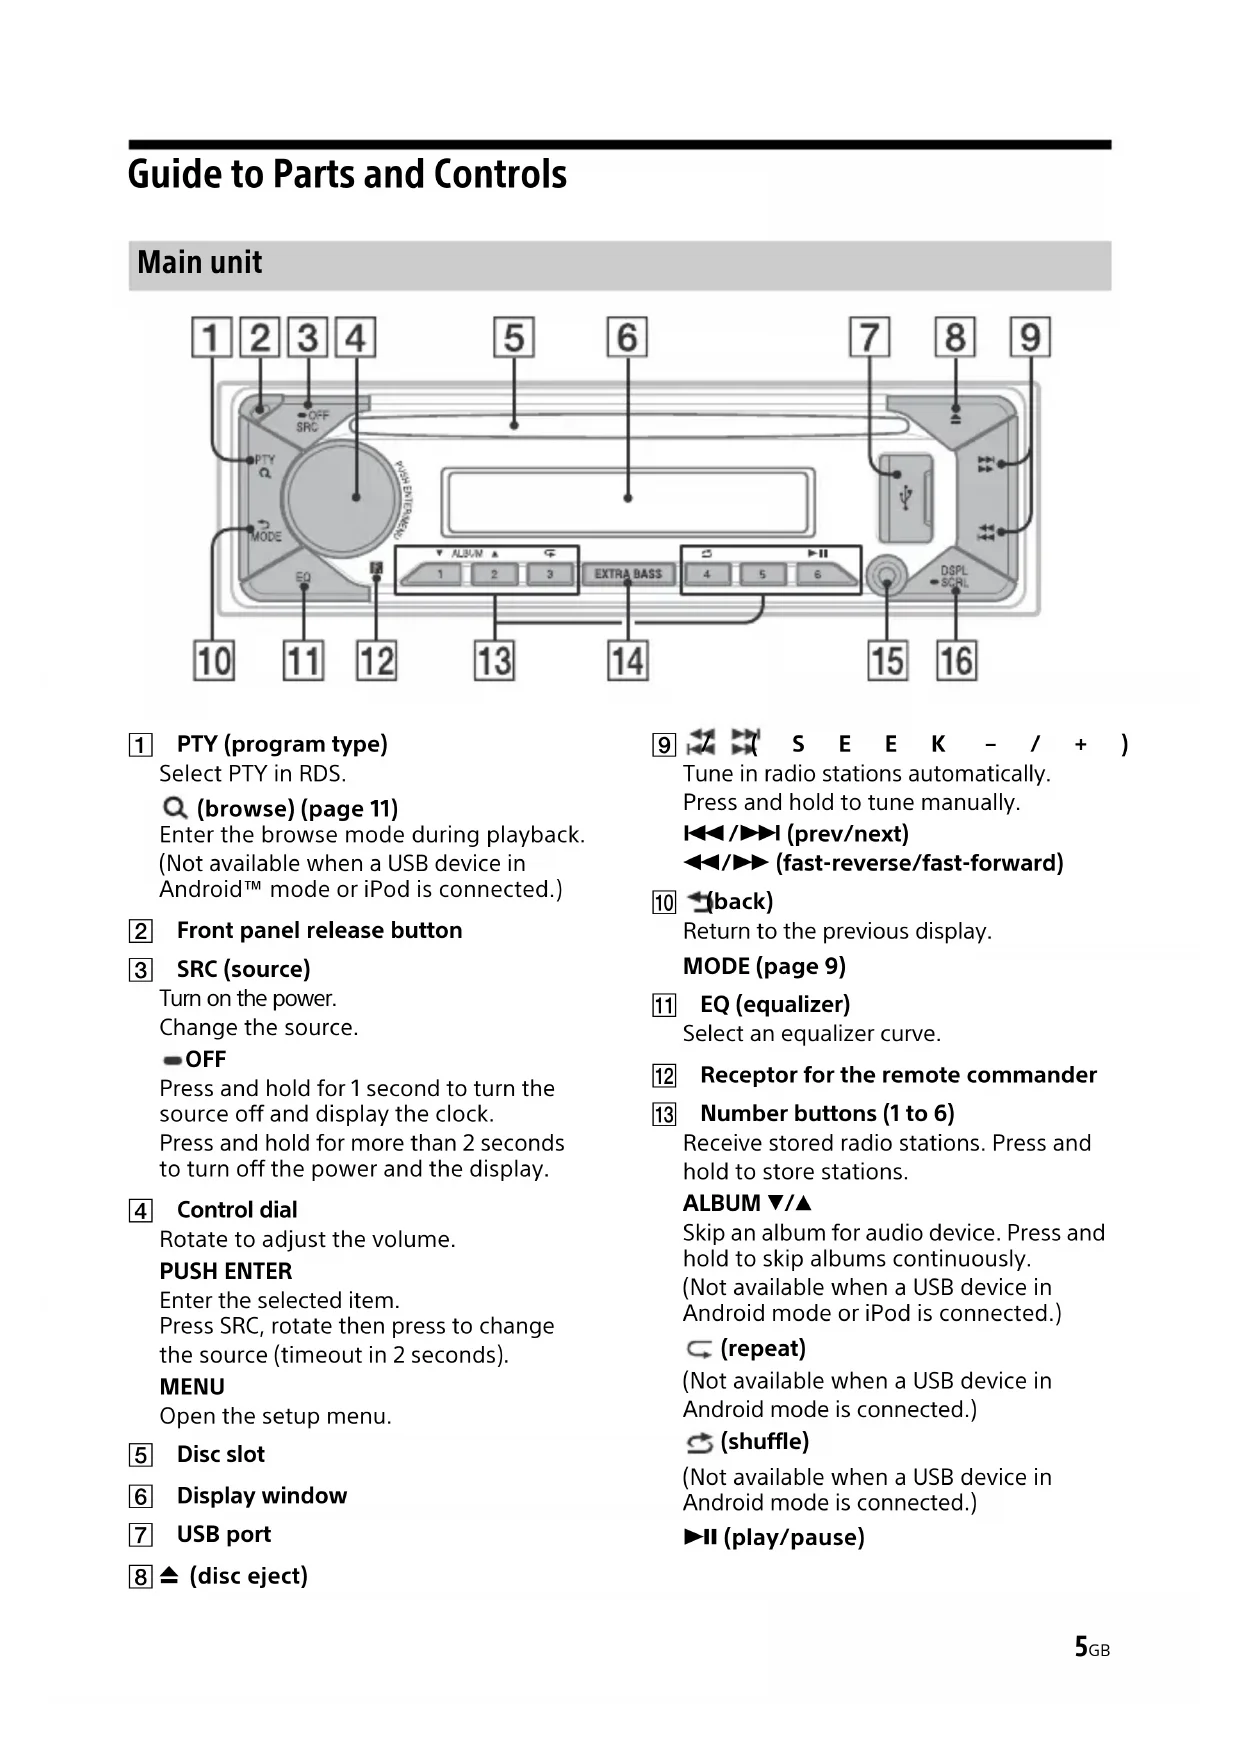
Guide to Parts and Controls
Main unit
1 PTY (program type)
Select PTY in RDS.
Q (browse) (page 11)
Enter the browse mode during playback.
Not available when a USB device in
Android™ mode or iPod is connected.)
2 Front panel release button
3 SRC (source)
Turn on the power.
Change the source.
OFF
Press and hold for 1 second to turn the source off and display the clock.
Press and hold for more than 2 seconds to turn off the power and the display.
4 Control dial
Rotate to adjust the volume.
PUSH ENTER
Enter the selected item.
Press SRC, rotate then press to change the source (timeout in 2 seconds).
MENU
Open the setup menu.
5 Disc slot
6 Display window
7 USB port
8 (disc eject)
9
Tune in radio stations automatically. Press and hold to tune manually.
1/prev/next)
( fast-reverse/fast-forward)
10 (back)
Return to the previous display.
MODE (page 9)
EQ (equalizer)
Select an equalizer curve.
12 Receptor for the remote commander
13 Number buttons (1 to 6)
Receive stored radio stations. Press and hold to store stations.
ALBUM
Skip an album for audio device. Press and hold to skip albums continuously.
(Not available when a USB device in Android mode or iPod is connected.)
(repeat)
(Not available when a USB device in Android mode is connected.)
(shuffle)
(Not available when a USB device in Android mode is connected.)
II (play/pause)
14 EXTRA BASS
Reinforces bass sound in synchronization with the volume level. Press to change the EXTRA BASS setting: [1], [2], [OFF].
15 AUX input jack
DSPL(display)
Press to change display items.
SCRL (scroll)
Press and hold to scroll a display item.
Getting Started
Detaching the Front Panel
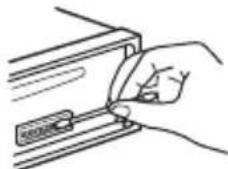
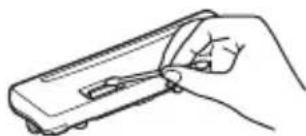
You can detach the front panel of this unit to prevent theft.
1 Press and hold OFF ① until the unit turns off, press the front panel release button ②, then pull the panel towards you to remove.
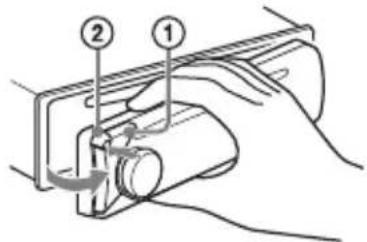
Caution alarm
If you turn the ignition switch to the OFF position without detaching the front panel, the caution alarm will sound for a few seconds. The alarm will only sound if the built-in amplifier is used.
Attaching the front panel
Resetting the Unit
Before operating the unit for the first time, after replacing the car battery, or changing the connections, you must reset the unit.
1 Press DSPL and EQ for more than 2 seconds.
Note
Resetting the unit will erase the clock setting and some stored contents.
Setting the area/region
After resetting the unit, the area/region setting display appears.
1 Press ENTER while [SET AREA] is displayed. The area/region currently set appears.
2 Rotate the control dial to select [EUROPE] or [RUSSIA], then press it.
3 Rotate the control dial to select [YES] or [NO], then press it. If the setting area/region is changed, the unit is reset, then the clock is displayed.
This setting can be configured in the general setup menu (page 12).
Setting the Clock
1 Press MENU, rotate the control dial to select [GENERAL], then press it.
2 Rotate the control dial to select [SET CLOCK], then press it.
3 Rotate the control dial to select [MANUAL], then press it. The hour indication flashes.
4 Rotate the control dial to set the hour and minute. To move the digital indication, press 1 / 2 (SEEK-/+).
5 After setting the minute, press MENU. The setup is complete and the clock starts.
To display the clock
Press DSPL.
To set the clock automatically
Select [AUTO
Checking the Battery Voltage
You can check the current battery voltage. (Not available while the source is off and the clock is displayed.)
1 Press DSPL repeatedly until the battery voltage display appears.
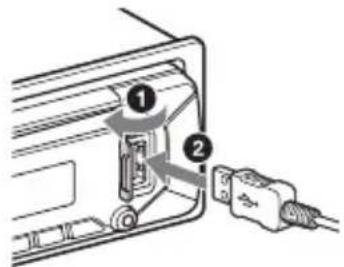
Connecting a USB Device
1 Turn down the volume on the unit.
2 Connect the USB device to the unit. To connect an iPod/iPhone, use the USB connection cable for iPod (not supplied).
Connecting Other Portable Audio Device
1 Turn off the portable audio device.
2 Turn down the volume on the unit.
3 Connect the portable audio device to the AUX input jack (stereo mini jack) on the unit with a connecting cord (not supplied)*.
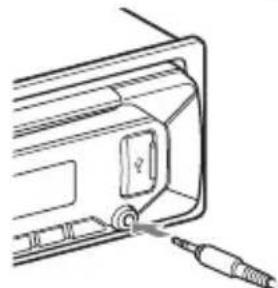
4 Press SRC to select [AUX].
To match the volume level of the connected device to other sources
Start playback of the portable audio device at a moderate volume, and set your usual listening volume on the unit. Press MENU, then select [SOUND] SET AUX VOL.
Listening to the Radio
Listening to the Radio
To listen to the radio, press SRC to select [TUNER].
Storing automatically (BTM)
1 Press MODE to change the band (FM1, FM2, FM3 or MW/LW).
2 Press MENU, rotate the control dial to select [GENERAL], then press it.
3 Rotate the control dial to select [SET BTM], then press it.
The unit stores stations in order of frequency on the number buttons.
Tuning
1 Press MODE to change the band (FM1, FM2, FM3 or MW/LW).
2 Perform tuning.
To tune manually
Press and hold 1 / > (SEEK-/+ to locate the approximate frequency, then press 1 / > (SEEK-/+ ) repeatedly to fine adjust to the desired frequency.
To tune automatically
Press / (SEEK-/+).
Scanning stops when the unit receives a station.
Storing manually
1 While receiving the station that you want to store, press and hold a number button (1 to 6) until [MEM] appears.
Receiving the stored stations
1 Select the band, then press a number button (1 to 6).
Using Radio Data System (RDS)
Setting alternative frequencies (AF) and traffic announcement (TA)
AF continuously retunes the station to the strongest signal in a network, and TA provides current traffic information or traffic programs (TP) if received.
1 Press MENU, rotate the control dial to select [GENERAL], then press it.
2 Rotate the control dial to select [SET AF/TA], then press it.
3 Rotate the control dial to select [SET AF-ON], [SET TA-ON], [SET AF/TA-ON] or [SET AF/TA-OFF], then press it.
To store RDS stations with the AF and TA setting
You can preset RDS stations along with an AF/TA setting. Set AF/TA, then store the station with BTM or manually. If you preset manually, you can also preset non-RDS stations.
To receive emergency announcements
With AF or TA on, emergency announcements will automatically interrupt the currently selected source.
To adjust the volume level during a traffic announcement
Level will be stored into memory for subsequent traffic announcements, independently from the regular volume level.
To stay with one regional program (REGIONAL)
When the AF and REGIONAL functions are on, you will not be switched to another regional station with a stronger frequency. If you leave this regional program's reception area, set [SET REGIONAL] in [GENERAL] to [SET REG-OFF] during FM reception (page 13).
This function does not work in the UK and some other areas.
Local Link function (UK only)
This function enables you to select other local stations in the area, even if they are not stored on your number buttons.
During FM reception, press a number button (1 to 6) on which a local station is stored.
Within 5 seconds, press again a number button of the local station. Repeat this procedure until the local station is received.
Selecting program types (PTY)
1 Press PTY during FM reception.
2 Rotate the control dial until the desired program type appears, then press it.
The unit starts to search for a station broadcasting the selected program type.
Type of programs
NEWS (News), AFFAIRS (Current Affairs), INFO (Information), SPORT (Sports), EDUCATE (Education), DRAMA (Drama), CULTURE (Culture), SCIENCE (Science), VARIORED (Varied), POP M (Pop Music), ROCK M (Rock Music), EASY M (M.O.R. Music), LIGHT M (Light classical), CLASSICS (Serious classical), OTHER M (Other Music), WEATHER (Weather), FINANCE (Finance), CHILDREN (Children's program), SOCIAL (Social Affairs), RELIGION (Religion), PHONE IN (Phone In), TRAVEL (Travel), LEISURE (Leisure), JAZZ (Jazz Music), COUNTRY (Country Music), NATION M (National Music), OLDIES (Oldies Music), FOLK M (Folk Music), DOCUMENT (Documentary)
Playback
Playing a Disc
1 Insert the disc (label side up).
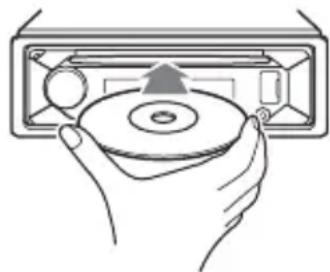
Playback starts automatically.
Playing a USB Device
In these Operating Instructions, "iPod" is used as a general reference for the iPod functions on an iPod and iPhone, unless otherwise specified by the text or illustrations.
For details on the compatibility of your iPod, see "About iPod" (page 16) or visit the support site on the back cover.
AOA (Android Open Accessory) 2.0, MSC (Mass Storage Class) and MTP (Media Transfer Protocol) type USB devices* compliant with the USB standard can be used. Depending on the USB device, the Android mode or MSC/MTP mode can be selected on the unit.
Some digital media players or Android smartphones may require setting to MTP mode.
- e.g., a USB flash drive, digital media player, Android smartphone
Notes
- For details on the compatibility of your USB device, visit the support site on the back cover.
- Smartphones with Android OS 4.1 or higher installed support Android Open Accessory 2.0 (AOA 2.0). However, some smartphones may not fully support AOA 2.0 even if Android OS 4.1 or higher is installed.
For details on the compatibility of your Android smartphone, visit the support site on the back cover.
- Playback of the following files is not supported. MP3/WMA/FLAC:
-copyright-protected files
- DRM (Digital Rights Management) files
Multi-channel audio files
MP3/WMA:
- lossless compression files
Before making a connection, select the USB mode (Android mode or MSC/MTP mode) depending on the USB device (page 13).
1 Connect a USB device to the USB port (page 8).
Playback starts.
If a device is already connected, to start playback, press SRC to select [USB] ([IPD] appears in the display when the iPod is recognized).
2 Adjust the volume on this unit.
To stop playback
Press and hold OFF for 1 second.
To remove the device
Stop playback, then remove the device.
Caution for iPhone
When you connect an iPhone via USB, phone call volume is controlled by the iPhone, not the unit. Do not inadvertently increase the volume on the unit during a call, as a sudden loud sound may result when the call ends.
Searching and Playing Tracks
Repeat play and shuffle play
Not available when a USB device in Android mode is connected.
1 During playback, press (repeat) or (shuffle) repeatedly to select the desired play mode.
Playback in the selected play mode may take time to start.
Available play modes differ depending on the selected sound source.
Searching a track by name (QuickBrowZerTM)
Not available when a USB device in Android mode or iPod is connected.
1 During CD or USB playback, press (browse) to display the list of search categories.
When the track list appears, press (back) repeatedly to display the desired search category.
- During USB playback, press (browse) for more than 2 seconds to directly return to the beginning of the category list.
2 Rotate the control dial to select the desired search category, then press it to confirm.
3 Repeat step 2 to search the desired track.
Playback starts.
To exit the Quick-BrowZer mode
Press (browse).
Searching by skipping items (Jump mode)
Not available when a USB device in Android mode or iPod is connected.
1 During CD or USB playback, press (browse).
2 Press (SEEK +).
3 Rotate the control dial to select the item.
The list is jumped in steps of 10% of the total number of items.
4 Press ENTER to return to the QuickBrowZer mode.
The selected item appears.
5 Rotate the control dial to select the desired item, then press it.
Playback starts.
Settings
Canceling the DEMO Mode
You can cancel the demonstration display which appears when the source is off and the clock is displayed.
1 Press MENU, rotate the control dial to select [GENERAL], then press it.
2 Rotate the control dial to select [SET DEMO], then press it.
3 Rotate the control dial to select [SET DEMO-OFF], then press it. The setting is complete.
4 Press (back) twice.
The display returns to normal reception/ play mode.
Basic Setting Operation
You can set items in the following setup categories:
General setup (GENERAL), Sound setup (SOUND), Display setup (DISPLAY)
1 Press MENU.
2 Rotate the control dial to select the setup category, then press it. The items that can be set differ depending on the source and settings.
3 Rotate the control dial to select the options, then press it.
To return to the previous display
Press (back).
General Setup (GENERAL)
AREA (area)
Specifies the area/region to use this unit: [EUROPE], [RUSSIA].
If the area/region currently set is changed, this unit is reset, then the clock is displayed.
(Available only while the source is off and the clock is displayed.)
DEMO (demonstration) Activates the demonstration: [ON], [OFF].
CLOCK (clock) (page 7) Sets the clock: [AUTO
CAUT ALM (caution alarm) Activates the caution alarm: [ON], [OFF] (page 7). (Available only while the source is off and the clock is displayed.)
BEEP (beep) Activates the beep sound: [ON], [OFF].
AUTO OFF (auto off) Shuts off automatically after a certain time when the unit is turned off and the clock is displayed (i.e. press and hold OFF for 1 second): [ON] (30 minutes), [OFF].
STEERING (steering) Registers/retsets the setting of the steering wheel remote control. (Available only while the source is off and the clock is displayed.) STR CONTROL (steering control) Selects the input mode of the connected remote control. To prevent a malfunction, be sure to match the input mode with the connected remote control before use. CUSTOM (custom) Input mode for the steering wheel remote control PRESET (preset) Input mode for the wired remote control excluding the steering wheel remote control (Automatically selected when [RESET CUSTOM] is performed.) EDIT CUSTOM (edit custom) Registers the functions (SOURCE, ATT, VOL + / - ,SEEK + / - ) to the steering wheel remote control:
1 Rotate the control dial to select the function you want to assign to the steering wheel remote control, then press it.
2 While [REGISTER] is blinking, press and hold the button on the steering wheel remote control you want to assign the function to. When registration is complete, [REGISTERED] is displayed.
3 To register other functions, repeat steps 1 and 2.
(Available only when [STR CONTROL] is set to [CUSTOM].)
RESET CUSTOM (reset custom)
Resetsthe registered functions of the steering wheel remote control: [YES], [NO].
(Available only when [STR CONTROL] is set to [CUSTOM].)
Notes
- While making settings, only button operation on the unit is available. For safety, park your car before making this setting.
If an error occurs while registering, all the previously-registered information remains. Restart registration from the function where the error occurred. - This function may not be available on some vehicles. For details on the compatibility of your vehicle, visit the support site on the back cover.
USB MODE (USB mode)
Changes the USB mode: [ANDROID], [MSC/MTP].
(Available only when the USB source is selected.)
AF/TA (alternative frequencies/traffic announcement)
Selects the alternative frequencies (AF) and traffic announcement (TA) setting: [AF-ON], [TA-ON], [AF/TA-ON], [AF/TA-OFF].
(Available when any source is selected.)
REGIONAL (regional)
Restricts reception to a specific region: [ON], [OFF].
(Available only when FM is received.)
BTM (best tuning memory) (page 9)
(Available only when the tuner is selected.)
FIRMWARE (firmware)
(Available only while the source is off and the clock is displayed.)
Checks/updates the firmware version. For details, visit the support site on the back cover.
FW VERSION (firmware version)
Displays current firmware version.
FW UPDATE (firmware update)
Enters firmware update process: [YES], [NO].
Updating the firmware takes a few minutes to complete. During the update, do not turn the ignition to the OFF position, nor remove the USB device.
Sound Setup (SOUND)
This setup menu is not available when the source is off and the clock is displayed.
EQ10 PRESET (EQ10 preset)
Selects an equalizer curve from 10
equalizer curves or off:
[OFF], [R&B], [ROCK], [POP], [HIP-HOP],
[EDM], [JAZZ], [SOUL], [COUNTRY], [KARAOKE]*, [CUSTOM].
The equalizer curve setting can be memorized for each source.
- [KARAOKE] reduces the vocal sound but cannot fully remove it during playback. Also, using a microphone is not supported.
EQ10 CUSTOM (EQ10 custom)
Sets [CUSTOM] of EQ10.
Setting the equalizer curve: [BAND1] -
[BAND10] (32 Hz, 63 Hz, 125 Hz, 250 Hz,
500 Hz, 1 kHz, 2 kHz, 4 kHz, 8 kHz, 16 kHz).
The volume level is adjustable in 1 dB
steps, from -6 dB to +6 dB.
BALANCE (balance)
Adjusts the sound balance: [RIGHT-15] - [CENTER] - [LEFT-15].
FADER (fader)
Adjusts the relative level: [FRONT-15] -
[CENTER] - [REAR-15].
([ATT] is displayed at the lowest setting.)
Selects the subwoofer phase: [SUB NORM], [SUB REV].
LPF FREQ (low pass filter frequency)
Selects the subwoofer cut-off frequency: [80Hz], [100Hz], [120Hz].
HPF FREQ (high pass filter frequency)
Selects the front/rear speaker cut-off frequency: [OFF], [80Hz], [100Hz], [120Hz]
AUX VOL (AUX volume)
Adjusts the volume level for each connected auxiliary device:
[+18 ~dB] - [0 dB] - [-8 dB].
This setting negates the need to adjust the volume level between sources.
(Available only when the AUX is selected.)
Display Setup (DISPLAY)
DIMMER (dimmer)
Change the display brightness: [OFF], [ON], [CLK] (clock).
To set this function to be active only during a fixed period, select [CLK], then set the start and end times.
- To set the brightness when the dimmer function is activated:
Set [DIMMER] to [ON], then adjust [BRIGHTNESS].
- To set the brightness when the dimmer function is deactivated:
Set [DIMMER] to [OFF], then adjust [BRIGHTNESS].
The brightness setting is stored and applied when the dimmer function is activated or deactivated.
BRIGHTNESS (brightness)
Adjusts the display brightness. The brightness level is adjustable: [1] - [10].
BUTTON-C (button color)
Sets a preset color or customized color for the buttons.
COLOR (color)
Selects from 15 preset colors, 1 customized color.
CUSTOM-C (custom color)
Registers a customized color for the buttons.
RGB RED, RGB GRN, RGB BLUE
Adjustable color range: [0] - [32] ([0] cannot be set for all color ranges).
DSPL-C (display color)
Sets a preset color or customized color for the display.
COLOR (color)
Selects from 15 preset colors, 1 customized color.
CUSTOM-C (custom color)
Registers a customized color for the display.
RGB RED, RGB GRN, RGB BLUE
Adjustable color range: [0] - [32] ([0]
cannot be set for all color ranges).
SND SYNC (sound synchronization)
Activates the synchronization of the illumination with the sound: [ON], [OFF].
Not available when no source is selected and the clock is displayed.)
AUTO SCR (auto scroll)
Scrolls long items automatically: [ON], [OFF].
Not available when the AUX or tuner is selected.)
Additional Information
Updating the Firmware
To update the firmware, visit the support site on the back cover, then follow the online instructions.
Note
During the update, do not remove the USB device.
Precautions
- Do not leave the front panel or audio devices on the dashboard.
- When the unit is turned on, the power antenna (aerial) extends automatically.
- Do not splash liquid onto the unit.
Moisture condensation
Do not splash liquid onto the discs. When moisture condensation occur inside the unit, remove the disc and wait for about an hour for it to dry out; otherwise the unit will not operate properly.
Notes on discs
-
Do not expose discs to direct sunlight or heat sources such as hot air ducts, nor leave it in a car parked in direct sunlight.
-
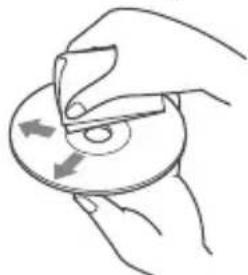
Wipe the discs with a cleaning cloth from the center out. Do not use solvents such as benzine, thinner, commercially available cleaners.
This unit is designed to play discs that conform to the Compact Disc (CD) standard. DualDiscs and some of the music discs encoded with copyright protection technologies do not conform to the Compact Disc (CD) standard, therefore, these discs may not be playable by this unit.
-
Discs that this unit CANNOT play
-
Discs with labels, stickers, or sticky tape or paper attached. Doing so may cause a malfunction, or may ruin the disc.
- Discs with non-standard shapes (e.g., heart, square, star). Attempting to do so may damage the unit.
-8cm(1B4in)discs.
Notes on CD-R/CD-RW discs
- If the multi-session disc begins with a CD-DA session, it is recognized as a CD-DA disc, and other sessions are not played.
-
Discs that this unit CANNOT play
-
CD-R/CD-RW of poor recording quality.
- CD-R/CD-RW recorded with an incompatible recording device.
- CD-R/CD-RW which is finalized incorrectly.
- CD-R/CD-RW other than those recorded in music CD format or MP3 format conforming to ISO9660 Level 1/Level 2, Joliet/Romeo or multi-session.
Playback order of audio files
About iPod
- You can connect to the following iPod models. Update your iPod devices to the latest software before use.
Compatible iPhone/iPod models
| Compatible Model USB | |
| iPhone X √ | |
| iPhone 8 √ | |
| iPhone 8 Plus √ | |
| iPhone 7 √ | |
| iPhone 7 Plus √ | |
| iPhone SE √ | |
| iPhone 6s √ | |
| iPhone 6s Plus √ | |
| iPhone 6 √ | |
| iPhone 6 Plus √ | |
| iPhone 5s √ | |
| iPhone 5c √ | |
| iPhone 5 √ | |
| iPhone 4s √ | |
| iPod touch (6th generation) √ | |
| iPod touch (5th generation) √ | |
| iPod nano (7th generation) √ |
- Use of the Made for Apple badge means that an accessory has been designed to connect specifically to the Apple product(s) identified in the badge, and has been certified by the developer to meet Apple performance standards. Apple is not responsible for the operation of this device or its compliance with safety and regulatory standards.
Please note that the use of this accessory with an Apple product may affect wireless performance.
If you have any questions or problems concerning your unit that are not covered in this manual, consult your nearest Sony dealer.
Maintenance
Cleaning the connectors
Avoid touching the connectors directly. The unit may not function properly if the connectors between the unit and the front panel are not clean. In order to prevent this, detach the front panel (page 7) and clean the connectors with a cotton swab. Do not apply too much force. Otherwise, the connectors may be damaged.
Note
For safety, do not remove the front panel while driving.
Specifications
Tuner section
FM
Tuning range:
When [AREA] is set to [EUROPE]: 87.5 MHz - 108.0 MHz
When [AREA] is set to [RUSSIA]: FM1/FM2: 87.5 MHz - 108.0 MHz (at 50 kHz step) FM3: 65 MHz - 74 MHz (at 30 kHz step)
Usable sensitivity: 7 dBf
Signal-to-noise ratio: 73 dB
Separation: 50 dB at 1 kHz
MW/LW
Tuning range: 531 kHz - 1,602 kHz (MW), 153 kHz - 279 kHz (LW)
Sensitivity: MW: 26 V , LW: 50 V
CD Player section
Signal-to-noise ratio: 95 dB
Frequency response: 20Hz - 20,000Hz Maximum number1 of:
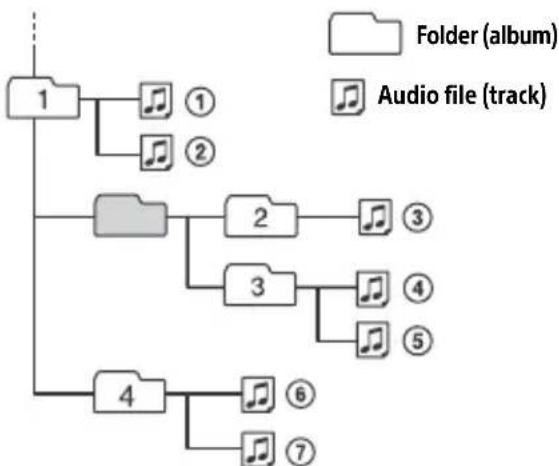
- Folders (albums) 2: 150
- Files (tracks) and folders*3: 300
- Displayable characters for a folder/file name: 32 (Joliet)/64 (Romeo)
Corresponding codec: MP3 (.mp3), WMA (.wma)
1 CD-R/CD-RW only 2 including the root folder *3 may be less than the measured value if folder/file names contain many characters
USB Player section
Interface: USB (Full speed)
Maximum current: 1 A
Maximum number of recognizable folders and files:
Folders (albums): 256
Files (tracks) per folder: 256
Compatible Android Open Accessory protocol (AOA): 2.0
Corresponding codec:
MP3 (.mp3)
Bit rate: 8 kbps - 320 kbps (Supports VBR (Variable Bit Rate))
Sampling rate: 16 kHz - 48 kHz
WMA (.wma)
Bit rate: 32 kbps - 192 kbps (Supports VBR (Variable Bit Rate))
Sampling rate: 32 kHz, 44.1 kHz, 48 kHz
FLAC (.flac)
Bit depth: 16 bit, 24 bit
Sampling rate: 44.1 kHz, 48 kHz
Supported file system: FAT16, FAT32
Power amplifier section
Output: Speaker outputs
Speaker impedance: 4 - 8 Maximum power output: 55W × 4 (at 4 )
General
Power requirements: 12 V DC car battery (negative ground (earth))
Rated current consumption: 10 A
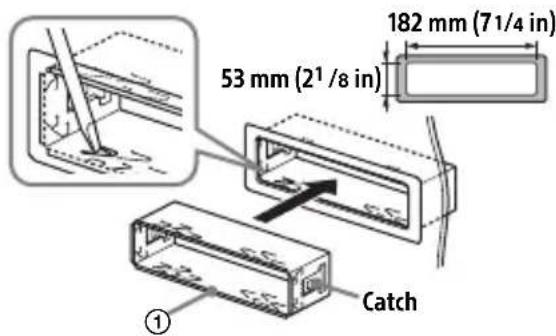
Dimensions:
Approx. 178mm× 50mm× 176mm (7 1/8 in × 2 in × 7 in) (w/h/d)
Mounting dimensions: Approx. 182mm× 53mm× 159mm (71 / 4 in × 21 / 8 in × 63 / 8 in) (w/h/d) Mass: Approx. 1.2kg (2 lb 11 oz) Package contents: Main unit (1) Parts for installation and connection (1 set)
Ask the dealer for detailed information.
Design and specifications are subject to change without notice.
Copyrights
Windows Media is either a registered trademark or trademark of Microsoft Corporation in the United States and/or other countries.
This product is protected by certain intellectual property rights of Microsoft Corporation. Use or distribution of such technology outside of this product is prohibited without a license from Microsoft or an authorized Microsoft subsidiary.
Apple, iPhone, iPod, iPod nano, and iPod touch are trademarks of Apple Inc., registered in the U.S. and other countries.
Android is a trademark of Google LLC.
libFLAC
Copyright (C) 2000-2009 Josh Coalson
Copyright (C) 2011-2013 Xiph.Org Foundation
Redistribution and use in source and binary forms, with or without modification, are permitted provided that the following conditions are met:
- Redistributions of source code must retain the above copyright notice, this list of conditions and the following disclaimer.
- Redistributions in binary form must reproduce the above copyright notice, this list of conditions and the following disclaimer in the documentation and/or other materials provided with the distribution.
- Neither the name of the Xiph.org Foundation nor the names of its contributors may be used to endorse or promote products derived from this software without specific prior written permission.
THIS SOFTWARE IS PROVIDED BY THE COPYRIGHT HOLDERS AND COLNTRIBUTORS "AS IS" AND ANY EXPRESS OR IMPLIED WARRANTY, INCLUDING, BUT NOT LIMITED TO, THE IMPLIED WARRANTY OF MERCHANTABILITY AND FITNESS FOR A PARTICULAR PURPOSE ARE DISCLAIMED. IN NO EVENT SHALL THE FOUNDATION OR COLNTRIBUTORS BE LIABLE FOR ANY DIRECT, INDIRECT, INCIDENTAL, SPECIAL, EXEMPLARY, OR CONSEQUENTIAL DAMAGES (INCLUDING, BUT NOT LIMITED TO, PROCEDURE OF SUBSTITUTE GOODS OR SERVICES; LOSS OF USE, DATA, OR PROFITS; OR BUSINESS INTERRUsION) HOWEVER CAUSED AND ON ANY THEORY OF LIABILITY, WHETHER IN CONTRACT, STRICT LIABILITY, OR TORT (INCLUDING NEGLIGENCE OR OTHERWISE) ARISING IN ANY WAY OUT OF THE USE OF THIS SOFTWARE, EVEN IF ADVISED OF THE POSSIBILITY OF SUCH DAMAGE.
Troubleshooting
The following checklist will help you remedy problems you may encounter with your unit. Before going through the checklist below, check the connection and operating procedures.
For details on using the fuse and removing the unit from the dashboard, see "Connection/Installation" (page 22). If the problem is not solved, visit the support site on the back cover.
General
No sound or the sound is very low.
The position of the fader control [FADER] is not set for a 2-speaker system.
The volume of the unit and/or connected device is very low.
- Increase the volume of the unit and connected device.
No beep sound.
An optional power amplifier is connected and you are not using the built-in amplifier.
Stored stations and correct time are erased.
The fuse has blown.
Makes a noise when the position of the ignition is switched.
The leads are not matched correctly with the car's accessory power connector.
During playback or reception, the demonstration mode starts.
If no operation is performed for 5 minutes with [DEMO-ON] set, the demonstration mode starts.
The display disappears from/does not appear in the display window.
The connectors are dirty (page 16).
The display/illumination flashes.
The power supply is not sufficient. Check that the car battery supplies enough power to the unit. (The power requirement is 12 V DC.)
The operation buttons do not function. The disc will not eject.
The connection is not correct.
- Press DSPL and EQ for more than
2 seconds to reset the unit.
The contents stored in memory are erased.
The clock set automatically is not accurate.
The clock data on radio waves is not accurate.
- Set the clock manually (page 7).
Radio reception
The radio reception is poor.
Static noise occurs.
Connect the antenna (aerial) firmly.
65 MHz to 74 MHz in FM3 cannot be tuned in.
[AREA] is set to [EUROPE].
- Set [AREA] to [RUSSIA] (page 12).
RDS
RDS services cannot be received (when [AREA] is set to [RUSSIA]).
FM3 is selected.
- Select FM1 or FM2.
RDS services are unavailable in the current region.
The SEEK starts after a few seconds of listening.
The station is non-TP or has weak signal. -Deactivate TA (page 9).
No traffic announcements.
The station does not broadcast any traffic announcements despite being TP.
- Tune in another station.
PTY displays [- - - -]
The current station is not an RDS station, or the radio reception is poor.
Program service name flashes.
There is no alternative frequency for the current station.
- Press / (SEEK -/+ ) while the program service name is flashing. [PI SEEK] appears and the unit starts searching for another frequency with the same PI (program identification) data.
CD playback
The disc does not play.
Defective or dirty disc.
The CD-R/CD-RW is not for audio use (page 15).
MP3/WMA files cannot be played.
The disc is incompatible with the MP3/WMA format and version. For details on playable discs and formats, visit the support site on the back cover.
MP3/WMA files take longer to play than others.
The following discs take a longer time to start playback.
- A disc recorded with a complicated tree structure.
- A disc recorded in Multi Session.
-A disc to which data can be added.
USB device playback
A USB device takes longer to play.
The USB device contains files with a complicated tree structure.
The audio file cannot be played.
For details on supported formats, see "Specifications" (page 17).
If the audio file still cannot be played, refer to the operating instructions supplied with the USB device, or contact the manufacturer of the USB device.
Operations for skipping an album, skipping items (Jump mode), and searching a track by name (QuickBrowZer) cannot be performed.
Set [USB MODE] to [MSC/MTP] (page 13).
The sound cannot be output during playback in Android mode.
Check the status of the audio playback application on the Android smartphone.
Messages
The following messages may appear or flash during operation.
INVALID: The selected operation could be invalid.
READ
Wait until reading is complete and playback starts automatically. This may take some time depending on the file organization.
(underscore): The character cannot be displayed.
For CD playback:
CD ERROR
Clean or insert the disc correctly, or make sure the disc is not blank or defective.
CD NO DISC
Insert a disc containing playable files (page 17).
CD NO MUSIC
Insert a disc containing playable files (page 17).
CD PUSH EJT: The disc could not be ejected properly.
Press (eject).
LLL or The beginning or the end of the disc has been reached.
For USB device playback:
HUB NO SUPRT: USB hubs are not supported.
IPD STOP: iPod playback has finished.
Operateryour iPod/iPhone to start playback.
NOT SUPPORT ANDROID MODE
A USB device not supporting AOA (Android Open Accessory) 2.0 is connected to the unit while [USB MODE] is set to [ANDROID]. - Set [USB MODE] to [MSC/MTP] (page 13).
USB ERROR
Connect the USB device again.
USB NO DEV
Make sure the USB device or USB cable is securely connected.
USB NO MUSIC
Connect a USB device containing playable files (page 17).
USB NO SUPRT
For details on the compatibility of your USB device, visit the support site on the back cover.
USB OVERLOAD: The USB device is overloaded.
Disconnect the USB device, then press SRC to select another source.
The USB device has a fault, or an unsupported device is connected.
For RDS operation:
NO AF: No alternative frequencies.
Press 144 / 10 (SEEK-/+)while the program service name is flashing. The unit starts searching for another frequency with the same PI (program identification) data ([PI SEEK] appears).
NO PI: No program identification. The selected station has no PI (program identification) data.
Select another station.
NO TP: No traffic programs.
The unit will continue searching for available TP stations.
For steering wheel remote control operation:
ERROR
Register again from the function where the error occurred (page 12).
TIMEOUT
Try completing the registration while [REGISTER] is blinking (about 6 seconds) (page 12).
For firmware update operation:
FILE ERROR: The updater is not stored in the USB device.
Store the updater in the USB device, then try again (page 15).
UPDATE ERROR PRESS ENTER: Firmware update is not completed properly.
Press ENTER to clear the message, then try again.
During the update, do not turn the ignition to the OFF position, nor remove the USB device (page 15).
If these solutions do not help improve the situation, consult your nearest Sony dealer. If you take the unit to be repaired because of device playback trouble, bring the device that was used at the time the problem began.
Connection/Installation
Cautions
- Run all ground (earth) leads to a common ground (earth) point.
- Do not get the leads trapped under a screw, or caught in moving parts (e.g., seat railing).
- Before making connections, turn the car ignition off to avoid short circuits.
- Connect the power supply lead ⑥ to the unit and speakers before connecting it to the auxiliary power connector.
- Be sure to insulate any loose unconnected leads with electrical tape for safety.
Precautions
- Choose the installation location carefully so that the unit will not interfere with normal driving operations.
- Avoid installing the unit in areas subject to dust, dirt, excessive vibration, or high temperature, such as in direct sunlight or near heater ducts.
- Use only the supplied mounting hardware for a safe and secure installation.
Note on the power supply lead (yellow)
When connecting this unit in combination with other stereo components, the amperage rating of the car circuit to which the unit is connected must be higher than the sum of each component's fuse amperage rating.
Mounting angle adjustment
Adjust the mounting angle to less than 30^ .
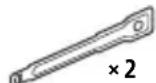
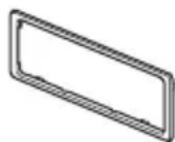
Parts List for Installation
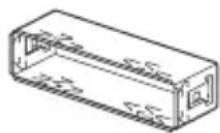
①
②
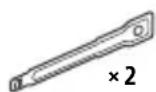
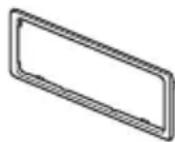
(3)
(4)


(5)

(6)
- This parts list does not include all the package contents.
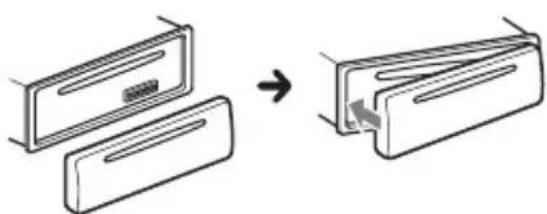
- The bracket ① and the protection collar ③ are attached to the unit before shipping. Before mounting the unit, use the release keys ② to remove the bracket ① from the unit. For details, see "Removing the protection collar and the bracket" (page 25).
- Keep the release keys ② for future use as they are also necessary if you remove the unit from your car.
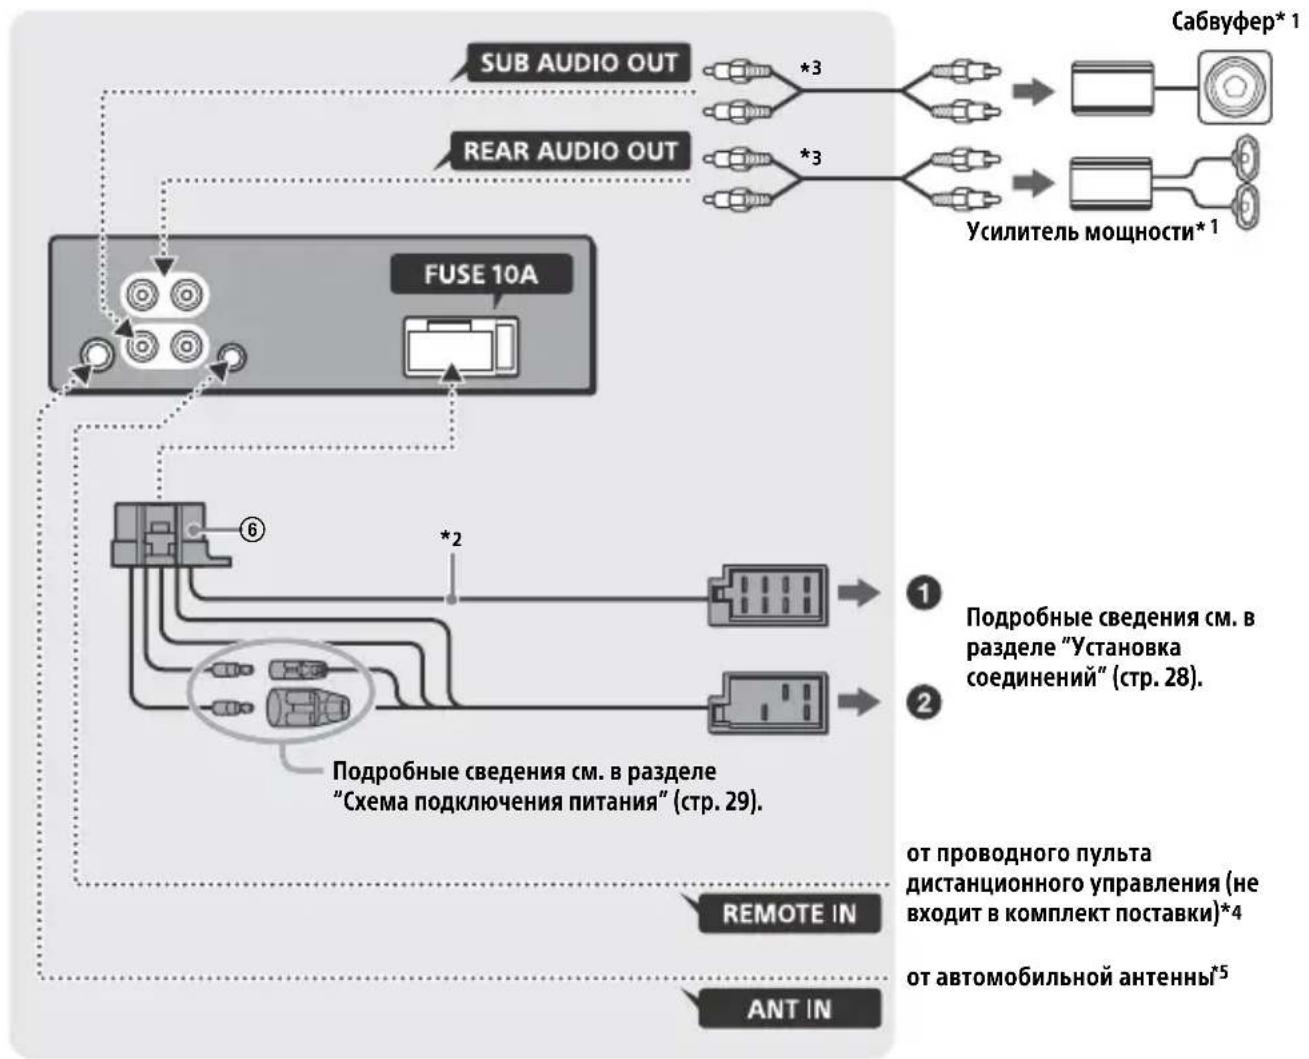
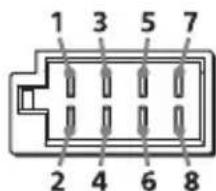
Connection
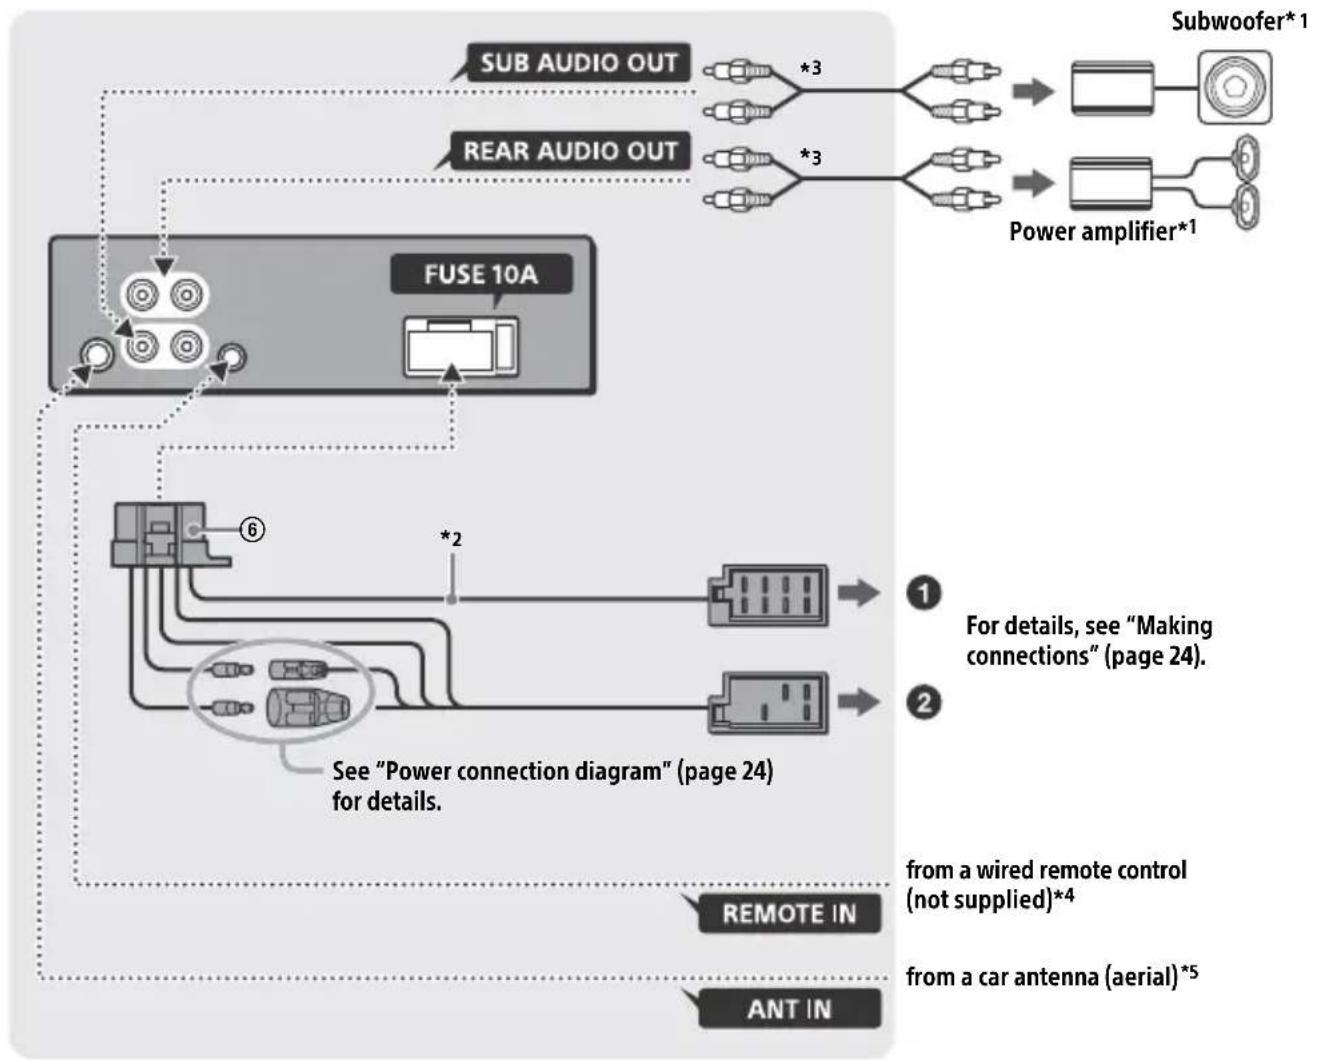
1 Not supplied
2 Speaker impedance: 4 - 8 × 4
3 RCA pin cord (not supplied)
4 Depending on the type of car, use an adaptor for a wired remote control (not supplied). For details on using the wired remote control, see "Using the wired remote control" (page 25).
*5 Depending on the type of car, use an adaptor (not supplied) if the antenna (aerial) connector does not fit.
Making connections
If you have a power antenna (aerial) without a relay box, connecting this unit with the supplied power supply lead ⑥ may damage the antenna (aerial).
To the car's speaker connector
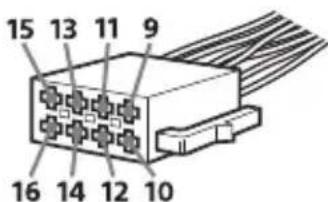
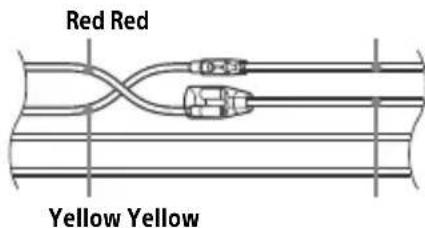
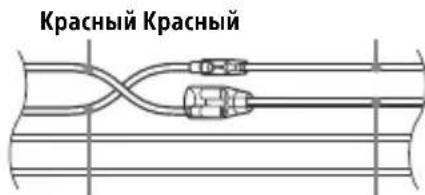
| 1 | Rear speaker (right) | ⊕ | Purple |
| 2 | Purple/black striped | ||
| 3 | Front speaker (right) | ⊕ | Gray |
| 4 | Gray/black striped | ||
| 5 | Front speaker (left) | ⊕ | White |
| 6 | White/black striped | ||
| 7 | Rear speaker (left) | ⊕ | Green |
| 8 | Green/black striped |
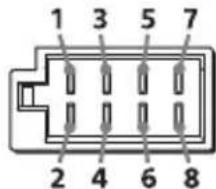
To the car's power connector
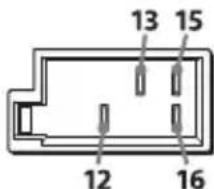
| 12 | continuous power supply | Yellow |
| 13 | power antenna (aerial) / power amplifier control (REM OUT) | Blue/white striped |
| 15 | switched power supply | Red |
| 16 | ground (earth) Black |
Subwoofer Easy Connection
You can use a subwoofer without a power amplifier when it is connected to a rear speaker lead.
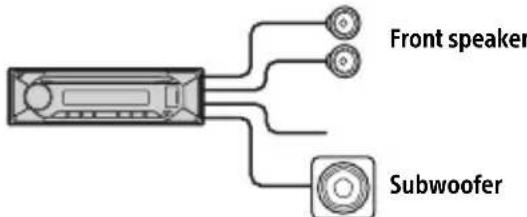
Notes
- Preparation of the rear speaker leads is required.
- Use a subwoofer with an impedance of 4 to 8 and with adequate power handling capacities to avoid damage.
Memory hold connection
When the yellow power supply lead is connected, power will always be supplied to the memory circuit even when the ignition switch is turned off.
Speaker connection
Before connecting the speakers, turn the unit off.
- Use speakers with an impedance of 4 to 8 , and with adequate power handling capacities to avoid damage.
Power connection diagram
Check your car's auxiliary power connector, and match the connections of leads correctly depending on the car.
Auxiliary power connector
Common connection
| 12 | continuous power supply | Yellow |
| 15 | switched power supply Red |
When the positions of the red and yellow leads are inverted
| 12 | switched power supply | Yellow |
| 15 | continuous power supply | Red |
When the car without ACC position
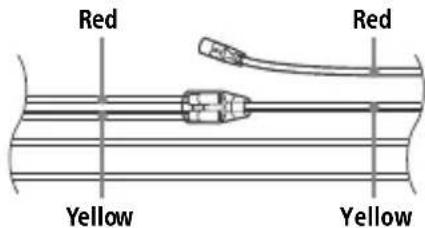
After matching the connections and switching power supply leads correctly, connect the unit to the car's power supply. If you have any questions and problems connecting your unit that are not covered in this manual, consult the car dealer.
Using the wired remote control
1 To enable the wired remote control, set [STR CONTROL] in [SET STEERING] to [PRESET] (page 12).
Installation
Removing the protection collar and the bracket
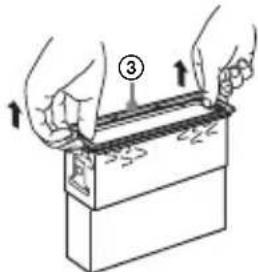
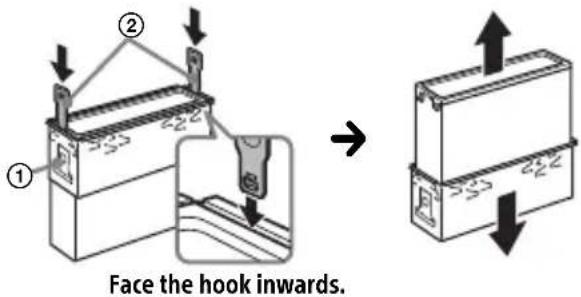
Before installing the unit, remove the protection collar ③ and the bracket ① from the unit.
1 Pinch both edges of the protection collar ③ then pull it out.
2 Insert both release keys ② until they click, and pull down the bracket ①, then pull up the unit to separate.
Mounting the unit in the dashboard
Before installing, make sure the catches on both sides of the bracket ① are bent inwards 2mm (3/32 in).
1 Position the bracket ① inside the dashboard, then bend the claws outward for a tight fit.
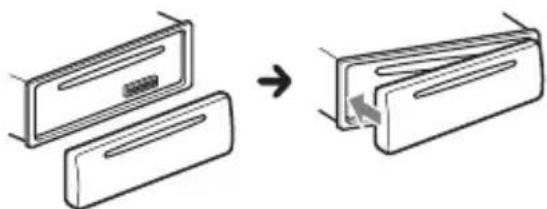
2 Mount the unit onto the bracket ①, then attach the protection collar ③.
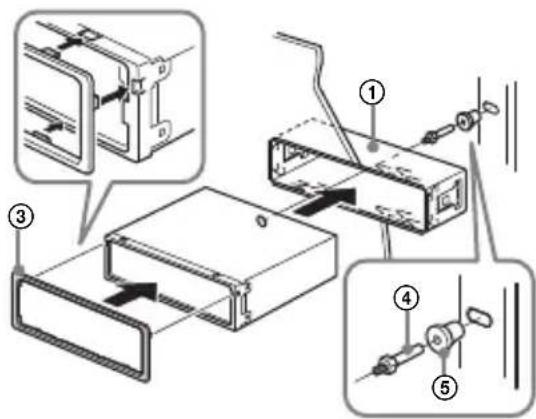
Notes
- If the catches are straight or bent outwards, the unit will not be installed securely and may spring out.
Make sure the 4 catches on the protection collar are properly engaged in the slots of the unit.
Detaching and attaching the front panel
For details, see "Detaching the Front Panel" (page 7).
Resetting the unit
For details, see "Resetting the Unit" (page 7).
Fuse replacement
When replacing the fuse, be sure to use one matching the amperage rating stated on the original fuse. If the fuse blows, check the power
connection and replace the fuse. If the fuse blows again after replacement, there may be an internal malfunction. In such a case, consult your nearest Sony dealer.
FW VERSION (Firmwareversion)
Raccordement/Installation
Attention 24
La lecture commence.
DEMO (demonstration)
Permet d'activer la démonstration : [ON], [OFF].
CLOCK (Horloge) (page 7)
EDIT CUSTOM (modifier personnalisation)
[OFF], [R&B], [ROCK], [POP], [HIP-HOP], [EDM], [JAZZ], [SOUL], [COUNTRY], [KARAOKE]*, [CUSTOM].
[BAND1] - [BAND10] (32 Hz, 63 Hz, 125 Hz, 250 Hz, 500 Hz, 1 kHz, 2 kHz, 4 kHz, 8 kHz, 16 kHz).
Raccordement/Installation
Attention
EDIT CUSTOM (modifica
personalizzazioni)
[OFF], [R&B], [ROCK], [POP], [HIP-HOP], [EDM], [JAZZ], [SOUL], [COUNTRY], [KARAOKE]*, [CUSTOM].
(32 Hz, 63 Hz, 125 Hz, 250 Hz, 500 Hz, 1 kHz, 2 kHz, 4 kHz, 8 kHz, 16 kHz).
Interfaccia: USB (Full speed)
EDIT CUSTOM (editor personalizacion)
[OFF], [R&B], [ROCK], [POP], [HIP-HOP], [EDM], [JAZZ], [SOUL], [COUNTRY], [KARAOKE]*, [CUSTOM].
[BAND1] - [BAND10] (32 Hz, 63 Hz, 125 Hz, 250 Hz, 500 Hz, 1 kHz, 2 kHz, 4 kHz, 8 kHz, 16 kHz).
Copyright (C) 2000-2009 Josh Coalson
Copyright (C) 2011-2013 Fundación Xiph.Org
Pon3Bovntelb: CoHn KopnpoeuH, 1-7-1
KoHaH MnHaTo-Ky TokNo, 108-0075 JnoHna
B ueJx 6e30nacHocTn o6aTeIbHo yCTaHaBnBaIte 3TO yCTpoiCTBO Ha np6OpHO nAHeJI n ABTomO6nJI, TaK KaK erO 3aDnY aCt b HArpeBaETcR BO BpEm pa60Tbl.
Ioppo6Hee cm."YcTaHOBka/ npKlOyuHne" (ctp. 26).
3TOT npOdyKT nMeet Klaacc 1 na3epnoro n3nyeHnCOrIaCNo cTaHdapTam IEC/EN 60825-1:2007 n IEC/EN 60825-1:2014.
-ДиnteьHoCTb n3JnyeHn: NOCToHHoe
MoUHocTbJa3epa:MeHee55,8MkBT
Динha BOЛHBi:775HM-800 HM
Tabnukc cyka3aHneM pa6oeryo HnnpjKeHnI npyInx xapaKTepcntk HaxOuNTcHa HnXHei NaHei KOpnyca.
MapknpoBka CE DeiCTBnTeIbHa IuMb B Tex CTpaHax, B KOToPbIX npHraHa 3aKHOdaTeIbHOM yPoBHe. B OCHOBHom 3TO CTpaHbE3 (EBpOeNcKoJ KOnHomuecko3OHbl).
IaTa n3rTOBJIeHnYka3aHa Ha TOBape, a TaKxHe Ha yNaKOBKe B CneDyIOUeM oOpMaTe:
MM.YYYY, rnde MM-Mecra u YYYYY-roD n3rotOBJIeHn.
AByTomOmbnIbHna ayuNocncTeMa c noIepKko paNo FM/MW/LW
HΦopMaunIyKpaHne
YnoHOMOeHHbI npedCTaBnteB BV KpanHe nO BOpocam COOTBeTCTBnA Tpe6oBaHnM TexHnuecknx peIamaHTOB: OOO "COnn YKpanHa", yI. NlbuHcKa, 8, r.KneB,04070,YkpanHa.
YcIOBxpaHeHn
TobapbcoxpaHOT ByynaKOBaHHOM BnDe B TeMHbIX, cyNX, YnCTbIX, XopoSo BeHTnIpyEmbIX NOMEuEHNrX, N3OJInpoBaHHbIX OT MeCt XpaHeHnKNCJOT n IeIoueY.
TemnepaTpa xpaHHeNHa: ot -20 do +60 °C. OTHocnteIbHna BlaXHoCTb XpaHHe He 6oJee < 80 %, 6e3 o6pa3OBAHnKaONHeHCata.
Pa6o7a TemnepaTypa: ot 0 do 40^ Pa6o7a OTHOCHTbHa BnaXHOCTb: 40-60%.
Cpok xpaHeHn He yCTaHOBneH.

YTNn3aun
NCIOJIb30BaHHhIX
3JIeMeHTOB NITaHnI N
OTCJyKnBWeRo
JIeKTpNuecKOrOu
3JIeKTPoHOrO O6OpUdoBaHnA (DInpeKTHBa npIMeHmAb CtpaHax EbpocIO3a n DpyrNxC TpaHax, rIe DeiCTByOT cNCTeMbI pa3dJeBHorO c6opa OTXODOB)
IpeynpeKdHne IJcIyuaEB, KOrdaB3aMKe 3axnraHnHerT noLoXKeHHAACC
Y6eHNTecb, YTO HAcTpoEHa FyHKcIa AUTO OFF (ctp.14). YCTpoiCTBO NOJHOCtBIO OTKJIIOUHTCra ABTomaTHueCKn IIO NCTeueHnn 3aDaHHoro BpeMeHi, KOrJa YCTPOICTBO BbIKIIOuHTCra I OTO6pa3rTcraacbl (HaIprImep, npn HaxKatN KHOKN OFF n ydePkaHnn ee B TeueHne 1cekyndbl). 3To npedOTBpaAaet pa3pIky aKKymyIaTopa. EcIn FyHKcIa AUTO OFF He HAcTpoEHa, npn KaJdOM OTKJIIOUeHnn 3aXnIraHn HaXMMTe n ydePknBaIte OFF, noka ekpan He NotyxHeT.
OTka3 OT OTBETCTBeHHoCTN B OTHOWeHmYcIyr, npeIOCTaBJIeMbIX CTOpOHHMn NOCTaBUnkamN
Cnyk6bl, npdeOCTaBIAReMbIe CTOpOHHMn NOCTaBUnKaMn, MOryt 6bITb N3MeHeHbl, npnoctaHOBLeHbl NII OTMeHeHbl 6e3 npedBapntbHoro yBeDOMJeHna. Kompanya Sony He Hecet OTBETCTBHeHHocTn 3a cnTyauuPiNo6Horo poJa.
IIMnopTeP Ha TeppuTOpn CTpaH TamOxKeHHoro coIO3a AO "CoHn 3JeKtpoHnKc", PocCn, 123103, MockBa, KapamblweBckn npoe3d, 6
Opran3aun, yonHOMoehna npHHMaTb npeTeHNOTnOtpe6nteJeHa TeppITOpu Ka3axCTaHa AO "COnn 3NeKtpOnHK" PpeDCTabNTeJIbCTBO B Ka3axCTaHe, 050010, Pecny6nka Ka3axCTaH, r. AImatbI, np. DocTBk, dom 117/7
Ka3aKCTAH JepiHderi TyTbIHyBilapDbIH
waFBIM-TanantapbIH Ka6blndayfya yKeJneTTi
YbIM «COHN 3JeKTPOHnKC» AK
Ka3aKCTAHdaftI ΘkiNdiiri, 050010, Ka3aKCTAH
Pecny6nKacbl, AnMaTbIK., DocTBk DaHfbINbl,
117/7y
Copepkanhe
CnpaBoUHnK nO DeTajm N opraHaM ynpaBHeHn 5
Haualo pa60tbl
ChTne npeDne nane 7
Ipee3arpy3ka yctpoiCTBa 7
YcTaHOBka YacOB 8
PnoBepka HapprKeHnB aKKymyIaTope. 8
PoiKJIIOUeHne yCTpoNCTBa USB 8
IopKnHoueHne npyroro nepenocchoro aynOuycTpoiCTBa 9
Послшване радио
PpocnyuBauHne paDno 9
CnCTembl paIIOaHHbIX (RDS) 10
Bocnpon3BeDeHne
Bocnpon3BeJeHne nncka 11
Bocnpoun3BeJeHne yCtpoiCTBa USB. 11
Понск и Воспpon3ВeДeне КомпоЗици 12
NapaMeTpbl
OTmeHa pexima DEMO 13
OchOBhIe Oepaunn HacTpoiKn npapaMeTpOB 13
HactpoKa o6ux npaMeTpoB (GENERAL) 14
HactpoikKa 3Byka (SOUND) 15
Hactpoika nucnpea (DISPLAY) 16
1 CeKyHdbI IJIbY BbIKJIOUeHn NCTOCHNka N OTo6paXeHn YacOB.
Haxmte u ydepknaBaiTe 6oJee 2 cekyHd Ia BbIKIOUeHnI NTaHnI dncnn.
4 DnCKOBbI peYJrTOp
IobopaunBaIte InpeylnpoBAnHnypOBHrPOMKoCTN.
PUSH ENTER
OTkpblTne BbI6paHHOrO IyHKTa MeHIO.
YTo6bI Bbl6paTb pyroN nCTOuHnK cnHaJa, HaxMnte KhoNky SRC,
IOBepHnTe DnCKOBbIpeYJrTOp,a 3aTeM HaxMMteero(BpemOxNdaHnra- 2ceKyHdbI).
MENU
BxoD B MeHIO HacTpoiKn.
5 Cnot dna nckOB
6 Okouko dncnpea
7 Nopr USB
8 (n3Bneyb dNcK)


SE E K -/ +)
AByTOMaTnuecka HaCTpoNka Ha paAnocTaHcun. HaxMITE yIepKNaIte dJa HAcTPOKn BpyHyU.
1/1 (npedbyuəa/cneyuoua)
<//> (yckopeHHa nepeMOTka Ha3aI/yckopeHHa nepeMOTka BnepeI)
10 Ha3aD)
Bo3BpaT K npeIbIyUeMy ekpaHy. MODE (cTp.9)
11 EQ (3KBana3ep)
Bb6op Kpmbo 3Kbaaia3epa.
12 PnpemHK cnHaIOB c npbTa dNCTaHcNOHHoro ynpabHeHn
13 HomepHbIe KhoNkn (1-6)
PpneM coXpaHeHHbIX B namrTn
paIIOCTaHcN. HaxMnte n
yIepKINBaTe dIra coXpaHeHra cTaHcN.
ALBUM ▼/▲
PpOnyck aIb6OMa IJy ayDnoyctpoiCTBa. HaxMnte uYdepxNBaIte dJIr HeNpepbIBHOro npOpycka aIb6OMOB.
(Heioctynho,ecnnoKIOUeHO yctpoiCTBO USBBpeXmmeAndroidnnyctpoiCTBO iPod.)
(noBTop)
(Heioctynho,ecnnoKluoyeHo yctpoicTBO USB bpekme Android.)
(cnyaHna nocJeDoBaTeIbHoCTb)
(Heioctynho,ecnnoKIOueHo yctpoiCTBO USBBpeximeAndroid.)
II (Bocnpoun3BepeHne/nay3a)
14 EXTRA BASS
YcJIeHHe 3ByaHn8 6acOBOro 3ByKa B CnHXPOHn3aUuN C yPoBHeM rPOMKoCTn. HaxmTe, YTO6bI n3MeHnTb HaCTpOrykExTRA BASS: [1], [2], [OFF].
15 BxoHoe rHe3do AUX
DSPL(dncnnei)
Haxmnte nIy I3MeHeHn yHnKauu nnCnJe.
SCRL (npokpyrka)
HaKmTe n ydepXnBaIe TnI npOKpyTKn INdNkauuN.
Hauaio pa60tbi
Сятыпешени панели
Bo n36exahanie kpaun yctpoiCTBa moxho cHrTb C Hero nepeHIOI naHeIb.
1 HaKMnte u ydepxnBaIte KhoNky OFF ① do Tex nop, noka ycTpoNCTBO He OTKJIIOUHTcra. HaKMnte KHOKNy CHaTna NpeDHeN NaHEn ②, a 3aTeM NotHaHtne NaHeJb Ha Ce6n CHHMnte ee.

PpeDynpednteHbI 3ByKOBOc nHaJ
EcnI Do nobopoTa BbIKIOUaTeJIa 3axnraHnB NonoXeHne OFF c yCTpoiCTBa He 6bla CHrTa nepeHnA naHEnb,TO B TeueHne HeckoBKnx CeKHyD 6yDet CblIWeH npDeynpeDntelhBn 3ByKOBoCnHaJ. 3ByKOBo CNHaJ 6yDet CblIWeH, TOnkO ecnn nCNoNb3yETcBCTPOeHHbYcNJNTeJIb.
YcTaHOBKa nepeDnei naHeJI
Ipepe3arpy3ka yctpoiCTBa
IpeepnepBIM nCnoJb3OBaHneM yCTpOInCTBa, nocJe 3aMeHbl aBTOMo6nJIbHO rAKyMyJrToPa nJIN NOBtOpHOro nOcOeDInHeHnKaBeJe HEO6xOIMO nepe3arpy3ntb yCTpOInCTBO.
1 HaxmTe u ydepxuBaIte KhoNk DSPL n EQ 6oJee 2 cekyHd.
PpIMeuaHne
Ipe3arpy3ka yctpoiCTBa npnbEeT K ydaJIeHIO HAcTpoE YacOB N HeKOTOpbIX COxpaHeHHbIX 3JIeMeHTOB CoepXIMoro.
YctaHOBKa CTpaHbI/perNoHa
Iocne nepe3arpy3kn yctpoiCTBa OTKpoeTcMeHIO HAcTPOiKN CtpaHbI/perNoHa.
1Ipn OTo6paXeHnn [SET AREA] HaxMnTe KhoNky ENTER. OTo6pa3ntcTЯ TeKyuza TcpaHa nIn nperoH.
2 NobopaunBaJ DNCKOBbl peYIaTOp, BbI6epnte [EUROPE] nIn [RUSSIA], a 3aTeM HaXMMte DNCKOBbl peYIaTOp.
3 NOBOPaUHbA DnCKOBbl peYJrTOp, BbI6epnte [YES] nnn [NO], a 3aTeM HaxMMte DnCKOBbl peYJrTOp. Ppi n3MeHeHHn perNoHa nnn cTpaHbI yCTpOuCTBO nepe3arpy3nTcra, nocJe Yero Ha dncJIee OTO6pa3rTc qacbl.
3TOTnapaMeTp MoXHO HaCTpOHTb B MeHIO 06x npaMeTPOB (cTp.14).
YctaHOBka yacob
1 HaKMnte KhoNky MENU, nobepHnTe DnCKOBbl peRyIaTOp dIra Bbl6opa [GENERAL], 3aTeM haKmTe DnCKOBbl peRyIaTOp.
2 NobopaunBaJ dNCKOBbI peYJrTOp, BbI6epnte [SET CLOCK], a 3aTeM HaxMMte dNCKOBbI peYJrTOp.
3 NOBepHyB DnCKOBbI peYJrTOp, BbI6epnte [MANUAL], a 3aTeM Haxmnte DnCKOBbI peYJrTOp. NaHcET Mrratb INdNkauza Yaca.
4 NOBOPaUBaIe DnCKOBbl peYJrTOp dJa YCTaHOBKn 3HaueHnra YacOB mNHyT. IJIy BbOpa HAcTppaNBaEMoro pa3pda nCNoJIb3yIte KHOKN (SEEK-/+).
5 NocJe yctaHOBKn MmHyT HaXMMTe KhoNky MENU. YcTaHOBka 3aBepSeHa, nocJe yero qacbl NaHyT OTCuET BpeMeHn.
Дя OCTaHOBKn BOCnpon3BeHeHn
Haxmte u yepxuBaTe KhONky OFF TeueHne 1ceKyHdbI.
OCTaHOBnTe BOCpON3BeJeHne,3aTeM ydaJIte yCTPOIcTB0.
PpeynpeKdHne kacaTeJbHo iPhone
Ipn nodknoyeHn iPhone uepe3 nHTepcec USB rpoMkoctb TelefoHHoro Bbl3OBA ynpaBnaTcraYCTPOINCTBOM iPhone, a He annapaTom. He yBeNnuBaIte rpoMkoCTb yCTPOINCTBa BO Bpemr TeLeoHHoro pa3roBopa, TaK KaK npn 3aBepseHn pa3roBopa MoKeT pa3daTbcra rpoMKn 3ByK.
Bocnpoun3BedeHne B Bb6paHHom pexkme MoKeT HaaTbcr He cpa3y.
IocTyHbIepeKIMblBocnpOn3BeJeHnO TInuHaOTcB3aBNCMOCtNOT BbIbpaHHOrIO NCTOCHNka 3Byka.
ПОИСК KOMПОЗИЦИ NO Ha3BaHиIO (Quick-BrowZer™)
Функия HeOCTyNHa, ecn noKIOUeHO yctpoiCTBO USB b pexime Android nIu yctpoiCTBO iPod.
1BoBpemBaBocnpOn3BeDeneHnC DnCKa CDnnuYcTpoiCTBaUSBHaXmTe KHOKNyQ (O63Op)*,YTO6bl OTo6pa3ntb CnncOK KaTeOpn nnCKa.
Korda noBtca cnucOK KOMno3nui, Haxmaite KHonky Ta3ad), noka He OTo6pa3ntc HxHna KaTeOpnia NONCA.
*Bo BpemBaBocPon3BeDeHnC yCTpoNCTBa USB HaxMute n ydepxnBaIte KhONky (o630p) 6OJee 2 cekyHn, YTO6bl BepHyTbCn HeNocepEaCTBeHHo K Haayany CnNcKa KaTeOpn.
2 NobopaunBaJ DNCKOBbI peYJIaTOp, Bbl6epnt Tpe6yeMyIO KaTeropnIO noncKa, 3aTeM HaXMMTe DNCKOBbI peYJIaTOp dJa NOdTBePKeJdHnA.
3 Nobtopte war 2 dny noncka Tpe6yemoy KOMno3uyn. HaynetcBocnpoun3BeJeHne.
CLOCK (uacbl) (CTp. 8)
YcTaHOBka Yacob: [AUTO
CAUT ALM (npedynpeiTeIbHbI 3ByKOBoCnHaI)
BkIIOueHne npeDynpeDHTeNbHOrO 3BykoBOro cHnHa: [ON], [OFF] (cTp.7).
(OCTyHToTbko npn BbIKIOueHHOM nTOUHNKe, KOrda OTo6paXaIOTcYacbl.)
BEEP(3ByKOBOcHnHaJ)
AknBn3aun 3ByKOBOrO cnHaJa: [ON], [OFF].
AUTO OFF (aBtOMaTnueeCKoe OTKJIIOUeHHe)
ABTOMATnuecko OTKIOUeHne uepe3
ONpeIeJIeHHoe BpeM, KOrda yCTpOietBO
BbIKIOUeHO N OTo6paXaOTcY aCbl
(HaXMnTe KHOJky OFF n IepXnTe ee
HaKaTo1 cekyHny): [ON] (30 MInHyT),
[OFF].
STEERING (pylb)
PereTpaun/In3MeHHe HacrpoKn pyIbTa DnCTaHcIOHOrO ynpabEnHa
(OCTyHNO TOJbKO npu BbIKNIOueHHOM NTOUHNKe, KOrDa OTo6paKaIOTcYacbl.)
STR CONTROL (nybT dntaHcnoHHoro ynpabHeHa pyne)
Bb6op pexkma BBOda noKluoyehHoro nyIbTa nCTaHcuONHoro ynpabLeHna.Bo
n36exaHne HeNCppaBHOCTe nepei NCNoIb3OBaHnem NOp6epnte COOTBeTCTByUoI npexIM BBOJa IJIPOdkJIIOueHHO rNylTa
ДиСТанцИОНHOrOУ npaВлeнЯ.
CUSTOM (cneuaNbHbI)
Pexm BBOda IJnIyIbTa IInCTaHcNIOHHOrO ynpabJeHnHa pyne.
PRESET (CTaHdapTbI)
Pexm BBOda IJn npoBODHO nylbTa
IInCTaHcNoHHoro ynpabLeHn3a
NCKJIooHeHnEM nylbTa
Дистацноногу npablenHa pyne (BbIbupaetca abTomatnueckn npn BblonHeHn [RESET CUSTOM].)
EDIT CUSTOM (HactpoNka cneuaJIbHOpeXIma)
Perectpaunya yHKn (SOURCE,ATT, VOL + / - ,SEEK + / - )IyIyIbTa
[OFF], [R&B], [ROCK], [POP], [HIP-HOP],
[EDM], [JAZZ], [SOUL], [COUNTRY], [KARAOKE]*, [CUSTOM].
Bb6paHnyIO JIA KaKdoRO NCTOCHNKA KpNByIO 3KBaJAA3epa MOXHO 3aHeCTN B NaMAYb.
*PnBb6ope[KARAOKE]3ByK BOKaJa BO BpeMaBOcnpOn3BeDeHn nprJnywaetc,HO He yCTpaHareTcNoHocTbIO.1CpONb3ObaHne MKNkofoHaHe NoDnepXNBaETcR.
EQ10 CUSTOM (cpeuaJIbHbIe HaCTpoiKn
3KbalaJ3epa EQ10)
Bb6op BapnaHTa [CUSTOM]dЯ EQ10.
HaCTpoiKa KpIBoN 3KbalaJ3epa:
[BAND1] - [BAND10] (32 ΓU, 63 ΓU, 125 ΓU, 250 ΓU, 500 ΓU, 1 KΓU, 2 KΓU, 4 KΓU, 8 KΓU, 16 KΓU).
YpOBeHb rPOMKOCTn HAcTpaUNBaETcR B
dIinaJ3OHe oT -6 dB do +6 dB c WaROM
1 dB.
BALANCE (6aHaHc)
PergunpoBka 3BykoBoro 6aHaHca: [RIGHT-15] - [CENTER] - [LEFT-15].
FADER (pacnpedeJeHne cunHaJa) PerynipOBka OTHocntelbHoro ypOBn: [FRONT-15] - [CENTER] - [REAR-15].
S.WOOFER (ca6ByΦep) SW LEVEL (уровень ca6ByΦepa) Perулровka уровьгрмкости ca6ByΦepa: [+6 dB] - [0 dB] - [-6 dB]. ([ATT] оTOбражаetс, ecIn yCTaHOBJIeHo MInHMaJIbHoe 3HaueHne.) SW PHASE (fa3a ca6ByΦepa) BbI6op fa3bI ca6ByΦepa: [SUB NORM], [SUB REV]. LPF FREQ (чacToTa ФильТра НИЗКИX чacToT) Bbl6opЧacToTы ФильТра ca6ByΦepa: [80Hz], [100Hz], [120Hz].
HPF FREQ (caCTOta fNbTpRa BbICOKNX
chaTOT)
Bb6op 3HaueHnra rpaHnUHOu cactOTbl
pepeDnX/3aDnX rPOMKOrOBOpnteJeN: [OFF], [80Hz], [100Hz], [120Hz].
HacrtpoiKa dncnpej (DISPLAY)
DIMMER (perynpoBka noCBeTKn)
I3meHne npKocTn DncJIeR: [OFF], [ON], [CLK] (acbl).
YTo6bI 3Ta yHKcNya 6bla aKTNBHa
TOJbKO B TeueHne onpeJeHNO
BpeMeH, BbIbepnte [CLK], a 3aTeM
3aJaTe Bpem Haayla n OKOHuaHna.
- YTo6bI 3aDaTb npKocTb npn BKIOUeHHo FyHKcN ynpabLeHna NOcCBETKO:
yctAHOBnTe dIra [DIMMER] 3NaueHne [ON] n OtperyLnpuYte [BRIGHTNESS].
- YTo6bI 3aDaTb npKocTb npn BbIKIOUeHHo FyHKcN ynpabLeHna NOcCBETKO:
yctAHOBnTe dIra [DIMMER] 3NaueHne [OFF] n OtperyLnpuYte [BRIGHTNESS].
HaCTPOBa npKocTn coxpaHaeTc n
npIMHeHreTc npn BkIOUeHNn IIN
BbIKIOUeHNn FyHKcN ynpabLeHna NOcCBETKO.
CUSTOM-C (NoB3OBAteNbCKn UBeT)
Hactpoika noJIb3OBaTeIbckOro cBeTa Ira nucnne.
RGB RED, RGB GRN, RGB BLUE
HactpoIka UBeTOBOrO dHaana30Ha: [0] - [32] (3HaueHne [0] He nCnoJIb3yETcR Hn Ia KaKnx dHaana30HOB UBeTOB).
SND SYNC (cHxpoHn3aunno 3Byky)
BkIIOueHne cINxPOHn3aunn IOncBeTKn co 3ByKOM: [ON], [OFF].
(HeNoCTyInHO, KOrJa nCTOuHnK He Bbl6paH n OTo6paXaIOTcra Yacbl.)
AUTO SCR (aBtOMaTnuecka npokpyTKa)
AByomatnuecka npokpyTKa nnHHbIX JIeMeHToB: [ON], [OFF].
(Heioctynho,ecn BbipaH nCTouHK AUXnn TIOhep.)
MepbI npeOcTOPOXHOCTH
He octabJnTe nepedHIOI naHeJIb nnI nepeHOChIe ayDIOyCTpoiCTBa Ha np6OpHoI naHeJI.
- Ecni yctpoiCTBO BkIuyeHo, aBTOMaTnueCKN BblBnraeTCaHTeHHa C 3JIeKTPnueCKM nPnBODOM.
-He npolnBaIte XnKoCTn Ha yCTpoIcTBO.
KoHdEHaCuaBbIaRn
He npolnBaTe JxndKoCTn Ha DnCKn. Pnp KOHdeHcauN BlaRn BHyTpN yCTpoiCTBa n3BLeKeNTe NsCK N NOJOKDnte np6n3ntelbHo Yac, Noka BlaRa He nCnapITc. B npOTNBOM clyuae BO3MOXhbl C60N pnp pa6ote yCTpoiCTBa.
Приимechи OTHOCHTeIbHoДИСКOB
He noDBepraTe DNCKN BO3DeICTBnIO npMbIX COJIHeYHbIX JUyei N IUCTOCHNKOB TeIIa, TaKnx KaK BO3dyXBOyBIC FOPaUM BO3dYxOM. He OCTaBnIe DNCKN B MaUNHe, pPnnapKObaHHoB B COJIHeuHOM MecTe.
Ecn HeCnpaBHOCTb He ydaetc yctpaHntb CneDy DaHHo INHCTpyKuIN - 6paTnTeCb B 6nnKaaMn ABTopN3OBaHHb SNY ceHTp no peMOHTy n O6CnyXnBaHHIO.
Abtopckne npaba
Windows Media KBJIETCB TOBapHbIM 3HaKOM nnn 3apernctpnpoBaHHbIM TOBapHbIM 3HaKOM Kopnpaunn Microsoft Corporation B CLUA n/nnn dpynx CTpaHax.
Данhoeи3делпьзшениопрденинblimnpabaMuHHTeJIeKTyalbHoH co6CTbeHHOCTNMicrosoftCorporation.ИспльЗВанеипрацпостразенп побов ТхнOLORn,Кромкв ДданHom npOdykTe,6e3лцeнЗКорпорачи Microsoft nAn ABTOpI3OBaHHoro npedctabITelbCTBa KOPnapaun Microsoft 3anpeuho.
Apple, iPhone, iPod, iPod nano u iPod touch
YBIAHOCTC TOBAPHBIM 3HAKAMu Apple Inc.,
3apernctpnpoBAHHbIM B CUSA u pyrnx ctpaHax.
Android yBnIeTcTOBapHbIM 3HaKOM KOpnpaun Google LLC.
libFLAC
Abtopckoe npabo (C) 2000-2009 rr. Jxooi Koalcoh Abtopckoe npabo (C) 2011-2013 rr. Xiph.Org Foundation
PacnpoctpaHeHne n nCnoJIb3ObaHne B nCXoIbIX n DBOuHbIX φOpMax C n3MeHeHnA M N 6e3 HNX pa3peWaeTc npN BblONHeHn CneDyUOux ycNoBn:
-BpacnpoctpaHReMOMHCxoDHomKoDeIOnJXHO coxpaHntbcraYka3aHHoeBbIe yBeDomJIeHneO6 abTOpcknx npabax,daHHbICNcOKycIOBn IN cJeDyUoee 3aABLeHneO6OTKa3eOT rapaHTn.
-PacnpoctpaHReMbIeB DBOUHOn φOpMe faiJIbI DOJXHbI COxpaHHTb yKa3aHHoe BblSe yBeDOMLeHne 06 ABTopCKnX npabax, daHHbI CNcOK YCNoBm I CNeDyUoOee 3aABLeHne 06 OTka3E OT rapaHTN B DOKyMeHTaCnN n/Nn IN dpYrNX MaTePnaJax, ppeOCTaBnE mbIX C pacnpoctpaHReMbIM NaKeTOM.
-ИмяфОнда Xiph.org Foundation Иимeha yuaCTHnKOB ФОнда HeIb3Я ICNoIb3OBAТь ДпЯ NOOupeHnI NII npOdBnIXeHnI npOdyKTOB, CO3dAHHbIX Ha OCHOBE 3TOTO pOgPamMHOro obecneueHn6e3npedBapntelbHOro nncbMeHHOro pa3peWeHnI.
DAHHOE NPOPGAMMHOE OBCNEYEHNE
PPEOCTABJARETC DEPKATEJIAMN ABTOPCKNX
PNAB N UYACTHnikAM "KAK ECTb". PPN 3TOM HE
PPEOCTABJARETC HNKAKNE FAPAHNTN, RHBbie
NJIN NOJPA3YMBAEMbIE, B TOM YNCJIe
NOJPA3YMBAEMbIE FAPAHNTN KOMMEPUECKO
PNIROHOCTN IN PNIROHOCTN DJIa
OPPEJEHHOH UCEJI. HN PPIN KAKIX
OBCTOReTbCTBAX FOHN. INJN UYACTHNIK
FOHDA HE BYUYT HECTN OTBETCTBEHHOCb 3A
JIIOBbI INPMAbIE, KOCBEHHbIE, CJUYAHbIE,
CNEUJAbHbIE, INPYCUYXDEHHbIE B NOPJIKKE
HAKA3AHN INIIN IONCEYIOUIIE Y5BITKN (B
TOM YNCJI E PNI0BpETHE TOBAPOB INJN YCLIY
DJIAR 3AMEHbI, NOTEPRA INPIGIOHOCTN, DAHHbIX
NJIN INPISBJIN, INPEPBIBAHNE DEYTEJBHOCTN),
BO3NHKWHNE IN JIOBOIN PNUHNE, IN 3A JIOBbIE
O6R3ATEJIbCTBA, KAK KOHTPAKTbIE, CTPOIe
NJIN DEJNKATHBIE (BKJIIOUAY XAIATHOCTb IN T.
D.), KOTOPBIE BO3HNKJIIN PIP JIOBOM
NCIOJIb3OBAHIN 3TOTO NPOPGAMMHOTO
OBCNEYEHNA, DAXE ECIN bblNO COOBUHEO O
BO3MOXHOCTN IOIOBHOrO UIePBA.
Понск и устараенье
пес四项
<|im_start|>assistant нecрабrost
<|im_start|>assistant Нем
<|im_start|>assistant Нем
<|im_start|>assistant Нем
<|im_start|>assistant Нем
<|im_start|>assistant Нем
<|im_start|>assistant Нем
<|im_start|>assistant Нем
<|im_start|>assistant Нем
<|im_start|>assistant Нем
<|im_start|>assistant Нем
<|im_start|>assistant Нем
<|im_start|>assistant Нем
<|im_start|>assistant Нем
<|im_start|>assistant Нем
<|im_start|>assistant Нем
<|im_start|>assistant Нем
<|im_start|>assistant Нем
<|im_start|>assistant
IpiNbOdImbHnXe npoBepOHybI
IpeueHb NOMOxET yCTpaHNTb
60JIbUHNCTBO IpO6JIeM, KOTOpbIE MOyT
BO3HKnHYb Ipn 3KcPnLyatauN uCTpoiCTBa.
Ipeed O3HaKOMJIeHMe C
HnXeepnPBedeEHNO TablneE no6paTntEc b K
pa3Je lam no noKJIoueHIO n
3KcPnLyatauN uCTpoiCTBa.
Dna noLyehn DaONJHnTeMbHix
CBeHEN o npimHeHn ppeOxpaHTeJIa,
a TaKxe n3BLeueHn uCTpoiCTBa n3
npnbOPHO naHeJI cm. "YctahOBka/
noDKnUoyHne" (cTp.26).
EcIn HeNoJaKy He ydaLoCb yCTpaHNTb,
nocTeTe Be6-caIT noJdePxxk, yKa3aHHbI
Ha 3aAdHe CTopoHE 6bLOxKn.
067aHΦopMaun
3BYKOTCYTCTBYETNINOChbTNXm.
→ PerynTop pacnpedeHnna CnHaJa [FADER] He yCTaHOBJeH dIЯ CnCTeMbI c 2 rpoMkoROBOpTeJMaN.
OueHb Hn3Kn ypOBeHb rPOMKOCTn DaHHoro yCTpoiCTBa n/INn NOdkJIIOUeHHoro yCTpoiCTBa. -YBeJIuCyTe rPOMKOCTb DaHHoro yCTpoiCTBa n NOdkJIIOUeHHoro yCTpoiCTBa.
He cIbIweH 3ByKOBoCnHaJI.
PoiKJIIOUeH DOnOJIHNHTeJIbHbI yCUNITeJIb MOUHOCTn, a BCTPOEHHbI He INCNOJIb3yETcR.
I3 namrtn ydaJIeHbI
3anporpaMMnpoBaHHbIe paNocTaHcHm N
yCTaHOBka BpeMeHN.
Ipeperopel npedoxpAHntelb.
CbliSeH wym npn nepeKJIoueHm
noLOXeHn KIOUa 3aXnraHn.
→Пювда He npaBnIbHNo NOdcoeINHeHbI K pa3bemy 3JIeKTPoPNTaHnB BCNOMORAteIbHOrO O6OpyIDOBaHnABTOMO6nIy.
Bo Bpemra Bocnpon3BedeHn nn npema NaHHaETcJeMoHCTpaZna.
EcIn npn BkIIOueHHOM DeMOHCTpaUHOHHoMpeKIme [DEMO-ON] B TeueHne 5 MNHyT He BbINOJIHЯOTcH NkaKHe ONEpaUH, HauHHaETcR DeMOHCTpaUH. -YctaHOBHT3NaueHne [DEMO-OFF] (cTp.14).
Ipona/He oTo6paXaetcHnDnKaunB OKoUke nucnne.
KOHTaKTbI 3aarp3HeHbI (CTp.19).
Ducnnei/npcbetka Muraet.
→ HeioctaToHna NoaHa NHTaHn. -Y6eIInTeCb, YTO Ha yCTpoiCTBO nOdaTcA DoCTaTOUHO NHTaHn OT aBTOMo6bHbHO aKKyMylrTopa. (Tpe6oBaHne K nCTouHnky NHTaHn: 12 B noCToHHoro Toka.)
He pa6oTaIOT KHONKn ynpaBLeHn. Nsck He n3BNeKaETc.
HenpaBnJIbHoe coeDInHeHne. -HaXMMTe uYdePKNBaIte KhoNkN DSPL nEQ 6oJee 2 cekyH, yTo6bl nepe3aRpy3ntb yCTpOiCTBO. CoepKIMoe naMrtn 6yJeT yJaIeHo.
ABTOMaTnuecka yCTaHOBka yacob 6bila HeTOUHOI.
Dopokhbie coo6ueHn He nepeaotcra.
→ BклнчитTe TA (cTp. 10).
→ CtaHnna He TpaHcInpyeT DopoXhbIX coo6uHen, XOTa N OTHocNTcK TtNy TP. -HacptpoItecb Ha dpyrTu cTaHcuio.
PnBkIIOueHnn FyHKcH N PTY oTo6paXkaeTcN HdNkaun [---].
Tekyuaa CTAHnHe YBJIeTcra CTAHnei RDS nn KaueCTBO npnema paNocTaHnYBJIeTcPiOxM.
Ha3BaHne nporpamMHOyCnyr MnraeT.
→ДЯ ВьбраHHОВ B daHHbIMOMeHT CTaHcIN He NcNoJIb3YeTcra aIbTePHaTnBHaЯ YacToTa.
- Haxmnte KhoNky /I (SEEK -/+), noka miraet Ha3BaHne nporpaMMHO cnYx6bl. NOBuNTc uHdNkaCnra [PI SEEK], uyctpoiCTBO NaHcT nonck dpyroJyactOTbI c TaKIMn Je daHHbIMn PI (nporpaMMHa nJeHTnФkauna).
Bocnpon3BeJeHne nckOB CD
KomnakT-undK He BOCnpOn3BODNTc.
→ДиCK3aRpa3HeHnIIN NOBpeKdEh.
→ДиСКИ CD-R/CD-RW He npeДнaЗнayeны ДЯ BOCnpoU3BedeHnA 3Byka (cTp.18).
HeBo3MOxHOBocpOu3BeCTnФaJIbI MP3/WMA.
ДИСК He COBMEcTUM C φOpMaTOM I BepCnei MP3/WMA. YTo6bI NOJyUHTb NOДрОБнtie CBeDEHnI O BOCIpON3BOIDMbIX DnCKaX N φOpMaTAX, NocETInTe Be6-caIT, aJpeC KOTOPOrO yKa3aH Na 3aDHeN O6IoXKe.
He ydaetc Bocnpoun3Bectn aydnofaJ.
DoonHnTeIbHbIe CBeDeHnO O nOJIepXnBaEMbIX FOpmTaX CM. B pa3JeNe "TexHnueckne xapaKTepeNtKN" (cTp.20). EcIn BocnpOn3BecTn ayDnOphiJn NO- npexHemy He ydaetcR, CM. INHCTpyKcNn NO 3KcIIyatauN, NOCTaBnAeMbIe C ycToiCBOM USB, mIIN o6paNTeCb K npOn3BOIDTeJIIO 3TOrO yctpoiCTBa USB.
He ydaetcBbINOJHHTb onepaunn nponycka aIb60Ma, nponycka 3JeMeHTOB (peKIM nepeXoJa) n noncka komno3nucn no Ha3BaHnIO (QuickBrowZer).
→ДляnapaMeTpapu [USB MODE]yctaHOBnTe 3HaueHne MSC/MTP.
B pexnme Android 3Byk c annapaTa He BocnpOn3BODNTc.
→ПоверпсocToHnne npuToxKeHnЯДня BOCpOn3BeDeHnЯ aydno Ha cMapTfoHe C OC Android.
Co06eHn
BoBpeMpa6OtbIyCTpOiCTBaMOryt OTo6paXaTbCnN MInMnTaTb CJIeDyIOUne COo6uHn.
INVALID: BbIbpaHnA onepaCnMy MoKeT He NOIDepXnBaTbcra.
READ
Dojntecb 3aBepWeHnCHTbHaHn. BocnpOn3BeDeHne HaHHeTcra ABToMaTuYeCK. 3To MoKet 3aHrTb HeKOTOpoe BpeM B 3aBucmOCTn OT CTpykTypbl faiJa.
(3нak почеркваня): He ydaetcnyOTO6pa3NTb CnMBOJ.
Bocnpo3BeDeHne nckOB CD:
CD ERROR
→ПоунстиЕ ИИnpaBnIbHO BCTaBbTeДИСК,ЛИбОуБeДNTeСь,ЧТОДИСК HeЯВЯETcIpyCTbIM IINIOVBpeKDeHHbIM.
CD NO DISC
→ BCTaBbTeДИСК CBOCnPoN3BOДIMbIMn Файlamи (Стр. 20).
CD NO MUSIC
BcTaBbTe dNcK c BOCnpon3BOIDMbIMn aJnamn (ctp. 20).
CD PUSH EJT: He ydaIocb npaBnIbHO n3BJIeY bNCK.
→ HaKMnTe KHOHOnKy (n3BVeYb).
L L L Nnn TnHytb Haayano NNN KOHeu DnCKa.
Bocnpo3BepeHne cyctpoCTBa USB:
HUB NO SUPRT: He noДeрЖиВaIOTcKoHuceHTpaTOpbl USB.
IPD STOP: Bocnpoun3BedeHne c yCTpoiCTBa iPod 3aKoHcHo.
→Ha iPod nnn iPhone BkniuHTe yHKnIO BocnpOn3BeDeHn.
NOT SUPPORT ANDROID MODE
→ Kaannapaty nodkloueNo yctpoicTBO USB, He noDepkNBAIOUee npotoKoI AOA (Android Open Accessory) 2.0, kOrda nI npametpa [USB MODE] 3aDaHO 3NaueHne [ANDROID].
-ДяnapaMeTpa [USB MODE] yctaHOBnTe 3HaueHne [MSC/MTP] (cTp.15).
USB ERROR
→ CHOBA NOДКЛЮЧИТЕ yCTpoIcTBO USB.
USB NO DEV
Y6eIntecb, yTo yCTpoiCtBO USB nnn Ka6eIb USB HaJeXHo NODKJIIOUeHbl.
USB NO MUSIC
→ПоДсоeДиНHTe yCTpoIcTBo USB c BOCpOu3BOdIMMbIMn faJ lamn (ctp. 20).
USB NO SUPRT
→Дяпolyчehня порбньх с蜱едиоCOBmecTUMOCTN yctpoiCTBa USBNocetNTe Be6-caNT NOdepKKN,уKa3aHHbI Ha 3aJHeN CTOpOHe O6IoXKn.
USB OVERLOAD: yctpoiCTBO USB nepenolHeNo.
→ OTKIIOUHTe yCTpOoiCTBO USB, a 3aTeM HaxMMTe KHOIIky SRC IJIy Bbl6opa dpyrTO nCTOuHnka.
YcTpoiCTBO USB noBpeJxdeHo, nIIN NOIDcoEiHHeHO HeIOIDepKnBaemoe YcTpoiCTBO.
ФункционпованneRDS:
NO AF:OTCYTCTBYOT aJIbTePHaTINBHBie yaCTOTbl.
→HaxmTe KhoNkyI/(SEEK-/+), noka mnaet Ha3BaHne nporpaMMHO cnJx6bl.YcTpoiCTBO NaHHae TnOsc kdpuroyacToTBcTeMn Je daHHbIMPi (nporpaMMHnIeHTnΦkaCnna) (noBnEeTc HndnKaCnra [PI SEEK]).
NO PI:OTCYTCTBYeT nporpaMMHa nDeHTnФИKaUЯ.Y Bbl6paHHoI cTaHcIn OTCYTCTBYIOT DaHHbIe PI (nporpaMMHa nDeHTnФИKaUЯ).
→ BbI6epnte npyuryo ctaHnIO.
NO TP: Het coocheHn O TekyeJ cnTyauuHa doporax.
YcTpoiCTBO npoIoJXHT nonCK cTaHcN, nepedaIOuNX nporpaMMy TP.
MepblnpedoctopoXhOCTn
TuaTeJIbHO BbIbnpaIte MeTo dJa yCTaHOBKn aPnapaTa, YTObI OH He MeJauynpaBHeNIO aBTOMO6nJeM.
- He yctaHaBnBaIe Taannapat TaM, rde OH 6ydet nOdBepXeH BO3DeiCTBIO nbIN, rpa3N, Ype3MePHO Bn6paCUN INN BbICOKNX TempeATyp, HApPIMep B MeCTax, Kya IONaDAIoT npAble COJIHeuHbIe JLyU, INN B6JIn3N BeHTINLAIOHHbIX peWetOK o6OrpeBaTeJeN.
B ueJx o6ecneueHnHaedXHoN 6e3OpaCHO uCTaHOBKn nCNoJIb3yIte IINb BXoJaUne B KOMPJIeKT MOHTaXHbIe DeTaII.
PnmeaHne OTHocnteIbHo npoBoda nTaHna (KeIb)
Pn noKIOueHn DaHHoro yCTpOcTbBA BMeCTe C DpyrMM nTepeOKOMNOHeHTaM HOMHaJIbHOE 3NaueHne CNbl TOKa B KOHType NtTaHn ABTOMOUIA DoJXHO pReBbIaTb CymMapHOE 3NaueHne CNbl TOKa, YKa3aHHoe Ha npdeOxpaHNTeJx BCex KOMNoHETOB.
Peynilpobka yrna yctaHOBKn
OtperynipyTe yroJ yctaHOBKn TaK, UTo6bI OH coCTaBJI MeHee 30^
Ipeuehb deTaJei dJa yCTaHOBKn
①
②
③
(4)

⑤
(6)


B 3TOT cncOK BXOINT He BCE coJepeKmOe KOMNJIeKTA NOCTaBKN.
-KpoHwTeH ① 3aUHTHaMaHKeTa ③ npKpeJIeHbIKyCTpOuCTByIO NOCTaBKn. IpeJyCTaHOBkoYCTPOINCTBa BOCNoJIb3yIITecb KJIIOUaMn DnIaDemOHTaKa ② ,TO6blOTCOeHNHTb KPOHwTeH ① OT yCTpOuCTBa.DONOLHInTeJBhIe CBeJeHn CM.Bpa3dJe“OTcoeINHeHne3aUHTHO MaHXKeTb IN KPOHwTeHa"(cTp.30).
-CoxpaHnte KJIoun IJy DeMOHTaJa ② JIy INCPOJb3OBAHnB 6yDyuIeM, NOCKoJIbky OHI TaKKe NOTpe6yIOTc npN DeMOHTaKe aannapata n3 aBTOMO6nJI.
Поклоченье
1 He BXOДNT B KOMПЛЕКТ NOCTaВК.
2 Полhoe copotnbIeHne rpoMkorOBopuTeJeN: 4Ω-8Ω×4
3 Ka6eNb c pa3bemAmu RCA (He BXoIIT B KOMNJIeK T NOCTaBkU).
*4B 3aBncmocTn OT Tuna aBTOMO6nla, BO3MOxHO, NOTpe6yETcra NCNoJIb3OBaTb aAnTeP dIy npoBOJHO rNtTa INCTaHIOHO YnpaBHeHna (He BXoNT B KOMnKeT NOCTaBK). IOnONHHTeJIbHbIe CBeDeHnO bNCNoJIb3OBaHn INPOBOJHO NylbTa DInCTaHcIOHO Hr OYnpaBHeHnC M.B pa3dene "NcNoJIb3OBaHne npoBOJHO NylbTa INCTaHcIOHO Hr YnpaBHeHn" (CTp.29).
5 B 3aBncuMoCTn OT Tnna ABTomo6nla
NcNoJIb3yIte aAnTep (He BXoJIT B KOMnJIeKT
NocTaBKn), ecJI na pa3bem paIIOaHTehHbI He
NODxOJNT.
YcTaHOBka CoeHHeHn
EcnncnoB3yETcBHeuHna aHTeHHa C 3JeKtpoPnBODom6e3peIeHoro6loka, NODcoeINHeHne 3TOrO yCTpoiCTBa C NOMObIO npNlaRaEMO rPOBOda NITAHN ⑥ MoXeT npNBecTN K NOBpeXdEHNO aHTeHHbl.
Kpa3bemyrpoMkoROBOpHTeIaBTOMO6nJIa
EcnKpaChbI N XeJIbI npoBoda nepeCTaBHeHbI MeCTaMn
XeIbI XeIbI
KOTOpblc COOTBeTCTByIOT
CUNTe TOKa, Yka3aHHoH Ha
OpunHaJIbHOM

IpeoxpauHntel (10 A)
PpeoXpaHnteJe. Ecnn neperopej
PpeOxpanTeIb, npOBepbTe noKIOUeHne
nTahnI 3aMeHnte npedoxpaHnteJIb.
Ecnn nocne 3aMeHbI npedoxpaHnteJb cHOBa
peperopeJ,3TO MOKeT O3HaHaTb
HEnCnpaBHOCTb yCTpoNcTBA. B 3tOM cIyuae
6paTecbK 6bnXaIWeMy dInepy Sony.
BbIrapckn
СпостяшоTo, Sony Corporation Декларupa,
ЧЕ TOВа оборудвае в СьотBetCTBис
ДиpeктИва 2014/53/EU.
LJIIOCTHnT TeKCT Ha EC JeKnapaunTa 3a CbOTBETCTBne MoKe Da ce HamepHa CNeHNr INHTepHeT aDpeC:
http://www.compliance.sony.de/
Hrvatski
Sony Corporation ovime izjavljube da je ova oprema u skladu s Direktivom 2014/53/EU. Cjeloviti tekst EU izjave o sukladnosti dostupan je na sljedecoj internetskoj adresi: http://www.compliance.sony.de/
Cesky
Hereby, Sony Corporation declares that this equipment is in compliance with Directive 2014/53/EU. The full text of the EU declaration of conformity is available at the following internet address: http://www.compliance.sony.de/
Eesti keel
If you have any questions or for the latest support information on this product, please visit the web site below:
Site d'assistance
Register your product online now at:
Support by Sony app - Find information and get notification about your product:
App. de smartphone
https://sony.net/SBS

Made for


- FM/MW/LW CD Car Audio
- Made in Thailand
- CE
- Notice for customers: the following information is only applicable to equipment sold in countries applying EU Directives
- Disposal of waste batteries and electrical and electronic equipment (applicable in the European Union and other countries with
- separate collection systems)
- CAUTION
- Warning if your car's ignition has no ACC position
- Disclaimer regarding services offered by third parties
- Table of Contents
- Getting Started
- Listening to the Radio
- Playback
- Settings
- Additional Information
- Connection/Installation
- Guide to Parts and Controls
- Main unit
- Detaching the Front Panel
- Caution alarm
- Attaching the front panel
- Resetting the Unit
- Note
- Setting the area/region
- Setting the Clock
- To display the clock
- To set the clock automatically
- Checking the Battery Voltage
- Connecting a USB Device
- Connecting Other Portable Audio Device
- To match the volume level of the connected device to other sources
- Storing automatically (BTM)
- Tuning
- Storing manually
- Receiving the stored stations
- Using Radio Data System (RDS)
- Setting alternative frequencies (AF) and traffic announcement (TA)
- To store RDS stations with the AF and TA setting
- To receive emergency announcements
- To adjust the volume level during a traffic announcement
- To stay with one regional program (REGIONAL)
- Local Link function (UK only)
- Selecting program types (PTY)
- Type of programs
- Playing a Disc
- Playing a USB Device
- Notes
- Searching and Playing Tracks
- Repeat play and shuffle play
- Searching a track by name (QuickBrowZerTM)
- Searching by skipping items (Jump mode)
- Canceling the DEMO Mode
- Basic Setting Operation
- General Setup (GENERAL)
- Sound Setup (SOUND)
- Display Setup (DISPLAY)
- Updating the Firmware
- Precautions
- Moisture condensation
- Notes on discs
- Notes on CD-R/CD-RW discs
- Playback order of audio files
- About iPod
- Maintenance
- Cleaning the connectors
- Specifications
- Tuner section
- FM
- MW/LW
- CD Player section
- USB Player section
- Power amplifier section
- General
- Copyrights
- libFLAC
- Troubleshooting
- The operation buttons do not function. The disc will not eject.
- The clock set automatically is not accurate.
- Radio reception
- The radio reception is poor.
- Static noise occurs.
- MHz to 74 MHz in FM3 cannot be tuned in.
- RDS
- RDS services cannot be received (when [AREA] is set to [RUSSIA]).
- The SEEK starts after a few seconds of listening.
- No traffic announcements.
- PTY displays [- - - -]
- Program service name flashes.
- CD playback
- The disc does not play.
- MP3/WMA files cannot be played.
- MP3/WMA files take longer to play than others.
- USB device playback
- A USB device takes longer to play.
- The audio file cannot be played.
- Operations for skipping an album, skipping items (Jump mode), and searching a track by name (QuickBrowZer) cannot be performed.
- The sound cannot be output during playback in Android mode.
- Messages
- READ
- For CD playback:
- CD ERROR
- CD NO DISC
- CD NO MUSIC
- For USB device playback:
- NOT SUPPORT ANDROID MODE
- USB ERROR
- USB NO DEV
- USB NO MUSIC
- USB NO SUPRT
- For RDS operation:
- For steering wheel remote control operation:
- ERROR
- TIMEOUT
- For firmware update operation:
- Cautions
- Note on the power supply lead (yellow)
- Mounting angle adjustment
- Parts List for Installation
- Connection
- Making connections
- To the car's speaker connector
- To the car's power connector
- Subwoofer Easy Connection
- Memory hold connection
- Speaker connection
- Power connection diagram
- Common connection
- When the positions of the red and yellow leads are inverted
- When the car without ACC position
- Using the wired remote control
- Installation
- Removing the protection collar and the bracket
- Mounting the unit in the dashboard
- Detaching and attaching the front panel
- Fuse replacement
- FW VERSION (Firmwareversion)
- Raccordement/Installation
- DEMO (demonstration)
- CLOCK (Horloge) (page 7)
- Attention
- HΦopMaunIyKpaHne
- IpeynpeKdHne IJcIyuaEB, KOrdaB3aMKe 3axnraHnHerT noLoXKeHHAACC
- OTka3 OT OTBETCTBeHHoCTN B OTHOWeHmYcIyr, npeIOCTaBJIeMbIX CTOpOHHMn NOCTaBUnkamN
- Copepkanhe
- Haualo pa60tbl
- Послшване радио
- Bocnpon3BeDeHne
- NapaMeTpbl
- PUSH ENTER
- MENU
- HomepHbIe KhoNkn (1-6)
- ALBUM ▼/▲
- (noBTop)
- (cnyaHna nocJeDoBaTeIbHoCTb)
- II (Bocnpoun3BepeHne/nay3a)
- EXTRA BASS
- BxoHoe rHe3do AUX
- DSPL(dncnnei)
- SCRL (npokpyrka)
- Hauaio pa60tbi
- Сятыпешени панели
- PpeDynpednteHbI 3ByKOBOc nHaJ
- YcTaHOBKa nepeDnei naHeJI
- Ipepe3arpy3ka yctpoiCTBa
- PpIMeuaHne
- YctaHOBKa CTpaHbI/perNoHa
- YctaHOBka yacob
- ПОИСК KOMПОЗИЦИ NO Ha3BaHиIO (Quick-BrowZer™)
- CLOCK (uacbl) (CTp. 8)
- CAUT ALM (npedynpeiTeIbHbI 3ByKOBoCnHaI)
- BEEP(3ByKOBOcHnHaJ)
- AUTO OFF (aBtOMaTnueeCKoe OTKJIIOUeHHe)
- STEERING (pylb)
- HacrtpoiKa dncnpej (DISPLAY)
- MepbI npeOcTOPOXHOCTH
- KoHdEHaCuaBbIaRn
- Приимechи OTHOCHTeIbHoДИСКOB
- Abtopckne npaba
- Понск и устараенье
- 067aHΦopMaun
- 3BYKOTCYTCTBYETNINOChbTNXm.
- He cIbIweH 3ByKOBoCnHaJI.
- I3 namrtn ydaJIeHbI
- Bo Bpemra Bocnpon3BedeHn nn npema NaHHaETcJeMoHCTpaZna.
- Ipona/He oTo6paXaetcHnDnKaunB OKoUke nucnne.
- Ducnnei/npcbetka Muraet.
- He pa6oTaIOT KHONKn ynpaBLeHn. Nsck He n3BNeKaETc.
- ABTOMaTnuecka yCTaHOBka yacob 6bila HeTOUHOI.
- Dopokhbie coo6ueHn He nepeaotcra.
- PnBkIIOueHnn FyHKcH N PTY oTo6paXkaeTcN HdNkaun [---].
- Ha3BaHne nporpamMHOyCnyr MnraeT.
- Bocnpon3BeJeHne nckOB CD
- KomnakT-undK He BOCnpOn3BODNTc.
- HeBo3MOxHOBocpOu3BeCTnФaJIbI MP3/WMA.
- He ydaetc Bocnpoun3Bectn aydnofaJ.
- He ydaetcBbINOJHHTb onepaunn nponycka aIb60Ma, nponycka 3JeMeHTOB (peKIM nepeXoJa) n noncka komno3nucn no Ha3BaHnIO (QuickBrowZer).
- B pexnme Android 3Byk c annapaTa He BocnpOn3BODNTc.
- Co06eHn
- Bocnpo3BeDeHne nckOB CD:
- Bocnpo3BepeHne cyctpoCTBa USB:
- ФункционпованneRDS:
- MepblnpedoctopoXhOCTn
- PnmeaHne OTHocnteIbHo npoBoda nTaHna (KeIb)
- Peynilpobka yrna yctaHOBKn
- Ipeuehb deTaJei dJa yCTaHOBKn
- Поклоченье
- YcTaHOBka CoeHHeHn
- Kpa3bemyrpoMkoROBOpHTeIaBTOMO6nJIa
- EcnKpaChbI N XeJIbI npoBoda nepeCTaBHeHbI MeCTaMn
- BbIrapckn
- Hrvatski
- Cesky
- Eesti keel
- Site d'assistance
- App. de smartphone
- https://sony.net/SBS
Brand : SONY
Model : CDXG3300UV
Category : Car stereo