MEX100NV - Car stereo SONY - Free user manual and instructions
Find the device manual for free MEX100NV SONY in PDF.

User questions about MEX100NV SONY
0 question about this device. Answer the ones you know or ask your own.
Ask a new question about this device
Download the instructions for your Car stereo in PDF format for free! Find your manual MEX100NV - SONY and take your electronic device back in hand. On this page are published all the documents necessary for the use of your device. MEX100NV by SONY.
USER MANUAL MEX100NV SONY
©2002 Sony Corporation


natural_image
Pure geometric diagram with crosshair and circle symbols, no text or labels presentEbene Stations RDS 68
Ebene Stations Fix 68
PTY (Program Type) 69
Technische Daten 70
MERKBLATT 71


natural_image
Pure geometric diagram with crosshair and circular shapes, no text or symbols present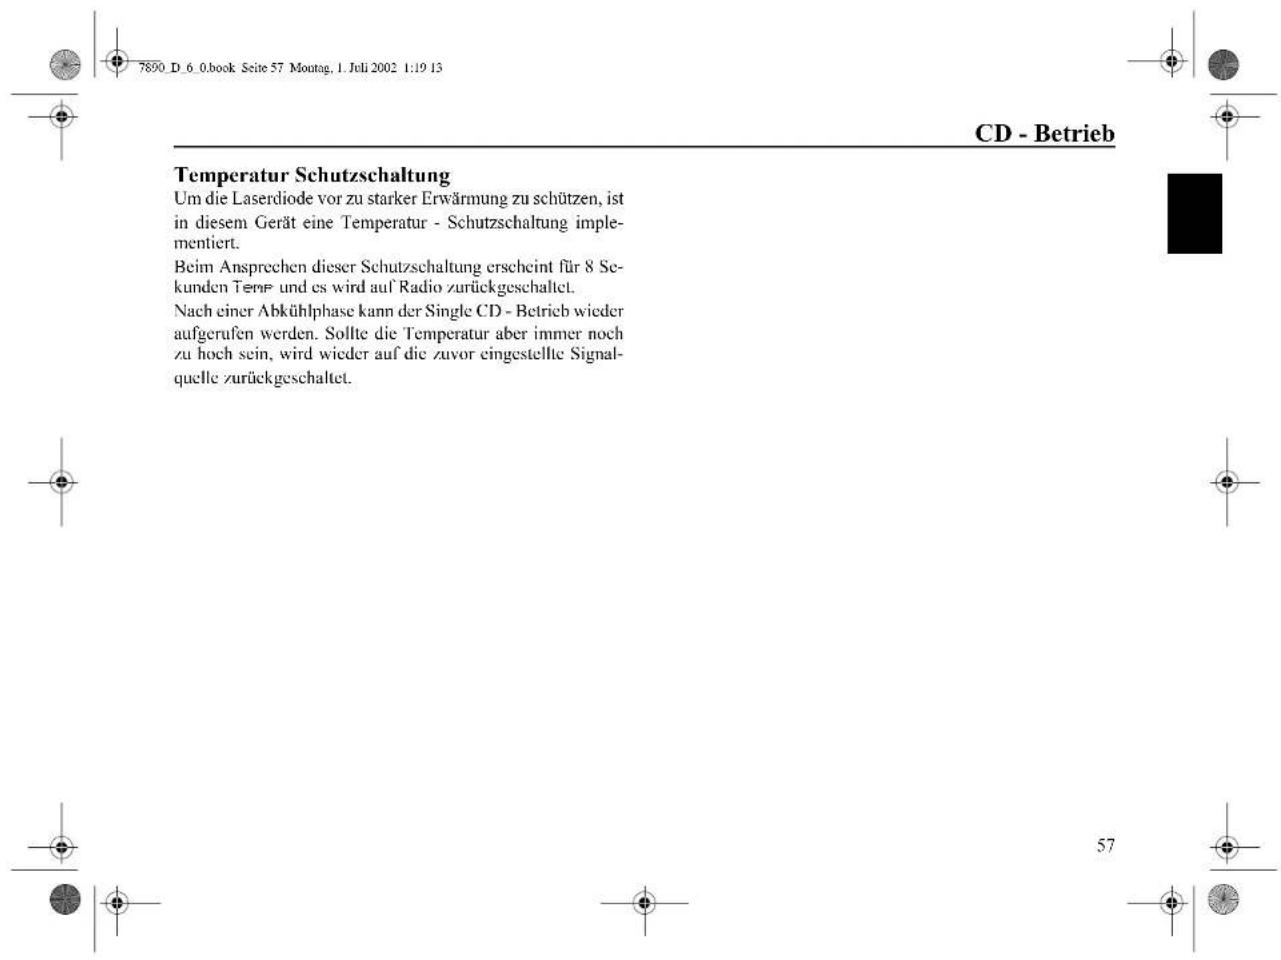
COUNTRY Countrymusic
NATION M Volksmusik
OLDIES Oldies
FOLK Folklore Musik
Important! Safety instructions

Use of the navigation unit is only permitted if the traffic conditions are suitable and you are absolutely sure that no risk, obstruction or inconvenience will be incurred to you, your passengers or other road users.
The requirements of the Road Traffic Regulations apply at all times. The destination must only be entered when the vehicle is stationary.
The navigation system serves solely as an aid to navigation. It neither releases the driver from his duty to drive carefully in road traffic, nor does it take the place of his own ability to make judgement. It is possible that inaccurate or incorrect instructions are given due to changing traffic conditions or varying data. The actual road signs and traffic regulations must therefore always be observed. In particular, the navigation system cannot be used as an aid to orientation when visibility is poor.
The unit must only be used for its intended purpose. The volume of the car radio/navigation system must be adjusted so that external noise is still audible.
Switch off the unit immediately if a fault occurs (e.g. emission of smoke or odours).
In the interest of safety, the unit must only be opened by a specialist. Please refer to your dealer for repair.

Contents
Contents 73
Arrangement of controls 75
Anti-theft system 76
Entering the code number 76
Removing the portable panel 77
Inserting portable panel 77
General operation 78
Switch on / off 78
Adjusting the volume 78
Activating the tone menu 78
Setting the bass 78
Setting the treble 78
Fader 79
Setting the balance 79
Linear setting 79
Setting the subwoofer or centre speaker volume 79
Switching loudness on / off 79
Navigation operation 80
What is navigation? 80
Safety instructions 80
Digitised area 80
General notes 81
Selecting navigation 82
Main navigation menu 82
Entering destination 83
Route menu 89
Storing a specified destination in the
destination memory 91
Route guidance calculation 92
Stopover 93
Traffic jam function 94
Cancelling route guidance 95
Notes on route guidance 96
Dynamic navigation with TMC 98
Information during route guidance 101
Destination memory 104
Special destinations 104
System settings 107
Radio mode 113
Switching on radio mode 113
Switching on radio menu mode 113
Selecting the FM waveband 113
Selecting the AM waveband 113
Setting options for transmitter selection 113
Dynamic autostore (FM DAS) 114
FM DAS transmitter search 114
Transmitter search MW, LW, SW 114
Scan search 115
Programme filtering for FM DAS 115
Programme type selection (PTY) 115
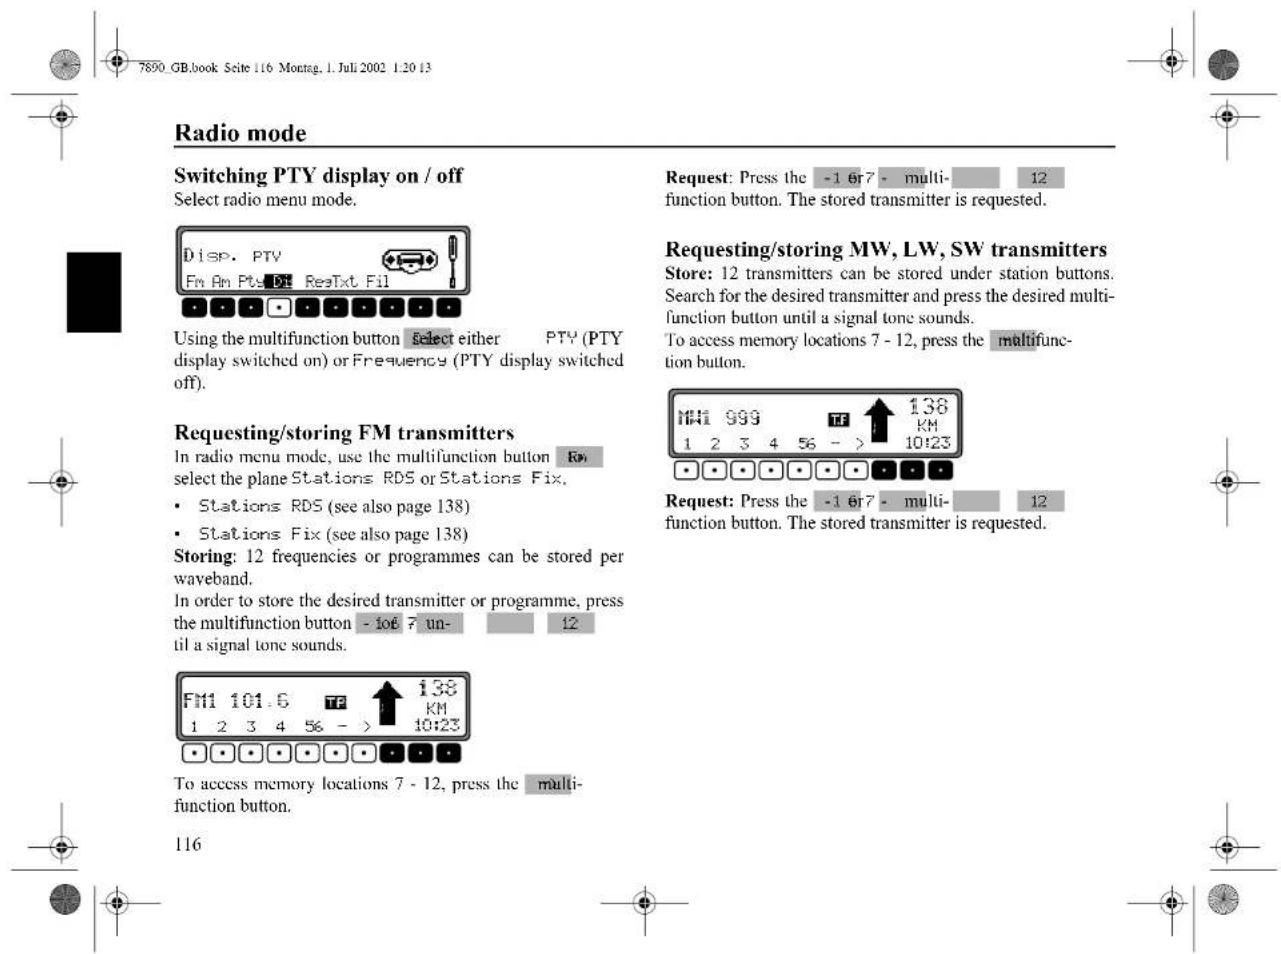
Switching PTY display on / off 116
Requesting/storing FM transmitters 116
Requesting/storing MW, LW, SW transmitters 116
MW, LW autostore 117
FM manual tuning 117
MW, LW, SW manual tuning 117
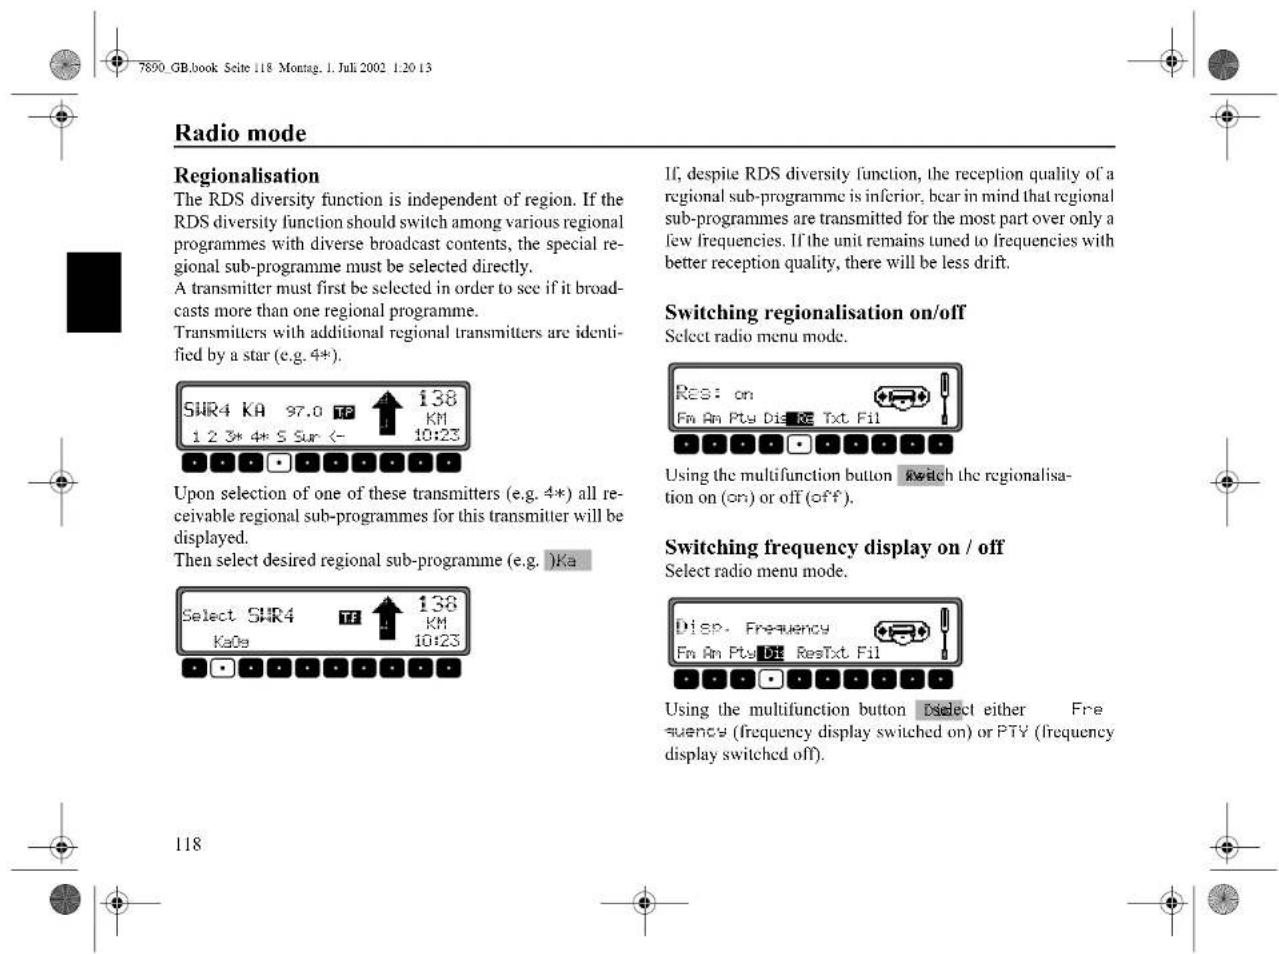
Regionalisation 118
73


Switching frequency display on / off 118
Switching radio text display on / off 119
Traffic Programme (TP) 119
Activating/quitting the TP menu 120
Switching TP on/off 120
Selecting automatic tracking 121
Selecting / deleting direct programming 121
Switching mute on/off 121
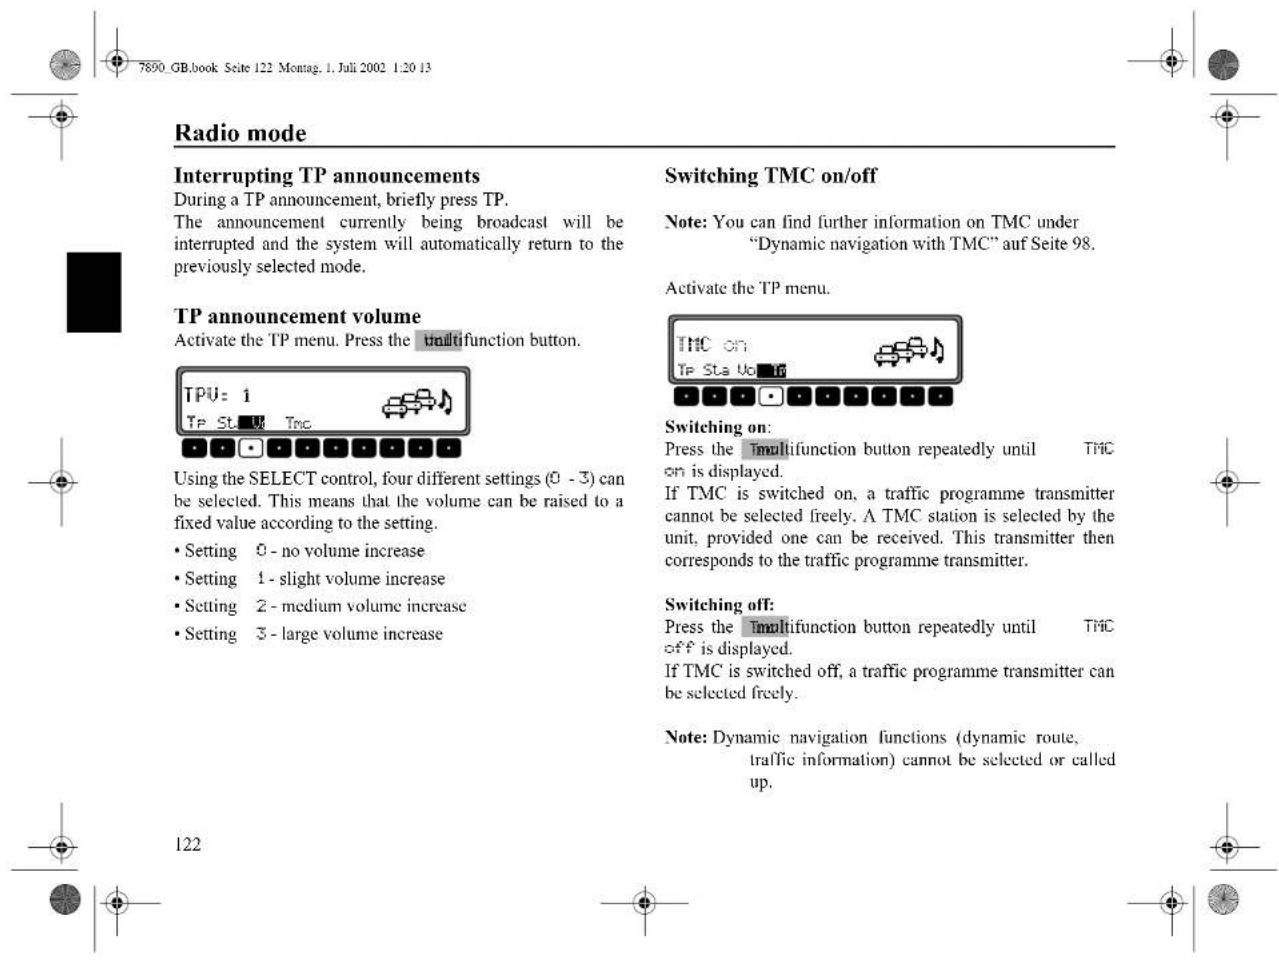
Interrupting TP announcements 122
TP announcement volume 122
Switching TMC on/off 122
Display for TMC stations 123
Telephone mute function 123
CD operation 124
Compact Disc (CD) instructions 124
Moisture condensation 124
Inserting / ejecting CDs 125
Track skip - forwards / backwards 125
Scan search 125
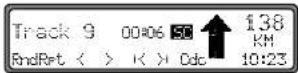
Fast forward / rewind 126
Random play 126
Repeating a track 126
Number of tracks and total playing time 126
Temperature protection circuit 127
CD changer operation
Operational readiness of CD changer 128
CD magazine - load / unload 128
Playing CDs 128
User menu 129
Requesting/quitting user menu 129
GAL (Gal) setting 129
Telephone mute characteristics (Tel) 130
Display colour setting (Col) 130
Display setting (Lcd) 130
Setting reception optimisation (M/S) 131
Setting navigation announcements (Nav) 131
AUX input (Aux) 132
Compass display (Cmp) 132
Signal tone volume (BeV) 133
Service menu 134
Requesting /quitting the service menu 134
Triggering reset 134
Connection instructions 135
Removal / installation guide 136
General instructions 138
RDS SYSTEM 138
DAS Seek Qual. plane 138
DAS Seek Name plane 138
Stations RDS plane 138
Stations Fix plane 138
PTY (Programme Type) 139
Technical data 140
NOTICE 141


text_image
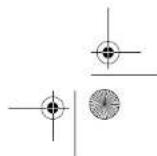
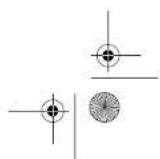
7800 GB.book Seite 75 Montag, I. Juli 2002 1:20 13 Arrangement of controls 1 VOLINNO control 2 (Poly(Flow/olf) button) 3 SOUND button 4 TP button 5 CD button 6 TUNER button 7 NAVI button 8 (RDCase)/ (ejc button) 9 SELECT control 10 Multifunction buttons 11 Display window 12 VOLINNO control 13 CLENT 14 GPSD TUNER MNT 15 6 7 8 SELECT 9 10 11 75
text_image
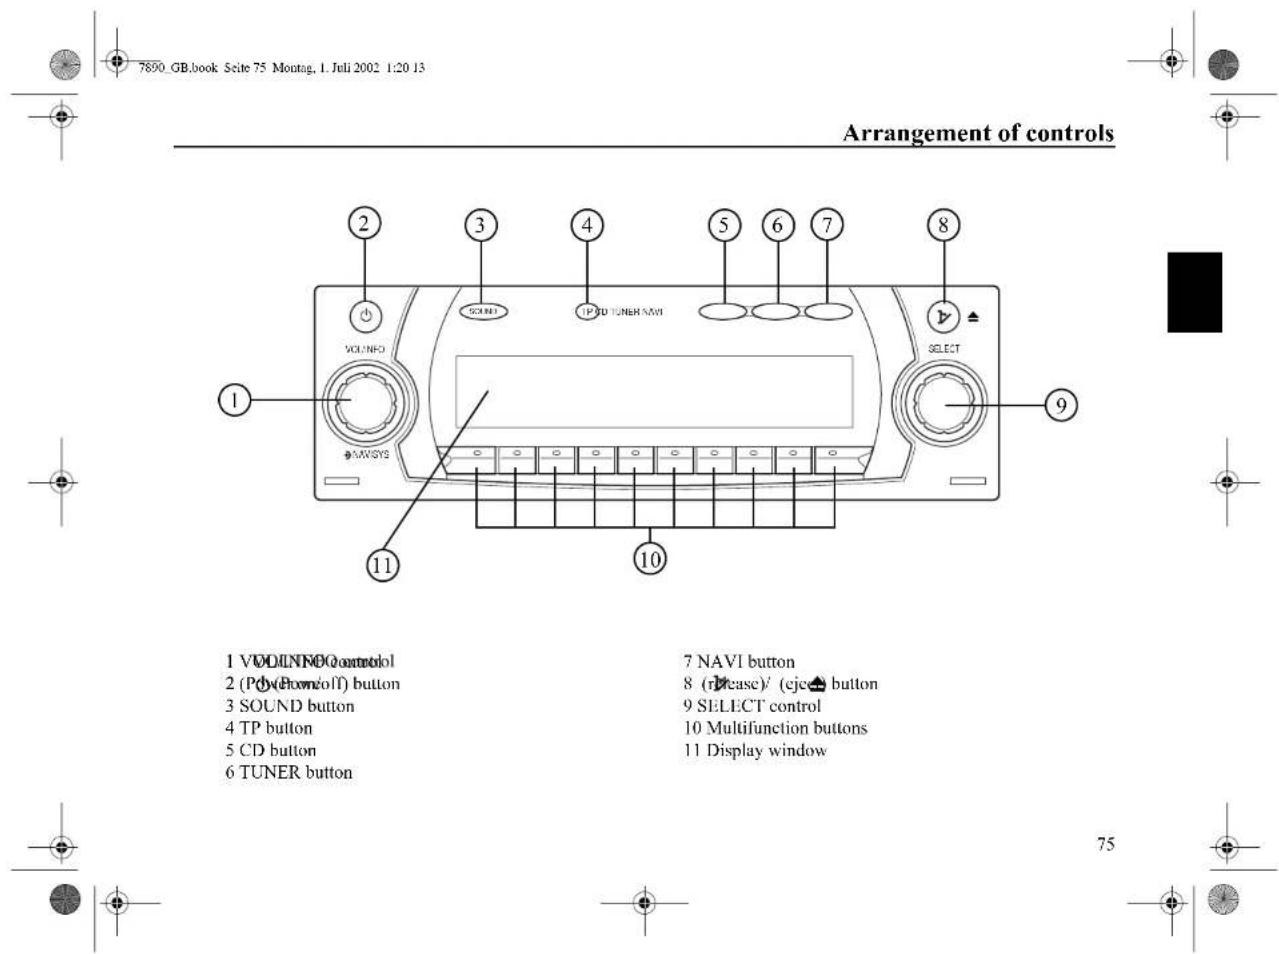
7890 GB.book Seite 76 Montag, 1. Juli 2002 1:20 13 Anti-theft system Entering the code number If the car radio is disconnected from the power supply, it is theft-protected upon reconnection. After switching on via the (Power on/off), the prompt Enter Code Number, is displayed. Enter Code Number 1 2 3 4 5 6 7 The five-digit code must then be entered using the multifunction buttons "1 -7". Example: Code number 15372 (the code number can be found on the enclosed CODE CARD). Enter code number using the multifunction buttons. The unit automatically switches when the fifth digit is entered and all other digits have been entered correctly. Note: It is essential that the CODE CARD be kept in a safe place outside the vehicle. Thus, illegal use is not possible. The sticker provided should be attached to the inside of the vehicle windscreen/ window. If an incorrect code number is entered, the prompt CODE is displayed again. After entering an incorrect code three times UNIT is displayed and the unit is disabled for approx. 60 minutes. Three further incorrect entries block the unit for another 60 minutes. Attention : The disabling period functions only with the unit switched on. 76Removing the portable panel
As an effective anti-theft device, the portable panel (A) can be removed from the unit.
Press ▶bfly (storage medium remains in the unit). The display folds forwards.
The portable component can then be pulled out.

natural_image
Line drawing of two electronic device setups with labeled terminals and a circular icon (no text or symbols)Inserting portable panel
Insert the portable panel in the lower left catch and then engage it in the lower right catch. Then fold up the portable panel and engage it in the upper catches.
Alternately, position portable panel directly over all four catches and press in firmly to engage.
For correct functioning, ensure that the portable panel is firmly engaged in all four catches.
If a new portable panel or one from another unit is utilised, the code number must be entered, as previously described, in order to activate the unit.
The volume is limited to a maximum value after the display has been folded down. After 20 seconds an audible signal indicates that the control component is folded down. The unit then switches off automatically.
Note: For safety reasons, it is not permitted to leave the portable panel open when driving.
Attention: Please insert the portable panel in the accompanying protective cover after removal.
Do not touch the metal contacts on the portable panel or on the radio.
text_image
General operation Switch on / off Press (Power on/off). Additional options for switching on / off: Via ignition. In order to switch on via the ignition, the unit must have been switched off previously via the ignition. After switching off the ignition, the unit can be prevented from switching off by pressing (Power on/off) within 3 seconds. Note: With the ignition switched off, the unit can also be switched on via (Power on/off). The unit switches off automatically after 1 hour. Adjusting the volume Turn the VOL/INFO control. The volume is increased or decreased. Activating the tone menu Press SOUND. The tone menu is activated. The following functions can be requested: Bas (Bass), Trb (Treble), Fad (Fader), Bal (Balance), Flt (Linear setting) Sub (Subwoofer) and Lcn (Loudness). FM Bass 0 BasTrb Fad Bal Flt Sub Lcn Settings for the bass, treble, lader, balance and loudness are stored separately for wavebands MW, LW, SW, FM, for traffic announcements, navigation messages, telephone operation, CD and CDC/AUX operation. Setting the bass Press SOUND and then the multifunction button .Bas FM Bass 0 BasTrb Fad Bal Flt Sub Lcn Set the desired bass level using the SELECT control. Setting the treble Press SOUND and then the multifunction button .Trb FM Treble 0 BasTrb Fad Bal Flt Sub Lcn Set the desired treble level using the SELECT control. 78
text_image
78

Press SOUND and then the multifunction button Fed
Use the SELECT control for the desired fader setting.
Setting the balance
Press SOUND and then the multifunction button Bal
Set the desired balance level using the SELECT control.
Linear setting
Briefly press SOUND.
Press the multifunction button Flt Tone flat is displayed. By pressing the multifunction button regain the tone settings for the currently selected signal source (e.g. FM) are set to an average value.
Setting the subwoofer or centre speaker volume Press SOUND and then the multifunction button .Sub
Use the SELECT control to set the desired subwoofer volume level.
Switching loudness on / off
Press SOUND and then the multifunction button .Ldn

Using the multifunction button you can select either loudness on (ON) or loudness off (OFF). Loudness is switched off in MW, LW and SW wavebands.


Navigation operation
What is navigation?
The term "navigation" (lat. navigare = to travel by sea) is generally understood to mean the location of a vehicle, the determination of the direction and distance from the desired destination and the required route. Stars, prominent landmarks, compasses and satellites etc. are used as navigation tools.
With this unit, the location is determined via the GPS receiver (GPS = Global Positioning System). The direction and distance from the destination is determined using a digital street map, a navigation computer and sensors. A speedometer and reverse signal are additionally used to calculate the route. For safety reasons, route guidance follows predominantly in spoken form supported by a direction indicator on the display.
Safety instructions
• The requirements of the Road Traffic Regulations (RTR) apply.
- Observation of traffic signs and local traffic regulations always takes priority.
- Traffic guidance is restricted to passenger vehicles. Special driving recommendations and regulations for other vehicles (e.g. commercial vehicles) are not taken into account.
- The destination must only be entered when the vehicle is stationary.
Digitised area
The navigation CD provided contains a digitised street map. Motorways, federal and regional roads, as well as district roads are detailed in this street map. Larger cities and boroughs are completely covered. The regional and unclassified roads or access roads and the town centre for smaller towns and boroughs are included.
One way streets, pedestrian zones, turn bans and other traffic regulations are taken into account as far as possible. There may be discrepancies between the data on the navigation CD and the actual local situation, due to permanent changes to road systems and their traffic regulations.


Navigation operation
General notes
- During navigation mode, radio or CD can still be heard.
The distance to the next announcement and, depending on the setting made in "Setting the time display" on page 112, the estimated time of arrival, the current time or the remaining travel time are displayed at the right of the display. - The unit can be switched to radio mode when route guidance is in operation by pressing TUNER. Press CD to switch to CD mode.
The navigation menu is automatically displayed when navigation announcements are given. - When entering the address, only those letters, digits and symbols which are relevant for the address are displayed. The entries are automatically completed.
Spaces (e.g. in Bad Abbach) must be entered using the underline symbol.
Letters, numbers and symbols can be selected via the multifunction buttons to. The individual sym-
bols can be selected by pressing the relevant multifunction buttons repeatedly.
Selection can also be made using the SELECT control, as described later in this guide.
- NAVI quits the current menu and displays the previous menu.
- The route is recalculated by the system if deviation from the route is made.
- Press the VOL/INFO control to hear the current navigation announcement.
- During the navigation announcement, adjustment can be made to the volume using the VOL/INFO control and to the tone by pressing SOUND (see page 78).
- By briefly pressing the VOL/INFO control additional information can be requested during route guidance or the current position when route guidance is not active. See "Information during route guidance" on page 101.
- The current navigation announcement is interrupted by pressing the VOL/INFO control.
- If the VOL/INFO control is pressed for longer than 2 seconds during a navigation announcement, the navigation announcement switches off and route guidance continues via display only. By briefly pressing the VOL/INFO control the navigation announcements are switched on again.
- The scroll marks and indicate a selection list which can be scrolled through using the SELECT control. Each entry in the list shown in capital letters can be selected by pressing the SELECT control.


text_image
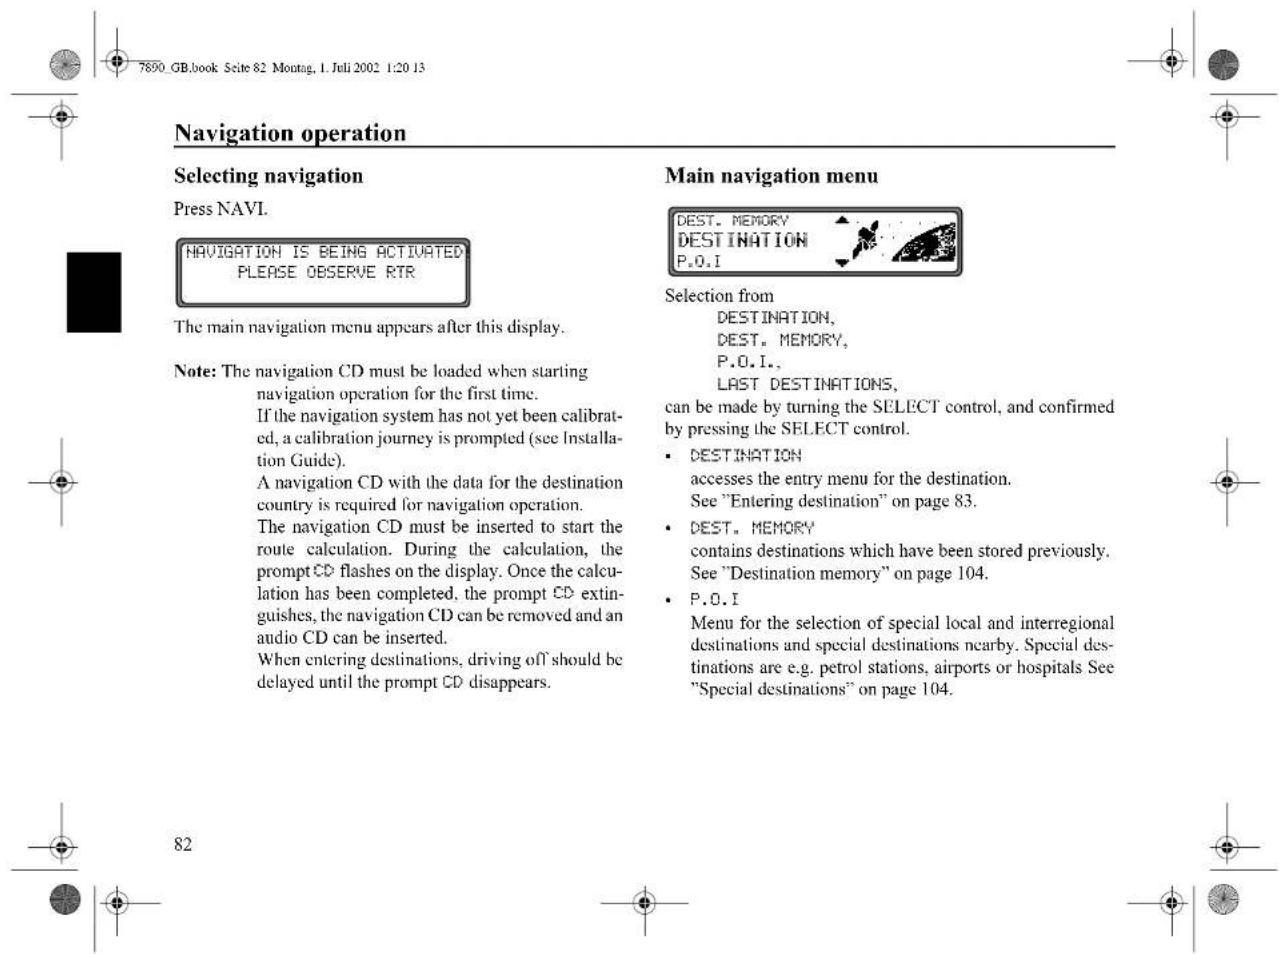
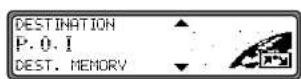
7890 GB.book Seite 82 Montag, I. Juli 2002 1:20 13 Navigation operation Selecting navigation Press NAVI. NAVIGATION IS BEING ACTIVATED PLEASE OBSERVE RTR The main navigation menu appears after this display. Note: The navigation CD must be loaded when starting navigation operation for the first time. If the navigation system has not yet been calibrat- ed, a calibration journey is prompted (see Installa- tion Guide). A navigation CD with the data for the destination country is required for navigation operation. The navigation CD must be inserted to start the route calculation. During the calculation, the prompt CD flashes on the display. Once the calcu- lation has been completed, the prompt CD extin- guishes, the navigation CD can be removed and an audio CD can be inserted. When entering destinations, driving off should be delayed until the prompt CD disappears. Main navigation menu DEST. MEMORY DESTINATION P.O.I Selection from DESTINATION, DEST. MEMORY, P.O.I., LAST DESTINATIONS, can be made by turning the SELECT control, and confirmed by pressing the SELECT control. • DESTINATION accesses the entry menu for the destination. See "Entering destination" on page 83. • DEST. MEMORY contains destinations which have been stored previously. See "Destination memory" on page 104. • P.O.I Menu for the selection of special local and interregional destinations and special destinations nearby. Special des- tinations are e.g. petrol stations, airports or hospitals See "Special destinations" on page 104. 82

Navigation operation
LAST DESTINATIONS
A list of the last 50 destinations is displayed. The desired destination can be selected using the SELECT control. Before confirming with the SELECT control, details of the destination can be requested by pressing the VOL/INFO control. Stopovers are not stored as last destinations.
Entering destination
Select DESTINATION in the main navigation menu using the SELECT control and press to confirm.
Selecting the country
If your destination lies in another country, select GERMANY using the SELECT control and press to confirm.


Select the country using the SELECT control and press to confirm.

Note: We recommend the selection of a stopover (page 93) at the half-way point to the destination.


83


text_image
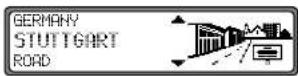
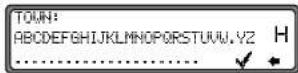
Navigation operation Entering the destination GREAT BRITAIN EDINBURGH ROAD The last location entered is displayed. If you want to enter a destination in the displayed location, you can select ROAD or CENTRE immediately. If your destination lies in another location, select the location using the SELECT control and press to confirm. TOWN: ABCDEFGHIJKLMNOPQRSTUVWXYZ.YZ H Select the letters one after the other by turning the SELECT control and press to confirm. The enlarged selected letter ap- pears at the right of the display. Using the multifunction button the last confirmed let- ter is deleted. The complete entry is deleted if the multifunction button is pressed for more than 2 seconds. TOWN: LINDEN ...D...G...LM....M ......✓* Letters which are already entered are displayed inversely. For the purpose of support, the existing entry is displayed at the next place-name to be reached. The unit offers only the pos- sible remaining letters for selection. If no other entries are available, the unit completes the place-name automatically. To accept the entry, press and hold the SELECT control for more than 2 seconds or select the small tick √nd briefly press the SELECT control. If the complete place-name was previously entered or was au- tomatically completed, the program switches to either place- distinguishing list or to road or centre entry. If no roads and only the centre can be selected in the location entered, the program switches directly to route menu. If an incomplete location entry was confirmed, the place se- lection list is displayed.

Navigation operation

The place nearest to the entry appears in capital letters in the place selection list.
The scroll marks indicate that more places are available for selection in alphabetical order.
Select by turning and confirm by pressing the SELECT control. (See "General notes" on page 81.)
If the entry is unequivocal, the program switches to road or centre entry. If no roads and only the centre can be selected in the location entered, the program switches directly to route menu.
The place-distinguishing list is displayed if the selection is ambiguous.
Select the required place using the SELECT control and press to confirm.
The program switches to road or centre entry. If no roads and only the centre can be selected in the location entered, the program switches directly to route menu.
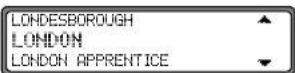
Selecting destination via post code
The destination can also be selected via the town's post code.
Select the destination's POST CODE by turning the SELECT control and press to confirm the selection.
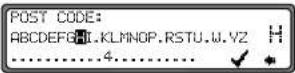
Using the SELECT control, enter the post code for the destination and press for more than 2 seconds to confirm the entry. To confirm, the small tick can also be selected and the SELECT control briefly pressed.

The display then shows either the destination corresponding to the post code or, if the post code is shared among several towns, a list containing these towns.


text_image
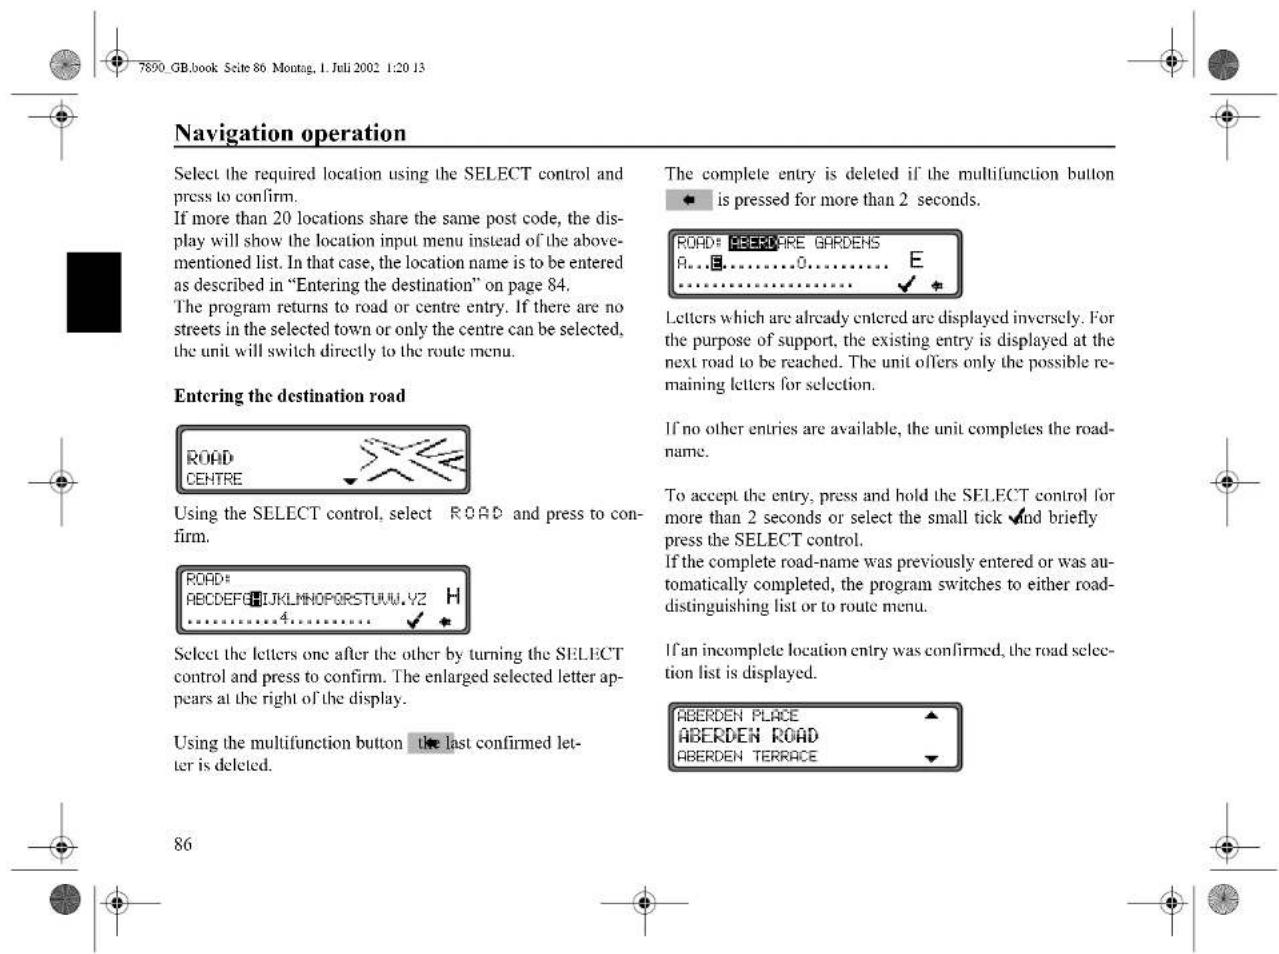
Navigation operation Select the required location using the SELECT control and press to confirm. If more than 20 locations share the same post code, the display will show the location input menu instead of the above-mentioned list. In that case, the location name is to be entered as described in "Entering the destination" on page 84. The program returns to road or centre entry. If there are no streets in the selected town or only the centre can be selected, the unit will switch directly to the route menu. Entering the destination road ROAD CENTRE Using the SELECT control, select ROAD and press to confirm. ROAD# A B C D E F G H I K L M N O P O R S T U W V Z H 4....4....4....4....4....4....4....4....4....4....4....4....4....4....4....4....4....4....4....4....4....4....4....4....4....4....4....4....4....4....4....4....4....4....4....4....4....4....4....4....4....4....4....4....4....4....4....4....4....4....4. Select the letters one after the other by turning the SELECT control and press to confirm. The enlarged selected letter appears at the right of the display. Using the multifunction button the last confirmed letter is deleted. The complete entry is deleted if the multifunction button is pressed for more than 2 seconds. ROAD: SECTORE GARDENS A...E......0......E ......✓ + Letters which are already entered are displayed inversely. For the purpose of support, the existing entry is displayed at the next road to be reached. The unit offers only the possible remaining letters for selection. If no other entries are available, the unit completes the road-name. To accept the entry, press and hold the SELECT control for more than 2 seconds or select the small tick √nd briefly press the SELECT control. If the complete road-name was previously entered or was automatically completed, the program switches to either road-distinguishing list or to route menu. If an incomplete location entry was confirmed, the road selection list is displayed. ABERDEN PLACE ABERDEN ROAD ABERDEN TERRACE 86
text_image
86

Navigation operation
The road nearest to the entry appears in capital letters in the road selection list.
The scroll marks indicate that more roads are available for selection in alphabetical order.
Select the road by turning the SELECT control and press to confirm.
If the entry is unequivocal, the program switches to route menu.
The road-distinguishing list is displayed if the selection is ambiguous.
IN NW 10
IN N 18
Select the required place using the SELECT control and press to confirm.
The program switches to route menu.
Entering the destination centre
CENTRE
ROAD

Using the SELECT control, select CENTRE and press to confirm.
If the place selected only has one centre, the program switches immediately to route menu.
If the number of centres is less than 10, the centre list is displayed.
ABBY WOOD
ACTON
Select the centre by turning the SELECT control and press to confirm.
If the number of centres is greater than 9, the program switches to centre entry.
CENTRE:
ABCDEFGHIJKLMNOPQRSTUVWXYZ.
......

Select the letters one after the other by turning the SELECT control and press to confirm. The enlarged selected letter appears at the right of the display.


Navigation operation
Using the multifunction button the last confirmed letter is deleted.
The complete entry is deleted if the multifunction button is pressed for more than 2 seconds.

Letters which are already entered are displayed inversely. For the purpose of support, the existing entry is displayed at the next centre to be reached. The unit offers only the possible remaining letters for selection. If no other entries are available, the unit completes the centre-name.
To accept the entry, press and hold the SELECT control for more than 2 seconds or select the small tick √ and briefly press the SELECT control.
If the complete centre-name was previously entered or was automatically completed, the program switches to route menu.
The program switches to the centre list if the selection is ambiguous.

The centre nearest to the entry appears in capital letters in the centre list.
The scroll mark indicates that more centres are available for selection in alphabetical order.
Select the centre by turning the SELECT control and press to confirm.
The program switches to the route menu.
Note: A list of possible centres is displayed immediately by pressing the SELECT control for more than 2 seconds without having selected any letters.


Navigation operation
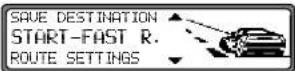
Route menu

Selection from
SAVE DESTINATION,
START-FAST R., (START-SHORT R. or
START-DYN. R.)
HOUSE NUMBER,
CROSSING
ROUTE SETTING
can be made by turning, and confirmed by pressing the SELECT control.
- SAVE DESTINATION accesses the entry menu for the destination memory (page 91).
- START-FAST R., START-SHORT R. or START-DYN. R. Starts route guidance. Simultaneously, a prompt appears indicating the currently selected route option (-SHORT R. for a short route, -FAST R. for a fast route and -DYN. R. for a dynamic route).
- HOUSE NUMBER The house number in the specified destination road can be entered here. This function is only available if this information is stored on the navigation CD.
CROSSING
An intersecting road can be defined as the destination here.
This function is only available if this information is stored on the navigation CD.
- ROUTE SETTINGS
Specifications such as quick route, short route, dynamic route, motorway, ferries and toll roads can be selected here.
Entering the house number for the destination road
Using the SELECT control select HOUSE NUMBER in the route menu and press to confirm.
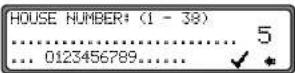
Using the SELECT control, enter the house number for the destination road and press for more than 2 seconds to confirm the entry. To confirm, the small tick can also be selected and the SELECT control briefly pressed.
Due to the system characteristics, route guidance continues only in the area of the house number specified.
Select START- to start route guidance.


text_image
Navigation operation Select SAVE DESTINATION to jump to the destination mem- ory menu. Select ROUTE SETTINGS to access the possible route set- tings. Select by turning the SELECT control and press to confirm the selection. Select the intersection for the destination road Using the SELECT control, select CROSSING in the route menu and press to confirm. EDINBURGH ROAD GLASGOW ROAD Select the intersection for the destination road by turning the SELECT control and press to confirm. SAVE DESTINATION START-FAST R. ROUTE SETTINGS Select START- to start route guidance. Select SAVE DESTINATION to jump to the destination mem- ory menu. Select ROUTE SETTINGS to access the possible route set- tings. Select by turning the SELECT control and press to confirm the selection. Selecting the route settings Using the SELECT control, select ROUTE SETTINGS in the route menu and press to confirm. SHORT ROUTE DYNAMIC ROUTE FAST ROUTE FAST ROUTE If selected, the program calculates the shortest possible journey time. SHORT ROUTE If selected, the program calculates the shortest possible distance. Note: The setting "SHORT ROUTE" is often recommended for larger cities or conurbations. DYNAMIC ROUTE Dynamic route guidance is used to calculate the route, taking current traffic announcements into account. Note: Can only be selected if TMC has been switched on or is currently switched on. See "Switching TMC on/off" on page 122. If dynamic route guidance has been activated, the routes are calculated using the "fast route" setting. 90Navigation operation
Further information under "Dynamic navigation with TMC" on page 98.
- RESTRICTIONS
Provides options for avoiding motorways, ferries or toll roads.
/ WITHOUT
Selection can be made by turning the SELECT control, and settings can be changed by pressing the SELECT control.
Press the control for more than 2 seconds to accept all settings and quit the menu.
Note: Routes without motorways can only be calculated for short distances (up to 200 km).
Storing a specified destination in the destination memory
It is not absolutely necessary to store a destination in the destination memory for route guidance. It saves repeated manual entry, if the destination is required at a later date.
Select SAVE DESTINATION in the route menu and press the SELECT control to confirm.

Any name of your choice consisting of up to 20 characters can be entered for the specified destination and then automatically stored in the destination memory after pressing the SELECT control for more than 2 seconds. See "Destination memory" on page 104.
To store, the small tick can also be selected and the SELECT control briefly pressed.
If you do not wish to enter a name of your choice, press and hold the SELECT control for more than 2 seconds to store the address as previously entered in the destination memory.
The last destination entered can be filed at any position by turning the SELECT control. The memory position is confirmed by briefly pressing the SELECT control.
A total of 50 destinations can be stored.


text_image
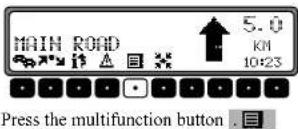
Navigation operation For final storage in the destination memory, either route guidance must be started or the program must be switched to new destination entry by selection of NEW DEST.. Deleting stored destinations Select destination memory (see page 104). AUNT MARY, MUNICH. BUSINESS STUTTGART, STUTTGA Select the destination to be deleted using the SELECT control and press the multifunction button. Destination memory full DEST. MEMORY FULL DELETE = OK BACK = HNU Occurs when the destination memory is full. Select either DELETE (to jump to the destination memory in order to delete a destination) or BACK (to cancel saving). Route guidance calculation MAIN ROAD CD CALC ROUTE The message "Calculating route" indicates that the distance is being calculated, which may take several seconds. After the first route guidance announcement, the prompt CD flashes on the display until the route has been completely calculated. When entering a destination, driving off should be delayed until CD no longer flashes. Recalculating the route. MAIN ROAD NEU ROUTE If the current route is not followed due to road blocks, diversions, unintentional driving in the wrong direction or failing to observe the recommendations, the system immediately calculates a new route. During this recalculation, NEW ROUTE is displayed.
natural_image
Pure geometric diagram with crosshair and circular shapes, no text or symbols presentNavigation operation
Stopover
This function enables a stopover to be entered when route guidance is active.
Entering a stopover

Press the multifunction button ↗*
Using the SELECT control, make a selection and press to confirm.
- DEST. MEMORY
(see page 104) Select the stopover from the destination memory.
- DESTINATION
(see page 83) allows entry of a stopover with the precise specification of the address.
P.O.I
(see page 104) enables the selection of special destinations as stopovers via LOCAL AREA, NEARBY DESTINATION and TOWN/COUNTRY, e.g. petrol stations or airports.
Starting route guidance to a stopover

To start route guidance to the stopover, press the SELECT control.
The route is calculated and route guidance begins.
Note: The symbols is displayed inversely during route guidance to a stopover.


text_image
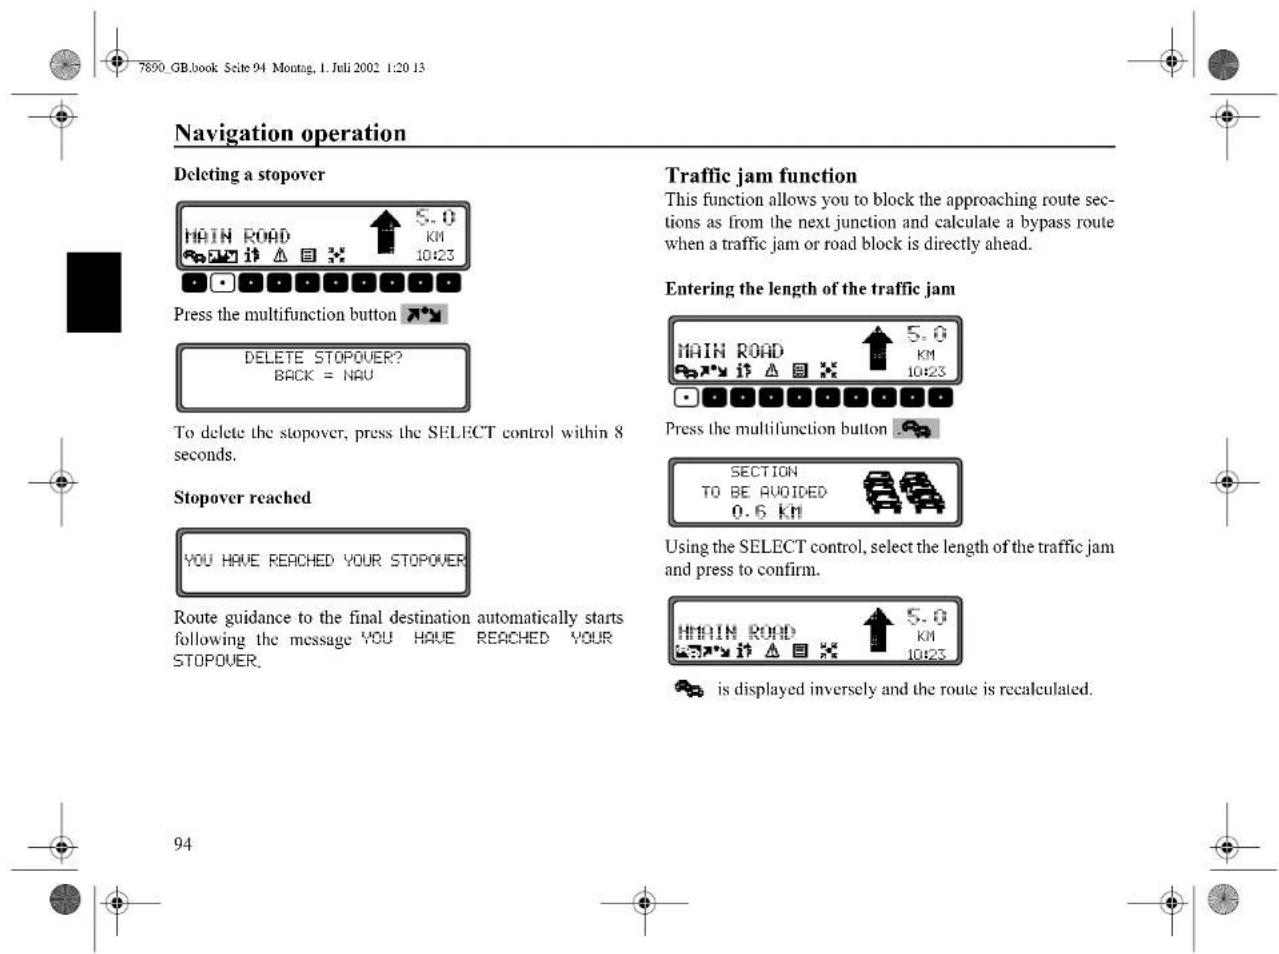
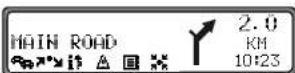
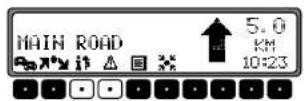
Navigation operation Deleting a stopover MAIN ROAD 5.0 KM 10:23 Press the multifunction button DELETE STOPOVER? BACK = NAV To delete the stopover, press the SELECT control within 8 seconds. Stopover reached YOU HAVE REACHED YOUR STOPOVER Route guidance to the final destination automatically starts following the message YOU HAVE REACHED YOUR STOPOVER. Traffic jam function This function allows you to block the approaching route sections as from the next junction and calculate a bypass route when a traffic jam or road block is directly ahead. Entering the length of the traffic jam MAIN ROAD 5.0 KM 10:23 Press the multifunction button SECTION TO BE AVOIDED 0.6 KM Using the SELECT control, select the length of the traffic jam and press to confirm. MAIN ROAD 5.0 KM 10:23 is displayed inversely and the route is recalculated.
natural_image
Pure geometric diagram with crosshair and circular shapes, no text or symbols present

Navigation operation
Delete block
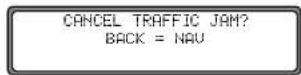
To delete a block, press the SELECT control within 8 seconds.
Cancelling route guidance
Press NAVI.

Route guidance is cancelled by pressing the SELECT control within 8 seconds.
Otherwise, route guidance continues.


95


text_image
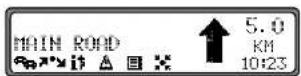
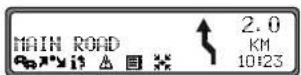
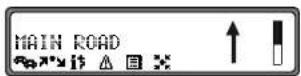
7800 GB.book Seite 96 Montag, I. Juli 2002 1:20 13 Navigation operation Notes on route guidance After entering the destination (address), the system calculates the route and announces: "Ready to drive off". The driving recommendations are given by voice messages and displays on the screen. By pressing the VOL/INFO control the current driving recommendation can be repeated. If the route to be travelled is not clear, e.g. at an intersection where a change in direction is not specified, the direction of travel can be displayed by pressing the SELECT control. For clarification, there follows a selection of examples of possible driving recommendations: • "Please perform a U-turn if possible". MAIN ROAD MAIN ROAD You are driving in the wrong direction and should turn back at the earliest opportunity. • "Please turn right after 300 metres". MAIN ROAD STATION STREET MAIN ROAD Please follow the direction indicated by the arrow. The display appears for 8 seconds after pressing the SELECT control. Danger! If a driving recommendation contradicts the applicable Road Traffic Regulations (RTR), the RTR is always valid! The arrow indicator ▶ points to the next street into which you should turn. The progress bar on the right illustrates the distance and the black part decreases as you approach the intersection. 96Navigation operation
- "Please follow the road".
This display tells you that you should follow the course of the road.
- "Prepare to turn left" or
"Please move into the left-hand lane".
This recommendation prepares you for the next turning to be taken.
However, "move into the left-hand lane" does not mean that you should do so immediately!
Note: At junctions and roundabouts, only the end of the road which is to be passed is displayed.
- "Please leave the roundabout at the third exit on the right".
This display shows you which exit (marked with the arrow) you must take at the roundabout.
- "Now drive straight ahead".
At this point, you must drive straight ahead.
- "Please follow the direction arrows".
This display tells you that you are in a non-digitised street (e.g. car park, garage), which is not included in the digital street map. The arrow indicates the direction of the destination as the crow flies.


Navigation operation
- "Keep right after 2 kilometres".

Keeping to the right means that the road forks and you should follow the relevant direction.
- "You have reached your destination".

The destination specified is reached and route guidance is terminated.
Dynamic navigation with TMC
Note: Dynamic route guidance is not possible in all countries.
To use dynamic navigation and the functions described below, TMC must be switched on, as described under "Switching TMC on/off" on page 122.
When any route recalculations are made with active dynamic route guidance, the navigation system may request the Navigation CD (if the Navigation CD is not already inserted).
What is dynamic route guidance?
Dynamic route guidance is used to calculate the route, taking current traffic announcements into account.
The traffic announcements are transmitted by a TMC radio station in addition to the radio programme and are received and analysed by the navigation system. There is no charge for receiving traffic announcements.
Note: Traffic announcements are transmitted by radio stations, therefore we cannot accept any responsibility for the completeness and correctness of the announcements


Navigation operation
Dynamic route guidance
Dynamic route guidance can be started by selecting START-DYN. R. in the route menu.
If dynamic route guidance has been activated, a continuous check is made for the presence of relevant announcements for the selected route. The route is then calculated using the "fast route" option, while taking into account current traffic announcements. If the check determines that a traffic announcement is relevant for the route guidance, then a new route to the destination is calculated automatically by the unit. NEW ROUTE appears on the display. In addition, there is a voice announcement "The route is being recalculated due to current traffic announcements", it is displayed inversely.
Note: If no TMC station was found, then FOR THE TIME BEING TMC RECEPTION IS NOT POSSIBLE is displayed. After a short time, the unit switches back to the route guidance display. If a TMC station still cannot be found after 10 minutes, FOR THE TIME BEING TMC RECEPTION IS NOT POSSIBLE displayed, accompanied by a brief signal tone.
Your navigation system can receive TMC information, whether a TMC station is selected or not. However, in order to guarantee optimal reception of TMC information, we recommend the selection of a TMC station. During radio operation (FM), a selected TMC station can be recognised by the abbreviation TMC (see page 123).
Displaying traffic information
Current traffic announcements can be displayed in plain text. There are several options for requesting current traffic information.
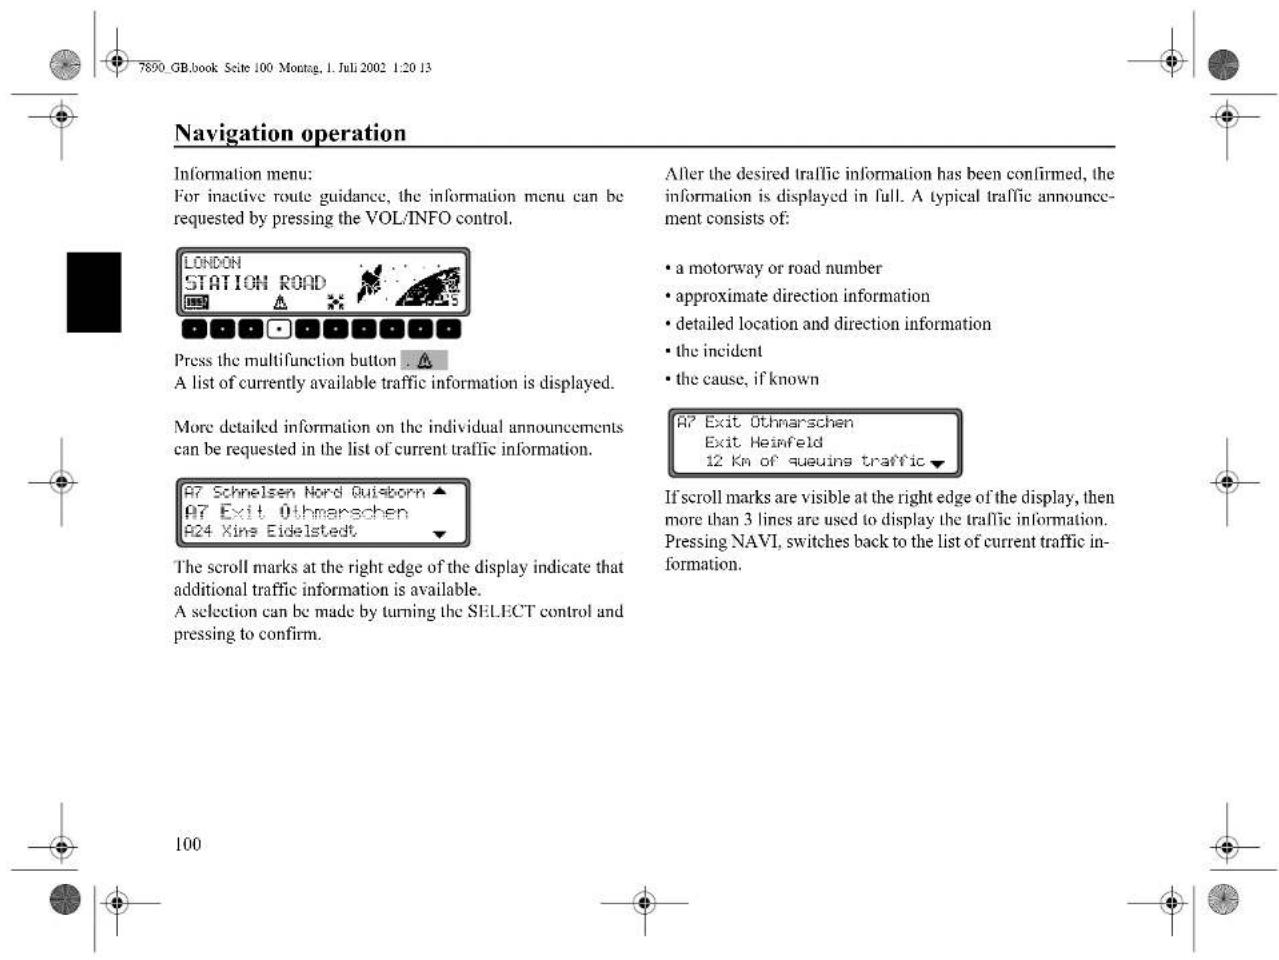
Traffic information can be requested via the multifunction buttons and in the route guidance display and, in the case of inactive route guidance, via the multifunction button in the information menu.
Route guidance display:
A list of all currently available traffic information is displayed by pressing the multifunction button.
A list of all current traffic information which is relevant for the calculated route is displayed by pressing the multifunction button.
Note: If no traffic information is currently available, NO TRAFFIC MESSAGES RECEIVED is displayed.


text_image
Navigation operation Information menu: For inactive route guidance, the information menu can be requested by pressing the VOL/INFO control. LONDON STATION ROAD Press the multifunction button . A list of currently available traffic information is displayed. More detailed information on the individual announcements can be requested in the list of current traffic information. A7 Schnelsen Nord Quisborn ▲ A7 Exit Öthmarschen A24 Xine Eidelstedt ▼ The scroll marks at the right edge of the display indicate that additional traffic information is available. A selection can be made by turning the SELECT control and pressing to confirm. After the desired traffic information has been confirmed, the information is displayed in full. A typical traffic announcement consists of: • a motorway or road number • approximate direction information • detailed location and direction information • the incident • the cause, if known A7 Exit Öthmarschen Exit Heinfeld 12 Km of sueuins traffic ▼ If scroll marks are visible at the right edge of the display, then more than 3 lines are used to display the traffic information. Pressing NAVI, switches back to the list of current traffic information.Navigation operation
Information during route guidance
Press the VOL/INFO control.
The destination, the distance and the estimated time of arrival are displayed.
If a stopover has been specified, the stopover, the distance and the estimated time of arrival are displayed. The main destination can be displayed via the multifunction button .
To return to route guidance, press the VOL/INFO control again or wait for 8 seconds.
Requesting journey duration and kilometres travelled Press the VOL/INFO control.
Press multifunction button .
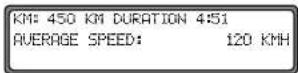
The journey duration, kilometres travelled and the average speed are displayed.
If navigation is not active, the values of the last journey are displayed.
Pressing the SELECT control for more than 2 seconds resets the values to zero.
Pressing NAVI returns to the navigation display, if navigation is active. If navigation is not active, the display shows the information menu.


101

text_image
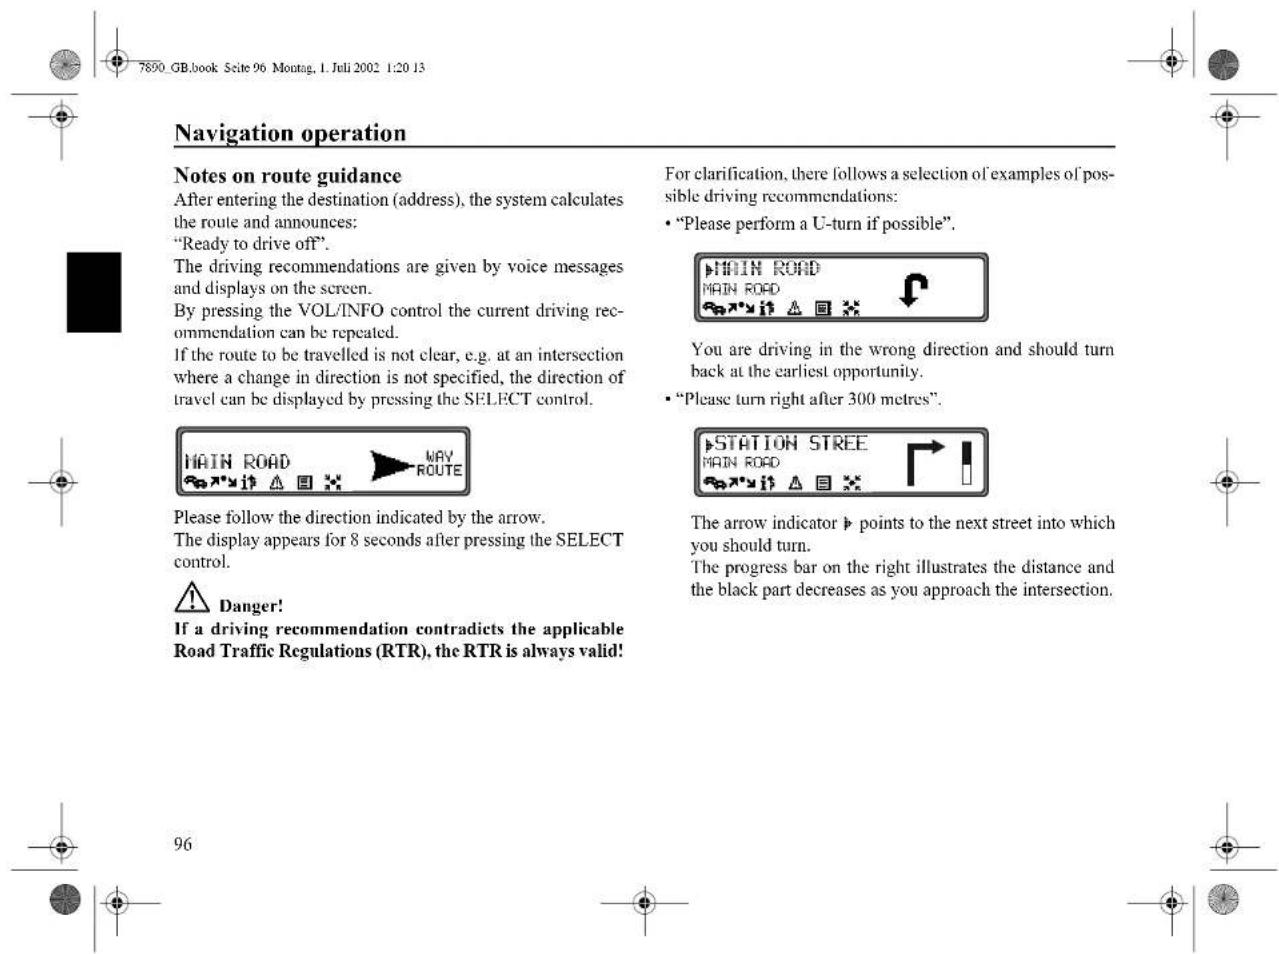
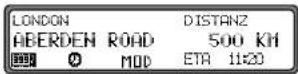
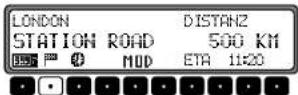
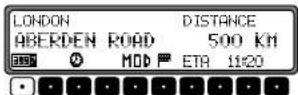
Navigation operation Displaying settings LONDON DISTANCE ABERDEN ROAD 500 KM SET MOD ETA 1:20 During navigation, press the VOL/INFO control. Press multifunction button ROUTE: DVNAM. ETA: LOU-RISK DURATION: ETA The settings are displayed in a list. The list can be scrolled by turning the SELECT control. After 8 seconds, the system returns to the navigation display. Request current time LONDON DISTANZ ABERDEN ROAD 500 KM SET MOD ETA 1:20 During route guidance, press the VOL/INFO control. Press multifunction button . TIME 12:31 102 The current time is displayed. After 8 seconds, the system returns to the route guidance display. Requesting current position During route guidance, the current position can be requested. MAIN ROAD 5.0 MAIN ROAD 10:23 Press the multifunction button .. LONDON ABERDEN ROAD 1138.34N 5449.14E 200M SAT 5 The current position with road name (if available), degrees of longitude and latitude, altitude above sea level and the number of satellites received are displayed. Pressing the SELECT control returns to the navigation display. By pressing the SELECT control, the program returns to the route guidance display. For inactive route guidance, the information menu can be requested by pressing the VOL/INFO control.

Navigation operation
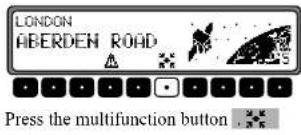
text_image
LONDON ABERDEN ROAD Press the multifunction button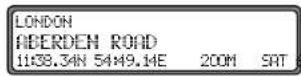
The current position with road name (if available), degrees of longitude and latitude, altitude above sea level and the number of satellites received are displayed.
Pressing the SELECT control or NAVI returns to the information menu.
Requesting the road list
During route guidance, the planned route list can be requested.

The current road and the road names up to the destination are displayed. The route list can be scrolled by turning the SELECT control.
By pressing the SELECT control, the program returns to the route guidance display.
Note: After destination entry, there is a short delay until the route list is created.
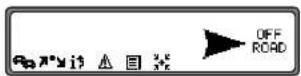
If the vehicle is "off road" at the moment of destination entry, the route list cannot be created until a stored road is reached.


103

Navigation operation
Destination memory
Using the SELECT control, select DEST. MEMORY in the main navigation menu and press to confirm.


The destination memory contains personally stored destinations. Once stored, manual entry of the destination is no longer necessary.


Select the destination using the SELECT control and press to confirm.
Then start route guidance.
Special destinations
Menu for selecting special destinations from a specified list. Special destinations are e. g. petrol stations, airports or hospitals.

Using the SELECT control, select P.O.I. from the main navigation menu and press to confirm.
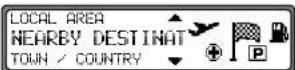
Using the SELECT control, make a selection and confirm.
- Special destinations LOCAL AREA / NEARBY DESTINATION Special destinations in the current surrounding area of the vehicle or special destinations near the destination can be selected.

Using the SELECT control, select a category and press to confirm.
104


Navigation operation
EDNONTON GREEN 1.2 KM+ WHITE HART LANE 1.3 KM+
Destinations are listed according to proximity. The figures in kilometres relate to the direct distance (as the crow flies) between the special destination and the current location.
The arrows following the distance information indicate the distance as the crow flies to the relevant special destination (e.g. ♦special destination lies in the direction of travel, ♦special destination lies in the opposite direction to that of travel).
Select the desired destination using the SELECT control. By pressing the VOL/INFO control, information on the selected destination is listed (e.g. a hospital).
NORTH MILESEX HOSPITAL N 18 1 LONDON TEL.: <44>-XXX-XXXX
Confirm the selection using the SELECT control. The system jumps to the route menu.
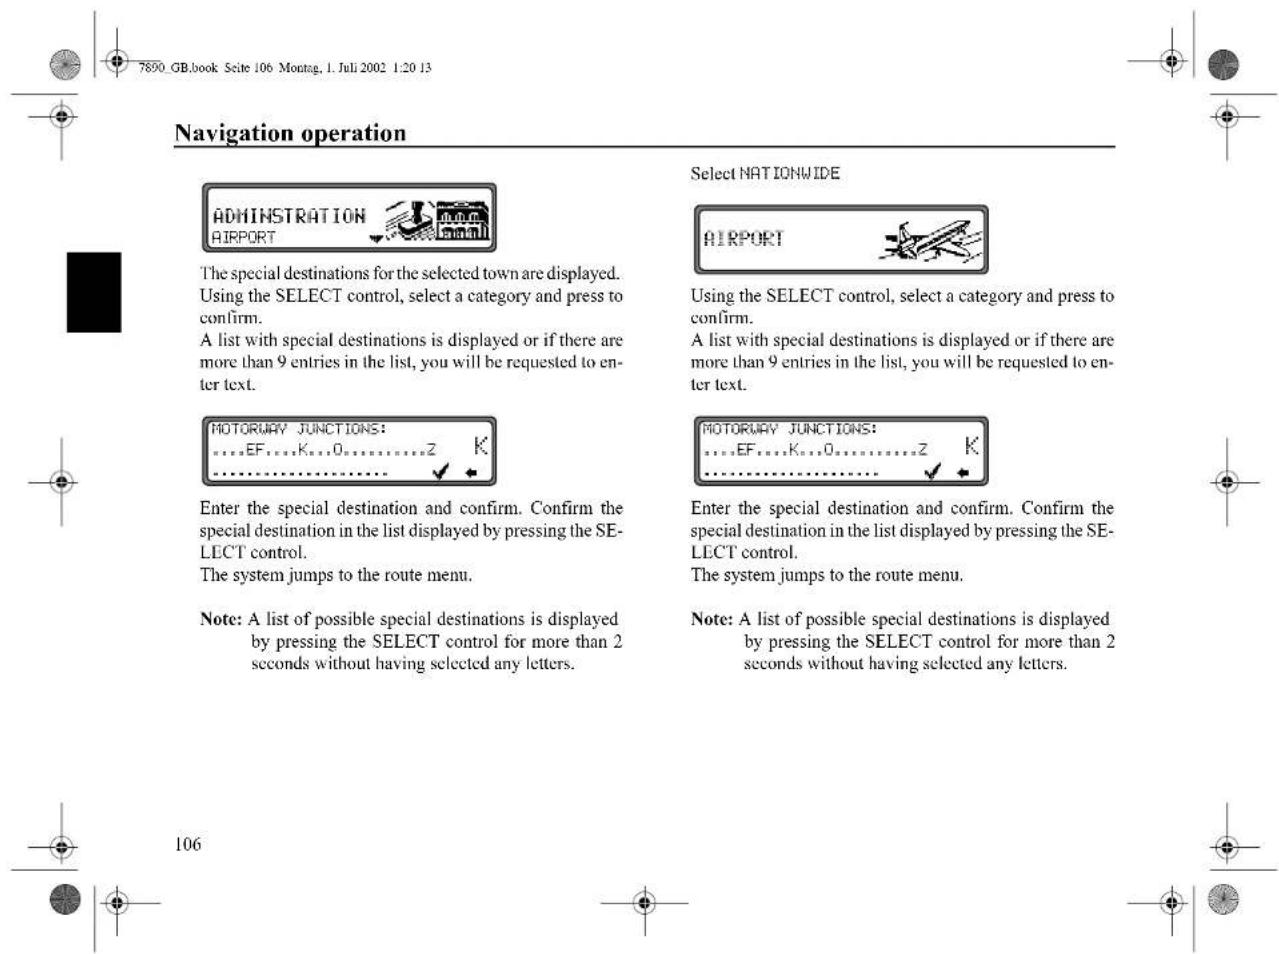
- Special destinations TOWN / COUNTRY Special destinations of your choice in countries contained in the navigation CD can be selected.

Using the SELECT control, select either GERMANY (see page 83), TOWN or NATIONWIDE and press to confirm.
Select TOWN Special destinations in a specified town can be selected.
Using the SELECT control, select the town name and press to confirm. Then select the town from the town selection list using the SELECT control and press again to confirm.


105


text_image
7890 GB.book Seite 106 Montag, 1. Juli 2002 1:20 13 Navigation operation ADMINISTRATION AIRPORT The special destinations for the selected town are displayed. Using the SELECT control, select a category and press to confirm. A list with special destinations is displayed or if there are more than 9 entries in the list, you will be requested to enter text. MOTORWAY JUNCTIONS: ....EF....K....0......Z K Enter the special destination and confirm. Confirm the special destination in the list displayed by pressing the SELECT control. The system jumps to the route menu. Note: A list of possible special destinations is displayed by pressing the SELECT control for more than 2 seconds without having selected any letters. Select NATIONWIDE AIRPORT Using the SELECT control, select a category and press to confirm. A list with special destinations is displayed or if there are more than 9 entries in the list, you will be requested to enter text. MOTORWAY JUNCTIONS: ....EF....K....0......Z K Enter the special destination and confirm. Confirm the special destination in the list displayed by pressing the SELECT control. The system jumps to the route menu. Note: A list of possible special destinations is displayed by pressing THE SELECT control for more than 2 seconds without having selected any letters. 106

Navigation operation
System settings
In the main navigation menu, press NAVI. The system settings menu is requested.

Selection from
TIME.
SAVE POSITION,
LANGUAGE*.
ANIMATIONS.
MEASURING UNIT.
ANNOUNCEMENT ETA,
ETA CALCULATION,
DURATION
can be made by turning, and confirmed by pressing the SELECT control.
• TIME
The internal system clock can be set to local time.
- SAVE POSITION
The current position can be saved and stored in the destination memory.
LANGUAGE*
Language setting for the navigation system.
The star also enables recognition of the entry for setting a language, even if an unknown language is active.
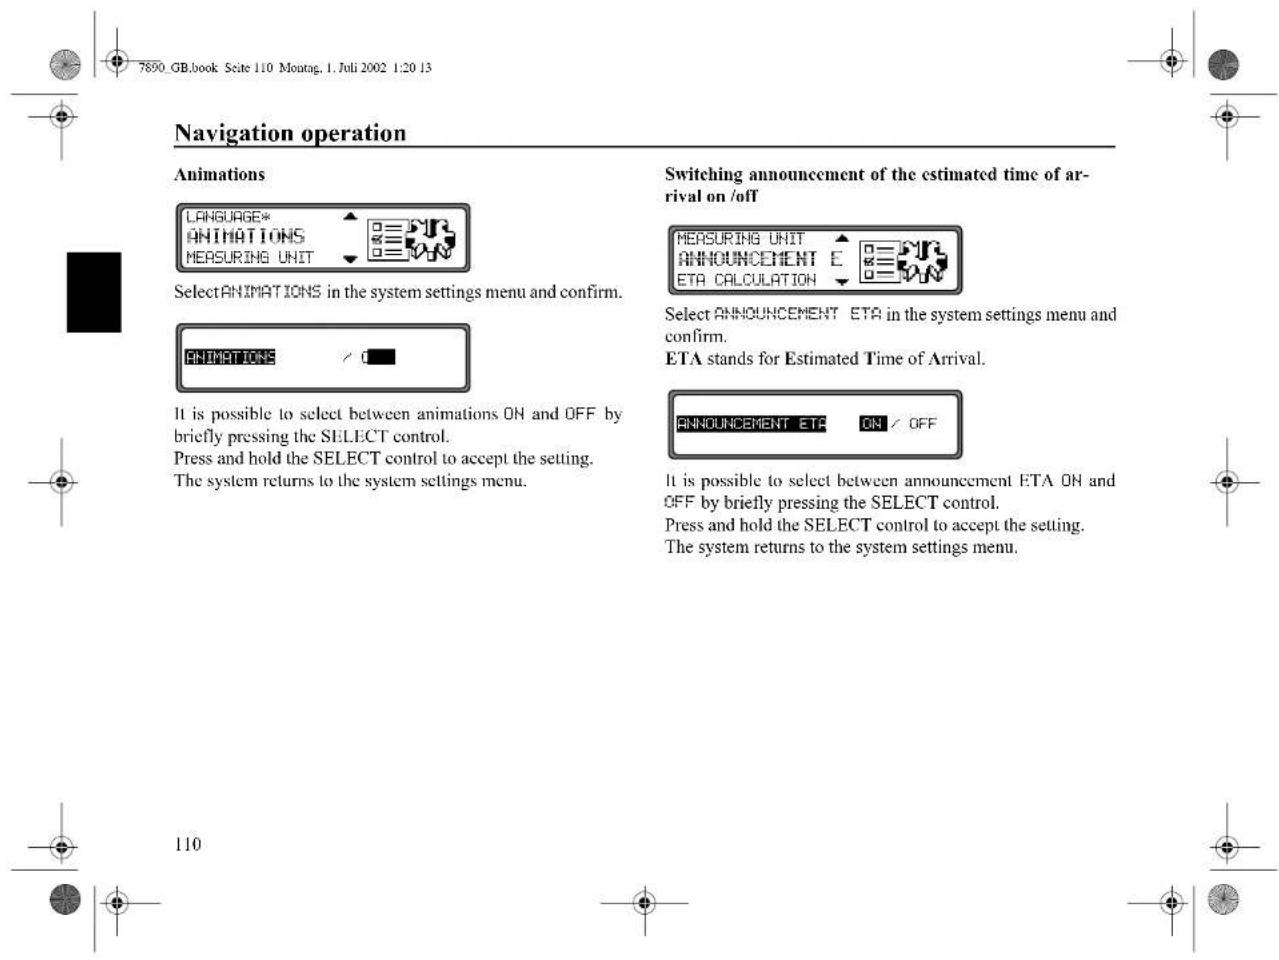
• ANIMATIONS
The display animations can be switched on or off.
MEASURING UNIT
The display units can be changed from metres to yards.
• ANNOUNCEMENT ETA
Announcement of the estimated time of arrival can be switched on / off.
• ETA CALCULATION
Calculation of the ETA can be influenced.
• DURATION
Whether ETA, the current time or the remaining travel time should be displayed on the right side of the display during navigation, is a setting option.


Navigation operation
Setting the time
In order to achieve correct navigation on routes requiring guidance under time restrictions and to calculate the estimated time of arrival, it is necessary to set the GMT time transmitted from satellites to the current time zone.


Select TIME in the system settings menu and confirm.
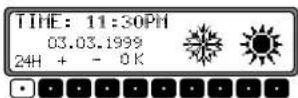
Using the multifunction button 24the time can be changed from the 24 hour to the 12 hour display.
Using the multifunction buttons of the time is changed every half an hour.
By pressing the SELECT control or the multifunction button OK the time set is accepted.
The program returns to the system settings menu.
Saving the position

Select SAVE POSITION in the system settings menu and confirm.
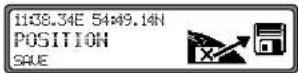
The current co-ordinates (degrees of longitude and latitude) for the position are displayed.
Confirm again by pressing the SELECT control.
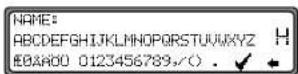
Enter the name of the position.
Press the SELECT control for more than 2 seconds to confirm the name entered. To confirm, the small tick an also be marked and the SELECT control briefly pressed.
The destination memory is automatically requested (see page 104).
Select the desired position in the destination memory using the SELECT control and press to confirm.


108


Navigation operation
Requesting the position
Request the destination memory (see page 104) and select destination using the SELECT control.
If the position is outside a digitised area, the driver is guided to the digitised route nearest to the destination. The announcement "Your destination is nearby" is given. The direction of the arrows must be followed in order to reach the destination.
Setting the language

Select LANGUAGE* in the system settings menu and confirm.

Select the language using the SELECT control. The language selection is accepted by pressing the control and the language is installed.
You can choose either a male or a female voice for certain languages.

Select the voice using the SELECT control. The voice is accepted and installed by pressing the control.
The system returns to the system settings menu after installation.


109

text_image
Navigation operation Animations LANGUAGE* ANIMATIONS MEASURING UNIT Switching announcement of the estimated time of arrival on /off MEASURING UNIT ANNOUNCEMENT E ETA CALCULATION Select ANIMATIONS in the system settings menu and confirm. Select ANNOUNCEMENT ETA in the system settings menu and confirm. ETA stands for Estimated Time of Arrival. ANIMATIONS It is possible to select between animations ON and OFF by briefly pressing the SELECT control. Press and hold the SELECT control to accept the setting. The system returns to the system settings menu. ANNOUNCEMENT ETF ON / OFF It is possible to select between announcement ETA ON and OFF by briefly pressing the SELECT control. Press and hold the SELECT control to accept the setting. The system returns to the system settings menu. 110

Navigation operation
Selecting the measuring unit

Select MEASURING UNIT from the system settings menu and confirm.

Select the measuring unit using the SELECT control. The measuring unit is accepted by pressing the control. The system returns to the system settings menu.
Note: METRIC indicates calculation in metres. IMPERIAL indicates calculation in yards.
Influencing the calculation of ETA

Select and confirm ETA CALCULATION in the system settings menu.
ETA stands for Estimated Time of Arrival.

Use the SELECT control to select the desired setting.
- SPORTIV With this setting the unit adjusts ETA for faster drivers. An earlier ETA is calculated.
• NORMAL This is the default setting. It offers a sufficiently accurate calculation of ETA for most drivers.
- LOW-RISK With this setting the unit adjusts for drivers who may take longer for the planned journey. This setting could be used, for example, in areas of dense traffic.
Selection is confirmed by pressing the control.
The system returns to the system settings menu.
111


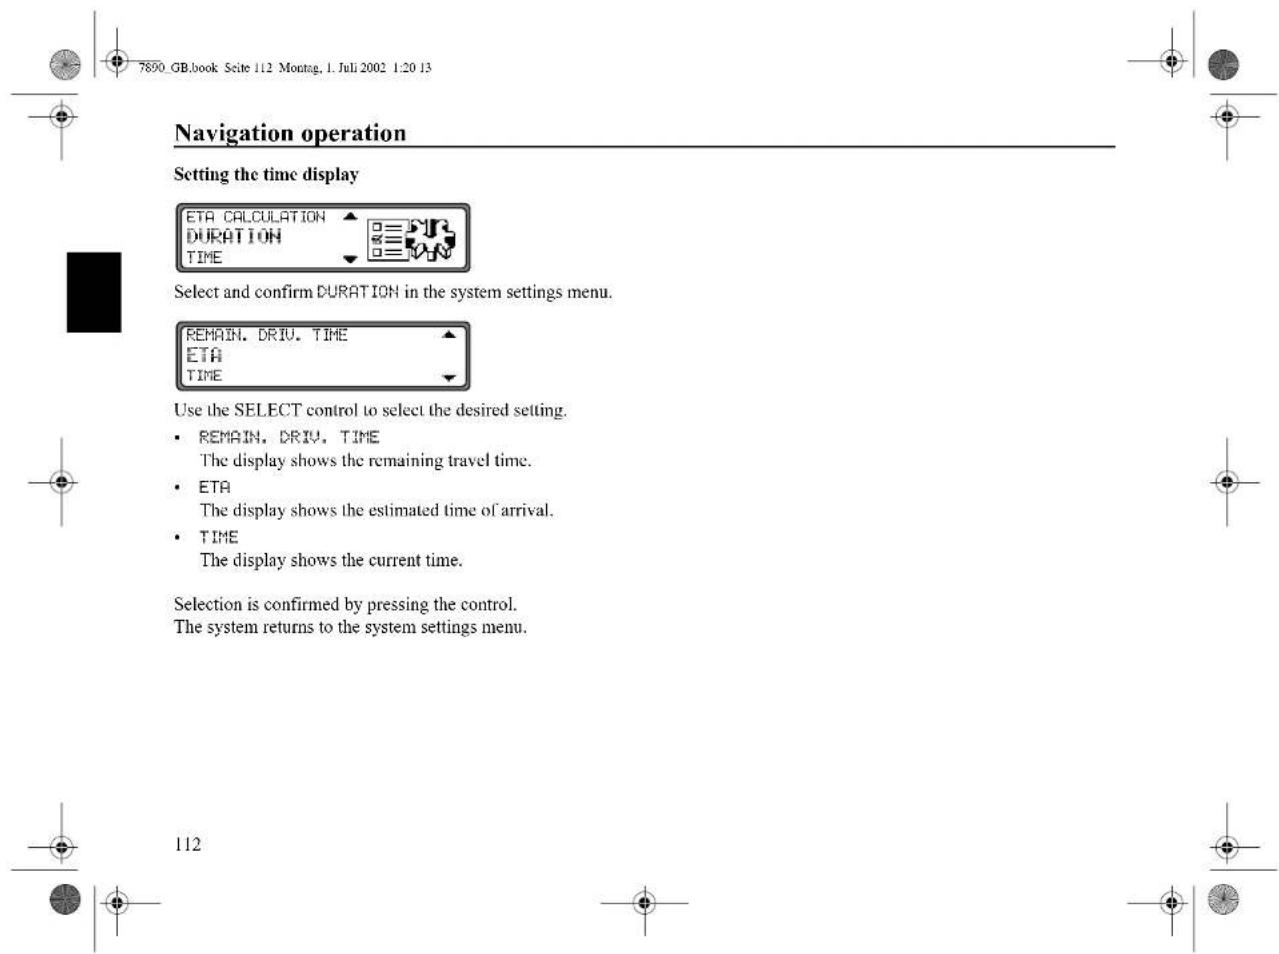
text_image
Navigation operation Setting the time display ETA CALCULATION DURATION TIME Select and confirm DURATION in the system settings menu. REMAIN. DRIVE. TIME ETA TIME Use the SELECT control to select the desired setting. • REMAIN. DRIVE. TIME The display shows the remaining travel time. • ETA The display shows the estimated time of arrival. • TIME The display shows the current time. Selection is confirmed by pressing the control. The system returns to the system settings menu. 112Switching on radio mode
Press TUNER.
The radio is set to the previously selected waveband.
Switching on radio menu mode
In radio mode, press TUNER.
The radio menu mode is switched on and displayed. The unit switches back to radio mode if no button is pressed within the next 8 seconds.
Selecting the FM waveband
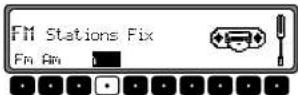
In radio menu mode, press the multifunction button.
The last selected transmitter and plane are displayed.
By pressing several times, the planes DAS Seek Qual., DAS Seek Name, Stations RDS and Stations Fix can be selected.
• DAS Seek Qual. (see also page 138).
• DAS Seek Name (see also page 138)
• Stations RDS (see also page 138)
• Stations Fix (see also page 138)
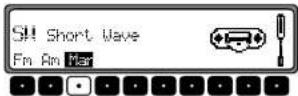
Selecting the AM waveband
In radio menu mode, press the multifunction button.
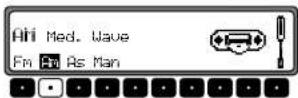
The last selected waveband and transmitter are set.
To select the wavebands MW (med. wave), LW (long wave) and SW (short wave), press the multifunction button repeatedly until the required waveband is selected.
Setting options for transmitter selection
The desired transmitter can be selected via dynamic autostore (FM), autostore (MW, LW), transmitter search, scan search, manual tuning, and station buttons.


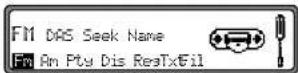
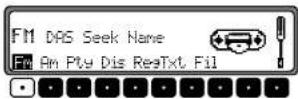
text_image
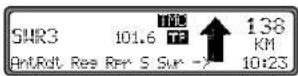
Radio mode Dynamic autostore (FM DAS) In radio menu mode, press the multifunction button repeatedly until DAS Seek Qual. or DAS Seek Name is displayed. FM DAS Seek Qual. Am Pty Dis Res Txt In FM DAS mode, the receivable transmitters are displayed according to the setting via the multifunction buttons. SHR4 KA 101.6 TF 138 KM AntRdt Res Rpr S Sur -7 10:23 Set the desired transmitter by pressing the button directly below the abbreviated station designation. If the selected transmitter broadcasts several programmes/regional programmes, a submenu is automatically displayed to select the desired programme. SHR4 KA 101.6 TF 138 KM 13 Ant Rdt <- 10:23 If a programme has previously been selected that belongs to the particular transmitter chain, the last stored programme entry will be automatically selected. The multifunction button indicates that the button can be pressed for displaying and selecting additional transmitters. To indicate those transmitters not easily identified due to the display of advertisements or news, the abbreviation L-1... L-Z (L = Local) is used. This prevents constant switching in the lower display line. When a transmitter is selected, it is indicated by a star (e.g. L*1). When using the unit for the first time, or following interruption of the power supply, allow for a brief waiting period so that the receiver can evaluate the transmitter signals. The display will appear incrementally as the evaluation progresses. FM DAS transmitter search Turn the SELECT control to the left/right. The radio displays the receivable and identified transmitters in descending/ascending order. Transmitter search MW, LW, SW In the desired waveband (MW, LW, SW), turn the SELECT control to the left/right. The radio searches for reception frequencies in descending/ascending order of frequency. 114In the desired waveband (FM, MW, LW, SW) press the SELECT control; SC is displayed.
An automatic transmitter search is started. The first run is performed on an insensitive plane, all further runs on a sensitive plane. Receivable transmitters can be heard for 8 seconds. Press the SELECT control if the received programme should be retained.
Note: For FM DAS, the scan search is performed in alphabetical order.
Programme filtering for FM DAS
You have the option of filtering various stations from the FM DAS transmitter list. In radio menu mode, press the Multifunction button.
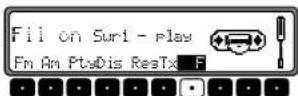
The individual programmes can be selected using the SELECT control. It is then possible to select between play (programme not filtered) and skip (programme filtered out) by pressing the SELECT control.
In order to switch the filter function on or off, repeatedly press the multifunction button FThe filter function is switched on (Fil on) or off (No Fil).
Programme type selection (PTY)
In radio menu mode, press the multifunction button.
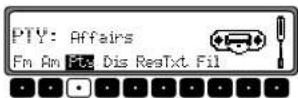
Then, using the multifunction button select the desired PTY (see also page 139). Note: Only those PTYs can be selected that are currently available.
Once a PTY has been selected, only those transmitters can be selected in FM DAS mode that are equipped with this PTY. By selecting NO PTY, all transmitters will be re-displayed in FM DAS mode.


text_image
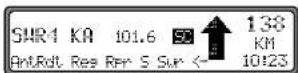
Radio mode Switching PTY display on / off Select radio menu mode. Disp. PTV Fm Am Pty Dt ReaTxt Fil Using the multifunction button select either PTV (PTY display switched on) or Frequency (PTY display switched off). Requesting/storing FM transmitters In radio menu mode, use the multifunction button For select the plane Stations RDS or Stations Fix. • Stations RDS (see also page 138) • Stations Fix (see also page 138) Storing: 12 frequencies or programmes can be stored per waveband. In order to store the desired transmitter or programme, press the multifunction button - 106 7 un- til a signal tone sounds. FM1 101.6 TF 138 KM 1 2 3 4 56 - > 10:23 To access memory locations 7 - 12, press the multi- function button. 116 Request: Press the -1 6r7 - multi- 12 function button. The stored transmitter is requested. Requesting/storing MW, LW, SW transmitters Store: 12 transmitters can be stored under station buttons. Search for the desired transmitter and press the desired multi- function button until a signal tone sounds. To access memory locations 7 - 12, press the multifunc- tion button. MHI 999 TF 138 KM 1 2 3 4 56 - > 10:23 Request: Press the -1 6r7 - multi- 12 function button. The stored transmitter is requested.

In the desired waveband, pressTUNER.
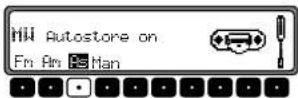
Press the multifunction button repeatedly until Auto store on is displayed.
Press the multifunction button until Seek Autostore is displayed.
The 6 transmitters with the best reception are stored under the station buttons in order of quality.
In order to quit the autostore storage plane, use the multifunction button to switch off the autostore storage plane (off). The radio switches back to the station button plane.
FM manual tuning
In radio menu mode, use the multifunction button RRI select the Stations Fix plane.
Press the Multifunction button twice. Then turn the SELECT control.
100 kHz tuning steps are performed.
On the display, active manual tuning is indicated by MRH. After a short delay and without turning the SELECT control, MRH disappears and manual tuning is switched off.
MW, LW, SW manual tuning
In the desired waveband, press TUNER.
Press the multifunction button twice. Then turn the SELECT control.
9kHz (MW), 3kHz (LW) or 5kHz (SW) tuning steps are performed.
On the display, active manual tuning is indicated by MRN. After a short delay and without turning the SELECT control, MRN disappears and manual tuning is switched off.


text_image
German radio mode settings interface showing regionalisation and switching options for RDS diversity function, including switch status, frequency selection, and radio menu mode.Radio mode
Switching radio text display on / off
Select FM radio menu mode. Using the multifunction button Txt switch on radio text.
The car radio filters information transmitted by the transmitter and displays it in the form of radio text.
Radio text cannot be displayed unless the selected transmitter also transmits radio text.
Unfavourable reception conditions, including interference, can garble or even block a radio text display.
In order to quit the radio text plane, press TUNER.
Note: Since information transmitted via radio text display varies constantly, we recommend tuning in the radio text only when the vehicle is stationary to avoid unnecessary distraction for the driver. This is a necessary precaution for accident prevention.
Traffic Programme (TP)
If an RDS diversity transmitter transmits TP announcements, it is possible to interrupt CD, CDC/AUX, MW, LW or SW operation or the mute function and to switch through the transmitted TP announcement. Moreover, you can listen to one FM station while having TP announcements switched through that are transmitted by another FM station.
The functionality of the traffic programme functions depends on the status of the TMC setting - TMC switched on/off ("Switching TMC on/off" auf Seite 122)
When TMC is switched off:
- There are two ways to select a TP transmitter:
- automatic tracking
- direct programming
Automatic tracking always uses the FM station currently being received as the TP transmitter. If the selected FM station has poor reception quality or cannot function as a TP transmitter, the unit applies specified criteria to search for a new TP transmitter.
Direct programming enables a TP transmitter to be programmed that is not the FM station being received. For example, one FM station can be received while TP announcements transmitted by another FM station are switched through.
If the programmed TP transmitter reception is poor, the unit switches to automatic tracking until the programmed TP transmitter is receivable.


text_image
Radio mode When TMC is switched on: • With TMC, the unit is capable of selecting a suitable traffic programme transmitter automatically. If possible, a TMC station is selected as the traffic programme transmitter. The selected TMC station usually offers the best traffic information for the region in which you are travelling. If no TMC station is available, the traffic programme transmitter with the strongest signal is selected. If an RDS transmitter is equipped with a traffic programme, this is indicated on the display by TP. An inverse TP appears on the display to indicate that the traffic programme is active. Activating/quitting the TP menu Activating: Press TP (traffic announcements cannot be transmitted). Press the multifunction button. Quitting: Press TP or the TP menu will be automatically terminated after 8 seconds without actuation. Switching TP on/off In all modes and wavebands, TP can be switched on/off by pressing TP for more than 2 seconds. TP can also be switched on/off in the TP - menu. Switching on: To switch on TP in the TP menu, press the multifunction button repeatedly until TP on is displayed. TP on Sta Vol Tnc Switching off: To switch off TP in the TP menu, press the multifunction button repeatedly until TP off is displayed. TP off Sta Vol Tnc TP is switched off after returning to normal display. 120
text_image
120

Selecting automatic tracking
Only applies when TMC is switched off.
In all modes and wavebands, automatic tracking can be switched on by pressing TP for more than 2 seconds.
To switch on automatic tracking in the TP menu, press the TP multifunction button repeatedly until TP on is displayed.
Attention: If a TP transmitter has already been programmed directly, it will once again be selected as the TP transmitter.
Selecting / deleting direct programming
Only applies when TMC is switched off.
Activate the TP menu.
Selecting: Press the Multifunction button.
Using the SELECT control, select the desired TP transmitter. After a short delay and without actuation, the selected transmitter is accepted.
Deleting: Press the shutdown function button.
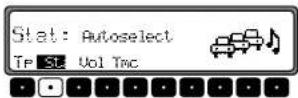
Using the SELECT control, selectAutoselect and press to confirm. After a short delay and without actuation, the direct programming is deleted.
Quit the TP menu.
Switching mute on/off
After selecting a TP or EON transmitter, the mute function can be activated by briefly pressing TP.

Thereafter, only traffic announcements and navigation announcements will be switched through. After pressing TP again, muting is cancelled.


text_image
Radio mode Interrupting TP announcements During a TP announcement, briefly press TP. The announcement currently being broadcast will be interrupted and the system will automatically return to the previously selected mode. TP announcement volume Activate the TP menu. Press the multifunction button. TPU: 1 TP St U TMC Using the SELECT control, four different settings (0 - 3) can be selected. This means that the volume can be raised to a fixed value according to the setting. • Setting 0 - no volume increase • Setting 1 - slight volume increase • Setting 2 - medium volume increase • Setting 3 - large volume increase Switching TMC on/off Note: You can find further information on TMC under "Dynamic navigation with TMC" auf Seite 98. Activate the TP menu. TMC on TP Sta Uo Uo Switching on: Press the Multifunction button repeatedly until TMC on is displayed. If TMC is switched on, a traffic programme transmitter cannot be selected freely. A TMC station is selected by the unit, provided one can be received. This transmitter then corresponds to the traffic programme transmitter. Switching off: Press the Multifunction button repeatedly until TMC off is displayed. If TMC is switched off, a traffic programme transmitter can be selected freely. Note: Dynamic navigation functions (dynamic route, traffic information) cannot be selected or called up. 122Display for TMC stations
If a radio station transmits TMC information in addition to the radio programme, this is indicated on the display by the abbreviation TMC. TMC information is received and analysed by the navigation system. The reception of traffic announcements is free of charge.
TMC is shown in normal typeface:
The instantaneously selected station is a TMC station. TMC is switched off.
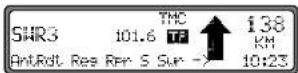
TMC is shown in inverted typeface:
The instantaneously selected station is a TMC station. TMC is switched on.
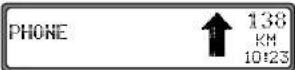
Telephone mute function
The telephone characteristics can be set in the user menu (page 130) if a telephone system is installed in the vehicle and the mute function lead for the car telephone is connected to the car radio.
If mute is selected, the radio is switched to mute if a call is received.
If audio signal is selected, the telephone call is connected through the radio unit if a call is received (vehicle ignition must be switched on).
However, this is only possible if, in addition to the telephone, a handsfree unit with loudspeaker output is installed and connected to the radio. In both cases, PHONE is displayed.
123

Compact Disc (CD) instructions
Sound interruptions may occur if the CD is dirty. In order to ensure optimum tone quality, please note the following:
• Always touch the CD at the edges only. Keep the disc clean and never touch the surface.
- Never stick anything to the CD.
- Protect the CDs against direct sunlight and from heat sources such as heaters etc.
- Be careful not to splash juice or other soft drinks onto the unit or discs.
- Before playing, clean the CD with a commercially available cleaning cloth, wiping from the centre outwards. Solvents such as petrol, thinners or other commercially available cleaners and anti-static sprays must not be used.
| Correct | Incorrect |
| Incorrect | Correct |
Hinweis: 8 cm CDs are not playable.
Discs with non-standard shapes (e.g., heart, square, star) cannot be played on this unit. Attempting to do so may damage the unit. Do not use such discs.
Moisture condensation
On a rainy day or in a very damp area, moisture condensation may occur inside the lenses and dispaly of the unit. Should this occur, the unit will not operate properly. In such a case, remove the disc and wait for about an hour until the moisture has evaporated.
124


Press and hold ▶; the display folds downwards and the CD slot becomes visible. Insert the disc into the CD slot with the printed side upwards. The unit pulls in the CD automatically and begins to play the disc from the first track. Then fold the display up again.
After playing the last track, the unit automatically begins to play the first track of the CD again.
If there is already a CD in the slot, press CD. If CD changer / AUX operation was last selected, use the multifunction button Break switch to CD operation.
To eject a CD, press and hold ▶th▲display folds downwards and the CD is ejected. Remove the CD. Then fold the display up again.
Attention : The CD is not ejected when the unit is switched off but remains in the CD slot.
Track skip - forwards / backwards
Press the multifunction button (forwards) or (backwards).

By pressing the multifunction button repeatedly, several tracks can be skipped over in forward or reverse directions. The unit switches to the first track when the last track has been reached. Analogously, it switches from the first track to the last track.
If the track has been playing for longer than 10 seconds when the track skip function is triggered, the device returns to the beginning of the track.
Scan search
Press the SELECT control, appears on the display.
All following CD tracks are played for 10 seconds each. Press the SELECT control again to terminate the scan search.


125


text_image
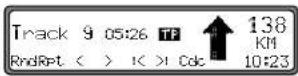
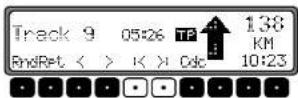
7890 GB.book Seite 126 Montag, 1. Juli 2002 1:20 13 CD mode Fast forward / rewind By pressing the multifunction button (audible) fast forward is activated, or by pressing the multifunction button < (audible) fast rewind is activated. Track 9 05:26 TT 138 KM RndRet < > K > Cdc 10:23 Fast forward / rewind is terminated by releasing the multifunction button. Repeating a track By pressing the multifunction button The track repeat function is switched on. The prompt Ret is displayed inversely. Track 9 05:26 TT 138 KM RndRet < > K > Cdc 10:23 After pressing the multifunction button Again, the track repeat function is switched off. Random play By pressing the multifunction button Random play is activated. The tracks on the current CD are then played in random order. The prompt Ret is displayed inversely. Track 9 05:26 TT 138 KM RndRet < > K > Cdc 10:23 After pressing the multifunction button Again, the random play function is deactivated. Number of tracks and total playing time In CD mode, press CD. By pressing the multifunction button Trk the elapsed time for the tracks already played is displayed briefly. 18 Tracks 12:26 TT Trk Tt1 By pressing the multifunction button The number of tracks and the total playing time of the current CD are displayed briefly. 126
text_image
126
text_image
7890 GB.book Seite 127 Montag, 1. Juli 2002 1:20 13 CD mode Temperature protection circuit A temperature protection circuit is utilised in this unit in order to protect the laser diode against overheating. When the protection circuit is requested, Temp is displayed for 8 seconds and the unit switches back to radio operation. The single CD operation can be requested again after a short cooling phase. However, if the temperature is still too high, the unit again switches back to the previously selected signal source. 127CD changer operation
Operational readiness of CD changer
If a CD changer is connected to the car radio, it is ready for operation when loaded with a full CD magazine. Close the sliding tray after loading. Further operation is performed via the car radio control panel.
CD magazine - load / unload
To remove the CD magazine, open the sliding cover on the changer and press the eject button. The magazine is ejected and can be removed.
When inserting CDs in the magazine, please note imprint on magazine.
Attention: Incorrectly inserted CDs will not be played.
Note: In order to ensure the fastest possible CD change.
the magazine should be fully loaded from compartment 1.
Playing CDs
Press CD. If the unit was last set to CD changer operation or there is no CD (or navigation CD) in the CD drive, the CD changer menu is now active.
If CD operation was last selected, use the multifunction button ☐ switch to CD changer operation.
The last CD to be played is played from the position at which it was left before switching off.
Stored CDs can be selected by turning the SELECT control. Loading CD X is displayed during the selection time. The magazine compartment number or the name of the CD and the number of the current track on the selected CD are then displayed.
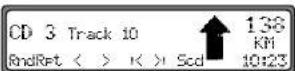
If no CD is present in the selected magazine compartment (e.g. compartment 2), NO CD 2 is displayed briefly. After playing the last track of a CD, the next CD is automatically selected and played.
For further operation, see under CD mode (Page 124):
- "Compact Disc (CD) instructions" on page 124
- "Track skip - forwards / backwards" on page 125
- "Scan search" on page 125
- "Fast forward / rewind" on page 126
• "Random play" on page 126
- "Repeating a track" on page 126
- "Number of tracks and total playing time" on page 126


128


Requesting/quitting user menu
After requesting the user menu, the following basic settings can be selected on two planes according to your personal preference.
First plane:
• Gal - speed-dependent volume control
- Tel - telephone characteristics
• Col - display colour setting
- Led - display setting
- M/S - reception optimisation setting
- Nav - navigation announcement setting
Second plane:
- Aux - aux input setting
- CmF - compass display setting
• BeV - signal tone volume setting
The user menu is requested by pressing SOUND for more than 2 seconds.
In order to access the second plane of the user menu, press the multifunction button.
Press SOUND again to quit the user menu.
GAL (Gal) setting
The GAL is a car radio control circuit, which automatically adjusts the car radio volume according to vehicle speed. This results in compensation of the driving noise produced at higher speeds.
Request the user menu. Press the Multifunction button. Using the SELECT control select either 0 or +15.
With the GAL setting, the start of volume adjustment can be specified according to vehicle speed.
The setting is stored automatically.
Explanation:
- 0 - no volume increase
• +1 - volume is increased at low speed
• +15 - volume is increased at a higher speed


Telephone mute characteristics (Tel)
If a telephone system with handsfree unit is installed in the vehicle, the telephone conversation can be conducted via the car radio system. Thus, installation of the additional loudspeaker which is normally required is not necessary. However, the signal cables (AF - telephone input and earth - telephone input) must be connected to the car radio (see page 140).
For selection, request user menu. By pressing the multifunction button Select either audio signal or mute.
- mute - Telephone mute mode
• audio signal - Telephone conversation via car radio
Display colour setting (Col)
This setting is used to choose between two illumination colours (not possible for all versions).
For selection, request user menu. By pressing the multifunction button Select either red or yellow.
The setting is stored automatically.
Display setting (Lcd)
The display setting allows you to select among three different display versions.
- Negative display ( negative)
- Positive display (Positive)
• Automatic display (automatic) - the display will appear negative or positive depending on vehicle illumination.
For selection, request user menu. By pressing the multifunction button select either negative, positive or automatic.
The setting is stored automatically.


Three different reception optimisation settings can be selected in order to suppress reception-dependent interference and reflections.
Request the user menu. By pressing the multifunction button M/S select either Stereo, Mono or Auto.
- Auto - Setting for normal operation - i.e., the system switches from stereo to mono and back depending upon reception location (provides the optimum setting for almost all reception areas).
- Stereo - Setting for exceptional reception conditions - i.e. the unit is constantly set to stereo.
- Mono - Setting for reception conditions in which reflections constantly occur - i.e., the unit is set constantly to mono.
The setting is effective immediately and is also retained on switching off.
Setting navigation announcements (Nav)
With this function you can select how you wish to hear navigation announcements.
- only - The audio source currently being listened to is switched off and only navigation announcements are heard.
- mixed - The volume level of the audio source currently being listened to is decreased. The navigation announcement is set to the same volume level as the previously heard audio source but still adjustable within a range of +/-6 dB. If the audio source volume is then changed, the navigation announcement volume is adjusted accordingly.
- independ - The audio source being listened to and the navigation announcement can be set to various levels.
For selection, request user menu. Using the multifunction button Select either only, mixed or independ.
The setting is stored automatically.
131


text_image
7890 GB.book Seite 132 Montag, 1. Juli 2002 1:20 13 User menu AUX input (Aux) This can be used to switch on the CD changer AF connections if no CD changer is connected. An external unit (Discman, Walkman, etc.) can then be connected. For selection, request user menu. By pressing the multifunction button request the second plane of the user menu. Using the multifunction button Select either AUX mode on (on) or Aux mode off (off). Compass display (Cmp) When the Navigation is not active, it is possible to have a compass and the current time shown on the right side of the display. For selection, request user menu. By pressing the multifunction button request the second plane of the user menu. Using the multifunction button Select either show compass (compass is displayed) or hide compass (compass is not displayed). If the compass display is switched off, 9 multifunction buttons are assigned transmitter abbreviations in FM - DAS mode (route guidance not active). show compass Aux Comp BeU <- ?The setting is stored automatically.

text_image
132
text_image
7890 GB.book Seite 133 Montag, 1. Juli 2002 1:20 13 User menu Signal tone volume (BeV) the volume of signal tones (e.g. storage confirmation) can be set using this function. For selection, request user menu. By pressing multifunction button request the second plane of the user menu. Press the multifunction button. Using the SELECT control select either 0 (quiet) or +5 (loud). Alert Beer Beep Vol. +5 AuxCompBeV <- The setting is stored automatically. 133
text_image
7890 GB.book Seite 134 Montag, 1. Juli 2002 1:20 13 Service menu Requesting /quitting the service menu The following information can be requested from the service menu. • Model No.: - display of model number • Serial No.: - display of serial number • Chanser Reset - reset triggering for CDC (if present). To reset, press multifunction button. • GAL - display of current GAL setting • Radio Software - display of radio software status • Radio Bolo - display of radio bolo status • Navi Rom - display of navi rom / lib status • Navi Flash - display of navi flash status • RTC Value - display of RTC value In order to select the service menu, press NAVI and the 10 multifunction buttons simultaneously in radio mode. Model Name: SONY HEX-100NU Nvt PrvEnd Using the multifunction buttons and by turning ing the SELECT control, the individual items can be selected. In order to quit the service menu, press the multifunc- tion button. Triggering reset If a malfunction of the unit should occur, such that the unit is no longer capable of operation or is defective in some other way, a restart of the internal unit software (reset) can be trig- gered via the following button combination. In order to trigger a reset, press the , the multi- 5 function buttons and TP simultaneously. The navigation CD must be inserted after a reset of the unit software.
text_image
7890 GB.book Seite 135 Montag, 1. Juli 2002 1:20 13 Connection instructions Antenna socket GPS antenn: Warning! Terminal 30 and terminal 15 must always be connected separately, otherwise excessive current consumption occurs when the unit is switched off. Connection socket A is not the same for all vehicle types. Therefore, always measure voltages before installation. Socket A 1 Speed signal (GAL.) 2 Reversing lamp signal 3 Telephone mute / clearing function 4 Permanent positive (terminal 30) 5 Control output for automatic antenna/amplifier 6 Illumination (terminal 58) 7 Switched positive (terminal 15) 8 Earth (terminal 31) Socket B 1 Loudspeaker rear right + 2 Loudspeaker rear right - 3 Loudspeaker front right + 4 Loudspeaker front right - 5 Loudspeaker front left + 6 Loudspeaker front left - 7 Loudspeaker rear left + 8 Loudspeaker rear left - Socket C1 1 LineOut rear left 2 LineOut rear right 3 AF carth 4 LineOut front left 5 LineOut front right 6 Subwoofer LineOut Socket C2 7-12 Special connection for Sony optional CD changer CDX-T6NV Socket C3 13 AF telephone input 14 Earth - telephone input 15-17 Special connection for Sony optional CD changer CDX-T6NV 18 CD AF carth (AUX) 19 CD AF left (AUX) 20 CD AF right (AUX) 135
text_image
7890 GB.book Seite 136 Montag, 1. Juli 2002 1:20 13 Removal / installation guide A universal bracket for DIN installation slots is integrated into this car radio. An installation frame is not required. The unit is inserted into the installation slot and secured with the slides supplied. Complete the electrical connections. Then push the unit into the installation slot. Subsequently, push the slides into the apertures in the front of the unit to the first detent position (Figure A). Now lock the radio by pulling both slides, as shown in Figure B. Subsequently, remove the slides. 136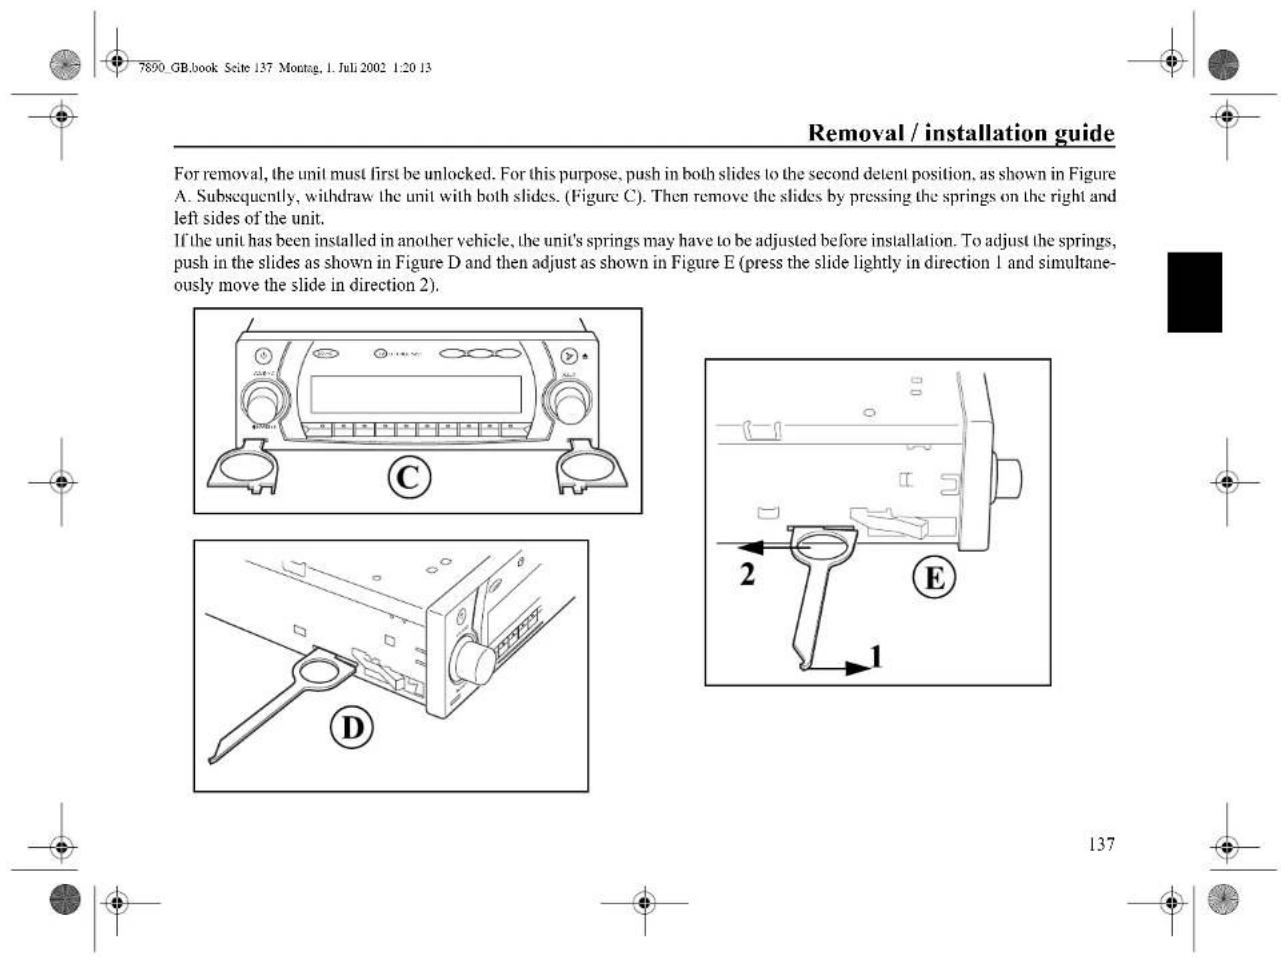
text_image
7890 GB.book Seite 137 Montag, 1. Juli 2002 1:20 13 Removal / installation guide For removal, the unit must first be unlocked. For this purpose, push in both slides to the second detent position, as shown in Figure A. Subsequently, withdraw the unit with both slides. (Figure C). Then remove the slides by pressing the springs on the right and left sides of the unit. If the unit has been installed in another vehicle, the unit's springs may have to be adjusted before installation. To adjust the springs, push in the slides as shown in Figure D and then adjust as shown in Figure E (press the slide lightly in direction 1 and simultaneously move the slide in direction 2). C D E 2 1 137
General instructions
RDS SYSTEM
This car radio is capable of receiving RDS signals (RDS = Radio Data System) in the VIIF range. RDS is a technique which enables the transmission of inaudible additional information in the VIIF broadcasting range. This means that the transmitter broadcasts information which can be evaluated by the car radio.
DAS Seek Qual. plane
In the DAS Seek Qual. plane, all receivable and identifiable RDS programmes are arranged in a list according to quality. The dynamic autostore, search and scan search functions fall back upon this list.
DAS Seek Name plane
In the DAS Seek Name plane, all receivable and identifiable RDS programmes are alphabetically arranged in a list according to name. The dynamic autostore, search and scan search functions fall back upon this list.
Stations RDS plane
In the Stations RDS plane, only identified RDS stations can be stored. The unit constantly switches to the best receivable transmission frequency for the station. During the search on Stations RDS the unit only stops at identifiable stations.
Stations Fix plane
In the Stations Fix plane, frequencies can be assigned to the station buttons. RDS evaluation does not take place. The search on Stations Fix is applicable to FM manual tuning (page 117).


General instructions
PTY (Programme Type)
Specific types of programme, such as e.g. sport, pop music, classical music etc., can be selected using the PTY function. The PTY is broadcast by the RDS transmitter, provided that the transmitter is equipped with this function. The selected transmitter programme type can be displayed or a search for a specific PTY transmitter can be performed. Examples of programme types are:
NEWS News services
POP M Pop music
AFFAIRS Politics and current affairs
ROCK M Rock music
INFO Special word programme
SCIENCE Science
EDUCATE Learning and further education
LIGHT M Light music
DRAMA Radio plays and literature
CLASSICS Classical music
CULTURE Culture, church and society
EASY M Easy listening
VARIED Light entertainment
SPORT Sport
OTHER M Special music programmes
WEATHER Weather report
FINANCE Financial information
CHILDPRG Children's programmes
SOCIAL Social reports
RELIGION Religious reports
PHONE IN Interviews
TRAVEL Travel reports
LEISURE Leisure reports
JAZZ Jazz music
COUNTRY Country music
NATION M National folk music
OLDIES Oldies
FOLK Folk music
DOCUMENT Documentaries
NO PTY No PTY


Frequency range : 20 Hz - 20 kHz for CD operation
30 Hz - 15 kHz for FM
50 Hz - 2.5 kHz for MW, LW, SW
Output power : 4 x 18 Watt
Line cross section : min. 0.75 mm²
Loudspeaker impedance : min. 4 Ω
Line out : 4 x analogue line out (Va max 3Veff at 10 kΩ)
GAL: In order to utilise the GAL, a square wave voltage
with an amplitude of +4 V - +12 V relative to earth, must be available from the electronic speedometer of the vehicle. The adjustment is performed in 7 steps of 2.5 dB.
Aerial : Impedance 50 Ω
AF telephone input : Max. input voltage 8 V (if interference occurs, a commercially available 1 : 1 transformer should be connected into the signal cable).
AUX input : 16 kΩ input impedance, max. input voltage 1.7 Veff
Telephone mute: Low active level < 2 Volt
Supply voltage : 1 2 V
CD connection : Sony optional CD changer CDX-T6NV can be connected.
Playable CDs : Only CDs which conform to DIN EN 60908 may be used.
The use of 8 cm CDs with adapter is not recommended.


In conformance with current EC guidelines, any person may operate this radio receiver.
This unit conforms to the current valid European or harmonised national regulations. The designation is your guarantee of conformance to the applicable specifications concerning electromagnetic compatibility for the unit. This means that interference affecting other electrical/electronic devices caused by your unit, as well as interfering influences on your unit from other electrical/electronic devices, can be largely prevented.
Current valid designations are:
- CE symbol for issue according to European guideline 89/336/EEC under application of the following standards: EN 55013
EN 55020
- e symbol according to European motor vehicle EMC guideline 95/54/EU, also permits operation in motor vehicles (classes M, N and O) which received their type approval after 1st January 1996.
C ∈
e 1 021473

141


Instructions de raccordement
natural_image
Diagram showing two electronic device setups with labeled component A (no text or symbols on devices)Activer/désactiver le mode TMC
Instructions de raccordement
text_image
Prise jack pour au- tenne C1 C2 C3 1 4 7 10 13 16 18 3 6 9 12 16 18 2 3 5 7 1 [3] [6] [7] 2 [4] [6] [6] 1 [3] [6] [7] 2 [4] [6] [6] Antennes GPSnatural_image
Front view line drawing of a car air conditioner unit with control knobs and buttons (no text or symbols)
text_image
2 1 E

natural_image
Technical line drawing of a mechanical assembly with a tool and labeled component D (no text or symbols beyond label)207


Remarques générales
SYSTEME RDS
Livello Stations RDS 278
Livello Stations Fix 278
PTY (Program Type) 279
Dati tecnici 280
FOGLIO INDICATIVO 281


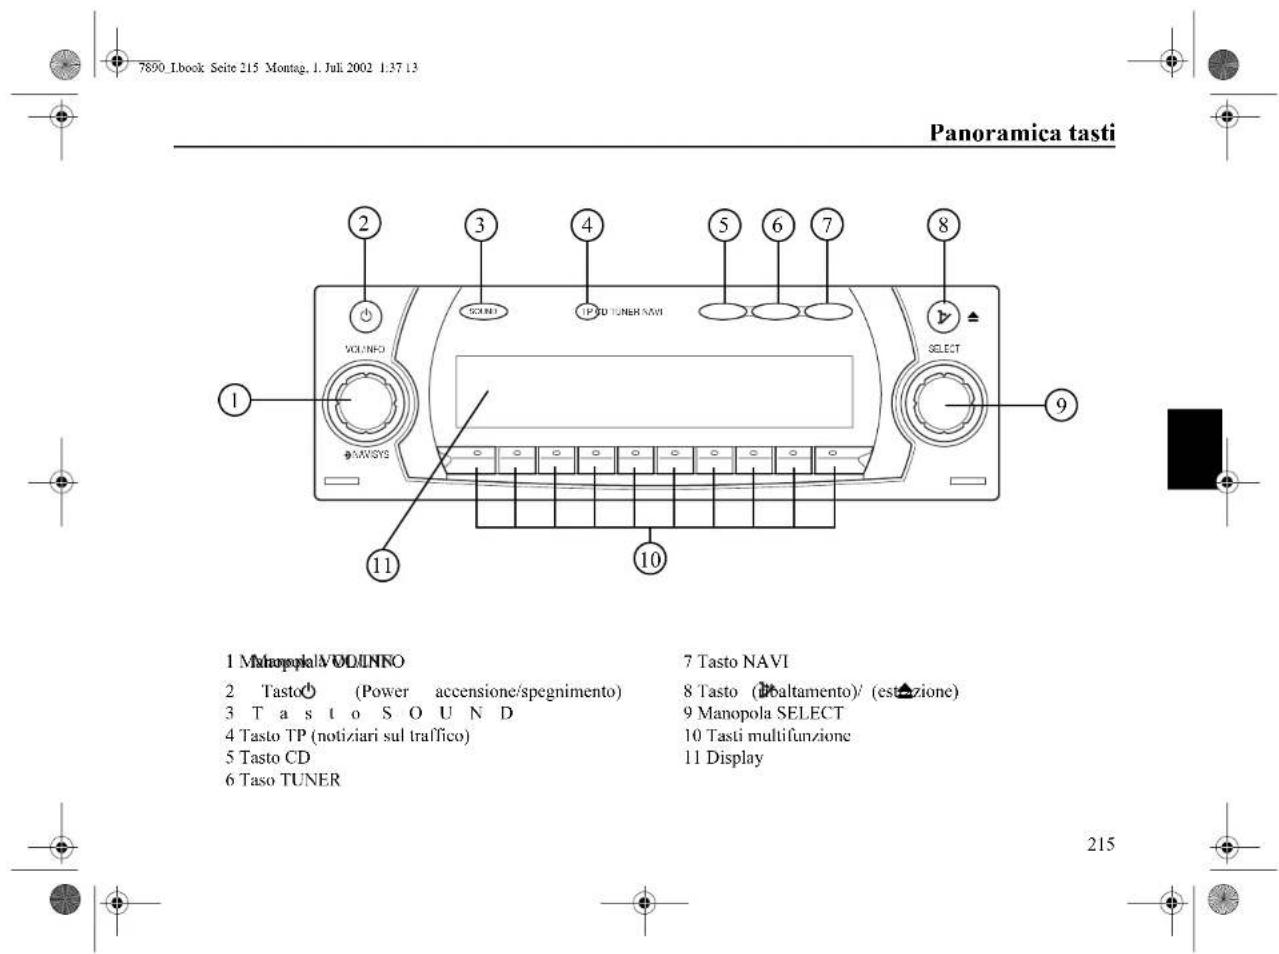
text_image
7890 Ibook Seite 215 Montag. 1. Jul. 2002 1.37 13 Panoramica tasti 1 Manopola VOLINFO 2 Tasto (Power accensione/spegnimento) 3 T a s t o S O U N D 4 Tasto TP (notiziari sul traffico) 5 Tasto CD 6 Taso TUNER 7 Tasto NAVI 8 Tasto (baltamento)/ (estazione) 9 Manopola SELECT 10 Tasti multifunzione 11 Display 215


text_image
Diagram showing two car front-mounted devices with labeled components and a circular indicator labeled 'A'Inserimento del frontalino
natural_image
Pure geometric diagram with crosshair markers and numerical label 267, no readable text or symbols
Livello Stations RDS
OTHER M Programmi musicali speciali
WEATHER Notiziario meteorologico
30 Hz - 15 kHz in FM
50 Hz - 2,5 kHz in MW, LW, SW