Aromatica II Thermo - Coffee machine Klarstein - Free user manual and instructions
Find the device manual for free Aromatica II Thermo Klarstein in PDF.

User questions about Aromatica II Thermo Klarstein
0 question about this device. Answer the ones you know or ask your own.
Ask a new question about this device
Download the instructions for your Coffee machine in PDF format for free! Find your manual Aromatica II Thermo - Klarstein and take your electronic device back in hand. On this page are published all the documents necessary for the use of your device. Aromatica II Thermo by Klarstein.
USER MANUAL Aromatica II Thermo Klarstein
Unit 6 Riverside Business Centre
Brighton Road
Shoreham-by-Sea
BN43 6RE
United Kingdom
Dear Customer,
Congratulations on purchasing this device. Please read the following instructions carefully and follow them to prevent possible damages. We assume no liability for damage caused by disregard of the instructions and improper use. Scan the QR code to get access to the latest user manual and more product information.

CONTENTS
Safety instructions 20
Product Description 22
Control Panel, Buttons and Indicators 24
Start and Operation 25
Cleaning and Maintenance 33
Troubleshooting 35
Disposal Considerations 36
Manufacturer & Importer (UK) 36
TECHNICAL DATA
| Item number 10032875, 10032876 | |
| Power supply 220-240 V ~ 50/60 Hz | |
| Power consumption 1000 W | |
| Max. capacity (water tank) 1.25 l |
SAFETY INSTRUCTIONS
General safety
- Read the manual carefully before use and keep the manual for future reference.
- Only use the appliance and the accessories for their intended purposes and do not use the appliance and the accessories for other purposes than described in the manual.
- Do not use the appliance if any part or any accessory is damaged or defective. If a part or an accessory is damaged or defective, it must be replaced by the manufacturer or an authorised repair agent.
- Children should be supervised to ensure that they do not play with the appliance.
- The use of this appliance by children or persons with a physical, sensory, mental or motorial disability, or lack of experience and knowledge can give cause to hazards. Persons responsible for their safety should give explicit instructions or supervise the use of the appliance.
- Do not use the appliance near bathtubs, showers, basins or other vessels containing water.
- Do not immerse the appliance in water or other liquids.
- If the appliance is immersed in water or other liquids, do not remove the appliance with your hands. Immediately remove the mains plug from the wall socket. If the appliance is immersed in water or other liquids, do not use the appliance again.
- This appliance is intended to be used in domestic and similar applications such as staff kitchen areas in shops, offices and other working environments; farm houses; by clients in hotels, motels and other residential type environments; bed-and-breakfast type environments.
Electrical safety
- Before use, always check that the mains voltage is the same as the voltage on the rating plate of the appliance.
- The appliance is not intended to be operated by means of an external timer or separate remote-control system.
- Connect the appliance to an earthed wall socket. If necessary, use an earthed extension cable of a suitable diameter (at least 3 × 1 ~mm^2 ).
- Make sure that water cannot enter the contact plugs of the mains cable and the extension cable.
- Always fully unwind the mains cable and the extension cable.
- Make sure that the mains cable does not hang over the edge of a worktop and cannot be caught accidentally or tripped over.
- Keep the mains cable away from heat, oil and sharp edges.
-
Do not use the appliance if the mains cable or the mains plug is damaged or defective. If the mains cable or the mains plug is damaged or defective, it must be replaced by the manufacturer, an authorised repair agent or by a qualified person.
-
Do not pull the mains cable to disconnect the mains plug from the mains.
- Disconnect the mains plug from the mains when the appliance is not in use, before assembly or disassembly and before cleaning and maintenance.
Safety instructions for coffeemakers
- Do not use the appliance outdoors.
- Do not use the appliance in damp environments.
- Only use the appliance in frost-free environments if the appliance is fi lled with water.
- Place the appliance on a stable and fl at surface.
- Place the appliance on a heat-resistant and splash-proof surface.
- Do not place the appliance on a hob.
- Do not place the appliance on hot surfaces or near open fl ames.
- Make sure that the appliance does not come into contact with flammable material.
- Keep the appliance away from heat sources.
- Be careful with hot water and steam to avoid burns.
- Store the appliance in a dry place when not in use. Make sure that children do not have access to stored appliances.
Disposal of packaging

WARNING
Danger of suffocation! Dispose of plastic packaging immediately so that children do not injure themselves.
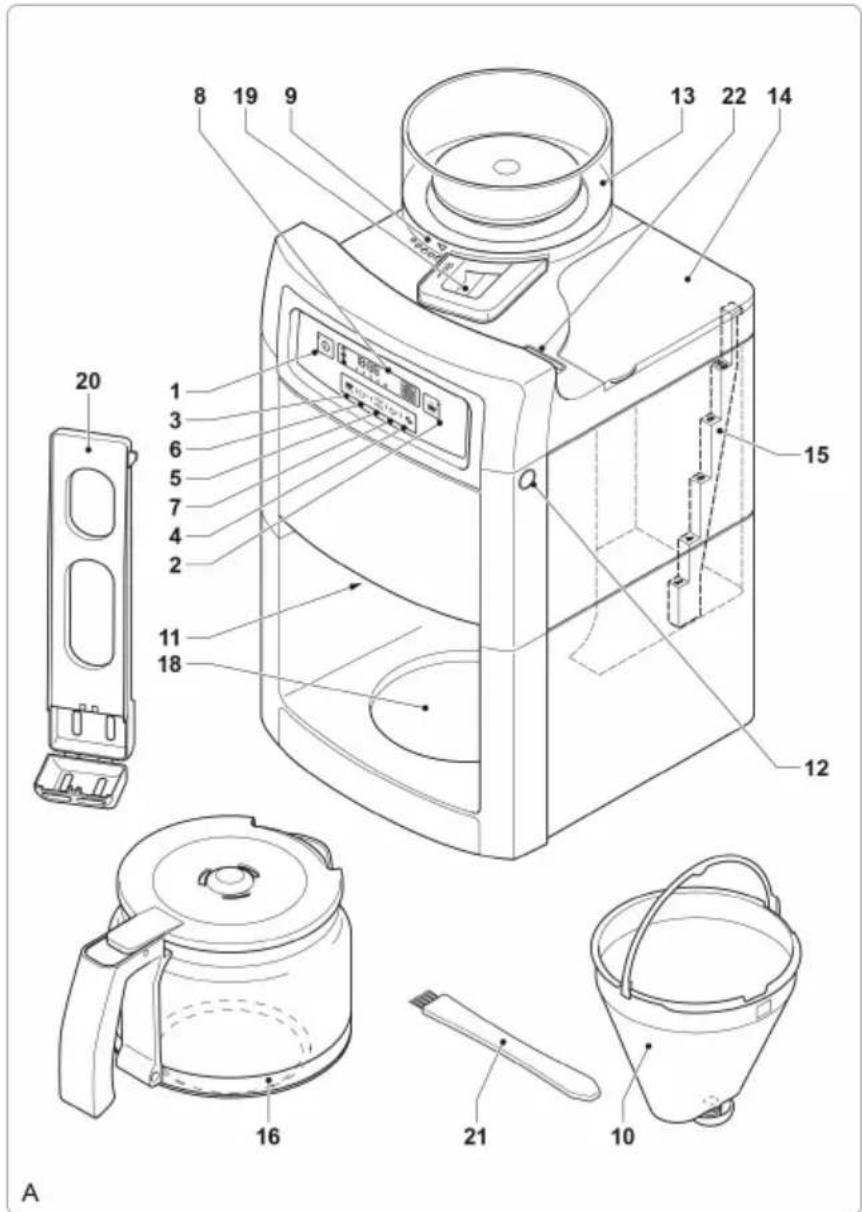
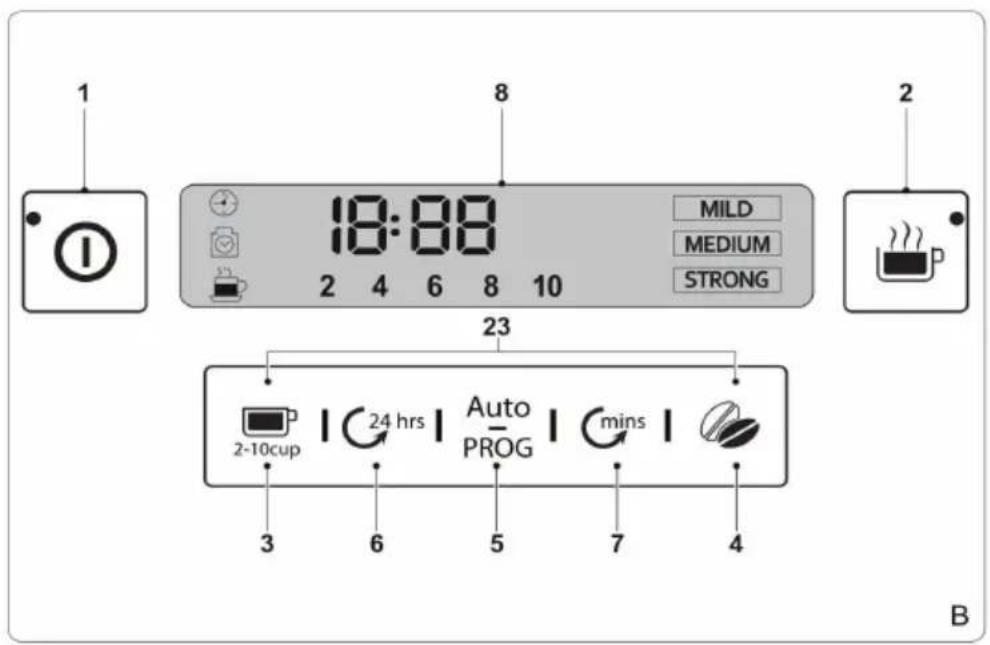
1 On/off button A Coff ee quantity indicator
2 Grinding button B Coff ee stre indicator
3 Coff ee quantity selector C Timer indicator
4 Coff ee strength selector D Desoing indicator
5 Timer button
6 Hour button
7 Minute button
8 Display
9 Ground coff ee fi neness selector
10 Permanent filter
11 Filter holder assembly
12 Release button (fi lter holder assembly)
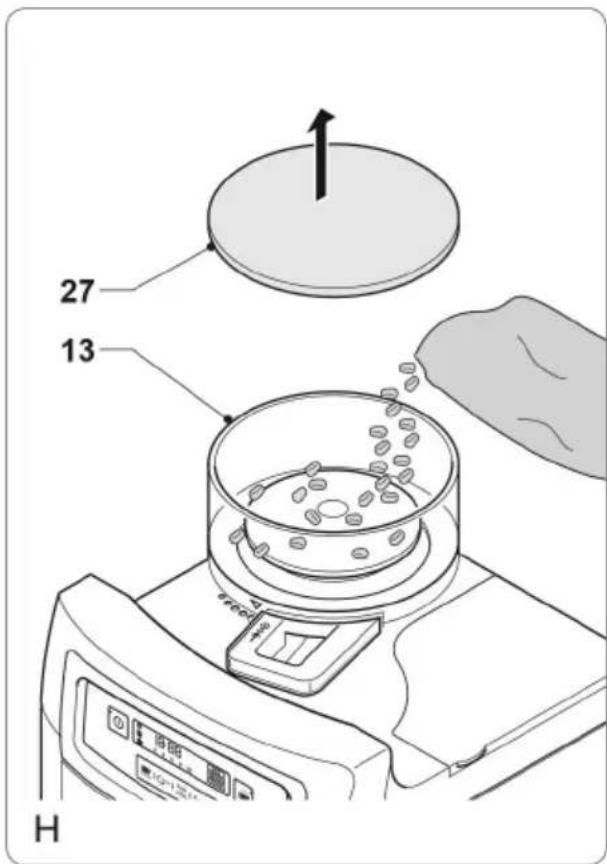
13 Coff ee bean compartment
14 Water reservoir
15 Water level indicator
16 Coff ee pot
18 Storage plate
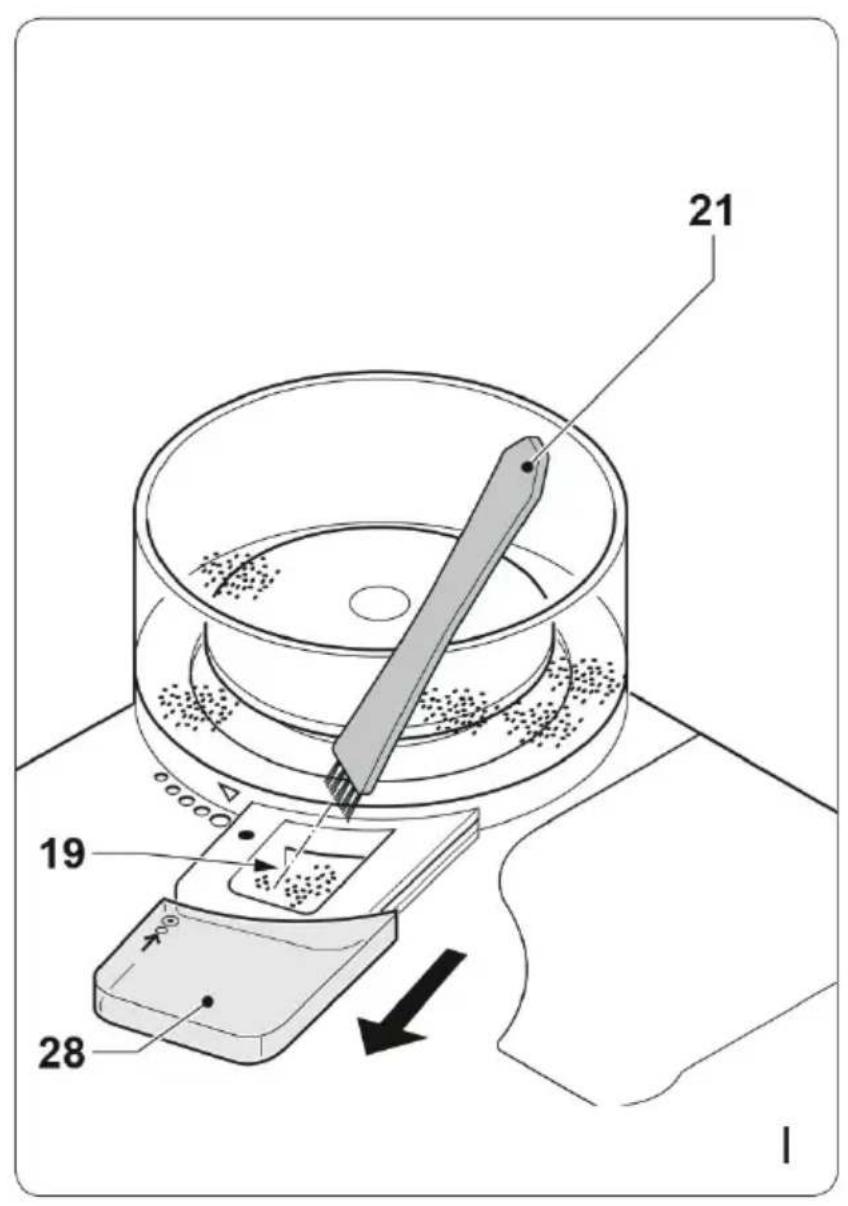
19 Grinding compartment
20 Carbon filter holder
21 Brush/screwdriver
22 Steam hole
23 Descale button (button 3+4)
24 Water tank cover
25 Carbon filer mounting
26 Carbon filter
27 Coff ee bean compartment cover
28 Cleaning opening cover

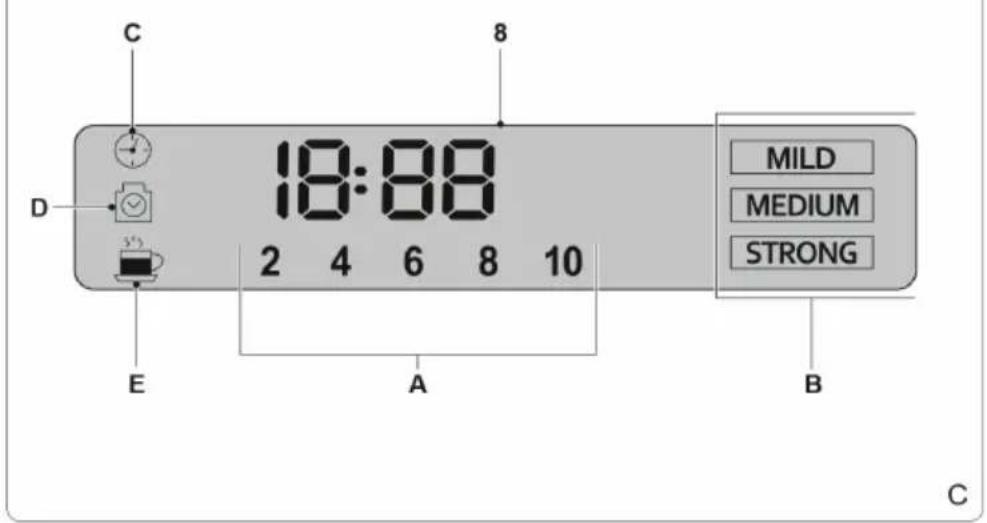
CONTROL PANEL, BUTTONS AND INDICATORS
START AND OPERATION
Before Initial Use
- Clean the appliance. Refer to the section "Cleaning and maintenance".
- Clean the accessories. Refer to the section "Cleaning and maintenance".
Setting the clock (fig. B & C)
If the mains plug is inserted into the wall socket, the display (8) will light to indicate that the clock can be set. The clock can be adjusted at any time later on.
- Repeatedly press the hour button (6) to set the hours.
- Repeatedly press the minute button (7) to set the minutes.
- The time is shown on the display (8).
Use

CAUTION:
Risk of scalding! Keep your hands, face and other body parts away from the steam hole. The steam from the appliance becomes very hot during use. Do not cover the steam hole.
- The appliance can be used for making coff ee with coff ee beans or ground coff ee.
- Before first use, the appliance is set to make coff ee with coff ee beans.
- After each use, the appliance will memorise the last used setting for the next use: making coff ee with coff ee beans or making coff ee with ground coff ee.
Note: The appliance can only be used when the display is activated. If the display is not activated, press any button to activate the display. The appliance is ready for use.
Setting the coff ee quantity (fig. B & C)
- The coff ee quantity selector (3) is used for setting the required coff ee quantity. It can be set to 2, 4, 6, 8 or 10 cups.
- Repeatedly press the coff ee quantity selector (3) to set the coff ee quantity. The number of cups (A) is shown on the display (8).
- Aroma function: Long press the coffee quantity selector (3) to enter the "AROMA" stage, the icon lights up and the heating tube is heated up at intervals.
Setting the coffee strength (fig. B & C)
- The coffee strength selector (4) is used for setting the required coffee strength. It can be set to mild coffee (MILD), medium coffee (MEDIUM) and strong coffee (STRONG).
- Repeatedly press the coffee strength selector (4) to set the coffee strength.
The coffee strength (B) is shown on the display (8).
Delay start function (fig. B & C)
The appliance has a delay start function which makes it possible to program the time for starting the coffee-making process. The delay start can be selected via the timer button (5).
- Set the clock. Check whether the clock has already been set. If the clock has not been set, refer to the section "Setting the clock".
- Keep the timer button (5) pressed until the clock on the display flashes.
- Repeatedly press the hour button (6) to set the hours.
- Repeatedly press the minute button (7) to set the minutes.
- Set the coffee quantity. Refer to the section "Setting the coffee quantity".
- Set the coffee strength. Refer to the section "Setting the coffee strength".
- If you want to make coffee with ground coffee, switch off the grinding function before using the delay start function.
- Press the timer button (5) to save the settings. The timer indicator (C) lights continuously.
- To interrupt the process, press the timer button (5) again. The timer indicator (C) goes off.
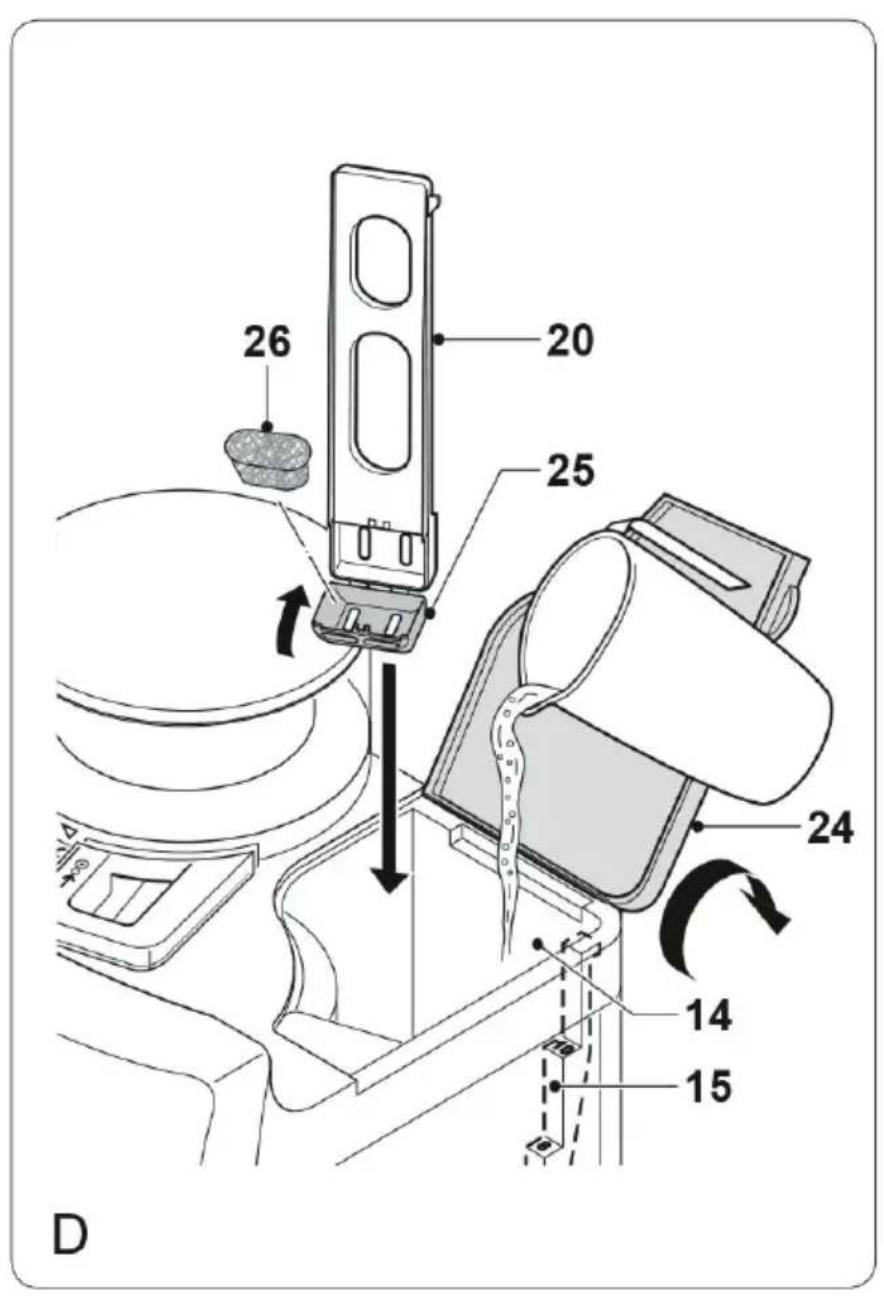
Filling the water reservoir (fig. D)
- Before filling the water reservoir, switch off the appliance and remove the mains plug from the wall socket.
- Do not fill the water reservoir with more water than required for making the coffee. Only use the amount of water required for making the coffee. The appliance automatically stops when the water reservoir is empty.
- Do not use the appliance without water in the water reservoir.
- Do not exceed the maximum mark (10 cups) when you fill the water reservoir. Make sure that the water level is always above the minimum mark (2 cups) during use.
- Only use cold water to fill the water reservoir.
- Do not use carbonated water or other liquids to fill the water reservoir.
- Do not pour water in the coffee bean compartment.

To fill the water reservoir:
- Open the cover (24).
- Fill the water reservoir (14) with water up to the required mark on the water level indicator (15).
- Do not fill the water reservoir with more water than required for making the coffee. Only use the amount of water required for making the coffee. The appliance automatically stops when the water reservoir is empty.
- Close the cover (24).
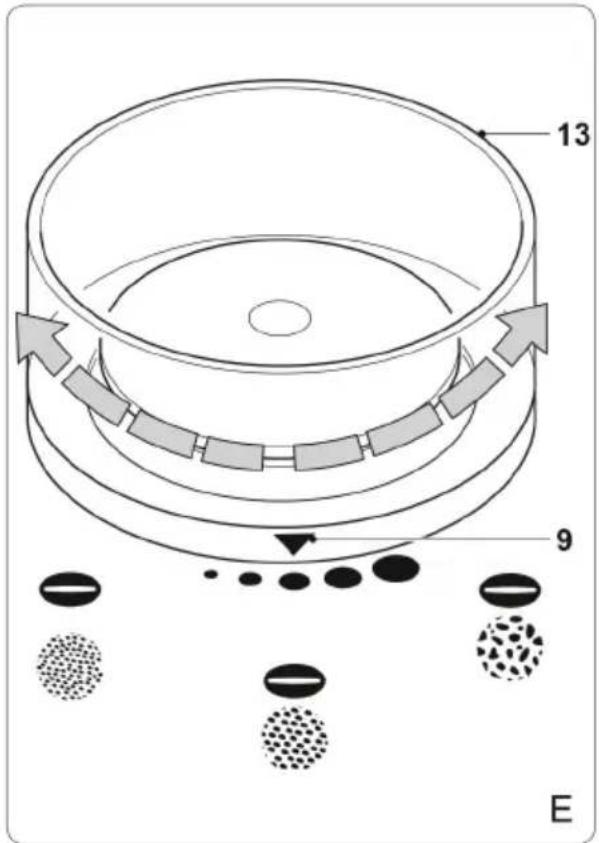
Setting the ground coffee fineness (fig. E)
- The ground coffee fineness selector (9) is used for setting the required fineness of the ground coffee when using coffee beans. It can be set to different positions from fine coffee grounds to coarse coffee grounds.
- Turn the ground coffee fineness selector (9) to the required position to set the fineness of the ground coffee.
Removing/replacing the lid of the thermos jug
- Remove the lid: Turn the lid anticlockwise. The lid can now be removed.
- Fit the lid: Place the lid onto the jug so that the release lever is pointing to the right. Turn the lid clockwise until it stops. The lid is now closed.
- Pour coffee: Press and hold down the release lever in order to pour out the contents of the thermos jug.
Note: We recommend preheating the thermos jug with hot water before use.
Making coffee with coffee beans (fig. A - H)
Note: Use only coffee beans and basket filter bags of size 80/200 mm.
- If the grinding function is not activated, press the grinding button (2) to activate the grinding function. The coffee quantity and the coffee strength are shown on the display.
- Fill the water reservoir (14) with the required amount of water. Do not fill the water reservoir with more water than required for making the coffee. Only use the amount of water required for making the coffee. The appliance automatically stops when the water reservoir is empty.
- Open the cover of the coffee bean compartment (27).
- Fill the coffee bean compartment (13) completely with coffee beans.
- Close the cover (27).
- Set the ground coffee fineness. Refer to the section "Setting the ground coffee fineness".
- Press the release button (12) to open the filter holder assembly (11).
- Place a suitable coffee filter in the coffee filter holder (10).
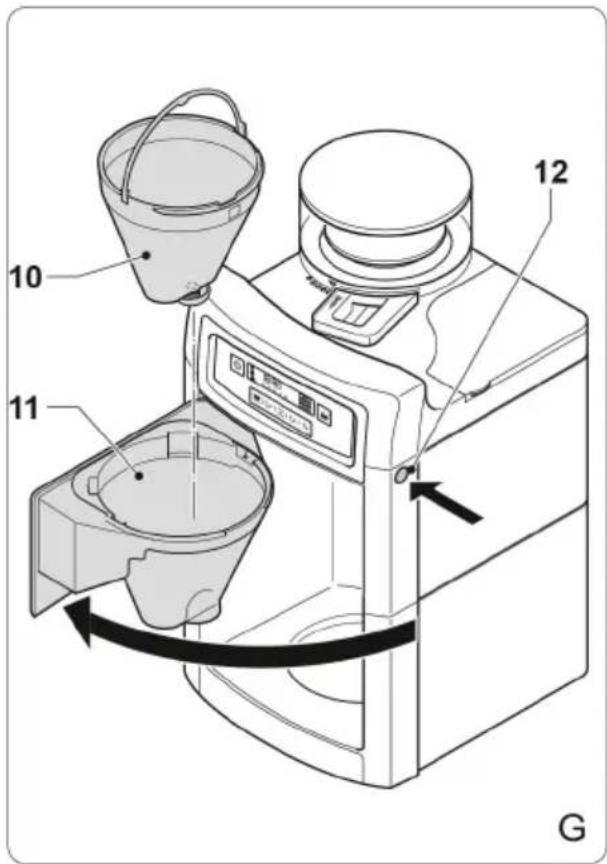
- Close the filter holder assembly (11) until the release button (12) clicks into place.
- Set the coffee quantity. Refer to the section "Setting the coffee quantity".
- Set the coffee strength. Refer to the section "Setting the coffee strength".
- Place the coffee pot (16) on the storage plate (18).
- Switch on the appliance by pressing the on/off button (1). After a few seconds, the appliance starts grinding the coffee beans and making the coffee.
- To interrupt the process, press the on/off button (1).
- If the process is completed, the appliance will beep. The appliance can be switched off by pressing the on/off button (1).
- Allow the appliance to cool down completely.
Making coffee with ground coffee (fig. A, B, C, D, F & G)
Note: Use only ground coffee and basket filter bags of size 80/200 mm.
- If the grinding function is activated, press the grinding button (2) to deactivate the grinding function. The coffee quantity and the coffee strength are not shown on the display.
- Fill the water reservoir (14) with the required amount of water. Do not fill the water reservoir with more water than required for making the coffee. Only use the amount of water required for making the coffee. The appliance automatically stops when the water reservoir is empty.
- Press the release button (12) to open the filter holder assembly (11).
- Place a suitable coffee filter in the coffee filter holder (10).
- Put the required amount of coffee in the coffee filter.
- Close the filter holder assembly (11) until the release button (12) clicks into place.
- Place the coffee pot (16) on the storage plate (18).
- Switch on the appliance by pressing the on/off button (1). The appliance starts making the coffee.
- To interrupt the process, press the on/off button (1).
- If the process is completed, the appliance will beep. The appliance can be switched off by pressing the on/off button (1).
- Allow the appliance to cool down completely.
CLEANING AND MAINTENANCE
- Before cleaning or maintenance, always switch off the appliance, remove the mains plug from the wall socket and wait until the appliance has cooled down.
- Do not immerse the appliance in water or any other liquids.
- Do not use aggressive or abrasive cleaning agents to clean the appliance.
- Do not use sharp objects to clean the appliance.
- Regularly check the appliance for possible damage.
-
Clean the accessories:
-
Clean the coffee pot in soapy water.
- Clean the coffee filter holder in soapy water.
- Clean the lid of the coffee bean compartment in soapy water.
- Thoroughly dry the accessories.
- Clean the outside of the appliance with a damp cloth. Dry the outside of the appliance with a clean, dry cloth.
- Put the appliance and the accessories in the original packaging
- Store the appliance in a dry and frost-free place, out of the reach of children.
Cleaning the grinding compartment (fig. C & I)
Note: When grinding coffee beans, coffee powder can clog the grinding mechanism. The grinding compartment (19) can be cleaned every 2 weeks to prevent the grinding mechanism from being clogged.
Before cleaning the grinding compartment the following steps are required:
- Switch off the appliance.
- Remove the mains plug from the wall socket.
- Remove the coffee pot from the storage plate.
- Empty the coffee filter holder. Place a suitable coffee filter. Close the filter holder assembly.
- Release the lock on the cover (28) by pressing the small button.
- Remove the cover (28).
- Clean the grinding compartment (19) using the brush (21).
- Mount the cover (28).
Descending the appliance (fig. A - D)
- The appliance must be descaled after each 70 brewing cycles. If you leave the mains plug in the wall socket, the appliance will keep track of the number of brewing cycles.
- The indicator (D) will flash on the display to indicate that the appliance must be descaled.
-
If the appliance must be descaled, use a suitable descending agent. Special descending agents are available from local specialist shops.
-
Before descending the appliance, remove the mains plug from the wall socket and wait until the appliance has cooled down
- Do not immerse the appliance in water or any other liquids.
- Make sure that the grinding function is not activated when descaling the appliance.
To start the descending process:
- Open the cover (24).
- If necessary, empty the water reservoir (14).
- Remove the carbon filter holder (20) from the water reservoir (14).
- Fill the water reservoir (14) with a suitable descaling agent.
- Place the coffee pot (16) on the storage plate (18).
- Insert the mains plug into the wall socket.
- Switch on the appliance by pressing the on/off button (1).
- Let the appliance run until 13 of the descending agent is in the coffee pot (16).
- Switch off the appliance by pressing the on/off button (1).
- Let the descending agent work for approximately 30 minutes.
- Switch on the appliance by pressing the on/off button (1).
- Let the appliance run until the remaining descending agent is in the coffee pot (16). The appliance stops automatically when the water reservoir (14) is empty.
Rinse the appliance twice according to the below procedure:
- Fill the water reservoir (14) with clean water up to the maximum mark on the water level indicator (15).
- Place the empty coffee pot (16) on the storage plate (18).
- Switch on the appliance by pressing the on/off button (1).
- Let all water run through the appliance. The appliance stops automatically when the water reservoir (14) is empty.
After descending:
- Place the carbon filter holder (20) in the water reservoir (14).
- Close the cover (24).
- Switch off the appliance by pressing the on/off button (1).
- Keep the coffee quantity selector (3) and the coffee strength selector (4) pressed until the indicator (D) disappears from the display (8) (fig. C).
- Clean the outside of the appliance with a damp cloth. Dry the outside of the appliance with a clean, dry cloth.
- The appliance is ready for use.
Replacing carbon filter
- Open the cover (24).
- If necessary, empty the water reservoir (14).
- Remove the carbon filter holder (20) from the water reservoir (14).
- Open the cover (25).
- Remove the old carbon filter (26).
- Place the new carbon filter (26).
- Close the cover (25).
Note: The carbon filter holder must not be placed in the water reservoir before the appliance has been descaled. This does not apply the first time you put the appliance into operation.
TROUBLESHOOTING
| Problem Possible Cause | Use Suggested Solution | |
| No symbol in the display. | Not plugged in. Insert the plug. | |
| No mains power. Check the fuse/socket. | ||
| Display is defective. Contact | customer service. | |
| The automatic circuit breaker in the fuse box trips | Too many appliances connected to the same power circuit. | Plug the device into its own power socket. |
| Appliance defective. Contact | customer service. | |
| Water runs out of the appliance | Too much water in the water tank. | Do not overfill the water tank |
DISPOSAL CONSIDERATIONS
If there is a legal regulation for the disposal of electrical and electronic devices in your country, this symbol on the product or on the packaging indicates that this product must not be disposed of with household waste. Instead, it must be taken to a collection point for the recycling of electrical and electronic equipment. By disposing of it in accordance with the rules, you are protecting the environment and the health of your fellow human beings from negative consequences. For information about the recycling and disposal of this product, please contact your local authority or your household waste disposal service.
MANUFACTURER & IMPORTER (UK)
Manufacturer:
Chal-Tec GmbH, Wallstrasse 16, 10179 Berlin, Germany.
Importer for Great Britain:
Chal-Tec UK limited
Unit 6 Riverside Business Centre
Brighton Road
Shoreham-by-Sea
BN43 6RE
United Kingdom
Chere cliente, cher client,
Unit 6 Riverside Business Centre
Brighton Road
Shoreham-by-Sea
BN43 6RE
United Kingdom
Estimado cliente:
Unit 6 Riverside Business Centre
Brighton Road
Shoreham-by-Sea
BN43 6RE
United Kingdom
Gentile clientele,
PRODUTTORE E IMPORTATORE (UK)
Produtlore:
Chal-Tec GmbH, Wallstraße 16, 10179 Berlin, Germania.
Unit 6 Riverside Business Centre
Brighton Road
Shoreham-by-Sea
BN43 6RE
United Kingdom
Vázenzý zákazníku,
Unit 6 Riverside Business Centre
Brighton Road
Shoreham-by-Sea
BN436RE
Velká Británie
Geachte klant,
INSTRUCTIES VOOR AFVOER
Unit 6 Riverside Business Centre
Brighton Road
Shoreham-by-Sea
BN43 6RE
United Kingdom


KLARSTEIN