
Aromatica Taste 10 - Coffee machine Klarstein - Free user manual and instructions
Find the device manual for free Aromatica Taste 10 Klarstein in PDF.
| Product type | Coffee machine with built-in grinder |
| Brand | Klarstein |
| Model | Aromatica Taste 10 |
| Power supply | 220-240 V~, 50/60 Hz, 1000 W |
| Capacity | 10 cups (max) |
| Coffee type | Coffee beans or ground coffee |
| Grinder | Integrated, adjustable intensity |
| Functions | Delayed programming, keep warm, descaling, cup selection (2/4/6/8/10), intensity adjustment |
| Display | LED display with clock and indicators |
| Carafe | Glass with handle and lid |
| Hot plate | Keep warm (auto shut-off after 40 min) |
| Included accessories | Cleaning brush, filter basket, glass carafe |
| Safety | Auto shut-off, overheat protection |
| Maintenance | Clean after each use, regular descaling |
| Item number | 10035654 |
| Manufacturer | Chal-Tec GmbH, Wallstraße 16, 10179 Berlin, Germany |
Frequently Asked Questions - Aromatica Taste 10 Klarstein
User questions about Aromatica Taste 10 Klarstein
0 question about this device. Answer the ones you know or ask your own.
Ask a new question about this device
Download the instructions for your Coffee machine in PDF format for free! Find your manual Aromatica Taste 10 - Klarstein and take your electronic device back in hand. On this page are published all the documents necessary for the use of your device. Aromatica Taste 10 by Klarstein.
USER MANUAL Aromatica Taste 10 Klarstein
KLARSTEIN
www.klarstein.com

area
| Category | Value | | -------- | ----- | | A | 100 | | B | 100 | | C | 100 | | D | 100 | | E | 100 | | F | 100 | | G | 100 | | H | 100 | | I | 100 | | J | 100 | | K | 100 | | L | 100 | | M | 100 | | N | 100 | | O | 100 | | P | 100 | | Q | 100 | | R | 100 | | S | 100 | | T | 100 | | U | 100 | | V | 100 | | W | 100 | | X | 100 | | Y | 100 | | Z | 100 |INHALT
Technische Daten 3
Hersteller 3
Unit 6 Riverside Business Centre
Brighton Road
Shoreham-by-Sea
BN43 6RE
United Kingdom
SICHERHEITSHINWEISE
Tastenfunktionen
natural_image
Symbol of a trash bin with crossed lines indicating no waste or discharge, and a solid black rectangle below (no text or labels)Congratulations on purchasing this equipment. Please read this manual carefully and take care of the following hints to avoid damages. Any failure caused by ignoring the items and cautions mentioned in the instruction manual are not covered by our warranty and any liability. Scan the QR code to get access to the latest user manual in your language.

CONTENTS
Technical Data 11
Producer 11
Product Overview 14
Overview 15
Operation 16
Cleaning and Care 18
Hints on Disposal 18
TECHNICAL DATA
| Item numer 10035654 | |
| Power supply 220-240 V~ 50/60 Hz | |
| Power rating 1000 W | |
| Brewing quantity 10 cups | |
MANUFACTURER & IMPORTER (UK)
Manufacturer:
Chal-Tec GmbH, Wallstrasse 16, 10179 Berlin, Germany.
Importer for Great Britain:
Chal-Tec UK limited
Unit 6 Riverside Business Centre
Brighton Road
Shoreham-by-Sea
BN43 6RE
United Kingdom
SAFETY INSTRUCTIONS
General safety
- Read the manual carefully before use and keep the manual for future reference.
- Only use the appliance and the accessories for their intended purposes and do not use the appliance and the accessories for other purposes than described in the manual.
- Do not use the appliance if any part or any accessory is damaged or defective. If a part or an accessory is damaged or defective, it must be replaced by the manufacturer or an authorised repair agent.
• Children should be supervised to ensure that they do not play with the appliance. - The use of this appliance by children or persons with a physical, sensory, mental or motorial disability, or lack of experience and knowledge can give cause to hazards. Persons responsible for their safety should give explicit instructions or supervise the use of the appliance.
- Do not use the appliance near bathtubs, showers, basins or other vessels containing water.
- Do not immerse the appliance in water or other liquids.
- If the appliance is immersed in water or other liquids, do not remove the appliance with your hands. Immediately remove the mains plug from the wall socket. If the appliance is immersed in water or other liquids, do not use the appliance again.
- This appliance is intended to be used in domestic and similar applications such as staff kitchen areas in shops, offices and other working environments; farm houses; by clients in hotels, motels and other residential type environments; bed-and-breakfast type environments.
Electrical safety
- Before use, always check that the mains voltage is the same as the voltage on the rating plate of the appliance.
- The appliance is not intended to be operated by means of an external timer or separate remote-control system.
- Connect the appliance to an earthed wall socket. If necessary, use an earthed extension cable of a suitable diameter (at least 3 × 1 mm^2 ).
- Make sure that water cannot enter the contact plugs of the mains cable and the extension cable.
• Always fully unwind the mains cable and the extension cable. - Make sure that the mains cable does not hang over the edge of a worktop and cannot be caught accidentally or tripped over.
- Keep the mains cable away from heat, oil and sharp edges.
-
Do not use the appliance if the mains cable or the mains plug is damaged or defective. If the mains cable or the mains plug is damaged or defective, it must be replaced by the manufacturer, an authorised repair agent or by a qualified person.
-
Do not pull the mains cable to disconnect the mains plug from the mains.
- Disconnect the mains plug from the mains when the appliance is not in use, before assembly or disassembly and before cleaning and maintenance.
Safety instructions for coffee makers
- Do not use the appliance outdoors.
- Do not use the appliance in damp environments.
- Only use the appliance in frost-free environments if the appliance is filled with water.
- Place the appliance on a stable and fl at surface.
- Place the appliance on a heat-resistant and splash-proof surface.
- Do not place the appliance on a hob.
- Do not place the appliance on hot surfaces or near open flames.
- Make sure that the appliance does not come into contact with fl ammable material.
- Keep the appliance away from heat sources.
- Be careful with hot water and steam to avoid burns.
- Store the appliance in a dry place when not in use. Make sure that children do not have access to stored appliances.
Disposal of packaging

WARNING:
Danger of suffocation! Dispose of plastic packaging immediately so that children do not injure themselves.
PRODUCT OVERVIEW
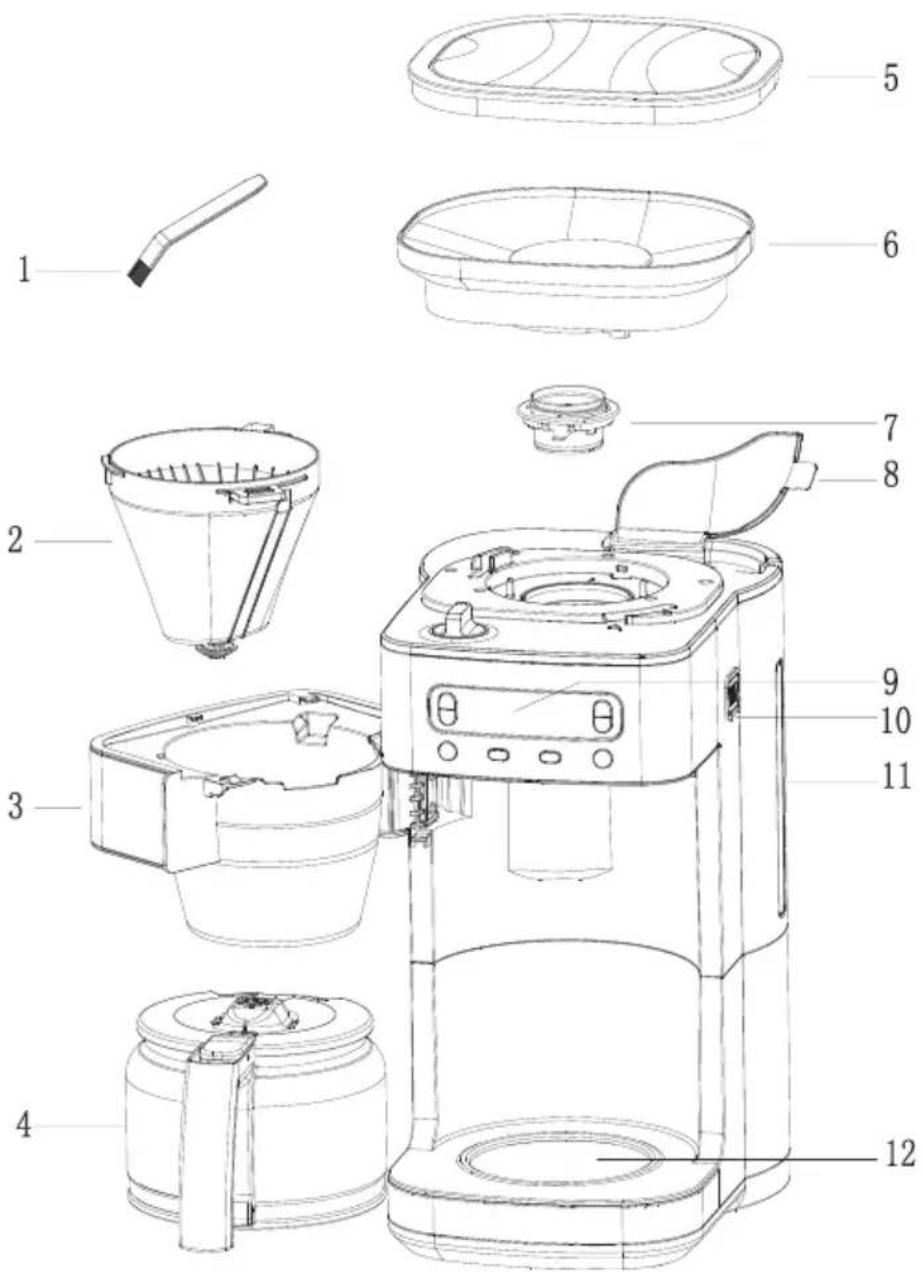
1 Cleaning brush
2 Filter basket
3 Filter basket holder
4 Glass carafe
5 Bean box lid
6 Bean Box
7 Grinding plant
8 Water tank lid
9 Display
10 Steam outlet
11 Water level indicator
12 Hot plate
OVERVIEW
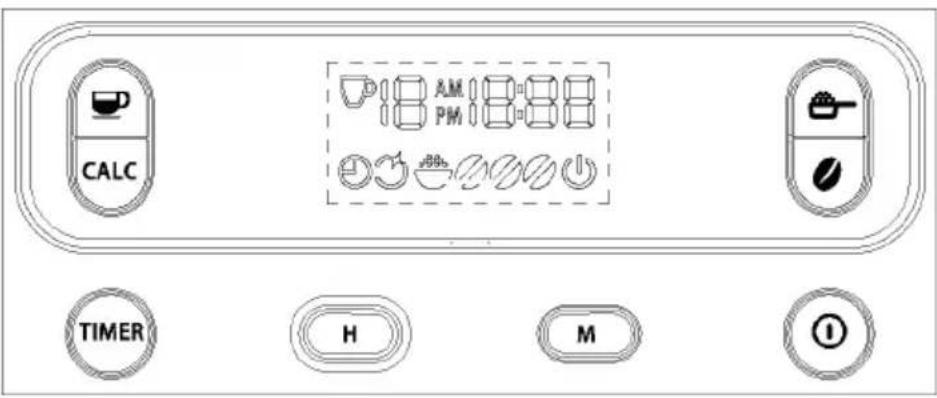
Button fuctions instruction
 | On/Off switch. Turn the appliance on or off. |
 | Timer button: Switch-on timer1) Press this button briefly to start or end the power-on timer.2) Press and hold this button for a few seconds to enter the automatic power-up mode. Then press the "H" or "M" button to set the automatic power-on time. |
 | "H" button: Setting the hours. Press the button repeatedly to set the hours. The number of hours increases each time the button is pressed. |
 | "M" button: Setting the minutes. Press the button repeatedly to set the minutes. The number of minutes increases each time the button is pressed. |
 | Number of cups. In standby mode, press to set the number of cups to 2, 4, 6, 8 or 10. |
 | Setting coffee strength button: In standby mode, press this button to set the coffee strength via selecting icon 2, or on display for weak to strong coffee. |
 | Brewing mode: Press this key to switch directly to brewing mode without activating grinding mode. |
 | Decalcification: Press to enter decalcification mode. Press again to exit the decalcification mode. |
OPERATION
- Connect the unit to the power supply. The time display shows 00:00. The clock symbol flashes without counting the time. The default setting is 2 cups (weak coffee). Press the ON/OFF switch to start grinding and brewing. The power indicator light flashes and the machine starts working.
2. Setting the clock
In standby mode, press the "H" and "M" buttons to display the clock setting screen. Use the "H" button to set the hours of the clock (in 12-hour format). Each time you press the button, the value increases by one hour. Press and hold the button to increment the hours continuously.
Use the "M" button to set the minutes of the time (00-59). Each time the button is pressed, the value increases by one minute. Keep the key pressed to increase the minutes continuously.
3. Auto On
In standby mode, press the TIMER button to access the power-on time settings. The automatic switch-on time flashes in the display (AM 6:00 is the default setting). The clock symbol flashes in the display. Press the H or M keys to set the power-on time. If you do not press anything within 3 seconds, the machine returns to standby mode.
4. Automatic start time
In standby mode, press the TIMER button to start the automatic start time function. The clock symbol on the display lights up. In this mode, all buttons are unavailable except the TIMER button. The automatic start time flashes and the machine returns to the current time after 3 seconds. If the automatic switch-on time matches the actual time, the machine runs automatically. The operating indicator flashes and the symbol for the automatic switch-on time goes out.
5. Brewingsettings
In standby mode, press the 📞 to select the only brewing function. Press until the brewing symbol appears in the display. To brew, press the ON/OFF switch. The machine starts the brewing without grinding operation. The operating indicator flashes.
6. Grinding and brewing
When the or symbol is lit on the display, the machine is in grinding and brewing mode. You can set the coffee strength with the Button. Press the button to set the number of cups.
Press the ON/OFF button to start the process. The machine first grinds the beans and then brews the powder. When the water has completely drained from the tank, the machine switches to keep warm mode.
7. Keep warm mode
When the brewing process is complete, the appliance goes into keep warm mode. The operating light is on and the appliance indicates this by humming three times. When the warm-keeping mode ends (after 40 minutes max.), the machine goes into standby mode. The unit hums three times and the operating lamp goes out.
8. Decalcification mode
When the machine needs to be cleared of calcium, the clear calcium icon on the display will illuminate.
Decalcify the machine with a commercially available decalcifier or a water/vinegar mixture. Fill the water tank with the mixture and run the mixture through the machine once. Then fill the water tank with fresh, clean water up to the MAX mark and allow the water to run through as well.
In standby mode, briefly press the CALC button to start the decalcification process. The light on the CALC button flashes and the display shows the symbol ⚙️. Press the CALC button to stop the decalcification process after a few minutes (or during the process). Decalcification is complete.
Abnormal indication: Buzzer beeps twice and machine will enter the standby mode when the gate above the filter holder is closed or opened abnormally.
CLEANING AND CARE
- Clean the unit after each use.
• Always unplug the power cord before cleaning. - Never immerse the housing in water or other liquids.
- Disconnect the coffee machine from the power supply and allow it to cool completely before cleaning.
- Clean the housing surface with a soft, damp cloth.
- Do not clean the hot plate with abrasive cleaner or steel wool.
- Clean the glass carafe and funnel with water and dry both parts carefully.
- Remove thet spray arm and clean it as well.
HINTS ON DISPOSAL
natural_image
Symbol of a trash bin crossed out by two diagonal lines (no text or labels)
If there is a legal regulation for the disposal of electrical and electronic devices in your country, this symbol on the product or on the packaging indicates that this product must not be disposed of with household waste. Instead, it must be taken to a collection point for the recycling of electrical and electronic equipment. By disposing of it in accordance with the rules, you are protecting the environment and the health of your fellow human beings from negative consequences. For information about the recycling and disposal of this product, please contact your local authority or your household waste disposal service.
Chère cliente, cher client,
SOMMAIRE
Fiche technique 19
Fabricant 19
Unit 6 Riverside Business Centre
Brighton Road
Shoreham-by-Sea
BN43 6RE
United Kingdom
CONSIGNES DE SÉCURITÉ
natural_image
Symbol of a trash bin with crossed lines indicating no waste or discharge, and a solid rectangle below (no text or labels)ÍNDICE
Datos técnicos 27
Fabricante 27
Unit 6 Riverside Business Centre
Brighton Road
Shoreham-by-Sea
BN43 6RE
United Kingdom
Teclas de función
natural_image
Symbol of a trash bin with crossed lines indicating no waste or discharge, and a solid black rectangle below (no text or labels)INDICE
Dati tecnici 35
Produttore 35
PRODUTTORE E IMPORTATORE (UK)
Produttore:
Chal-Tec GmbH, Wallstraße 16, 10179 Berlino, Germania.
Unit 6 Riverside Business Centre
Brighton Road
Shoreham-by-Sea
BN43 6RE
United Kingdom
AVVERTENZE DI SICUREZZA
Funzione dei tasti
natural_image
Symbol of a trash bin with crossed lines indicating no waste or discharge, and a solid black rectangle below (no text or labels)
- INHALT
- SICHERHEITSHINWEISE
- Tastenfunktionen
- CONTENTS
- TECHNICAL DATA
- MANUFACTURER & IMPORTER (UK)
- Manufacturer:
- Importer for Great Britain:
- SAFETY INSTRUCTIONS
- General safety
- Electrical safety
- Safety instructions for coffee makers
- Disposal of packaging
- WARNING:
- PRODUCT OVERVIEW
- OVERVIEW
- Button fuctions instruction
- OPERATION
- Setting the clock
- Auto On
- Automatic start time
- Brewingsettings
- Grinding and brewing
- Keep warm mode
- Decalcification mode
- CLEANING AND CARE
- HINTS ON DISPOSAL
- SOMMAIRE
- CONSIGNES DE SÉCURITÉ
- ÍNDICE
- INDICE
- PRODUTTORE E IMPORTATORE (UK)
- Produttore:
- AVVERTENZE DI SICUREZZA
Brand : Klarstein
Model : Aromatica Taste 10
Category : Coffee machine