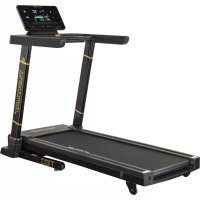
J77P - Treadmills TUNTURI - Free user manual and instructions
Find the device manual for free J77P TUNTURI in PDF.
User questions about J77P TUNTURI
0 question about this device. Answer the ones you know or ask your own.
Ask a new question about this device
Download the instructions for your Treadmills in PDF format for free! Find your manual J77P - TUNTURI and take your electronic device back in hand. On this page are published all the documents necessary for the use of your device. J77P by TUNTURI.
USER MANUAL J77P TUNTURI
PLEASE READ THIS OWNER'S MANUAL THROUGH CAREFULLY BEFORE ASSEMBLING, USING AND SERVICING THE TREADMILL.
THE EQUIPMENT HAS BEEN DESIGNED FOR DOMESTIC AND INSTITUTIONAL REHABILITATION USE, FOR WHICH FULL TUNTURI WARRANTY APPLIES. THE WARRANTY DOES NOT COVER DAMAGE DUE TO NEGLIGENCE OF ADJUSTMENT OR MAINTENANCE INSTRUCTIONS DESCRIBED IN THIS MANUAL. PLEASE PAY PARTICULAR ATTENTION TO THE NOTES REGARDING LUBRICATION AND ADJUSTMENT OF THE RUNNING BELT.
The figures referred to in the text are in the back fold.
Before connecting the device to a power source make sure that the local voltage matches that which is indicated on the type plate. The device operates on 230 V voltage.
Please note that the device's maximum power consumption is 10 A.
The device may only be plugged into an earthed socket. Never use extension cords between the treadmill and your wall outlet.
Outlets, that service multiple appliances, or have fluctuating voltage of more than 5 %, may result in erratic performance or cause damage to treadmill electronics. Using electrical power other than that which has been specified in this manual, will ultimately void any warranty, implied or otherwise.
* Before you start using the treadmill, make sure that it functions correctly in every way. Do not use a faulty device.
* Do not attempt any servicing or adjustment other than those described in this manual. The given instructions must be followed carefully.
* Never operate with the dust or side covers removed.
* Make sure that the treadmill is unplugged and turned off before beginning any assembly or maintenance procedures.
* A Iways unplug the treadmill from the electrical outlet after each training session.
* Do not pull the treadmill by its power cord.
* Do not use outdoors.
* Place the treadmill on a firm, level surface. Allow 200x100 cm (6,5 feet x 3,5 feet) of clearance behind the treadmill and 60 cm or 2 feet on either side and in front of the treadmill.
* Parents and others responsible for children should note that children's natural playfulness and curiosity may lead to situations and behaviour for which the treadmill is not designed. If children are allowed to use the treadmill, they should be supervised and taught to use it properly, keeping in mind the child's physical and mental development and their personality. The treadmill is not a toy.
* This treadmill is equipped with a cord having an equipment earthed connector and an earthed plug. Do not modify the plug provided with the treadmill in any way. If it will not fit your outlet, have a proper outlet installed by a person familiar with the maintenance of electromechanical devices and authorized under the laws of the country in question (or otherwise) to carry out maintenance and repair work.
* Do not apply silicone as it will damage the running deck.
* Before operating the treadmill familiarize yourself with the adjustments, displays and keys.
NOTE ALSO
* Before you start any training, consult a physician to check your state of health.
* If you experience nausea, dizziness or other abnormal symptoms while exercising, stop your workout at once and consult a physician.
* Only one person may use the treadmill at a time.
* Always use the handlebar when stepping on or off the treadmill and when changing speed. Do not jump off the running belt when it is moving.
* Keep hands clear of any moving parts. Never place hands, feet or any other objects under the treadmill.
* Wear appropriate clothing and shoes when exercising. Make sure your shoelaces are properly tied. To avoid injury and unnecessary wear on your treadmill, be sure your shoes are free of any debris such as gravel and small pebbles.
* Always clip the cord attached to the safety tether key to a part of your clothing so that the key will be pulled from its place, stopping the treadmill, if necessary.
* A lways strech your muscles prior to and following any exercise program.
* The treadmill must not be used by persons weighing more than 135 kg / 310 lbs.
ASSEMBLY
Ensure that all parts are present (fig. 1):
A M e t er
B Safety tether key with cord (+ 1 spare key)
C Power cord
D Left handlebar
E Handlebar bracket cover
F R ight handlebar with attached meter base
G M a i n frame
H T transmitter belt
Assembly kit (contents are marked with * in the spare part list)
T-Lube can
If you notice that a part is missing, contact the dealer and give the model, serial number and spare part number from the spare part list at the back of the manual.
Left, right, front and rear are seen from the exercising position.
Assemble the equipment as follows:
HANDLEBARS
NOTE! Do not tighten any locking screws before both handlebars are completely assembled.
Remove and dispose the silicate bag from the bottom of the right handlebar. The purpose of this bag is simply to absorb dampness during transportation and storage.
Install the right handlebar in place at the front right corner of the treadmill and secure it using the allen screw and washer. Press the white decorative cap onto the lower end of the right handlebar (fig. 2).
Attach the left handlebar to the running deck side rail using an allen screw and a washer. If necessary, lean the treadmill on one side with help of another person. Attach the handlebar bracket cover by snapping it into place over the lower end of the left handlebar (fig. 3).
NOTE! Plug the small cable, located at the top of the left handlebar, into the cable coming out of the meter base before connecting the two handlebars (fig. 4).
Push the left handlebar inside the plastic meter base attached to the right handlebar.
When the top of the left handlebar is touching the top of the right handlebar, tighten the screws in the bottom of the meter base, while ensuring the handlebars are held securely together.
NOTE! Be careful not to pinch or otherwise damage the flat ribbon cable that runs inside the right handlebar.
Tighten the locking screws of both handlebars.
METER
Plug in the pulse cable and flat ribbon cable connectors on the back side of the display. Tuck the cables inside the meter base and carefully slide the meter onto the base (fig. 5).
NOTE! Be careful not to pinch or otherwise damage the cables.
Remove the protecting film from the display.
METER CABLE
Plug the lower end of the flat ribbon cable coming out from the right sidecover into the upper end coming out of the right handlebar. Thread the connected cable inside the hole in the sidecover and push the cover plug on the through hole so that the cable will not be damaged (fig.6).
PLUGGING IN THE TREADMILL
Plug the socket end of the power cord into the treadmill at the lower right front corner (fig. 7).
Before connecting the device to a power source make sure that the voltage is correct from the type plate (at the lower right corner of the treadmill, next to the power switch).
SAFETY TETHER KEY
The treadmill is equipped with a safety tether key. If the key is removed from its place near the electronic display, the treadmill will immediately stop.
Insert the yellow safety tether key into the meter base. Attach the clip on the other end of the cord to your clothing (fig. 5).
NOTE! The treadmill cannot be used and the meter will not function completely if the tether key is not properly installed in the meter base (text "tEtH" in the display).
TRAINING
NOTE! Ensure before you start to use your treadmill that both the belt and the running deck are moist with lubricant. If these are dry, lubricate them.
Turn on the power switch at the lower right front corner of the treadmill.
Stand on the landing rails to the left and right of the running belt. Do not stand on the running belt.
When the treadmill is switched on, the system first checks LED display operation. After this the meter displays its "tunturi J77P" emblem and then "Usr 1" or "Usr 2". They indicate the meter's user alternatives or memory stores for your own exercise programs. Select the user mode desired by pressing the arrow keys (SET/ADJUST) and ENTER. The meter will now display the weight entry mode.
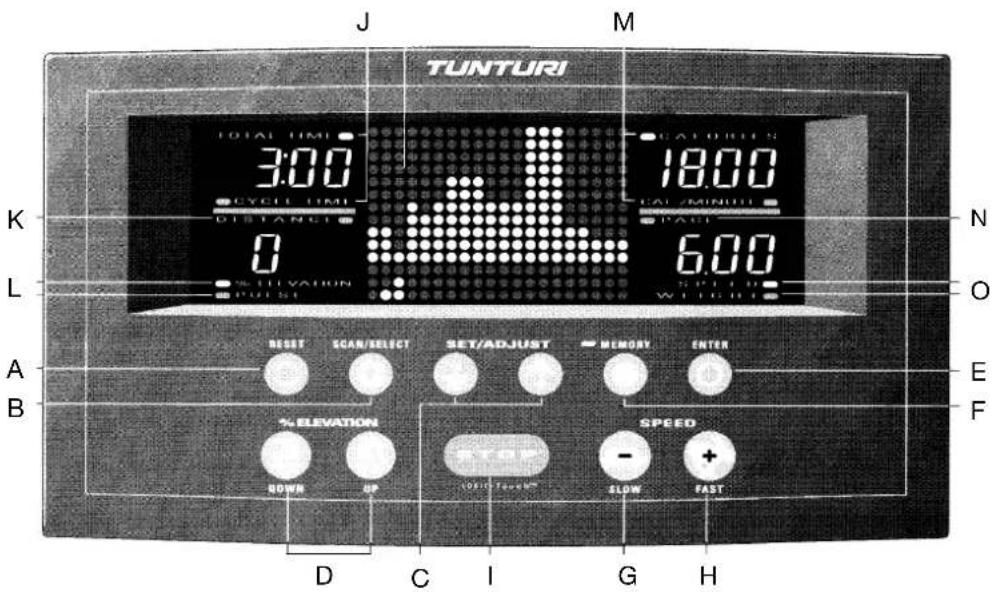
text_image
J M TUNTURI TOTAL TIME 3:00 CALORIES 18:00 CYCLE TIME CAL / MINUTE DISTANCE PACT K N L 6:00 % ELEVATION SPEED WHTIGHT A E B RESET SCAN/SELECT SET/ADJUST MEMORY ENTER % ELEVATION DOWN UP OFF TEACH SPEED - + FLOW FAST D C I G HMETER: KEYS
A. RESET
When the treadmill is running: Resets time, distance and kilocalories.
When the treadmill is stopped: Returns meter to the "enter weight" mode. To continue, either set weight with the arrow keys and push the ENTER key or just push ENTER and accept the default weight.
B. SCAN / SELECT
Pressing this key once starts scanning the different display values. Pressing the key a second time stops scanning, allowing the computer to display the current parameter.
C. + AND - ARROW KEYS (SET / ADJUST)
These keys are used to set the correct weight for the calculation of energy consumption. In addition the arrow keys are used in the user set up mode. In the heart-rate control program, the keys are used to select the pulse mode and set the heart-rate and maximum exercise speed.
D. UP AND DOWN ARROW KEYS (% ELEVATION)
UP-key increases the elevation in 1 % increments. The back of the treadmill goes down increasing the elevation.
DOWN-key decreases the elevation in 1 % increments. The back of the treadmill will rise decreasing the elevation.
E. ENTER
Used to confirm the set user weight. In addition the ENTER key is used in the user set up mode.
F. MEMORY
The MEMORY-key is used to save and open one of the nine pre-programed workouts or one manually made workout. The small light next to the MEMORY text is on when a pre-programed or a user program is being used.
G. TORTOISE (SPEED / SLOW)
Decreases belt speed in 0.1 increments. In the heart-rate control program, the keys are used to decrease the maximum speed of the exercise.
H. HARE (SPEED / FAST)
Increases belt speed in 0.1 increments. In the heart-rate control program, the keys are used to increase the maximum speed of the exercise.
I. STOP
Stops the treadmill motor and running belt. If pressed once, enters the "pause" mode. All exercise data including current speed and elevation are stored for 1-5 minutes (depending on the set pause time-out duration). To continue exercising press the HARE key.
NOTE! Do not remove the tether key when you pause the treadmill. This will stop the elapsed timer. If the STOP key is pressed twice or when the pause time has expired, the meter will continue displaying the cumulative training values, but it is not possible to continue the workout from those values. In the heart-rate control program, pressing the STOP key a third time switches the meter to weight entry mode.
METER: FUNCTIONS
The small light next to each function indicates which function is currently displayed.
J. TOTAL TIME
Displays the elapsed time of the exercise session in minutes and seconds (00.00-99.59 minutes in 1 second increments).
CYCLE TIME
Displays time remaining of each cycle of the programmed workouts.
K. DISTANCE
Displays distance traveled during the exercise session in kilometres or miles (00.0-99.9).
L. %ELEVATION
Displays current % elevation (0-10 %).
PULSE
Displays heart-rate.
M. CALORIES
Displays estimated energy consumption in kilocalories (0-999 kcal). This meter uses values for weight, time, speed and elevation to calculate the cumulative kilocalories burned during the exercise session. Since different people's capacity to produce energy varies, the energy consumption display shows an approximation of the real consumption.
CAL/MIN
Displays estimated energy consumption in kilocalories per minute.
N. PACE
Displays the time it takes to run/walk a kilometre or a mile at the current speed.
O. SPEED
Displays belt speed either in km/h (1.5-16.0 km/h) or in mph (1.0-10.0 mph).
WEIGHT
Displays user weight entered (max. 135 kg / 310 lbs).
ENTER WEIGHT MODE
- The small light next to WEIGHT will blink and the display shows the last entered weight.
- Set your own weight to the meter in kg or lbs by using the arrow keys. The unit depends on the chosen parameter in the user set up mode.
- Press ENTER to confirm the set weight.
USER SET UP MODE
- Press and hold the STOP key while pressing the SCAN/SELECT (when meter displays "enter weight" mode).
- The meter will display either "EngL" (for English units; mile, mph, lbs) or "ISo" (for metric units; km, km/h, kg). Choose the desired units by using the arrow keys.
- Press the SCAN/SELECT key again. The meter will display either "Aud 1" (= Audio signal on) or "Aud 0" (= Audio signal off). Choose the desired parameter by using the arrow keys.
- Press the SCAN/SELECT key again. The meter will display either "to 1", "to 2", "to 3", "to 4" or "to 5" (= time out). Choose the desired pause time-out duration by using the arrow keys. If you have chosen e.g. "to 4", the meter will memorize the exercising data for 4 minutes allowing you to continue training within that time without losing any numerical data.
- Press the SCAN/SELECT key again. The meter will display either "PEnb" (memory protection off) or "PdIS" (memory protection on). When the memory protection is switched on, the training programs saved in the memory of the meter cannot be modified. Choose the desired parameter by using the arrow keys.
- Press the ENTER-key to return to "enter weight" mode.
HEART-RATE MEASUREMENT
The J 77P is manufactured with heart rate monitoring capability. This treadmill has been fitted with an internal heart-rate receiver to make it compatible with Polar telemetric heart-rate transmitters.
The telemetric heart rate measurement, in which the electrodes of the transmitter fastened to the chest transmit the pulses from the heart to the meter by means of an electromagnetic field, is the most reliable method of heart-rate measurement.
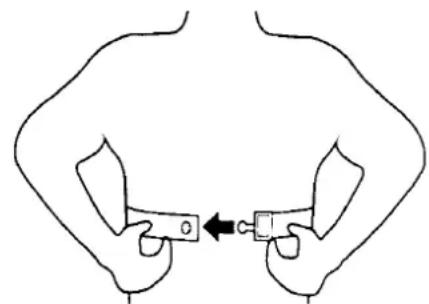
If you want to measure your heart-rate telemetrically during your workout start by attaching the elastic belt to the heart-rate transmitter.
Moisten the grooved electrodes on the transmitter belt with saliva or water. If you wear the transmitter and belt over a light shirt, moisten the shirt slightly at the points where the electrodes touch the shirt.
Fasten the transmitter just below the chest firmly enough so that the electrodes remain in contact with the skin while running, but not so tight that normal breathing is prevented.
natural_image
Simple line drawing of two hands holding a rectangular object with an arrow pointing to it (no text or symbols)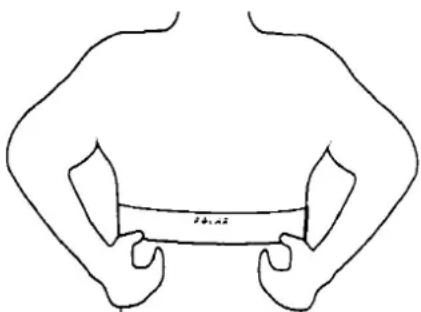
text_image
2014.12NOTE! If the electrode surfaces are not moist, the heart-rate reading will not appear on the display. If the electrodes are dry, moisten them again. It is also important to allow the electrodes to warm up properly to ensure accurate heart-rate measurement.
The transmitter automatically transmits the heart-rate reading to the meter up to a distance of about 1 m. Display will show heart-rate when the small light is on next to the PULSE text. The light flashes in time with the user's heartbeat. NOTE! If there are several telemetric heart-rate measurement devices next to each other, the distance between them should be at least 1.5 m. Similarly, if there is only one receiver and several transmitters in use, only one person with a transmitter should be within transmission range.
The transmitter is switched to an active state only when it is being used for measurement. Sweat and other moisture can, however, keep the transmitter in an active state and waste battery energy. Therefore it is important to dry the electrodes carefully after use.
HEART-RATE CONTROL MODE
Exercise within different heart-rate ranges affects the body in different ways. For example, long duration exercise within a heart-rate range of about 50-60 % of the maximum burns fat, whereas exercise within a heart-rate range of about 70-80 % of the maximum develops the heart and respiratory system, and overall endurance, i.e. improves your condition.
If you are not sure of your own maximum heart-rate, we recommend you consult your doctor. The following formulae can be used as a guideline:
WOMEN: 226 - AGE, MEN: 220 - AGE
The pulse control program enables exercise within the desired pulse range and requires pulse measurement during exercising. The pulse control program is run as follows:
- After setting the user weight, the meter displays PULSE Ctrl and the alternatives YES or no. You can toggle between them with the arrow keys (SET/ADJUST). Select YES to enter the pulse control program and no to access pre-programed profiles and manual mode. Confirm by pressing ENTER.
- The J77P meter offers three alternative bases for pulse control standardisation:
a) Mainly by changing belt inclination (ELEV on display). If adjusting the angle of inclination is not sufficient to standardise the pulse rate, the treadmill automatically changes the speed of the belt, too.
b) Automatic equal adjustment of both the inclination angle and the speed of the belt (COMB on display).
c) Mainly by changing in belt speed (SPEED on display). If adjusting the speed is not sufficient to standardise the pulse rate, the treadmill automatically changes the inclination angle of the belt as well.
The meter always offers ELEV first. Other alternatives are accessed by the arrow keys (SET/ADJUST). Confirm the mode selected by pressing ENTER.
-
The meter display will show SET PULSE. Set the desired pulse rate with the arrow keys (SET/ADJUST). The default value is 110 beats/minute, shown on the bottom left-hand side of the display. The pulse rate can be modified with the arrow keys (SET/ADJUST). Confirm the value selected by pressing ENTER. The value can then be modified during the exercise.
-
The meter display will show MAX SPEED. Set the desired maximum speed for your exercise with the arrow keys (SET/ADJUST). The default is 8 km/h (5 mph), shown on the bottom right-hand side of the display. The maximum speed can be modified with the arrow keys (SET/ADJUST). Confirm the value selected by pressing ENTER. The value can be modified during the exercise.
-
Start the pulse control program by pressing the HARE key.
Monitor your pulse during the exercise. The heart symbol in the middle of the meter display flashes to show the pulse control program is running. If the device is not receiving the pulse signal, the heart symbol remains lit, in which case you should interrupt the exercise and check that you have followed the instructions given on pulse measurement. If the treadmill does not receive a pulse signal for a full two minutes during the pulse control, the program is automatically interrupted and the device changes to time out mode.
CHANGING THE SELECTED VALUES
If the exercise feels too demanding or too easy, you can change the target pulse and maximum speed during the exercise itself. Change the target pulse by pressing the arrow keys (SET/ADJUST) while the pulse control program is running. The display will then show SET PULSE and the target pulse number. Set the new target pulse with the arrow keys and the treadmill will automatically return to the exercise program. You can change the maximum speed of the belt in the same way by pressing the TORTOISE and HARE keys during the pulse control program. The display will then show MAX SPEED and the maximum speed number. TORTOISE sets the speed lower and HARE higher. After setting the speed, the treadmill automatically returns to the exercise program.
PROGRAM MODE
The J 77P offers nine different training programs and the possibility to save two user programs in the memory of the meter. If you want to choose one of the pre-programed workouts or a user program, press the MEMORY key. NOTE! If a user program has not been recorded earlier you can only choose a pre-programed workout. Choose the desired program alternative by using the arrow keys (SET/ADJUST). Confirm by pressing the ENTER key.
If you have selected one of the pre-programed profiles, press then the arrow keys (SET/ADJUST) until the desired intensity level is displayed; IL 1 = Beginner, IL 2 = Intermediate, IL 3 = Advanced Intermediate, IL 4 = Advanced, and IL 5 = Athletic. Each pre-programed workout profile can be executed at five different intensity levels, except EASY WALKING which has three levels. If necessary, you can change the speed and elevation of the pre-programed workouts during the training. Confirm by pressing the ENTER key.
Start the program by pressing the HARE key. The meter beeps 15 seconds before each change in speed and elevation during the program.
PROGRAM 1: EASY WALKING
This program is especially suitable for warm up and cooling down. There are only very minor changes in speed and elevation throughout the whole program. EASY WALKING can be executed at three different intensity levels. The program duration with the lowest level is 15 minutes, with the second level 20 minutes and with the highest level 25 minutes.
PROGRAM 2: TIME / DISTANCE
The TIME/DISTANCE program strengthens cardiovascular system as well as the muscles of the upper and lower body. It helps you to maintain the current level of fitness you have gained. The program duration varies from 20 to 40 minutes according to the different intensity levels.
PROGRAM 3: HILL CLIMBING
A cardiovascular conditioning program. Slight changes in speed accompanied by drastic incline changes help create a stronger heart and greater cardiac output. The program duration varies from 15 to 25 minutes according to the different intensity levels.
PROGRAM 4: CARDIOVASCULAR TRAINING
This program is based on the principle of interval training. The heart rate is elevated to 85 % of its maximum for several minutes and then allowed to rest for several minutes. The CARDIOVASCULAR TRAINING program will increase your cardiovascular capacity to enable your body to handle workouts of longer duration. The program duration varies from 15 to 35 minutes depending on the chosen intensity level.
PROGRAM 5: WEIGHT LOSS
This program has been developed for individuals whose goal is to burn excess body fat or to maintain present body weight. If you are just beginning a weight loss program, a long duration exercise session at any intensity would be too strenuous. Therefore start with level one and change the intensity level gradually after regular training of four to six weeks. It is important to allow your muscles and metabolism to get used to the new rhythm and life style. The program duration varies from 25 to 45 minutes depending on the chosen intensity level.
If you want to lose weight, energy consumption must exceed energy supply. So in order to lose weight, you must either increase the amount of exercise you get, or reduce your intake of food. Weight loss may be rather slow in the beginning as the fat burning increases the amount of fluid in the body. Gradually the additional fluids leave the body in form of sweat and urine as the metabolism adapts to its new, quickened rhythm. It is also important to remember that muscles weigh more than fat, but require less volume.
PROGRAM 6: TIME SAVER
The TIME SAVER program is a combination of interval training, hill climbing and strength training lasting for 20 minutes. Despite of its short length regularly performed and as long as the heart rate stays within 60 to 85 % of the maximum the TIME SAVER program provides both cardiovascular and strength training benefits.
PROGRAM 7: STRENGTH DEVELOPMENT
The STRENGTH DEVELOPMENT program strengthens leg, hip and buttock muscles. The program begins with a five minute warm up, which is followed by a ten minute run. The program ends with a five minute cool down period allowing the heart rate to return back to its normal level.
PROGRAM 8: 5 KM RACE
In this program you decide the speed and thus determine the overall duration of the workout. The meter only controls elevation changes when you reach specific mileposts. The program ends when you reach 5 kilometres (3.1 miles).
PROGRAM 9: 10 KM RACE
Similar to the 5 km race, you determine the speed and overall duration of the workout, the meter only controls the elevation changes. The program ends at 10 kilometres (6.2 miles).
PROGRAM PROFILES
The columns of dots in the display indicate the changes in elevation while using the pre-programed workouts or the user programmes. The dots at the bottom of the profile display indicate user position relative to overall workout.
SAVING A USER PROGRAM
If requested you can save your training workout in the memory of the meter after the workout has been finished. The J 77P allows you to save two programs.
- Press the MEMORY key after entering user weight.
- Using the arrow keys (SET/ADJUST) select a program (Pro 1, Pro 2 etc.). If a user program has already been saved in the memory of the meter earlier, the display will first read USr 1 or USr 2 depending on the selected user mode. Press ENTER.
- Select desired intensity level (IL 1, IL 2 etc.) by using the arrow keys (SET/ADJUST). Press ENTER.
- Start the training. Speed and elevation can be adjusted during the workout, if desired.
- Complete the recorded workout by running to the end of the program or by pressing the STOP key (twice if you stop training in the middle of the workout).
- The meter will display the text "Save no". If you wish to save this particular workout in the memory of the meter or the changes that you have done to an earlier saved program, press either one of the arrow keys (SET/ADJUST) and the display will read "Save yes". Press ENTER.
- The workout has been saved in the memory of the meter as a user program.
MANUAL MODE
If you do not want to use the pre-programed workouts, start the training by pressing the HARE key once. The belt will start moving at 1.5 km/h (or 1.0 mph). Steady yourself by holding onto the handlebars and carefully stepping onto the moving belt. Increase speed by pressing the HARE key until the desired speed is reached. To slow down, press the TORTOISE key.
NOTE! Never step onto the running belt at speeds greater than 1.5 km/h or 1.0 mph.
If requested you can change the elevation angle of the treadmill during the training by using the UP and DOWN arrow keys. The UP-key increases the elevation in 1 % increments. The back of the treadmill goes down increasing the elevation. The DOWN-key decreases the elevation in 1 % increments. The back of the treadmill will rise decreasing the elevation.
MANUAL PROFILE
When choosing the manual mode the display shows a 1/2 km or 0.31 mile race track profile. The moving dot outside the track indicates user position relative to user set speed, whereas the moving dot inside the track represents a pacer, which travels around the track at 11.2 km/h or 7 mph. The starting line is at the bottom of the display, in the middle of the track.
COMPLETE YOUR EXERCISE SESSION
The treadmill can be stopped in several ways, for example:
- By pressing the STOP key.
- By removing the safety tether key.
- By decreasing the running speed to 0.0 by using the TORTOISE key.
- By reaching the end of a programmed workout.
Remember to stretch your muscles following any exercise program.
Use the main power switch to turn the unit off.
Never leave the safety tether key in the treadmill. Unplug the electrical cord from the wall outlet and from the treadmill. Store the electrical cord where it is clear from all pathways and out of childrens' reach.
If necessary clean the treadmill from sweat with a damp cloth. Do not use solvents.
ADJUSTMENTS
Monitor belt tracking during exercise and make adjustments as needed (described below).
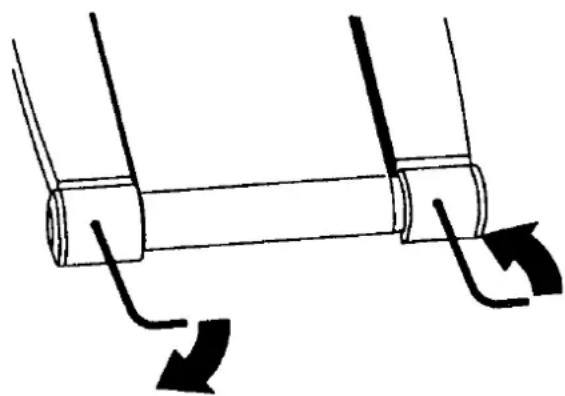
ALIGNING THE RUNNING BELT
The running belt should remain centered at all times. Normally when the unit is in the horizontal position and the belt properly tightened the belt will stay in the middle. It is, however, possible for the belt to be pushed to one side due to the user's running style (e.g. more weight on one foot). The alignment of the belt is adjusted by turning the two bolts at the back of the treadmill. Proceed then as follows:
- Turn the power switch on and increase the treadmill's speed to 5 km/h (3 mph).
- If the belt drifts to the left, turn the left adjustment bolt 1/8 turn clockwise and the right adjustment bolt 1/8 turn anticlockwise.
- If the belt drifts to the right, turn the right adjustment bolt 1/8 turn clockwise and the left adjustment bolt 1/8 turn anticlockwise. NOTE! Do not turn more than 1/8 at the time as already very small adjustments effect the alignment.
natural_image
Diagram of a mechanical component with two curved arrows indicating rotation or movement (no text or symbols)- If the belt remains centered the adjustment is correct. If not, continue to make small adjustments as above until the belt is correctly aligned.
If the belt is allowed run across to one side for long periods of time the edges of the belt may be damaged and the treadmill may not continue to operate correctly. Any damage to the belt caused by the lack of necessary adjustment will not be covered by the warranty.
ADJUSTING THE BELT TENSION
The belt must be tensioned if it begins to slip on the rollers. In normal use, however, keep the belt as loose as possible! The belt tension is adjusted by turning the same screws as used for aligning the running belt.
- Turn the power switch on and increase the treadmill's speed to 5 km/h (3 mph).
- Turn both adjustment screws an equal amount, approximately 1/8 turn clockwise.
- Try to slow the belt down by holding onto the handrails and braking as you walk (as if you were walking downhill). NOTE! When braking heavily the belt may slip.
- If the belt slips, turn another 1/8 turn and repeat the test.
MAINTENANCE
We strongly recommend that a periodic maintenance schedule is adhered to. However, if you wish to have the maintenance carried out by a trained technician please contact your local Tunturi dealer for details of service available and charges.
Check from time to time that all fasteners are properly tightened and wiring is in place. To avoid damaging fasteners, do not overtighten.
CLEANING THE RUNNING BELT
Turn the unit off and unplug the electrical cord from the wall outlet and from the treadmill. Carefully turn the treadmill on its side.
Wipe off the inside of the running belt using a harsh brush. Do not use solvents.
Rotate the running belt carefully by hand to clean the entire inside face. Loosen the belt adjusting screws at the back of the treadmill, if necessary. Return the treadmill into the upright position.
If running belt edges are frayed, check the running belt alignment.
CLEANING THE TREADMILL
Wipe the treadmill surfaces, especially the handlebars and meter from dust with a damp cloth or towel. Do not use solvents.
Use a small vacuum nozzle to carefully vacuum around all visible components (belt, running deck, side rails etc.). By supporting the device on one of the side rails you can also vacuum it from below. Vacuum also from inside the motor hood.
Clean both the treadmill's rollers once a year as follows: loosen both the roller's adjusting bolts and clean the roller with a roughish brush. Tighten the adjusting bolts and check that the belt sits in the middle and is tight enough.
LUBRICATING THE RUNNING DECK
NOTE! Lubrication is the most important service activity for the treadmill.
This is absolutely essential, if the friction of the running deck increases noticeably or the motor begins to heat up. Ensure after every 50 hours of use that both the belt and the running deck are moist with lubricant. Insufficient lubrication will cause the belt, running deck and motor to wear out and break.
The need for relubrication depends to a great extent on the running styles and weight of the user: heavy user weight and slow speed put particular strain on the device and therefore demand greater lubrication. Use only T-Lube lubricant to lubricate the treadmill. Contact your local Tunturi dealer for further supplies of T-Lube.
NOTE! The device must under no circumstances be lubricated with silicone!
- Let the treadmill run at 5 km/h (3 mph).
- Spray T-Lube directly to the underside of the running belt for 5 seconds; the amount corresponds to 10 ml.
- Ensure that a strip of about 20 cm / 8" wide on the underside of the running belt becomes moist with T-Lube along its whole length. The treadmill is instantly ready for use.
ERROR CODES
In case of certain faults relating to the electronics of the treadmill, it has an integral, internal fault-finding system in order that faults can be found and corrected as quickly as possible.
The fault-finding system obviously does not cover all possible faults, but it does help to identify the most likely faults resulting from long-term use. When such a fault occurs, the display shows one of the following error codes:
CODE DESCRIPTION
E 1 Failure of speed sensor (sensor does not detect belt movement)
E 4 Lift sensor or elevation system failure
E 7 Software failure
E 8 Speed of the running belt exceeds set speed
If any error code appears on the display or there are other malfunctions, proceed as follows:
- Turn off the power switch for a minute and then turn it on again.
- Insure the tether key is properly inserted.
- Insure the power cord is properly plugged.
- Insure the treadmill is properly lubricated.
- If the error code does not disappear after the above mentioned maintenance actions, please contact your local Tunturi dealer. Always give the error code and serial number.
tEth The tether key is not properly inserted
NOTE! If you notice a malfunction during use, contact the dealer. Always give the model and serial number of your device. Please state also the nature of the problem, conditions of use and purchase date.
In spite of continuous quality control, individual defects and malfunctions may occur due to individual components. It is in most cases unnecessary to take the whole treadmill for repair, as it is usually sufficient to replace the defective part.
USER MAINTENANCE MENU
The total treadmill running time and total distance are automatically saved in the memory of the treadmill. If you wish to check the total values at any time, proceed as follows:
- Press and hold the STOP key while pressing the SCAN/SELECT key (when meter displays "enter weight" mode). The meter displays the user set up mode.
- Press and hold the STOP key again while pressing first the SCAN/SELECT key and then the ENTER key.
- The meter will scan the following functions: software version, total time and total distance.
- Press ENTER key twice to exit the user maintenance menu.
MOVING AND STORAGE
The J 77P is equipped with wheels for easy mobility. Before moving, be sure the power cord is unplugged from the wall and the treadmill. Lift the rear end of the treadmill, then push or pull, rolling the treadmill on the front wheels.
NOTE! The running belt may need to be realigned and centered after moving.
To prevent malfunctioning of the treadmill, store it in a dry place with as little temperature variation as possible, protected against dust. Always unplug the treadmill from the electrical outlet when not in use.
TECHNICAL DATA
Length 150 cm / 60"
Height 125 cm / 49.2"
Width 90 cm / 36"
Weight 71 kg / 157 lbs
Running surface length 135 cm / 54" x 44 cm / 17.6"
Speed 1.5 -16 km/h / 1-10 mph
Elevation range 0 - 10 %
Motor 1,5 HP (continuous duty)
Maximum user weight 135 kg / 310 lbs
All Tunturi models are designed to meet the electromagnetic compatibility directive, EMC and are affixed with the CE conformity marking.
All Tunturi treadmills meet DIN accuracy and safety norms (DIN 32933-1+3).
NOTE! The instructions must be followed carefully in the assembly, use and maintenance of your equipment. The warranty does not cover damage due to negligence of the assembly, adjustment and maintenance instructions described herein. Changes or modifications not expressly approved by Tunturi Oy Ltd will void the user's authority to operate the equipment!
Due to our continuous program of product development we reserve the right to change specifications without notice.
SICHERHEITSHINWEISE
PROGRAMM 2: KONDITIONSPROGRAMM
PROGRAMM 8: 5-KILOMETER-PROGRAMM
natural_image
Diagram of a mechanical component with two curved arrows indicating rotation or force direction (no text or symbols)K. DISTANCE (distance)
PROGRAMMES MIS EN MEMOIRE
natural_image
Diagram of a mechanical component with two curved arrows indicating rotation or force direction (no text or symbols)J. TOTAL TIME (TIEMPO TOTAL)
PROGRAMA 6: AHORRO DE TIEMPO
PROGRAMA 8: 5 KM DE CARRERA
PROGRAMA 9: 10 KM DE CARRERA
natural_image
Simple line drawing of a mechanical component with two curved arrows indicating rotation or movement (no text or symbols)PROGRAMMA 1: WANDELEN
PROGRAMMA 5: AFSLANKEN
PROGRAMMA 7: CONDITIETRAINING
natural_image
Simple line drawing of a mechanical component with two curved arrows indicating rotation or movement (no text or symbols)text_image
Diagram showing two hand positions with a magnified view of a rectangular object, labeled with 'θ₀, n₂'PROGRAMMA 6: RISPARMIO DI TEMPO
PROGRAMMA 7: SVILUPPO MUSCOLARE
natural_image
Simple line drawing of a mechanical component with two curved arrows indicating rotation or movement (no text or symbols)D. PILKNAPPAR UP- OCH DOWN (% ELEVATION)
O. SPEED (Hastighet)
Displayen anger bandets hastighet i kilometer per timme (1.5 - 16.0 km/h).
WEIGHT (vikt)
text_image
Diagram showing two hand positions with a magnified view of a device, labeled '10.00' at the bottom.PROGRAMMET FÖR KONSTANT PULS
TRÄNINGSPROGRAM 4: KONDITIONSFÖRBÄTTRING
natural_image
Simple line drawing of a mechanical component with two curved arrows indicating rotation or movement (no text or symbols)TRANSPORT OCH FÖRVARING
text_image
Diagram showing two hand positions with a magnified view of a device, labeled 'dashed' and 'solid'VAKIOSYKEOHJELMA
natural_image
Diagram of a mechanical component with two curved arrows indicating rotation or force direction (no text or symbols)mph 3.0 4.0 4.0 4.0 3.0 Stop
% 01210
IL 3
00:00 04:00 08:00 12:00 16:00 20:00
km/h 6.4 7.2 7.2 7.2 6.4 Stop
mph 4.0 4.5 4.5 4.5 4.0 Stop
% 12321
PRG 2
IL 1
00:00 04:00 08:00 12:00 16:00 20:00
km/h 3.2 4.8 4.8 4.8 3.2 Stop
mph 2.0 3.0 3.0 3.0 2.0 Stop
% 00100
IL 2
00:00 04:00 11:20 18:40 26:00 30:00
km/h 4.8 6.4 6.4 6.4 4.8 Stop
mph 3.0 4.0 4.0 4.0 3.0 Stop
% 01210
IL 3
00:00 04:00 14:40 25:20 36:00 40:00
km/h 6.8 8.4 8.4 8.4 6.8 Stop
mph 4.2 5.2 5.2 5.2 4.2 Stop
% 12321
IL 4
00:00 04:00 14:40 25:20 36:00 40:00
km/h 8.9 10.5 10.5 10.5 8.9 Stop
mph 5.5 6.5 6.5 6.5 5.5 Stop
% 23432
IL 5
00:00 04:00 14:40 25:20 36:00 40:00
km/h 10.5 12.0 12.0 12.0 10.5 Stop
mph 6.5 7.5 7.5 7.5 6.5 Stop
% 34543
PRG 3
IL 1
00:00 04:00 04:50 05:40 06:30 07:20 08:10 09:00 09:50 10:40 15:00
km/h 4.0 4.8 4.8 4.5 4.8 4.0 4.8 4.5 4.8 4.0 Stop
mph 2.5 3.0 3.0 2.8 3.0 2.5 3.0 2.8 3.0 2.5 Stop
% 010213121
IL 2
00:00 04:00 07:00 08:30 10:00 11:30 13:00 14:00 16:00 20:00
km/h 4.8 6.4 5.6 6.4 4.8 6.4 5.6 6.4 4.8 Stop
mph 3.0 4.0 3.5 4.0 3.0 4.0 3.5 4.0 3.0 Stop
% 013152320
IL 3
00:00 04:00 06:10 08:20 10:25 12:30 14:40 16:45 18:55 21:00 25:00
km/h 6.1 8.0 8.0 7.2 8.0 6.4 8.0 7.2 8.0 6.1 Stop
mph 3.8 5.0 5.0 4.5 5.0 4.0 5.0 4.5 5.0 3.8 Stop
% 0215284620
IL 4
00:00 04:00 06:45 09:30 12:15 15:00 17:45 20:30 23:15 26:00 30:00
km/h 8.0 10.5 10.5 9.7 10.5 8.9 10.5 9.7 10.5 8.0 Stop
mph 5.0 6.5 6.5 6.0 6.5 5.5 6.5 6.0 6.5 5.0 Stop
% 0215294631
IL 5
00:00 04:00 07:25 10:45 14:10 17:30 20:50 24:15 27:35 30:50 35:00
km/h 9.7 12.1 12.1 11.3 12.1 10.5 12.1 11.3 12.1 9.7 Stop
mph 6.0 7.5 7.5 7.0 7.5 6.5 7.5 7.0 7.5 6.0 Stop
% 02152104631
PRG 4
IL 1
00:00 06:00 06:30 07:40 08:10 09:20 09:50 11:00 15:00
km/h 2.9 5.3 3.7 5.3 3.7 5.3 3.7 2.9 Stop
mph 1.8 3.3 2.3 3.3 2.3 3.3 2.3 1.8 Stop
% 00000000
IL 2
00:00 06:00 07:10 09:20 10:30 12:40 13:50 16:00 20:00
km/h 3.9 6.4 5.6 6.4 5.6 6.4 5.6 3.9 Stop
mph 2.4 4.0 3.5 4.0 3.0 4.0 3.5 4.0 Stop
% 00000000
IL 3
00:00 06:00 07:40 11:00 12:40 16:00 17:40 21:00 25:00
km/h 5.3 8.4 7.2 8.4 7.2 8.4 7.2 5.3 Stop
mph 3.3 5.2 4.5 5.2 4.5 5.2 4.5 3.3 Stop
% 00000000
IL 4
00:00 06:00 08:20 12:40 15:00 19:20 21:40 26:00 30:00
km/h 7.2 11.3 9.7 11.3 9.7 11.3 9.7 7.2 Stop
mph 4.5 7.0 6.0 7.0 6.0 7.0 6.0 4.5 Stop
% 00000000
IL 5
00:00 06:00 08:50 14:20 17:10 22:40 25:30 31:00 35:00
km/h 8.2 12.9 10.5 12.9 10.5 12.9 10.5 8.2 Stop
mph 5.1 8.0 6.5 8.0 6.5 8.0 6.5 5.1 Stop
% 00000000
PRG 5
IL 1
00:00 05:00 10:00 15:00 20:00 25:00
km/h 4.0 5.3 5.3 5.3 4.0 Stop
mph 2.5 3.3 3.3 3.3 2.5 Stop
% 02020
IL 2
00:00 05:00 10:00 15:00 20:00 25:00 30:00
km/h 4.0 6.4 7.2 5.6 6.4 7.2 Stop
mph 2.5 4.0 4.5 3.5 4.0 4.5 Stop
% 034443
IL 3
00:00 05:00 10:00 15:00 20:00 25:00 30:00 35:00 40:00 45:00
km/h 6.4 8.0 8.4 8.0 7.7 7.7 8.0 8.0 6.4 Stop
mph 4.0 5.0 5.2 5.0 4.8 4.8 5.0 5.0 4.0 Stop
% 034555430
IL 4
00:00 05:00 10:00 15:00 20:00 25:00 30:00 35:00 40:00 45:00
km/h 8.0 9.7 10.0 9.7 9.3 9.3 9.7 9.7 8.0 Stop
mph 5.0 6.0 6.2 6.0 5.8 5.8 6.0 6.0 5.0 Stop
% 045666540
IL 5
00:00 05:00 10:00 15:00 20:00 25:00 30:00 35:00 40:00 45:00
km/h 9.7 11.3 11.6 11.3 10.9 10.9 11.3 11.3 9.7 Stop
mph 6.0 7.0 7.2 7.0 6.8 6.8 7.0 7.0 6.0 Stop
% 045666540
PRG 6
IL 1
00:00 04:00 06:00 08:00 10:00 12:00 14:00 16:00 20:00
km/h 2.4 4.8 5.6 4.0 4.8 5.6 4.0 2.4 Stop
mph 1.5 3.0 3.5 2.5 3.0 3.5 2.5 1.5 Stop
% 00030030
IL 2
00:00 04:00 06:00 08:00 10:00 12:00 14:00 16:00 20:00
km/h 4.0 6.4 7.2 5.6 6.4 7.2 5.6 4.0 Stop
mph 2.5 4.0 4.5 3.5 4.0 4.5 3.5 2.5 Stop
% 01151151
IL 3
00:00 04:00 06:00 08:00 10:00 12:00 14:00 16:00 20:00
km/h 5.6 8.0 8.9 7.2 8.0 8.9 7.2 7.2 Stop
mph 3.5 5.0 5.5 4.5 5.0 5.5 4.5 4.5 Stop
% 02282282
IL 4
00:00 04:00 06:00 08:00 10:00 12:00 14:00 16:00 20:00
km/h 8.0 10.5 11.3 9.7 10.5 11.3 9.7 8.0 Stop
mph 5.0 6.5 7.0 6.0 6.5 7.0 6.0 5.0 Stop
% 03393393
IL 5
00:00 04:00 06:00 08:00 10:00 12:00 14:00 16:00 20:00
km/h 9.7 12.1 12.9 11.3 12.1 12.9 11.3 9.7 Stop
mph 6.0 7.5 8.0 7.0 7.5 8.0 7.0 6.0 Stop
% 0441044104
PRG 7
IL 1
00:00 05:00 10:00 15:00 20:00
km/h 4.0 4.8 4.8 4.0 Stop
mph 2.5 3.0 3.0 3.3 Stop
% 0220
IL 2
00:00 05:00 10:00 15:00 20:00
km/h 4.8 5.6 5.6 4.8 Stop
mph 3.0 3.5 3.5 3.0 Stop
% 2442
IL 3
00:00 05:00 10:00 15:00 20:00
km/h 6.1 7.7 7.7 6.1 Stop
mph 3.8 4.8 4.8 3.8 Stop
% 3663
IL 4
00:00 05:00 10:00 15:00 20:00
km/h 8.0 10.5 10.5 8.0 Stop
mph 5.0 6.5 6.5 5.0 Stop
% 4884
IL 5
00:00 05:00 10:00 15:00 20:00
km/h 9.7 11.6 11.6 9.7 Stop
mph 6.0 7.2 7.2 6.0 Stop
%
5 1
0 10 5
PRG 8
IL 1
km 0.0 0.3 0.6 1.0 1.3 1.8 2.3 2.6 3.1 3.4 3.9 4.2
miles 0.0 0.2 0.4 0.6 0.8 1.1 1.4 1.6 1.9 2.1 2.4 2.6
% 000200313013
IL 2
km 0.0 0.3 0.6 1.0 1.3 1.8 2.3 2.6 3.1 3.4 3.9 4.2
miles 0.0 0.2 0.4 0.6 0.8 1.1 1.4 1.6 1.9 2.1 2.4 2.6
% 011301524025
IL 3
km 0.0 0.3 0.6 1.0 1.3 1.8 2.3 2.6 3.1 3.4 3.9 4.2 4.5 5.0
miles 0.0 0.2 0.4 0.6 0.8 1.1 1.4 1.6 1.9 2.1 2.4 2.6 2.8 3.1
% 0 2 1 4 0 2 8 3 5 1 2 8 0 S t o p
IL 4
km 0.0 0.3 0.6 1.0 1.3 1.8 2.3 2.6 3.1 3.4 3.9 4.2 4.5 5.0
miles 0.0 0.2 0.4 0.6 0.8 1.1 1.4 1.6 1.9 2.1 2.4 2.6 2.8 3.1
% 0 3 1 5 1 3 9 4 6 1 2 9 0 S t o p
IL 5
km 0.0 0.3 0.6 1.0 1.3 1.8 2.3 2.6 3.1 3.4 3.9 4.2 4.5 5.0
miles 0.0 0.2 0.4 0.6 0.8 1.1 1.4 1.6 1.9 2.1 2.4 2.6 2.8 3.1
% 0 4 1 6 2 4 9 5 7 1 2 1 0 0 S t o p
PRG 9
IL 1
km 0.0, 0.5 1.0 1.9 2.9 3.4 3.9 4.8 5.3 5.8 6.3 6.8 7.2 8.2 8.7 9.2 9.7 10.0
miles 0.0 0.3 0.6 1.2 1.8 2.1 2.4 3.0 3.3 3.6 3.9 4.2 4.5 5.1 5.4 5.7 6.0 6.2
% 0 1 0 3 5 0 2 0 4 0 4 0 1 4 0 0 0 Stop
IL 2
km 0.0 0.5 1.0 1.9 2.4 2.9 3.4 3.9 4.8 5.3 5.8 6.3 6.8 7.2 8.2 8.7 9.2 9.7 10.0
miles 0.0 0.3 0.6 1.2 1.5 1.8 2.1 2.4 3.0 3.3 3.6 3.9 4.2 4.5 5.1 5.4 5.7 6.0 6.2
% 1 2 0 4 0 6 0 2 0 5 0 5 0 2 5 1 0 0 Stop
IL 3
km 0.0 0.5 1.0 1.9 2.4 2.9 3.4 3.9 4.8 5.3 5.8 6.3 6.8 7.2 8.2 8.7 9.2 9.7 10.0
miles 0.0 0.3 0.6 1.2 1.5 1.8 2.1 2.4 3.0 3.3 3.6 3.9 4.2 4.5 5.1 5.4 5.7 6.0 6.2
% 1 3 2 4 0 6 2 9 4 1 7 1 7 1 4 7 2 1 Stop
IL4
km 0.0 0.5 1.0 1.9 2.4 2.9 3.4 3.9 4.8 5.3 5.8 6.3 6.8 7.2 8.2 8.7 9.2 9.7 10.0
miles 0.0 0.3 0.6 1.2 1.5 1.8 2.1 2.4 3.0 3.3 3.6 3.9 4.2 4.5 5.1 5.4 5.7 6.0 6.2
% 2 4 0 6 2 9 1 4 1 4 1 7 1 4 7 3 2 1 Stop
IL 4
km 0.0 0.5 1.0 1.9 2.4 2.9 3.4 3.9 4.8 5.3 5.8 6.3 6.8 7.2 8.2 8.7 9.2 9.7 10.0
miles 0.0 0.3 0.6 1.2 1.5 1.8 2.1 2.4 3.0 3.3 3.6 3.9 4.2 4.5 5.1 5.4 5.7 6.0 6.2
% 3 5 0 7 3 10 2 5 1 9 1 9 2 5 8 4 3 1 Stop
text_image
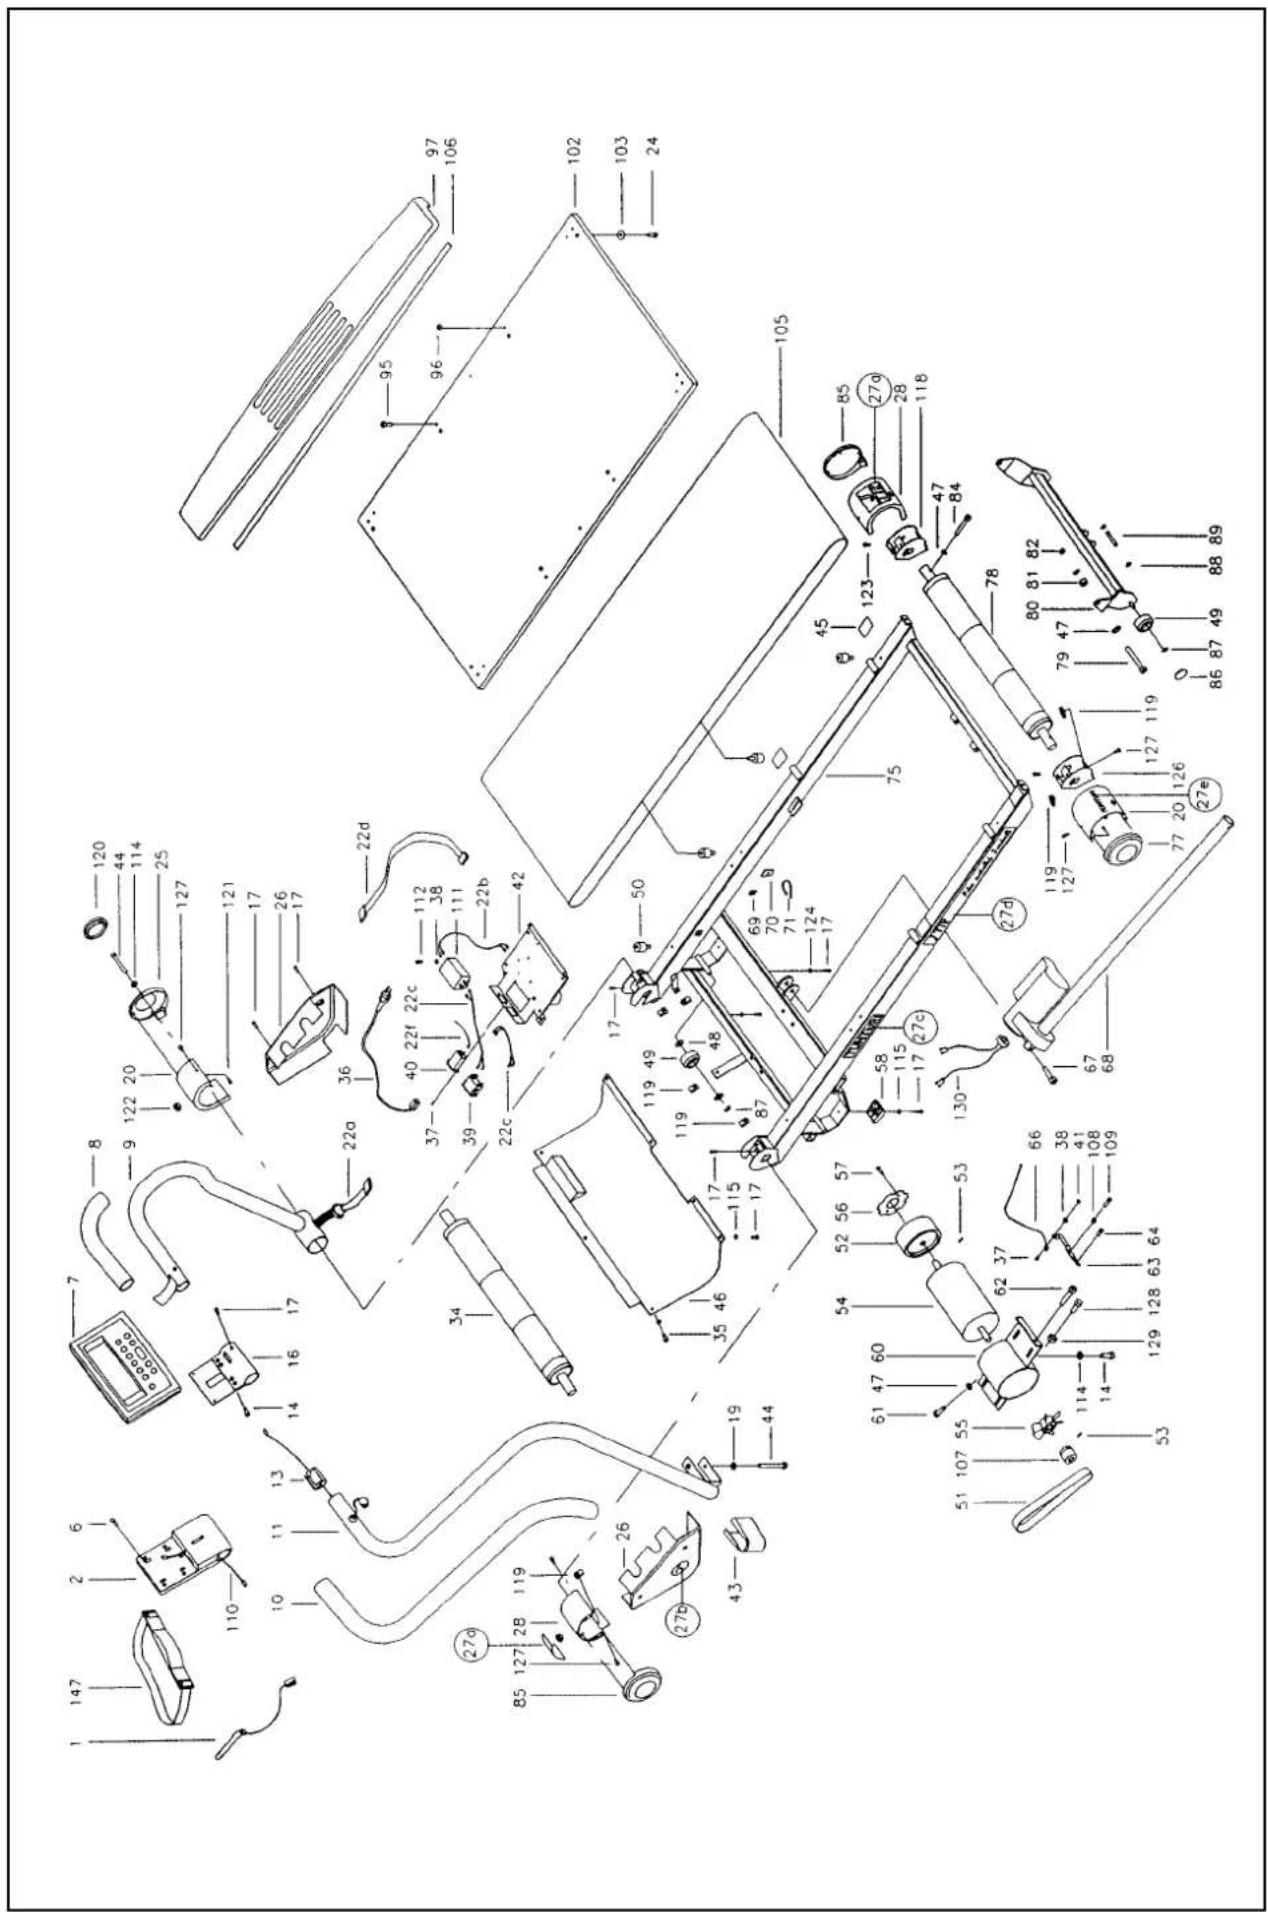
Exploded view diagram of a mechanical device with numbered components and labeled partsRef. no Part no.
| 1* | 403 4019 A | |
| 2 | 503 4009 A | |
| 6 | 35x13 DIN 7981 | C |
| 7 | 233 4011 D |
- 173 4024 A
| 8 | 213 4004 R | A |
| 9 | 203 4010 R (+ 8) | C |
10 213 4005 L A
| 11 203 4004 L (+ 10) | C |
| 13 403 4023 D |
14 M8x20 DIN 912 C
| 16 503 4007 | C |
17 M5x14 DIN 7985 C
| 19* | M8 DIN 127B | C |
| 20 | 173 4028 front R, rear L A |
22 403 4059 (+ 22a-22d, 22f) D
| 24 KB 40x16 WN-1442 | C |
25 173 4025 R A
| 26 173 4030 x 2 | A |
27 423 4049 (+ 27a - 27d) A
| 28 173 4029 front L, rear RA |
| 34 523 4015 |
35 M5x12 DIN 7985 C
| 36 403 4024 EUR | D |
| - 403 4015 USA D |
- 403 4061 GB D
| - 403 4062 SUI | D |
| - 403 4063 ISR | D |
- 403 4064 AUS D
| 37 M3x8 DIN 966 A4 | C |
38 M4 DIN 127B C
| 39 | 403 | 470 | D |
40 403 4016 D
41 M3 DIN 934 C
42 403 4043 D
| - 403 4045 USA D(+ 22b,22c,22f,37,39,40) |
43 173 4016 A
| 44* | M8x80 DIN 912 | (* x1) | C |
45 533 4010 A
46 173 4033 A
47 62 0817 20 C
| 48 12x18x1 DIN 988 | C |
49 533 4005 A
| 50 533 4008 | A/C |
51 443 4007 A
| 52 303 4004 | C |
53 M6x8 DIN 916 C
| 54 813 4010 D(+ 47,52,53-57,60,61,107,125) |
55 303 4005 A
| 56 263 4002 | C |
57 M4x8 DIN 7985 C
| 58 | 533 | 4006 | x 2 (+ 115) | A |
60 103 4021 C
| 61 5/6"x 1/2" DIN 933 | C |
62 M8x45 DIN 912 C
| 63 503 4010 | C |
64 M5x8 DIN 7985 A4 C
Ref. no Part no.
| 66 403 4017 D | |
| 67 M8x40 DIN 912 C | |
| 68 813 4008 C | |
| - 813 4006 USA C | |
| 69 503 125 89 A | |
| 70 503 420 A | |
| 71 501 104 74 A | |
| 75 103 4013 A | |
| 77 173 4027 L C | |
| 78 523 4017 C | |
| 79 M8x65 DIN 912 C | |
| 80 103 4008 C | |
| 81 533 4015 C | |
| 82 M8 DIN 912 C | |
| 84 M8x50 DIN 912 C | |
| 85 173 4026 front L, rear R A | |
| 86 533 4018 A | |
| 87 12 DIN 471 C | |
| 88 8 DIN 471 C | |
| 89 343 4003 C | |
| 95 M8x25 DIN 7984 C | |
| 96 M8 DIN 936 C | |
| 97 433 4006 A | |
| 102 433 4015 A | |
| 103 62 0624 10 C | |
| 105 443 4004 A | |
| 106 683 400 A | |
| 107 263 4003 C | |
| 108 M5 DIN 934 C | |
| 109 M5x16 DIN 84 | C |
| 111 403 4033 D | |
| 112 M4x6 DIN 7985 C | |
| 113 403 4009 52 | D |
| 114* 652 133 74 (* 1) | C |
| 115 M5 DIN 9021 | |
| 118 103 4019 C | |
| 119 653 1003 C | |
| 120 533 4033 A | |
| 121 KB 35x12 WN-1441 | C |
| 122 533 5005 C | |
| 123 M5x10 DIN 7985 C | |
| 124 M5 6798I | C |
| 126 103 4020 | C |
| 127 M5x12 DIN ISO 7380 | C |
| 128 M8x25 DIN 933 C | |
| 129 M8 DIN 934 C | |
| 130 403 4048 | C |
| 147 403 0015 D | |
| * 553 4004 (+ *) | A |
| * 553 0009 6mm | C |
| - 563 4003 T-Lube | C |
| - 583 4014 B |