
Originals Lab - Camera POLAROID - Free user manual and instructions
Find the device manual for free Originals Lab POLAROID in PDF.
| Product type | Instant camera for smartphone |
| Brand | Polaroid |
| Model | Originals Lab |
| Dimensions (closed) | 150 mm (L) x 115.6 mm (D) x 149.7 mm (H) |
| Dimensions (open) | 150 mm (L) x 115.6 mm (D) x 177.16 mm (H) |
| Weight | 600 g (without cartridge) |
| Power supply | Rechargeable lithium-ion battery 1100 mAh, 3.7 V, 4.07 Wh |
| Battery life | Up to 100 cartridges per full charge |
| Charging time | Approximately 2 h (wall outlet) or 4 h (USB port) |
| Compatible film | Polaroid Originals i-Type and type 600 (color and B&W) |
| Main features | Print photos from smartphone via dedicated app |
| Connectivity | Polaroid Originals app (iOS and Android) |
| LED indicators | Photo counter (8 orange LEDs), battery level (4 LEDs), rainbow logo |
| Maintenance and cleaning | Cleaning the rollers with a damp cotton swab (dedicated mode) |
| Safety | Do not disassemble, do not immerse, keep out of reach of children |
| Spare parts and repairability | Non-removable battery; repair by authorized center only |
| General information | Operating temperature: 4 to 42 °C; humidity 5-90% |
| Lens | Fixed polycarbonate lens, focal length 150 mm, aperture f/2.35 |
| Smartphone requirements | iPhone 6 or newer, most current Android phones |
Frequently Asked Questions - Originals Lab POLAROID
User questions about Originals Lab POLAROID
0 question about this device. Answer the ones you know or ask your own.
Ask a new question about this device
Download the instructions for your Camera in PDF format for free! Find your manual Originals Lab - POLAROID and take your electronic device back in hand. On this page are published all the documents necessary for the use of your device. Originals Lab by POLAROID.
USER MANUAL Originals Lab POLAROID
For updated information, video tutorials and more, please visit
natural_image
Five horizontal black bars on white background, no text or symbols present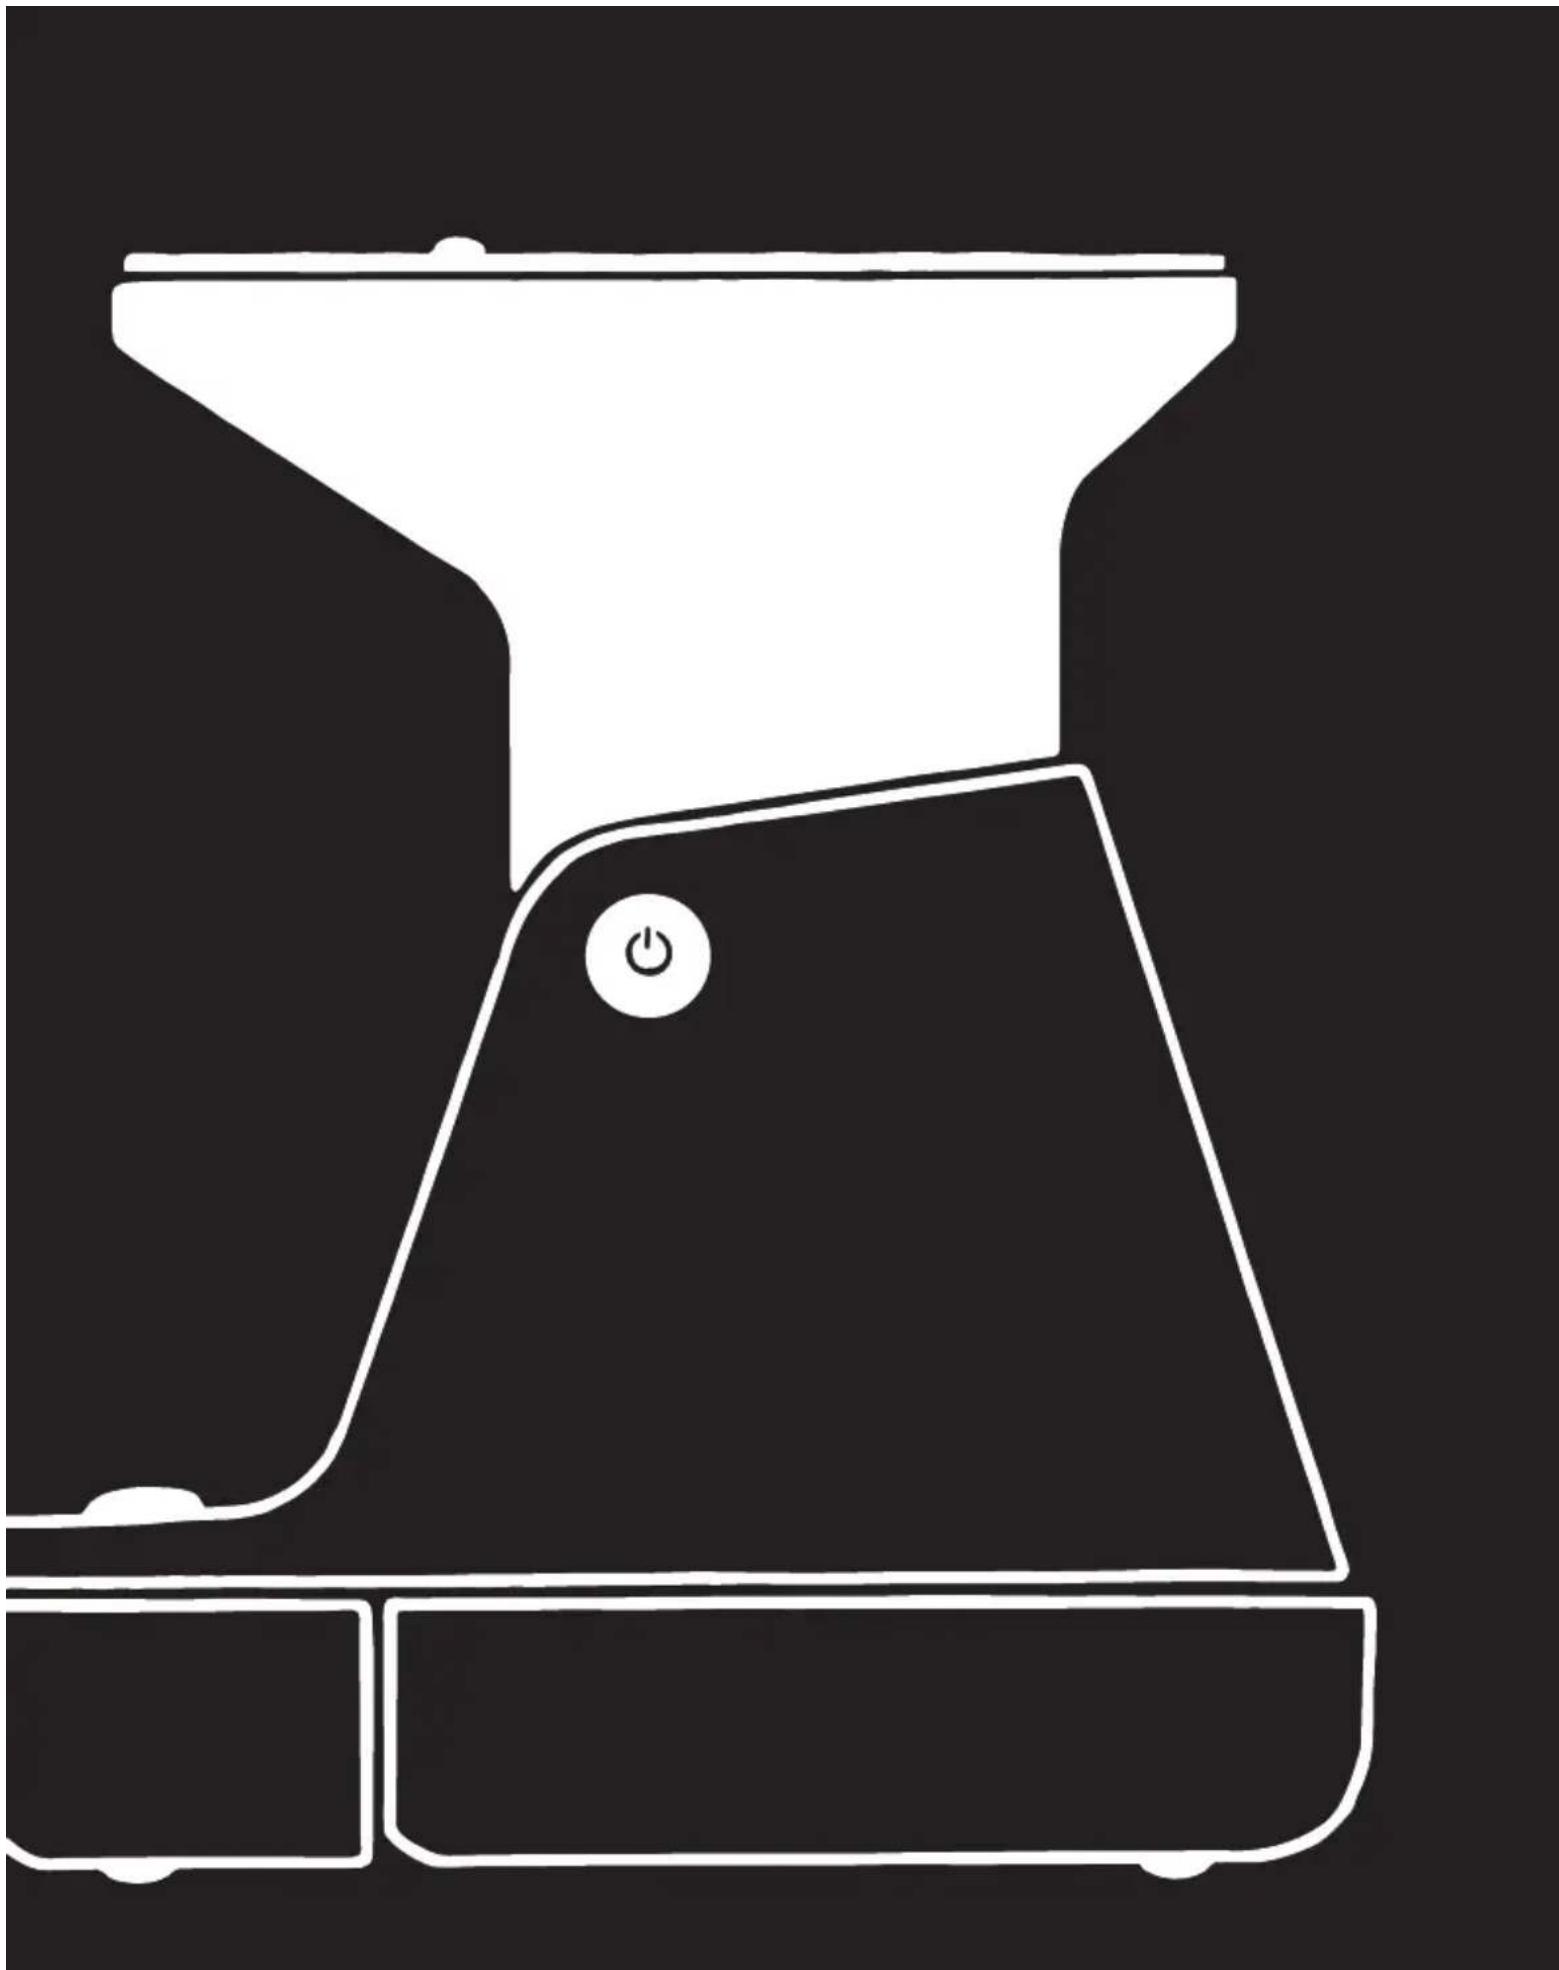
natural_image
Line drawing of a kitchen grater with a power button, no text or symbols presentPolaroid Lab
The Polaroid Lab helps you transform your digital photos from your phone into tangible, beautiful Polaroid photographs.
Please be sure to read through this manual before using the Polaroid Lab. Keep for future reference. To download the companion app, for updated information, video tutorials and more, please visit: polaroidoriginals.com/polaroidlab
A Platform cover
E On/Platform release button
Battery level rear LEDs
Micro-USB charging port
Port de chargement micro USB
text_image
A D E G F H I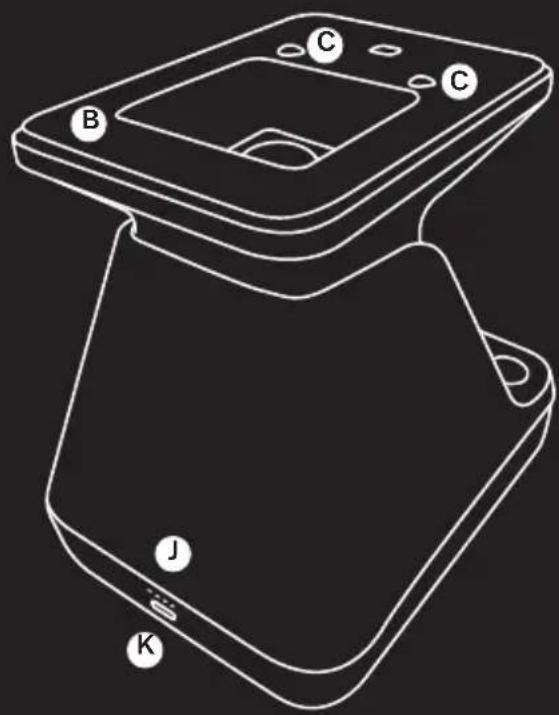
natural_image
Line drawing of a smartphone with labeled components (B, C, J, K) and no readable text or symbols beyond labelsUser Manual
10 Box Contents
10 How to use the Polaroid Lab
11 Further Guidance
12 Troubleshooting & FAQ
13 Tips for Making Great Photos
14 Customer Support
14 Technical Specifications
15 Safety Information
15 Compliance
Manuale utente
natural_image
Technical line drawing of a mechanical device with top and side views (no text or symbols)How to use the Polaroid Lab
1. Download the Polaroid Originals App on your phone
You will need the Polaroid Originals App to use the Polaroid Lab. The App also contains Tips, Tricks & Tutorials, and Inspiration for more ways to create.
→ polaroidoriginals.com/polaroidlab

text_image
QR code image containing encoded data, no visible human-readable text2. Charge the Polaroid Lab
Important The Polaroid Lab will not be fully charged upon purchase. Make sure that it is fully charged before first use. To charge the Polaroid Lab, plug the USB charging cable into the Micro-USB slot on the Polaroid Lab's back panel and the other end of the cable into a charger, such as a phone adapter or your computer's USB slot. The LEDs next to the slot light up to show the current battery level, four lit LEDs means fully charged. If the Polaroid Lab is connected to a charger and is fully charged then all charging LEDs will be off. A full charge usually takes about 2 hours through a wall socket with a phone adapter, or up to 4 hours through a computer's USB slot. A fully-charged Polaroid Lab will have enough power to shoot 100 packs of film, depending on usage. Remember to turn off the Polaroid Lab after use to conserve battery life.
3. Load the film
Pick up the Polaroid Lab and gently pull down the front of the Film door. Take the fi lm cassette out of the packaging and push the fi lm cassette all the way in, with the fi lm's darkslide facing up. When you close the fi lm door, the darkslide will eject from the Polaroid
Lab automatically. If the darkslide has not ejected, remove the film pack and re-insert it, making sure it is pushed all the way to the back of the camera.
Note Please check individual film packaging for development time, handling and storage details.
4. Turn the Polaroid Lab on
Push the black button on the right side of the Polaroid Lab to raise the phone platform to the photo taking position and power on. The Rainbow logo LED will light up and the film counter LED will light up to show how many shots are remaining in the Polaroid Lab. When you're done, turn off the Polaroid Lab by pushing down the platform. Alternatively, it will turn itself off automatically after several minutes of inactivity.
5. Open the app and select your photo
Open the Polaroid Originals App and select the Polaroid Lab section. Tap the image selection button to choose the image you want to expose and tap proceed. The app will guide you through your first exposure.
6. Place your phone on the phone platform
Place your phone on the phone platform with the screen facing toward the lens of the Polaroid Lab. Ensure that it is correctly aligned: the top of your phone must be facing the rear of the camera. Remove any phone covers or screen protectors to ensure best performance. The app will detect the Polaroid Lab and orientate the image to be perfectly aligned with the film. It will also display a calibration image above the light sensor to correctly expose your image without having to adjust your phone's backlight. Make sure that you turn off all settings or apps which influence the color of the display, such as night shift or true tone, as these can severely impinge the final photograph.
7. Push the red Shutter button
The Polaroid Lab will detect your phone on the platform and will measure the brightness of the display to ensure the perfect exposure. Wait until the Rainbow logo LED flashes then press the red shutter button. The photo will be ejected from the slot at the front of the camera as soon as you let go of the shutter button. Remove the photo from beneath the film shield and let the shield roll back into the Polaroid Lab. Place the photo face down to continue shielding it from light as it develops.
If you want to take another photo of the same image then press the shutter button again.
Further Guidance
1. How much film is left in the pack?
There are 8 orange LED lights on the front of the Polaroid Lab. When the Lab is switched on and not in sleep mode, the LEDs will constantly display the film count. The number of LEDs which light up corresponds to the number of shots left in the film pack. For example: If 6 LEDs light up, that means there are 6 shots left in the film pack. If you have used up all 8 shots in the film pack, or if there is no film pack inserted in the camera, then the LEDs will blink rapidly when you turn the Polaroid Lab on or press the shutter button.
2. How much battery is left?
The Polaroid Lab displays the remaining battery level on four LED above the USB slot. When the Polaroid Lab is charging the LED will flash, and when fully charged with a USB cable inserted the LEDs will all be unlit as it will be running on power directly from the charger.
Battery level:
- Between 1 to 4 LEDs light up One LED indicates enough charge for at least 2 packs of film.
- Battery charged and USB cable connected: No LEDs light up. The film counter LED will show the remaining number of photos.
- Battery empty No charge remaining. No LEDs light up, and the Polaroid Lab will cease to operate until it is recharged.
3. Compatible film
The Polaroid Lab works with all Polaroid
Originals i-Type and 600 type film packs. We recommend using i-Type film as it is optimized for use with the Polaroid Lab. The Polaroid Lab is not intended to be used with SX-70 film, Spectra film or any other type of film.
4. Power supply
Charge the Polaroid Lab before use to ensure it has enough (see → Charge the Polaroid Lab). The battery level rear LEDs will flash whilst the Polaroid Lab is plugged in and charging, and will turn off once the Polaroid Lab is fully charged.
5. Cleaning the rollers
Sometimes excess developer paste from photos may build up on the Polaroid Lab's rollers, affecting the Polaroid Lab's performance and causing photos to show unwanted imperfections. The Polaroid Lab has a built-in roller cleaning mode to help with this issue. Just follow these steps:
- Close the phone platform to turn off the Polaroid Lab
- Open film door
- Hold down the right touch point and press and hold shutter button for >2 seconds
- Rollers will move to the starting position for cleaning
- Release the both buttons, the Polaroid Lab is now in roller cleaning mode
- Using a damp cloth or cotton swab, gently clean the rollers
- Press the shutter button to incrementally advance the roller positions
- Once both rollers are clean on all sides, close the film door
Troubleshooting & FAQ
1. My Polaroid Lab won't eject my photo/darkslide
Make sure that your Polaroid Lab is charged: The Rainbow logo LED and rear LEDs won't light up unless there is enough charge to operate.
If this is the case, you should connect the Polaroid Lab to a charger before using again. Make sure you still have film in your Polaroid Lab: to check, lower and then raise the phone platform. The remaining film counter LEDs will indicate how many shots you have left in the film pack. If the LEDs flash rapidly when the Polaroid Lab turns on again, this means that there are no shots left in the film pack, or that no film pack is inserted.
- All unlit
Polaroid Lab off, or no pack inserted - Shutter button depressed, all flashing Pack inserted, no film
- All lit
Pack inserted, 8 photographs available - Alternate LED lit
Pack insertion error
2. The app made an error noise at me
The app will detect if your phone has been placed on the Polaroid Lab correctly. The touch points on the phone platform allow the app to rotate and place the image directly above the lens of the Polaroid Lab. If the app can't do this then it will let you know so you can place your phone in a better position. When you pick up your phone the app will guide you through the correct positioning with a short video.
3. The shutter button won't work
If the Rainbow logo LED is lit up then the Polaroid Lab is powered on, and if there is film in the Polaroid Lab then the appropriate number of film count LED will be lit. If you press the shutter button and nothing comes out, look at the film count LED. If your phone isn't oriented correctly then the Polaroid Lab won't be able to read the brightness of the image.
The Rainbow logo LED will blink 3 times if the phone is recognized. If it keeps rapidly blinking, the Polaroid Lab can't recognize the sensor area/brightness correctly. If it doesn't blink at all, it means that it doesn't recognize the phone on top. This can be because of a phone case or screen protector, which can impair the recognition of the phone. To rectify this, remove any phone case or screen protector. Gently push the phone on the Lab.
4. My photo turned out slightly too dark
We didn't take the original photo on your phone camera, but our regular photo taking advice still applies. We'd recommend that you disable True Tone, Night Shift or Night Mode. The app will automatically adjust your phone brightness. You can also adjust exposure under the "More" menu in the app. EV can be adjust from -3 to +3 f-stops.
Tips for Making Great Photos
- Make sure your phone screen is clean. If you have a phone screen protector make sure that the screen doesn't have scratches, stains or fingerprints. Ideally, remove any phone screen protector or phone covers to ensure optimum results.
- Make sure that your phone is completely flat on the Polaroid Lab phone platform.
- Make sure that your film is fresh! Stock up on new film at polaroidoriginals.com and follow the tip sheet that comes with the film packaging to ensure that your film is as good as it can be.
- Make sure all settings and apps which influence colors are turned off (eg. night shift, true tone).
Customer Support
The Polaroid Originals Customer Support Team is always more than happy to hear from you. Get in touch using the contact details provided. For more detailed and up-to-date information, visit polaroidoriginals.com/help
USA/Canada
usa@polaroidoriginals.com
+1 212 219 3254
Europe/Rest of World
service@polaroidoriginals.com
00 800 577 01500
Impossible B.V.
P.O. Box 242 - 7500 AE Enschede
The Netherlands

natural_image
Line drawing of a mechanical device with a base and top component, no text or symbols presentTechnical Specifications
General
Dimensions
150mm (L) × 115.6mm (W) × 149.7mm
(H closed) ×177.16mm (H open)
Weight
600 grams (without film pack)
Operating Temperature
40-108°F / 4-42°C, 5-90% relative humidity
Compatible Film
Polaroid Originals i-Type and 600 type film in both Color and Black & White, including Special Editions.
Battery
High performance lithium-ion battery,
1100mAh, 3.7V nominal voltage, 4.07Wh
Materials
Outer shells
Polycarbonate, TPU, EPDM (Ethylene
Propylene Diene Monomer)
Lens
Optical grade polycarbonate lens, AR coated
Shutter system
Fixed aperture, variable speed shutter
Optical System
Lens
Fixed focus lens
Focal length
150mm
Lens type
1:2.35 3 element lens system
App System Requirements
Supported phones
- iPhone 6 and newer (except iPhone SE)
- Most current Android devices
Supported phones and operating systems are subject to change. For a full list please visit polaroidoriginals.com/labworkswith
Safety Information
Caution
Risk of electric shock – Do not open/Disassemble the motorized roller system
- Do not disassemble the device. Incorrect reassembly can cause electrical shock if the device is used again.
- Do not immerse the device in water or other fluids.
- Do not operate the device in a high humidity environment or very dusty environments.
- Do not attempt to tamper with, adjust or remove the battery and/or the electronics located below the rollers behind the device's film door.
- Do not attempt to remove the door itself as it is connected electronically to the body of the device. Doing so is unsafe, will likely damage your device, and will void your warranty.
- Do not insert metal objects into the device.
- Do not insert any objects into the rollers or gears.
- Keep small children and infants away from device to avoid them being injured by the device's moving parts.
- Do not use or store the device near any heat source or any type of equipment that generates heat, including stereo amplifiers.
- Do not use the device near flammable or explosive gases.
- Do not charge the device if you notice any unusual odors, noise or smoke.
- Do not attempt to disassemble the film's battery or modify it in any way (if using 600-type film). If battery fluid gets in your eyes, immediately rinse your eyes with fresh, cold running water and seek medical attention immediately.
Battery and Charger
- This device uses a custom lithium-ion battery that is non-removable and mounted inside the Lab body. No other type of battery can be used. Battery replacement can only be done by authorized service centers. The battery will provide many years of service if properly used. Power consumption varies depending on the environment the device is used in and how the device has been stored. Used immediately after full charge, the battery will power the processing of up to 30 film packs.
- Once the battery energy level falls below a certain level, the device will no longer process film. The LED will blink and signal when it needs to be recharged. This is to avoid a photo getting stuck as it is being processed through the roller system.
- The rechargeable battery is not fully charged at the time of purchase. Charge the battery fully with the USB charging cable (provided). This usually takes 1-2 hours (can vary depending on usage).
- The supplied battery charging cable has been tested to work with the Apple iPhone power adaptors. While it can be used in other USB ports e.g. computer, USB power adaptors, TVs, cars etc., correct operation cannot be guaranteed.
- When the device is no longer in use, please recycle it properly.
Usage Environment
• To protect the high-precision technology contained in this device, never leave the
Lab in the following environments for extended periods of time: high temperature (+42°C/108°F), high humidity, places with extreme changes in temperature (hot and cold), direct sunlight, sandy or dusty environments such as beaches, damp places, or places with strong vibrations.
- Do not drop the device or subject it to severe shocks or vibrations.
- Do not push, pull or press on the lens surface
Compliance
Important directions for using
Lithium-Ion Batteries
- Do not throw into fire.
- Do not short circuit.
- Do not disassemble.
- Do not continue to use when damaged.
- Dispose correctly after use.
- Keep away from water.
EU Declaration of Conformity
Hereby, Impossible B.V. declares that the Polaroid Lab is in compliance with the essential requirements of the Electromagnetic Compatibility Directive (2014/30/EU), Low Voltage Directive (2014/35/EU) and RoHs Directive (2011/65/EU) and other relevant provisions, when used for its intended purpose.
FCC Compliance Statement
This device complies with Part 15 of the FCC Rules. Operation is subject to the following two conditions: (1) this device may not cause harmful interference, and (2) this device must accept any interference received, including interference that may cause undesired operation.
Caution The user is cautioned that changes or modifications not expressly approved by the party responsible for compliance could void the user's authority to operate the equipment. This equipment must not be co-located or operated in conjunction with any other antenna or transmitter.
Note This equipment has been tested and found to comply with the limits for a Class B digital device, pursuant to part 15 of the FCC rules. These limits are designed to provide reasonable protection against harmful interference in a residential installation. This equipment generates, uses and can radiate radio frequency energy and, if not installed and used in accordance with the instructions, may cause harmful interference to radio communications. However, there is no guarantee that interference will not occur in a particular installation. If this equipment does cause harmful interference to radio or television reception, which can be determined by turning the equipment off and on, the user is encouraged to try to correct the interference by one or more of the following measures:
- Reorient or relocate the receiving antenna.
- Increase the separation between the equipment and receiver.
- Connect the equipment into an outlet on a circuit different from that to which the receiver is connected.
- Consult the dealer or an experienced radio/TV technician for help.
This equipment complies with fcc radiation exposure limits set forth for an uncontrolled environment. End user must follow the specific operating instructions for satisfying rf exposure compliance.
Industry Canada (IC)
The symbol means that according to local laws and regulations your product should be disposed of separately
from household waste. When this product reaches its end of life, take it to a collection point designated by local authorities. Some collection points accept products for free. The separate collection and recycling of your product at the time of disposal will help conserve natural resources and ensure that it is recycled in a manner that protects human health and the environment.

bar
| Category | Value | |---|---| | Category 1 | 100 | | Category 2 | 100 | | Category 3 | 100 | | Category 4 | 100 | | Category 5 | 100 | | Category 6 | 100 | | Category 7 | 100 | | Category 8 | 100 | | Category 9 | 100 | | Category 10 | 100 | | Category 11 | 100 | | Category 12 | 100 | | Category 13 | 100 | | Category 14 | 100 | | Category 15 | 100 | | Category 16 | 100 | | Category 17 | 100 | | Category 18 | 100 | | Category 19 | 100 | | Category 20 | 100 | | Category 21 | 100 | | Category 22 | 100 | | Category 23 | 100 | | Category 24 | 100 | | Category 25 | 100 | | Category 26 | 100 | | Category 27 | 100 | | Category 28 | 100 | | Category 29 | 100 | | Category 30 | 100 | | Category 31 | 100 | | Category 32 | 100 | | Category 33 | 100 | | Category 34 | 100 | | Category 35 | 100 | | Category 36 | 100 | | Category 37 | 100 | | Category 38 | 100 | | Category 39 | 100 | | Category 40 | 100 | | Category 41 | 100 | | Category 42 | 100 | | Category 43 | 100 | | Category 44 | 100 | | Category 45 | 100 | | Category 46 | 100 | | Category 47 | 100 | | Category 48 | 100 | | Category 49 | 100 | | Category 50 | 100 | | Category 51 | 100 | | Category 52 | 100 | | Category 53 | 100 | | Category 54 | 100 | | Category 55 | 100 | | Category 56 | 100 | | Category 57 | 100 | | Category 58 | 100 | | Category 59 | 100 | | Category 60 | 100 | | Category 61 | 100 | | Category 62 | 100 | | Category 63 | 100 | | Category 64 | 100 | | Category 65 | 100 | | Category 66 | 100 | | Category 67 | 100 | | Category 68 | 100 | | Category 69 | 100 | | Category 70 | 100 | | Category 71 | 100 | | Category 72 | 100 | | Category 73 | 100 | | Category 74 | 100 | | Category 75 | 100 | | Category 76 | 100 | | Category 77 | 100 | | Category 78 | 100 | | Category 79 | 100 | | Category 80 | 100 | | Category 81 | 100 | | Category 82 | 100 | | Category 83 | 100 | | Category 84 | 100 | | Category 85 | 100 | | Category 86 | 100 | | Category 87 | 100 | | Category 88 | 100 | | Category 89 | 100 | | Category 90 | 100 | | Category 91 | 100 | | Category 92 | 100 | | Category 93 | 100 | | Category 94 | 100 | | Category 95 | 100 | | Category 96 | 100 | | Category 97 | 100 | | Category 98 | 100 | | Category 99 | 100 | | Total (Total) |natural_image
Simple line drawing of a laboratory flask with a funnel and stopper (no text or symbols)
natural_image
Simple line drawing of a mechanical component or housing (no text or symbols)text_image
QR code image containing encoded data, no visible human-readable text2. Chargement du Polaroid Lab
natural_image
Line drawing of a mechanical device with a base and top component, no text or symbols presentIndustry Canada (IC)
natural_image
Technical line drawing of a mechanical device with top and side views (no text or symbols)text_image
QR code image containing encoded data, no visible human-readable text2. Cargue la Polaroid Lab
natural_image
Line drawing of a mechanical device with a base and top component (no text or symbols)natural_image
Technical line drawing of a mechanical device with top and side views (no text or symbols)text_image
QR code image containing encoded data, no visible human-readable text2. Caricare la Polaroid Lab
natural_image
Line drawing of a mechanical device with a base and top component (no text or symbols)Scheda Tecnica
Dati generali
Dimensioni
150mm (L) × 115,6 mm (P) × 149,7 mm
(H chiusa) ×177,16 mm (H aperta)
Peso
natural_image
Technical line drawing of a mechanical device with top and side views (no text or symbols)text_image
QR code image containing encoded data, no visible human-readable textnatural_image
Line drawing of a mechanical device with a base and top component, no text or symbols presentTechnische Daten
Allgemein
Abmessungen
150mm (L) × 115.6mm (B) × 149.7mm
natural_image
Simple line drawing of a laboratory flask with a funnel and stopper (no text or symbols)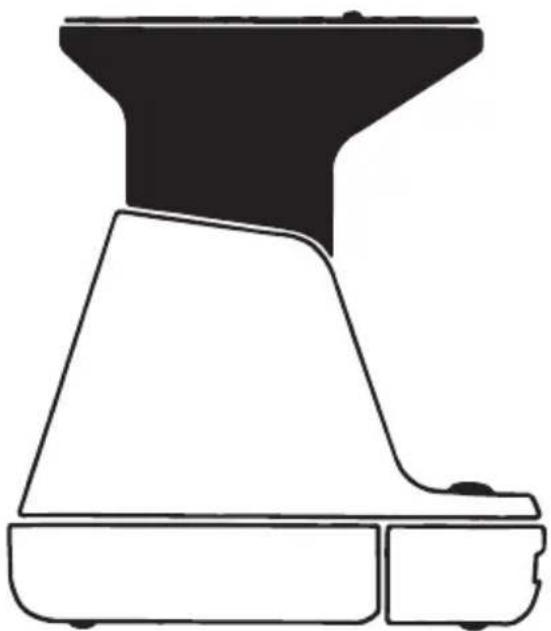
natural_image
Pure technical line drawing of a mechanical component or housing (no text or symbols)Polaroid Lab の使い方
text_image
QR code image containing encoded data, no visible human-readable textnatural_image
Line drawing of a mechanical device with a base and top component (no text or symbols)技術仕様
一般
寸法:
natural_image
Simple line drawing of a laboratory flask with a funnel and stopper (no text or symbols)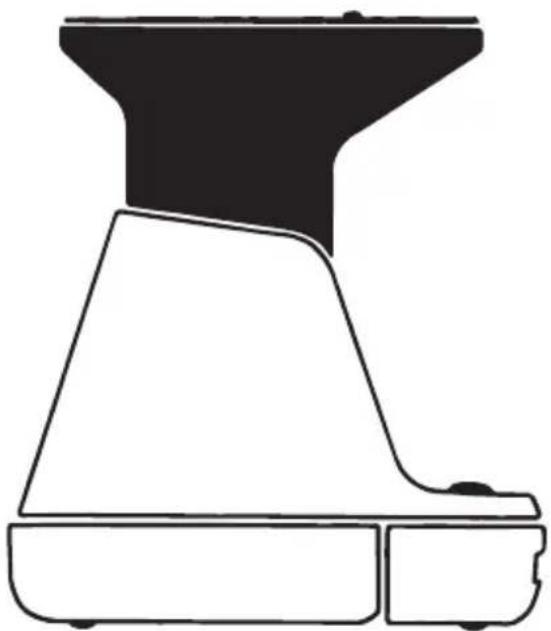
natural_image
Pure technical line drawing of a mechanical component or housing (no text or symbols)如何使用 Polaroid Lab
text_image
QR code image containing encoded data, no visible human-readable text2. 给 Polaroid Lab 充电
natural_image
Line drawing of a mechanical device with a base and top component, no text or symbols present技术规格
一般规格
尺寸
natural_image
Simple line drawing of a laboratory flask with a funnel and stopper (no text or symbols)
natural_image
Pure technical line drawing of a mechanical component or housing (no text or symbols)Polaroid Lab 使用指南
text_image
QR code image containing encoded data, no visible human-readable textnatural_image
Line drawing of a mechanical device with a base and top component (no text or symbols)技術規格
一般規格
尺寸
natural_image
Simple line drawing of a laboratory flask with a funnel and stopper (no text or symbols)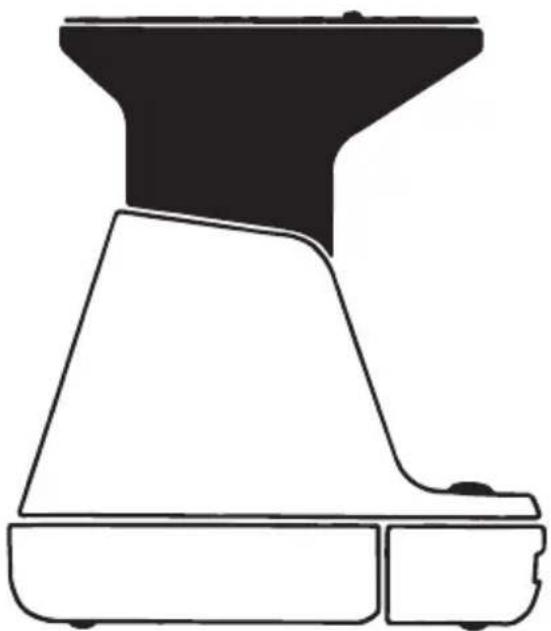
natural_image
Pure technical line drawing of a mechanical component or housing (no text or symbols)Polaroid Lab 사용 방법
text_image
QR code image containing encoded data, no visible human-readable text2. Polaroid Lab 충전한다
natural_image
Line drawing of a mechanical device with a base and top component (no text or symbols)기술 명세
일반 사항
치수
150mm (L) × 115.6mm (W) × 149.7mm (H)
닫힘)x177.16mm(H 열림)
중량
600g(필름 팩 제외)
작동 온도
폴리카보네이트,TPU,EPDM(Ethylene Propylene
Diene Monomer)
렌즈
natural_image
Simple line drawing of a laboratory flask with a funnel and stopper (no text or symbols)
natural_image
Simple line drawing of a mechanical component or housing (no text or symbols)text_image
QR code image containing encoded data, no visible human-readable textnatural_image
Line drawing of a mechanical device with a base and top component (no text or symbols)End of life disposal warning: When the product has come to the end of life, dispose of it in accordance
with local regulations. This product is subject to the
EU directive 202/96/EC on Waste Electrical and Electronic Equipment (WEEE) and should not be disposed as unsorted municipal waste.
Version 2.0 - 05/2019
Manufactured in China. This product is distributed and sold by Impossible B.V., P.O. Box 242, 7500 AE Enschede, The Netherlands and its wholly owned subsidiaries. Polaroid, Polaroid Classic Border Logo, Polaroid Originals & Design and Phone to Polaroid are trademarks of PLR IP Holdings, LLC, used under license. PLR IP Holdings, LLC, does not manufacture this product or provide any manufacturer's warranty or support.
Apple and the Apple logo are trademarks of Apple Inc., registered in the U.S. and other countries. App Store is a service mark of Apple Inc.
Google Play and the Google Play logo are trademarks of Google LLC.
©2019 All rights reserved.
Learn more about the PolaroidLab:

text_image
QR code image containing encoded data, no visible human-readable textJoin our community by signing up at polaroidoriginals.com