
PCKA 1121 - Coffee machine PROFICOOK - Free user manual and instructions
Find the device manual for free PCKA 1121 PROFICOOK in PDF.
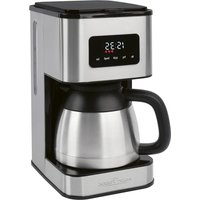
| Product type | Filter coffee machine |
| Brand | ProfiCook |
| Model | PCKA 1121 |
| Power supply | 220-240 V ~, 50/60 Hz |
| Power | 600 W max |
| Carafe capacity | 0.6 liters (about 6 cups) |
| Net weight | Approximately 1.2 kg |
| Protection class | I |
| Coffee type | Ground coffee |
| Filter | Paper filter size 1x2 |
| Anti-drip device | Yes |
| Automatic shut-off | Yes, after approx. 40 minutes (according to Ecodesign directive) |
| Keep warm | Up to 40 minutes |
| Water level indicator | Visible marking on the reservoir |
| Status light | Yes, lights up when operating |
| Carafe material | Glass with lid |
| Heating surface | Hot plate |
| Maintenance | Descaling with citric acid-based product |
| Cleaning | Carafe and filter holder washable in soapy water; housing wiped with a damp cloth |
| Child safety | Hot surface warning; do not let children play with packaging |
| Use | Indoor, household use only |
| Included accessories | Glass carafe, filter holder, lid |
Frequently Asked Questions - PCKA 1121 PROFICOOK
User questions about PCKA 1121 PROFICOOK
0 question about this device. Answer the ones you know or ask your own.
Ask a new question about this device
Download the instructions for your Coffee machine in PDF format for free! Find your manual PCKA 1121 - PROFICOOK and take your electronic device back in hand. On this page are published all the documents necessary for the use of your device. PCKA 1121 by PROFICOOK.
USER MANUAL PCKA 1121 PROFICOOK
ATTENTION: Anti-goutte
Thank you for choosing our product. We hope you will enjoy using the appliance.
Symbols in these Instructions for Use
Important information for your safety is specially marked. It is essential to comply with these instructions in order to avoid accidents and prevent damage to the appliance:

WARNING:
This warns you of dangers to your health and indicates possible injury risks.

CAUTION:
This refers to possible hazards to the appliance or other objects.

NOTE: This highlights tips and information.
Contents
Overview of the Components 3
General Notes 31
Special Safety Instructions for this Appliance. 31
Designated Use 33
Overview of the Components / Delivery Scope 33
Unpacking the Appliance 33
Notes on Use 33
Operation 34
De-scaling 34
Cleaning 34
Storage 35
Troubleshooting 35
Technical Data. 35
Disposal. 35
General Notes
Read the operating instructions carefully before putting the appliance into operation and keep the instructions including the warranty, the receipt and, if possible, the box with the internal packing. If you give this appliance to other people, please also pass on the operating instructions.
- The appliance is designed exclusively for private use and for the envisaged purpose. This appliance is not fit for commercial use.
- Do not use it outdoors. Keep it away from sources of heat, direct sunlight, humidity (never dip it into any liquid) and sharp edges. Do not use the appliance with wet hands. If the appliance is humid or wet, unplug it immediately.
- When cleaning or putting it away, switch off the appliance and always pull out the plug from the socket (pull the plug itself, not the lead) if the appliance is not being used and remove the attached accessories.
- Do not operate the appliance without supervision. If you leave the room you should always turn the appliance off. Remove the plug from the socket.
- The appliance and the mains lead have to be checked regularly for signs of damage. If damage is found the appliance must not be used.
- Use only original spare parts.
- In order to ensure your children's safety, please keep all packaging (plastic bags, boxes, polystyrene etc.) out of their reach.

WARNING:
Don't let small children play with foils for danger of suffocation!
Special Safety Instructions for this Appliance

WARNING: Risk of burns!
- The hotplate and the pot get very hot. Only grab the glass pot by the handle. The surface of the warming plate may still be hot after having used the appliance.
- Never open the lid of the water reservoir during the cooking process.
CAUTION:
This appliance is not intended to be immersed in water during cleaning. Please observe the instructions that we have included in the chapter "Cleaning".
- Use the appliance only on a level work surface.
- Only use the appliance when water is filled into the water container.
- Do not move the appliance when it is in operation.
- This appliance can be used by children aged from 8 years and above if they have been given supervision or instruction concerning the safe use of the appliance understand the hazards involved.
- Cleaning and maintenance by the user shall not be made by children unless they are older 8 years and supervised.
- Keep the appliance and its cord out of reach of children less than 8 years.
Children shall not play with the appliance. - Appliances can be used by persons with reduced physical, sensory or mental capabilities or lack of experience and knowledge if they have been given supervision or instruction concerning use of the appliance in a safe way and if they understand the hazards involved.
- Do not repair the appliance by yourself. Please contact authorized personnel. If the supply cord is damaged, it must be replaced by the manufacturer, its service agent or similarly qualified persons in order to avoid a hazard.
Designated Use
- This appliance serves for brewing of ground coffee.
- Only use the appliance in a dry, indoor area.
- It is intended for domestic use and similar areas of use such as e. g.: - In staff kitchens in shops, offices and other commercial areas; - By guests in hotels, motels and other accommodation facilities. It is not intended for use in farm accommodation or Bed & Breakfast establishments.
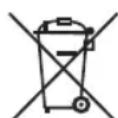
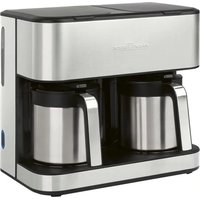
Overview of the Components / Delivery Scope
1 Filter holder (with tab to remove the filter)
2 Water tank lid
3 Tab to open the water tank lid
4 Water tank
5 Water level indicator (in the water tank)
61/ switch
7 Warming plate
8 Glass jug with lid
9 Operating control lamp
Unpacking the Appliance
- Remove the appliance from its packaging.
- Remove all packaging material such as plastic films, filler material, cable ties and cardboard packaging.
- Check the content for any missing parts.
- In the event that the packaging content should be incomplete or if damages are noticeable, do not operate the appliance. Return it to the dealer immediately.

NOTE:
There may be dust and production residue on the appliance. We recommend cleaning the appliance as described under "Cleaning".
Notes on Use
Placement
- Place the automatic coffee maker on a stable and level surface. Place the appliance in such way that it cannot tip over.
- Do not place the appliance in close proximity to a gas or electric stove or any other heat source.
Note About the Brewing Process
During the brewing process and depending on the degree of grinding and the used amount, the coffee powder absorbs a certain amount of water. That is why the quantity of coffee might diverge from the quantity of water in the water tank.
European Regulations on Energy Saving

NOTE:
The European Directive 2009 / 125 / EC (Ecodesign Directive) incorporates measurements for energy saving.
The following applies to coffee makers: The keep-warm period is limited to max. 40 minutes after which the appliance turns off automatically.
You benefit from better safety and lower energy consumption.
Electric Connection
- Ensure that your mains power corresponds with the specifications of the appliance. The specifications are printed on the type label.
- Connect the mains cable to a properly installed and earthed wall outlet.
Initial Operation
Before making coffee for the first time operate the appliance twice with clean water only and without paper filter. This removes dust, which may have collected during transport. Follow the instructions given under "Operation".
Turning the Machine On / Off
- Set the switch to " I" to turn the machine on. The operating control lamp lights up.
- Set the switch to "to turn the machine off and / or cancel the brewing process. The operating control lamp turns off.
Operation
- Open the lid of the water tank.
- Fill cold water according to the desired amount of cups of coffee into the rear water tank. You can determine the water level with the help of the scale in the water tank.

NOTE:
You can use the pot to fill the water tank.

CAUTION:
Do not overfill the tank! Do not fill it above the MAX mark.
- Ensure that the filter holder is properly attached.
- Turn over the lower fold of the paper filter (size 1 × 2 ) and place it in the filter funnel. Then fill it with coffee powder.

NOTE:
Do not put too much coffee powder into the filter to avoid spillage.
- Now close the lid of the water tank.
- Place the jug onto the warming plate.

CAUTION: Drip stop
Your appliance comes with a drip stop. It closes when removing the coffee pot. This prevents the coffee from dripping onto the warming plate if there is still water in the filter.
- Ensure that the lid is attached to the coffee pot. It opens the drip stop.
-
If there is still water in the tank, place the pot underneath as soon as possible. Otherwise the filter might overflow.
-
Switch on the device. The operating control lamp lights up.

NOTE:
The unit switches off automatically about 30 minutes after the brewing. The operating control lamp turns off. If you want to use the appliance again, you have to switch it off first by setting the switch to "O". Following that, proceed as described in "Operating".
The Coffee is Ready
- When no more coffee is flowing through the filter you can remove the pot.
- Turn the device off.
- Would you like to keep the remaining coffee warm? Leave the appliance turned on until the end of the keep-warm period. If you wish to keep the coffee warm even after the keep-warm period has finished, pour the remaining coffee into a thermal flask.

NOTE:
The filter holder can be removed from the machine by its handle.
This makes it easier to dispose of the old coffee filter, for example.

WARNING:
If you want to make another pot of coffee immediately, switch off the device first. Let it cool down with the water tank open in order to avoid hot water splashing when refilling with water.
De-scaling
De-scaling is necessary when the brewing time increases substantially.
- Use only commercially available citrus acid-based de-scaler.
- Follow the recommended instructions for use.

WARNING:
- Afterwards you should boil fresh water in the pot three or four times in order to rinse out residues of the de-scaling agent.
- Do not use any coffee powder!
- Do not use this water for consumption.
Cleaning

WARNING:
- Before cleaning, always remove the mains plug and wait until the device has cooled down.
- Do not immerse the device in water. Otherwise this might result in an electric shock or fire.

CAUTION:
- Do not use a wire brush or any abrasive items.
-
Do not use any acidic or abrasive detergents.
-
The exterior of the device should be cleaned as necessary with a slightly damp cloth - without any additives.
-
Remove spilled coffee grounds with a paper towel from the inner casing. Afterwards wipe with a damp cloth.
-
The coffee pot and the filter pad should be cleaned by rinsing in warm water. Use a soft brush if necessary.
Storage
- Clean the appliance as described and let it dry completely.
- We recommend that you store the appliance in its original packaging when it is not to be used for a longer period.
Always store the appliance at a well ventilated and dry place outside the reach of children.
Troubleshooting
| Problem Possible cause Solution | ||
| The appliance does not work. The appliance is not connected to mains power. | Check the wall outlet with a different appliance. | |
| Insert the plug properly in the wall outlet. | ||
| Check the fuse. | ||
| The appliance is defective. Contact our service or a repair center. | ||
| Filter blockage: coffee grounds spill over the edge of the filter. | The drip stop is closed: The coffee pot is not on the warming plate or the lid is not on the coffee pot. | 1. Switch the appliance off. Disconnect from mains power supply. 2. Put the coffee pot with lid on the warming plate so that the filter is emptied. 3. Dispose of the paper filter. 4. Clean the appliance as described. |
| Too much coffee powder in the filter. | ||
| Coffee grounds in the coffee. The paper filter is too small. Use a paper filter | size “1 x 2”. | |
| Too much coffee powder in the filter. Use less coffee powder. | ||
| The brewing process takes too long. | Limescale deposits in the appliance. Decalcify the appliance as described. | |
| The appliance turns off automatically. | This is not a malfunction of the appliance. In order to comply with the Ecodesign Directive (2009 / 125 / EC), the appliance turns off automatically after max. 40 minutes after the brewing process has finished. | |
Technical Data
Model: PC-KA 1121
Power supply: 220-240V\~, 50/60Hz
Power consumption: 600W max.
Net weight: approx. 1,2kg
The right to make technical and design modifications in the course of continuous product development remains reserved.
This appliance complies with all current CE directives, such as electromagnetic compatibility and low voltage directive and is manufactured according to the latest safety regulations.
Disposal
Meaning of the "Wheelie Bin" Symbol
Take care of our environment, do not dispose of electrical appliances via the household waste.
Dispose of obsolete or defective electrical appliances via municipal collection points.
Please help to avoid potential environmental and health impacts through improper waste disposal.
You contribute to recycling and other forms of utilization of old electric and electronic appliances.
Your municipality provides you with information about collecting points.
Instrukcja obslugi
CTC Clatronic Sp. zo.o.
Ul. Brzeska 1
45-960 Opole
Usuwanie
Yka3bIbaeT Ha BO3MOxHyO ONaCHOCTb IIN3dEINN INpynx OKpyKaHOxN PpeDMTOB.

IPIMEUYAHNA:JaetcoBebtiHnHdopmaunio.
Copepkanie
O63op detanei np6opa 3
O6uhe 3ameuHn. 47
Oc6bIe yka3aHnno TeXnKe 6e3oNaChOTn Dn8 3TOrO yCTpOInCTBa. 47
Ha3naueHne 49
063op detaneepnpi6opa/KomnneKT noCTaKn 49
PacnaKOBka yctpoiCTBa. 49
PpIMeuaHnno nncnoB3ObaHnna 49
Pa6ota 50
UdaneHne Hakn.. 50
Ynctka. 51
Xpahene. 51
UcTpaHHe HEnCnpaBHOCTeI. 51
Texnueckne daHHbIe 52
06üne 3ameuahnna
Ipeed hauanom 3Kcnnyataunn np6opba BHNMaTeIbHO npouHTaIte npnaaraemyu HNCTpykTuIO no 3Kcnnyataunn coxpaHInTe ee B HaJExKHOM MeCTe, BMeCTe C rapaHTnHBIM TaHOm, KaccOBbIM YekOM I, NO BO3MOXHOCTn, KAPTOHHo Kopo6KOc yNaKOBOChbIM MaTePAnOM. Ecn daete kOMy nloNoonb3OBAbCra np6bOpom, o63aTeNbHO daJIte B npndaHy dAnHyIO INCHtpKTuIO nO 3KcnNyataunn.
ПользунТecь пиборм тько чатнимобрахи Ипэз haЧаehи. Пибор He npedha3haeyн дя кOMМерчeCKORIO nCNoIb3OBAHЯ.
He noIb3yIeTcB npIbOpom nO tKpbItbIM He60m. PpeOxpaHnIe npIbOp OT xapbl, npIaMbIX cOnHeuHbIX lyuei, BnaXHoCTN (Hn B Koem Cnyae He nOrpykaTe erO B Body) n yApOB o6 ocTpble yrbl. He npIkaCaiTeCb K npIbOpByNaXHbIMPykami. EcnI npIbOp yBaJaxHnIcra nnHAMOK, TyT Je BbIHbTe BNk Ky n3 po3ETKn.
- Nocne 3KcnpyaTaUIM, MoTaxKe npHaJnEeXHOCTe, YNCTKe INI NOLOMKe np6opa Bcerda BbIHMaIte BUNKy n3PO3eTKI (TAHTE 3a BNJKy, a He 3a Ka6eJIb).
He octabJrIe BKJIIOUeHHbIe 3JIeKTPoPn6OpbI 6e3 npICMOTpa. BbIXOJa n3 NOMeUeHHa BcERJa BbIKNIOuAHTe np6Op.BbIHbTe uTEKepe n3 po3eTKI.
- Pn6bOp n Ka6eBcTeBOro nTuTAnHna Heo6xOaMPO peryIpaHO o6CneObaTb Ha hAInuHne cNeIOB NOBpeKdEHn. Pn O6hApUkeHH NOBpeXdEHn ONb3OBAtbcr np60pom 3aIpeuaetc.
IcnoJb3yTeToJIbKO opunHaJIbHbe 3aIuaCTN.
- 13 coobpaekhen be3onacchoCTn DnI DeTeH He ocTbIaI Te IexKaTb ynaKOBky (PiactNKOBbIe MeUKN, KapTOH, neHOIIpACTn T.d.) Be3 npncmToPa.

IPEyIpyEJHHeH:
He no3BOJnIe TeTm IrpTaB c nOIN3TNHeHOBoIJIeHKo. Onachocb ydyub!
Oco6bIe yka3aHnI NO TexHnke 6e3OpacHTn IJRA 3TOrO yCTpOiCTBa

PpmeaHne K npoccecy npiroTOBHeHn
B npocce nproTOBHeHn B 3aBNCMOCTn OT CTeneHn NOMOna n Obema MoIOTbIM KOpe NOrIOuaET HeKOTOpoe KOINcEeTBO BObl. POStOMy KOINcEeTBO KOpe MOKeT He COOTBeTCTBOBaTB KOINcEeTBy BObl B EMKOCTn DnRA BObl.
Ebponeckne Hopmb1 3Heproc6epexeHHa
I PIPIMEYAHNA:
EbponeickaI NpekTnBa 2009/125/EC (DInpeKtNa no 3koJn3ayHy) BKNIOUaET Bce6a MepbI NO 3Hepc6epeXeHIO.
Cneyuooee noLoxKeHne npmeHReTcB OTOoHeHH KOeBapok: IepnoI NOdepkaHnKoPe B TeIOM COCTOHNOrpaHnHBaETcMAKcIMyM 40 MHyTaM, NocJe Yero np6Op ABOTMaTHueCKN OTKnIOuHaTeCJ.
BbI n3BneyeTe noIb3y n3 ycIneHHo 6eOnaHocTn n IOHNKeHHOrO 3HeprONTope6JIeHn.
IopdknloueHne
- Y6eIITecb, YTO npaAMETpbI 3NEKtpoNTaHnA COOTBETCTBYOT CNEUΦNkauM N yCTPOITcBA.CNEUΦNkauaHa HaneyataHa Ha 3TNKeTke.
- BctabBe 7TeNceB 7Hypa 3JekTpOnTahnB 8ncpabHyu N 3a3eMJIeHHyU pO3eTKy.
BbOaBcTPOI
Ipeed TEM KAK BAPNTB KOeB N IepBbI pa3, BKNIOHTe KOeBapKy Dba pa3a npocTo C uHCTo BOoN 6e3 6ymaxHoro qnIbTpa. 3TO ydaNt n3 ycTpoNCTBa nbInb, KOTopar MOrna cKONITcBA BO Bpem TpaHcNOpTnpOBKn. Cneynte HNCTpykUINM B pa3dene "Pa6Ota".
BkHIOUeHne H BbIKIOUeHne np6opa
YTO6bI BKNIOHHTb npn6Op, yCTaHOBtte nepeKNIoHAteTb B NOIOXKeHne "]. 3aropaetc Hndkataop pa60bl.
YTO6bI BbIKIOUHTb PnB6Op INN OTMeHNb PPOeCC npIROTOBJIeHn, yCTaHOBtE nepeKIOUaTeNb B NOnOKeHne "O". IVdNKATop pa60Tb IacHeT.
Pa6ota
- OtkpoTe KpbIuKy EMKOCTN DnBODbl.
- HanoJIHInTe EMKoCTb DnI B OdbI, HaxOJaUyOCB 3aJHeN Yactn yCTpOcTBa, XoJIoHN B ODoB B COOTBeTCTBm C XeJNaEMbIM KOnuYeCTBOM YaWeK KoPe. OnpeJeJIITb UPOBeHb BOdbI MoXHO C NOMOUsbIO uKaJIbI Ha EMKOCTn DnI B ODbI.

ПРИМЕЧАнЯ:
ДяЗANHENЯ EMKCTN DЯ BObl Bbl MoKeTe BOCNoJIb3OBaTbC KOpeHNIKOM.

BHIMAHHE:
He nepenonHnIte EMKoCTb IaBBoI! He 3anBaIte BOy Bblwe OTMeTKn MAX.
- Y6eIntecb, yTO dePkaTeIb fInIbTp a yCTaHOBJIeH DOJKNbIM O6pa3OM.
4.ПоДогнITE НИКН Краь 6умжHorO Фиьтра (pa3Мер 1x2)иуLOЖITE erO BФиьТрOBaMbHyO BOPOHky.HanONHITe erO MONOTbIM Kcpe.

ПРIMECHИЗ:
YTO6bI N36EkaTb pa36pb3rmbaHnA, He nOmeuAte B cnJIbTp CmUKOM MHO MOJOTORO KOpe.
- 3akpoTe KpbIuKj EMKoCTn Dn BODbI.
- NocTaBbTe YaSy Ha noOrpeBaOuSyo NoCTaBky.

BHIMAHHE:3aunTaOTnoTeKaHn
YcTpoCTBO CHa6KeH0 3aUHToT OT NOTeKaHnO. OHO 3aKpbIbAeTcPn N3BLeueHn KoeEHHNka. 3To npedOTbPaauet KanAHne KoPe Ha 3NeKtpoPTnTKy,ecnBΦnIbTpE BCE eue eCTb Boda.
- Y6eIITecb, yTO KpbIka npncoeHHea K KoepHnky. OHa o6ecneuBaet 3auNTy OT noTeKaHn.
-
EcnB EMMKOCnEeEcTBBoa,TO CBOEBpeMeHNO CHOBa NODCTaBbTe KOpEHHK. HNaYe MoKeT nepeNoJINHTbC4ΦNtBp.
-
BkHouHTe np6Op. 3aRopaetc HnDnKaTOp pa6Otbl.

ПРIMEЧАнЯ:
Pn6H3ntbNoYepe3 30 MNHyT pa60tbpn6Op BbIKHOaETcABTomatNueck.NHdkatoppa60tB rachet. TTo6bl CHoBa NcIOJb3OBaTb Pn6Op,ero Heo6xOIMO Chayana BBKIOHHTb,yCTAHOBNBpeeknoaTeJIb B nIoXeHne ^ .3aTeM BbINOHNte yka3aHnB p43dene "Pa6ota".
Kode npriroTOBJIEN
- Pocne Toro, kak Kofoe 6oIbIe He TeUeT Upe3 fHJIbTp, KoofoeHHK MoXHO yBpaTb.
- BviknOuHTe np6op.
BbXOTNE, YTO6bIOCTaTOK KOFe OCTaBAJcRA TEnbIM? OctabTe npIbOp BKNIOUeHHbIM DO OKOHuaHnRA nepNoDA NOdEprKaHnRA KOFe B TENlOM COCToRHaHm. EcIN BbXOTNe coxpaHnTB KOFe TEnMbIM DaKe Nocne OKOHuaHnRA 3To- ro nepNoDa, BJIneTe OCTaBUnsCA KOFe B TepMOKpyKky.

ПРIMEЧАнЯ:
aalalalalalalalalalalalal


山
a11 111 111 111 111 111 111 111 111 111 111 111 111 111 111 111 111 111 1

z1y1 = 66 663
1
a.b.c.
:
gao jie jiaqai yao jiu jia jia jia jia jia jia jia jia jia jia jia jia jia jia jia jia jia jia jia jia jia jia jia jia jia jia jia jia jia jia jia jia jia jia jia jia jia jia
"zjbjll jlgall jsl gglb
puiuuyi ciu
j4
aaiy d aay jy goo. Coo y oao 0o aoy aoy aoy all ayie
abg
j3j j 5g jglj 2j 2j j j j j j j j j j
aill aolus jilabgolo
ogall gaaa aaii 1000
ED = 12 AB = 6 AC = 8
jaiy jai / 10gS1 jie aolc ojai
(a)dijy jaojgao)laao 1
2
3
4
(1) | x - 2| = | x| | x - 3| | x + 4| .
0/I 6
inocuill 25j 7
8
Jusill 9
#
.1
gag aag aagaaag aagaaag aagaaag
.8gab6j 8gjj j0 a9giab6j gaiy
.3
wJ. jgX J 120
jglal 1g jglal 1g jglal 0g
ale 100
jlll lle 10000000000000000000000000000000000000000000000000000000000000000000
#
jglallulnolg jdl Jnluioe y
alwyyl laoj y
jglal 10g jol al 10000000000000000000000000000000000000000000000000000
y.0olal 1g (aIw ola g l aIb 2uai y) aygbnyg oJalal uai
jU,gl Ie jI Stu g I Ib jIqll Jls 1I. altu du yg jIqll piai
Jgall
aai j 111 111 111 111 111 111 111 111 111 111 111 111 111
J 151 JyS 151 151 151 151 151 151 151 151 151 151 151 151 151 151 151 151 151 151 151 151 151 151 151 151 151 15
jll jai jai jai g aiaa iiaai jai jai laii aie
- jglj 1
clogalglgaillgeagalljai jai
ggluie glu (lglgjy
Ct 1000
3 15
- aoe 56
55.
55.
55 4
55
54.
54
54.
53
53.
53
jlll lgl aolal oLwll
!:
.
jIqol pluoiol uol jouw
^1 = ( 12) + ( 12) - 1
:
J 1
.
.111 111 111 111 111
A
1
1
一
一
GARANTIEKARTE
warranty card · garantiekaart · carte de garantie · scheda di garanzia · tarjeta de garantia · cartao de garantia · garantikort karta gwarancyjna · zaručni list · karta jamstva · carte de garantie · fapaunouHa KapTa · zaručný list · garancijski list · garanciajegy · rapaHTHmΦOpMynrp · fapaHTHmTbI TANOH
PC-KA 1121
24 Monate Garantie gemäß Garantieerklarung - 24 months warranty according to warranty declaration - 24 maanden garantie volgens garantieverklaring - 24 mois de garantie selon la déclaration de garantie - 24 mesi de garania seconda la dichiarazione di garania - 24 meses de garantia de acordo con la déclaration de garantia - 24 manedors garanti
1 henhold til garantibetingensene - 24 misescagwarancjna podstawtie owsiadcnziona gwarancjnego - zaruka 24 mescu podle prohlaseni o zaruke - 24 meseeno jamstvo u skladu s jamstvenom déclaracijom - 24 luni garantie conform déclaratiei de garantie - 24 mecua rapanunb c bocetctbnc c rapanonhata deknapaujna - 24-mesca nza zaruka podla vyhlasenia o zaruke - 24-mesecnac garancija, skladno z garancjsko izavo - 24 honap garancia a garancifeltetelekben leirtak szerint - rapanrha na 24 micui iBIDIOIHO 3a8 npo rapanllo - rapanrta 24 mecua cornacho 3a8nneHHBM rapanTINHMnpaanm + 24 10
Kaufdatum, Handelstermelt, Unterschied - date of purchase, dealer stamp, signature - aankoepdatum, dealersteml, handelteking - date d'achat, tampon du concessionaire, signature - data de acquisto, timbre del rivenditure, fimia - fecha de compa, sella del distribuidor, fimia - data de compa, carinbo do distribuidor, assinatura - kopsdata, forhandelderment, signatur - data zakupi, piecnic spredawcy, podis - datum zakupei, nathiko projecej, podis - datum kapovine, zig trovica, potis - data de achizyie, stampila furnuzuluri, semnatura - da na noekymara, lvear na Ibogaava, Iopnac - datum nakupi, pebstika obchodnikla/ predajcu, podis - datum napka, zig trovica, podis - vassanas datuma, kereskeio belyegzja, alaisra - daera npkdoanne, ne-ataknpdoanae, pnapic - daa npnoepertenik, ulamn nposablaa, npnoicn.
PROFI COOK.
www.proficook.de


- ATTENTION: Anti-goutte
- Symbols in these Instructions for Use
- WARNING:
- CAUTION:
- Contents
- General Notes
- Special Safety Instructions for this Appliance
- WARNING: Risk of burns!
- Designated Use
- Overview of the Components / Delivery Scope
- Unpacking the Appliance
- NOTE:
- Notes on Use
- Placement
- Note About the Brewing Process
- European Regulations on Energy Saving
- Electric Connection
- Initial Operation
- Turning the Machine On / Off
- Operation
- CAUTION: Drip stop
- The Coffee is Ready
- De-scaling
- Cleaning
- Storage
- Technical Data
- Disposal
- Meaning of the "Wheelie Bin" Symbol
- Instrukcja obslugi
- Usuwanie
- Copepkanie
- 06üne 3ameuahnna
- IPEyIpyEJHHeH:
- Oco6bIe yka3aHnI NO TexHnke 6e3OpacHTn IJRA 3TOrO yCTpOiCTBa
- PpmeaHne K npoccecy npiroTOBHeHn
- Ebponeckne Hopmb1 3Heproc6epexeHHa
- I PIPIMEYAHNA:
- IopdknloueHne
- BbOaBcTPOI
- BkHIOUeHne H BbIKIOUeHne np6opa
- Pa6ota
- ПРИМЕЧАнЯ:
- BHIMAHHE:
- ПРIMECHИЗ:
- BHIMAHHE:3aunTaOTnoTeKaHn
- ПРIMEЧАнЯ:
- Kode npriroTOBJIEN
- 山
- a.b.c.
- :
- puiuuyi ciu
- aill aolus jilabgolo
- jaiy jai / 10gS1 jie aolc ojai
- #
- ale 100
- jlll lgl aolal oLwll
- GARANTIEKARTE
- PC-KA 1121
- PROFI COOK.
Brand : PROFICOOK
Model : PCKA 1121
Category : Coffee machine