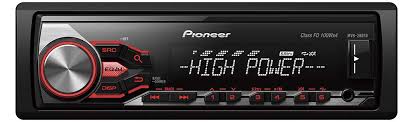
MVH-280FD - Car stereo PIONEER - Free user manual and instructions
Find the device manual for free MVH-280FD PIONEER in PDF.


User questions about MVH-280FD PIONEER
0 question about this device. Answer the ones you know or ask your own.
Ask a new question about this device
Download the instructions for your Car stereo in PDF format for free! Find your manual MVH-280FD - PIONEER and take your electronic device back in hand. On this page are published all the documents necessary for the use of your device. MVH-280FD by PIONEER.
USER MANUAL MVH-280FD PIONEER
REPRODUCTOR DE CD CON RECEPTOR RDS
CD RDS-EMPFÄNGER
CD RDS-ONTVANGER
CD RDS ПРИЕМнИK
DEH-4800FD
DIGITAL MEDIA RECEIVER
RECEPTEUR NUMERIQUE MULTIMEDIA
RICEVITORE MULTIMEDIALE DIGITALE
RECEPTOR DIGITAL DE MEDIOS
DIGITALER MEDIA RECEIVER
DIGITALE MEDIA-RECEIVER
LUNΦPOBOI MEDIAPECINBEP
MVH-280FD
Pioneer
Made for

iPod iPhone
Owner's Manual
Mode d'emploi
PykoBOIDCTBO NOIb3OBaTeJia
Table of Contents
Before You Start. 2
Getting Started. 3
Radio. 5
CD/USB/iPod/AUX 6
App Mode 8
Using Pioneer ARC APP 8
Settings 9
FUNCTION settings 9
AUDIO settings. 10
SYSTEM settings 11
ILLUMINATION settings 11
Connections/Installation 12
Additional Information 14
About this manual:
- In the following instructions, a USB memory or USB audio player are referred to as "USB device".
- In this manual, iPod and iPhone are referred to as "iPod".
Before You Start
Thank you for purchasing this PIONEER product
To ensure proper use, please read through this manual before using this product. It is especially important that you read and observe WARNINGS and CAUTIONs in this manual. Please keep the manual in a safe and accessible place for future reference.

If you want to dispose this product, do not mix it with general household waste. There is a separate collection system for used electronic products in accordance with legislation that requires proper treatment, recovery and recycling.
Private households in the member states of the EU, in Switzerland and Norway may return their used electronic products free of charge to designated collection facilities or to a retailer (if you purchase a similar new one).
For countries not mentioned above, please contact your local authorities for the correct method of disposal.
By doing so you will ensure that your disposed product undergoes the necessary treatment, recovery and recycling and thus prevent potential negative effects on the environment and human health.
WARNING
- Do not attempt to install or service this product by yourself. Installation or servicing of this product by persons without training and experience in electronic equipment and automotive accessories may be dangerous and could expose you to the risk of electric shock, injury or other hazards.
- Do not attempt to operate the unit while driving. Make sure to pull off the road and park your vehicle in a safe location before attempting to use the controls on the device.
CAUTION
- Do not allow this unit to come into contact with moisture and/or liquids. Electrical shock could result. Also, damage to this unit, smoke, and overheating could result from contact with liquids.
- Always keep the volume low enough to hear outside sounds.
The CarStereo-Pass is for use only in Germany.
This product is evaluated in moderate and tropical climate condition under the Audio, video and similar electronic apparatus - Safety requirements, IEC 60065.
CAUTION
This product is a class 1 laser product classified under the Safety of laser products, IEC 60825-1:2007.
CLASS 1 LASER PRODUCT
If you experience problems
Should this unit fail to work properly, please contact your dealer or nearest authorized PIONEER Service Station.
Getting Started
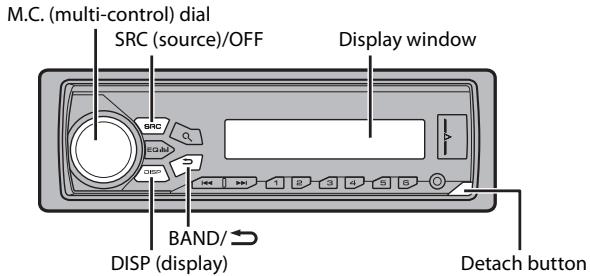
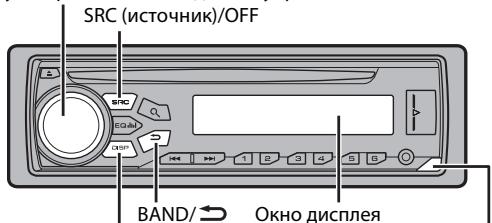
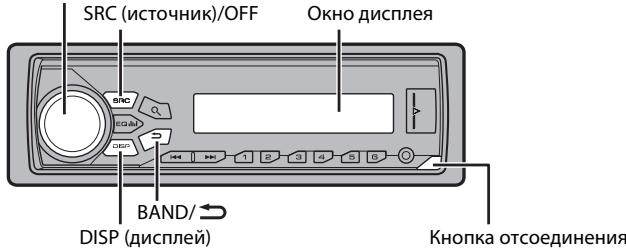
Basic operation
DEH-4800FD
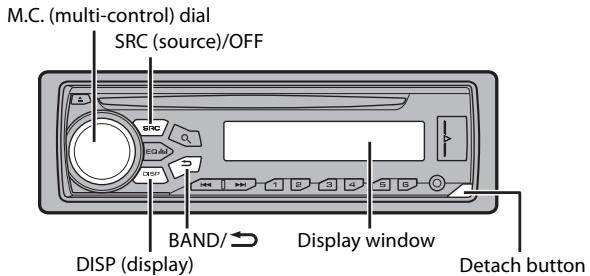
MVH-280FD
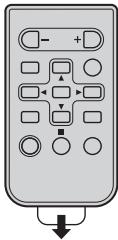
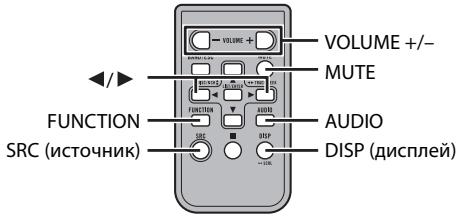
Optional remote control
(Only for DEH-4800FD)
The remote control CD-R320 is sold separately.
Remote Control
NOTE
Remote control is supplied only for MVH-280FD.
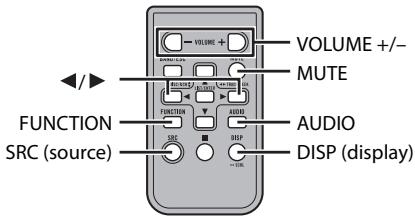
Frequently used operations
The available buttons vary depending on the unit.
| Purpose | Operation | |
| Head Unit | Remote Control | |
| Turn on the power* | Press SRC/OFF to turn on the power. Press and hold SRC/OFF to turn off the power. | Press SRC to turn on the power. Press and hold SRC to turn off the power. |
| Adjust the volume | Turn the M.C. dial. | Press VOLUME + or -. Press MUTE to mute the unit. Press again to unmute. |
| Select a source | Press SRC/OFF repeatedly. | Press SRC repeatedly. |
| Change the display information | Press DISP repeatedly. | Press DISP repeatedly. |
| Return to the previous display/list | Press BAND/→. | Press Ↄ to select the next/previous folder. |
| Return to the normal display from the menu | Press and hold BAND/→. | - |
- When this unit's blue/white lead is connected to the vehicle's auto-antenna relay control terminal, the vehicle's antenna extends when this unit's source is turned on. To retract the antenna, turn the source off.
Display indication
| Indication | Description |
| ↓ | Appears when a lower tier of the menu or folder exists. |
| P | Appears when the Q button is pressed. |
| LOC | Appears when the local seek tuning function is set (page 9). |
| TP | Appears when a traffic program is received. |
| TA | Appears when the TA (traffic announcements) function is set (page 9). |
| S.Rtrv | Appears when the sound retriever function is set (page 10). |
| XXX | Appears when random/shuffle play is set. |
| ← | Appears when repeat play is set. |
| # | Appears when the iPod control function is set (page 8). |
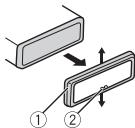
Detaching the front panel
Detach the front panel to prevent theft. Remove any cables and devices attached to the front panel and turn off the unit before detaching it.
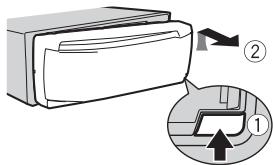
Detach


Attach

Important
- Avoid subjecting the front panel to excessive shock.
- Keep the front panel out of direct sunlight and high temperatures.
- Always store the detached front panel in a protective case or bag.
Preparing the remote control
Remove the insulation sheet before use.
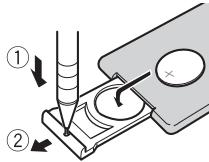
How to replace the battery
Insert the CR2025 (3 V) battery with the plus (+) and minus (-) poles orientated properly.

WARNING
- Do not ingest the battery, Chemical Burn Hazard.
- This product, including the supplied remote control, contains a coin/button cell battery. If the coin/ button cell battery is swallowed, it can cause severe internal burns in just two hours and can lead to death.
- Keep new or used batteries out of the reach of children. If the battery is swallowed or placed inside any part of the body, consult a doctor immediately.
- If the battery compartment does not close securely, stop using the product and keep it away from children.
- Do not expose the battery or remote control to excessive heat such as direct sunlight or fire.

CAUTION
- There is a potential danger of explosion if the battery is incorrectly replaced. When replacing the battery, replace it with the same type.
- Do not handle or store the battery with metallic tools or objects.
- If the battery leaks, remove the battery and wipe the remote control completely clean. Then install a new battery.
- When disposing of used batteries, please comply with governmental regulations or environmental public institutions' rules that apply in your country/area.

Important
- Do not store the remote control in high temperatures or direct sunlight.
- Do not let the remote control fall onto the floor, where it may become jammed under the brake or accelerator pedal.
Setup menu
When you turn the ignition switch to ON after installation, [SET UP:YES] appears in the display.
1 Press the M.C. dial.
The setup menu disappears after 30 seconds of no operation. If you prefer not to set at this time, turn the M.C. dial to select [NO], then press to confirm.
2 Turn the M.C. dial to select the options, then press to confirm.
To proceed to the next menu option, you need to confirm your selection.
| Menu Item | Description |
| LANGUAGE [ENG](English), [PYC](Russian), [TUR](Turkish) | Select the language to display the text information from a compressed audio file. |
| CLOCK SET | Set the clock. |
| FM STEP [100], [50] | Select the FM tuning step from 100 kHz or 50 kHz. |
3 [QUIT:YES] appears when all the settings have been made.
To return to the first item of the setup menu, turn the M.C. dial to select [QUIT:NO], then press to confirm.
4 Press the M.C. dial to confirm the settings.
NOTES
- You can cancel the menu setting by pressing SRC/OFF.
- These settings can be made at any time from the SYSTEM settings (page 11) and INITIAL settings (page 5).
Canceling the demonstration display (DEMO OFF)
1 Press the M.C. dial to display the main menu.
2 Turn the M.C. dial to select [SYSTEM], then press to confirm.
3 Turn the M.C. dial to select [DEMO OFF], then press to confirm.
4 Turn the M.C. dial to select [YES], then press to confirm.
INITIAL settings
1 Press and hold SRC/OFF until the unit turns off.
2 Press and hold SRC/OFF to display the main menu.
3 Turn the M.C. dial to select [INITIAL], then press to confirm.
4 Turn the M.C. dial to select an option, then press to confirm.
| Menu Item | Description |
| FM STEP[100], [50] | Select the FM tuning step from 100 kHz or 50 kHz. |
| SP-P/O MODE[REAR/SUB.W] | Select when there is a full-range speaker connected to the rear speaker output leads and there is a subwoofer connected to the RCA output. |
| [SUB.W/SUB.W] | Select when there is a passive subwoofer connected directly to the rear speaker output leads and there is a subwoofer connected to the RCA output. |
| [REAR/REAR] | Select when there are full-range speakers connected to the rear speaker output leads and RCA output. If there is a full-range speaker connected to the rear speaker output leads, and the RCA output is not used, you may select either [REAR/SUB.W] or [REAR/REAR]. |
| AUTO AMP OFF[ON], [OFF] | Select [OFF] when the tweeter is directly connected to any channel, otherwise select [ON] to automatically stop amplifier output. |
| SYSTEM RESET[YES], [CANCEL] | Select [YES] to initialize the unit settings. The unit will be restarted automatically.(Some of the settings may be retained even after resetting the unit.) |
Radio
The tuner frequencies on this unit are allocated for use in Western Europe, Asia, the Middle East, Africa and Oceania. Use in other areas may result in poor reception. The RDS (radio data system) function only works in areas that broadcast RDS signals for FM stations.
Receiving preset stations
1 Press SRC/OFF to select [RADIO].
2 Press BAND/ to select the band from [FM1], [FM2], [FM3], [MW] or [LW].
3 Press a number button (1/ to 6/
TIP
The / buttons can be also used to select a preset station when [SEEK] is set to [PCH] in the FUNCTION settings (page 10).
Best stations memory (BSM)
The six strongest stations are stored on the number buttons (1 / to 6 /
1 After selecting the band, press the M.C. dial to display the main menu.
2 Turn the M.C. dial to select [FUNCTION], then press to confirm.
3 Turn the M.C. dial to select [BSM], then press to confirm.
To seek a station manually
1 After selecting the band, press to select a station.
Press and hold / then release to seek an available station. Scanning stops when the unit receives a station. To cancel seek tuning, press / .
NOTE
[SEEK] needs to be set to [MAN] in the FUNCTION settings (page 10).
To store stations manually
1 While receiving the station you want to store, press and hold one of the number buttons (1 / to 6 / ) until it stops flashing.
Using PTY functions
The unit searches for a station by PTY (program type) information.
1 Press during FM reception.
2 Turn the M.C. dial to select a program type from [NEWS/INFO], [POPULAR], [CLASSICS] or [OTHERS].
3 Press the M.C. dial.
The unit begins to search for a station. When it is found, its program service name is displayed.
NOTES
To cancel the search, press the M.C. dial.
- The program of some stations may differ from that indicated by the transmitted PTY.
- If no station is broadcasting the type of program you searched for, [NOT FOUND] is displayed for about two seconds and then the tuneurs return to the original station.
PTY list
For more details about PTY list, visit the following site:
http://www.pioneer.eu/eur/products/25/121/tech/CarAudio/PTY.html
CD/USB/iPod/AUX
NOTE
CD function is not available for MVH-280FD.
Playing back
Disconnect headphones from the device before connecting it to the unit.
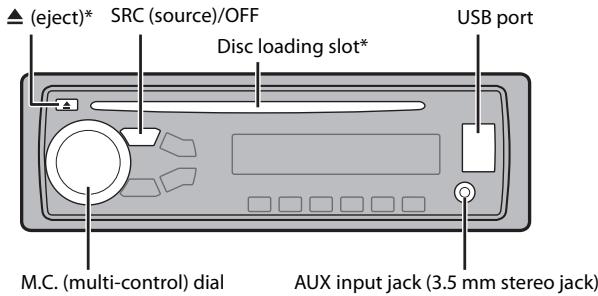
* Not equipped for MVH-280FD
CD
1 Insert a disc into the disc loading slot with the label side up.
To eject a disc, stop playback first then press .
USB devices (including Android™)/iPod
1 Open the USB port cover.
2 Plug in the USB device/iPod using an appropriate cable.
NOTE
To automatically switch to [USB] source when a USB device/iPod is connected to the unit, set [USB AUTO] to [ON] in the SYSTEM settings (page 11).

CAUTION
Use an optional Pioneer USB cable (CD-U50E) to connect the USB device as any device connected directly to the unit will protrude out from the unit, which could be dangerous.
Before removing the device, stop playback.
AOA connections
For details on AOA connection, see page 8.
MTP connection
A device installed with Android OS 4.0 or later can be connected to the unit via MTP, using the cable supplied with the device. However, depending on the connected device and the numbers of the files in the device, audio files/songs may not be able to be played back via MTP. Note that MTP connection is not compatible with WAV and FLAC file formats.
NOTE
If you use an MTP connection, [ANDROID WIRED] needs to be set to [MEMORY] in the SYSTEM settings (page 11).
AUX
1 Insert the stereo mini plug into the AUX input jack.
2 Press SRC/OFF to select [AUX] as the source.
NOTE
If [AUX] is set to [OFF] in the SYSTEM settings, [AUX] cannot be selected as a source (page 11).
Operations
You can make various adjustments in the FUNCTION settings (page 9).
Note that the following operations do not work for an AUX device. To operate an AUX device, use the device itself.
| Purpose | Operation |
| Select a folder/album*1 | Press 1/▲ or 2/√. |
| Select a track/song (chapter) | Press ↓ or ▷↓. |
| Fast forward or reverse*2 | Press and hold ↓ or ▷↓. |
| Search for a file from a list | 1 Press Q to display the list. 2 Turn the M.C. dial to select the desired file (folder) name or category, then press to confirm. 3 Turn the M.C. dial to select the desired file, then press to confirm. Playback starts. |
| View a list of the files in the selected folder/ category*1 | Press the M.C. dial when a folder/category is selected. |
| Play a song in the selected folder/ category*1 | Press and hold the M.C. dial when a folder/ category is selected. |
| Purpose | Operation |
| Alphabetical search (iPod only) | 1 Press to display the list.2 Turn the M.C. dial to select the desired category list, then press to enter the alphabetical search mode.(Turning the M.C. dial twice also enters the alphabetical search mode.)3 Turn the M.C. dial to select a letter, then press to display the alphabetical list.To cancel alphabetical search, press BAND/→. |
| Repeat play | Press 6/→. |
| Random/shuffle play | Press 5/→. |
| Shuffle all play (iPod only) | Press and hold 5/→. |
| Pause/resume playback | Press 4/PAUSE. |
| Sound retriever*1 | Press 3/S.Rtrv.[1]: Effective for low compression rates[2]: Effective for high compression rates |
| Return to root folder (CD/USB only)*1 | Press and hold . |
| Switch between compressed audio and CD-DA (CD only) | Press BAND/→. |
| Change drives in USB device(Devices that support the USB mass storage device class protocol only) | Press BAND/→. |
1 Compressed audio files only
2 When you use the fast forward or reverse function while playing a VBR file, the playback time may be not correct.
Useful functions for iPod
Link play mode
You can access songs based on the artist, album, or genre currently playing.
1 While listening to a song, press and hold to enter the link play mode.
2 Turn the M.C. dial to select the mode ([ARTIST], [ALBUM], [GENRE]), then press to confirm.
The selected song/album will be played after the currently playing song.
NOTE
The selected song/album may be canceled if you use functions other than those from the link play mode (e.g. fast forward and reverse).
iPod control
You can control the unit via a connected iPod.
The following iPod models are not compatible with this function.
- iPod nano 1st generation, iPod with video
1 Press BAND/ during playback, then select the control mode.
[CONTROL iPod]: The unit's iPod function can be operated from the connected iPod.
[CONTROL AUDIO]: The unit's iPod function can only be operated by the buttons on
the unit or supplied remote control. In this mode, the connected iPod cannot be
turned on or off.
NOTES
- Switching the control mode to [CONTROL iPod] pauses song playback. Use the connected iPod to resume playback.
- The following operations are still accessible from the unit, even if the control mode is set to [CONTROL iPod].
- Pause, fast forward/reverse, song/chapter selection
- The volume can only be adjusted from the unit.
App Mode
You can enjoy listening to an application on an iPhone via the unit. In some cases, you can control an application by using the unit.
For details on compatible devices, visit our website.

Important
Use of third party apps may involve or require the provision of personally identifiable information, whether through the creation of a user account or otherwise, and for certain applications, the provision of geolocation data.
ALL THIRD PARTY APPS ARE THE SOLE RESPONSIBILITY OF THE PROVIDERS, INCLUDING WITHOUT LIMITATION COLLECTION AND SECURITY OF USER DATA AND PRIVACY PRACTICES. BY ACCESSING THIRD PARTY APPS, YOU AGREE TO REVIEW THE TERMS OF SERVICE AND PRIVACY POLICIES OF THE PROVIDERS, IF YOU DO NOT AGREE WITH THE TERMS OR POLICIES OF ANY PROVIDER OR DO NOT CONSENT TO THE USE OF GEOLOCATION DATA WHERE APPLICABLE, DO NOT USE THAT THIRD PARTY APP.
For iPhone users
This function is compatible with iPhones and iPod touches installed with iOS 5.0 or later.
NOTE
PIONEER IS NOT LIABLE FOR ANY THIRD PARTY APPS OR CONTENT, INCLUDING WITHOUT LIMITATION THEIR ACCURACY OR COMPLETENESS. THE CONTENT AND FUNCTIONALITY OF SUCH APPS ARE THE SOLE RESPONSIBILITY OF THE APP PROVIDER.
Playback of an application via the unit
1 Connect this unit with the mobile device.
- iPhone via USB (page 6)
2 Press SRC/OFF to select [APP].
3 Operate the mobile device to start up the application.
Basic operations
You can make various adjustments in the FUNCTION settings (page 9).
| Purpose | Operation |
| Select a track | Press ↓ or ▷. |
| Fast forward or reverse | Press and hold ↓ or ▷. |
| Pause/resume playback | Press BAND/→. |
Using Pioneer ARC APP
You can operate the unit from Pioneer ARC APP installed on an iPhone/Android device. In some cases, you can control aspects of the application, such as source selection, pause, etc., by using the unit.
For details on what operations are available on the application, see the application's help section.

WARNING
Do not attempt to operate the application while driving. Make sure to pull off the road and park your vehicle in a safe location before attempting to use the controls on the application.
For iPhone users
This function is compatible with iPhones (iPhone 5 or later) and iPod touches installed with iOS 8.0 or later.
You can download Pioneer ARC APP on iTunes App Store.
For Android device users
This function is compatible with devices that have Android OS 4.1 or later installed and also support AOA (Android Open Accessory) 2.0.
You can download Pioneer ARC APP on Google PlayTM.
NOTE
Some Android devices connected via AOA 2.0 may not work properly or emit sounds due to their own software design, regardless of the OS version.
Making a connection with Pioneer ARC APP
1 Connect this unit with the mobile device.
iPhone/Android device via USB (page 6)
Proceed to step 6 if you select the USB connection for iPhone.
2 Press the M.C. dial to display the main menu.
3 Turn the M.C. dial to select [SYSTEM], then press to confirm.
4 Turn the M.C. dial to select [ANDROID WIRED], then press to confirm.
5 Turn the M.C. dial to select [APP CONTROL] for an Android device connected via USB.
If [ON] is selected in [P.APP AUTO ON] (page 11), Pioneer ARC APP on the Android device starts automatically, and all the steps are finished.
NOTE
If Pioneer ARC APP has not been installed on your Android device yet, a message that prompts you to install the application will appear on your Android device. Select [OFF] in [P.APP AUTO ON] to clear the message (page 11).
6 Press SRC/OFF to select any source.
7 Launch Pioneer ARC APP on the mobile device.
NOTE
You can also launch the application by pressing and holding the M.C. dial for iPhone.
Listening to music on Android
1 Press SRC/OFF to select [ANDROID].
Basic operations
| Purpose | Operation |
| Select a track | Press |← or ▷|. |
| Fast forward or reverse | Press and hold |← or ▷|. |
| Pause/resume playback | Press 4/PAUSE. |
| Sound retriever | Press 3/S.Rtrv. [1]: Effective for low compression rates [2]: Effective for high compression rates |
Settings
You can adjust various settings in the main menu.
Press the M.C. dial to display the main menu.
2 Turn the M.C. dial to select one of the categories below, then press to confirm.
FUNCTION settings (page 9)
- AUDIO settings (page 10)
SYSTEM settings (page 11)
ILLUMINATION settings (page 11)
3 Turn the M.C. dial to select the options, then press to confirm.
FUNCTION settings
The menu items vary according to the source.
| Menu Item | Description | ||
| FM SETTING RADIO [TALK], [STANDARD], [MUSIC] | Match the sound quality level with the broadcast signal conditions of the FM band signal. (Available only when FM band is selected.) | ||
| BSM RADIO | Store the six strongest stations on the number buttons (1/∧ to 6/←) automatically. | ||
| REGIONAL RADIO [ON], [OFF] | Limit the reception to the specific regional programs when AF (alternative frequencies search) is selected. (Available only when FM band is selected.) | ||
| LOCAL RADIO FM: [OFF], [LV1], [LV2], [LV3], [LV4] MW/LW: [OFF], [LV1], [LV2] | Restrict the tuning station according to the signal strength. | ||
| TA RADIO [ON], [OFF] | Receive current traffic information if available. (Available only when FM band is selected.) | ||
| Menu Item | Description | ||
| AF RADIO [ON], [OFF] | Allow the unit to retune to a different frequency providing the same station. (Available only when FM band is selected.) | ||
| NEWS RADIO [ON], [OFF] | Interrupt the currently selected source with news programs. (Available only when FM band is selected.) | ||
| SEEK RADIO [MAN], [PCH] | Assign |← or ➔ buttons to seek the stations one by one (manual tuning) or select a station from the preset channels. | ||
| S.RTRV CD USB iPod APP ANDROID | |||
| [1] (effective for low compression rates), [2] (effective for high compression rates), [OFF] | Enhance compressed audio and restore rich sound. Not available when: • CD-DA/CD-TEXT is played back. • The FLAC file is played back. | ||
| AUDIO BOOK iPod [FASTER], [NORMAL], [SLOWER] | Change the playback speed. (Not available when [CONTROL iPod] is selected in the control mode.) | ||
| PAUSE APP | Pause or resume playback. | ||
AUDIO settings
| Menu Item | Description |
| FADER*1 | |
| Adjust the front and rear speaker balance. | |
| BALANCE | |
| Adjust the left and right speaker balance. |
| Menu Item | Description |
| EQ SETTING | |
| [SUPER BASS], [POWERFUL], [NATURAL], [VOCAL], [CUSTOM1], [CUSTOM2], [FLAT] | Select or customize the equalizer curve. [CUSTOM1] can be set separately for each source. However, each of the below combinations are set to the same setting automatically. |
| Select an equalizer band and level for further customizing. Equalizer band: [80HZ], [250HZ], [800HZ], [2.5KHZ], [8KHZ] Equalizer level: [+6] to [-6] | • USB, iPod, ANDROID, and APP (iPhone) [CUSTOM2] is a shared setting used for all sources. You can also switch the equalizer by pressing EQ. |
| EQ. | |
| LOUDNESS | |
| [OFF], [LOW], [MID], [HI] | Compensate for clear sound at low volume. |
| SUB.W*2 | |
| [NOR], [REV], [OFF] | Select the subwoofer phase. |
| SUB.W CTRL*2*3 | |
| Cut-off frequency: [50HZ], [63HZ], [80HZ], [100HZ], [125HZ], [160HZ], [200HZ] Output level: [-24] to [+6] Slope level: [-12], [-24] | Only frequencies lower than those in the selected range are output from the subwoofer. |
| BASS BOOST | |
| [0] to [+6] | Select the bass boost level. |
| HPF SETTING | |
| Cut-off frequency: [OFF], [50HZ], [63HZ], [80HZ], [100HZ], [125HZ], [160HZ], [200HZ] Slope level: [-12], [-24] | Only frequencies higher than the high-pass filter (HPF) cutoff are output from the speakers. |
| SLA | |
| [+4] to [-4] | Adjust the volume level for each source except FM. Each of the below combinations are set to the same setting automatically. • USB, iPod, ANDROID, and APP (iPhone) |
1 Not available when [SUB.W/SUB.W] is selected in [SP-P/O MODE] in the INITIAL settings (page 5).
2 Not available when [REAR/REAR] is selected in [SP-P/O MODE] in the INITIAL settings (page 5).
*3 Not available when [OFF] is selected in [SUB.W].
SYSTEM settings
You can also access to these menus when the unit is turned off.
| Menu Item | Description |
| LANGUAGE | |
| [ENG](English), [PVC](Russian), [TUR](Turkish) | Select the language to display the text information from a compressed audio file. |
| CLOCK SET | |
| Set the clock (page 5). | |
| 12H/24H | |
| [12H], [24H] | Select the time notation. |
| AUTO PI | |
| [ON], [OFF] | Search for a different station with the same programming, even if using a preset station. |
| AUX | |
| [ON], [OFF] | Set to [ON] when using an auxiliary device connected to the unit. |
| MUTE MODE | |
| [MUTE], [20dB ATT], [10dB ATT] | Mute or attenuate sound automatically when a signal from equipment with a mute function is received. |
| PW SAVE* | |
| [ON], [OFF] | Reduce the battery power consumption. Turning on the source is the only operation allowed when this function is on. |
| ANDROID WIED | |
| [MEMORY], [APP CONTROL] | Select the appropriate connection method for an Android device. |
| P.APP AUTO ON | |
| [ON], [OFF] | Select [ON] to automatically launch the car remote application when an Android device is connected to the unit via AOA. (Not available when [MEMORY] is selected in [ANDROID WIED].) |
| Menu Item | Description |
| USB AUTO | |
| [ON], [OFF] | Select [ON] to automatically switch to [USB] source when a USB device/iPod is connected to the unit. Select [OFF] when a USB device/iPod is being connected to the unit just for charging. |
- [PW SAVE] is canceled if the vehicle battery is disconnected and will need to be turned back on once the battery is reconnected. When [PW SAVE] is off, depending on connection methods, the unit may continue to draw power from the battery if your vehicle's ignition does not have an ACC (accessory) position.
ILLUMINATION settings
| Menu Item | Description |
| DIM SETTING | |
| [SYNC CLOCK], [MANUAL] | Change the display brightness. |
| BRIGHTNESS | |
| [1] to [10] | Change the display brightness. The available setting ranges differ depending on [DIM SETTING]. |
Connections/Installation
Connections
Important
- When installing this unit in a vehicle without an ACC (accessory) position on the ignition switch, failure to connect the red cable to the terminal that detects operation of the ignition key may result in battery drain.

ACC position

No ACC position
- Use of this unit in conditions other than the following could result in fire or malfunction.
- Vehicles with a 12-volt battery and negative grounding.
- Speakers over 100 W (maximum input power) and 4 Ω to 8 Ω (impedance value). Do not use 1Ω to 3Ω speakers for this unit.
- To prevent a short-circuit, overheating or malfunction, be sure to follow the directions below.
- Disconnect the negative terminal of the battery before installation.
- Secure the wiring with cable clamps or adhesive tape. Wrap adhesive tape around wiring that comes into contact with metal parts to protect the wiring.
- Place all cables away from moving parts, such as the shift lever and seat rails.
- Place all cables away from hot places, such as near the heater outlet.
- Do not connect the yellow cable to the battery by passing it through the hole to the engine compartment.
- Cover any disconnected cable connectors with insulating tape.
-Do not shorten any cables.
- Never cut the insulation of the power cable of this unit in order to share the power with other devices. The current capacity of the cable is limited.
- Use a fuse of the rating prescribed.
- Never wire the negative speaker cable directly to ground.
- Never band together negative cables of multiple speakers.
- When this unit is on, control signals are sent through the blue/white cable. Connect this cable to the system remote control of an external power amp or the vehicle's auto-antenna relay control terminal (max. 300mA 12 V DC). If the vehicle is equipped with a glass antenna, connect it to the antenna booster power supply terminal.
- Never connect the blue/white cable to the power terminal of an external power amp. Also, never connect it to the power terminal of the auto antenna. Doing so may result in battery drain or a malfunction.
- The black cable is ground. Ground cables for this unit and other equipment (especially, high-current products such as power amps) must be wired separately. If they are not, an accidental detachment may result in a fire or malfunction.
- The graphical symbol —— placed on the product means direct current.
This unit
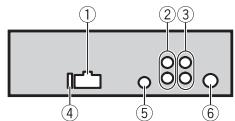
① Power cord input
② Rear output or subwoofer output
③ Front output
④ Fuse(15A)
⑤ Wired remote input Hard-wired remote control adapter can be connected (sold separately).
⑥ Antenna input
Power cord
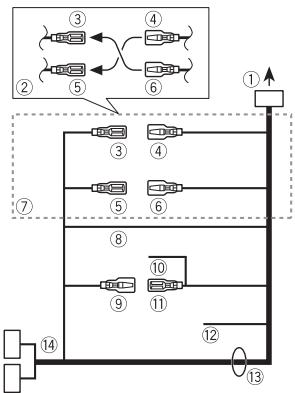
① To power cord input
② Depending on the kind of vehicle, the function of ③ and ⑤ may be different. In this case, be sure to connect ④ to ⑤ and ⑥ to ③
③ Yellow Back-up (or accessory)
④ Yellow Connect to the constant 12 V supply terminal.
When the amperage rating of the fuse used on your vehicle is 10A , connect to the positive battery terminal directly to avoid short circuits. For details on the power connection, see page 12.
⑤ Red Accessory (or back-up)
⑥ Red
Connect to terminal controlled by the ignition switch (12 V DC).
⑦ Connect leads of the same color to each other.
⑧ Black (chassis ground)
Blue/white
The pin position of the ISO connector will differ depending on the type of vehicle. Connect 9 and 11 when Pin 5 is an antenna control type. In another type of vehicle, never connect 9 and 11.
Blue/white
Connect to the system control terminal of the power amp (max. 300 mA 12 V DC).
Blue/white
Connect to the auto-antenna relay control terminal (max. 300mA12VDC
Yellow/black
If you use equipment with a Mute function, wire this lead to the Audio Mute lead on that equipment. If not, keep the Audio Mute lead free of any connections.
⑬ Speaker leads*
White:Front left
White/black:Front left
Gray:Front right
Gray/black: Front right
Green:Rear left
Green/black: Rear left
Violet: Rear right or subwoofer
Violet/black:Rear right or subwoofer
ISO connector
In some vehicles, the ISO connector may be divided into two. In this case, be sure to connect to both connectors.
- Use speakers with 100 W or higher power input capacity (recommended).
NOTES
-
Change the initial menu of this unit. Refer to [SP-P/O MODE] (page 5). The subwoofer output of this unit is monaural.
-
When using a subwoofer, be sure to connect the one-side channel of the subwoofer to the violet and violet/black leads of this unit. Do not connect anything to the green and green/black leads.
- Connect to the battery directly despite connection to the power supply lead of the vehicle in the case that the unit may not perform fully due to insufficient power.
- Connect the wires to the +12V and GND terminals of the unit with at least 14 - Gauge or have a sectional area of more than 2mm^2 as a current of more than 15 A will run through the system during full power operation.
- All power wires connected to the positive battery post should be fused within 450 mm of the battery post and before they pass through any metal if the power wires are connected to the positive battery terminal directly.
- Make sure that the vehicle's battery wires connected to the vehicle (ground (earth) to chassis)* are of a wire gauge equal to at least that of the main power wire connected from the battery to the head unit.

For details, consult your dealer if you have any questions or problems about the connection.
Power amp (sold separately)
Perform these connections when using the optional amplifier.
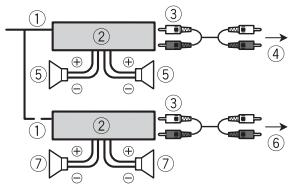
① System remote control Connect to blue/white cable.
② Power amp (sold separately)
③ Connect with RCA cables (sold separately)
④ To front output
⑤ Front speaker
⑥ To rear output or subwoofer output
⑦ Rear speaker or subwoofer
Installation
Important
- Check all connections and systems before final installation.
- Do not use unauthorized parts as this may cause malfunctions.
- Consult your dealer if installation requires drilling of holes or other modifications to the vehicle.
- Do not install this unit where: it may interfere with operation of the vehicle.
-it may cause injury to a passenger as a result of a sudden stop. - The semiconductor laser will be damaged if it overheats. Install this unit away from hot places such as near the heater outlet.
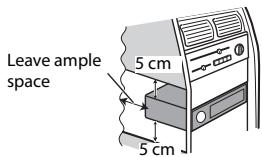
Optimum performance is obtained when the unit is installed at an angle of less than 60^ . - When installing, to ensure proper heat dispersal when using this unit, make sure you leave ample space behind the rear

panel and wrap any loose cables so they are not blocking the vents.
DIN mount installation
1 Insert the supplied mounting sleeve into the dashboard.
2 Secure the mounting sleeve by using a screwdriver to bend the metal tabs (90^) into place.
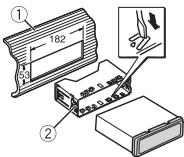
① Dashboard
② Mounting sleeve
- Make sure that the unit is installed securely in place. An unstable installation may cause skipping or other malfunctions.
When not using the supplied mounting sleeve
1 Determine the appropriate position where the holes on the bracket and the side of the unit match.
2 Tighten two screws on each side.

① Tapping screw (5 mm × 9 mm, not supplied with product)
② Mounting bracket
③ Dashboard or console
Removing the unit (installed with the supplied mounting sleeve)
1 Remove the trim ring.
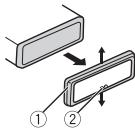
① Trim ring
② Notched tab
- Releasing the front panel allows easier access to the trim ring.
- When reattaching the trim ring, point the side with the notched tab down.
2 Insert the supplied extraction keys into both sides of the unit until they click into place.
3 Pull the unit out of the dashboard.
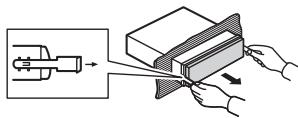
Additional Information
Troubleshooting
The display automatically returns to the normal display.
No operations have been made for about 30 seconds.
- Perform an operation.
The repeat play range changes unexpectedly.
Depending on the repeat play range, the selected range may change when another folder or track is being selected or during fast forwarding/reversing.
- Select the repeat play range again.
A subfolder is not played back.
Subfolders cannot be played when [FLD] (folder repeat) is selected.
- Select another repeat play range.
The sound is intermittent.
→ You are using a device, such as a cellular phone, that may cause audible interference.
- Move electrical devices that may be causing the interference away from the unit.
Error messages
Common
AMP ERROR
→ This unit fails to operate or the speaker connection is incorrect.
The protective circuit is activated.
- Check the speaker connection.
Turn the ignition switch OFF and back to ON again. If the message remains, contact your dealer or an authorized Pioneer Service Station for assistance.
NO XXXX (NO TITLE, for example)
There is no embedded text information.
- Switch the display or play another track/file.
CD player (Only for DEH-4800FD)
ERROR-07,11,12,17,30
→The disc is dirty.
Clean the disc.
→ The disc is scratched.
-Replace the disc.
ERROR-07, 10, 11, 12, 15, 17, 30, A0
→ There is an electrical or mechanical error.
- Turn the ignition switch OFF and back to ON, or switch to a different source, then back to the CD player.
ERROR-15
→ The inserted disc is blank.
-Replace the disc.
ERROR-23
Unsupported CD format.
-Replace the disc.
FORMATREAD
→ Sometimes there is a delay between the start of playback and when you start to hear any sound.
- Wait until the message disappears and you hear sound.
NO AUDIO
→ The inserted disc does not contain any playable files.
-Replace the disc.
SKIPPED
→ The inserted disc contains DRM protected files.
- The protected files are skipped.
PROTECT
→ All the files on the inserted disc are embedded with DRM.
- Replace the disc.
USB device/iPod
FORMATREAD
→ Sometimes there is a delay between the start of playback and when you start to hear any sound.
- Wait until the message disappears and you hear sound.
NO AUDIO
There are no songs.
- Transfer the audio files to the USB device and connect.
→ The connected USB device has security enabled.
- Follow the USB device instructions to disable the security.
SKIPPED
The connected USB device contains DRM protected files.
- The protected files are skipped.
PROTECT
All the files on the connected USB device are embedded with DRM.
- Replace the USB device.
N/A USB
The connected USB device is not supported by this unit.
- Disconnect your device and replace it with a compatible USB device.
HUB ERROR
→ The USB device connected via a USB hub is not supported by this unit.
- Connect the USB device directly to this unit using a USB cable.
CHECK USB
The USB connector or USB cable has short-circuited.
- Check that the USB connector or USB cable is not caught in something or damaged.
The connected USB device consumes more than maximum allowable current.
- Disconnect the USB device and do not use it. Turn the ignition switch OFF and back to ACC or ON. Connect only compliant USB devices.
The iPod operates correctly but does not charge.
- Make sure the connection cable for the iPod has not shorted out (e.g., not caught in metal objects). After checking, turn the ignition switch OFF and back to ON, or disconnect the iPod and reconnect.
ERROR-19
Communication failed.
Perform one of the following operations, then return to the USB source.
- Turn the ignition switch OFF and back to ON.
- Disconnect the USB device.
- Change to a different source.
iPod failure.
- Disconnect the cable from the iPod. Once the iPod's main menu is displayed, reconnect the iPod and reset it.
ERROR-23
USB device was not formatted properly.
- Format the USB device with FAT12, FAT16 or FAT32.
ERROR-16
The iPod firmware version is old.
- Update the iPod version.
iPod failure.
- Disconnect the cable from the iPod. Once the iPod's main menu is displayed, reconnect the iPod and reset it.
STOP
There are no songs in the current list.
-Select a list that contains songs.
NOT FOUND
No related songs.
- Transfer songs to the iPod.
Apps
STARTUPAPP
→ The application has not started running yet.
- Operate the mobile device to start up the application.
Handling guidelines
Discs and player
- Use only discs that feature either of the following two logos.


- Use 12-cm discs.
- Use only conventional, fully circular discs.
- The following types of discs cannot be used with this unit:
-DualDiscs
-8-cm discs: Attempts to use such discs with an adaptor may cause the unit to malfunction. - Oddly shaped discs
- Disks other than CDs
- Damaged discs, including discs that are cracked, chipped or warped
-
CD-R/RW discs that have not been finalized
-
Do not write on or apply chemicals to the surface of the discs.
- To clean a CD, wipe the disc with a soft cloth outward from the center.
- Condensation may temporarily impair the player's performance. Let it rest for about one hour to adjust to a warmer temperature. Also, wipe any damp discs off with a soft cloth.
- When using discs that can be printed on label surfaces, check the instructions and the warnings of the discs. Depending on the discs, inserting and ejecting may not be possible. Using such discs may result in damage to this equipment.
-
Do not attach commercially available labels or other materials to the discs.
-
The discs may warp making the disc unplayable.
The labels may come off during playback and prevent ejection of the discs, which may result in damage to the equipment.
USB storage device
-
Depending on the USB storage device, the following problems may occur.
-
Connections via USB hubs are not supported.
-
Firmly secure the USB storage device before driving. Do not let the USB storage device fall onto the floor, where it may become jammed under the brake or accelerator pedal.
-
Operations may vary.
- The storage device may not be recognized.
- Files may not be played back properly.
- The device may cause audible interference when you are listening to the radio.
iPod
-
Do not leave the iPod in places with high temperatures.
-
Firmly secure the iPod when driving. Do not let the iPod fall onto the floor, where it may become jammed under the brake or accelerator pedal.
- The settings of the iPod such as the equalizer and repeat play are changed automatically when the iPod is connected to the unit. Once the iPod is disconnected, those settings will return to the original settings.
- Incompatible text saved on the iPod will not be displayed by the unit.
Compressed audio compatibility
- Only the first 32 characters can be displayed as a file name (including the file extension) or a folder name.
- The unit may not work properly depending on the application used to encode WMA files.
- There may be a slight delay at the start of the playback of audio files embedded with image data, or audio files stored on a USB device with numerous folder hierarchies.
- Russian text to be displayed on this unit should be encoded in one of the following character sets: - Unicode (UTF-8, UTF-16)
A character set other than Unicode that is used in a Windows environment and is set to Russian in the multi-language setting
CAUTION
- Pioneer cannot guarantee compatibility with all USB mass storage devices, and assumes no responsibility for any loss of data on media players, smartphones, or other devices while using this product.
- Do not leave discs or a USB storage device in any place that is subject to high temperatures.
WMA files
| File extension | .wma |
| Bit rate | 48 kbps to 320 kbps (CBR), 48 kbps to 384 kbps (VBR) |
| Sampling frequency | 32 kHz, 44.1 kHz, 48 kHz |
| Windows MediaTM Audio Professional, Lossless, Voice/DRM Stream/Stream with video | Not compatible |
MP3 files
| File extension | .mp3 |
| Bit rate | 8 kbps to 320 kbps (CBR), VBR |
| Sampling frequency | 8 kHz to 48 kHz (32 kHz, 44.1 kHz, 48 kHz for emphasis) |
| Compatible ID3 tag version | 1.0, 1.1, 2.2, 2.3, 2.4 (ID3 tag Version 2.x is given priority over Version 1.x.) |
| M3u playlist | Not compatible |
| MP3i (MP3 interactive), mp3 PRO | Not compatible |
WAV files
- WAV file formats cannot be connected via MTP.
| File extension | .wav |
| Quantization bits | 8 and 16 (LPCM), 4 (MSADPCM) |
| Sampling frequency | \( {16}\mathrm{{kHz}} \) to \( {48}\mathrm{{kHz}} \) (LPCM), \( {22.05}\mathrm{{kHz}} \) and \( {44.1}\mathrm{{kHz}} \) (MS ADPCM) |
FLAC files
- FLAC file formats cannot be connected via MTP.
- FLAC files may not be playable, depending on the encoder.
| File extension | . flac |
| Sampling frequency | 8/11.025/12/16/22.05/24/32/44.1/48 kHz |
| Quantization bit rate | 16 bit |
| Channel mode | 1/2 ch |
Disc (DEH-4800FD only)
- Regardless of the length of the blank section between the songs from the original recording, compressed audio discs play with a short pause between songs.
| Playable folder hierarchy | Up to eight tiers (A practical hierarchy is less than two tiers.) |
| Playable folders | Up to 99 |
| Playable files | Up to 999 |
| File system | ISO 9660 Level 1 and 2, Romeo, Joliet |
| Multi-session playback | Compatible |
| Packet write data transfer | Not compatible |
USB device
- There may be a slight delay when starting playback of audio files on a USB storage device with numerous folder hierarchies.
| Playable folder hierarchy | Up to eight tiers (A practical hierarchy is less than two tiers.) |
| Playable folders | Up to 500 |
| Playable files | Up to 15 000 |
| Playback of copyright-protected files | Not compatible |
| Partitioned USB device | Only the first partition can be played. |
iPod compatibility
This unit supports only the following iPod models. Supported iPod software versions are
shown below. Older versions may not be supported.
Made for
-iPod touch (1st through 5th generation)
-iPod classic
- iPod with video
-iPod nano (1st through 7th generation)
iPhone 6
iPhone 6 Plus
iPhone 5s
iPhone 5c
iPhone 5
iPhone 4s
iPhone 4
iPhone 3GS
iPhone 3G
-iPhone
- Operations may vary depending on the generation and/or software version of the iPod.
- Users of iPod with the Lightning Connector should use the Lightning to USB Cable (supplied with iPod).
- Users of iPod with the Dock Connector should use the CD-IU51. For details, consult your dealer.
Refer to the iPod manuals for information about the file/format compatibility. - Audiobook, Podcast: Compatible
CAUTION
Pioneer accepts no responsibility for data lost on the iPod, even if that data is lost while this unit is used.
Sequence of audio files
The user cannot assign folder numbers and specify playback sequences with this unit. Sequence of audio file depends on the connected device.
Note that the hidden files in a USB device cannot be played back.
Example of a hierarchy
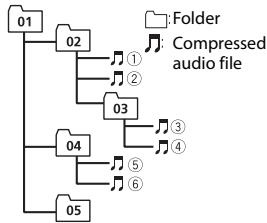
Level 1 Level 2 Level 3 Level 4
01 to 05: Folder number
① to ⑥: Playback sequence
Russian character chart
| D: C | D: C | D: C |
| R:A | Б:B | Б:B |
| F:Γ | Д:Д | Ε:E,Ε |
| *::Ж | З:З | И:И,И |
| К:К | М:Л | М:М |
| H:H | Д:О | П:П |
| P:P | Ε:C | Τ:Τ |
| Y:Y | Ф:Ф | Ч:Х |
| U:U | Ч:Ч | Ш:Ш,Ш |
| Ž:Ž | И:И | Б:Б |
| Ž:Э | Η:Ο | Ч:Я |
D:Display C:Character
Copyright and trademark
iTunes
Apple and iTunes are trademarks of Apple Inc., registered in the U.S. and other countries.
WMA
Windows Media is either a registered trademark or trademark of Microsoft Corporation in the United States and/or other countries.
This product includes technology owned by Microsoft Corporation and cannot be used or distributed without a license from Microsoft Licensing, Inc.
FLAC
Copyright © 2000-2009 Josh Coalson
Copyright © 2011-2013 Xiph.Org Foundation
Redistribution and use in source and binary forms, with or without modification, are permitted provided that the following conditions are met:
- Redistributions of source code must retain the above copyright notice, this list of conditions and the following disclaimer.
- Redistributions in binary form must reproduce the above copyright notice, this list of conditions and the following disclaimer in the documentation and/or other materials provided with the distribution.
- Neither the name of the Xiph.org Foundation nor the names of its contributors may be used to endorse or promote products derived from this software without specific prior written permission.
THIS SOFTWARE IS PROVIDED BY THE COPYRIGHT HOLDERS AND
CONTRIBUTORS "AS IS" AND ANY EXPRESS OR IMPLIED WARRANTY, INCLUDING, BUT NOT LIMITED TO, THE IMPLIED
WARRANTIES OF MERCHANTABILITY AND
FITNESS FOR A PARTICULAR PURPOSE ARE DISCLAIMED. IN NO EVENT SHALL THE FOUNDATION OR COLLECTORS BE LIABLE FOR ANY DIRECT, INDIRECT, INCIDENTAL, SPECIAL, EXEMPLARY, OR CONSEQUENTIAL DAMAGES (INCLUDING, BUT NOT LIMITED TO, PROCEDURE OF SUBSTITUTE GOODSOR SERVICES;LOSS OF USE, DATA, OR PROFITS; OR BUSINESS INTERRUPTION) HOWEVER CAUSED AND ON ANY THEORY OF LIABILITY, WHETHER IN CONTRACT, STRICT LIABILITY, OR TORT (INCLUDING NEGLIGENCE OR OTHERWISE) ARISING IN ANY WAY OUT OF THE USE OF THIS SOFTWARE, EVEN IF ADVISED OF THE POSSIBILITY OF SUCH DAMAGE.
iPod & iPhone
iPhone, iPod, iPod classic, iPod nano, and iPod touch are trademarks of Apple Inc., registered in the U.S. and other countries. Lightning is a trademark of Apple Inc. "Made for iPod" and "Made for iPhone" mean that an electronic accessory has been designed to connect specifically to iPod or iPhone, respectively, and has been certified by the developer to meet Apple performance standards. Apple is not responsible for the operation of this device or its compliance with safety and regulatory standards. Please note that the use of this accessory with iPod or iPhone may affect wireless performance.
Android & Google Play
Android, Google Play, and the Google Play logo are trademarks of Google Inc.
Specifications
General
Power source: 14.4 V DC (10.8 V to 15.1 V allowable)
Grounding system: Negative type Maximum current consumption: 15.0A
Dimensions (W× H× D) DIN
Chassis: 178mm× 50mm× 155mm Nose: 188mm× 58mm× 17mm D
Chassis: 178mm× 50mm× 155mm Nose: 170mm× 46mm× 17mm
Weight: 1 kg (DEH-4800FD), 0.7 kg (MVH-280FD)
Audio
Maximum power output: 100W× 4ch / 4 (for no subwoofer)
Continuous power output: 40W× 4 (50 Hz to 15 000 Hz, 5 % THD, 4 Ω load, both channels driven)
Load impedance: 4 (4 to 8 allowable) Preout maximum output level: 2.0V
Loudness contour: +10 dB (100 Hz), +6.5 dB (10 kHz) (volume: -30 dB)
Equalizer (5-Band Graphic Equalizer): Frequency: 80Hz / 250Hz / 800Hz / 2.5 kHz/8 KHz
Equalization range: ± 12 dB (2 dB step)
Subwoofer (mono): Frequency: 50Hz / 63Hz / 80Hz / 100 Hz/125 Hz/160 Hz/200 Hz Slope: -12dB /oct, -24dB /oct Gain: +6 dB to -24 dB Phase: Normal/Reverse
CD player
(DEH-4800FD)
System: Compact disc audio system
Usable discs: Compact disc
Signal-to-noise ratio: 94 dB (1 kHz) (IEC-A network)
Number of channels: 2 (stereo)
MP3 decoding format: MPEG-1 & 2 Audio Layer 3
WMA decoding format: Ver. 7, 7.1, 8, 9, 10, 11, 12 (2 ch audio) (Windows Media Player)
WAV signal format: Linear PCM & MS ADPCM (Non-compressed)
USB
USB standard specification: USB 2.0 full speed
Maximum current supply: 1 A
USB Protocol: MSC (Mass Storage Class) MTP (Media Transfer Prot AOA (Android Open Access
File system: FAT12, FAT16, FAT32
MP3 decoding format: MPEG-1 & 2 Audio Layer 3
WMA decoding format: Ver. 7, 7.1, 8, 9, 10, 11, 12 (2 ch audio) (Windows Media Player)
FLAC decoding format: v1.3.0 (Free Lossless Audio Codec)
WAV signal format: Linear PCM & MS ADPCM (Non-compressed)
FM tuner
Frequency range: 87.5 MHz to 108.0 MHz
Usable sensitivity: 11 dBf (1.0 V/75 , mono, S/N: 30 dB)
Signal-to-noise ratio: 72 dB (IEC-A network)
MWtuner
Frequency range: 531 kHz to 1602 kHz
Useable sensitivity: 25 V (S/N: 20 dB)
Signal-to-noise ratio: 62 dB (IEC-A network)
LWTuner
Frequency range: 153kHz to 281kHz Usable sensitivity: 28~ V (S/N: 20 dB)
Signal-to-noise ratio: 62 dB (IEC-A network)
NOTE
Specifications and the design are subject to modifications without notice.
Table des matières
Raccordements/Installation 13
Mémoire des越来越好es stations (BSM)
Raccordements/Installation
Raccordements
Important
ERROR-07, 11, 12, 17, 30
ERROR-07, 10, 11, 12, 15, 17, 30, A0
Copyright © 2000-2009 Josh Coalson
Copyright © 2011-2013 Xiph.Org Foundation
MSC (Mass Storage Class)
MTP (Media Transfer Protocol)
AOA (Android Open Accessory) 2.0
10, 11, 12 (2 canaux audio) (Windows
Media Player)
Format de decodage FLAC : v1.3.0 (Free
Lossless Audio Codec)
ADPCM (non compressed)
Syntoniseur FM
Best stations memory (BSM)
ERROR-07, 10, 11, 12, 15, 17, 30, A0
Copyright © 2000-2009 Josh Coalson
Copyright © 2011-2013 Xiph.Org Foundation
Pendenza: -12 dB/oct, -24 dB/oct
Guadagno:da +6 dB a-24dB
Fase:normale/inversa
Lettore CD
(DEH-4800FD)
Sistema:istema audio compact disc
Specifica standard USB: USB 2.0 full speed
MSC (Mass Storage Class)
MTP (Media Transfer Protocol)
AOA (Android Open Accessory) 2.0
File system: FAT12, FAT16, FAT32
Alternatively, you can use the following two methods:
- Alternatively, you can use the following two methods:
- Alternatively, you can use the following two methods:
ERROR-07, 10, 11, 12, 15, 17, 30, A0
Copyright © 2000-2009 Josh Coalson
Copyright © 2011-2013 Xiph.Org
Foundation
Curva: -12 dB/oct, -24 dB/oct
Ganancia: +6 dB a -24 dB
(Windows Media Player)
ERROR-07, 11, 12, 17, 30
ERROR-07, 10, 11, 12, 15, 17, 30, A0
KLASSE 1 LASERPRODUCT
Bij problemen
Best stations memory (BSM)
U aunt Pioneer ARC APP downloaden op iTunes App Store.
Reserve (of accessoire)
④Geel
Accessoire (of reserve)
⑥ Rood
ERROR-07, 11, 12, 17, 30
Copyright © 2000-2009 Josh Coalson
Copyright © 2011-2013 Xiph.Org
Foundation
Helling: -12 dB/oct, -24 dB/oct
Gain: +6 dB tot -24 dB
Fase: Normaal/tegengesteld
Cd-speler
(DEH-4800FD)
System: Compact Disc Audio
(Windows Media Player)
WAV-signaalformula: Lineaire PCM & MS
MSC (Mass Storage Class)
MTP (Media Transfer Protocol)
AOA (Android Open Accessory) 2.0
Bestandsystem: FAT12, FAT16, FAT32
MP3-decoderingsformaat: MPEG-1 & 2
Audio Layer 3
(Windows Media Player)
FLAC-decoderingsformaat:v1.3.0 (Free
Lossless Audio Codec)
JI3EPHbI IPOdyKT KJACC 1
PpB03HnKHOBeHNn npo6nem
PnH ennoLaKab X bOa6e 3TO rA hEINNA BCBNtceb C TORPOBIM pIepCTABNTEm EOMKAnHHI npOn3BODInTeJI Hm C BNkAAHM CEPBCHMIM PTHKTM OPIEIER.
Hauano pa60tbl
OchOBhble onepaun
DEH-4800FD
PerylaTOp M.C. (MnHOrO3aDaUHoe ynpabLeHne)
DISP (dɪnʌpɪneɪ)
Khonnka OTCoeDHeHn
MVH-280FD
PerylaTop M.C. (Mnroo3aauHoe ynpabneHne)
DononHntenbHn nybT Ny
(TonbkoДЯDEH-4800FD)
IyblT Dy CD-R320 npno6peTaetc OtdeNbHO.
Nybld
ПОНМЕЧАНЕ
IyBbT DBy BXoJNT B KOMnJIeKT NOCTaBKn TOnbKO yCTpoNCTBa MVH-280FD.
Yacto nCnOJb3yEmble onepaunn
OCTyHbIe KHOJKN MOrYT OTnuaTbCBy 3aBcNMOcTn OYCTPOcTbA.
PpneM npeBapuTeIbHo yCTaHOBJIeHHbIX cTaNcH
1 Haxmnte SRC/OFF dans Bbyb6opa [RADIO].
2 Haxmte BAND/ dans bbl6opa nonocb [FM1], [FM2], [FM3], [MW] nn [LW].
3 HaKmIte YcNcOByo KhoNky (ot 1/ do 6/
COBET
KHOKNIO MOXHO TAKKHe NcONb3OBaTb DnA Bb6Opa PpeBaPteJIbH Oy UCTAHOBLeHHo CTaHcI,ecnI dnnapametpa [SEEK] yctahOBHeNo 3NaueHne [PCH] B hactpoiKaX FUnction (ctp.11).
3anomnhaHne lyuushx cTaHcni (BSM)
3aKaKdoNcNOBOKNHOKoCOxpaHeHaOHaI3WeCTn paDIOCTaHcN C HauJIyUIM KaueCTBOM npMeMa (c1/An6/).
1 Pocne Bb6opa nooCb haxmite peryIaTOp M.C. dIra oTo6paXeHnaIabHoro MeHIO.
2 NopBepHnTe M.C.ДЯ Bb6opa [FUNCTION], 3aTeM haxmite dIe noDtBepeJxdeHn.
3 NobepHnTe M.C.ДЯ Вьбopa [BSM], 3aTeM Haxmite Дя NOДТВЕРЖDEHIN.
Ponck cTaHcN BpyHyIO
1 Nocne Bb6opa noJocblnXmTe I/ DnBb6opa ctaHcnn.
HakMMTEuJepKJBaIe T/1,3aTEM OTNcyTITE JnIouSCKa DOCTyTHOIN CTaHcN. IOnCK OCTaHOBtCRA, KOrda yctpoiCTBO BbINONHIT npMEM CTaHcN.IIr OTMEHbl NocCKa HAKMMTE
ПРИМЕЧАНЕ
Дяnapametpa [SEEK] Heo6xodmo yctahOBnTB 3naeHne [MAN] B hactpoikax FUNCTION (cTp.11).
CoxpaHenne cTaHnBpyHyIO
1 Bo Bpem npnema cTahun, KOtopyTO Tpe6yETc coxpaHntb, haxmnte u ydepmbaTe OHy n3 YncIOBbIX KhoNOK (c 1/An no 6/), noka muraHne He npekpatNTc.
UcnoJIb3OBAHneФyHKnI PTY
UcpoCTBO BbINOLHReT nonck taHcuN no INHOpMaun PTY (TIN nporpaMbl).
1 Haxmite BOBpeMa FM-npneema.
2 ПовернITE М.С. Ддя Вьбoga Типа поррамьи [NEWS/INFO], [POPULAR], [CLASSICS] ии [OTHERS].
3 Haxmte peryIaTOp M.C..
UcTpoCTBO HauHET NOCK CTAHUN. Iocne haoXoJeHHa CTAHUN OTO6pa3ntca Ha3BaHHe n pOrpAMMHO cnJxkbI.
ПРИМЕЧАЦA
- YTO6bI OTMeHHTb NONCK, HAXMNTe M.C..
-
PnorgpAMMbHeKHeTOBpbXaRIOCTAHucnI MOrY OTNIuHaTbCt OR nPOrpAMM, yK3a3AHbX B nepedaaEMOM kOePTY.
-
EcnH N O dHa n3 CTaHnI He nepeAeT npOrpAMMb HxKHO TINa,TO hAn DInCnIeB TceHne IpnMeRho DByx CekyD 6ydet noka3Ano [NOT FOUND], n 3aTeM TIOheP nepeJed B pEkmn PpHema TaChnU, c KOTOpB 6bl NauhTaONIC.
Cnncok PTY
- He yctahobneho dlya MVH-280FD
KomnaKT-dnck
1 BCTaBtE DNCK B ⅢeIb 3aRpy3KN DNCKa MapKnpoBaHHO CTopoHOB BBepx.
YTo6bI 3N3BLeuB DnCK, OCTaHOBITE BOCnPOn3BeDeHHe, 3aTeM HaxMNITe
UcTpoIcTbA USB (BkIIOuAra AndroidTM)/iPod
1 OtkpoTe KpbiIshky npTa USB.
2 PooklouHTe yctpoiCTBO USB/iPod c nomoo bbo COOTBeTCTBvUoero Ka6ena.
ПРИМЕЧАНЕ
Давотаматимбосторешип Нсточник [USB], Кordу CTpoшков [USB/iod podnokihoюк ] rhaBOMYATyOPOCTBCTy, ytaTahOBITE ndu [USB AUTO] zhaHneHn [USB N haTropkaiX SYSTEM (ctp. 12).
BHUMAHNE
Icnobn3yte IonoonnhtenBnHn Ka6eb Pioneer USB (CD-U50E) nna NkNoeHn yctpoiCTBa USB, nockOblky nuOb6ye UcTPOI CTBO, noNkOnuHHeHn HneHocpeDcTBENHO K rAaBHOMy UcTPOI CTBY, 6ydet BByCTIpyb, YTO MOKET npDECTBAJrTo aCHOCTb.
Ipeed n3BneHnem yctpoiCTBa OCTaHOBtBe BOCnpOn3BedeHne.
IopKJIoueHnA OAO
KOMTANHIA PIONEER HE HECET OTBETCTBEHHOCTN 3A PIPINOLOXEHHI INJ COJEPKIMMOE, PINEOCTABJIEEHOHE CTOPOHIMM PA3PABOTUHKAMMI, BKJIOUAY INX DOCTOBEPHOCTB INPOJHTOT. 3A COJEPKIMMOE INYHKUNHOAHBJTOBCT TAKINX PIPINOLOXEHHI HECYT OTBETCTBEHHOCTb PA3PABOTUKNIPINOLOXEHHI.
IcnoJb3OBaHne npniloXeHnHa yCTpoiCTBe
1 PioKnIOuHTe daHHOe yCTpoIcTBO K Mo6NbHOMy yCTpoIcTBy.
iPhone uepe3 USB (ctp.7)
2 HaxmTe SRC/OFF dIaBb6opa [APP].
3 IcnoIb3yIte Mo6nIbHoe yCtpoCTBO gn 3aNyCs npInoXeHn.
OchOBhble onepaun
BbMOxTe HAcTPOuMbTa3nUHbIe NapaMeTpbl B HaCTpoiKax FUNCTION (ctp. 10).
(yCTaHOBJIeHHORO C NOMOIO
npnilaraemoyyctaHOBOUHON waxTbl)
1 CHUMMTE OKAHTOBKY.
UcTaPaHeHne HEnCnpaBHOCTeI
IinCIneABTOMaTNUeCKNBO3BpaaTaETCA B INCXOHNbPexIM.
→BteuHne 30 cekyHne H6bIIO BbIOpJIHeN HnKaKnx OpeaIci. -BbIOpNIte OpeaIciO.
Dnana3OH NOBTOPHORO
BOCPONP3BDEHNA CAMONPON3BOHNO 1M3EHRETCA.
→B3aBnCmOCTNOT BbIbpaHnHO
DIIaIa3oHaNoTobTOPHO
BOcPOnIOBVEeHnOHMOKeT
IVMeHnBaCpI NpRbIbOpeIpyrOtnapKn
INIIOPOJckn,aTaKHeIpnIpeMOTke
BpePeH/Na3d.
-BbIbepHTe DIIaIa3oH NoBTOPHOr
BOcPOnIOBVEeHnEue p3.
Bloxehna nanka He Bocpon3BOUntc.
→BLOXeHbIe nankn He BOCPON3B0aTc,ecn Bb6paH dnaa3oH [FLD] (noBtOpHoe BOCPON3BedeHne nankn)
- Bb6epnte dpyroinana30nnoTbOPHOro BocnpOn3BedeHn.
IMeOTcI NOMEXN 3Byka.
ERROR-07, 10, 11, 12, 15, 17, 30, A0
© 2000-2009 Josh Coalson
© 2011-2013 Xiph.Org Foundation
PacnpoctpaHeHne nIcNoIb3ObaHne bVBe INCXoDnBIX KODOB nIIb 6NHaPbIX
paIIOB, CMOINKNAQaJMN nIIb 6e3,
papeBaETC pRn Co6IIODeHN
cnedyUOxN yCNOBn:
-BpacnpocpaHREMOMXCxOHDOMKoDe JdJNO6bIbCOxApoaHEyBvEDOMNeHMe 06abTOpCKOM npabe,HactOJIuN CnICOK yCNoBnNycOBnO6orpaHueHn OTBeTcBEHOCTN.
-Пи распсностарени 6инарьх фαιлов ob83aTeлььno BOCspnOЗБЕне ВьшуелуmarHTOro YByedOMENHEО бАТСКOMPлрав,НACTOSUERо CINCKA УСЛБОМИ ПИВЕDEHнБИХ NIXe YCNOBи 6ОраганчENH NO TBETCTBEHNOCTN B ДOKUMETAИ N/NINДугNX СОПВОДNTeLьнБx MATEРДANAX.
- HanmehoBahne Xiph.org Foundation
- ИмЕну учаCTHКВ Не ДДЛЖны
- ИСПОЛБЗВОВТУ ДДИОДЕРЖКИ ИП
- РОДВИКЕНЯ TÓвAPОВ, COZDAHbX C
pimmeHnEMdAHHORnporpaMMHOro
6bcneuehen,63nepeBaPitEnbHOro
PiCbMeHHOrO pa3peHenn
npaboo6nadatena.
DAHHO NO IPEIOCTABJRETC
PAPBOO5JAIDATEJIMN COABTOPAMN
"KAK ECTb N HE IPEIOCTABJRE
HNIKAKIX RBHbX NIN
IPOPA3YMEBAEMbIX FAPAHTNI
IPRFOIDHOCTN IJIPOJDAJKN NIN
KOHKPETHORIO NCIOLB3OBAHNI. HNI KAKNX OBCTOTJEbCTBAX
YNPABLIOUIEMCOABTOBHEHCYTBTETCEBHHOCT3AIPMBie.
KOCBEHHBIE, CUYAHHBIE, UTPAΦHBIE
VIU NIOCEJYIYOLIME YbBtKN (BKJIHOUAR, HO HE OPAHNUVBACB 3ATPATAMH NA
PNOBPETEHME 3AMEHJOILIMX
TOBAPOB N YCJYG, YTPATOI
BO3MOXHOCTN IcNoJIb3OBAHIN,
IOTEPEI DAHHbIX, YNYUJIENHOI
BbIIOJI IN IIObIMN YbIJKAMN B
PE3YJbTATE IPIPNOCTAHOBKN
DAETIELHOCTN),BO3HNKAIOUNE HA
OCHOBE COIJIALJEHNA,HECEHNA
OTBETCTBEHHOCTN IJIH HAPUJEHIN
OB3ATEJIbCTB (BKJIOUAR
HE6PEXHOCTb) PNI NCIPOJb3OBAHIN
DAHHOTO IPOPTPAMMHORO
OBECNEUeHnA,DAxE ECIN KOMNAHnA
BbJIa IPEyIPEXKeHApO
BO3MOXKHOCTN TAKOTO UUEP5A.
iPod & iPhone
iPhone, iPod, iPod classic, iPod nano n iPod touch web mobile TOBAPHBIMN 3NaKAMN komnApple Inc., 3aperntpnpobAHbIMN B CUSA n npyrrnx ctpnaax.
Lightning yBJIeTc TOpRObIM 3HakOM KOMnAhuNApple Inc.
"Made for iPod" n "Made for iPhone" o3hauaet, УТо дектPORHbIй рибор 6blа pa3pa6obotan сцелю поКнluоченя onpeDeLEhenho к iPhone оmo iPhone COOTBETCBENHO, И IMeTcA ceTINФИЦКАЦЯ pa3pa6BOTUKNa O
COOTBCTBMI C TexHINHECKMIMXapakTepnCTNkAmi Apple He He HecetOTBTCTBENHOCT3a pABOT DaHOROYCTPOICTBA NII IRO COOTBCTBNEcoCTAHdPAMNI OTEXHKe 6eONaCHOCTNI INPEYPTNHBHMI HOPMAMNI.
IoxaJyIcTa, 6bpaTHe BnHMaHne, YTO nCnOlb3OBaHne dAnHOro npN6Opa c iPod uIN iPhone MOKeT OTpUcaTeBHo CkA3bBaTbcHa KaueCTBe 6ecPNOBDoH OCB3N.
Android & Google Play
MaKcMaIbHbI NtOpe6nHembI TK:15,0 A
Pa3Mepb1 (U X B X Γ): DIN
Jaccn:178MM×50MM×155MM
Пелегдя панень: 188 MM × 58 MM × 17 MM
D
Uaccn:178MM×50MM×155MM
PereHnra naneb: 170 MM x 46 MM x 17 MM
Bec: 1 kR (DEH-4800FD), 0,7 kR (MVH-280FD)
Aydno
MaKcMaJbHbYbIXoDHaMoUHocTb: 100Bt4KaHana/4Ω(6e3 ca6Byepa)
HOMnHaBnHaB BbIXoDnHa MoUHOCTb: 40BTx4OT5TDO15000Tc CymmApHoe 3NaYeHne KOaΦnIeHTa HeInHeNbIX NCKaKeHn 5% Harpy3ka4ΩnO6nxKaHaNob
CONOPTIBNENHEHARpy3K:4Ω (DONYCTMTO-04D08Og 4
ConpoTnBJIeHneHarpy3Kn:2,0B
KoHTyp rpoMkoCTn: +10 d5 (100 fU), +6,5 d5 (10 kU) (rpoMkoCTb: -30 d5)
3Kbanaa3ep(5-noonchB rpaDnueckn 3Kbanaa3ep): 8CaTeTo:80T/250T/800T/2,5k1 8KtU
Дианазон AmmTTyDHO-чаTOTHbIXхарakтepntNK:±12d5(cшaROM2dB)
Ca6Bypef (MOH):
Yactota:50Tg/63Tg/80Tg/100Tg/125Tg/160Tg/200Tg
Kpytn3Ha xapaKtepncTkn: -12日 OK,-24Db/OKT
YCnneHe: +6 Dbdo-24bD
Φa3a:HopMaIbHa/O6paTHa
IpounrpbIBaTeIb KOMnakT- DnCKOB
(DEH-4800FD)
MSC (Mass Storage Class)
MTP (Media Transfer Protocol)
AOA (Android Open Accessory) 2.0
Фаловая систema: FAT12, FAT16, FAT32
Φopmat DekoDinpoBaHnЯ faIIOB MP3: MPEG-1 u 2 Audio Layer 3
Pioneer CarStereo-Pass
Please fill out immediately after purchase.
MmnpTeP OOO "IIOHEP PYC"
105064, Rocchra, r. MockbA, HuxnH CycaIbHbnI nepeynok, Dom 5, cTpoEHHe 19
Ten.: +7(495) 956-89-01
PIONEER EUROPE NV
Haven 1087, Keetberglaan 1, B-9120 Melsele, Belgium/Belgique
TEL: (0) 3/570.05.11
PIONEER ELECTRONICS (USA) INC.
P.O. Box 1540, Long Beach, California 90801-1540, U.S.A.
TEL: (800) 421-1404
PIONEER ELECTRONICS OF CANADA, INC.
340 Ferrier Street, Unit 2, Markham, Ontario L3R 2Z5, Canada
TEL: 1-877-283-5901
TEL: 905-479-4411
PIONEER ELECTRONICS ASIACENTRE PTE. LTD.
2 Jalan Kilang Barat, #07-01, Singapore 159346
TEL: 65-6378-7888
PIONEER ELECTRONICS AUSTRALIA PTY. LTD.
5 Arco Lane, Heatherton, Victoria, 3202 Australia
TEL: (03) 9586-6300
PIONEER ELECTRONICS DE MEXICO, S.A. de C.V.
Blvd. Manuel Avila Camacho 138 10 piso
Col.Lomas de Chapultepec, Mexico, D.F. 11000
TEL: 55-9178-4270
先锋股份有限公司
台北市內湖區瑞光路407號8樓
電話:886- (0)2- 2657-3588
先鋒電子(香港)有限公司
香港九龍長沙灣道909號5樓
電話:852-2848-6488