
PI3 - Earphones BOWERS & WILKINS - Free user manual and instructions
Find the device manual for free PI3 BOWERS & WILKINS in PDF.
| Product Type | Wireless Bluetooth In-Ear Headphones |
| Brand | Bowers & Wilkins |
| Model | PI3 |
| Weight | 31 grams |
| Battery Type | Rechargeable Lithium Polymer |
| Battery Life (Bluetooth playback) | Up to 8 hours |
| Fast Charging | 2 hours playback with 15 minutes charge |
| Full Charge Time | Up to 3 hours |
| Bluetooth Version | Bluetooth 5.0 with aptX-Adaptive technology |
| Bluetooth Codecs | aptX-Adaptive, aptX-HD, aptX-Classic, AAC, SBC |
| Bluetooth Profiles | A2DP v1.3.1, AVRCP v1.6.1, HFP v1.7.1, HSP v1.2, BLE GATT |
| Speakers | 2 x ø 9.2 mm full range + 2 x Balanced Armature |
| Frequency Response | 10 Hz - 30 kHz |
| Distortion (THD) | < 0.3% (1 kHz / 10 mW) |
| Microphone | 1 microphone for calls (CVC1) |
| Charging Connector | USB-C (charging and audio) |
| Included Accessories | USB-A to USB-C cable (20 cm), storage case, ear tips (S, M, L), stabilizing wings (S, M, L) |
| Main Features | Play/pause, volume, track skip, call management, secret mode activation, call waiting, auto sleep, multipoint pairing (up to 8 devices) |
| Care and Cleaning | Clean with a slightly damp microfiber cloth; remove ear tips and wings for separate cleaning; do not use abrasive products, detergents, or immerse in water |
| Repairability | Spare parts available through Bowers & Wilkins support; reset possible via buttons or app |
| Environmental Compliance | RoHS, REACH, WEEE |
Frequently Asked Questions - PI3 BOWERS & WILKINS
User questions about PI3 BOWERS & WILKINS
0 question about this device. Answer the ones you know or ask your own.
Ask a new question about this device
Download the instructions for your Earphones in PDF format for free! Find your manual PI3 - BOWERS & WILKINS and take your electronic device back in hand. On this page are published all the documents necessary for the use of your device. PI3 by BOWERS & WILKINS.
USER MANUAL PI3 BOWERS & WILKINS
Welcome to Bowers & Wilkins and PI3
Thank you for choosing Bowers & Wilkins. When John Bowers first established our company, he did so in the belief that imaginative design, innovative engineering and advanced technology were keys that could unlock the enjoyment of audio in the home. His belief is one that we continue to share and inspires every product we design, tailored for new audio experiences outside of the home.
The Bowers & Wilkins PI3 are high performance in-ear headphones designed to deliver the highest quality mobile personal audio experience combined with the convenience of wireless operation in a compact easy to wear design. This manual will tell you everything you need to know to get the most from your PI3 headphones.
PI3 features exclusive custom designed Hybrid Dynamic-Balanced Armature drive units, paired with two separate dedicated amplifiers producing a wide, accurate soundstage.
PI3 incorporates a rechargeable battery pack. When fully charged the battery pack can provide up to 8 hours of continuous wireless media streaming at average playback volume levels.
1. PI3 Carton Contents
PI3 headphones
Storage case
USB-C charging cable
Ear tips (small, medium and large)
Ear stabilisers (small, medium and large)
Document pack
2. Getting to know your PI3
2.1 Switching Headphones On and Off
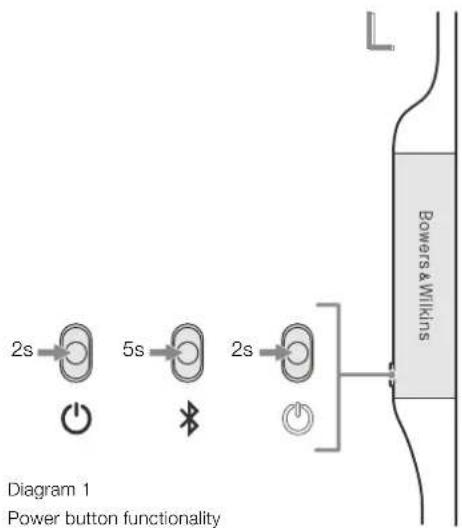
Diagram 1 illustrates Power button functionality.
Switching On
The Power button is located on the left control unit. Press and hold the Power button for 2 seconds. An audible cue will be presented and the LED indicator will light up in ether green, amber or red displaying the current charge level.
Switching Off
Press and hold the Power button for 2 seconds.
An audible cue will be presented and the
headphones will power down when the LED
indictor is no longer lit.
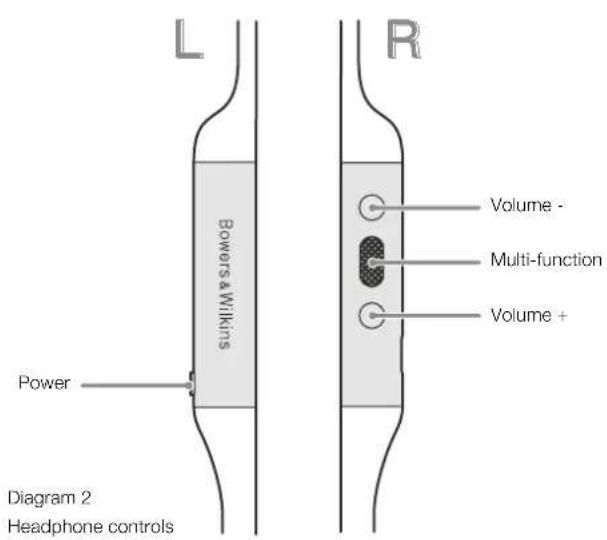
2.2 Headphone Controls
Diagram 2 illustrates the headphone controls. The following buttons on the right control unit are used to for media playback:
Function Action
| Play or pause | Press the Multi-function button once. |
| Play to next track | Press the Multi-function button twice in quick succession.Note: functionality dependent on source device. |
| Play previous track | Press the Multi-function button three times in quick succession. Note: functionality dependent on source device. |
| Increase Volume Press the Volume + button. | |
| Lower Volume Press the Volume - button. | |
The following buttons on the right control unit are used for phone call functionality:
Function Action
| Answer or end call | Press the Multi-function button once. |
| Answer an incoming call | When incoming call occurs, press the Multi-function button once. |
| Decline an incoming call | When incoming call occurs, hold the Multi-function for 2 seconds. |
| Switch between two calls | With two calls active, press the Multi-function button twice. |
| Merge two calls | With two calls active, hold the Multi-function button for 1 second. |
| Toggle mute | While on a call, press the Multi-function button three times. |
2.3 Status Indicator
The status LED indicator is located on the right control unit, Diagram 3 explains the illumination states.
Illumination Operational state
| White Battery charge > 30% |
| Amber Battery charge between 30% and 10% |
| Red Battery charge < 10% |
| Red flashing Battery charge insufficient for headphone operation |
| Blue flashing Pairing mode enabled |
| Blue (2 sec solid) Pairing successful |
| Blue flashing (calls) Incoming call |
| Green flashing Rapid charging |
| Green solid Battery charge full, trickle charging |
Diagram 3
Status indicator illuminations
3. Battery Charging and Power Saving
Your PI3 comes with the battery partially charged may be used immediately. For best practice we recommend to fully charge the headphones before first use. Please allow up to 3 hours for full charge. The headphones can be used while charging.
To charge:
- Please use the supplied charging cable and connect the USB-A plug to a wall charger or a powered computer USB-A socket.
- Then connect the USB-C end to the headphones USB-C socket
Note: During charging, the headphone indicator will flash green. When fully charged, the indicator will remain illuminated. See Diagram 3 for status indicator details.
3.1 Auto Power Off
PI3 features smart power management. If no audio is being streamed or played after 15 minutes, PI3 will automatically disconnect Bluetooth and power down to save battery life.
With the app, you can customise how long the headphones will wait before auto power off, please see Standby Timer under Settings in the app.
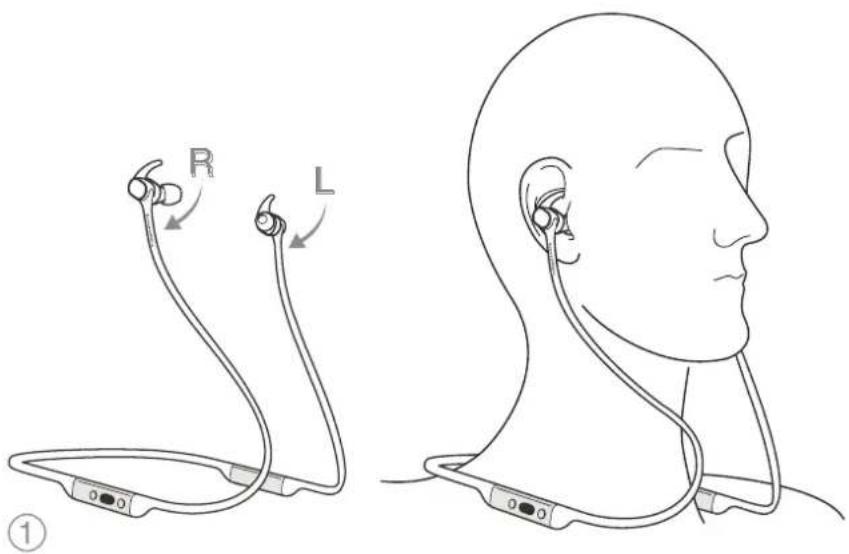
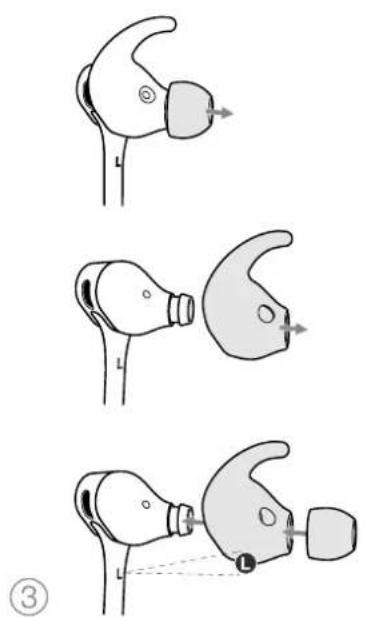
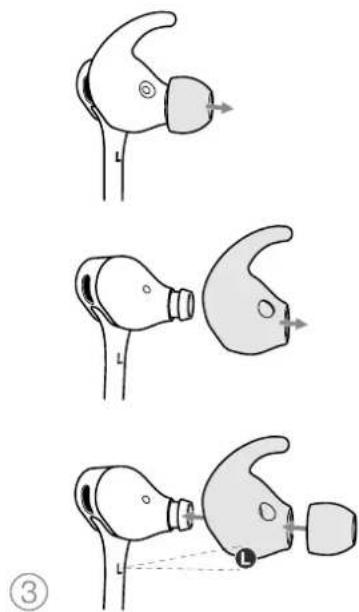
4. Wearing Your Headphones
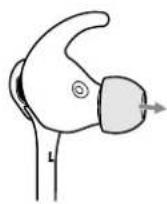
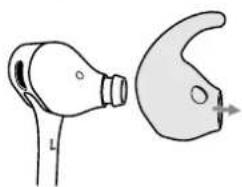
Wearing your headphones correctly will help ensure you get the best possible experience, see Diagram 5. Like many in-ear headphones, the PI3 earpieces are designed to seal the ear canal in order to perform optimally. The earpieces are also designed be used with the stabiliser fins and must be installed prior to use.
Both ear tips and stabiliser fins come in three sizes (small, medium and large). Finding the proper size for your ear is critical to obtaining a good seal and ensure PI3 performs optimally.
- Identify the left and right earpieces by finding the identification legends located on the interior of each cable near the earpieces. Hold PI3 by the left and right control units and hang the headphone around your neck comfortably, the earpieces should be at equal length.
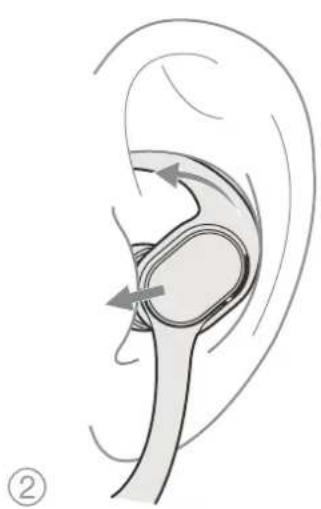
- Place the earphones in your ear so that the tips sit comfortably at the opening of the ear canal.
- Ensure the stabiliser fins are sitting comfortably in the ear. Try another size if they do not fit. Different sized ear tips and stabiliser fins can be used to ensure the best possible fit.
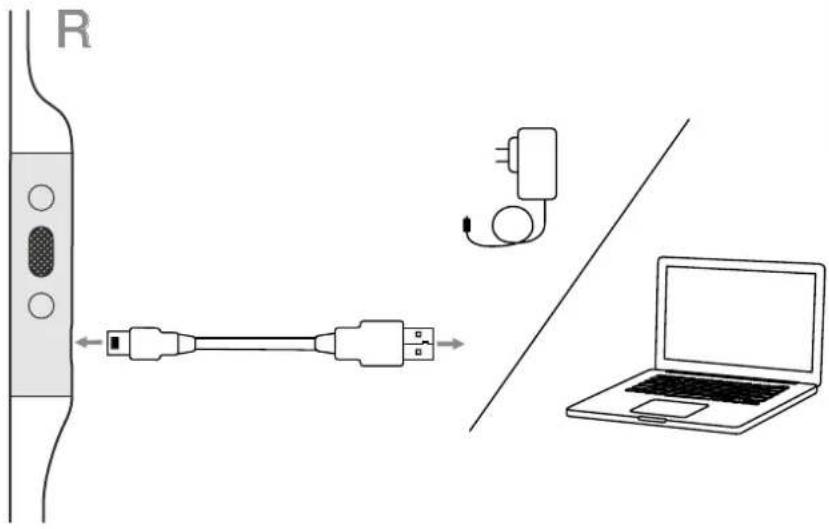
Diagram 4
USB-C cable connection
natural_image
Anatomical illustration of the human ear with directional arrows indicating movement or force (no text or labels present)Diagram 5
Wearing your headphones
natural_image
Diagram of a pair of earbuds, one with a handle and the other with a curved blade (no text or symbols)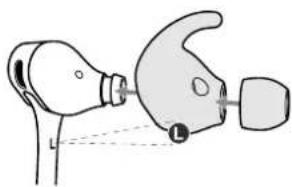
natural_image
Diagram of a medical device with a bulb and connector, showing alignment lines (no text or symbols)5. Bluetooth Connection
5.1 Pairing
PI3 is designed to stream media wirelessly from Bluetooth audio devices, such as smartphones, tablets or personal computers. To do so, the headphone and device (source) must first be paired, see Diagram 6.
- The first time you switch on your headphones, Bluetooth pairing mode will be enabled, the indicator will flash blue. If pairing mode is not enabled, press and hold the power button for 5 seconds, let go when the indicator blinks blue and when an audible cue is presented.
- Ensure the Bluetooth feature is enabled on the audio device, PI3 will appear in the discovery list, select it to pair.
- The indicator will flash blue while pairing is in progress, this will change to solid blue and an audible cue presented when pairing is successful.
Your headphones will remember up to eight paired Bluetooth devices. Repeat the above steps to pair more devices.
Note: Your headphones will automatically exit Bluetooth pairing mode if no device is paired within 5 minutes. If pairing fails, the indicator will rapid flash blue, please try pairing again.
5.2 Multiple Bluetooth Connections
PI3 can connect up to two devices at the same time, but note that you can only play audio or take calls from one device at a time.
To switch between two devices:
- Pause audio on the first device, or use the PI3 multi-function button.
- Play audio from the second device and the headphone will switch over.
When streaming audio, receiving a call on the second device will automatically pause playback and the call will be routed automatically to your headphones. Ending the call will automatically resume playback from the first device.
5.3 Disconnect from a Device
You can quickly disconnect PI3 from a device by pressing the Power button two times in quick succession, an audible tone will be presented indicating successful disconnection.
Alternatively, you can manage connection in further detail using the Bowers & Wilkins Headphones app under Connections.
5.4 Setting Up Headphones with the App
The Bowers & Wilkins Headphones app provides extended setup. The app also provides further customisations such as voice prompt, standby time, connection management and headphone software updates. The app is available as a free download on iOS and Android devices.
To add your headphones:
- From your mobile device, download and install the Bowers & Wilkins Headphones app.
- Launch the app, then read and follow the instructions pertaining app notification and permissions.
- After reaching the main screen, simply tap + and following the in-app instructions.
5.5 Headphone Software Updates
Bowers & Wilkins will occasionally make available software updates that refine and optimise the performance of your headphones or add new features.
The Bowers & Wilkins Headphones app will notify you when a software update is available, tap on the notification and the follow in-app instructions.
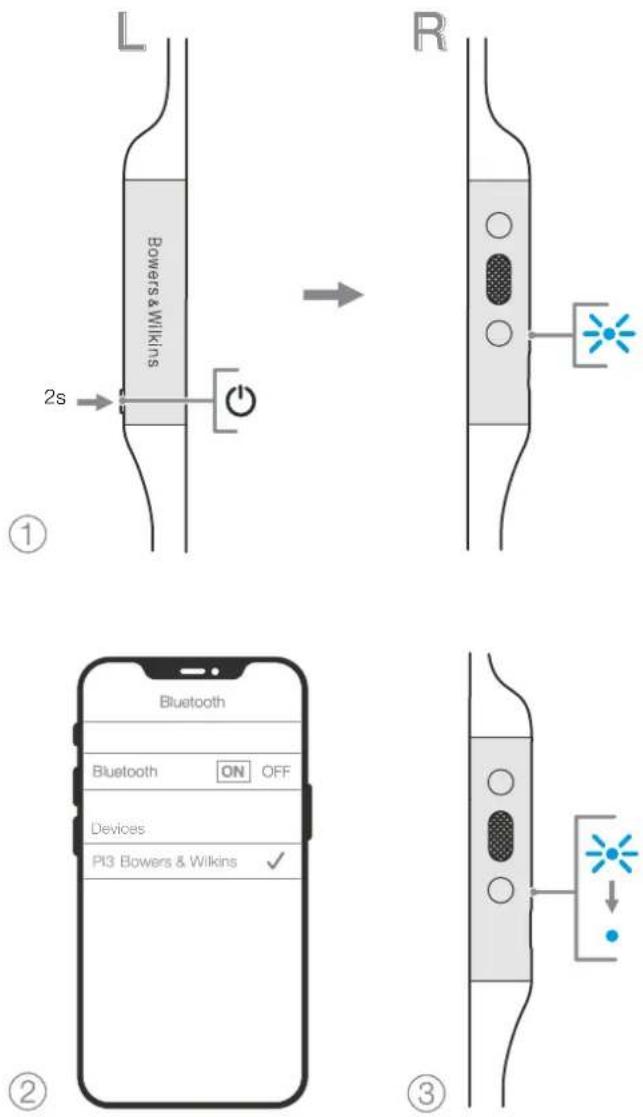
Diagram 6 Bluetooth pairing
6. Power Cycle and Reset
6.1 Power Cycle
You can power cycle your PI3, simultaneously hold the Volume + and Volume - buttons for 10 seconds until the indicator LED extinguishes, let go when the indicator lights up again. Rebooting your headphones will not reset their internal settings or clear the paired device history.
6.2 Reset to Default
You can clear the paired device history and restore all settings to their defaults. With PI3 powered on, simultaneously hold the Volume +, Volume - and Power buttons for 10 seconds until the indicator LED extinguishes, let go when the indicator lights up again, the headphones will be ready to pair to a device. Alternatively, you can reset from the Bowers & Wilkins Headphones app, please see Reset under Settings in the app
7. Care & Maintenance
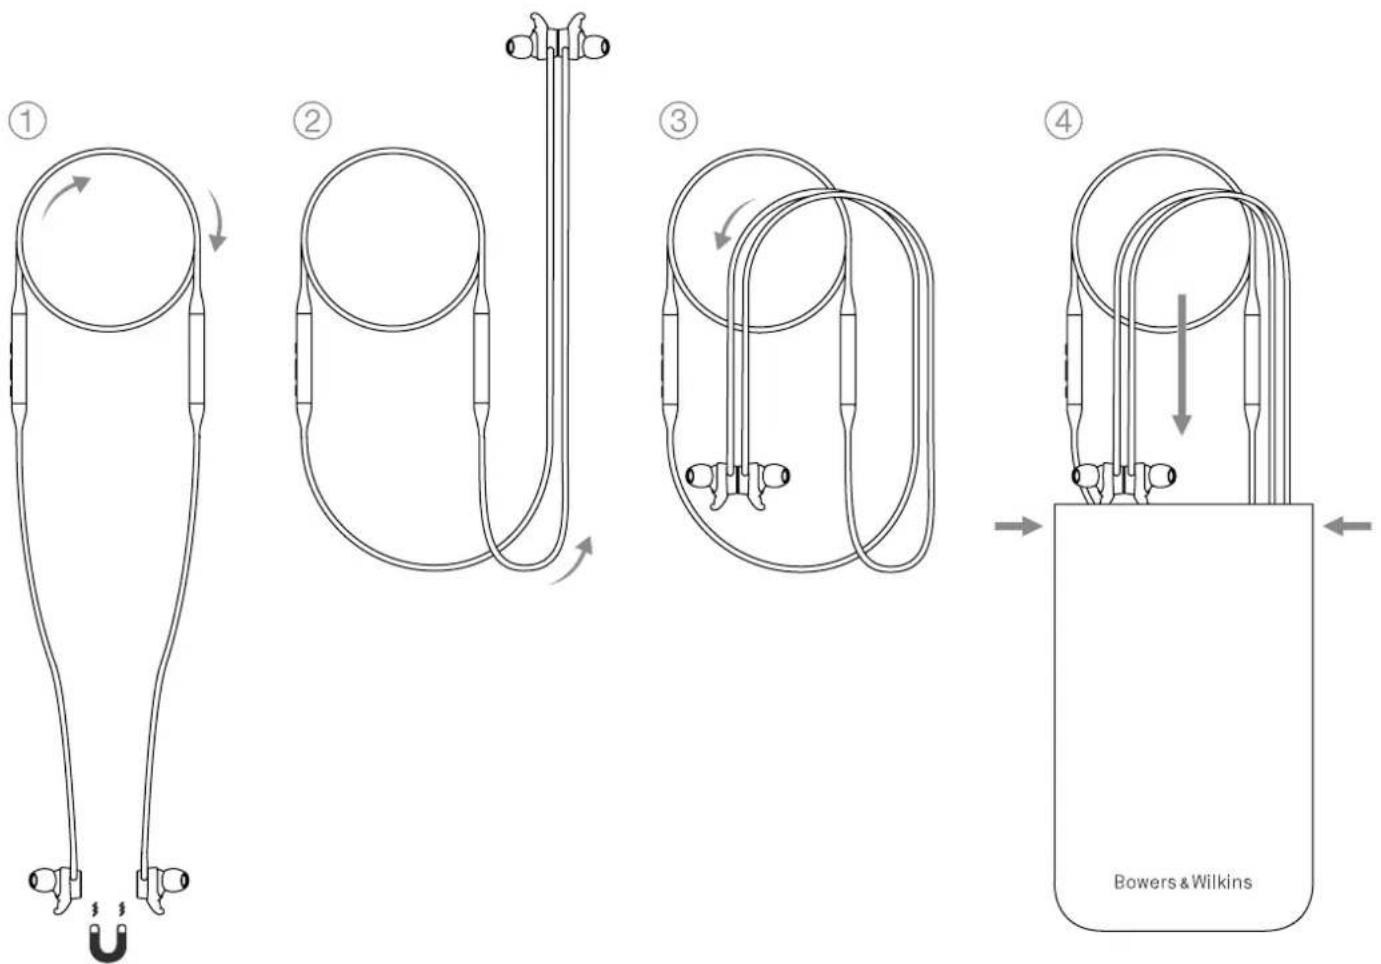
7.1 Storing Your PI3
Taking care of your PI3 will ensure they continue to deliver the best performance and experience.
When not used, stow your headphones using the included storage pouch, see Diagram 7. It is recommended the headphones are first powered off:
- With the headphones not worn, take the neckband and form a single loop.
- Bundle the loop and control units together in one hand. With the free hand, clip the earpieces together and loop the earbuds over the bundle.
- The opening of the pouch can be pinched open, slide the headphones in, then ensure the opening is closed and no parts of the headphones are sticking out.
7.2 Cleaning Your PI3
Your PI3 can be cleaned by a soft, damp microfiber cloth, gently wipe or dab clean. Removable pieces such as ear tips and stabiliser fins should be taken off and cleaned separately.
If you notice wax and residue accumulation on the sound tubes, take a cotton swab or soft brush and gently wipe away.
- Do NOT aggressively rub or use an abrasive tool to clean.
- Do NOT use paper towels, napkins or tissue as they will leave residue.
- Do NOT use cleaning detergents, soapy water, polish or chemical cleaners.
- Do NOT wash or submerge all or parts of the headphones in liquid.
8. Support
Should you require further help or advice regarding your PI3 please visit the Headphones support site here www.bowerswilkins.com/support.
flowchart
graph TD
    A["① Body Position"] --> B["② Tendon Insert"]
    B --> C["③ Tendon Pulling"]
    C --> D["④ Bower & Wilkins Placement"]
    style A fill:#f9f,stroke:#333
    style B fill:#ccf,stroke:#333
    style C fill:#cfc,stroke:#333
    style D fill:#fcc,stroke:#333
Diagram 7
Storing your headphones
Specifications
Wearing Style Bluetooth Wireless In-Ear Headphone
Technical Features World-first fully active 2-way wireless earbuds
Magnetic Cliping Earpieces
Bluetooth 5.0 with aptX-Adaptive technology
USB-C charging and audio interface
Bluetooth Codecs AptX-Adaptive
AptX-HD
AptX-Classic
AAC
SBC
Bluetooth Profiles A2DP v1.3.1
AVRCP v1.6.1
HFP v1.7.1
HSP v1.2
BLE GATT (Generic Attribute Profile)
Drive Units 2 x ø 9.2mm full range
2 x Balanced Armature
Microphones 1x mics for telephony (CVC1 - Clear Voice Communication v1)
Frequency Range 10Hz to 30kHz
Distortion (THD) <0.3% (1kHz/10mW)
Battery Type Rechargeable Lithium Polymer
Battery Life & Charging 8 hrs Bluetooth, 2hrs with 15min charge
Inputs Bluetooth, USB-C audio
In Box Accessories 20cm USB-A to USB-C cable, Storage Pouch, Ear Tips (S, M, L) & Stability Fins (S, M, L)
Weight 31 grams
Environmental Information
This product complies with international directives, including but not limited to the Restriction of Hazardous Substances (RoHS) in electrical and electronic equipment, the Registration, Evaluation, Authorisation and restriction of Chemicals (REACH) and the disposal of Waste Electrical and Electronic Equipment (WEEE). Consult your local waste disposal authority for guidance on how properly to recycle or dispose of this product.
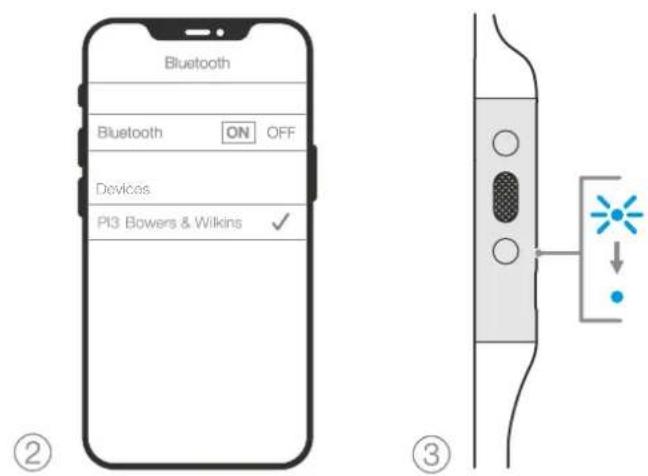
Figure 6 Jumelage Bluetooth
flowchart
graph TD
    A["① Body Position"] --> B["② Tube Placement"]
    B --> C["③ Tube Placement"]
    C --> D["④ Bowers & Wilkins Storage"]
natural_image
Anatomical illustration of the human ear with directional arrows indicating movement or force (no text or labels present)natural_image
Three-step illustration of a hand holding an earpiece, showing head, jaw, and ear (no text or symbols)natural_image
Anatomical illustration of the human ear with directional arrows indicating movement or force (no text or labels present)natural_image
Diagram showing a pair of earbuds, one with a handle and the other with a curved blade (no text or symbols)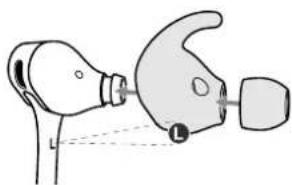
natural_image
Diagram of a medical device with a bulb and connector, showing no text or symbolsflowchart
graph TD
    A["① Body Position"] --> B["② Tube Placement"]
    B --> C["③ Tube Placement"]
    C --> D["④ Bowers & Wilkins Storage"]
natural_image
Anatomical illustration of the human ear with directional arrows indicating movement or force (no text or labels present)natural_image
Illustration of two types of earbuds with directional arrows indicating motion (no text or symbols)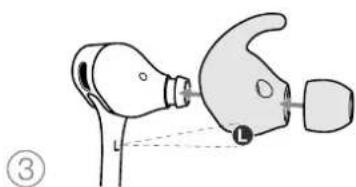
natural_image
Diagram of a medical device with a bulb and connector, no text or symbols present5. Connessione Bluetooth
5.1 Abbinamento
2 x Balanced Armature
natural_image
Anatomical illustration of the human ear with directional arrows indicating movement or force (no text or labels present)natural_image
Diagram of a pair of earbuds, one with a handle and the other with a curved blade (no text or symbols)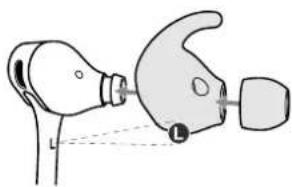
natural_image
Diagram of a medical device with a bulb and connector, showing alignment lines (no text or symbols)natural_image
Anatomical illustration of the human ear with directional arrows indicating movement or force (no text or labels present)natural_image
Three-step illustration of a hand holding an earpiece, showing head, jaw, and jawhead positioning (no text or symbols)2 x Balanced Armature
natural_image
Anatomical illustration of the human ear with directional arrows indicating movement or force (no text or labels present)natural_image
Three-step illustration of a bird vocal head with earphones and beak, showing head positioning and tail insertion (no text or symbols)flowchart
graph TD
    A["Step ①: Initial cable with loop"] --> B["Step ②: U-shaped tube with connecting rod"]
    B --> C["Step ③: U-shaped tube with connecting rod"]
    C --> D["Step ④: Bowers & Wilkins device with cable and connector"]
natural_image
Anatomical illustration of the human ear with directional arrows indicating movement or force (no text or labels present)natural_image
Three-step illustration of a hand holding an earpiece, showing head and jaw positions (no text or symbols)natural_image
Anatomical illustration of a human ear with directional arrows indicating movement or force (no text or labels present)図5 ヘッドフォンの装着
natural_image
Three-step illustration of a bird vocal head with earphones and beak, showing head positioning and motion (no text or symbols)5. ブルートウース接続
natural_image
Anatomical illustration of the human ear with directional arrows indicating movement or force (no text or labels present)그림 5 헤드폰 착용 방법
natural_image
Three-step illustration of a bird vocal head with earphones and beak, showing head positioning and tail insertion (no text or symbols)5. 블루투스 연결
5.1 르루투스 페어링
Bluetooth v5.0 aptX Adaptive
2x Balanced Armature

- Welcome to Bowers & Wilkins and PI3
- PI3 Carton Contents
- Getting to know your PI3
- Switching Headphones On and Off
- Switching On
- Switching Off
- Headphone Controls
- Status Indicator
- Battery Charging and Power Saving
- To charge:
- Auto Power Off
- Wearing Your Headphones
- Bluetooth Connection
- Pairing
- Multiple Bluetooth Connections
- Disconnect from a Device
- Setting Up Headphones with the App
- Headphone Software Updates
- Power Cycle and Reset
- Power Cycle
- Reset to Default
- Care & Maintenance
- Storing Your PI3
- Cleaning Your PI3
- Support
- Specifications
- Environmental Information
- Connessione Bluetooth
- Abbinamento
- ブルートウース接続
- 블루투스 연결
- 르루투스 페어링
Brand : BOWERS & WILKINS
Model : PI3
Category : Earphones