SG 65 - Croque monsieur clip STEBA - Free user manual and instructions
Find the device manual for free SG 65 STEBA in PDF.

| Product type | Sandwich press / Multifunctional snack appliance |
| Brand | Steba |
| Model | SG 65 |
| Usage | Private, non-commercial |
| Power supply | 220-240 V, 50/60 Hz |
| Power | 1200 W (estimated) |
| Dimensions (approx.) | 30 x 25 x 12 cm |
| Weight (approx.) | 2.5 kg |
| Housing material | Plastic and metal |
| Plate coating | Non-stick |
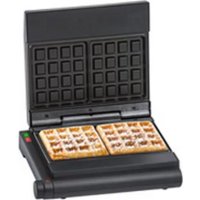
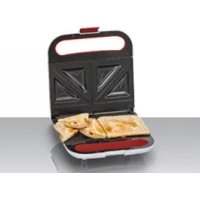
| Plates included | Sandwich, grill, waffles |
| Number of plates | 3 pairs (6 plates) |
| Functions | Grill, waffles, sandwiches, snacks |
| Indicator lights | Red LED (heating), Green LED (ready) |
| Safety distance | 10 cm from wall, 70 cm from flammable materials |
| Cleaning | Removable plates hand washable; housing wiped with a damp cloth |
| Cable length (approx.) | 1 m |
| After-sales service | Contact Steba (address on packaging or manual) |
Frequently Asked Questions - SG 65 STEBA
User questions about SG 65 STEBA
0 question about this device. Answer the ones you know or ask your own.
Ask a new question about this device
Download the instructions for your Croque monsieur clip in PDF format for free! Find your manual SG 65 - STEBA and take your electronic device back in hand. On this page are published all the documents necessary for the use of your device. SG 65 by STEBA.
USER MANUAL SG 65 STEBA
Multi-Snack-Maker „3 in 1"
SG 65
Instructions for use 12
Mode d'emploi 22
This appliance is for private and indoor use only and must not be used commercially. Please read the instruction manual carefully and keep it at a safe place. When the appliance is given to another person the instruction manual should be passed to that person, too. Only use the appliance as described in the instruction manual and pay attention to the safety information. No liability for damages or accidents will be accepted, which are caused by not paying attention to the instruction manual. Remove all packaging and sticker. Wash up all parts carefully (see cleaning).
Safety information
Hot surface! There is danger of burning when touching the surface during operation. Set the back of the device with a distance of 10cm to the kitchen wall.
- Connect and operate the appliance in accordance with the specifications shown on the rating label.
- Do not use if the plug cord is damaged. Verify before every use.
- Do not plug with wet hands.
- Connect the power plug to a properly installed and easily accessible socket only.
- To unplug the power plug, always pull the plug – not the cable.
- Plug off the appliance after each use or in case of failure.
- Do not pull at the cord. Don't pull it over edges and don't bend it too much.
- Keep the cord away from hot parts.
The appliance can be used by children aged 8 and above and persons with limited physical, sensory or mental capabilities or lack of experience/knowledge, provided that are supervised or have been provided with instruction in the safe use of the appliance and have understood the resulting dangers. Children must not use the packaging as a toy. Cleaning and user maintenance must not be carried out by children unless they are 8 years or older and are supervised.
Children under the age of 8 must be kept away from the appli
ance and the connecting cable.
-
Children should be supervised to ensure that they do not play with the appliance or packaging material (e.g. Plastic Bags).
-
The appliance must not be operated using a timer or a separate remote system!
-
Never leave the appliance unattended when in use.
-
Do not leave the appliance outdoors or in a damp area.
-
Never immerse the unit in water.
-
Leave a space of about 10cm around the device.
-
Never use the device after a malfunction, e.g. if it felt down or has been damaged in any other manner.
-
The manufacturer is not liable for damage which is occurring due to the usage of the appliance in a different way as described or a mistake in the handling has been made.
-
To prevent injury, repairs such as replacing a damaged cord, should only be carried out by a customer service. Only original spare parts have to be used.
-
The device gets hot, only transport after it cooled down.
-
Only use the device as described in this manual.
-
You must not put any materials such as paper, cardboard, plastic etc. into the appliance.
-
This appliance is intended to be used in household and similar applications such as:
o staff kitchen areas in shops, offices and others working environments
o by clients in hotels, motels and other residential type environments
o bed and breakfast type environments.
- Before initial use: clean all parts carefully and leave to dry. Heat up the device for about 15 min. to eliminate the smell of newness.
Attention! Housing and glass get hot. Danger of burns! Do not place the appliance on a sensitive surface (e.g. painted furniture) and keep a distance of at least 70cm
to burnable materials.
- During operation steam emerge. Keep hands and face away. Watch out for steam during cooking. Take appropriate distance to wall cupboards to avoid damage of the veneer.
- If an extension cable is used, it has to have a cross-section of 1.5mm^2 . A cable drum must always be unwound.
- If a GS-tested 16 A multi-pin extension is used, it may not be charged with more than 3680 watts due to fire hazard.
- Make sure that children do not tease the cable or that a trip hazard occurs.
- The device must always be disconnected from the power supply if it is not supervised and before assembling, disassembling or cleaning.
Hot steam may leave between the plates. Never place any wet food into the device, thaw frozen food slightly. Hygiene: Please always clean the device to avoid bacteria and mold formation.
Cleaning
-
Attention! Pull the plug before cleaning and allow the device to cool down.
-
Never immerse the unit into water.
-
Remove plates from the device and clean only with a dishwashing brush and detergent. Do not use abrasive cleaners, saponified steel wool or metal scrapers, otherwise the non-stick coating will be damaged.
- For the cleaning of the device surface and all other parts such as handles, adjustable hinges, etc., a damp cloth is sufficient, possibly with a small amount of detergent. No warranty claim can be made for cuts or scratches on the coating caused by use.
Workplace
Important:
Never place this device on or next to hot surfaces (e.g. hot stoves). Only use it on a even, stable and a heat resisting surface. It is important that no inflammable items are near to the device. Do not place the device on the edge of the table so that it cannot be touched by children or fall down when touched.
Before the first use:
Oil the grill slightly before the first use. Then heat up the device for about 10 min with closed lid and without food. Afterwards clean the plates with a humid cloth.
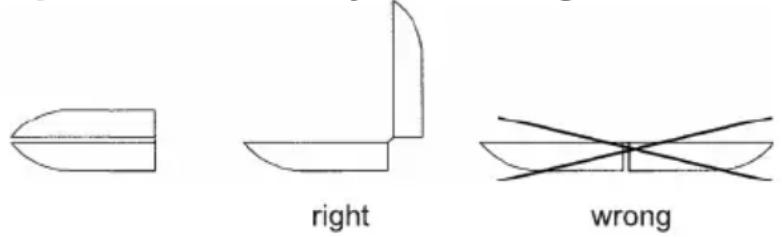
Open the device only in a 90^ angle, otherwise the hinge will break.
Changing the plates
- Unplug the device.
- Allow the device to cool down.
- Press the release buttons on each side and then pull the plates out of the device.
- For resetting the plates, put the two tabs into the recess on the back and press the plates into the device until you hear a noise.
The supplied plate sets allow you to use the device as follows:
- Sandwich plates: preparation of toasts and sandwiches
- Grill plates: for grilling
- Waffle plates: for baking waffles
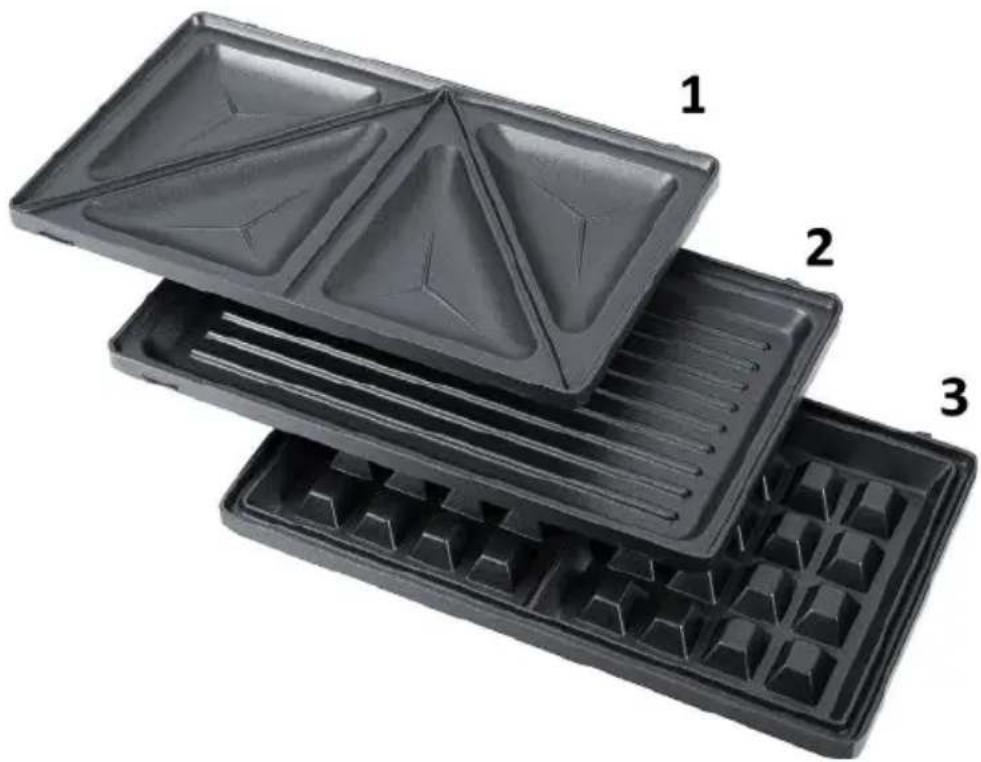
Always use only the matching plate sets!
Food preparation
(grilling, waffles, sandwiches)
- Connect the device according to the type plate.
- The red LED lights up, the device heats up.
- If the green LED lights up, the optimum temperature is reached.
- Put the food in the appliance and close the lid.
The closure clip on the handle should always be closed while preparing sandwiches.
The green LED clocks during the cooking time, the thermostat is working. - Once the snack is ready, remove it with a wooden or plastic spatula. Do not use metal objects or cut on the surface.
- If the green LED lights up again, the next snack can be inserted.
- Disconnect the power plug after use.
Sandwiches:
- Preheat the closed device with sandwich plates.
- Prepare the sandwiches: the slices of toast must not be larger than the sandwich surface of the plate.
- The topping should be cut slightly smaller than the toast, so that not too much cheese leaks.
- Spread the side of the toast which has contact with the plate with some butter, this will make the toast golden brown.
- Place the sandwiches on the preheated plates, close the lid and fix with the clip.
- Check the degree of browning after 4 - 5 minutes and if necessary, increase the time.
- Remove the sandwich with a non-metallic object.
Waffles:
- Preheat the closed device with waffle plates.
- Pour approx. 14 cup of waffle dough onto each waffle field.
- Do not use too much dough, as this may cause overflowing or burning.
- Close the lid, but do not clip it.
- Check the degree of browning after 7 - 8 minutes.
- If the waffle does not stick to the waffle plate anymore, it should be ready and can be removed with a non-metallic object.
- Close the lid, as soon as the green LED lights again the next waffle can be baked.
Grilling:
- Preheat the closed device with grill plates.
- Put the food on the grill and close the lid, but do not clip it.
- Open after 5 - 7 minutes and turn the food.
- If the desired degree of browning is achieved, remove the food with a non-metallic object.
- Panini and other products that do not have a high fat content can be prepared with these plates.
- The plates have no fat drain!
Recipe Suggestions
Slightly spread the toast with butter or margarine on the outside!
Hawaii-Toast
Cooked ham in thin slices
Chives
- Cheese in thin slices
- Small cut pineapple
Paprika
- Toast
Spread the toast with ham cheese and pineapple. Wash and chop the chives. Then, season, cover with a 2^nd toast and put in the device for about 5 minutes.
Italian Toast
- Basil pesto
- Parma ham slices
Tomatoes
Salt pepper - Mozzarella in thin slices
- Toast
Spread the toast thinly with pesto inside. Place the ham, tomato and mozzarella evenly and season. Cover with a 2^nd toast and put in the device for about 5 minutes.
Greek Toast
Feta cheese
- Garlic or garlic powder
Salt pepper
- Olive oil
Oregano
·Minced olives
- Skinned pepper
- Toast
Squash the feta cheese with a little olive oil and place it on the toast with the remaining ingredients. Cover with a 2^nd toast and put in the device for about 5 minutes.
Italian Steak
Thin rump steak slices
Oil
Italian herbs
Pepper
Oil the steak, season and grill until the desired cooking point is reached.
Lamp or Pork Medallion
Thin lamb or pork medallions
Oil
Garlic
Rosemary
Place medallions in garlic and oil, sprinkle with rosemary and grill until desired.
Hamburger
·Minced meat
- Onion
- Egg
Salt, pepper
Mix the minced meat with the remaining ingredients and form into flat hamburgers. Approximately grill for 5 - 7 minutes without opening the appliance.
Waffles
Spread the waffle dough on the waffle plate with a spoon (do not fill to the brim). Close the device and bake the waffle according to the recipe. During baking, the appliance should remain closed.
Classic Waffles
- 300 gr. Flour
· 12 I of milk - 75 gr. sugar
- 100 gr. butter
2 eggs - 10 gr. Baking powder
- Pinch of salt
Mix the flour and baking powder in a bowl. Add salt, sugar, melted butter and eggs. Slowly add the milk. The dough should rest for one hour.
Sand Waffles
- 200 gr. Butter
250 gr. Sugar
4 eggs - 1 sachet vanilla sugar
- Grated peel of an untreated lemon
·125 gr.flour - 125 gr. Cornflour
- 1 tbsp rum
Beat the butter with the sugar and eggs until frothy. Add the vanilla sugar and the lemon peel. Gradually add the flour. Finally, stir in the rum. The dough should be thick.
Belgian Waffles
- 500 gr. Flour
- 150 gr. Butter
- 6 eggs
- 50 gr. Sugar
- 1 pinch of salt
· 3 14 I of milk - 1 tsp orange or rum aroma
Mix the flour with the sugar, salt, melted butter and egg yolk. Gradually add the milk to make a smooth dough. Now add the flavour, beat the egg whites until stiff and lift gently under the dough. Bake the dough immediately.
Correct Disposal of this product
This marking indicates that this product should not be disposed with other household wastes throughout the EU. To prevent possible harm to the environment or human health from uncontrolled waste disposal, recycle it responsibly to promote the sustainable reuse of material resources. To return
your used device, please use the return and collection systems or contact the retailer where the product was purchased. They can take this product for environmental safe recycling.
Packaging disposal: Do not throw away the package materials. Please put it in the recycling bin.


Gift box: Paper, should be put to the old paper collection point. Plastic packaging material and foils should be collected in the special collection containers.
Service and Repair:
If the appliance must be repaired, please get in touch with your trader or with the manufacturer:
(grillen, wafels, broodjes)
Lamp or Pork Medallion
Dunne lams- of varkensmedaillons
Olie
Knoflook
Rosemary