Scala Plus 1661 - Coffee grinder Solis - Free user manual and instructions
Find the device manual for free Scala Plus 1661 Solis in PDF.


User questions about Scala Plus 1661 Solis
0 question about this device. Answer the ones you know or ask your own.
Ask a new question about this device
Download the instructions for your Coffee grinder in PDF format for free! Find your manual Scala Plus 1661 - Solis and take your electronic device back in hand. On this page are published all the documents necessary for the use of your device. Scala Plus 1661 by Solis.
USER MANUAL Scala Plus 1661 Solis
PASSO 2: MACINARE I CHICCHI DI CAFFÉ
Please read through this user manual thoroughly before using your Solis Scala Zero Static coffee grinder, so that you become familiar with your appliance and can use it safely. We thoroughly recommend that you keep these instructions and, if you pass the appliance on, that you also hand these instructions to the new owner.
For your own safety, please observe the following safety measures when using electrical appliances:
- To prevent electric shock, neither the appliance nor the power cord and the power plug must come into contact with water or other liquids. Protect the appliance against splashes or rain. Danger of electric shock! Should the appliance while connected to the power resp. the power cord or the power plug come into contact with liquid, use dry rubber gloves to immediately pull the power plug out of the socket. Do not use the appliance again until you have had it's ability to function safely checked by Solis or a Solis approved service centre.
- Never operate the appliance resp. pull or connect the plug with wet or moist hands or feet.
- Before using the appliance, check if the voltage stated on the type plate of your appliance matches your mains voltage. We do not recommend operating the appliance with a multiway plug adapter.
- Do not let the power cord hang over table edges to prevent the appliance from being pulled down. Make sure that neither the appliance nor the cable or plug comes into contact with hot surfaces, e.g. a hotplate or a radiator.
- After use, always place the mains cable in the cable storage compartment in the base of the appliance after the appliance has cooled down; never wrap the cable around the appliance.
GB
- Keep the appliance away from hot gas, hot ovens and other heat-emitting appliances or heat sources. Never use the appliance on a hot or wet surface. Never place the appliance near moisture, heat and naked flames. Keep the appliance away from moving parts or appliances.
- Never carry the appliance by the power cord and do not place anything on the power cord. Never pull on the power cord to disconnect the appliance from the power mains. Only pull on the plug.
- We recommend that you do not use an extension cable with this appliance. Do not place the appliance directly underneath a power socket.
- Before you unplug the appliance from the mains, please always check the appliance is not in operation.
- In use, the appliance must always be on a flat, clean, stable, dry surface such as a table or a work surface. The appliance must not be close to the edge.
- The appliance is not designed for outdoor use. Do not use in vehicles or on boats.
- Never cover the appliance with cloths or the like while it is in use.
- Always pull the power plug while the appliance is unsupervised or out of use or if it needs to be disassembled, reassembled or cleaned. We recommend the use of a residual current device (RCD safety switch) to ensure additional protection during the use of electrical appliances. It is advisable to use a safety switch with a rated residual operating current of 30mA maximum. For professional advice consult an electrician.
- Do not make any adjustments to the appliance, cable, plug or accessories.
- Improper use creates the risk of injury! No liability is assumed in the case of potential damages or injuries.
GB
- Never take hold of an appliance that has fallen into water or another liquid. Always use dry rubber gloves to pull the power plug before taking it out. Do not use the appliance again until you have had it's ability to function safely checked by Solis or a Solis approved service centre.
- Never place the appliance in such a way that it might fall into water or come into contact with water or another liquid (e.g. in or next to a sink).
- Never submerge the appliance, power cable or plug in water, or bring it into contact with water or other liquids.
- Place the appliance so that it is never exposed to direct sunlight.
- Never put sharp or pointed objects and tools into the appliance openings. The appliance may become damaged - danger of electric shock!
- Do not shake or move the appliance while it is in use. Never relocate the switched-on appliance!
- Only use the appliance as described in this manual. Only use with the provided accessories or accessories recommended by Solis, incorrect accessories or misuse can lead to damage of the appliance, fire, electric shock or personal damage.
- CAUTION: In order to avoid a hazard due to inadvertent resetting of the thermal cut-out, this appliance must not be supplied through an external switching device, such as a timer or a remote, or connected to a circuit that is regularly switched on and off by the utility.
- This appliance is only for household use and is not suitable for commercial use.
- Remove and discard all packaging materials and potential stickers or labels before using the appliance for the first time.
-
Check your coffee grinder before each use and ensure that the appliance, power cord and plug are not damaged.
-
To prevent electric shock, do not use the appliance if mains cable or power plug are damaged or if the appliance has other faults, has fallen down or is damaged in any other way. Never attempt repairs yourself, but take your appliance to Solis or a Solis approved service centre in order to get it inspected or mechanically and electrically repaired, in order to avoid a hazard.
- People with limited physical, sensorial or mental capabilities as well as unknowing or inexperienced people must not use the coffee grinder except when supervised or thoroughly instructed on how to use the appliance by a person responsible for their safety. Additionally, they must be aware of the dangers arising from the appliance and know how to operate it safely. Under no circumstances this appliance shall be used by children. Keep the appliance and its cord out of reach of children.
- Children must be supervised to prevent them from playing with the appliance.
-
Only switch on the coffee grinder:
-
If the bean container has been correctly attached to the appliance and locked to the grinder
- If the lid is firmly fitted to the bean container
-
If the empty ground coffee container with its lid has been pushed into the appliance
-
ATTENTION: During operation, never remove the lid from the bean container or reach into the bean container with your fingers, hands or kitchen utensils; also keep hair, clothing and jewellery away from the container.
- The appliance is suitable for grinding whole coffee beans. Do not place ground coffee beans or ground coffee in the bean container! Do not use the coffee grinder for grinding grains, fruit, fruit stones, poppy seeds or nuts etc.!
GB
- Do not undertake more than four grinding processes of 1 minute maximum in succession. In this situation leave the appliance to cool for 20 minutes after the fourth grinding process before you place it back in operation (see section "Overheating protection" on page 77 of this manual).
- The conical burrs are sharp, it needs to take care when handling the sharp cutting blades, emptying the bean container and during cleaning.
- Do not place or position any objects on the appliance.
- Always unplug from the mains before you remove the lid from the bean container or remove the entire bean container from the appliance.
- Always switch the appliance off with the Start/Stop button and disconnect the power plug when not using the appliance or left unattended. Then let the appliance cool down completely before assembling, disassembling, cleaning, changing accessories, approaching parts that move in use or moving the appliance.
- Pull the plug after every use. Only then, the appliance is fully switched off.
- Keep the appliance clean. Always switch the appliance off and pull the plug from the power socket before cleaning and storing the appliance. Please refer to the notes given in the section "Cleaning and care" on page 77 of this manual.
- Always fully unwind the power cord before connecting the power plug to the power socket.
- It is not necessary to use oils or lubricants on this appliance.
- Repairs to this appliance, including mains cable replacement, may only be carried out by authorised service agents. Improper repair work can be a source of danger to appliance users.


GB
APPLIANCE DESCRIPTION
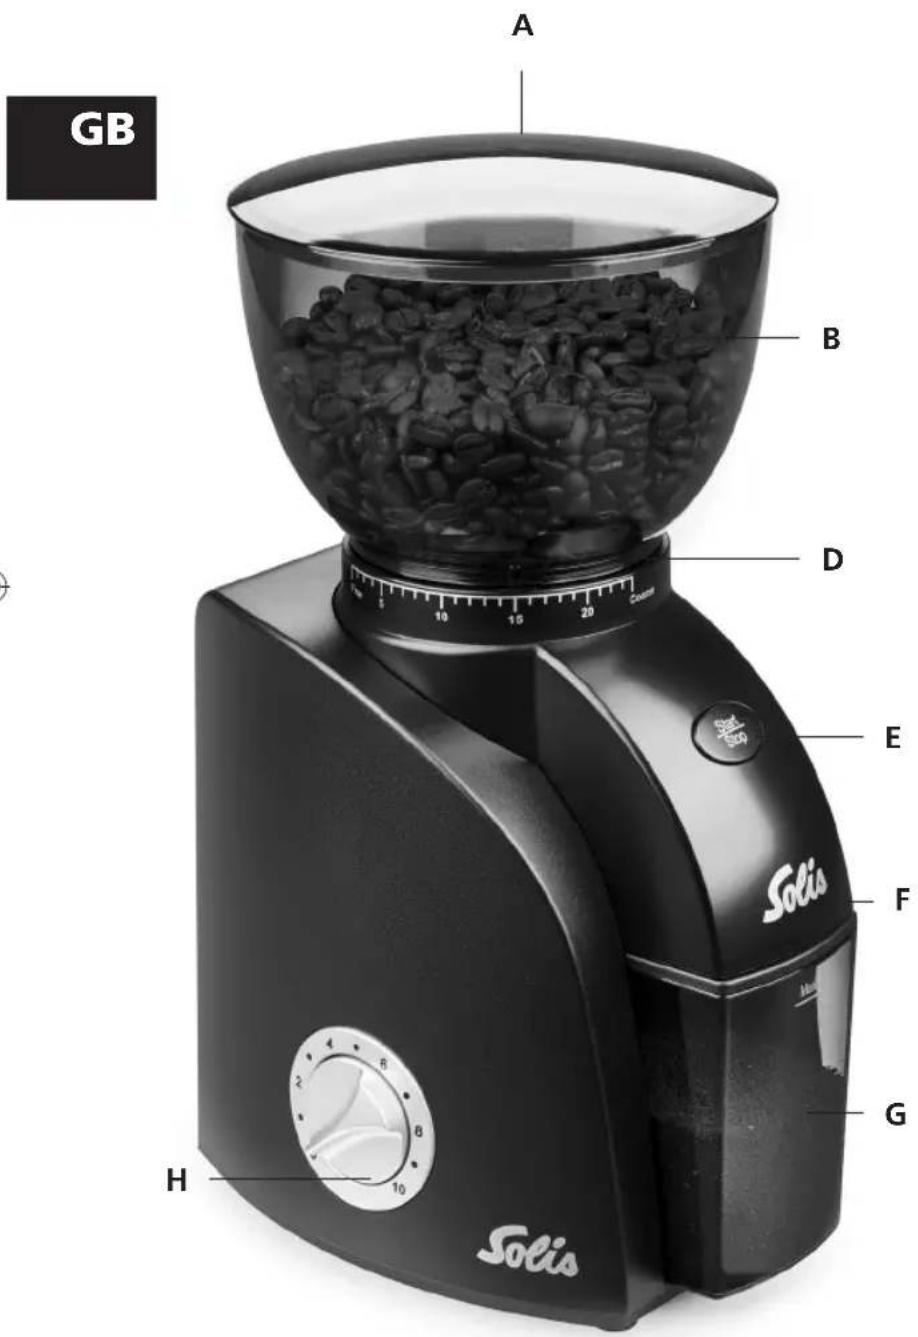
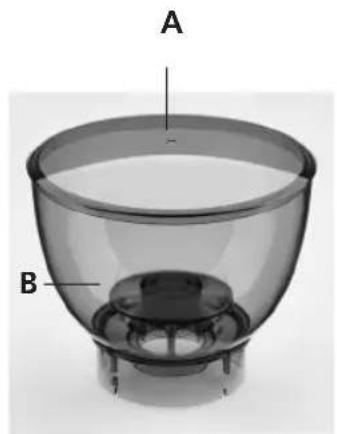
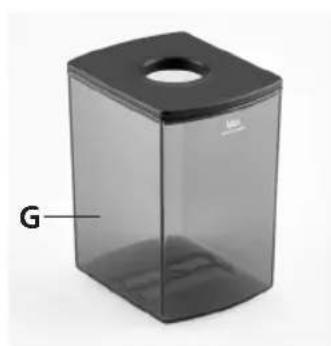
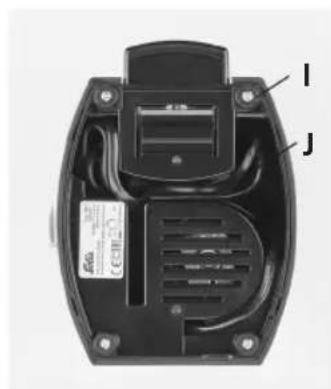
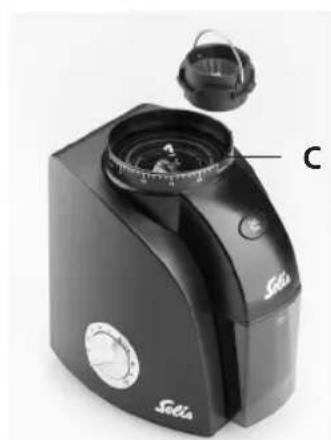
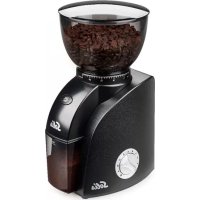
APPLIANCE DESCRIPTION
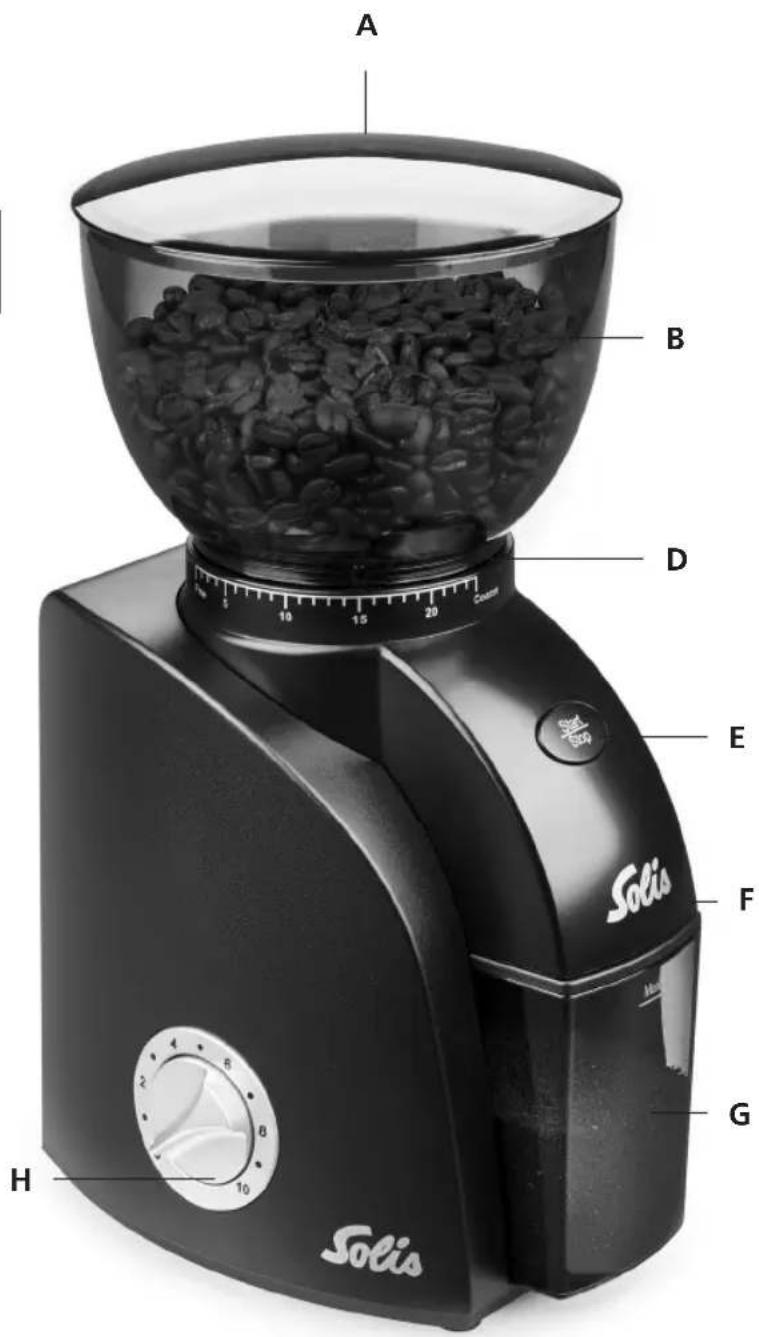
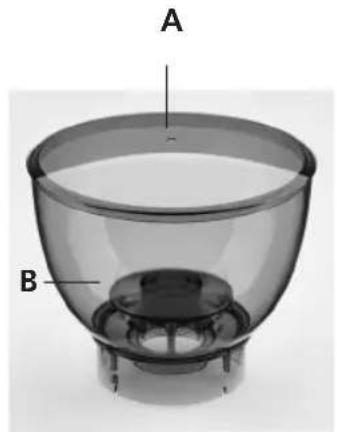
A Bean container lid made from UV-filtering plastic Closes the bean container to keep the coffee beans fresh.
B Bean container made from UV-filtering plastic
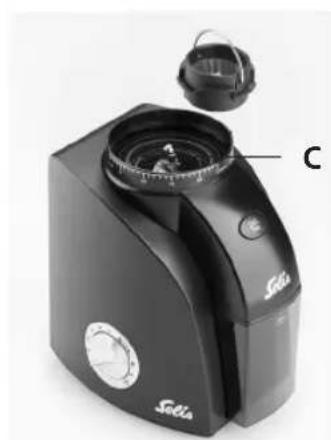
C Conical burrs made of hardened stainless steel Guarantees precise grinding to suit the setting for the grind; the upper conical burr can be removed for cleaning.
D Grind selector 24 different settings are possible - from "Fine" to "Coarse"; the area to the right beside "Coarse" is the unlocking zone for the bean container.
E Start/Stop button For starting and manually ending the grinding function.
F Ground coffee outlet
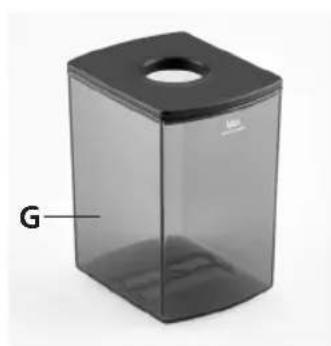
G Ground coffee container with lid and Max mark Collects the ground coffee.
H Timer control Using the Timer control you can define the quantity of ground coffee and adjust it to your needs: short time setting for less ground coffee, longer time setting for more ground coffee. At setting 10 the appliance grinds for 60 seconds.
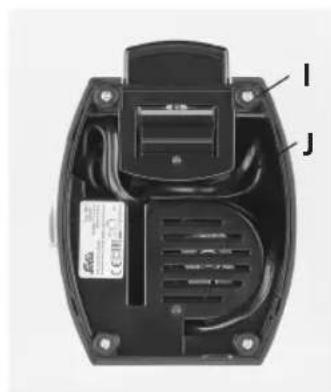
I Non-slip rubber feet
J Mains cable opening and cable storage compartment in the base of the appliance
K Cleaning brush (not shown)
▲ THE ADVANTAGES OF YOUR SOLIS SCALA ZERO STATIC COFFEE GRINDER
- Your Scala Zero Static coffee grinder is equipped with hardened stainless steel conical burrs and can effortlessly grind entire coffee beans to suit all the possible ways of preparing coffee, from the finest grind setting (Fine) for real espresso, to the coarsest grind setting (Coarse) for a coffee from a French press or for filter coffee.
- The quantity of ground coffee is controlled by an electronic timer. The quantity can be adjusted specifically by turning the Timer control on the side and defines how long the grinder is in operation. On setting 10 the grinder grinds for 60 seconds, on setting 5 it grinds for 30 seconds etc.
- You will need a different grind setting for each type of preparation, depending on whether you are preparing your espresso using an espresso machine or in an espresso maker, or you are preparing your coffee in a French press or a classic filter coffee machine. Each type of preparation requires a different grind for the optimal extraction of the coffee. With your Solis Scala Zero Static you can choose from a large number of grinds to suit your taste. By turning the bean container it is possible to set a total of 24 different grinds.
- The built-in ion generator eliminates the static charge that is created during the coffee grinding process almost completely. This prevents ground coffee from escaping and sticking to surfaces when the ground coffee container is opened.
- Carefully remove the appliance from the packaging and remove all stickers (except the type plate), labels, information sheets and packaging materials.
- Pull out of the appliance the ground coffee container with its lid.
- Turn the bean container clockwise to the stop (such that the two marks on the bean container and on the appliance housing are opposite each other) and lift off the bean container with its lid.
- Clean the bean container and the ground coffee container and their lids in warm washing up water and rinse off everything carefully with clean water. Dry the parts.
- Wipe clean the appliance housing using a soft, slightly damp cloth and dry it.
- Completely uncoil the mains cable and place it through the mains cable opening on the base of the appliance.
- Push the dry ground coffee container with lid fitted into the appliance to the stop under the ground coffee outlet. The "Max" mark should point to the front so that it is visible.
- Place the appliance on a dry, flat, stable work surface and insert the mains plug in a suitable socket.
- Attention: The housing for the coffee grinder, the mains cable and the mains plug must never be immersed in water or other liquids, or come into contact with them!
- Note: The parts of the coffee grinder and the accessories are not suitable for dishwashers.
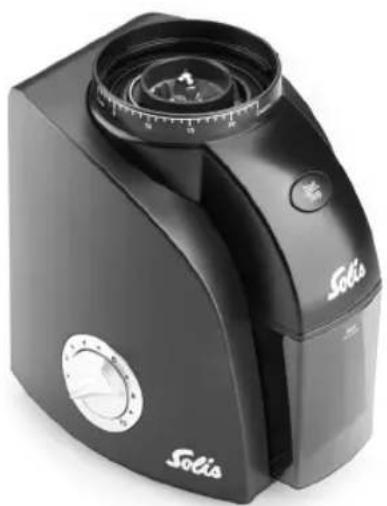
FITTING THE BEAN CONTAINER
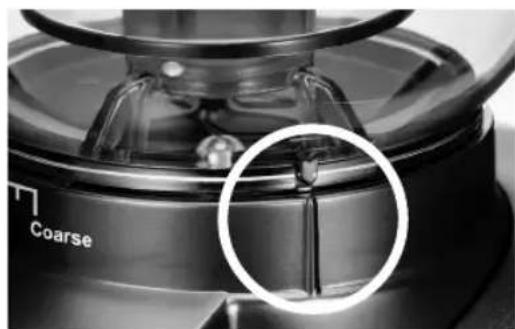
- Align the two lobes on the bean container with the slots on the container mounting or on the inside of the grind selector and press the bean container onto the appliance to the stop. The lug on the base of the bean container is over the mark on the right beside "Coarse".
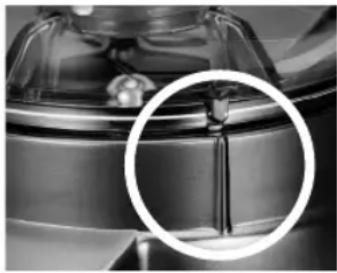
- Turn the bean container clockwise (to the right) to lock the container to the grinder. On turning the bean container you will hear slight "clicking" noises if the bean container is locked to the grinder and has been turned to the grind setting.
- Important: Check whether the bean container is sitting straight on the grind selector and press the bean container onto the housing to the stop. Only then turn to the right. If it is not possible to press the bean container down to the stop, check whether both lobes in the outermost ring on the bean container are in the mounting in the middle of the slots. Only then is it possible to fit and lock the bean container.
SETTING GRIND
- You can set the grind in the range of graduations and numbers from "Fine" to "Coarse". If you hear a slight "clicking" sound, the bean container is in the range for the grind setting. Turn the bean container counterclockwise or clockwise until the small arrow on the bottom of the bean container is over the required number/graduation on the grind selector. The higher the number, the coarser the grinding.
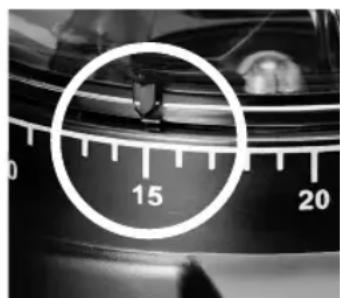
- For espresso coffee machines you need a fine grind (low number), for filter coffee machines a medium grind, for a French press a coarse grind (high number).
- Depending on the type of coffee beans, hardly any or only very little coffee may be ground if you select a very low grind (Fine). In this situation, select a coarser grind until the beans are ground and ground coffee is discharged. The "Fine" setting should be adequate for a good espresso.
- Attention: We recommend setting the grind before there are any coffee beans in the appliance. If the appliance is already filled with coffee beans, the grind is only allowed to be changed with the motor running. Note that a small quantity of ground coffee will be discharged before the required grind is achieved.

FILLING THE BEAN CONTAINER WITHBeans
- Now add the coffee beans to the container and fit the lid.
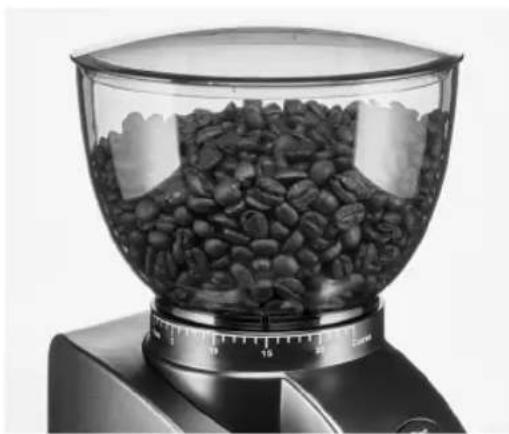

- Important: If you want to remove the bean container from the appliance again, you must first empty the beans. Only then turn the bean container counterclockwise to the unlocking zone until the lug on the base of the bean container is over the "Coarse" mark on the right and lift it off upward.
- The bean container has been fitted, the grind set and the coffee beans have been added. The ground coffee container with its lid has been pushed into the appliance.
1st STEP: SETTING QUANTITY OF GROUND COFFEE USING THE TIMER CONTROL
GB
-
Select the quantity of ground coffee required by turning the Timer control. The longer the time or the higher the number, the longer the appliance will grind and the greater the quantity of ground coffee. The shorter the time or the lower the number is, the less time the appliance will grind and the smaller the quantity of ground coffee. The maximum time that can be set is 60 seconds (setting 10).
-
Note: Make sure you turn the Timer control only to position 10 as a maximum. There you will notice a stop that must not be passed by applying force; this action would damage the timer. The costs that would be incurred for a repair are not covered by the guarantee.
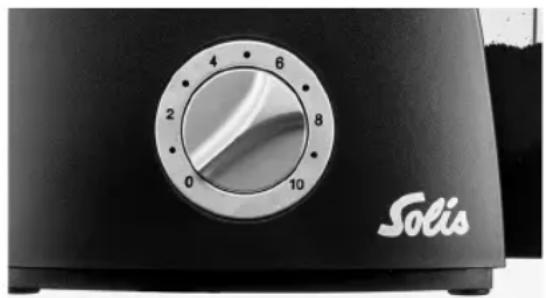
- Attention: Please ensure the ground coffee container is never overfilled. Depending on the grind set, this may occur already if the Timer control is set to setting 5. With a full ground coffee container, the build-up of ground coffee will cause the grinder to clog and the motor to overheat. If the Max mark on the ground coffee container is reached, immediately press the Start/Stop button and empty the ground coffee container before you start the grinding process again.
2ND STEP: GRINDING COFFEE BEANS
- Press the Start/Stop button and the grinding process starts. After the time set has elapsed, the appliance shuts down automatically.
- To interrupt the grinding process manually, you can press the Start/Stop button at any time.
- Attention: Never overfill the ground coffee container! As soon as the Max mark is reached, press the Start/Stop button and empty the container. On this issue, see the explanations at the end of step 1.
3RD STEP: REMOVING GROUND COFFEE
- Carefully pull the ground coffee container out of the appliance. The lid and the built-in ion generator prevent ground coffee from escaping. Carefully remove the lid and transfer the ground coffee to another container.
THE SAFETY FEATURES ON YOUR SOLIS SCALA ZERO STATIC:
- Stone safety device
Even high-quality coffees can contain very small stones among the beans; these stones can damage the grinder. To ensure this damage does not occur, your appliance is equipped with a stone safety device – a so-called clutch that prevents damage to the grinder. Should a stone enter the grinder, it will make its presence apparent by rattling loudly. Immediately switch off the appliance using the Start/ Stop button and unplug from the mains. Open the appliance as described in the section "Cleaning the conical burrs" on page 78 and remove the stone.
Overheating protection
If the appliance is overloaded and therefore overheats (e.g. on continuous operation lasting several minutes), the self-resetting overheating protection triggers and temporarily disables the appliance. Permanent damage to the motor is prevented using this protective feature. Once the appliance has cooled down again, it can be put into operation again by pressing the Start/Stop button.
CLEANING AND CARE
- Regular cleaning of the conical burrs helps to maintain consistent grinding performance, which is particularly important for the preparation of espresso.
CLEANING ACCESSORIES AND HOUSING
- Unplug from the mains before you start cleaning.
- Remove the lid from the bean container and empty out all beans by tipping the appliance. Then unlock the bean container and remove it (see page 75).
- Wash the ground coffee container and the bean container and their lids using warm washing up water and dry everything thoroughly.
- Clean the appliance housing using a soft, slightly damp cloth.
Notes: Do not use alkaline or aggressive cleaning agents, scouring sponges or steel wool – these could damage the surface of the appliance.
Do not place any parts of your coffee grinder or accessories in a dishwasher!
CLEANING THE CONICAL BURRS
A. Cleaning conical burrs once a week using GRINDZ™
- Once a week, place a pack of GRINDZ™ in the bean container instead of coffee beans and leave it to run through. Your coffee grinder is cleaned with natural products by using GRINDZ™. The tablets thoroughly remove coffee residue and coffee oils so that your grinder always remains clean and your coffee is always fresh and full of taste.
B. Cleaning after a few days without grinding or after 3kg of coffee beans
- The conical burrs should be cleaned as described in the following at the latest after approx. 3kg of coffee beans have been ground, or if it has not been used for a few days. In this way you will ensure the grinder always grinds consistently and evenly, which is particularly important for the preparation of espresso. Please ensure you only clean the conical burrs using the cleaning brush provided, never use liquids or water for cleaning. In general, the conical burrs should not come into contact with water or liquids.
- Unplug from the mains, remove the lid from the bean container, tip appliance and hold bean container over a container; allow beans to pour into the container. Refit lid to bean container.
- Plug back into the mains and press Start/Stop button. Grind until the grinder is empty. Switch off immediately as soon as the grinder is rotating empty.
- Unplug from the mains. Unlock bean container and remove (see page 75).
- Lift upward upper conical burr with the aid of the wire handle. Attention: Sharp edges!
- Clean upper conical burr and lower conical burr in the appliance using the cleaning brush.
- Clean coffee outlet using the cleaning brush.
- Refit upper conical burr with the aid of the wire handle, the lugs must slide into the slots.
- Refit bean container to the grinder and lock (see page 74).
HINTS
- Fresh grinds are the key to making coffee with more flavour and body.
- Coffee flavour and strength is a personal preference. Vary the type of coffee beans, amount of coffee and fineness of grind to achieve the flavour you prefer.
- Use freshly roasted coffee beans, preferably with a "roasted on" date.
- Best use the beans 5-20 days after the roasting date. Store coffee beans in a dark, cool and dry place. If possible, the beans should be vacuum sealed.
- Buy in small batches to reduce the storage time.
- Once coffee is ground it quickly loses its flavour and aroma. For the best results grind beans immediately before brewing.
- Do not keep the coffee beans in the bean container too long, if possible store them vacuum sealed.
- When the appliance is not in use for a long time, remove the beans and run grinder empty to clear of ground beans left in chamber.
- Clean the bean container, ground coffee container and conical grinder regularly.
TROUBLESHOOTING
| Problem Possible | le cause What to do | |
| Grinder does not start after pressing Start/Stop button | -Grinder not plugged in. -Grinder is overheated. -Bean container not attached correctly. -Timer control setting is“0”. | -Plug mains cord into power outlet. -Remove mains plug from power outlet. Leave for 20 minutes to cool down before using again. -Lock the bean container as described. -Turn the Timer control to a higher number. |
| Motor starts, but no ground coffee coming from coffee pow-der outlet | -No coffee beans in bean container. -Grinder or bean container is blocked. -The grind is set too fine. | -Fill bean container with fresh coffee beans. -First pour out the beans from the bean container and then remove the bean container. Check the bean container and the grinder for any blockages. Fit everything together again and start the appliance. -Select a coarser grind. |
| The bean container cannot be moved on the grind selector. | -Coffee beans are jammed in the grinder. -Bean container not locked correctly. | -Start the coffee grinder using the Start/Stop button and only then turn the bean container to change the grind. -Unlock the bean container and refit it. |
TROUBLESHOOTING
| Problem Possible cause | What to do | |
| Unable to lock bean container into position | - Coffee beans obstruc-ting bean container locking device. | - First remove the beans and then the bean container. Clear coffee beans from top of conical burr. Re-install and try again to re-lock bean hopper into position. |
| - Bean container cannot be pressed down. | - If it is not possible to press the bean container down to the stop, check whether both lobes in the outermost ring on bean container are in the mounting in the middle of the slots. Only then is it possible to fit and lock the bean container. | |
| Not enough / too much coffee grind | - Grind amount requires adjustment. | - Turn the Timer control to correct the quantity of ground coffee: shorter time is less, longer time is more. |
| Emergency stop necessary? | - Press the Start/Stop button to stop the grinding pro-cess. - Unplug from the mains. |
COFFEE AND OTHER PRODUCTS
The following products are available for your Solis Scala Zero Static coffee grinder:
Art. no. 993.08 SOLIS GRINDZ™ coffee grinder cleaner
Art. no. 992.04 SOLIS Intense Espresso coffee beans (pack of 500g )
Art. no. 992.60 SOLIS Smooth Crema coffee beans (pack of 500g )
You can obtain products for your Solis Scala Zero Static coffee grinder from good specialist retail outlets or from Solis.
You will find the contact information at the end of this user manual.
TECHNICAL SPECIFICATIONS
Model-no. Typ 1662
Product description CoffeeGrinder
Voltage, frequency 220-240V\~, 50-60Hz
Power Output 115-135 Watt
Dimensions (1 x h x d) approx. 13,5 x 28,5 x 17,0 cm
Weight approx. 1,54kg
Technical changes reserved.
DISPOSAL
EU 2012/19/EU
Information for correct disposal of the product in accordance with the European Directive EU 2012/19/EU.
At the end of its working life this equipment must not be disposed of as an household waste. It must be taken to special local community waste collection centres or to a dealer providing this service. Disposing of electrical and electronic equipment separately avoids possible negative effects on the environment and human health deriving from an inappropriate disposal and enables its components to be recovered and recycled to obtain significant savings in energy and resources. In order to underline the duty to dispose of this equipment separately, the product is marked with a crossed-out dustbin.
Solis of Switzerland Ltd reserves the right to carry out technical and visual changes and modifications to improve the product at any time.
SOLIS HELPLINE
This item stands out due to its long-life cycle and reliability. Despite this though, if a malfunction ever occurs, simply give us a call. Often a breakdown can be easily and quickly remedied with the right tip or technique without having to straight away send off the device for repair. We will give you all the advice and practical support you require. The contact addresses can be found at the end of this manual.
Keep the original packaging in a safe place so that you may use it in the event that transportation or shipping of the product becomes necessary.
APPPARAATBESCHRIJVING
APPPARAATBESCHRIJVING
Solis customer service
Please contact us in advance of sending in products for return or repair. We will gladly give you the respective address. Alternatively, you can simply visit www.solis.com.
Solis Klantendienst Helpline
Address for return shipment of goods differs - please refer to:
CH-6850 Mendrisio
Switzerland
Address for return shipment of goods differs - please refer to www.solis.com
+41-91-802 90 10
@ support.ch@solis.com
www.solis.com