DA310 - Radio SCANSONIC - Free user manual and instructions
Find the device manual for free DA310 SCANSONIC in PDF.

| Product Type | Micro system radio with CD/MP3 player, Bluetooth, DAB+ and FM tuner |
| Brand | Scansonic |
| Model | DA310 |
| Dimensions (W × D × H) | 350 mm × 120 mm × 190 mm |
| Net weight | Approximately 2.9 kg |
| Power supply | 100-240 V ~ 50/60 Hz |
| Power consumption | 28 W (standby < 1 W) |
| Output power | 2 × 5 W |
| USB port | 5 V ⎓ 1000 mA (charging and MP3 playback) |
| Compatible disc formats | CD, CD-R, CD-RW (Audio CD and MP3) |
| Connectivity | USB, AUX input (3.5 mm), Bluetooth (range 8 m) |
| Frequency ranges | DAB: 174-239 MHz; FM: 87.5-108 MHz |
| Main functions | DAB+ and FM radio, CD/MP3 player, Bluetooth, USB, AUX, alarm, sleep timer |
| Remote control | Yes, with LR6 1.5 V battery (AA/AM3) |
| Safety | Automatic standby shutdown after 15 min, automatic power off after 4 h in AUX mode |
| Maintenance and cleaning | Unplug before cleaning; wipe with a slightly damp, lint-free cloth; do not use solvents or abrasive products |
| Batteries | Do not expose to heat, keep out of reach of children, dispose of according to local regulations |
| Repairability | The device contains no user-serviceable parts; refer all repairs to qualified personnel |
Frequently Asked Questions - DA310 SCANSONIC
User questions about DA310 SCANSONIC
0 question about this device. Answer the ones you know or ask your own.
Ask a new question about this device
Download the instructions for your Radio in PDF format for free! Find your manual DA310 - SCANSONIC and take your electronic device back in hand. On this page are published all the documents necessary for the use of your device. DA310 by SCANSONIC.
USER MANUAL DA310 SCANSONIC
- Read all the instructions carefully before using the unit and keep them for future reference.
- Retain the manual. If you pass the unit onto a third party make sure to include this manual.
- Check that the voltage marked on the rating label matches your mains voltage.
Damage
- Please inspect the unit for damage after unpacking.
- Do not continue to operate the unit if you are in any doubt about it working normally, or if it is damaged in any way – switch off, unplug from the mains socket and consult your dealer.
Location of Unit
- The unit must be on a flat stable surface and should not be subjected to vibrations.
- Do not place the unit on sloped or unstable surfaces as the unit may fall off or tip over.
- The mains socket must be located near the unit and should be easily accessible.
- This unit is designed for indoor use only.
Temperature
- Avoid extreme degrees of temperature, either hot or cold. Place the unit well away from heat sources such as radiators or gas/electric fires.
- Avoid exposure to direct sunlight and other sources of heat.
Naked Flames
- Never place any type of candle or naked flame on the top or near the unit.
Moisture
- To reduce the risk of fire, electric shock or product damage, do not expose this unit to rain, moisture, dripping or splashing. No objects filled with liquids, such as vases, should be placed on the unit.
- If you spill any liquid into the unit, it can cause serious damage. Switch it off at the mains immediately. Withdraw the mains plug and consult your dealer.
Ventilation
- To prevent the risk of electric shock or fire hazard due to overheating,
ensure that curtains and other materials do not obstruct the ventilation vents.
- Do not install or place this unit in a bookcase, built-in cabinet or in another confined space. Ensure the unit is well ventilated.
Safety
- Always disconnect the unit from the mains supply before connection/disconnecting other devices or moving the unit.
- Unplug the unit from the mains socket before a lightning storm.
- In the interests of safety and to avoid unnecessary energy consumption, never leave the unit switched on while unattended for long periods of time, e.g. overnight, while on holiday or while out of the house. Switch it off and disconnect the mains plug from the mains socket.
Mains cable
- Make sure the unit or the unit stand is not resting on top of the mains cable, as the weight of the unit may damage the cable and create a safety hazard.
Interference
- Do not place the unit on or near appliances which may cause electromagnetic interference. If you do, it may adversely affect the operating performance of the unit, and cause distorted sound.
Batteries
- Batteries used in the remote control for this unit are easily swallowed by young children and this is dangerous.
- Keep loose batteries away from young children and make sure that the battery holder tray is secure in the remote control. Seek medical advice if you believe a cell has been swallowed.
- Please dispose of batteries correctly by following the guidance in this manual.
- Do not expose the battery to direct sunlight of sources of excessive heat.
Supervision
- Children should be supervised to ensure that they do not play with the unit and the remote control.
- Never let anyone especially children push anything into the holes, slots or any other openings in the case – this could result in a fatal electric shock.

The lightning flash with arrowhead symbol, within an equilateral triangle, is intended to alert the user to the presence of uninsulated "dangerous voltage" within the unit's enclosure that may be of sufficient magnitude to constitute a risk of dielectric shock.

The exclamation point within an equilateral triangle is intended to alert the user to the presence of important operating and maintenance accompanying the unit.
Service
- To reduce the risk of electric shock, do not remove screws. The unit does not contain any user-serviceable parts. Please leave all maintenance work to qualified personnel.
- Do not open any fixed covers as this may expose dangerous voltages.
Maintenance
- Ensure the unit is fully unplugged from the power supply before cleaning.
- Do not use any type of abrasive pad or abrasive cleaning solutions as these may damage the unit's surface.
- Do not use liquids to clean the unit.
Product overview Front view
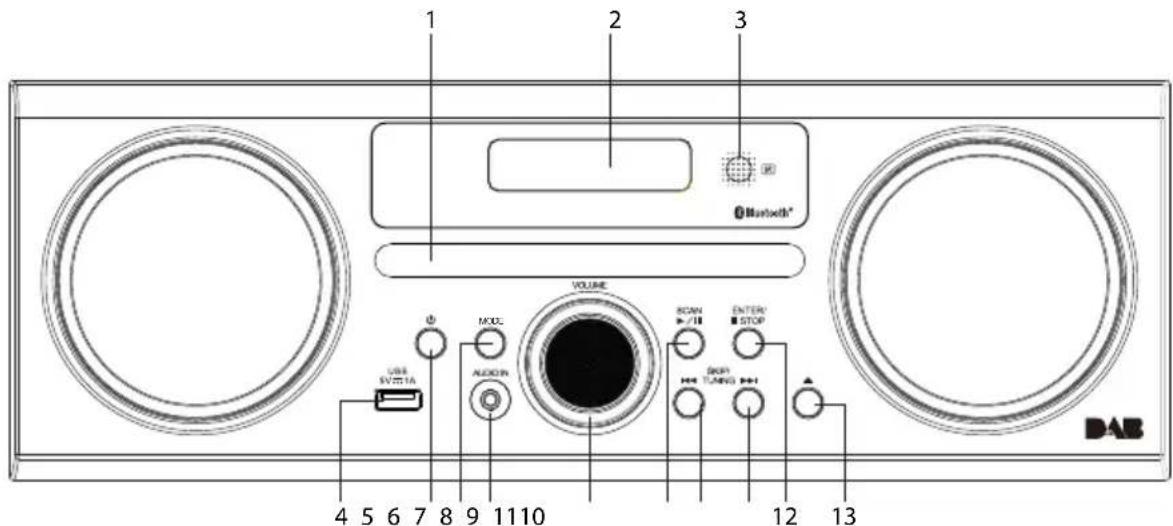
- Disk tray
- Display
- Remote Control Sensor Receive signal from the remote control.
- USB -5V 1A Charging Port For charging external devices. For MP3 playback.
- STANDBY Button Switch the unit between the ON and STANDBY modes.
- MODE Button Switch between DAB, FM, CD, USB, AUX and Bluetooth modes.
- AUDIO IN Socket Connects to an external audio device.
- VOLUME + / - Dial Increase or decrease the volume.
- SCAN/▶/II Button Play/pause/resume playback. Auto-scan in DAB/FM mode.
10. SKIP/TUNE SEARCH
Button
Skip backwards to the beginning of the track or to the previous track.
Allow fast reversing of the current track.
Search for a radio station going backwards through accessible radio frequencies.
11. SKIP/TUNE SEARCH
Button
Skip forwards to the next track.
Allow fast forwarding of the current track.
Search for a radio station going forwards through accessible radio frequencies.
12. ENTER Button - Stop playback
- ▲ open/close disk Button
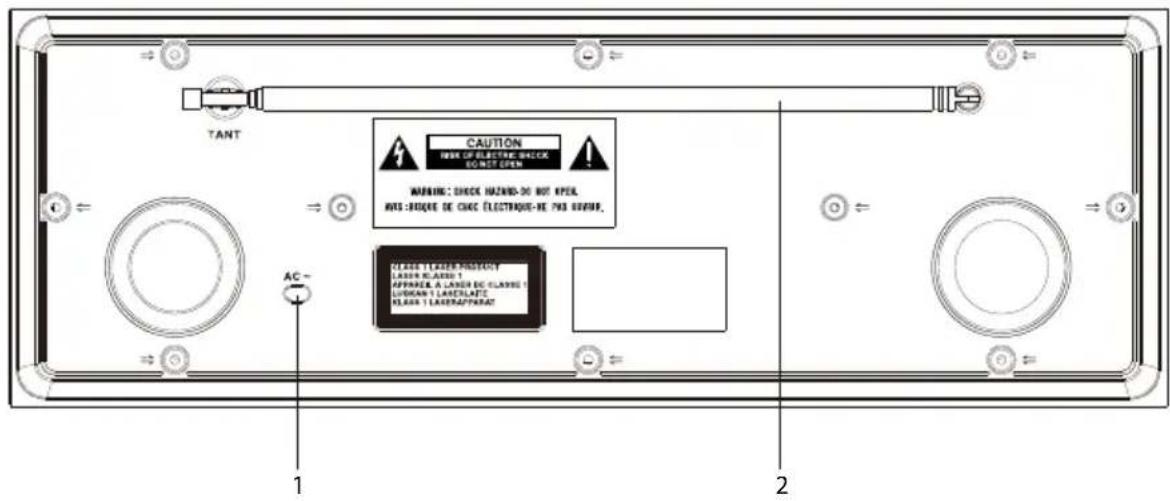
-
Mains Cable
-
FM Aerial
Remote control
- STANDBY Button Switch the unit between the ON and STANDBY modes.
- Number buttons
- REPEAT Button Set repeat function.
- EQ Button Select the EQ (Equaliser) mode.
- SELECT/MONO/ST. Button Switch between mono or stereo in FM mode.
- 1 Button
- PRESET Button Select a preset station up in DAB or FM mode.
- VOLUME - Buttons Decrease volume
- PRESET Button Select a preset station down in DAB or FM mode.
- FOLDER - Button Select folder down in CD or USB mode.
- CD Button switch to CD operating mode.
- USB Button switch to USB operating mode.
- BLUETOOTH Button switch to Bluetooth operating mode.
- 12 Button
Skip backwards to the beginning of the track or to the previous track in bluetooth mode. - Display Button Display track information in CD or USB mode.
- SCAN Button Auto-scan in DAB mode.
- OPEN/CLOSE Buttons open and close disc compartment.
- MEMORY Button Press to show preset stations in DAB or FM mode. Press to programme preset station in DAB or FM mode.
- CLOCK Button Press to show the clock. Press and hold to enter clock setup in Standby mode.
- TIMER Button Setup an alarm timer.
- INTRO Button Play soundtrack for 10 seconds.
- RANDOM Button Set to random playback.
- MUTE Button Silence the unit or restore the sound.
- SLEEP Button Select a sleep timer.
25.▶▶ Button
skip forwards to the next track.
Allow fast forwarding of the current track.
Search for a radio station going forwards through accessible radio frequencies. - VOLUME + Buttons Increase the volume.
- ENTER Button confirm selection.
- FOLDER + Button Select folder up in CD or USB mode.
-
AUDIO IN Button switch to AUDIO IN operating mode.
-
TUNER/DAB Button switch to TUNER or DAB operating mode.
- /II Button Start and pause playback in bluetooth mode.
32.▶▶ Button
Skip forwards to the next track in bluetooth mode. - /II Button Start and pause playback in CD or USB mode.
- Stop Button Stop playback in CD or USB mode.
- Display Buttons Display information in DAB mode.
- MENU Buttons
MENU in DAB mode. - Display Button switch between station names, program type, radio text and frequency in FM mode.
- SCAN Button Auto-scan in FM mode.
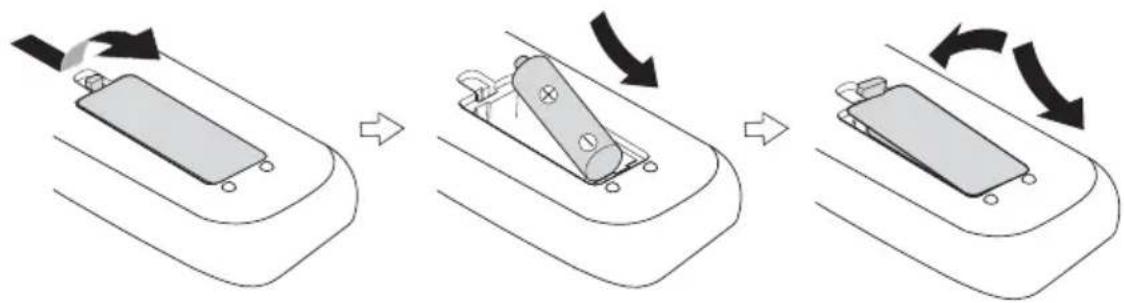
Battery replacement for the remote control
The remote control requires a LR6 1.5V AA/AM3 battery.
- Open the battery cover.
- Insert the supplied battery according to the direction indicated in the battery compartment. When inserting or removing the battery, push it towards the (-) battery terminals.
- Close the cover.

Handling the Battery
- Improper or incorrect use of batteries may cause corrosion or battery leakage, which could cause fire, personal injury or damage to property.
- Install the battery correctly in the battery compartment. Normally the battery's positive polarity (+) will face up.
- Use only the battery type indicated in this manual.
- Do not dispose of the used battery as domestic waste. Dispose of it in accordance with local regulations.
- Keep loose button cells away from young children and make sure that the battery is secure in the remote control.
Handling the Remote Control
- Take care of your fingernails when you slide and pull the battery release tab.
- Do not drop the remote control.
- Do not allow anything to impact the remote control.
- Do not spill water or liquid on the remote control.
- Do not place the remote control on a wet object.
- Do not place the remote control under direct sunlight or near sources of excessive heat.
- Remove the battery from the remote control when not in use for a long period of time, as corrosion or battery leakage may occur and result in physical injury, and/or property damage, and/or fire.
- When the battery is exhausted, the remote control will not function.
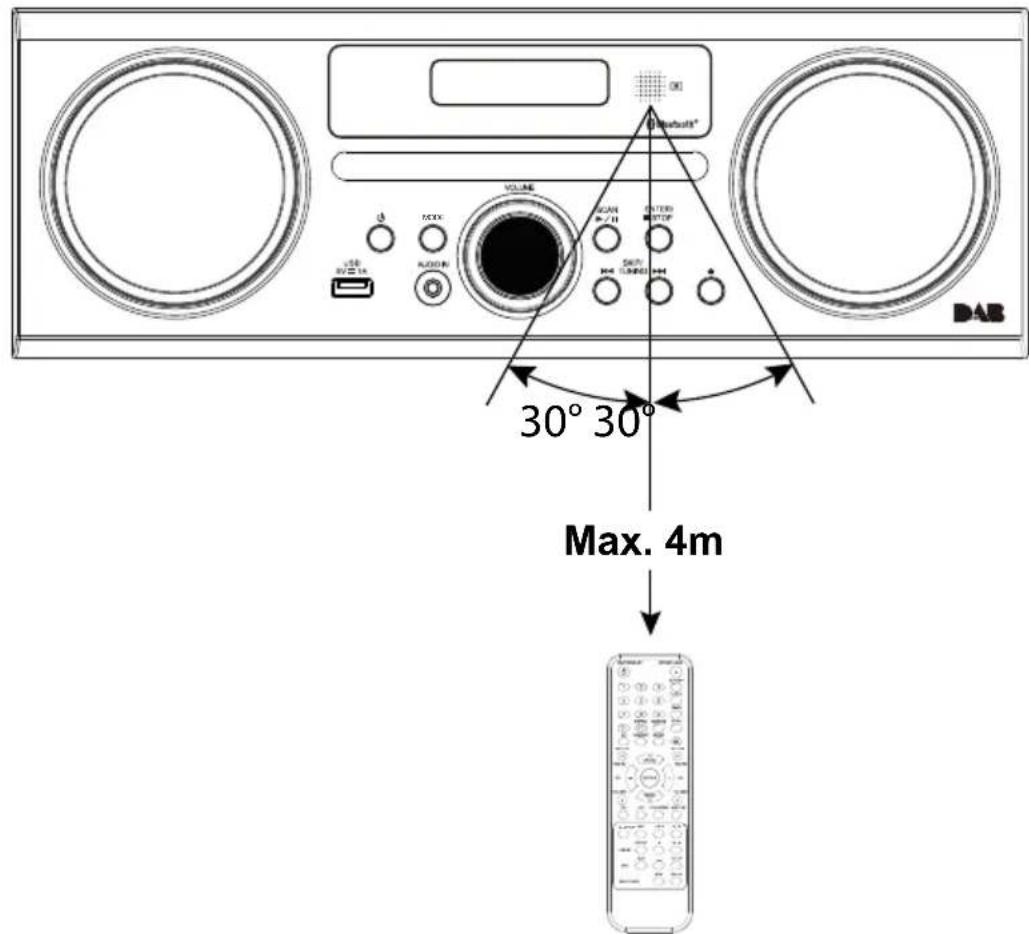
Remote control operation range
-
The remote control sensor on the front unit is sensitive to the remote control's commands up to a maximum of 4 metres away and within a maximum of 60^ arc.
-
Please note that the operating distance may vary depending on the brightness of the room.
Connecting to the mains supply
-
This unit is designed to operate with an AC power supply.
-
Connecting the unit to any other power source may cause damage to the unit. Unwind the mains cable to its full length. Connect the mains plug to a mains socket. Make sure the mains plug is fully inserted into the mains socket. The unit is now connected and ready to use.
-
To switch the unit off completely, unplug the mains plug from the mains socket.

Ensure all connections are connected to the mains power socket.
General operation powering ON/OFF
When you first connect the unit to the mains socket, display will show the "Scan Time 00:00:00" and synchronize to the current local time if you can receive a DAB signal in your location. After approximate one minute, it will switch to STANDBY mode.
- Press on the unit or press ON/STANDBY on the remote control to switch the unit to ON mode.
- Press to switch the unit back to STANDBY mode.
- Disconnect the mains plug from the mains socket if you want to switch the unit off completely.

- When the unit is idle for approximately 15 minutes, it will automatically switch to standby.
- Please turn the unit off completely to save when not in use.
Selecting modes
Press MODE repeatedly on the unit or press CD, USB, TUNER/DAB, AUDIO IN, BLUETOOTH on the remote to switch between DAB, FM, CD, USB, AUX and Bluetooth modes.
Adjusting the volume
- Turn the VOLUME +/- dial on the unit or press VOL +/- on the remote control to adjust the volume.
- If you wish to turn the sound off, press MUTE on the remote control. Press MUTE again or press VOL +/- on the remote control or turn VOLUME +/- to resume normal listening.
Auto setting the clock
The clock can be updated automatically if you can receive a DAB signal in your location. In order to synchronise to the current local time you must leave it on the DAB station for a short period of time.
Manually setting the time
- During Standby mode, press and hold CLOCK on the remote control. The hour digits flash on the display.
- Press to adjust the hour digits, and then press CLOCK to confirm. The minute digits will flash on the display.
- Press to adjust the minute digits, and then press CLOCK to confirm.
- The time is now set.

If you cannot receive any DAB signal, you can manually set the time. Once DAB signal is received, the time will be automatically updated.
Setting the daily timer
- Press and hold TIMER on the remote control until the display shows "On Timer", and the hour digits flash.
- Press to adjust the hour digits, and then press TIMER to confirm. The minute digits will flash on the display.
- Press to adjust the minute digits, and then press TIMER to confirm.
- When On Timer Clock set, the display will show "Off Timer" and the hour digits will flash.
- Press to adjust the hour digits, and then press TIMER to confirm. The minute digits will flash on the display.
- Press on the remote control to adjust the minute digits, and then press TIMER to confirm.
- Finally Press I to select DAB, FM, DICS or USB mode, then press TIMER to confirm. The display will show "VOL#" and flash. Press I to adjust the volume, and then press TIMER to confirm.
- Press TIMER to select "Timer On", wait for a while "C" icon will show on the display to indicate the timer is on.
- The Timer setting is now complete.
On Timer
Off Timer 00:00
Source DAB
VOLUME VOL.15
To cancel the daily timer
Press TIMER on the remote control repeatedly to select Timer Off mode. The "G" indicator will disappear from the display.
Setting the sleep timer
Use the sleep timer to turn the system off after a certain number of minutes in play mode. By setting the sleep timer, you can fall asleep to music and know that your system will turn off by itself rather than play all night.
- To set the sleep timer press SLEEP on the remote control repeatedly to view the different timer settings. The number of minutes shown will display in this sequence:

- The system is now set to turn off after the number of minutes you have set. The display will show "SLEEP #", e.g. "SLEEP 10" means the unit will switch itself off after 10 minutes, "SLEEP 20" means the unit will switch itself off after 20 minutes, and so on.
- Press SLEEP to show the reminding time till the unit switches off minutes and return back to previous screen.
- To cancel the sleep timer press SLEEP repeatedly until "Sleep OFF" shows on the display.
EQ control
the system supports a variety of equalizers and sound effects.
During playback, press EQ on the remote control to select a desired music mode. Each time EQ is pressed, the music mode will change to the next one as follows:

System reset
There may be times when you need to reset your unit back to the factory settings especially when you have moved house. If you experience reception problems you may want to reset and try again. If you move to another part of the country and pick up the local and national DAB stations in that area, your previously tuned channels may no longer be available.
- During DAB mode, open the CD Disk tray then press and hold STOP on the unit until the display show "Restarting... FACTORY RESET".
Restarting...
FACTORY RESET
- When successful reset, it will back to DAB mode.

After the system reset, all the tuned stations, FM/DAB preset stations will be erased.
DAB operation
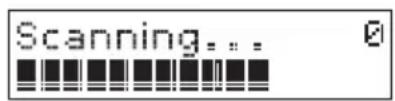
If the unit is connected to the mains power and then switched on from standby for the first time, the unit will automatically enter into the DAB mode and perform auto scan function. During the scan the display will show "Scanning..." together with a slide bar that indicates the progress of the scan and the amount of stations that have been found so far.
Once the scan has finished the unit will select the first alphanumericly found station. to explore the found stations, press I< I
Full scan
The full scan will search for the entire DAB Band III channels. After the scan has finished, the first alphabetically found station will be automatically selected.
-
To activate auto scan, press SCAN/▶/II and the display will show "Scanning ..." and a progressing slide bar.
-
All the stations that have been found will be stored automatically. To explore and listen to the found stations, press I I to select. Then press ENTER confirm into stations.
Manual tuning
As well as the auto tune function, you can manually tune the receiver. This can help you when aligning your aerial or when adding stations that were missed while auto tuning.
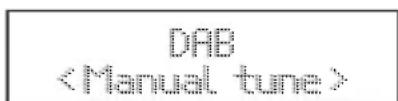
- Press ENTER to select Manual tune.
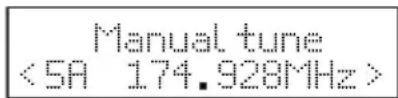
- Press to cycle through the DAB channels, which are numbered from 5A to 13F.
- After your desired channel number is selected, press ENTER to confirm. The display will show the multiplex.
- Press MENU again to add selected channel to station list.
Secondary services
You may see a “>” symbol after the name of the station, this indicates that there are secondary services available to that station. These secondary services contain extra services that are related to the primary station. e.g. a sports station may want to add extra commentaries. The secondary services are inserted directly after the primary station in the station list. To select the secondary station, press MENU when the “>” appears in the display before the station name. When the secondary service ends, the unit will automatically switch back to the primary station.
Preset stations
You can store up to 30 of your favourite stations to the memory. This will enable you to access your favourite stations quickly and easily.
-
To store a preset, you must first go back listening to the station that you would like to save, press and hold MEMORY. The display will show "Preset Store <#: (Empty)>".
-
Press PRESET to select your desired preset station number. Then press ENTER confirm.
- The station will be stored in few seconds and the screen will then show "Preset # Stored".
Recalling a stored station
- Once you have saved a station to one of the preset buttons, you can recall it by pressing MEMORY.
- Press PRESET until your desired station show on the display; Then press ENTER confirm into stations.

the stored stations will be saved into the memory and power off will not erase it. Storing a new station into a preset location will erase the previously stored station in that location.
DAB display modes
Press DISPLAY on the remote control, the display will switch through the following display modes.
The information of each display mode is displayed on the lower segment of the display.
Ensemble
This displays the name of the multiplex that contains the station you are listening to. A multiplex is a collection of radio stations that are bundled and transmitted on one frequency. There are national and local multiplexes. Local ones contain stations that are specific to that area.

DAB - unlike normal radio, groups together several radio stations and transmits them on one frequency.
Signal Strength
This shows a slide bar to indicate the signal strength, the stronger the signal, the longer the bar will be from left to right.
Time/Date
This displays the current time and date provided automatically by the broadcaster.
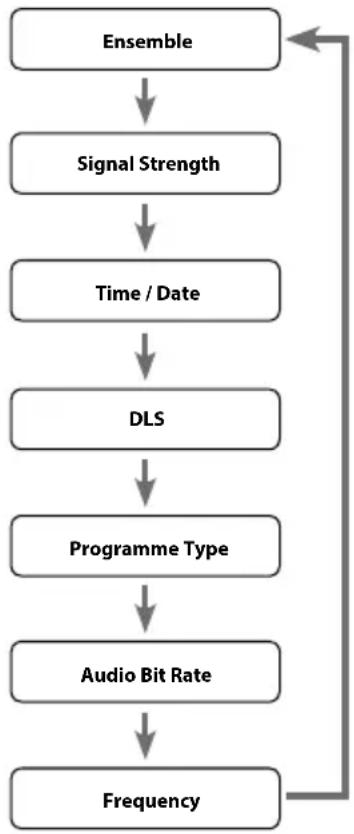
DLS (Dynamic Label Segment)
Dynamic label segment is a scrolling message that the broadcaster may include with their transmissions. The message usually includes information, such as programme details etc.
Programme Type
This describes the "style" or "genre" of the programme that is being broadcast.
Audio Bit Rate
The display will show the digital audio bit rate being received.
Frequency
This displays the frequency of the present station, such as "11C 220.352MHz".
FM operation
Switching from DAB to FM mode
To switch the unit to FM mode, press MODE repeatedly to select FM mode. The display will show the frequency.
Auto scan
Press SCAN/▶/II until the tuner starts searching for a station. To scan down the frequency band, press and hold SCAN/▶/II. Once a station has been found, the scanning will stop automatically.

The search may not stop at a station with a very weak signal.
Manual scan
To search for FM stations manually, press! repeatedly until your desired frequency is reached.

With FM radio it may be necessary to fine tune each station by pressing repeatedly. Each press/tap will adjust the frequency by 0.05 MHz. If reception is still poor adjust the position of the aerial or try moving the radio to another location.
Audio mode
Press SELECT/MONO/ST. on the remote control to toggle between the Stereo or Mono selection.

The unit will automatically switch between stereo and mono mode, but you can override this and switch this function manually. This is helpful when receiving poor signal reception.
Preset stations
You can store up to 30 of your favourite stations to the memory. This will enable you to access your favourite stations quickly and easily.
- To store a preset, you must first be listening to the station that you would like to save, press and hold MEMORY. The display will show "Preset Store <#: (Empty)>".
- Press PRESET to select your desired preset station number. Then press ENTER confirm.
- The station will be stored in few seconds and the screen will then show "Preset # Stored".
Recalling a stored station
- Once you have saved a station to one of the preset buttons, you can recall it by pressing MEMORY.
- Press PRESET until your desired station show on the display; Then press ENTER confirm.

The stored stations will be saved into the memory and power off will not erase it. Storing a new station into a preset location will erase the previously station in that location.
FM display modes
Press DISPLAY on the remote control, the display will switch through the following display modes.
The information of each display mode is displayed on the lower segment of the display.
Radio Text
This is a scrolling message displaying information about the current programme.
Programme Type
This describes the "style" or "genre" of the programme that is being broadcast.
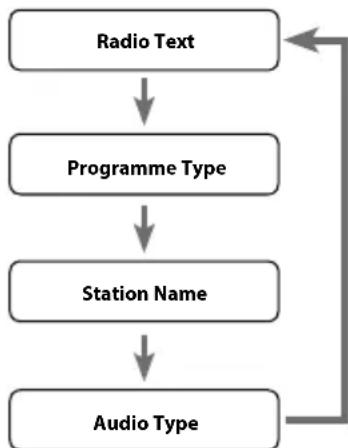
Station Name
This displays the station name.
Audio Type
This displays if the station being received is in mono or stereo.
Compatible disc types
| Disc Types Disc Logo Recorded Content | ||
| CD-R (CD Recordable) | COMPACT DISC Recordable | AUDIO |
| CD-RW (CD-Rewritable) | COMPACT DISC Rewritable | AUDIO |
| AUDIO-CD (Compact Disc Digital Audio) | COMPACT DISC DIGITAL AUDIO | AUDIO |
CD operation
Press MODE repeatedly on the unit or press CD on the remote to select CD mode.
Playback
- Press "▲open/close" to open the disc tray.
- Place the CD with the label side up into the CD compartment, and then press "▲ open/close" to close the disc tray.
- If there is no disc or the disc can't be read, "NO DISC" or "Unknown Disc" will show on the display.
-
The total number of tracks will display on the display, then press SCAN/▶/II to play the first track of the CD/MP3 disc automatically.
-
This unit can play CD, CD-R, CD-RW disc, 8cm.
To pause playback
- Press SCAN/▶/II to pause the playback.
- To resume playback, press SCAN/II again.
To stop playback
Press to stop playback.
Skipping to another track
- Press to skip backwards to the beginning of the track or previous track or skip forwards to the next track.
- Press and hold to perform fast forward/reverse playback.
Repeat playback
-
During stop or playback mode, press REPEAT once on the remote control, "REP_ ONE" will show on the display. The CD will play the current track repeatedly.
-
Press REPEAT twice, "REP_ALL" will show on the display. The CD will play all tracks repeatedly.
| REP_ONE | CD |
| T--01 | 00:07 |
| REP_ALL | CD |
| T--01 | 00:07 |
- Press REPEAT once more again, the REPEAT function will turn off.
Random playback
All tracks on the disc can be played in a random order.
| RANDOM | CD |
| T--13 | 00:00 |
- During playback mode, press RANDOM on the remote control. The "RANDOM" indicator will show on the display. All tracks will be played randomly.
- Press to playback the next random track.
- After all the tracks have played once, the playback will stop automatically.
- To cancel random playback, press RANDOM during RANDOM playback. Normal playback will resume.
Programme setting
User can program up to 32 tracks in CD mode or 64 tracks in MP3 in any desired order. Programme mode is activated while in STOP mode.
| MEMORY | F-01 |
| T-01 |
- Press MEMORY to enter programme mode.
- Press to select the track that you want to preset.
- Press MEMORY to confirm the track.
- Repeat steps 2-3 to programme more tracks. Once it is completed, press SCAN/▶/II to start playback of the programmed tracks.
Programme cancel
Press twice, or open the disk tray and close it again to erase the memory.
Intro playback
During playback mode
- During playback mode, press INTRO on the remote control. The "INTRO" indicator will show on the display. The unit will play the first 10 seconds of each track.
- Press INTRO on the remote control again to resume normal playback.
Bluetooth® operation
The unit has a Bluetooth function that can receive a signal within 8 metres.
Pairing the unit with a Bluetooth device to listen to music:
- While in the ON mode, press MODE repeatedly on the unit or press BLUETOOTH on the remote to select Bluetooth mode.
- If the unit is not paired with any Bluetooth device, the display will flash "BT LINK".
- Activate your Bluetooth device and select the search mode.
- "BT speaker N" will appear on your Bluetooth device list.
- Select "BT speaker N" and enter "0000" for the password if necessary.
- To disconnect the Bluetooth function, switch to another function on the unit or disable the function from your Bluetooth device.

- If the signal strength is weak, your Bluetooth receiver may disconnect, but it will re-enter pairing mode automatically.
- For better signal reception, remove any obstacles between the unit and the Bluetooth device.
- The unit supports A2DP (Advanced Audio Distribution Profile) and AVRCP (Audio Video Remote Control Profile) functions. This can only be paired with one Bluetooth device at one time.
- Compatibility with all devices and media types is not guaranteed.
- Some mobile phones with the Bluetooth function may connect and disconnect as you make and end calls. This is not an indication of a problem with your unit.
USB operation
- When a USB device is connected to the unit, press MODE repeatedly on the unit or press USB on the remote to select USB mode.
- The unit will automatically display the total number of tracks.
- All playback features are the same as if you were playing an MP3 CD.

- The unit can only play MP3 file format in USB operation.
- If your USB device is loaded with MP3's but the display keeps showing "NO" on the display, the format of your device might not be compatible with the unit.
- This unit supports USB versions 1.1 and 2.0.
- The unit can support USB devices with up to 32GB of memory.
-
The unit may not be compatible with all USB devices and memory cards, this is not an indication of a problem with the unit.
-
Press REPEAT once, "REP_ONE" will show on the display, It will play the current track repeatedly.
- Press REPEAT twice, "REP_ALBUM" will show on the display. It will play the current folder repeatedly.
- Press REPEAT three times, "REP_ALL" will show on the display. It will play all files repeatedly.
- Press REPEAT once more again, the repeat function will turn off.
AUX operation
- There is a AUDIO IN socket located at the front of the unit. Analogue audio sound signals from other sources can be input to the unit through this socket.
- Connect the input to another audio device via an AUX cable (not included) with AUDIO IN socket.
- Press MODE repeatedly on the unit or press AUDIO IN on the remote to select AUX mode.
- Turn VOLUME on the unit or press VOL +/- on the remote control to adjust the volume control for your desired sound output level.
- In AUX mode, operate your audio device directly for playback features.

- When connecting the external audio device, refer to the owner's manual of the external device, as well as the manual.
- Examples of External Audio Device that can be connected to the unit are: Portable MP3 Players, Cassette Players, Mini Disc Players, DVD Players, etc.

4-hours playback:
- If the unit is in AUX mode more than 4 hours, it will automatically switch to standby mode.
- 10 minutes before entering standby, "AUTO-OFF" will flash on the display.
- Press INTRO to continue cancel auto off function.
Maintenance
Cleaning the unit

Ensure the unit is fully unplugged from the mains socket before cleaning.
To clean the unit, wipe the case with a slightly moist, lint-free cloth.
- Do not use any cleaning fluids containing alcohol, ammonia or abrasives.
- Do not spray aerosol at or near the unit.
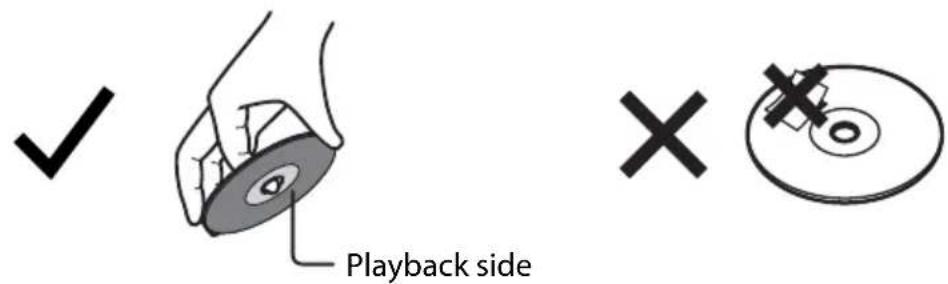
Handling discs
- Do not touch the playback side of the disc.
- Do not attach paper or tape to the disc.
Cleaning discs
- Fingerprints and dust on the disc cause sound deterioration. Wipe the disc from the centre outwards with a cloth. Always keep the disc clean.
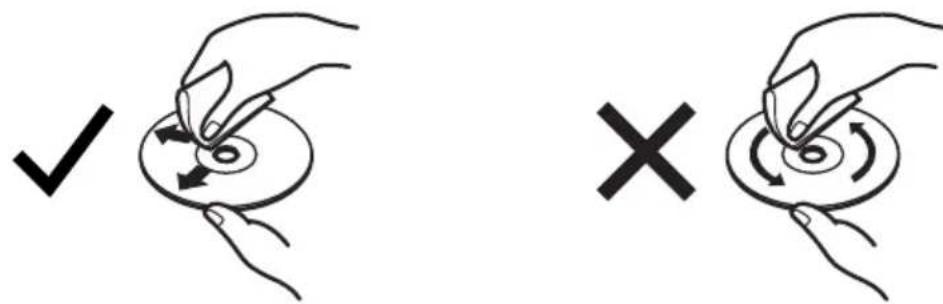
- If you cannot wipe off the dust with a soft cloth, wipe the disc lightly with a slightly moistened cloth and finish with a dry cloth.
- Do not use any type of solvent such as thinner, benzine, commercially available cleaners or antistatic spray. They may damage the disc.
Storing discs
- Do not store discs in places subjected to direct sunlight or near heat sources.
- Do not store discs in places subjected to moisture and dust such as a bathroom or near a humidifier.
- Storing discs vertically in a case, stacking discs or placing objects on discs outside of their cases may cause warping.
Hints and tips
If a problem occurs, it may often be due to something very minor. The following table contains various tips:
| Problem Solution | |
| No power Ensure | the mains cable is connected securely at both ends. Make sure that the ON mode is selected. |
| The remote control does not function | Use the remote control near the unit. Point the remote control at the remote sensor on the unit. Replace the battery in the remote control with a new one. Remove any obstacles between the remote control and the unit. |
| The unit does not respond when pressing any buttons | The unit may freeze up during use. Switch the unit off and then on again at he mains socket to reset the unit. |
| CD | |
| The disc does not play | There is no disc inside the unit ("No Disc" appears on the display). Insert the disc correctly with the label side facing up. Clean the disc. PAUSE mode may be activated, deactivate it. A non-valid disc has been inserted. Condensation may have formed inside the unit due to a sudden change in temperature. Wait about an hour for it to clear and try again. |
| Disc skips Make | sure the unit is on a secure spot. Vibrations or jarring can cause the disc to skip. |
| Radio | |
| Desired station not found | Weak signal. Use the Manual Tune function. No DAB coverage in your area or poor reception. Adjust the position of the aerial. |
| USB | |
| USB port not charging | Not all device are compatible with USB charging. |
| Bluetooth | |
| I cannot find "BT speaker N" my Bluetooth device | Ensure the Bluetooth function is activated on your Bluetooth device. |

If any functional abnormality is encountered, unplug the unit from the mains socket and reconnect it again.
Specifications
| Model DA310 | |
| Power | |
| Power Supply AC 100-240V ~ 50/60Hz | |
| Power Consumption 28W | |
| ECO Standby Power Consumption | < 1W |
| Output Power 5W x 2 | |
| USB Power 5V ... | — 1000 mA |
| Feature | |
| Decoding Format CD, | CD-R, CD-RW |
| Connectivity USB 5V ... | — 1A Charging Port x 1, AUDIO IN Socket x 1 |
| Frequency Range DAB 174-239 MHz, FM 87.5 – 108 MHz | |
| Dimension | |
| Unit 350 mm (W) x 120 mm (D) x 190 mm (H) | |
| Net Weight | |
| Unit ~ 2.9 kg | |
Features and specifications are subject to change without prior notice.
DA 310
Tryk for at vise uret.
DLS (Dynamic Label Segment)
Source DAB VOLUME VOL.15
DLS (Dynamic Label Segment)
DLS (Dynamic Label Segment)
DLS (Dynamic Label Segment)
DLS (Dynamic Label Segment)
- Se debe vigilar a los niños para que no juguen con la unidad ni con el mando a distancia.
- No permitted that nadie, especially those who are not permitted to do so.
- No permit to the children of those who are not permitted to do so.
- No permit to the children of those who are not permitted to do so.