TVVR33049T - Digital Video Recorder ABUS - Free user manual and instructions
Find the device manual for free TVVR33049T ABUS in PDF.
| Brand | ABUS |
| Model | TVVR33049T |
| Product Type | Digital Video Recorder |
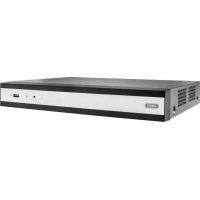
| Number of Channels | 6 |
| Built-in Hard Drive | 1 TB |
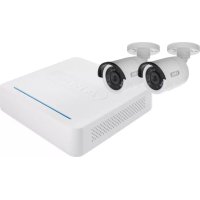
| Included Cameras | 4 mini analog HD 1080p outdoor cameras |
| Power Supply | 12 V DC |
| Connectivity | 1 x RJ45, 1 x USB, 6 x BNC video inputs |
| Recording Resolution | HD 1080p |
| Recording Functions | Continuous, motion detection |
| Remote Access | Yes, via network and DDNS |
| Menu Languages | German, French, English, etc. |
| Security | Administrator password, GUID file |
| Hard Drive Initialization | Required before use |
| Ventilation | Ensure good air circulation |
| Maintenance | Clean with a dry cloth, avoid liquids |
| Repairability | Replaceable hard drive |
| Included Cables | 4 coaxial cables of 30 m, 1 network cable of 1 m |
| Included Accessories | USB mouse, power supply, quick start guide |
| User Manual | 67 pages, available in PDF |
Frequently Asked Questions - TVVR33049T ABUS
User questions about TVVR33049T ABUS
0 question about this device. Answer the ones you know or ask your own.
Ask a new question about this device
Download the instructions for your Digital Video Recorder in PDF format for free! Find your manual TVVR33049T - ABUS and take your electronic device back in hand. On this page are published all the documents necessary for the use of your device. TVVR33049T by ABUS.
USER MANUAL TVVR33049T ABUS
text_image
ABUS Security Tech Germany ABUS TWVR33009| Scope of delivery | 24 |
| Warnings | 25 |
| connections | 26 |
| Hardware Installation | 27 |
| Tips for camera installation | 29 |
| System activation | 31 |
| Resetting the password | 32 |
| Software Set-up | 33 |
Français
text_image
Grid of product icons including battery, camera, lens, and accessories with Chinese labelsDeutsch

Warnhinweise
Hardwareinstallation

Brief Brochmann Sir, also the Brochmann's Health for 1997020 for health (logarithm), the Brochmann's Health for 1997020 for health will be used for health.
Deutsch
ABUS
text_image
ABUS Security Tech Germany ABUS TWR33009
Quick guide for Video Recorder I Monitoring Set: TVVR33009 I TVVR33049T I TVVR33049D
This quick start guide describes the initial installation steps for your network camera.
In-depth information can be found in the user guide, which can be downloaded via the IP installer or from the abus.com homepage.

Dear customers,
Thank you for purchasing this product.
This product complies with current domestic and European regulations.
Conformity has been proven, and all related certifications are available from the manufacturer on request (ABUS Security-Contor GmbH & Co. KG, Linker Krouthwong S, 86444 (Hing)).
To maintain this status and to guarantee safe operation, it is your obligation to observe these operating instructions! Read the entire operating manual carefully before putting the product into operation. Pay attention to all operating and safety information: All company names and product descriptions are trademarks of the corresponding owner. All rights reserved.
If you have any questions, please contact your specialist dealer.

text_image
ABUSScope of delivery
TVVR33049T
• E-Channel Analogue HD Video Recorder
log1TE HDD
• 4 x Analogue HD 1060p Mini Outdoor
Camera
• Universal power supply unit
• Industrial sector supply unit
+6×30m transatl cabin
-1×1 m network cable
电话:010-635
- 3.5% (NOVA)
- Quick guide
+ ①
TVVR33009
• R-Channel Analogie HD Video Recorder
- 1 x 1 cm network cable
- 2 x hard drive cable
- 4 x screws for hard drive
- Правительство
- UICP revision
Use in case
yinh@eine
·四

text_image
Grid of product icons including battery, camera, ear, and accessories with Chinese labels24
English

Warnings
Keep the recorder and camera away from strong magnetic fields.

Keep liquids away from the recorder.

Turn the recorder off before connecting or removing peripheral devices

Ensure an uninterrupted power supply.

Only store the recenter and camera in the ambient conditions recommended by the manufacturer.

Ensure that there is always sufficient ventilation.

English
25
Connections

text_image
Video - Out LAK RNS port for a network connection Video - In BRC inputs for analogue cameras USB Connection for USB devices 12 V 12 V OC power connectionEnglish

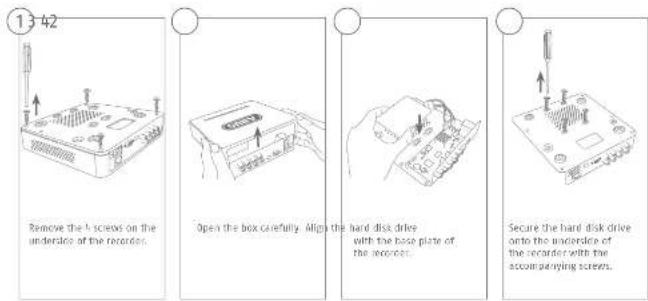
Hardware Installation
text_image
13 42 Remove the A screws on the underlence of the recorder. Open the box carefully. Align the hard disk drive with the base plate of the recorder. Secure the hard disk drive onto the underlence of the recorder with the accompanying screws.Please ensure that you begin with a circle that we have a resolution of PAB200, the resolution is a solution for the solar surveillance bits PAB3402 and 5782403 starts of step 9. In the band width as a point was called by these materials.
English

text_image
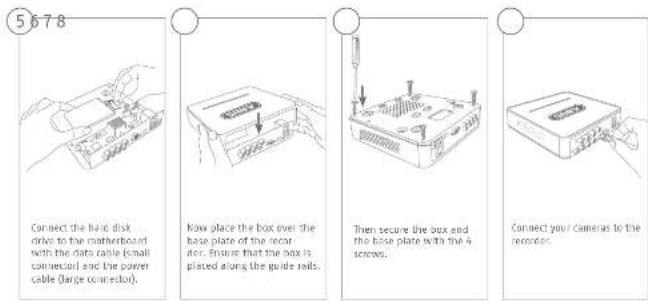
5678 Connect the hard disk drive to the motherboard with the data cable (small connector) and the power cable (large connector). Now place the box over the base plate of the recorder. Ensure that the box is plated along the guide rails. Then secure the box and the base plate with the 4 screws. Connect your cameras to the recorder.Tips for camera installation

text_image
Plug the recorder into the power supply The blue LED bar on top of the recorder indicates that the device is on. You can choose to turn off the light on the LED bar via the menu.
text_image
Avoid backlight or direct sunlight The camera must not be installed on unstable surfaces Please be aware that notice of video surveillance is required by law in public places Do not place cameras directly behind glass, as this can result in reflectionsEnglish

System activation


In the file 'New password' enter a password for the admin user, The password must meet the specified minimum requirements. Recommendation: Use a password that is as complex as possible and is classified as 'strong'.


Re-enter the password to confirm it. Make a note of the password in the quick start guide as well and keep it in a safe place. The admin password can only be reset by ARUS technical support.


The device is activated and all of its functions can now be used.
You will require the CUIO file in order to reset the password yourself. Export the file on to a USB stick and share it securely.
Notes Due to the pre-set default language, the arming process is always in German. Language independently, you can activate the recorder with the ABUS IP-installer via the network.
Admit passwords:
3130-
English

Resetting the password

You can only reset the admin password yourself using the Gold file.
Please be aware that this file becomes invalid if the password is subsequently changed or the GUID file has already been used, in both cases, a new file will need to be created manually.

GUID import, local interface:
Click on the 'Fargotten password' button in the local login dialog. Insert a USB data carrier containing the secure GRID file and select this file. Click on the 'import' button to reset the password.

GUID import, web interface:
Open your recorder's web interface and click on the 'Forgotten password' button. Insert a USB data carrier containing the secure GUID file and select this file. Click on the 'Import' button to reset the password.
Note: Resetting the admin password is a critical and complex process. Please ensure that you have access to this data in the event of an emergency by starting the password securely leave a note in these instructions or keep the GUIE file on an external data carrier). Therefore, please plan for this eventuality at initial start-up and specify where and how this data will be stored and who will have access to it.
Imported: If the password needs to be reset, and the password has not been noted down and the full file cannot be accessed (or is no longer valid), you will need to contact Technical Support at the ABUS Security-center. To reset the password with the help of ABUS, you must have a PC on the premises with a network connection to the recorder, and there must be internet access in order to receive the data that will be provided to you by technical support. If these requirements are not met, it will not be possible to reset the password on the recorder,
English
Soft ware Set-up

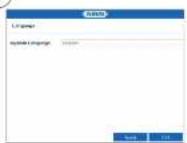
Select the desired language and click "Apply".


If you untick the checksum, the set-up wizard will not automatically pop up the next time the soft ware starts up. Click "Next".

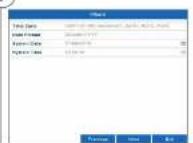
Specify time zone, date and system time. Continue by clicking "Next".
English
3332

④
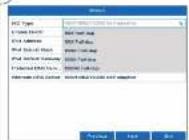
Set the adapter speed eye, KIE type manually. Default and recommended setting is the automatic detection (Self adaptive).
5
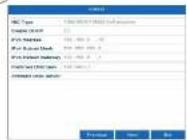
If you wish the address data to be automatically assigned, Iuk the "Enable DHCP" checkbox. The addresses will then be automatically assigned by your router (where supported). If proceeding in this way, move on it point 11.
6

If your router does not automatically assign the address data, enter the data according to the following steps. The image gives an example of connected devices with the corresponding IP addresses:
English
⑦

The first three positions of the IP address must correspond to the default gateway value. The final digit identifies devices addressed by the default gateway and is individually set for each device. For the reminder, choose e.g. 64; i.e., xxx.xxx.xxx.64.
8

The subnet mask is a network segment in which IP addresses with the same network address are used. The standard value is normally 255.255.255.0 In such cases. To determine the value for the default gateway, use a Windows PC connected to the network,
9

Enter the IP address of your router here. You can find the address with "cmd" and the command "ipconfig" on your Windows PC.
English
35J4

10

text_image
DNS Server Name: http://www.nasdaq.org/1234567 Address: 109-888-8, 109-888-8, 109-888-8 File Address: 109-888-8, 109-888-8, 109-888-8 File Address: 109-888-8, 109-888-8, 109-888-8 File Address: 109-888-8, 109-888-8, 109- File Address: 109-888-8, 109-888-8, 109- File Address: 109-888-8, 109-888-8, 109- The DNS server "translates" an Internet address into an IP address. Enter the value of the default gateway under "Referred DNS server".11

text_image
Product Sales Order: 100% SHP, Buy: 45% Order, Sell: 37% Delivery Order: 20% Delivery Order: 10% Delivery Order: 5% Delivery Order: 2% Delivery Order: 1% Delivery Order: 1% Delivery Order: 1% Delivery Order: 1% Delivery Order: 1% Delivery Order: 1% Delivery Order: 1% Delivery Order: 1% Delivery Order: 1% Delivery Order: 1% Delivery Order: 1% Delivery Order: 1% Delivery Order: 1% Delivery Order: 1% Delivery Order: 1% Delivery Order: 1% Delivery Order: 1% Delivery Order: You can manage and, if necessary, edit your parts here, we recommend that the default values are maintained.12

text_image
If you wish to set up remote access, then select the "Enable DOS" checkbox. Then select your DOS type using the entry field.English
13

text_image
Windows Current Test 10.27 PS 10.28 PS 10.29 PS 10.30 PS 10.31 PS 10.32 PS 10.33 PS 10.34 PS 10.35 PS 10.36 PS 10.37 PS 10.38 PS 10.39 PS 10.40 PS 10.41 PS 10.42 PS 10.43 PS 10.44 PS 10.45 PS 10.46 PS 10.47 PS 10.48 PS 10.49 PS 10.50 PS 10.51 PS 10.52 PS 10.53 PS 10.54 PS 10.55 PS 10.56 PS 10.57 PS 10.58 PS 10.59 PS 10.60 PS 10.61 PS 10.62 PS 10.63 PS 10.64 PS 10.65 PS 10.66 PS 10.67 PS 10.68 PS 10.69 PS 10.70 PS 10.71 PS 10.72 PS 10.73 PS 10.74 PS 10.75 PS 10.76 PS 10.77 PS 10.78 PS 10.79 PS 10.80 PS 10.81 PS 10.82 PS 10.83 PS 10.84 PS 10.85 PS 10.86 PS 10.87 PS 10.88 PS 10.89 PS 10.90 PS 10.91 PS 10.92 PS 10.93 PS 10.94 PS 10.95 PS 10.96 PS 10.97 PS 10.98 PS 10.99 PS 11.00 PS Next, save the sensor address and the Device Domain Name, user name and password. So to the next screen with "Next".14
text_image
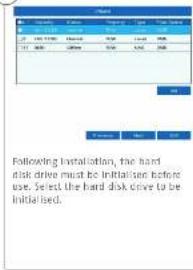
Following installation, the hard disk drive must be initialised before use. Select the hard disk drive to be initialised.15
text_image
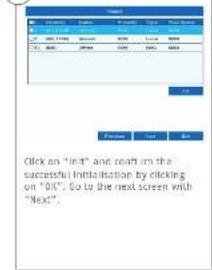
Click on "In" and Next is the successful Initialization by clicking on "OK". Go to the next screen with "Next"3736
16

Click on "Search" to look for available network cameras in the network.
17
You will find all the compatible network cameras below. Tick the checkbox of the network cameras you wish to use and click on "Add". Go to the next screen with "Next".
18

Select the recording type. It is possible to select between "Continuous" and "Mulsion detection". Close the set-up wizard by clicking "OK".

text_image
ABUS Security Tech Germany ABUS TVWR33009
[here clients, cher client]
text_image
Grid of product icons including battery, ear, camera, and accessories with Chinese labelsFrançais

Avertissements
text_image
ABUS Security Tech Germany ABUS TVVR33009
text_image
ABUS Security Tech Germany ABUS TWR33009
Kvikguide til Videooptager | Overvagningssat : TVVR33009 | TVVR33049T | TVVR33049D
text_image
Grid of product icons including battery, camera, ear, and accessories with Chinese labelsDansk

Hardwareinstallation

Administrator: Iordcard
8584
Dansk

Nulstil kodeord

text_image
5 Name: dsgn Name: 0.2 Name: 1.6 Name: 2.4 Name: 3.2 Name: 4.0 Name: 5.0 Name: 6.0 Name: 7.0 Name: 8.0 Name: 9.0 Name: 10.0 Name: 11.0 Name: 12.0 Name: 13.0 Name: 14.0 Name: 15.0 Name: 16.0 Name: 17.0 Name: 18.0 Name: 19.0 Name: 20.0 Name: 21.0 Name: 22.0 Name: 23.0 Name: 24.0 Name: 25.0 Name: 26.0 Name: 27.0 Name: 28.0 Name: 29.0 Name: 30.0 Name: 31.0 Name: 32.0 Name: 33.0 Name: 34.0 Name: 35.0 Name: 36.0 Name: 37.0 Name: 38.0 Name: 39.0 Name: 40.0 Name: 41.0 Name: 42.0 Name: 43.0 Name: 44.0 Name: 45.0 Name: 46.0 Name: 47.0 Name: 48.0 Name: 49.0 Name: 50.0 Name: 51.0 Name: 52.0 Name: 53.0 Name: 54.0 Name: 55.0 Name: 56.0 Name: 57.0 Name: 58.0 Name: 59.0 Name: 60.0 Name: 61.0 Name: 62.0 Name: 63.0 Name: 64.0 Name: 65.0 Name: 66.0 Name: 67.0 Name: 68.0 Name: 69.0 Name: 70.0 Name: 71.0 Name: 72.0 Name: 73.0 Name: 74.0 Name: 75.0 Name: 76.0 Name: 77.0 Name: 78.0 Name: 79.0 Name: 80.0 Name: 81.0 Name: 82.0 Name: 83.0 Name: 84.0 Name: 85.0 Name: 86.0 Name: 87.0 Name: 88.0 Name: 89.0 Name: 90.0 Name: 91.0 Name: 92.0 Name: 93.0 Name: 94.0 Name: 95.0 Name: 96.0 Name: 97.0 Name: 98.0 Name: 99.0 Name: 100.0
text_image
6 Hets din router like automatisk ländeter adresserbatsende, skal du lachste evi. I de förlige tiln. Graf kien lildeter som exsampel de apacenter, der kan sutter til med de dertibatsende IP adresser.Dansk

text_image
9 Name: NEXCP File name: 123-000-0000 File path: 000-000-0000 File size: 56.782.264.264 File type: standard file File path: 000-000-0000 File progress: 123-000-0000 Status: Status: Normal Status: Normal Status: Normal Status: Normal Status: Normal Status: Normal Status: Normal Status: Normal Status: Normal Status: Normal Status: Normal Status: Normal Status: Normal Status: Normal Status: Normal Status: Normal Status: Normal Status: Normal Status: Normal Status: Normal Status: Normal Status: Normal Status: Normal Status: Normal Status: Normal Status: Normal Success: Success: Success: Success: Success: Success: Success: Success: Success: Success: Success: Success: Success: Success: Success: Success: Success: Success: Success: Success: Success: Success: Success: Success: Success: Success: Success: Success: Success: Success: Success: Success: Success: Success: Success: Success: Success: Success: Success: Success: Success: Success: Success: Success: Success: Success: Success: Success: Success: Success: Success:Dansk
8998-

text_image
ABUS Security Tech Germany ABUS TVWR33009
• House can attack USB
• Cucla tor da
CD
TWR330490
-
(differential store
-
More can and are in US\$
• Guida conida
17

text_image
Grid of product icons including battery, camera, ear, and accessories with Chinese labelsItaliano

text_image
I cannot be used to create a new file. In favor of the following: 1. I can't use the file as an image or image that is not available. 2. I can't use the image as an image that is not available. 3. I can't use the image as an image that is not available. 4. I can't use the image as an image that is not available. 5. I can't use the image as an image that is not available. 6. I can't use the image as an image that is not available. 7. I can't use the image as an image that is not available. 8. I can't use the image as an image that is not available. 9. I can't use the image as an image that is not available. 10. I can't use the image as an image that is not available. 11. I can't use the image as an image that is not available. 12. I can't use the image as an image that is not available. 13. I can't use the image as an image that is not available. 14. I can't use the image as an image that is not available. 15. I can't use the image as an image that is not available. 16. I can't use the image as an image that is not available. 17. I can't use the image as an image that is not available. 18. I can't use the image as an image that is not available. 19. I can't use the image as an image that is not available. 20. I can't use the image as an image that is not available. 21. I can't use the image as an image that is not available. 22. I can't use the image as an image that is not available. 23. I can't use the image as an image that is not available. 24. I can't use the image as an image that is not available. 25. I can't use the image as an image that is not available. 26. I can't use the image as an image that is not available. 27. I can't use the image as an image that is not available. 28. I can't use the image as an image that is not available. 29. I can't use the image as an image that is not available. 30. I can't use the image as an image that is not available. 31. I can't use the image as an image that is not available. 32. I can't use the image as an image that is not available. 33. I can't use the image as an image that is not available. 34. I can't use the image as an image that is not available. 35. I can't use the image as an image that is not available. 36. I can't use the image as an image that is not available. 37. I can't use the image as an image that is not available. 38. I can't use the image as an image that is not available. 39. I can't use the image as an image that is not available. 40. I can't use the image as an image that is not available. 41. I can't use the image as an image that is not available. 42. I can't use the image as an image that is not available. 43. I can't use the image as an image that is not available. 44. I can't use the image as an image that is not available. 45. I can't use the image as an image that is not available. 46. I can't use the image as an image that is not available. 47. I can't use the image as an image that is not available. 48. I can't use the image as an image that is not available. 49. I can't use the image as an image that is not available. 50. I can't use the image as an image that is not available. 51. I can't use the image as an image that is not available. 52. I can't use the image as an image that is not available. 53. I can't use the image as an image that is not available. 54. I can't use the image as an image that is not available. 55. I can't use the image as an image that is not available. 56. I can't use the image as an image that is not available. 57. I can't use the image as an image that is not available. 58. I can't use the image as an image that is not available. 59. I can't use the image as an image that is not available. 60. I can't use the image as an image that is not available. 61. I can't use the image as an image that is not available. 62. I can't use the image as an image that is not available. 63. I can't use the image as an image that is not available. 64. I can't use the image as an image that is not available. 65. I can't use the image as an image that is not available. 66. I can't use the image as an image that is not available. 67. I can't use the image as an image that is not available. 68. I can't use the image as an image that is not available. 69. I can't use the image as an image that is not available. 70. I can't use the image as an image that is not available. 71. I can't use the image as an image that is not available. 72. I can't use the image as an image that is not available. 73. I can't use the image as an image that is not available. 74. I can't use the image as an image that is not available. 75. I can't use the image as an image that is not available. 76. I can't use the image as an image that is not available. 77. I can't use the image as an image that is not available. 78. I can't use the image as an image that is not available. 79. I can't use the image as an image that is not available. 80. I can't use the image as an image that is not available. 81. I can't use the image as an image that is not available. 82. I can't use the image as an image that is not available. 83. I can't use the image as an image that is not available. 84. I can't use the image as an image that is not available. 85. I can't use the image as an image that is not available. 86. I can't use the image as an image that is not available. 87. I can't use the image as an image that is not available. 88. I can't use the image as an image that is not available. 89. I can't use the image as an image that is not available. 90. I can't use the image as an image that is not available. 91. I can't use the image as an image that is not available. 92. I can't use the image as an image that is not available. 93. I can't use the image as an image that is not available. 94. I can't use the image as an image that is not available. 95. I can't use the image as an image that is not available. 96. I can't use the image as an image that is not available. 97. I can't use the image as an image that is not available. 98. I can't use the image as an image that is not available. 99. I can't use the image as an image that is not available. 100. I can't use the image as an image that is not available.
text_image
ABUS Security Tech Germany ABUS TWR33009
• 2a portola https USB
• Uulcigulde
· □

text_image
Grid of product icons including battery, camera, ear, and accessories with Chinese labelsPolski