SousVide Center SV1000 - Vacuum packaging machines CASO - Free user manual and instructions
Find the device manual for free SousVide Center SV1000 CASO in PDF.
| Product type | Vacuum sealer and sous vide cooker |
| Brand | CASO |
| Model | SousVide Center SV1000 |
| Tank capacity | Approx. 9 liters |
| Temperature range | 30 °C to 100 °C (86 °F to 212 °F) |
| Timer range | 00:00 to 99:00 (hours:minutes) |
| Maximum cooking time | 12 hours |
| Delayed cooking | Yes, from 6 minutes to 12 hours |
| Vacuum function | Yes, for zip bags with adapter |
| Included accessories | 2 stainless steel racks, 20 zip bags (10x20x23 cm + 10x26x23 cm), vacuum adapter, water drain hose |
| Cleaning and maintenance | Clean regularly after cooling; monthly cleaning cycle recommended; transparent lid part is dishwasher safe; do not immerse the appliance |
| Safety | Safety instructions: avoid burns, electric shock, fire; conforming use; repairs by authorized professional |
| Spare parts and repairability | Use only original parts; repairs by authorized after-sales service |
| Power supply | Required protection: 16 A; connection data on rating plate |
| Installation location | Stable, horizontal, heat-resistant surface; do not place near flammable materials |
Frequently Asked Questions - SousVide Center SV1000 CASO
User questions about SousVide Center SV1000 CASO
0 question about this device. Answer the ones you know or ask your own.
Ask a new question about this device
Download the instructions for your Vacuum packaging machines in PDF format for free! Find your manual SousVide Center SV1000 - CASO and take your electronic device back in hand. On this page are published all the documents necessary for the use of your device. SousVide Center SV1000 by CASO.
USER MANUAL SousVide Center SV1000 CASO
Please read the information contained herein so that you can become familiar with your device quickly and take advantage of the full scope of its functions.
Your SV1000 will serve you for many years if you handle it and care for it properly.
We wish you a lot of pleasure in using it!
10.2 Information on this manual
These Operating Instructions are a component of the SV1000 system (referred to hereafter as the device) and provide you with important information for the initial commissioning, safety, intended use and care of the device.
The Operating Instructions must be available at all times at the device. This Operating Manual must be read and applied by every person who is instructed to work with the device:
Commissioning
Operation
- Troubleshooting and/or
- Cleaning
Keep the Operating Manual in a safe place and pass it on to the subsequent owner along with the device.
10.3 Warning notices
The following warning notices are used in the Operating Manual concerned here.
▲GEFAHR
DANGER
A warning notice of this level of danger indicates a potentially dangerous situation.
If the dangerous situation is not avoided, this can lead to death or serious injuries.
Observe the instructions in this warning notice in order to avoid the danger of death or serious personal injuries.
WARNING
WARNING
A warning notice of this level of danger indicates a possible dangerous situation.
If the dangerous situation is not avoided, this can lead to serious injuries.
Observe the instructions in this warning notice in order to avoid the personal injuries.
AVORSICHT ATTENTION
A warning notice of this level of danger indicates a possible dangerous situation.
If the dangerous situation is not avoided, this can lead to slight or moderate injuries.
Observe the instructions in this warning notice in order to avoid the personal injuries.
HINWEIS PLEASE NOTE
A notice of this kind indicates additional information, which will simplify the handling of the machine.
10.4 Limitation of liability
All the technical information, data and notices with regard to the installation, operation and care are completely up-to-date at the time of printing and are compiled to the best of our knowledge and belief, taking our past experience and findings into consideration.
No claims can be derived from the information provided, the illustrations or descriptions in this manual.
The manufacturer does not assume any liability for damages arising as a result of the following:
Non-observation of the manual
Uses for non-intended purposes
- Improper repairs
- Technical alterations, modifications of the device
- Use of unauthorized spare parts
Modifications of the device are not recommended and are not covered by the guarantee.
All translations are carried out to the best of our knowledge. We do not assume any liability for translation errors, not even if the translation was carried out by us or on our instructions. The original German text remains solely binding.
10.5 Copyright protection
This document is copyright protected.
Braukmann GmbH reserves all the rights, including those for photomechanical reproduction, duplication and distribution using special processes (e.g. data processing, data carriers, data networks), even partially.
Subject to content and technical changes.
11 Safety
This chapter provides you with important safety notices when handling the device.
The device corresponds with the required safety regulations. Improper use can result in personal or property damages.
11.1 Intended use
This device is intended solely for indoor domestic use in sous vide cooking and vacuum sealing of zip bags.
Uses for a different purpose or for a purpose which exceeds this description are considered incompatible with the intended or designated use.
▲WARNING Warning
Danger due to unintended use!
Dangers can emanate from the device if it is used for an unintended use and/or a different kind of use.
Use the device exclusively for its intended use.
Observe the procedural methods described in this Operating Manual.
Claims of all kinds due to damages resulting from unintended uses are excluded.
The User bears the sole risk.
11.2 General Safety information
HINWEIS Please note
Please observe the following general safety notices with regard to the safe handling of the device.
- Examine the device for any visible external damages prior to using it. Never put a damaged device into operation.
- If the connection lead is damaged, you will need to have a special connection lead installed by an authorized electrician to avoid any hazard.
This appliance can be used by children aged 8 years and above and persons with reduced physical, sensory or mental capabilities or lack of experience and knowledge if they have been given supervision or instruction concerning use of the appliance in a safe way and understand the hazards involved.
Children shall not play with the appliance.
Cleaning and user maintenance shall not be made by children without supervision. - Only qualified electricians, who have been trained by the manufacturer, may carry out any repairs that may be needed. Improperly performed repairs can cause considerable dangers for the user.
HINWEIS Please note
- Only customer service departments authorized by the manufacturer may carry out repairs on the device during the guarantee period, as otherwise the guarantee entitlements will be null and void in the event of any subsequent damages.
Defective components must always be replaced with original replacement parts. Only such parts will guarantee that the safety requirements are fulfilled.
Do not leave the device unsupervised when it is in operation. - When disconnect, please unplug by grasp the plug and not the cord, to avoid any injury.
Do not immerse in water or any other liquids.
11.3 Sources of danger
11.3.1 Danger of burns
WARNING Warning
Do not touch hot surfaces.
The lid may be hot during cooking. Hot water may accumulate on the inside during cooking. Hold lid on both sides when removing in order to avoid scalding.
Let the device cool down before removing parts or the bin.
11.3.2 Danger of fire
WARNING Warning
There is a danger of fire due to the event the device is not used properly.
Observe the following safety notices to avoid dangers of fire:
Do not set up the device near flammable material.
- Keep this appliance away from sources of heat (gas, electric, burner, heated oven).
11.3.3 Dangers due to electrical power
AGEFAHR DANGER
Mortal danger due to electrical power!
Mortal danger exists when coming into contact with live wires or subassemblies!
Observe the following safety notices to avoid dangers due to electrical power:
If the connection lead is damaged, you will need to have a special connection lead installed by an authorized electrician to avoid any hazard.
Do not operate this device if its power cable or plug is damaged, if it does not work properly or if it is damaged or has been dropped. If the power cable is damaged, it will need to be replaced by the manufacturer or his service agency or a similar qualified person, to avoid any dangers.
▲GEFAHR DANGER
- Do not open the housing on the device under any circumstances. There is a danger of an electrical shock if live connections are touched and the electrical or mechanical structure is altered. In addition, functional faults on the device can also occur.
Before plugging the appliance in or when you operate it, make sure your hands are dry. - Remove the plug from the wall socket when the unit is not in use, and also before cleaning.
12 Getting Started
This chapter will guide you through safely unpacking and setting up your new unit.
12.1 Packaging safety information
▲GEFAHR DANGER
Packaging materials are not toys and should be disposed of properly.
Do not allow children to play with packaging materials due to risk of suffocation.
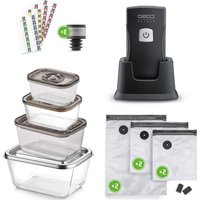
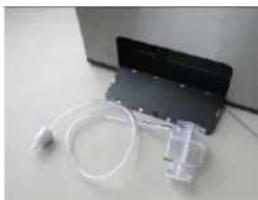
12.2 What's included
The SV1000 includes the following components:
SV1000
- 10 zipper bags (20 × 23 ~cm)
- 10 zipper bags (26 × 23 ~cm)
- 2 stainless steel racks (for the bag)
- 1 vacuum sealer hose adapter
1 water draining hose
- Instruction manual
HINWEIS PLEASE NOTE
Examine the shipment to ensure the unit and manual are included and inspect the unit for any visible damage.
- Immediately notify the carrier and/or the supplier about an incomplete shipment or any damage as a result of inadequate packaging or mishandling.
12.3 Unpacking
Carefully remove the packaging material and unit from the carton.
12.4 Disposal of the packaging

Caso believes in the importance of recycling and has selected packaging materials that not only protect your unit from damage during transit, but can be recycled to minimize any ecological impact.
Recycling the packaging materials preserves raw materials and reduces waste. Take any packaging materials that are no longer required to a recycling collection point for proper disposal.
HINWEIS PLEASE NOTE
If possible, keep the original packaging for the duration of the guarantee period in the event a return is necessary.
12.5 Setup
12.5.1 Setup location requirements:
In order to ensure the safe and trouble-free operation of the device, the setup location must fulfill the following prerequisites:
- The device must be set up on a firm, flat, level and heat-resistant surface. The carrying capacity of the support must be appropriate to withstand the weight of the device including water filling and the heaviest expected food loading.
- Do not set up the unit in a hot or damp environment or near flammable material.
- Do not move the SV1000 when it is in operation.
- The electrical outlet must be easily accessible so that the plug can be quickly disconnected in the case of an emergency.
- The setup of this unit in non-stationary locations (e.g., boats, airplanes, motor homes) must be carried out by a qualified electrician, provided they guarantee the prerequisites for the safe use of the unit.
12.6 Electrical connection
In order to ensure the safe and trouble-free operation of the device, the following instructions must be observed for the electrical connection:
- Before plugging in the unit, compare the voltage and frequency data on the vacuum sealer's rating plate (found on the bottom of the unit) with that of your electrical network. This data must be compatible. If in doubt consult a qualified electrician.
- The electrical outlet must be protected by a 16A safety cut-out switch.
- The use of a multiplug outlet adapter is not recommended due to fire danger.
- Inspect the power cord for damage and ensure it doesn't run under the unit or over hot or sharp surfaces.
- The electrical safety of the unit is only guaranteed if it is connected to a properly installed protective conductor system. Use of the unit without a protective conductor is prohibited. If in doubt, consult a qualified electrician. The manufacturer cannot be made responsible for damages due to a missing or damaged protective conductor.
12.6.1 Extension cords
If an extension cord is used:
The electrical rating of the extension cord should be at least as great as the electrical rating of the unit.
The cord should be arranged so that it does not drape over a countertop or tabletop where it can be pulled on by children or tripped over.
13 Complete Overview
This chapter provides you with an overview of your device and explains some of its key features.
13.1 Appliance diagram

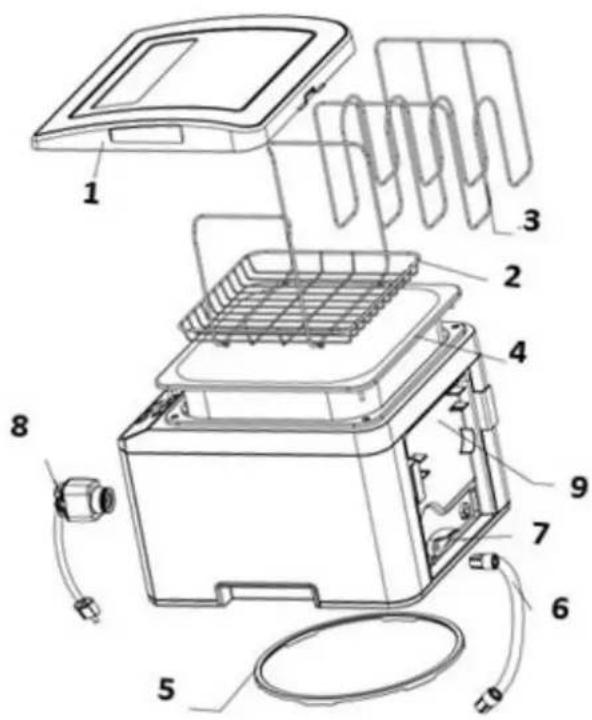
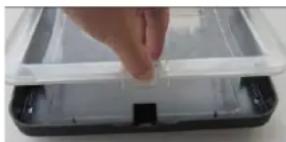
- Lid: During the cooking process the lid must always be kept closed in order to keep the bin temperature constant, and to
reduce water vapour formation. After cooking, you can invert the lid and use it as a tray for the bags. - Drainer (stainless steel rack): To facilitate removal of the bags.
- Bag holder (stainless steel rack): Use this bag holder for uniform vertical or horizontal positioning of a plurality of bags with food while ensuring good and uniform distribution of water between all bags. Make sure that the bags are covered in water during the cooking in the bin.
- Bin: Approx. 9 litres capacity for food and water (always fill in water up to above the minimum mark).
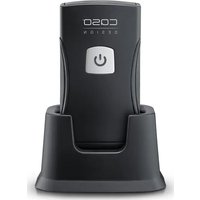
- Pivoted base: For rotation of the device, suitable for storing the cable and the drain hose and supporting the draining.
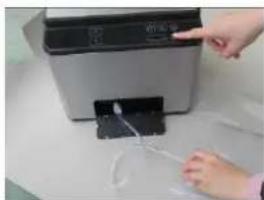
- Water draining hose: For connection to the water outlet.
- Draining lever: Opening / closing of the water outlet.
- Vacuum adapter: For vacuum sealing of the zipper bags. The adapter can be disassembled into two parts in order to remove any liquid or food residues.
- Reel: For storage of the cable and the draining hose
- Minimum filling level ("MIN"): Fill in water at least up to this marking. The water inlet should be completely covered.
- Water outlet: The water is drained from the bin and flows past the heating element.
- Water inlet: The heated water is fed back into the bin through the inlet which includes a triple filter system. This circulation system ensures uniform heating of the water and a perfect cooking temperature.
13.2 Control Panel
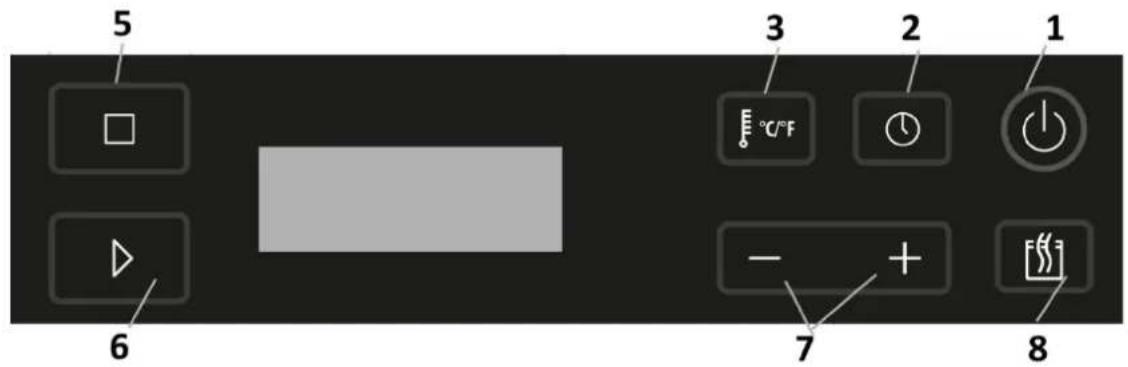
1 ON / OFF key: To switch on, press ON / OFF button for 1 second; LED indicator is lit.
2 Timer key: Timing from 00:00 to 99:00 hours. Default: 02:25.
3 Temperature controller: Temperature selection 30-90 °C or 86-194 °F. Default: 55 °C / 131 °F.
5 Timer setting: Select in how many hours the cooking time should end. The device will count down the remaining time and start the cooking process. The maximum selectable time is 12 hours.
6 Start / Stop key: Cooking process starts / stops.
7 (+ / - ) arrows: For timer or temperature or the end of the time selection.
8 Start / Stop vacuum sealing: Start / stop vacuum sealing.
13.3 Rating plate
The rating plate with the connection and performance data can be founded on the bottom of the unit.
14 Operation
This chapter provides instructions on the proper operation of your vacuum sealer:
14.1 Commissioning
- Before using the product, make sure the bin contains water. The water must be filled to above the minimum level. This marker is located on the side wall of the bin. The device will not start if the water level is below the "MIN" line and display the error signal E001 instead.
- Insert the power plug into the wall socket.
- Press key "C" for 1 second to power up the device. You will hear a click. The display will indicate the current temperature of the water in the bin.
- The device is set to either Celsius or Fahrenheit. To change the setting, press key 3 to select Celsius or Fahrenheit.
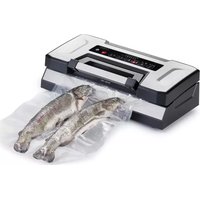
14.2 SousVide cooking
Cook gently in a vacuum bag. The food is cooked at low temperature in its own juice, making it particularly tender and tasty.
Setting the cooking temperature:
Press key 3 once. The display shows the default value of 131^ or 55^ and flashes. This means that the value can now be changed.
Use the arrow keys (+/-) to set the cooking temperature to the desired value. By keeping the arrow key pressed, you can change the numbers more quickly. Temperature selection is possible as follows: 30 - 90^ in increments of 0.1^ or 86 - 194^ in increments of 0.5^ .
Setting the cooking time:
To set the cooking time, press key (key 2). The LED display will indicate the time and flash. The default value of 02:25 is displayed. Press the arrow key (+/-) to increase / reduce the time. Time can be selected as follows: 00:00-99:00 hours.
Use the arrow keys (+ / -) to set the cooking time to the desired value. By keeping the arrow key pressed, you can change the numbers more quickly.
When the desired time is reached, after 5 seconds the display will automatically display the bin temperature.
Starting the cooking:
Please place the vacuum-packed foods into the bag holder and drainer into the bin.
Make sure that the food is completely covered with water.
Now close the lid carefully.
Select the cooking time and temperature and press key (Key 6) to start the heating of the water. An alarm sounds when the bin starts heating.
When the water reaches the selected temperature, 3 alarms will sound, and the actual cooking starts. The selected cooking time will start at this time point.
When the cooking time is completed, the alarm will sound again. The food can then be withdrawn.
WARNING
Warning
Risk of scalding! Carefully remove the food.
To check the remaining time during the cooking process, press key "O(Key 2) at any time.
Except in delayed mode, you can change both cooking temperature and time during cooking. Proceed again as described under "Setting the cooking time".
However, you can use the device also without setting the cooking time. Press key (Key 2) to activate the device. The unit will operate continuously without time limit if the cooking time is set to 00:00.
To stop or interrupt the cooking, press key (Key 6).
To interrupt the power supply and switch off the device, press (Key 1) for one second. To check the input made via the individual keys, press the respective key for a little more than half a second.
Setting the delayed mode:
If the cooking process is to be started not immediately but only after expiry of a delay, first set the desired temperature and cooking time as described above.
Then press key (Key 5) to activate the delayed cooking mode.
Once key "□" is lit, use the arrow keys (-1+) to select the desired end of the cooking time and confirm by pressing key (Key 6).
Now both key (Key 6) and (Key 5) are lit, and the device starts to count down.
When the time remaining equals the cooking time, key "□(Key 5) will go dark. The unit begins to heat up and starts the cooking program.
Once the time is down to 00:00, the cooking process is finished and the food can be served.
You can select the cooking delay times from 6 minutes to 12 hours.
Please note that the selected time may be delayed further by up to another 5 minutes because the heating time of the water is not included.
Depending on the initial temperature of the water filled in, a few minutes more will have to be taken into account.
HINWEIS Note: E001
If the device should indicate "E001" in the LED display after switching on even though the water filled in is above the minimum level, please add some salt to the water and stir well.
14.3 Vacuum function:
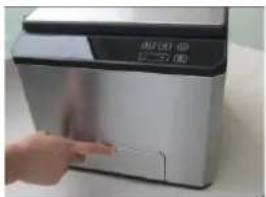
- Press against the door on the front of the device to open the magazine, and remove the vacuum adapter.
- Place the food in a suitable zip bag with vacuum valve. Press the vacuum adapter to the valve of the bag. Press key (key 8) to extract the air from the bag.
- After the sealing process, detach the vacuum adapter. If any liquid or food particles should have got into the vacuum adapter, you can easily open and clean it.
- Put the vacuum adapter back into the magazine.
14.4 Bags and rolls
Please only use specified bags and rolls designed for vacuum sealing. Do not use other materials such as plastic wrap.
All vacuum rolls and bags delivered by CASO are appropriate for cooking under vacuum (sous vide).
Furthermore the vacuum rolls and bags can be used for defrosting and heating in the microwave at up to 70^ C.
Please make sure when vacuum rolls and bags of other producers are used, whether they are also microwaveable and suitable for cooking under vacuum.
14.5 Storage
Store the unit in its upright position, out of the reach of children.
HINWEIS PLEASE NOTE
Always unplug the appliance from its outlet immediately after using and before cleaning.
15 Cleaning and Maintenance
This chapter provides important information on properly cleaning and maintaining your SV1000.
15.1 Safety information
▲GEFAHR Danger
Please observe the following safety notices, before cleaning the unit to avoid damage to the unit or personal injury:
To ensure optimum performance, the unit must be cleaned regularly. Failure to clean the unit regularly can lead to potential malfunctions, as well as safety and health risks.
Turn off and unplug the unit prior to cleaning.
Clean the unit after every use as soon as it has cooled. Leaving the unit uncleaned for long periods can make it very difficult to remove leftover food and grime and may even damage the unit.
- If moisture penetrates the unit's housing, it can damage the electronic components. Please ensure that no moisture enters the device.
Do not use any harsh or abrasive cleaning agents.
Do not attempt to scrape off stubborn grime with hard or abrasive tools.
Dry all parts thoroughly before using after cleaning.
Do not immerse the unit in water or other liquid.
15.2 Maintenance and cleaning:
After each use, drain the water completely via the drain hose. No water should be left in the bin.
Keep the filter on the water inlet in the bin clean. Use a brush to clean before and after use.
Fill the bin with clean water only, not with any other items.
If a cooking bag should burst or an object get into the water bin, you should clean the bin. In this case, do not let the water flow out through the drain hole. Pour everything out of the bin from above. Use a soft cloth or sponge and mild soap to clean the bin of all objects.
Never immerse the unit into water or other liquids while cleaning.
Do not use abrasives or aggressive (caustic) chemicals when cleaning the unit.
Never place the appliance in a dishwasher.
From time to time (once a month) or if a bag has burst, you should perform a cleaning run of your machine. To this end, fill clean water up to above the MIN marker line and add a mild detergent (no foam cleaner or acidic cleaning agents). Set the temperature to 40^ (104^) and run the unit for 20 minutes in the normal cooking cycle. Then drain the water
completely. If necessary, repeat the cycle to clean the device thoroughly.
Cleaning of the lid: The transparent part of the cover can be removed and is dishwasher-proof. Never place the entire lid in the dishwasher.
16 Troubleshooting
The following table may help you narrow down and address minor malfunctions:
16.1 Safety notices
AGEFAHR
Danger
- Only qualified electricians, who have been trained by the manufacturer may carry out any repairs on electrical equipment.
Improperly performed repairs may result in personal injury or damage to the device.
16.2 Troubleshooting
The device does not work:
- Check that the cable is properly plugged into the wall socket
- Check cable for damage.
- Verify that the wall socket works with another device.
- Verify that key (Key 1) is lit. If so, determine whether key (Key 1) has been pressed for more than 1 second.
16.3 Troubleshooting table
The digital display is lit, but the device does not start the cooking program and displays an error code instead:
| Error Code | Possible Causes | Solution |
| E001 | 1. Bin is empty | Fill clean water up to above the “MIN” level. |
| 2. Water too low Fill clean water up to above the “MIN” level. | ||
| 3. Device is not positioned correctly on the table | Place the device on a flat surface | |
| 4. The system cannot determine if there is water in the bin | Sprinkle a little salt into the water and mix this well. | |
| Error in electronics Please contact customer service | ||
| E002 | 1. Particles in filter | Please clean the filter thoroughly. |
| 2. Bag blocks water inlet | Please re-position bag. Always use the designated bag holder for the bag. | |
| 3. Bag blocks water outlet. | Please re-position bag. Always use the designated bag holder for the bag. | |
| 4. Bag burst, food blocks the water inlet. | Start the cleaning process according to chapter Maintenance and Cleaning | |
| 5. Dirt accumulates inside the circulation system of the device. | Start the cleaning process according to chapter Maintenance and Cleaning | |
| 6. Electronics error Contact customer service | ||
| E009 | 1. Electronics defect | Contact customer service |
HINWEIS PLEASE NOTE
In the event of technical troubles, faulty devices or missing parts, please contact Customer Service.
16.4 Disposal of the Old Device
To protect the environment, it's important to dispose of old electronic devices properly. Do not place your old unit in the non-recyclable waste under any circumstances.
HINWEIS PLEASE NOTE
- Please take your old unit to the nearest recycling center for safe disposal.
- Until it can be disposed of properly, store your old unit away from children.