
ES8043 - Razor PANASONIC - Free user manual and instructions
Find the device manual for free ES8043 PANASONIC in PDF.




| Product Type | Electric Shaver |
| Brand | Panasonic |
| Model | ES8043 |
| Power Supply | AC Adaptor 100-240 V AC, 50/60 Hz (model RE7-27) |
| Battery Type | Built-in rechargeable lithium-ion |
| Charging Time | 1 hour for a full charge |
| Battery Life | Approximately 14 shaves (3 minutes per shave) |
| Quick Charge | 5 minutes for one shave |
| Usage | Dry or wet shaving (Wet/Dry) |
| Waterproof | Usable in the shower |
| Head Type | Pivoting head with center blade and two foils |
| Shaving Modes | Free pivoting (soft) and locked (lock) |
| Special Functions | Turbo mode for cleaning by sonic vibrations |
| Built-in Trimmer | Yes, sliding for sideburns |
| Cleaning | Under running water with liquid soap, or with a brush |
| LED Indicators | Battery level (low/medium/full) and charging status |
| Replaceable Parts | Outer foil (1 year) and inner blades (2 years) |
| Safety | Unplug before water cleaning; do not immerse charger |
| Included Accessories | Charger, charging stand, cleaning brush, storage case |
| Noise Level | 64 dB(A) |
Frequently Asked Questions - ES8043 PANASONIC
User questions about ES8043 PANASONIC
0 question about this device. Answer the ones you know or ask your own.
Ask a new question about this device
Download the instructions for your Razor in PDF format for free! Find your manual ES8043 - PANASONIC and take your electronic device back in hand. On this page are published all the documents necessary for the use of your device. ES8043 by PANASONIC.
USER MANUAL ES8043 PANASONIC
Wet/Dry/Rechargeable Shaver
Operating Instructions
Model No. ES8044/ES8043
Matsushita Electric Works Wanbao (Guangzhou) Ltd.
Wanbao Base, Zhong Cun Pan Yu, GuangDong 511495, China
Before operating this unit, please read these instructions completely.
P000-005_ES8044_43_EU
05.2.21
11:15
2
1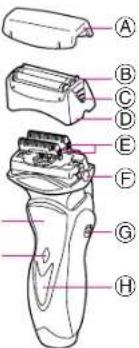
2
2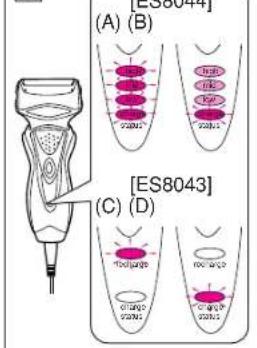
6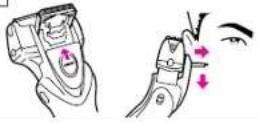
7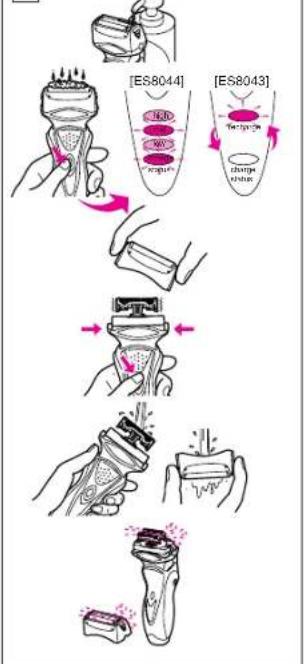
8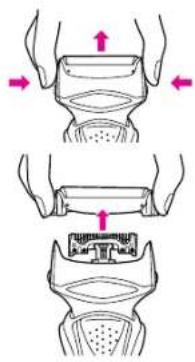
9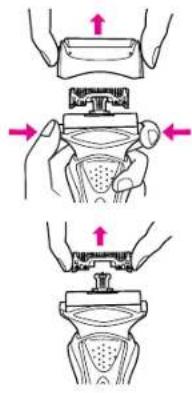
3
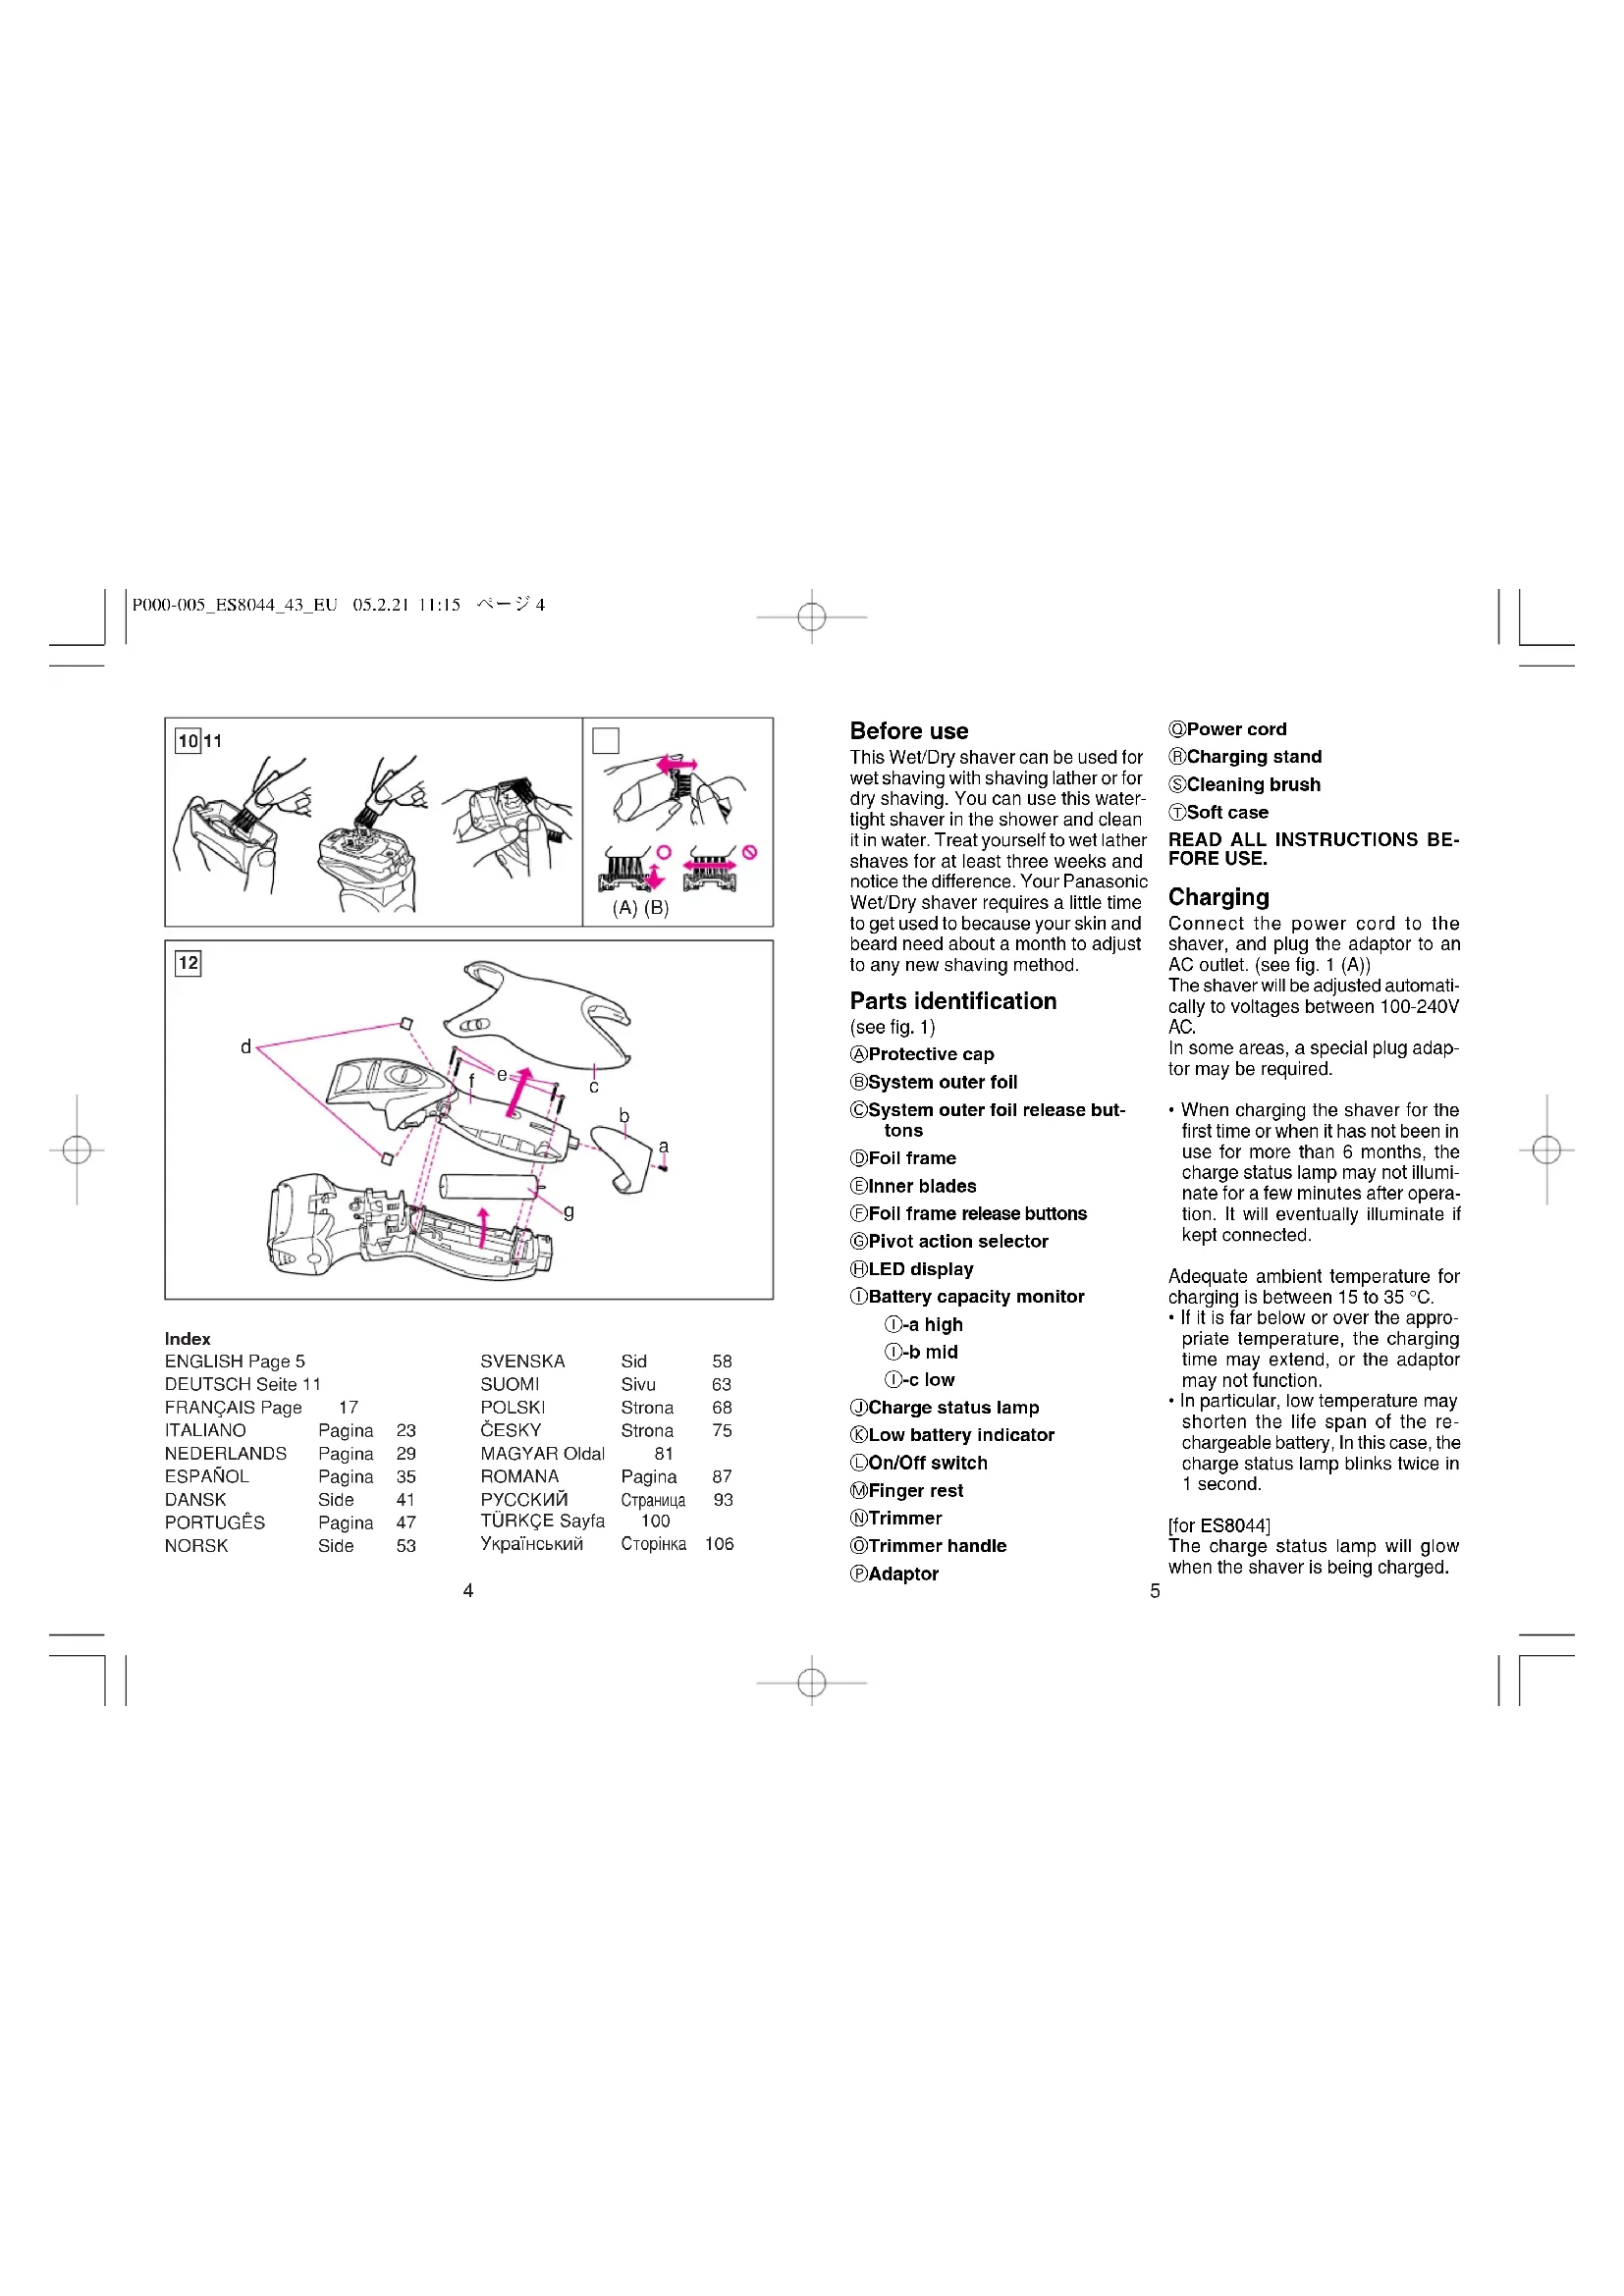
1011
(A) (B)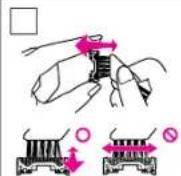
12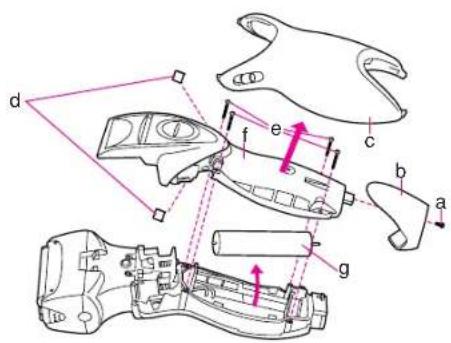
Index
| ENGLISH Page 5 | SVENSKA | Sid | 58 | ||
| DEUTSCH Seite 11 | SUOMI | Sivu | 63 | ||
| FRANÇAIS Page 17 | POLSKI | Strona | 68 | ||
| ITALIANO | Pagina | 23 | ČESKY | Strona | 75 |
| NEDERLANDS | Pagina | 29 | MAGYAR Oldal | 81 | |
| ESPÁÑOL | Pagina | 35 | ROMANA | Pagina | 87 |
| DANSK | Side | 41 | PYCCKÍN | Старашиа | 93 |
| PORTUGÉS | Pagina | 47 | TÜRKQE Sayfa | 100 | |
| NORSK | Side | 53 | Украïnhськý | Сторінka | 106 |
Before use
This Wet/Dry shaver can be used for wet shaving with shaving lather or for dry shaving. You can use this watertight shaver in the shower and clean it in water. Treat yourself to wet lather shaves for at least three weeks and notice the difference. Your Panasonic Wet/Dry shaver requires a little time to get used to because your skin and beard need about a month to adjust to any new shaving method.
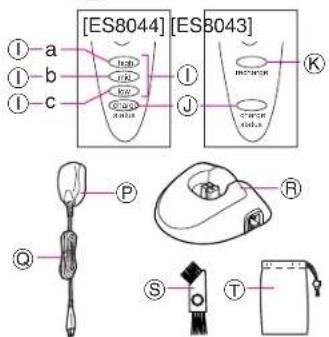
Parts identification
(see fig.1)
Protective cap
System outer foil
System outer foil release buttons
Foil frame
Inner blades
Full frame release buttons
Pivot action selector
LED display
Battery capacity monitor
High, mid, low
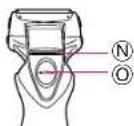
Charge status lamp, Low battery indicator, On/Off switch, Finger rest, Trimmer, Trimmer handle, Adaptor
Power cord
Charging stand, Cleaning brush
Soft case
READ ALL INSTRUCTIONS BEFORE USE.
Charging
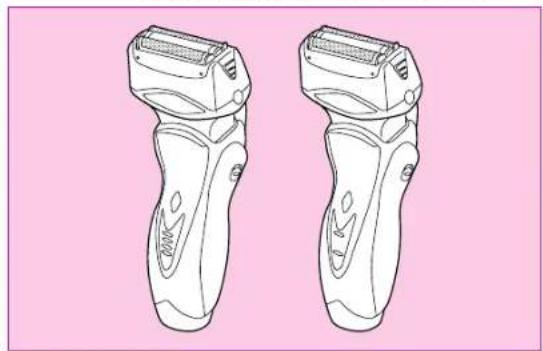
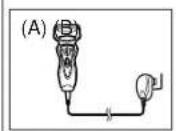
Connect the power cord to the shaver, and plug the adaptor to an AC outlet. (see fig. 1 (A))
The shaver will be adjusted automatically to voltages between 100-240V AC.
In some areas, a special plug adaptor may be required.
- When charging the shaver for the first time or when it has not been in use for more than 6 months, the charge status lamp may not illuminate for a few minutes after operation. It will eventually illuminate if kept connected.
Adequate ambient temperature for charging is between 15 to 35°C. If it is far below or over the appropriate temperature, the charging time may extend, or the adaptor may not function. In particular, low temperature may shorten the life span of the rechargeable battery. In this case, the charge status lamp blinks twice in 1 second.
[for ES8044]
The charge status lamp will glow when the shaver is being charged.
The battery capacity monitor will all illuminate and the charge status lamp will blink after charging is completed (see fig. 2 (A)).
10 minutes after charging is completed, the battery capacity monitor will extinguish and the charge status lamp will continue to blink (see fig. 2 (B)).
You can fully charge the shaver in 1 hour if the LED display shows "low" (low).
The battery capacity monitor indicates the charge remaining in the battery in 3 levels (high/mid/low). The unit can be used once or twice more after the "low" (low) starts to blink. (Differs depending on the use situation.)
[for ES8043]
The charge status lamp will glow when the shaver is being charged. It will blink when the charging is completed (see fig. 2 (D)).
You can fully charge the shaver in 1 hour if the low battery indicator blinks (see fig.2C).
The unit can be used once or twice more after the low battery indicator starts to blink.
A full charge will supply enough power for approx. 14 shaves (3 minutes per shave for a normal beard). Before travelling, charge it fully for 1 hour if you will not be taking the adaptor with you.
In case your shaver is without charge, you may quick charge it for 1 shave in about 5 minutes.
Charge with charging stand
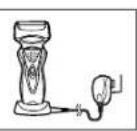
(see fig. 1 (B))
To charge with the charging stand, connect the power cord to the charging stand. Place the shaver into the stand, and plug the adaptor into the AC outlet.
You can always store your shaver in the charging stand to maintain full battery capacity. This shaver cannot be overcharged.
Using your shaver
Caution - The system outer foil is very thin and can be damaged if handled improperly. Before each use, always check the foil for damage. To avoid personal injury, do not use if the foil or other parts of the shaving head are damaged.
Disconnect the power cord from the shaver, and push the On/Off switch to turn the shaver on.
If you push and hold the On/Off switch for more than 2 seconds, it will activate the turbo mode for "sonic" vibration cleaning. (see "Cleaning your shaver") Caution: Shaving with "sonic" vibration may damage your skin. Please turn it off and on again to deactivate the turbo mode.
Do not place fingers on the On/Off switch during use.
This may cause the shaver to stop during use or change it to the "sonic" vibration cleaning mode. Place your finger on the finger rest during use.
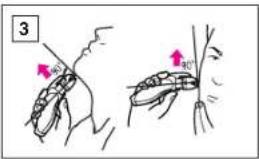
Hold the shaver at a right angle (90°) to your skin (see fig. 3). Start out shaving by applying gentle pressure to your face. Stretch your skin with your free hand and move the shaver back and forth in the direction of your beard. You may gently increase the amount of pressure as your skin becomes accustomed to this shaver. Applying excessive pressure does not provide a closer shave.
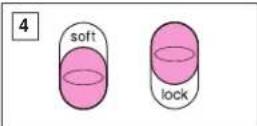
Pivot action selector
(see fig. 4)
Use the pivot action selector to choose the shaving mode, "soft" (soft) and "lock" (lock) based on your shaving preference.
The pivot action can be changed whether the switch is turned on or off.
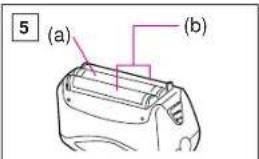
System outer foil
(see fig. 5)
System outer foil has a slit blade (a) between 2 foils (b). They move up and down independently to follow the contours of your face.
The slit blade catches and cuts longer and lying hairs easily.
For wet shaving
Put a thin layer of shaving foam on your face which works as a lubricator. Shaving foam is the most suitable among many other shaving aids
(gel, soap, cream, etc.). Do not put a thick layer of shaving foam as it may affect shaver's performance. If the shaving head is clogged with foam, simply rinse it under running water.
Using the trimmer
(see fig. 6)
Slide the trimmer handle up to open the trimmer.
Place the trimmer at a right angle to your skin and move it downward to trim sideburns.
Cleaning your shaver
(see fig. 7)
Warning - To prevent electric shock or personal injury, disconnect the power cord from the shaver before cleaning with water.
For cleanliness and convenience, we recommend that you clean your shaver with water and a liquid hand soap. Regular cleaning will keep your shaver in good condition while preventing odors or bacteria from developing, and maintain the cutting performance.
With the system outer foil in place, apply some hand soap onto the outer foil.
Push and hold the On/Off switch for more than 2 seconds to activate the turbo mode for "sonic" vibration cleaning.
At the same time, the lamps of the Battery capacity monitor (ES8044) or Low battery indicator/Charge status lamp (ES8043) will flash randomly.
Pour some water over the outer foil. After about 20 seconds, it will be automatically turned off, or you can turn it off by pushing the On/Off switch.
Remove the foil frame and push the On/Off switch for more than 2 seconds to activate the turbo mode for "sonic" vibration cleaning, and clean it with running water.
Wipe off any moisture from the shaver with a dry cloth and dry it without the foil frame.
Brush cleaning
Squeeze the foil frame release buttons and lift the foil frame upward to remove it (see fig. 9). Remove the inner blades one at a time by grasping it firmly at both ends and pulling it straight away from the shaver. Clean the outer foils, the shaver body, and the trimmer with the long brush (see fig. 10). Clean the inner blades with the short brush by moving it in the direction in fig. 11 (A). Do not move the brush in the direction in fig. 11 (B), as it will damage the inner blade and its cutting performance. Do not use the short brush to clean the outer foils.
Replacing shaving head components
It is recommended that you replace the system outer foil at least once a year and the inner blade at least once every 2 years to maintain your shaver's cutting performance.
Replacing the system outer foil (see fig. 8)
Squeeze the system outer foil release buttons and lift the system outer foil upward to remove it. To insert the new system outer foil, press down until it snaps into place.
Replacing the inner blades (see fig. 9)
Squeeze the foil frame release buttons and lift the foil frame upward to remove it. Remove the inner blade one at a time by grasping it firmly at both ends and pulling straight away from the shaver.
Do not touch the metal parts of inner blades.
To insert the new inner blade, hold the blade one at a time at both ends and press downward until it snaps into the shaver.
For environmental protection and recycling of materials
This shaver contains a Lithium-ion battery.
Please make sure that the battery is disposed of at an officially assigned location, if there is one in your country.
How to remove the built-in rechargeable battery before disposal of the shaver (see fig. 12)
WARNING: Do not attempt to replace the battery for the purpose of reusing the shaver. This could result in the risk of fire or electric shock.
The battery in this shaver is not intended to be replaced by consumers. However, the battery may be replaced at an authorized service center. The procedure described below is intended only for removal of the rechargeable battery for the purpose of proper disposal.
- Disconnect the power cord from the shaver when removing the battery.
- Remove the bottom cover screw (a).
- Remove the bottom cover (b).
- Slide the back panel (c) and remove it.
- Remove the housing clips (d).
- Remove the four housing screws (e).
- Remove the housing B (f).
- Lift the battery (g) and remove it.
Caution
- Do not charge the shaver where it will be exposed to direct sunlight or a heat source, or where there is a lot of moisture.
- Use only the included adaptor RE7-27 to charge the ES8044/ES8043 shaver.
- Dry the shaver completely before charging it.
- The shaver and adaptor will become slightly hot during use or charging, however this is not a malfunction.
- Keep the adaptor away from water and handle it only with dry hands.
- Grip the adaptor when disconnecting it from an AC outlet; tugging on the power cord may damage it.
- Store the adaptor in a dry area where it will be protected from damage.
- Do not pull, twist, or severely bend the power cord.
- Do not wrap the power cord tightly around the appliance.
- If the power cord gets damaged, it alone cannot be replaced. Contact an authorized service center.
- In cases where static noise is emitted from the television during use or recharging, connect the adaptor to a different outlet.
- Do not touch the edge (metal part) of the inner blade. Failure to observe this may lead to hand injuries.
- Wash the shaver in tap water. Do not use salt water or boiling water. Also, do not use cleaning products that are designed for toilets, bathrooms or kitchen appliances. Do not submerge the shaver for a long time.
- Do not wipe any part of the shaver with thinner, benzine or alcohol. Clean it by using a cloth dampened with soapy water.
- Do not take the housing apart as this can affect the watertight construction.
- Do not clean with water when the shaver is connected to the power cord.
- When cleaning the shaver with water, do so with both the inner blades attached. (Doing so with only one of the inner blades attached makes an abnormal noise and may damage the shaver.)
- Keep the unit away from children.
- Keep instructions in a safe place.
This product is intended for household use only.
Airborne Acoustical Noise: 64 (dB(A) re 1pW)
Before use
Use the mode selector to choose the shaving mode "soft" (soft) or "lock" (lock) depending on your preference.
The operating mode can be changed regardless of whether the appliance is in the "on" or "off" position.
Top hair trimmer system
(see fig. 5)
The top hair trimmer system (a) is secured between two combs (b). They move up and down independently of each other, following the contour of the skin.
The central cutting unit easily captures and cuts the longest hairs that lie close to the skin.
Wet shaving
Apply a thin layer of shaving gel or foam: this will perform a lubricating function. Shaving gel is a better product compared to many foams (gel, cream, etc.). Do not apply the gel in a thick layer, as this may negatively affect the effectiveness of the shave. If the shaving head is covered with gel, it is enough to rinse it under the tap.
Using the trimmer
(see fig. 6)
Slide the trimmer lever up to open the trimmer. Place the trimmer at a right angle to the skin and slide the shave downwards to trim the sideburns/beard.
Cleaning the shaver (see fig. 7)
Be careful to avoid electric shock or injury from the blades. Disconnect the shaver from the power supply before cleaning the shaver with water.
In all cases, for ease of use, it is recommended to clean the shaver under running water. Regular cleaning will help keep the shaver in good condition, prevent the buildup of unpleasant odors or bacteria, and also ensure high shaving efficiency. Do not remove the outer foil, rinse it with water.
Press and hold the switch "On/Off" for at least two seconds to activate the cleaning mode in the "sonic" setting.
Simultaneously, the charging indicator for the battery (ES8044) or the battery discharge indicator/charging status indicator (ES8043) will flash in a random sequence.
Rinse the outer foil with a small amount of water. After approximately 20 seconds, the shaver will turn off automatically, or you can turn it off by pressing the "On/Off" switch. Remove the frame for the foil, press and hold the "On/Off" switch for at least 2 seconds to turn on the cleaning mode in the "Sonic" setting, then rinse the shaver under running water.
Remove the blade from the device and dry it without the frame.
Cleaning
Cleaning the outer blades, removing the outer blade, and cleaning it (see fig. 9). To remove the inner blades, grasp them firmly from both sides and pull them out of the blade. Clean the outer blades, the blade housing, and the blades with a soft brush (see fig. 10). Clean the inner blades with a short brush, moving it in the direction indicated in fig. 11 (A). Do not move the brush in the direction indicated in fig. 11 (B) - this will damage the inner blades and reduce their cutting performance. Do not use a short brush for cleaning the outer blades.
Replacing the shaving head components
To maintain high shaving performance, it is recommended to replace the outer blade and cutter at least every year, and the inner blades at least every two years.
Replacing the outer blade and cutter
(see fig. 8) Press the release buttons on the shaving head, lift it up to remove it. Then remove the inner blades, firmly grasping them from both sides and pulling them upward out of the blade. Insert the new inner blades one by one, grasping each from both sides, and press down until they click into place in the blade.
Replacing the inner blades
(see fig. 9) Press the frame release buttons, lift it up to remove it. Then remove the inner blades, firmly grasping them from both sides and pulling them upward out of the blade. Do not touch the metal parts of the inner blades. Insert the new inner blades, grasping each from both sides, and press down until they click into place in the blade.
Protection of the environment and disposal of used materials
This shaver contains a lithium-ion battery.
Please dispose of the battery at an officially designated collection point, if such a service is provided in your country.
Removing the built-in battery for disposal of the shaver (see fig. 12)
CAUTION: Do not attempt to replace the battery for reuse in the shaver. This may cause fire or electric shock.
The battery in this shaver is not intended for replacement by the user. However, the battery can be replaced by an authorized service center. The procedure described below is intended only for removing the battery for proper disposal.
1. Unscrew the screw of the shaver head (a). 2. Unscrew the screw of the lower cover (a). 3. Remove the lower cover (b). 4. Pull the rear panel (c) and remove it. 5. Remove the housing screws (d). 6. Unscrew the housing screws (e).
P074-112_ES8044_43_EU
05.2.21
11:15
一98
- Remove the housing (f).
- Lift the battery (g) and remove it.
Caution
Do not charge the shaver in places exposed to direct sunlight, heat sources, or in rooms with high humidity. The user should only use the charger RE7-27 for charging the shaver ES8044/ES8043. Fully discharge the shaver before recharging. During charging, the shaver and charger may become slightly warm, but this is not a malfunction. Keep the charger away from water and only touch it with dry hands. - When disconnecting the charger, pull the plug, not the cord. If you pull the cord directly, you may damage it. Keep the charger in a dry place to protect it from damage. Do not pull the cord, do not twist or bend it strongly. Do not wrap the cord around the appliance. If the cord is damaged, it must be replaced by a qualified service center.
Contact an authorized service center. In cases where the shaver causes static interference on the TV during use or charging, plug the charger into a different outlet. - Do not touch the blade (metal part) of the inner cutter. Failure to comply with this requirement may result in injury to hands. Rinse the shaver under running water. Do not immerse the shaver in salt water or boiling water. Also, it is forbidden to use cleaning agents intended for cleaning toilets or kitchen equipment. Do not immerse the shaver in water for a long time. It is forbidden to wipe the outer parts of the shaver with thinner, benzene, or alcohol. Wipe the shaver with a cloth moistened with soapy water. Do not disassemble the shaver body, as this may impair its water resistance. Do not rinse the shaver under water if it is connected to the power supply. When cleaning the shaver under water, both inner blades must be attached. (If you perform such cleaning with only one blade attached, an imbalance may occur, which could lead to damage to the shaver.)
Keep out of reach of children. Store the instructions in a safe place.
This device is intended for household use only.
The service life of this product is 7 years from the date of manufacture, provided that the product is used in strict accordance with this instruction manual and applicable technical standards, as established in accordance with paragraph 2 of Article 5 of the Federal Law of the Russian Federation "On Protection of Consumer Rights".
BZ02
Made in China
The machine is electric.
Air acoustic noise 64 (B) at 1 m
Before use
Replacing the internal blades (Fig. MIN.9)
Press the release button for the cutting blade and remove the blade frame. Then remove the internal blade, holding it by the side edges and pulling it towards you.
Do not touch the metal surface of the internal blades. To install new internal blades, hold them by the side edges and insert them into the frame, pressing on the blades until you hear a click.
Environmental protection and disposal of materials
The trimmer contains a rechargeable battery. Ensure the battery is disposed of at an officially designated location, if such exists in your country.
Disposal of the built-in rechargeable battery before disposing of the trimmer (Fig. MIN.12)
WARNING: Do not attempt to replace the battery yourself to extend the use of the trimmer. You risk causing a fire or injury from electric shock.
The battery installed in the trimmer is not intended for replacement by the user. Battery replacement should only be done at an authorized service center. Follow the instructions provided for the safe disposal of rechargeable batteries. Before disposing of the trimmer, the battery must be removed from the device!
- Before disposing of the battery, remove it from the trimmer.
- Unscrew the screw (a) of the lower cover.
- Remove the lower blade (b). 3. Dry the blades thoroughly.
- Fix the trimmer head (d).
- Remove the battery (e). 7. Remove the battery pack (f). 8. Press the battery (g) and pull it out.
Safety precautions
It is forbidden to charge the battery of the trimmer in direct sunlight, near heat sources, or in conditions of high humidity. Charging the battery of the trimmer ES8044/ES8043 is allowed only with the charger RE7-27, which is included in the trimmer kit. - Pre-charge the battery completely dry. - During operation or charging, the trimmer and charger may heat up, but this is not a malfunction. Do not allow the charger to come into contact with water and handle it only with dry hands. When unplugging the charger from the AC outlet, hold it; do not pull the cord, as this may damage it. Store the charger in a dry place where it will be protected from damage. Do not twist, bend, or pull the cord at sharp angles.
P074-112_ES8044_43_EU
05.2.21
11:15
一112
Do not wrap the cord around the trimmer tightly. In case of damage, it is possible to replace only the cord. In any case, contact the official service center. In case of full discharge or charging of stationary batteries, insert the battery into another socket. Do not touch the blades (metal parts) of the cutting head. Improper handling may lead to injury. - Rinse the trimmer with running water. Do not use mineral or distilled water. Do not use cleaning agents intended for cleaning tiles, baths, or kitchen appliances. Do not immerse the trimmer in water or leave it in it. Do not wipe the trimmer components with solvents, gasoline, or alcohol. To clean the trimmer, use a cloth dampened with clean water. Do not disassemble the trimmer body to avoid its damage. It is forbidden to use the trimmer if it has fallen into water.
Remove the inner blade carefully. (If the inner blade is removed, it may be damaged and the trimmer may break). Store the trimmer in a dry place. Store the instructions in a safe place.
The service life (durability) established by the manufacturer for this product is 7 years from the date of manufacture, provided that the product is used in strict accordance with the operating instructions and technical standards applicable to this product.
The date of manufacture is indicated on the product.
Acoustic noise: 64 dB(A) (1pW)


- WET/DRY/RECHARGEABLE SHAVER
- OPERATING INSTRUCTIONS
- BEFORE USE
- PARTS IDENTIFICATION
- CHARGING
- [FOR ES8043]
- CHARGE WITH CHARGING STAND
- USING YOUR SHAVER
- PIVOT ACTION SELECTOR
- SYSTEM OUTER FOIL
- FOR WET SHAVING
- USING THE TRIMMER
- CLEANING YOUR SHAVER
- BRUSH CLEANING
- REPLACING SHAVING HEAD COMPONENTS
- REPLACING THE INNER BLADES (SEE FIG. 9)
- FOR ENVIRONMENTAL PROTECTION AND RECYCLING OF MATERIALS
- CAUTION
- TOP HAIR TRIMMER SYSTEM
- WET SHAVING
- (SEE FIG. 6)
- CLEANING THE SHAVER (SEE FIG. 7)
- CLEANING
- REPLACING THE SHAVING HEAD COMPONENTS
- REPLACING THE OUTER BLADE AND CUTTER
- REPLACING THE INNER BLADES
- PROTECTION OF THE ENVIRONMENT AND DISPOSAL OF USED MATERIALS
- REMOVING THE BUILT-IN BATTERY FOR DISPOSAL OF THE SHAVER (SEE FIG. 12)
- REPLACING THE INTERNAL BLADES (FIG. MIN.9)
- ENVIRONMENTAL PROTECTION AND DISPOSAL OF MATERIALS
- DISPOSAL OF THE BUILT-IN RECHARGEABLE BATTERY BEFORE DISPOSING OF THE TRIMMER (FIG. MIN.12)
- SAFETY PRECAUTIONS
Brand : PANASONIC
Model : ES8043
Category : Razor