
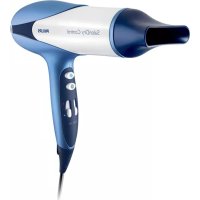
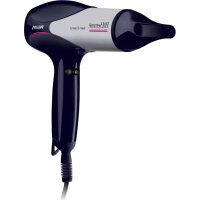
DryCare Pro BHD827 - Hair dryer PHILIPS - Free user manual and instructions
Find the device manual for free DryCare Pro BHD827 PHILIPS in PDF.
| Product type | Hair dryer |
| Brand | Philips |
| Model | DryCare Pro BHD827 |
| Power | 2400 W (estimated) |
| Technology | SenseIQ: intelligent temperature sensor for customized drying |
| Drying modes | Quick, Gentle, Manual, Style, Curl, Scalp |
| Heat settings | 3 levels (manual mode) |
| Speed settings | 3 levels (manual mode) |
| Cool shot function | Yes, dedicated button to lock in style |
| Included accessories | Concentrator, curl diffuser, scalp massager |
| Hanging loop | Yes, for easy storage |
| Settings memory | Yes (manual mode) |
| Cleaning | Vacuum for grilles, damp cloth for the body |
| Dimensions (L x W x H) | Approximately 28 x 10 x 28 cm (estimated) |
| Weight | Approximately 700 g (estimated) |
| Power supply voltage | 220-240 V, 50/60 Hz |
| Cable length | Approximately 2.5 m (estimated) |
Frequently Asked Questions - DryCare Pro BHD827 PHILIPS
User questions about DryCare Pro BHD827 PHILIPS
0 question about this device. Answer the ones you know or ask your own.
Ask a new question about this device
Download the instructions for your Hair dryer in PDF format for free! Find your manual DryCare Pro BHD827 - PHILIPS and take your electronic device back in hand. On this page are published all the documents necessary for the use of your device. DryCare Pro BHD827 by PHILIPS.
USER MANUAL DryCare Pro BHD827 PHILIPS
Specifications are subject to change without notice. © 2022 Kontraktike Philips N.V. All rights reserved.
3000.016.9328.6(2/02/2022)
PHILIPS
BH8D21, BH8D25 BH8D27
English 1
Былгарский 5
Čeština 9
Deutsch 13
Eesti 17
Francais 21
Hrvatski 25
Magyar 29
Ka3aKwa 33
Lietuviskai 37
Latviešu 41
Nederlands 45
Polski 49
Româna 53
Pycckn 57
Slovensky 62
Slovenscina 66
Srpski 70
yKpaHcbka 74
Azarbaycan 79
Rwjntu 83
johmynn 88
Kbiprbl34a 93
Toqnk 98
Türkmenge 103
O'zbek 108


1 ENGLISH
Congratulations on your purchase, and welcome to Philips! To fully benefit from the support that Philips offers, register your product at www.philips.com/welcome.
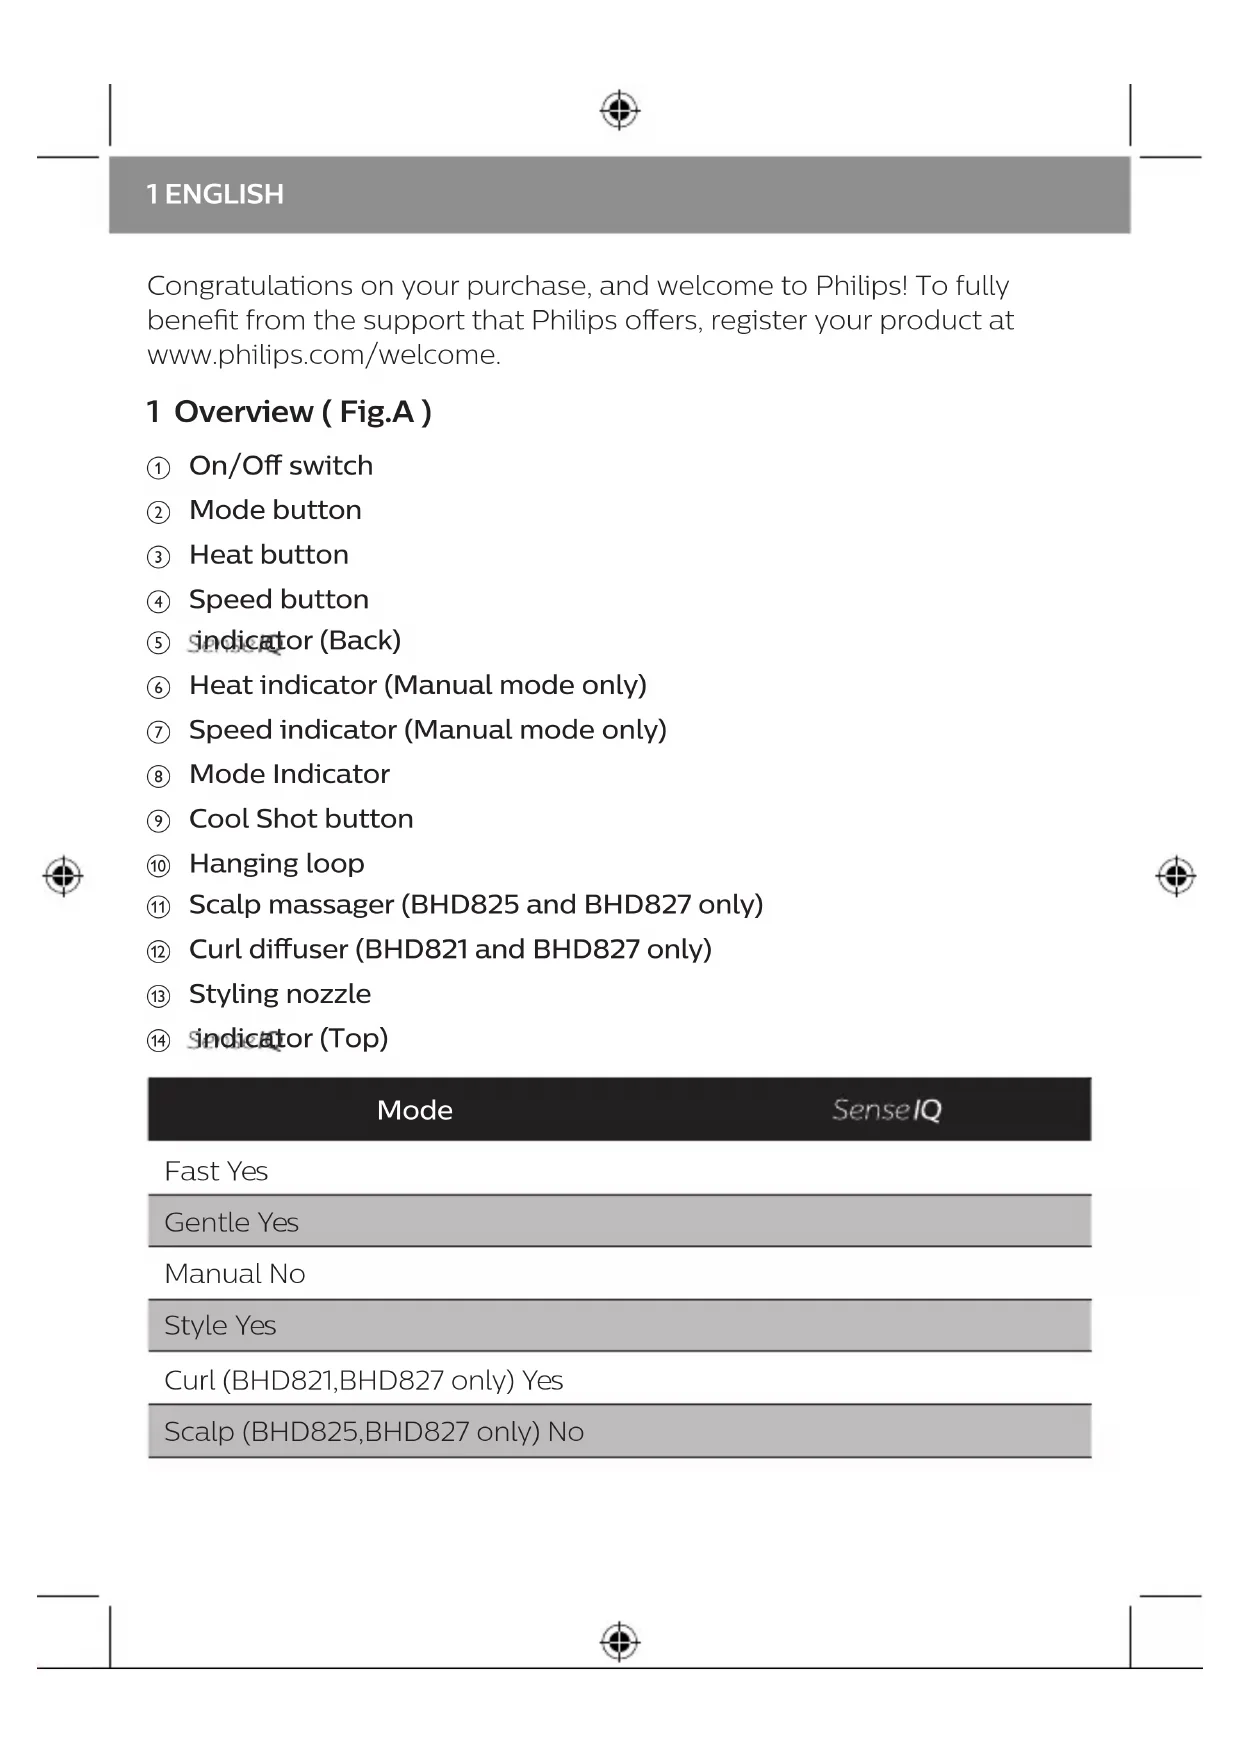
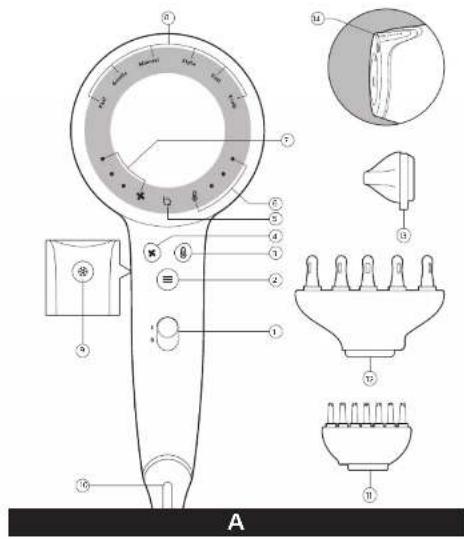
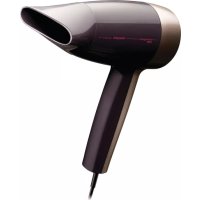
1 Overview (Fig.A)
① On/Off switch
② Mode button
③ Heat button
④ Speed button
⑤ indicator (Back)
⑥ Heat indicator (Manual mode only)
⑦ Speed indicator (Manual mode only)
⑧ Mode Indicator
Cool Shot button
10 Hanging loop
1 Scalp massager (BHD825 and BHD827 only)
② Curl diffuser (BHD821 and BHD827 only)
③ Styling nozzle
④ indicator(Top)
| Mode | SenseIQ |
| Fast Yes | |
| Gentle Yes | |
| Manual No | |
| Style Yes | |
| Curl (BHD821,BHD827 only) Yes | |
| Scalp (BHD825,BHD827 only) No |
2 How to Use Your Hairdryer Without Any Accessories
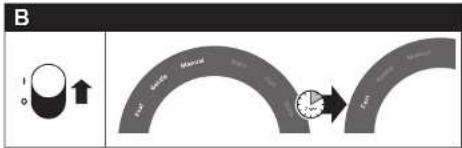
1 Connect the plug to a power supply outlet and switch on the appliance (①).
(Fig.B) Fast, Gentle, and Manual modes will indicate in the mode indicator (⑧) momentarily. Then, it will go to the default mode, i.e. Fast.
2 Press Mode button (②) to change between Fast, Gentle and Manual modes.
| Mode Function | |
| Fast | Dry your wet hair in a short time with its powerful performance. |
| Gentle | Dry hair at a caring temperature with gentle airflow. |
| Manual | Dry your hair with your desired Heat ® and Speed ® settings. Tips: • To activate Manual mode, you can press either the Mode ® button, Heat ® or Speed ® button. • Manual mode has memory function which saves your selected Heat and Speed settings for future use. |
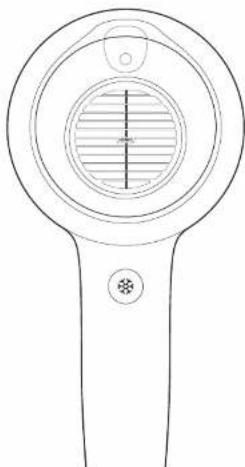
3 Press the Cool Shot button (⑨) ONCE for cool airflow to fix your style. At the back side of the dryer, the LEDs of Heat Indicator will be switched off as well. Only the LEDs of the Speed Indicator will be lit up. To deactivate this function, press the Cool Shot × Heat × Mode × button.
Note
- You do not need to press AND hold the Cool Shot button for cool airflow.
- Cool Shot ( is applicable to all modes. If you would like to change the speed in the Cool Shot setting, we recommend that you select Manual mode, change to Temperature 1 and select the desired speed.
3 ENGLISH
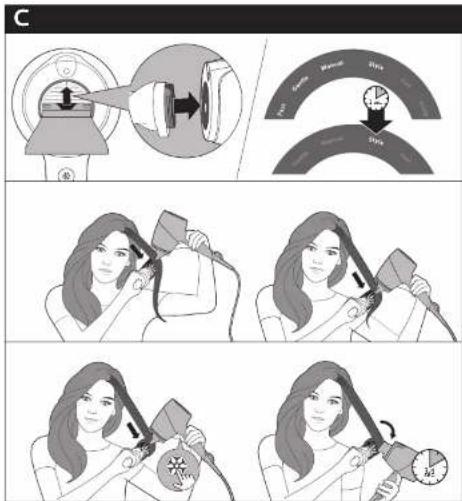
3 How to Style Your Hair (Fig.C)
1 Attach the styling nozzle (⑬) and the Style mode will activate automatically.
If you attach the styling nozzle and then switch on the dryer, you will see Fast, Gentle, Manual and Style modes in the mode indicator momentarily. Then, it will go to Style mode.
Note:
You can change to Gentle, Fast, Manual and Style mode as desired.
2 Select one section of hair (not wider than 5cm ) and place the brush underneath the hair near the roots. With the styling nozzle facing downward on your hair, move the brush and hairdryer in a single movement until it reaches the end of your hair. Repeat on other sections of hair.
3 To fix your style, press the Cool Shot button ONCE (⑨) to get cool airflow.
4 To create soft flicks: Slightly turn the brush inward when you reach the hair ends. Press the Cool Shot button ONCE and keep the hairdryer in the position for 3-4 seconds with cool airflow.
5 To remove the styling nozzle, simply take it off and the mode will switch to the previous setting.
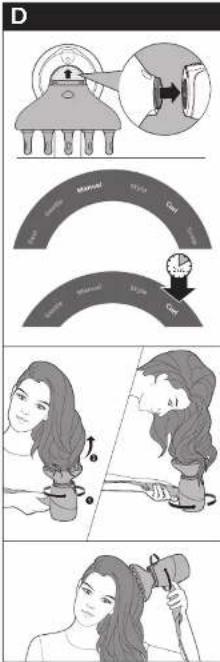
4 How to Use Curl Diffuser (BHD821, BHD827 only, Fig.D)
A curl diffuser is helpful for drying curly hair. If you have natural curly hair or permed curls, you can use a curl diffuser to enhance your curls. There is a hole on top of the curl diffuser, which allows Stosdetect your hair temperature when drying or styling the hair.
Note: You can change between Curl and Manual mode as desired.
1 Attach the curl diffuser ( ⑫ ) on the dryer and the Curl mode will activate.
2 Hold the hairdryer vertically and place the hair in a circular motion in between pins and move toward the scalp slowly.
3 Put the curl diffuser on your scalp and make rotating movements. It helps to dry your scalp and enhance volume at the roots of your hair.
4 To fix your style, press the Cool Shot button ONCE (⑨) to get cool airflow.
5 To remove curl diffuser, simply take it off and the mode will switch to the previous setting.
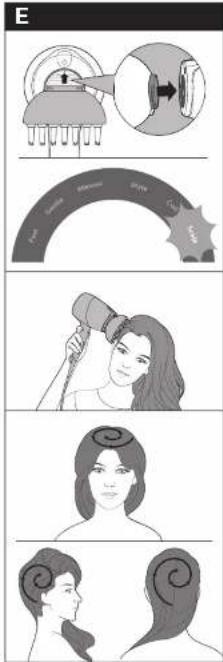
5 How to Massage Your Scalp (BHD825, BHD827 only, Fig.E)
The scalp massager attachment with the soft pins stimulates your scalp with vibration and gentle heat.
1 Attach the scalp massager attachment (①) on the dryer to activate the Scalp mode.
2 Gently place the massaging pins on your scalp for relaxation.
Note: The massager pins should touch the scalp. Do not press them hard on your scalp since this will reduce the effectiveness of the massager.
3 Move the scalp diffuser across different parts of your scalp in circular motion to dry your hair and massaging your scalp at the same time.
Note: Scalp mode can only be used with the scalp massager attachment. You cannot change to a different mode when this attachment is on the dryer.
6 After Use
Note: Do not immerse any attachments in water for cleaning.
1 Switch off the appliance and unplug it.
2 Place it on a heat-resistance surface until it cools down.
3 Use a vacuum cleaner to clear the dust at the grilles.
4 Clean the dryer with a damp cloth.
5. Keep it in a safe and dry place, free of dust. You can also hang it with the hanging loop (⑩).
7 Guarantee and Service
If you need information or if you have a problem, please visit the Philips website at www.philips.com/support or contact the Philips Customer Care Centre in your country (you find this phone number in the worldwide guarantee leaflet). If there is no Consumer Care Centre in your country, go to your local Philips dealer.


5 BbJIΓAPCKN
Поздраьваме ви за покупкату и добpe дошл Вьв Philips! 3a за ce ВьзползВаTe ИЗяло OT пededлаганatura OT Philips подрьжka, Perистрипайтей рожкту си на www.philips.com/welcome.
1 O6o6uence (Φu2.A)
① KliouвкЛ./ИЗКЛ.
② BytOH3apeKIM
③ ByToH 3a TempepaTypa
④ ByToH 3a cKOpOcT
⑤ INHnKaTOp3a(OT3a)
⑥ INHdkaTop 3a TeMnepaTypa (cMo 3a p6ueh pejkm)
⑦ INHdkaTop 3a ckopocT (cAmO 3a p6ueh peKIM)
⑧ INHДИКаTOP3apeKIM
⑨ ByToH 3a XlaHa CTpyA
⑩ YxO 3a 3aKa4BaHe
⑪ Macaikop 3a ckann (camo 3a BHD825 v BHD827)
⑫ ένγερ 3a Kβπις (cama 3a BHD821 n BHD827)
HaKpaHnK 3a oΦopMaHe
14 INHdNkatOp 3a (otrope)
Pekim
SenseIQ
Fast (Бързо) Да
Gentle (Heckno)Да
Manual (PbueH) He
Style (Ctvn)Да
Curl (KbDpeHe) (cMo 3a BHD821, BHD827) Da
Scalp (CkaII) (cAmo 3a BHD825, BHD827) He
2 Kak ga u3no3Bame Baunr ceuoap 6e3 akcecoapu
1 CbpykeTe ⅢeNceJa c KOHTaKTa N BkIIOye UpeHa. (①).
(Фиг.В)Бьр3,Heжен npbueh peЖIM lcce ce nokkaT ha INHДИКaTopa 3a peЖIM(⑧)3a MOMeHT.CleI TOBa lpe pemeHBe peЖIM no nopda36bnpaHe,T.e.Ha 6bp3 peЖIM.
2 HaTnSchHeTe 6byToHa 3a peKIM (②), 3a da npEeBKnIOuBaTe MeKdY 6bp3, HeJKeH n pBuVeH peKIM.
OHHIMRe OHaH TipKeAceHi3, 2 KbIaBik KeiAikke TaFbi 1 KblKocblaDbI caTbIn aLybIH 3 aHbIHda


37 LIETUVISKAI
IprimeaHne. He ouuuaTe hacaKn nyTem nx norgyKeHn B Body.
1 BbIKIIOUHTe np6Op n OTKIIOUHTe ero OT 3JIeKTPoCeTn.
2ПоложиTe npi6op Ha TepMOCTOnKyIO NOBepxHOCb I daIte emy OCTbITb.
3Дя ouHCTK peWteTK ΦeHa OT nbIIN NcNoJIb3yIte nbIInecoc.
4Для ounCTkn KOpnyca foHa nCNoJb3yIte BJaKHyIO TkaHb.
5 XpaHnTe np6op B 6e3oNaChOM n cyXOM MeCTe, 3aUuIeHHOM OT nbIN. TaKHe MoKHo NODBeCnTB np6op 3a CneuaJIbHyIO neTlIO (10).


61 PyCCKM
7 TapaHTnI n o6cnyKbAHne
BvDvIaIte Be6-CTOpiHky KomnaHii Philips www.philips.com/support
abo 3BepHITbCra do LcHTpy o6cIyROByBaHHra KJIeHTIB KOMnHaII Philips y CBOiIN KpaIH (CeH HOMep TelefoHy MoKHa 3HaHTN B rapaHTiHOMy
Talohi). Kaio y Baaiin KpaHi HeMae LcHTpy 06CnyroByBaHHa KJIeHTIB, 3BepHiTbcra do MicceBOrO dInepa Philips.
2 pokn rapaHTii nlloc 1 pik y pa3i peecTpaCiBnpo6y B lntepHeTI
ynpoIOBx3MiCzIbnicn npu6aHHa
KoMaHia Philips BCTaHOBIOE CToPcIyKbHa DaHn Bnpi6 - He MeHwe 3 pOKiB
Cnyk6a nIDtpmKn cNoXnBauiB
TeJ.: 0-800-500-697
(ДзВинки 3i StaцioHapнix i MOбьнх Teleфонов y Meжax Ykpaйн 6e3KoшTOBHi)
Для 6иьш ДeТальноi iHфОрmaцii 3aВiTайTe Ha www.philips.ua
79AZORBAYCAN
3 Yu Tabp 6a myu ycny6 doan MymknH act (TacBnpu C)
1 Mynxaka 6apon ycny6kyHnpo (13) nIOBa kyHei Ba PeXmN Ycny6 ba TaBpn xydkop fabOJ MerapdaI.
Arap shymo mylxaKa 6apOn ycny6kyHnpo naBact KApda, 6abdaH MynxuKKyHaKpO naBact KyHeD, dap HnwoHdNxahDa n peximxo 6a k Jax3a peximxon Te3, Mylonm, DaTbBa Ycny6 naIdo MeShaBaHd. BaDban, on 6a peximn Ycny6 6ap merapdaI.
Mapx:
Uymo peximpo 6a Mylonm, Te3, DaTn Ba Ycny6 a3 pyn xoxn uBa3 Kapda MetaBOHei.
2Якда муиpo (Ha BacebTap a3 5 cm) nHTnxO6 KyHei Ba uyTKapo 6apean mYxO qoIrgp KyHei. Myxaka 6apOn ycny6kyHnM yIxopo 6aNoeH paBOHa Kapda, yTKa Ba MmXyKKyHaKpo 60Яk xapaKaT yMboHei,TO KN OHxo 6a Hyrnn MyxO hapacAHd.Дap KncMaTxon dInrapn Mytakpop KyHei.
3 Bapon nClooxn ycny6n xud, TyrmaXyHyKpo *AK MAPOTNA (9) 6apOn rnpntaHn yapaehn xaBOON capd naxw KyHeD.
4 BaPon 3yOJ KAPdaHn MaBxON MaxIN: YyTKapo KaMe 6a DoxNt To6 dNxE, BaKTe KN TO HyrN MMyXo paceI. Ba TyrMaN XyHyKk KMAPOTNBa naxs KyHeD BA MyxUxKKyHaKpo Iap MaBKeB 3-4 baPon 6o qapaeHn capd HnroXdopeI.
5 Bapoi 6epyHkyHn Mynxaka, OHpo rpei Ba pejim 6a TaH3mOTn neuHa 6apmerapda.


4 A3 nΦy3Op yTabp 6oRnHCTnΦOda 6ypd (TaHxOBHD821,BHD827,TacBnprD)
Дифузори 3улфбарои xушкуни мйи 3улфони ууmo epin mednxad. Arap shymo mynxon qinrnan tabn e kn 3yflxopo 6abd a3 3ylnkynn KIMEBI doiTa 6oWeD, shymo nФфузор sbapon 3ylnkynipo sbapon 6extapkyHn 3ylnfoHn xyd nctnoda bypda metaboHeD. Nap 6olon DnФфузори 3ylnfshkofoe xact, kn sbapon MyaunHkyHnXapopatm MyIn shymo xaHROMn xuWKkyHn e KN ycny6kyHn MmKOH MeDnxad.
Uapx: Uymo peximpo 6aHn 3yIΦ Ba DaCTn a3 pyu xoxnTaHnp Doa MeTaBOHeD.
1 Mylnkaan 3ylo (12) 6a myxuykkyhak naBacKyHei Ba peKmN 3ylo fabol kapda MewaBaI.
2 MyxuKKyHaKpo amyHn HroXdopeB a Myxopo 6o xapaKaTxon daBpaBb BaHHn caHauKxo yOInp KyHeD Ba OXnCTa 6a nytcap XapaKaT KyHeD.
3ДиФуЗори 3yIΦpo 6a nyctn capn xud ryzopei Ba xapaKaTxon daBpaBkyHei. OH 6apoN xyuKkyHn nyctn cap epn MeDnxad Ba xaumpo dappean myxON yymo 6exTap MeKyHaJ.
4 Bapon nClooxn ycLy6n XyD, TyrMaH XyHyKpo *AK MAPOTNA (⑨) 6apOn rnpntaHn yapaehn xaBOu capd naXw KyHeJ.
5 Bapon 6epyhkyHm MyIxAkaan 3yIΦ, OHpo rIpeBb pejM 6a TaH3nMoTn neuHa 6apMerapdaI.
5 Yu Tabp nyctn capu ymopo macx KapdaH MymknH act (TaHxo BHD825, BHD827, TacBnp E)
Mynxkan mcxkyhna 6apon nycn cap 6o uTncxon mylonm myn cappo 6o Bn6paTcna Ba rapmn maxn CTmMyjTcna MekyHa.
1 3aMmam MacxkyHaKnDa nYcTn cappo (⑫) 6a MyxuKkyHaK 6apOn ΦabOJkyHn npexmN pYcTn cap naBac KyeIeI.
2 5TnΦTxon MacxkyHaHapO 6a nyctn capnx yd 6apOn poXat ryepei.
7apx: 5TnΦTxon maxckyHaHda 6a cTn cap xoxaI paCnI. OHXopo 6a
nyCTn cap caXT naXw HaKyHe, 3epo nH camapaHOKn MacxkyHaKpo
nact MekyHaI.
3Дифузори nyctn cappo yap KncmXOn rHyOryHn nyctn cap 6apon xuK KapdaHn MyB Ba MacxkyHn nyctn cap yap kBAKT daBpaBxapaKaT dNXeI.
Lapx: Peknmi nytcap TaHxo 6o 3ammam MacxkyHaan myn cap nctnoa yda metaboHa. Lymo xahromn 3amma da npxuknyhak 6ydaHaaw 6a pekmmxon rhyhoryn nBa3 Kapda HameTaBOHei.
6 Pnac a3 nctnfoda
Lapx: rroh 3ammapo 6apon To3akyn 6a 06 HaaHdo3eI.
1 TauchnoToxomyu KyeaBa a3 6apK yuo HaOeJ.
2 Ohpo 6a catxn rapmnto6OBap To xyHyKwaBy OoiHnp HAmoei.
3 Bapon HectkyHn nn Hr a3 nauhapaXo, a3 YaHrkawk nCTnoda 6apei.
4 Xyukkyhakpo 60 MaTOn HAM To3a KyHeI.
5 Tauxn3oTpo nap oon 6exatap, xuSK Ba To3a Hnroxdopei. Uymo nHcyHH MeTaBOHeD OHPO 6a Bocntan XaIka OBe3OH Kynei (10).
7 KafoJaT Ba Xn3MaTpacOH
Arap 6a shymo MaBlymOT lo3nM bo7aJ e arap shymo Mysknil KaWeJ, LyTpaH, 6a comohan Philips yap www.philips.com/support Bopnd shabeJ e yap Knsbapn xud Bo Mapka3n daCTTnpin MySTapnEHN Philips yap TAMOC WBeD (arap shymo TaBOHeN IN paKaMn TelefoHpo a3 pyu BapaKan KafoNat yMumuaXOH neBd). Arap yap Knsbapn shymo Mapka3n Hnroxy6HH nCTeBMOJkyHaHaOn MaBuyd Na6O7ad, 6a dInleprn maxaJInn Philips paBeJ.
103TÜRKMENCE
Satyn almagyñz bilen gutlayárys we Philips dunyäsine hos geldiniz! Philips-iñ hódürleyän goldawyndan doly peydalanmak üçin, önümünizi www.philips.com/welcome salgysynda bellige alyn.
- English 1
- ENGLISH
- Overview (Fig.A)
- How to Use Your Hairdryer Without Any Accessories
- Note
- ENGLISH
- How to Style Your Hair (Fig.C)
- Note:
- How to Use Curl Diffuser (BHD821, BHD827 only, Fig.D)
- Note: You can change between Curl and Manual mode as desired.
- How to Massage Your Scalp (BHD825, BHD827 only, Fig.E)
- After Use
- Guarantee and Service
- BbJIΓAPCKN
- O6o6uence (Φu2.A)
- Pekim
- SenseIQ
- Kak ga u3no3Bame Baunr ceuoap 6e3 akcecoapu
- LIETUVISKAI
- PyCCKM
- TapaHTnI n o6cnyKbAHne
- 79AZORBAYCAN
- Yu Tabp 6a myu ycny6 doan MymknH act (TacBnpu C)
- Mapx:
- A3 nΦy3Op yTabp 6oRnHCTnΦOda 6ypd (TaHxOBHD821,BHD827,TacBnprD)
- Uapx: Uymo peximpo 6aHn 3yIΦ Ba DaCTn a3 pyu xoxnTaHnp Doa MeTaBOHeD.
- Yu Tabp nyctn capu ymopo macx KapdaH MymknH act (TaHxo BHD825, BHD827, TacBnp E)
- Pnac a3 nctnfoda
- KafoJaT Ba Xn3MaTpacOH
- 103TÜRKMENCE
Brand : PHILIPS
Model : DryCare Pro BHD827
Category : Hair dryer