TYST10M - TV PANASONIC - Free user manual and instructions
Find the device manual for free TYST10M PANASONIC in PDF.

User questions about TYST10M PANASONIC
0 question about this device. Answer the ones you know or ask your own.
Ask a new question about this device
Download the instructions for your TV in PDF format for free! Find your manual TYST10M - PANASONIC and take your electronic device back in hand. On this page are published all the documents necessary for the use of your device. TYST10M by PANASONIC.
USER MANUAL TYST10M PANASONIC
natural_image
Technical line drawing of a mechanical component with mounting holes and curved base (no text or symbols)Model No.
TY-ST10-H
TY-ST10-M
| プラズマディスプレイ据置きスタンド取り付け設置説明書取り付け設置前に、この説明書とワイドプラズマディスプレイの取扱説明書をよくお読みのうえ、正しい取り付け設置を行ってください。(移動やメンテナンスのときは、必要になる場合がありますので保存いただきますようお願いします。) | 日本語 |
| Pedestal for Wide Plasma DisplayInstallation InstructionsBefore attempting to assemble these accessories, please read these instructions completely.Please retain this book for future reference. | English |
| Sockel für PlasmadisplayInstallationsanleitungVor der Installation lesen Sie bitte diese Anleitung sorgfältig durch.Diese Anleitung zum späteren Nachschlagen aufbewahren. | Deutsch |
| Vloerstandaard voor BreedbeeldPlasmadisplay MonitorInstallatiehandleidingLees deze handleiding zorgvuldig door alvorens u probeert deze accessoires te monteren.Bewaar de handleiding voor het geval dat u later iets wilt opzoeken. | Nederlands |
| Piedistallo per lo schermo al plasma-16:9Instruzioni per l'installazionePrima di iniziare a montare questi accessori, siete pregati di leggere interamente le presenti istruzioni.Siete inolte pregati di conservare questo libro per future consultazioni. | Italiano |
| Piédestal pour l'Ecran plasma 16/9èmeManuel d'installationAvant d'essayer d'assembler ces accessoires, veuillez lire ces instructions complètement.Veuillez garder ce manuel pour une référence future. | Français |
| Pedestal para Pantalla Panorámica de PlasmaInstrucciones de instalaciónAntes del instalar estos accesorios, lea cuidadosamente estas instrucciones.Guarde estas instrucciones para futuras referencias. | Español |
| Bottenplatta för Bred plasma-monitorMonteringsanvisningarLäs dessa anvisningar noggrant innan du monterar samman dessa tillbehör.Behåll häftet för framtida referens. | Svenska |
| Sokkel til bredformat-plasmaskærmMonteringsvejledningLæs hele denne vejledning grundigt, inden du samler dette tilbehör.Gem vejledningen til brug i fremtiden. | Dansk |
| 等离子显示器安置台架安装设置说明书在安装设置之前,请务必先认真阅读本说明书和等离子显示器的使用说明书,然后进行正确的安装设置。(因为在搬运或维修之时,可能还要再次查阅本说明书,所以阅读之后请将本说明书妥为保管。) | 中文 |
| 플라즈마 디스플레이 설치 스탠드설치 설명서설치 전에 본 설명서와 와이드 플라즈마 디스플레이의 취금 설명서를 숙지하시고 올바르게 설치해 주십시오.(이동 또는 수리 관리시 필요할 수 있으므로 잘 보관해 주시기 바랍니다.) | 한국어 |
安全上のご注意
必ずお守りください
natural_image
Technical line drawing of a mechanical component with mounting holes and curved surfaces (no text or symbols)② 太いねじ ...... 3
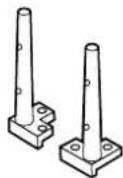
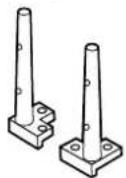
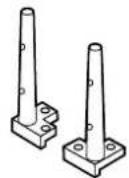
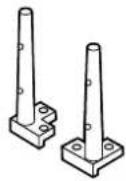
⑥ ポール ...... 2
③ 長いねじ. …… 4

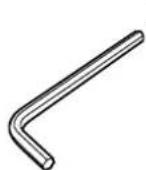
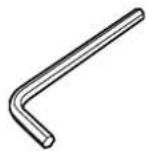
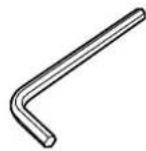
⑦ 六角レンチ ......1

④ 土台 .....1
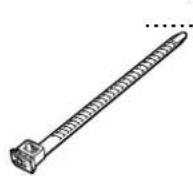
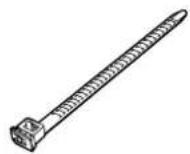
⑧ バンド ......1
スタンドを組み立てる
1. 土台にベースを取り付ける
Precautions with regard to setting up
WARNING
Installation work should only be carried out by a qualified technician.
- If the pedestal is not installed correctly, the Wide Plasma Display may fall over and personal injury may result.
CAUTION
Do not use any displays other than those given in the catalogue.
Do not climb up onto the pedestal or use it as a step. (Young children should be made particularly aware of this caution.)
- If the unit falls over or becomes damaged through misuse, injury may result.
Do not use the pedestal if it becomes warped or physically damaged.
- If you use the pedestal whilst it is physically damaged, personal injury may result. Contact your nearest Panasonic Dealer immediately.
Set up on a stable, level surface.
- If this is not done, the unit may fall over and become damaged, and personal injury may result.
Do not use in places with high humidity.
- Long-term usage in such conditions can cause warping or deformation. This can lead to loss of strength, and the unit may fall over and become damaged, and personal injury may result.
During setting-up, make sure that all screws are securely tightened.
- If sufficient care is not taken to ensure screws are properly tightened during assembly, the pedestal will not be strong enough to support the Wide Plasma Display, and it might fall over and become damaged, and personal injury may result.
Use the accessory fall-prevention brackets to secure the Wide Plasma Display.
- If the unit is knocked or children climb onto the pedestal with the Wide Plasma Display installed, the Wide Plasma Display may fall over and personal injury may result.
Two people are required to install and remove the display.
- If two people are not present, the display may be dropped, and personal injury may result.
- Leave a space of at least 3^15/16 inches (10 cm) at the top, left and right, at least 2^3/8 inches (6 cm) at the bottom, and at least 2^49/64 inches (7 cm) at the rear.
Notes on handling
1) If the unit is placed in direct sunlight or next to a stove, the light and heat may cause discoloration or deformation.
2) Cleaning
Wipe the unit with a dry cloth. If the unit is particularly dirty, clean it using a cloth soaked with water to which a small amount of neutral detergent has been added, and then wipe with a dry cloth.
Do not use products such as solvents, thinner or household wax for cleaning, as they can damage the surface coating.
(If using a chemically-treated cloth, follow the instructions supplied with the cloth.)
3) Do not attach sticky tape or labels, as they can make the surface of the pedestal dirty.
Parts for assembly
① Short screws .... 4

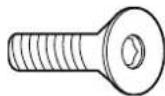
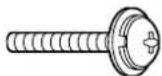
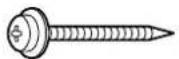
② Large screws ... 3

③ Long screws .... 4
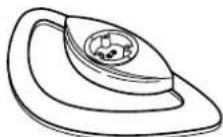
④ Pedestal ..... 1

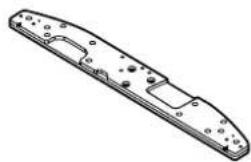
⑤ Base ..... 1
natural_image
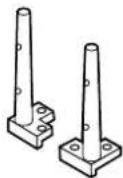
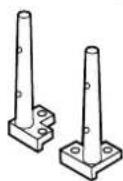
Technical line drawing of a mechanical part with mounting holes and internal channels (no text or symbols)⑥ Poles ..... 2

⑦ Allen key ..... 1

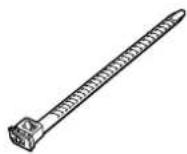
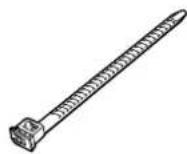
⑧ Binding strap ... 1

Assembling the stand
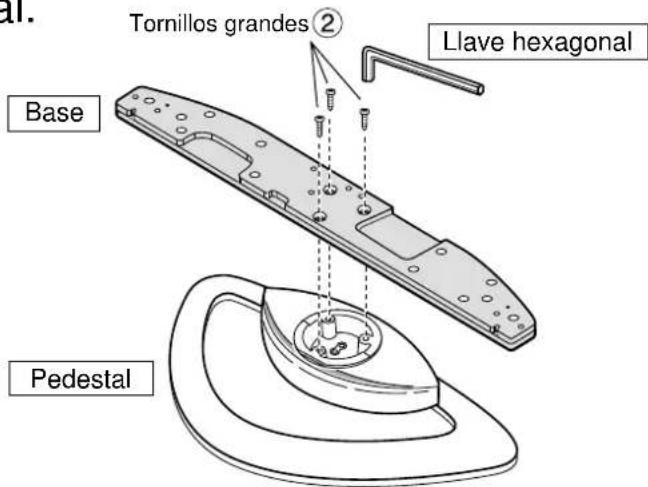
1. Attach the base to the pedestal.
Using the Allen key ⑦ securely fasten the base to the pedestal with the large screws ②, as shown in the diagram on the right.
text_image
Tornillos grandes ② Llave hexagonal Base Pedestal2. Attach the poles.
Securely attach both left and right poles to the top face of the base as shown below using short screws ①.
For 42-inch/50-inch
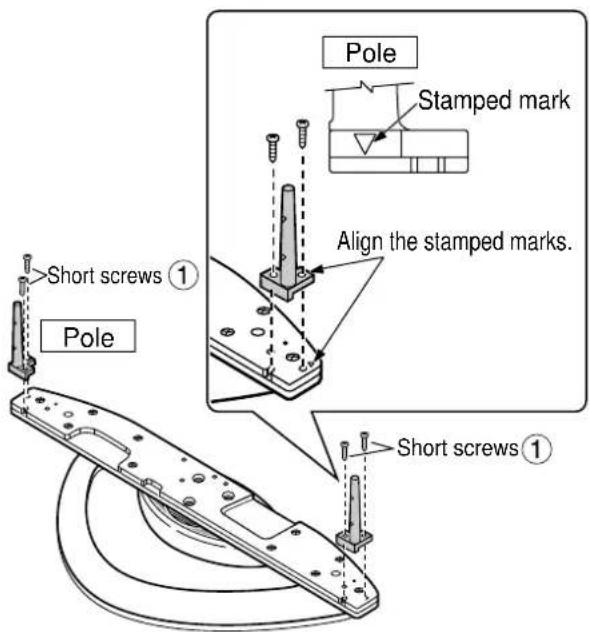
text_image
Pole Stamped mark Align the stamped marks. Short screws ① Pole Short screws ①For 37-inch
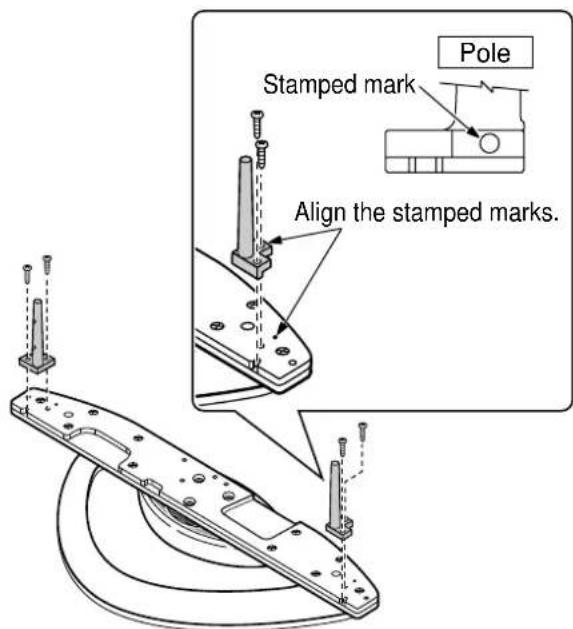
text_image
Stamped mark Pole Align the stamped marks.Attach to the display console
- Attach the connection cables to the display.
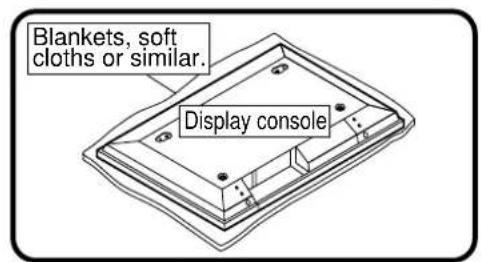
text_image
Blankets, soft cloths or similar. Display console* Place clean blankets or similar on a level floor or table, and place the display on top of them facing down.

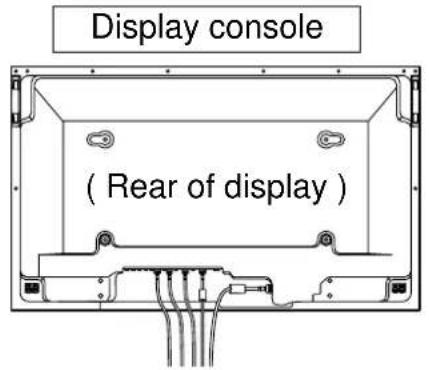
text_image
Display console (Rear of display)- Insert the poles into the holes in the display console.
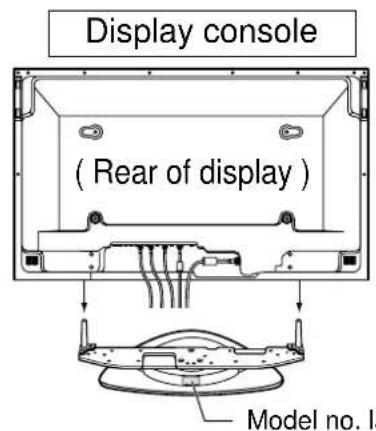
text_image
Display console ( Rear of display ) Model no. laPosition the side of the pedestal with the model no. label to the rear. Push the assembly into the display until it stops.
- Fasten with screws

text_image
Display console (Rear of display) Long screws ③ Long screws ③Securely fasten using long screws ③. * Work on a level and stable surface.
Cable Binding Instructions
■ Bind all cables to the PDP base with the supplied binding strap.
Rear View
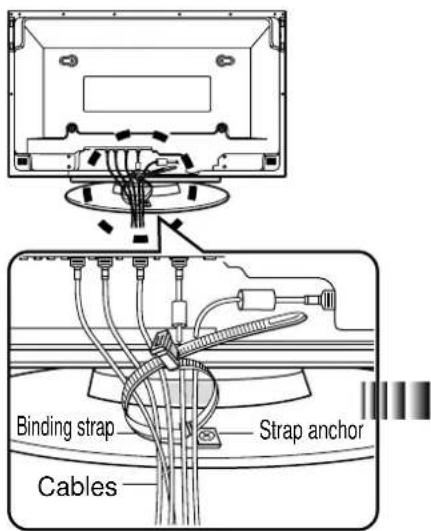
text_image
Binding strap Cables Strap anchorWhile ensuring there is sufficient slack in the power cord to minimize stress, firmly bind all cables with the supplied binding strap.
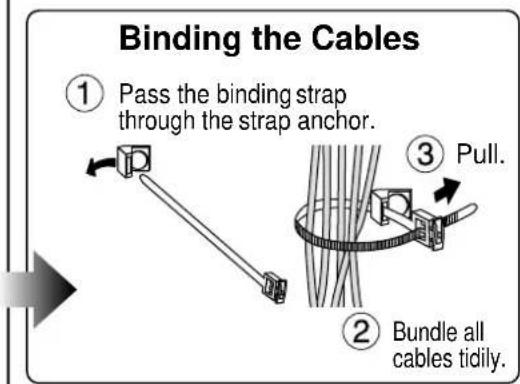
flowchart
graph TD
    A["① Pass the binding strap through the strap anchor."] --> B["② Bundle all cables tidily."]
    B --> C["③ Pull."]
Unbinding the Cables
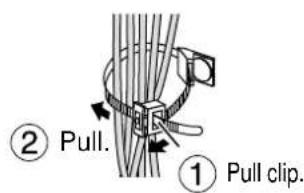
text_image
② Pull. ① Pull clip.Secure the console to prevent tipping
Parts for assembly
① Bands......2

② Black screws ....2

③ screws.....2 Clampsod.screws ⑤


⑤

■ Attaching to a TV stand ■ Attaching to a wall
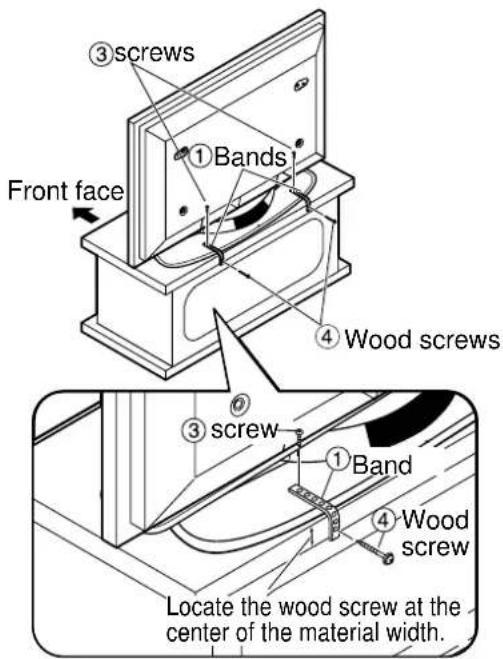
text_image
③ Screws Front face ① Bands ④ Wood screws ③ screw ① Band ④ Wood screw Locate the wood screw at the center of the material width.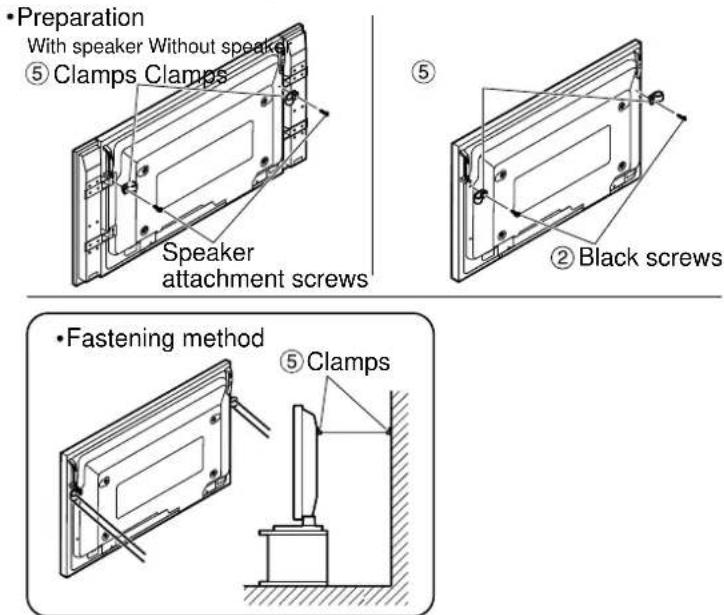
text_image
• Preparation With speaker Without speaker ⑤ Clamps Clamps Speaker attachment screws ② Black screws • Fastening method ⑤ Clamps* Securely attach to a wall, pillar or similarly solid structural feature using separately- obtained products such as cords or chains of adequate strength.
Dimension diagram
Units : mm (inches)
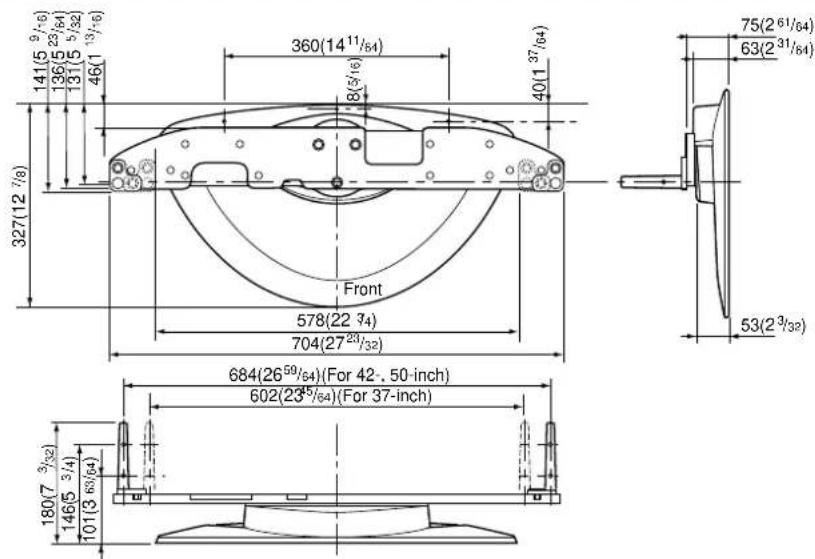
text_image
327(12 7/8) 141(5 9/16) 136(5 23/64) 131(5 5/32) 46(1 9/16) 360(14 11/64) 8(5/16) 40(1 37/64) Front 578(22 3/4) 704(27 23/32) 684(26 59/64)(For 42-, 50-inch) 602(23 5/64)(For 37-inch) 180(7 3/32) 146(5 3/4) 101(3 63/64)Matsushita Electric Industrial Co., Ltd
Web Site : http://www.panasonic.co.jp/global/
Panasonic Consumer Electronics Company Division of Matsushita Electric Corporation of America
One Panasonic Way
Secaucaus, NJ
07094
Panasonic Sales Company, Division of Matsushita Electric of Puerto Rico, Inc.
AVE. 65 de Infanteria, Km 9.5
San Gabriel Industrial Park
Carolina, Puerto Rico 00985
Panasonic®
RACKS AND STANDS
Panasonic Consumer Electronics Company or Panasonic Sales Company (collectively referred to as “the warrantor”), will replace parts in case of defects in materials or workmanship, free of change, in the USA or Puerto Rico, for ten (10) days from the date of the original purchase.
In-warranty parts in the USA
can be obtained during the warranty period be contacting:
Panasonic Services Company (PASC)
20421 84th Avenue South
Kent, Washington 98032
Tel.:1-800-833-9626
Fax.:1-800-237-9080
(6 am to 5 pm Monday-Friday; 6 am to 10:30 am Saturday; PST)
Service in Puerto Rico can be obtained during the warranty period by calling the telephone number listed above.
This warranty is extended only to the original purchaser. A purchase receipt or other proof of the original purchase is required for replacement parts under the warranty.
This warranty only covers failures due to materials and workmanship and does not cover normal wear. The warranty does not cover damages which occurred in shipment or failures which result from accidents, misuse, abuse, neglect, mishandling, misapplication, faulty installation, set-up adjustments, improper maintenance, alteration, line power surge, lightning damage, modification, or commercial use, such as hotel, office, restaurant, or other business or rental use of the product, or damage that is attributable to acts of God.
LIMITS AND EXCLUSIONS
There are no express warranties except as listed above.
PANASONIC SHALL NOT BE LIABLE FOR INCIDENTAL OR CONSEQUENTIAL DAMAGE RESULTING FROM THE USE OF THIS PRODUCT, OR ARISING OUT OF ANY BREACH OF THIS WARRANTY. ALL EXPRESS AND IMPLIED WARRANTIES. INCLUDING THE WARRANTIES OF MERCHANTABILITY, ARE LIMITED TO THE APPLICABLE WARRANTY PERIOD SET FORTH ABOVE.
Some states do not allow the exclusion or limitation of incidental or consequential damages, or limitations on how long an implied warranty lasts, so the above exclusions or limitations may not apply to you.
This warranty gives you specific legal rights and you may also have other rights which vary from state to state. If a problem with this product develops during or after the warranty period, you may contact your dealer or call the number listed above.
If the problem is not handled to your satisfaction, then write to the Customer Satisfaction Center at the Panasonic Consumer Electronics Company address indicated above.
natural_image
Technical line drawing of a mechanical component with mounting holes and curved body (no text or symbols)⑥ Stangen ..... 2

Matsushita Electric Industrial Co., Ltd
Web Site : http://www.panasonic.co.jp/global/
natural_image
Technical line drawing of a mechanical component with mounting holes and a curved body (no text or symbols)⑥ Insteekpennen
⑦ Inbussleutel ..... 1

⑧ Kabelbindriempje
text_image
① Montagestrips ....2② Zwarte schroeven....2

③ Schroeven...2 Klemhouschroeven ⑤
....2


Matsushita Electric Industrial Co., Ltd
Web Site : http://www.panasonic.co.jp/global/
Matsushita Electric Industrial Co., Ltd
Web Site : http://www.panasonic.co.jp/global/
natural_image
Technical line drawing of a mechanical component with mounting holes and a curved body (no text or symbols)⑥ Supports verticaux

Matsushita Electric Industrial Co., Ltd
Web Site : http://www.panasonic.co.jp/global/
natural_image
Technical line drawing of a mechanical component with mounting holes and a curved body (no text or symbols)⑥ Postes ..... 2
⑦ Llave hexagonal
⑧ Banda de unión

Montaje del soporte
Matsushita Electric Industrial Co., Ltd
Web Site : http://www.panasonic.co.jp/global/
natural_image
Technical line drawing of a mechanical component with mounting holes and internal features (no text or symbols)⑥ Stänger ..... 2
⑦ Sexkantsnyckel

⑧ Bindrem ...... 1
Matsushita Electric Industrial Co., Ltd
Web Site : http://www.panasonic.co.jp/global/
natural_image
Technical line drawing of a mechanical component with mounting holes and a central rectangular cutout (no text or symbols)⑥ Master ..... 2

⑦ Unbrakonøgle ... 1

⑧ Fastgøringsbånd

Samling af soklen
Matsushita Electric Industrial Co., Ltd
Web Site : http://www.panasonic.co.jp/global/
natural_image
Technical line drawing of a mechanical part with mounting holes and internal features (no text or symbols)⑥ 立杆 2
⑦ 六角扳手……1
⑧ 扎线带....1

组装台架
1. 把基架安装到底座上。
natural_image
Technical line drawing of a mechanical component with mounting holes and a curved body (no text or symbols)⑥ 풀 2
⑦ 6각렌치 ......1
⑧ 밴드 ..... 1