L1935WA - Monitor DGM - Free user manual and instructions
Find the device manual for free L1935WA DGM in PDF.


| Product Type | 19-inch LCD Monitor |
| Screen Size | 19 inches (diagonal) |
| Maximum Resolution | 1440 x 900 (WXGA) |
| Contrast Ratio | 500:1 (typical) |
| Brightness | 300 cd/m² (typical) |
| Response Time | 8 ms (Tr+Tf) |
| Viewing Angle | H: 150°, V: 130° |
| Number of Colors | 16.2 million (True Color) |
| Pixel Pitch | 0.285 mm (H) x 0.285 mm (V) |
| Video Connectivity | VGA (D-sub 15-pin), DVI-D (optional) |
| Audio Input | Stereo phone jack |
| Built-in Speakers | Not installed |
| Power Supply | 100-240 VAC, 50/60 Hz |
| Power Consumption (active) | Less than 48 W |
| Power Consumption (standby) | Less than 3 W |
| Dimensions (W x H x D) | 440 x 370 x 160 mm |
| Net Weight | 4.2 kg |
| Tilt | -5° to +20° |
| Operating Temperature | 5 °C to 40 °C |
| Operating Humidity | 20% to 80% RH |
| Certifications | UL/CUL, CE, FCC |
| Security Lock | Kensington |
| Power Management | VESA DPMS |
| Plug & Play | DDC2B |
Frequently Asked Questions - L1935WA DGM
User questions about L1935WA DGM
0 question about this device. Answer the ones you know or ask your own.
Ask a new question about this device
Download the instructions for your Monitor in PDF format for free! Find your manual L1935WA - DGM and take your electronic device back in hand. On this page are published all the documents necessary for the use of your device. L1935WA by DGM.
USER MANUAL L1935WA DGM
natural_image
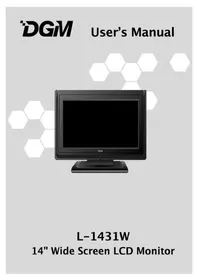
Line drawing of a computer monitor with a DGM logo on the front panel (no text or symbols on the screen)L-1935W / L-1935WA
19" Wide Screen LCD Monitor
Contents
PRODUCT....2
Features 2
Power saver 2
Plug & play....2
SAFETY 3
Electrical....3
Common....4
SET UP YOUR LCD MONITOR....5
Installation....5
Screen Adjustments ....5
OSD Control....6
Description 8
TROUBLE SHOOTING....9
MAINTENANCE....10
DISPLAY MODE ....11
SPECIFICATION ....12
PRODUCT
Note : Save the original box and packing material for future shipping needs.
Features
Bright image
Lightweight
Fast response time
◆ Stereo speakers (If there is no speaker installed, please skip this item.)
Power saving features
Low electromagnetic radiation output
◆ Kensington security lock
Safety certifications
Power saver
Power control system, also called (Power Saver), is installed inside the LCD monitor.
If the monitor has not been used for a certain period of time, the system will turn the monitor to low voltage mode to save power. Slight movement of the mouse or any pressing key on the keyboard will return the original image.
The VGA card inside the computer configures Power Saver. You can use your PC to set the function.
The LCD monitor is compatible with EPA ENERGY STAR and NÜTEK if used with a VESA DPMS computer.
To save power, turn off the LCD monitor power when not in use.
Plug & play
The new VESA Plug and Play function is used, eliminating the complicated and time-consuming installation process.
Use the Plug and Play system without encountering the usual installation problems. Your computer system can easily identify and automatically adjust the monitor.
The LCD monitor uses Display Data Channel (DDC) to send Extended Display Identification Data (EDID) to the computer system, so the computer system can auto adjust your monitor.
SAFETY
Note: Note the following safety precautions before using this monitor.
Electrical
Check the Voltage
Electrical Shock
Unusual conditions
This product should be operated from the type of power indicated on the marking label. If you are not sure of the type of power available, consult your dealer or local power company.
This product is equipped with a 3-wire grounding-type plug, a plug having a third (grounding) pin. This plug will only fit into a grounding-type power outlet. This is a safety feature. If you are unable to insert the plug into the outlet, contact your electrician to replace your obsolete outlet. Do not defeat the purpose of the grounding-type plug.
To prevent electrical shock, do not insert any metal object into any opening in the LCD monitor casing.
Do not attempt to service this product yourself, as opening or removing covers may expose you to dangerous voltage points or other risks. Refer all servicing to qualified service personnel.
If the power cord is damaged, do not use the LCD monitor. Do not place any object on the power cord, and place the power cord away from crowded areas.
While pulling the LCD monitor plug away from the socket on the wall, hold the plug not the power cord.
Do not expose the LCD monitor to rain and do not use in environments near water (such as in the kitchen, or near a swimming pool).
If the LCD monitor becomes wet, unplug the power cord immediately and contact a Service Center.
If the LCD monitor begins to perform abnormally, makes a noise, or emits smoke or odors, unplug it immediately and contact a service center.
Common
Monitor and Screen Care
Cleaning the screen
Avoid touching the screen with your fingers or any hard objects. Oil from the skin is difficult to remove, and touching the screen with anything may damage the panel. Clean the monitor using a soft, dry cloth after first turning it off.
The LCD monitor should not be used in dusty or humid environments.
The LCD monitor should be kept away from heat sources and radiation. Such as: stoves, ovens, or direct sunlight.
To reduce glare, avoid placing the monitor in a place that receives direct sunlight.
Avoid letting small children play with monitor. Frequent touching of the panel will leave marks on the screen and lower the image quality.
◆ Handle with care when unplugging and moving the monitor.
Do not place items on top of the LCD monitor.
If the LCD monitor is not in use for a long time, unplug it and store it in the proper package. The original carton and packaging should be used if possible.
The openings in the LCD monitor casing are for ventilation. To prevent overheating, the openings should not be blocked or covered. Do not place the LCD monitor on a bed, sofa, blanket or other soft surfaces; as soft objects may block the vents in the LCD monitor.
If you place the LCD monitor on a bookshelf or other enclosed space, it is essential to leave an air-space of 4-inches (10cm) between the monitor and the enclosure.
- Ensure that the area around the LCD monitor is clean and free of moisture. Please refer to "Maintenance" for normal maintenance information.
SET UP YOUR LCD MONITOR
Installation
Note: Read the last section "Safety" before you install the LCD monitor.
Notes
Installation Position
Note the instructions below prior to installing your LCD monitor.
For the best image quality, choose a position away from any windows to minimize reflection of light on the panel.
It is important to view the LCD monitor from at least 30 cm to minimize eyestrain.
◆ Position the LCD monitor slightly above your horizontal vision.
Tilt the LCD monitor either forward or backward for the most comfortable viewing angle.
This LCD monitor supports connection to a personal computer or workstation. The steps are described as Quick Setup.
After installation, refer to "Auto Adjust" for automatic adjustment procedures.
Workstation Height
Quick Installation
Screen Adjustments
Auto Adjust
Though your computer system can automatically identify the new LCD monitor system, the Auto Adjust function can enhance the display. To enter adjust mode, refer to "OSD Control".
◆ Turn the computer and LCD monitor on.
Press the 'Auto' button to start Auto Adjust.
The LCD monitor starts the Auto Adjust process. The process will continue for 10 seconds. You will notice the image change as the Auto Adjust is working.
Your LCD monitor provides a STFC function, through which you can check whether the LCD monitor is working properly.
If your LCD monitor is properly connected, but there is no image showing and the indicator light remains orange, follow these steps to start STFC.
□ Shutdown computer and LCD monitor.
□ Unplug the signal connector from the back of computer.
☐ Turn the LCD monitor on.
If the image connector is disconnected or damaged, the following message will appear during normal operation.
No Signal Input
☐ Turn off the LCD monitor and reconnect the signal cable. Turn the computer and LCD monitor on.
If the LED on the LCD monitor remains orange after completing the steps above, check your VGA card, cable, and computer system. Your monitor should be operating properly.
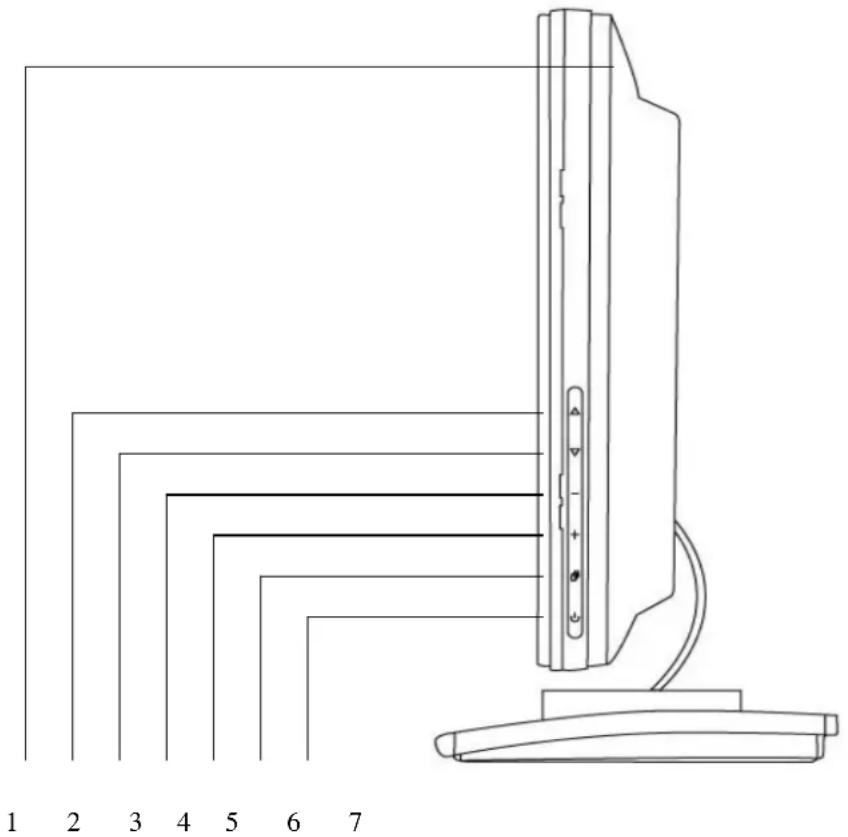
Keypad Button Definition
text_image
1 2 3 4 5 6 7| 1 | Speakers | Audio output. ( If there is no speaker installed, please skip this item.) |
| 2 | ▲ /Turbo | Switch between picture, text and economy modes.Move selection up when OSD is displayed. |
| 3 | ▼ /Auto | Automatically optimize positions, phase, and clock when OSD is not displayed.Move selection down when OSD is displayed. |
| 4 | - | Quick contrast adjustment and decrease contrast/brightness.Move selection left when OSD is displayed. |
| 5 | + | Quick brightness adjustment and increase contrast/brightness.Move selection right when OSD is displayed. |
| 6 | Enter and exit the OSD menu. | |
| 7 | Power On/Off button and indicator LED.Green: Normal.Orange: Power Saving.Off: Power Off. | |
Operation
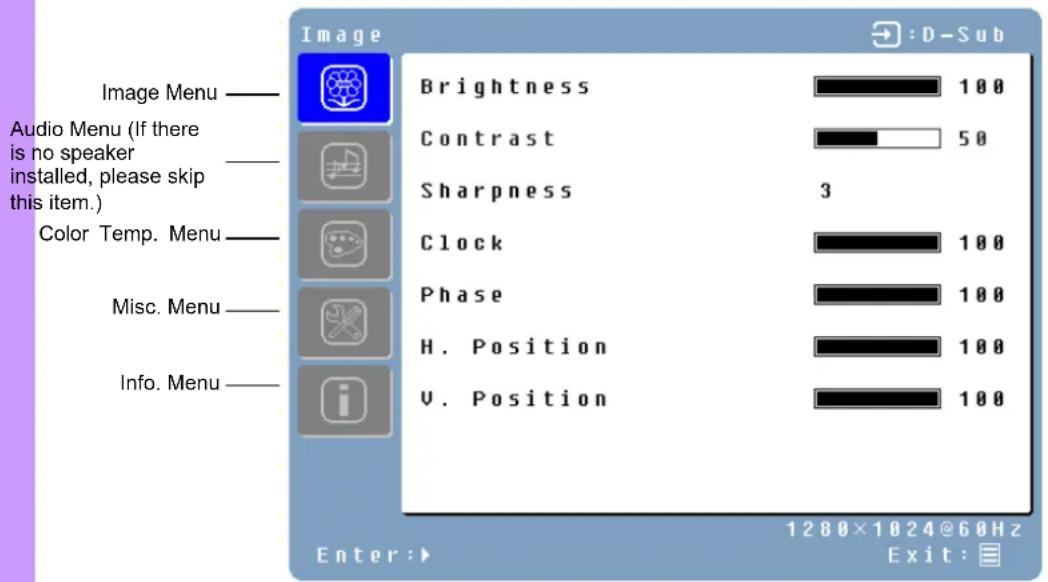
Your LCD monitor has been adjusted to its optimal settings before shipment. You can also adjust the image using the following illustrations and steps.
◆ Press the “Menu” ☐ button to display the OSD.
◆ Press the▲ or ▼ button to select the function to be adjusted.
◆ Press the +button to access the function to be adjusted.
◆ Press the -or + buttons to change the current setting of the function.
To go back to the previous menu, press the ☐ button. Changes are saved automatically.
To exit the OSD menu press "Menu" ☐ again.
text_image
Image Image Menu ———— Audio Menu (If there is no speaker installed, please skip this item.) Color Temp. Menu ———— Misc. Menu ———— Info. Menu ———— Brightness 100 Contrast 50 Sharpness 3 Clock 100 Phase 100 H. Position 100 V. Position 100 Enter:► 1280×1024@60Hz Exit: D-SubNotes
The OSD turns off several seconds after you stop pressing the buttons while performing an adjustment.
◆ Any changes are automatically saved in memory when the OSD turns off. Turning off the power should be avoided while using the menu.
Adjustments for clock, phase and positions are saved for each individual signal timing. Except for these adjustments, all other adjustments have only one setting, which applies to all signal timings.
To select function, click the blue cursor on the desired option.
Function Definition
| Primary Menu | Secondary Menu | Description |
| Image | Brightness | Adjust the brightness of the screen. |
| Contrast | Adjust the contrast of the image. | |
| Sharpness | Adjust the picture sharpness of low resolution pictures. | |
| Clock | Adjust the monitor clock. (Optional) | |
| Phase | Adjust the monitor phase. (Optional) | |
| H. | Positherimage left or right on the screen. (Optional) | |
| V. | Positherimage up or down on the screen. (Optional) | |
| Audio(If there is no speaker installed, please skip this item.) | Volume | Adjust the volume of the audio. |
| Mute | Disable the audio. | |
| Color | Color | temp/9300K/7500K/6500K/sRGB |
| Red | Adjust red color. | |
| Green | Adjust green color. | |
| Blue | Adjust blue color. | |
| Misc | Language | English, Français, Deutsch, Español, Italiano,日本語, Русский,繁陽日処,简体日処,한국어 |
| OSD time-out | Adjust OSD display time setting. | |
| OSD position | Move OSD display position to any one of the following 5 positions within the overall screen.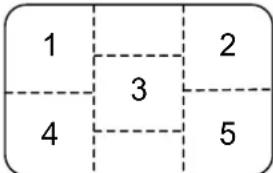 | |
| Reset | Restore LCD monitor to factory settings. | |
| Input Select | Analog / Digital | |
| Auto setting | Adjust clock, phase and positions automatically. (Optional) | |
| CM Engine | Color Management Engine. (Optional) | |
| Info | Resolution | Displays resolution. |
| Horizontal frequency | Displays horizontal frequency. | |
| Vertical frequency | Displays vertical frequency. | |
| Version | Displays firmware version. |
Quick Adjustment
You can skip the Menu pages and display an adjustment scale directly by using the following button operations:
◆ Brightness: Press the + Brightness button when the Menu is not displayed.
◆ Contrast: Press the - Contrast button when the Menu is not displayed.
Auto Setting: Press the Auto button when the Menu is not displayed.
Turbo: Press the Turbo button when the Menu is not displayed to switch between picture modes.
☐ Picture Mode - High brightness
□ Text Mode - Normal
□ Economy Mode - Brightness of back-light is reduced
□ Changing to a lower brightness mode can lessen eye fatigue.
☐ Change from Picture Mode to Text Mode when working with text.
☐ Change from Text Mode to Economy Modes when viewing the screen for long periods.
TROUBLE SHOOTING
| Check the information in this section to see if problems can be solved before requesting repair.Note: Users should only attempt to solve the problems described below. Any unauthorized product modification, or failure to follow instructions supplied with the product, will void the warranty immediately. | |
| No image | Make sure power is ON.Check whether the LCD monitor and computer power cords are plugged in and whether there is power. |
| No Signal Input | Check the signal connection between the computer and LCD monitor. |
| “Out Of Range” | Check the computer image output resolution and frequency and compare the value with the preset values. |
| Fuzzy image | Perform Auto Adjust, or adjust clock and phase. |
| Image too bright | Adjust brightness and contrast using OSD. |
| Image too dark | |
| Irregular image | Check the signal connection between the computer and LCD monitor.Perform Auto Adjust. |
| Distorted image | Reset the LCD monitor. (perform the “Reset” function using OSD)Remove extra accessories (such as signal extension cord). |
| Image is not centered | Use OSD Image Menu to adjust H. Position and V. Position. |
| Size is not appropriate | Check image size setting.Perform Auto Adjust. |
| Uneven color | Use OSD Color Menu to adjust color setting. |
| Color too dark | |
| Dark area distorted | |
| White color is not white | |
| Can’t adjust the LCD monitor with the buttons on the front panel. | Contact the store where you purchased the unit or service center listed on your warranty card. |
| Can’t display the LCD monitor with resolution 1440x900 | Please download the video card driver from websites below:Nvidia: http://www.nvidia.com/content/drivers/drivers.aspIntel: http://downloadfinder.intel.com/scripts-df/support_intel.aspATI:https://support.ati.com/ics/support/default.aspVideo chips below support the resolution 1440x900:Geforce4 Ti4200, Geforce FX5200, Geforce PCX6200,G5 Geforce FX5200, ATI Radeon 9600, ATI RadeonRX300Matrox P750, Nvidia Geforce2, I865G, I915G |
MAINTENANCE
This product has undergone strict quality control during the production process. For maintenance of the LCD monitor, refer to the information below. Maintenance is important for maximizing the display performance and product life.
Warning: To prevent electrical shock, do not open the LCD monitor casing. Users should not attempt to repair the LCD monitor on their own. User maintenance is limited to the procedures listed below.
Unplug the power
Check the cover
Clean
Cleaner
Screen
Case
Accessory
Conserve
Disclaimer
Unplug the LCD monitor from the AC socket before conducting maintenance.
Check to see if the LCD monitor and accessories are damaged or broken..
◆ Never spray or pour any liquid directly onto the screen or case.
Do not allow water or liquid to enter the LCD monitor or accessories.
☐ Use pure water or non-ammonia, non-alcohol based glass cleaner.
☐ Do not use ketene (such as acetone), ethanol, toluene, acetic acid, methane, chloride, or abrasive detergent to clean the monitor because these chemicals can damage the LCD monitor.
☐ To clean your LCD monitor screen, use water or mild cleaner, as above, to gently moisten a soft, clean cloth.
☐ If possible, use a special screen cleaner sheet or a solution suitable for static electricity application.
☐ To clean your LCD monitor case, use water or mild cleaner, as above, to gently moisten a soft, clean cloth.
☐ To clean your accessories, use water or mild cleaner, as above, to gently moisten a soft, clean cloth.
If the LCD monitor is not in use for a long time, please unplug and store in the original box in order to avoid any unexpected damage.
◆ Any damage resulting from use of any cleaner that is not mentioned above is not covered under this warranty term.
DISPLAY MODE
Incoming Display Mode
| Resolution | Horizontal Frequency (KHz) | Vertical Frequency (Hz) |
| 640X480 | 31.47 | 59.94 |
| 640X480 | 37.86 | 72.81 |
| 640X480 | 37.50 | 75.00 |
| 800X600 | 35.16 | 56.25 |
| 800X600 | 37.88 | 60.32 |
| 800X600 | 48.08 | 72.19 |
| 800X600 | 46.88 | 75.00 |
| 720X400 | 31.47 | 70.09 |
| 1024X768 | 48.36 | 60.00 |
| 1024X768 | 56.48 | 70.07 |
| 1024X768 | 60.02 | 75.03 |
| 1280X800 | 49.68 | 60.00 |
| 1280X800 | 62.62 | 75.00 |
| 1440X900 | 55.92 | 60.00 |
- We offer you 14 available modes compatible with Windows.
- If any interference occurs on your screen while you modulating your PC or OSD. It is normal.
- To have Best quality present on the PC, remember to upgrade your video card Driver. We strongly recommend you to choose a Mode listed in the table.
- The other Modes may not be supported that are not list on the table above.
- You may use the power management on your computer. It's good for last service life of the product.
Specification
| LCD Panel Type | Viewing AngleContrast RatioBrightnessResponse Time(Tr+Tf)Display ColorsMax ResolutionPixel Pitch | 19.0” TFT Active Matrix LCD DisplayH: 150°, V:130°500 : 1 (Typical)300 cd/m2 (Typical)8 ms16.2M colors1440 x 900(WXGA)0.285mm(H) x 0.285mm(V) |
| Input Signals | VGADVI* | VGA compatible analog RGB Composite sync supportedDDWG compliant Single Link TMDS Digital VisualInterface (DVI) |
| Compatibility | PC | Up to 1440 x 900@60Hz(Non-interlaced) |
| Connector | VGADVI*AudioPowerUSB Hub* | D-sub 15-pinsDVI-D*Stereo Phone JackA/C InputB type USB port +A type 2 port Hi-Speed USB 2.0(Windows ME, 2000, XP) |
| Power | VoltageConsumptionPower saving mode | Built-in universal power supply: 100-240 VAC, 50/60 HzActive < 48 Watt Max.Standby < 3 Watt |
| Internal Speaker | 2Wx2(Stereo) | |
| User Interface LED Indicator | Active - GreenStandby - Orange | |
| Operating Condition | TemperatureAir Humidity | 5°C~40°C20% ~ 80% R.H. |
| Dimensions (W x H x D) | Physical | 440.0mm(W) x 370.0mm(H) x160.0mm (D) |
| Net Weight | 4.17Kg | |
| DDC | DDC2B | |
| Power Management | VESA DPMS | |
| Tilt Angle | -5 | ° dip and 20° elevation |
| Regulation (Certifications) | UL/CUL、CE、FCC |
Notice: * DVI is optional.
Table des matières
PRODUIT 2
ATI : https://support.ati.com/ics/support/default.asp
natural_image
Line drawing of a computer monitor with a stand and cable, no text or symbols present1 2 3 4 5 6 7
- We offer you 14 available modes compatible with Windows.
- If any interference occurs on your screen while you modulating your PC or OSD. It is normal.
- To have Best quality present on the PC, remember to upgrade your video card Driver. We strongly recommend you to choose a Mode listed in the table.
- The other Modes may not be supported that are not list on the table above
- You may use the power management on your computer. It's good for last service life of the product.
Technische Angaben
RISOLUZ IONE DEI PROBLEMI 9
MANUTENZ IONE....10
MODALITÀ VIDEO....11
SPECIFICHE TECNICHE....12
PRODOTTO
natural_image
Line drawing of a computer monitor with control panel and keyboard (no text or symbols)1 2 3 4 5 6 7
natural_image
Line drawing of a computer monitor with a stand and cable, showing no text or symbols1 2 3 4 5 6 7