AAC7000 - Air Conditioning BESTRON - Free user manual and instructions
Find the device manual for free AAC7000 BESTRON in PDF.
| Product type | Mobile monoblock air conditioner |
| Brand | Bestron |
| Model | AAC7000 |
| Operating modes | Cooling, dehumidification, fan |
| Sleep mode | Yes (cooling mode only) |
| Timer | Programmable 1-24 hours (auto on/off) |
| Remote control | Yes (AAA batteries not included) |
| Fan speed | 2 speeds (low and high) |
| Temperature range (cooling) | 16°C to 31°C |
| Refrigerant | R290 |
| Filter type | Washable EVA filter |
| Filter maintenance | Clean every 2 weeks, annual replacement recommended |
| Water drainage | Internal tank (manual drain) + continuous drainage possible (dehumidification mode) |
| Maximum exhaust hose length | 150 cm (do not extend) |
| Display | LED screen |
| Warranty | 60 months |
| Use | Domestic use only |
| Safety | Use by children >8 years under supervision; do not block air inlets/outlets |
| Power supply | Standard mains socket (check rating label) |
| Included accessories | Exhaust hose, window slider, screw set, remote control |
Frequently Asked Questions - AAC7000 BESTRON
User questions about AAC7000 BESTRON
0 question about this device. Answer the ones you know or ask your own.
Ask a new question about this device
Download the instructions for your Air Conditioning in PDF format for free! Find your manual AAC7000 - BESTRON and take your electronic device back in hand. On this page are published all the documents necessary for the use of your device. AAC7000 by BESTRON.
USER MANUAL AAC7000 BESTRON
- Directive Basse tension
2014/35/EU
- Directive RoHS
2011/65/EU

R. Neyman
Contrôle qualité
WAT U MOET WETEN OVER DIT APPARAAT
Congratulations with the purchase of this Bestron product. These instructions tell you how the product works and how to use it. Read the instructions carefully before you start using the appliance. Only use the appliance in the manner described in the instructions. Keep these instructions in a safe place for future reference.
Defects:
If the appliance is defective, do not try to repair it yourself. Always have a qualified mechanic carry out any repairs.
Children:
- This appliance may be used by children over the age of 8 years old and persons with reduced physical, sensory or mental capabilities or lack of experience and know-how, but only if supervised or if they have been instructed on how to use the appliance safely and are aware of its potential dangers.
Children are not allowed to clean and maintain the appliance, except if they are over the age of 8 years old and supervised. - Keep the appliance and the cable out of reach of children under the age of 8 years old.
- Keep an eye on children to ensure that they do not play with the appliance.
WHAT YOU SHOULD KNOW ABOUT ELECTRICAL APPLIANCES
- Check that the mains voltage corresponds with that shown on the rating plate of an electrical appliance before you use it.
- Check that the socket to which you connect the electrical appliance is earthed.
- Always install electrical appliances on a stable and level surface where it cannot fall over.
- Certain parts of an electrical appliance may become warm or sometimes hot. Do not touch them as you may burn yourself.
- Make sure your hands are dry when you touch an electrical appliance, a cord or a plug.
- Electrical appliances must be able to lose their heat to avoid fire hazards. Therefore, make sure that the appliance has sufficient clearance around it and that it does not come into contact with flammable materials. Electrical appliances must never be covered.
-
Make sure that electrical appliances, cords or plugs do not come into contact with water.
-
Never immerse electrical appliances, cords or plugs in water or any other liquid.
- Do not touch electrical appliances if they have fallen in the water. Immediately pull the plug out of the socket. Stop using the appliance.
- Make sure that electrical appliances, cords and plugs do not come into contact with heat sources, such as a hot hob or open fire.
- Never let cords hang over the edge of the sink, a worktop or a table.
- Always remove plug from the socket when you are not using the electrical appliance.
- Remove the plug from the socket by pulling the plug itself and not the cord.
- Regularly check if the cord of the electrical appliance is not damaged. Do not use the electrical appliance if the cord shows signs of damage. If the cord is damaged, it should be replaced by the manufacturer, a technical service provider or a person with an equivalent qualification, to avoid any danger.
- The appliance may not be switched on with the aid of an external time switch, or by a separate system with remote control.
WHAT YOU SHOULD KNOW ABOUT THIS APPLIANCE
- Be careful when using the appliance outdoors.
- Never use the appliance in damp or wet locations.
- Thoroughly clean the appliance after use (see Cleaning and Maintenance).
- Pay attention when using the device near an open window. The device could become wet because of incoming rainwater, and could short circuit.
- Make sure no objects get stuck in the intake or outlet.
- Do not cover the device when it is in operation.
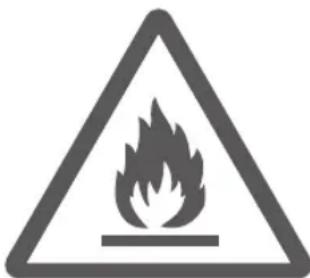
Caution, risk of fire! R290


ENVIRONMENT
- Dispose of packaging material such as plastic and cardboard boxes in the designated containers.
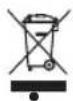
Do not dispose of this product as normal domestic waste at the end of its life, but hand it in at a collection point for the reuse of electric and electronic equipment. Look for the symbol on the product, the user instructions or the packaging showing the type of waste.
- The materials can be used as indicated. By helping us reuse and process the materials or otherwise recycle the old equipment, you will be making an important contribution towards the protection of the environment.
- Your municipality can tell you where to find the designated waste collection point in your neighbourhood.
CE DECLARATION OF CONFORMITY
This product conforms to the requirements of the following European Directives on safety:
EMC
Directive
2014/30/EU
- Low Voltage Directive
2014/35/EU
2011/65/EU
RoHS
Directive
R. Neyman
Quality control
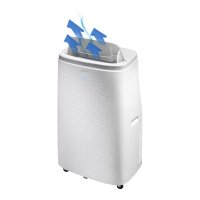
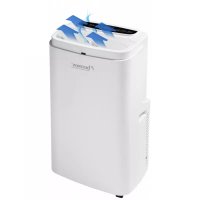
OPERATION - General
The appliance is intended only for domestic use, not for professional use.

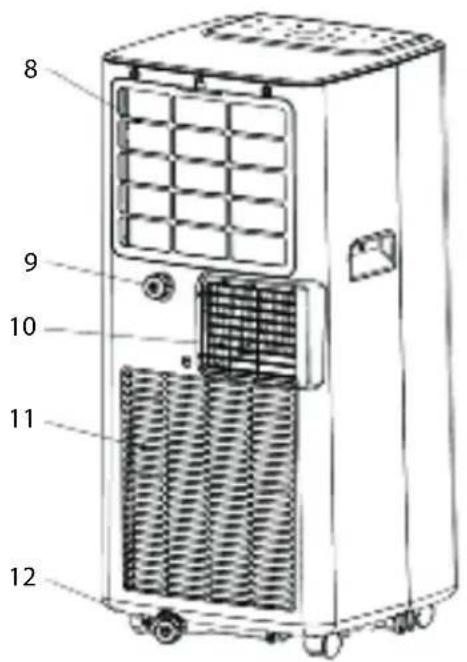
1
- Upside casing
- Handle
- Back of the casing
- Wheels
-
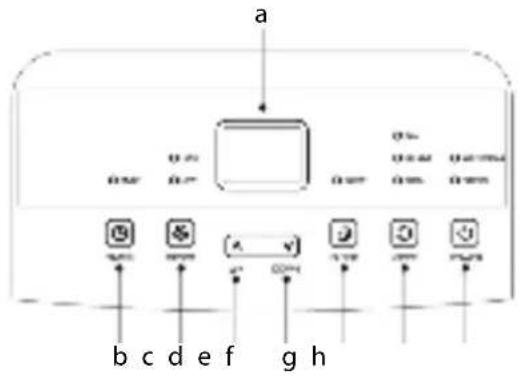
Control panel: a. LED-displ
b. Button timer function "TIMER"
c. Button speed " SPEED"
d. Button temperature up “ UP”
e. Button temperature down DOWN
f. Button sleep mode " SLEEP"
g. Button mode setting MODE
h. Button on/off " POWER" -
Air outlet
- Front of the casing
- EVA-filter
- Connection for continuous water drainage
- Hot air outlet
- Roster
- Drainage storage tray condense water
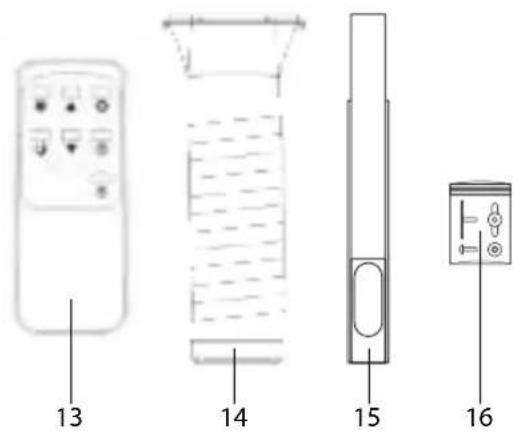
- Remote control
(2 x AAA battery, not included) - Exhaust hose (in 3 parts)
- Window slide set
- Screw set
INSTALLATION - Installing heat exhaust
- Choose a place near a window and socket to place the device.
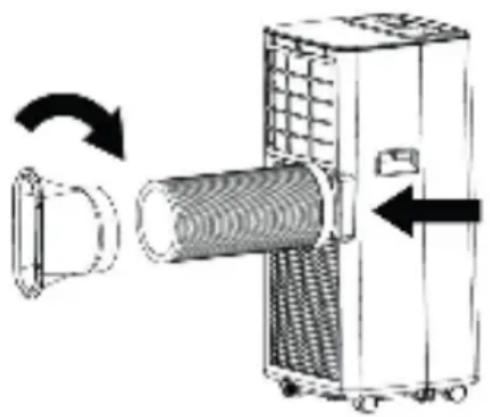
- Screw the two plastic exhaust hose ends (figure 1, No. 14) onto the exhaust hose (see figure 2).
- Install the drainage hose onto the hot air outlet (10) on the back of the device (see figure 2).
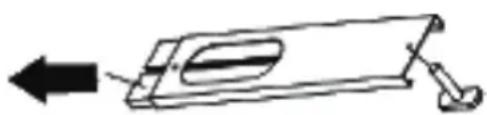
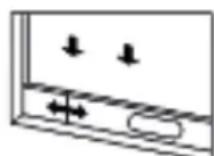
- Take the window slide set, and pull the inner part outside until the hole in the outer part is visible.
- Put the T-bolt from the screw set (16) through the hole (in the right direction, see figure 3).
- Push the parts of the window slide set back together, making sure the T-part of the T-bolt slides into the slit of the inner part of the window slide set lengthwise.
- Screw the butterfly nut from the screw set loosely onto the T-bolt.
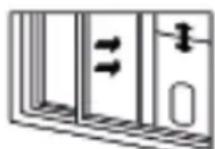
- Slide the window half open, and place the window slide set (15) in the frame. The window slide set can be installed both horizontally and vertically (see figure 4 and 5).
- Extend the window slide set so the full width of the frame is being covered.
- Fasten the butterfly nut to fix the window slide set.
- Close the window as far as the window slide set, so this covers the window opening completely.
- Place the device at least 50~cm away from walls and other objects.
- Stretch out the exhaust hose, place the flat end of the hose onto the opening in the window slide set and fix the hose with the remaining bolt and ring.
2
3
4
5
ATTENTION:
- To prevent breaking, the exhaust host can only be twisted or deformed to a certain limit.
- The maximal length of the exhaust hose is 150~cm . Do not use extensions or other exhaust hoses; this can cause serious malfunctions.
- To prevent overheating, the outlet of the device must not be blocked.
If you have a tilt window instead of a sliding window, purchase a window sealing kit to close off your entire window airtight.
USAGE -Turning on and off
- Put the plug in the socket. The devices peeps, which is normal. The display (figure 1, a) indicated the current room temperature.
- Push the button "POWER" (h). The device starts functioning in the last used mode. When you turn the device on for the first time, it is in the cooling mode. The indication light above the button "MODE" lights up.
- Set the desired direction of the air stream. Aim the air stream right ahead, or slightly downward by manually setting the horizontal slats (6) in desired position. You can easily turn of move the device with the sturdy castor wheels to direct the airstream into the room.
- Push the button "POWER" again to turn the device off.
- After use, pull the plug from the socket.
USAGE - Setting the mode
The device has three operating modes, with which you can ventilate, dehumidify, and cool the room.
Ventilating
- Press the button mode (figure 1, g), until the indication light lights up at "FAN". The device is now functioning as ventilator.
- Press the button "SPEED" (c) to change between low or high speed exhaust air. The indication light lights up at "LOW" (low speed) or "HIGH" (high speed).
Dehumidifying
- Press the button "MODE" (figure 1, g) once or multiple times, until the indication light lights up at "DEHUM". The device switches to the lowest speed, and will now dehumidify the air.
ATTENTION:
- When the internal water collection tray is full, the device stops functioning, and the indication light lights up on the control panel at "WATER FULL". You have to empty the water collection tray before you can continue using the device (see 'CLEANING AND MAINTENANCE - Water drainage').
If you often use the device to dehumidify the air, you can also use the continuous drainage (see 'CLEANING AND MAINTENANCE - Water drainage').
Cooling
- Press the button "MODE" (figure 1, g) once or multiple times, until the indication light lights up at "COOL". The device is now functioning as air cooler, and will cool the air by means of a cooling element.
- Use the buttons "UP" (d) and "DOWN" (e) to set the cooling temperature between 16^ and 31^ .
- Press the button "SPEED" (c) to switch between a low or high speed of exhaust air. The indication light lights up at "LOW" (low speed) and "HIGH" (high speed).
USAGE - Sleep function
The device has a sleep function. If you turn on this function, the device will operate in its most silent and energy saving mode. Attention: the sleep function only works in the "COOL" mode
- Press the button "SLEEP" (figure 1, f) to turn on the sleep function. The device switches to the lowest and most energy saving mode.
- Press the button "SLEEP" again to turn off the sleep function.
USAGE - Timer function
The device has a time switch with which you can automatically turn the device on or off at the end of a set time.
Automatically turning on
When the device is turned off:
- Press the button "TIMER" (figure 1, b). The display starts to flicker.
- Use the buttons "UP" (d) and "DOWN" (e) to set the switch-on time between 1 and 24 hours.
- Wait until the display (a) stops flickering. The switch-on time is set.
- Press the button "TIMER" again to adjust the switch-on time if desired.
- Press the button "TIMER" again to turn of the timer function.
Automatically turning off
When the device is turned on:
- Press the button "TIMER" (figure 1, b). The display starts to flicker.
- Use the buttons "UP" (d) and "DOWN" (e) to set the switch-off time between 1 and 24 hours.
- Wait until the display (a) stops flickering. The switch-off time is set.
- Press the button "TIMER" again to adjust the switch-off time if desired.
- Press the button "TIMER" again to turn of the timer function.
USAGE - Remote control
The device can also be controlled with the included remote control. The remote control requires two AAA-batteries (not included). Open the battery compartment on the underside, place the batteries, and close the lid. The buttons on the remote control function the same as the buttons on the control panel.
For an optimal functioning:
Make sure the distance between the ventilator and the remote control is not more than 6 metres.
- Aim the remote control at the device and make sure the direction angle is smaller than 30 degrees.
CLEANING AND MAINTENANCE - General
After a period of time, dust can get into the rosters and the slats of the device.
- Turn off the device and pull the plug from the socket.
- Remove the dust of the rosters and slats with a hand brush and/or vacuum cleaner.
- Clean the casing with a soft, moist cloth. Never immerse the device in water. Make sure no moist can get into the electrical connections.
CLEANING AND MAINTENANCE - Water drainage
The device has an internal water collection tray. When it is full, the device stops functioning and the indication light lights up on the control panel at "WATER FULL".
- Turn off the device and pull the plug from the socket.
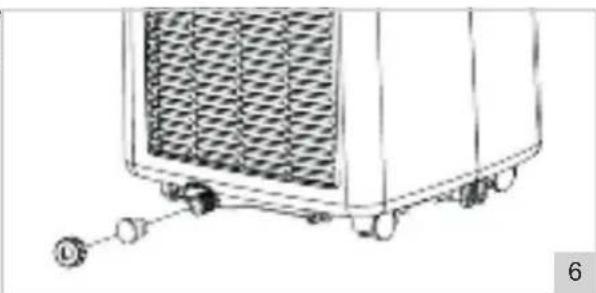
- Place the device on an elevation, and place a bucket or other kind of collection tray underneath the drain hole of the water collection tray.
- Unscrew the lid and plug of the drain hole (figure 1, No. 12), see figure 6. The water streams from the water collection tray in the bucket.
ATTENTION:
- Carefully move the device and keep it upright at all times, to prevent spillage of the water over the brim of the internal water collection tray. During emptying, you can slant the device slightly to remove the last water from the water collection tray.
-
If the bucket, or other kind of collection tray, cannot collect all the water at the same time, put the lid and plug of drain hole back. Empty the bucket and repeat the steps.
-
If the water collection tray is empty, put the lid and plug back in the drain hole, and make sure it is properly closed.
Continuous drainage
If you often use the device to dehumidify the air, you can also use the continuous drainage. Attention: continuous drainage only works in the "DEHUM" mode.
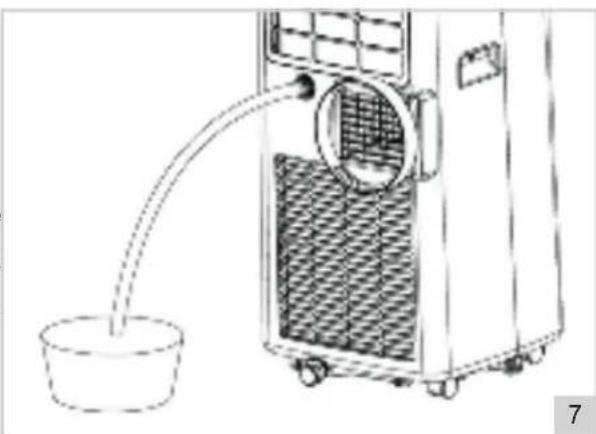
- Turn off the device and pull the plug from the socket.
- Unscrew the lid and plug from the continuous drain hole (figure 1 No. 9), see figure 7)
- Connect a drainage hose (not included) to the continuous drain hole, and make sure the end of the hose is placed in a bucket, or other kind of collection tray.
- Use the device as prescribed in this manual.
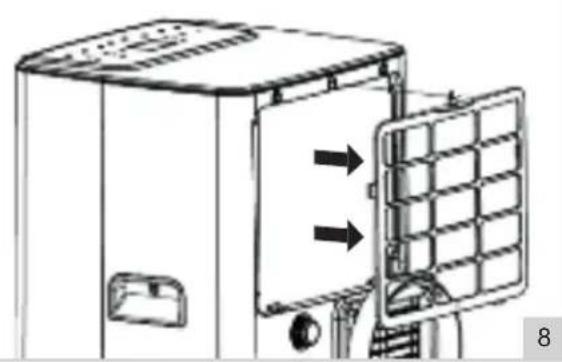
CLEANING AND MAINTENANCE - Cleaning the filter
For an optimal result, you have to clean the EVA-filter every two weeks, and replace at least 1x per year, or more often if the filter is visibly full. Also clean the filter before you store it for longer periods of time, or when you use it again after a long time.
- Turn off the device and pull the plug from the socket.
- Use a cross-head screwdriver to remove the filter from the back of the device (the middle screw, see figure 8).
- Rinse the filter with lukewarm water, or have it soak in soapy water.
- Let the filter dry properly.
- Put the cleaned (or new) filter back in the device and fixate it.
ATTENTION:
If the filter has not dried properly, water can enter the device. This could cause (electrical) damage.
PROBLEM SOLVING
| Problem Possible | cause Advised solution | |
| The air-conditioning is not functioning | There is no electricity The room temperature is lower than the set cooling temperature In the cooling mode: the room temperature is too low or too high In the dehumidifying mode: the room temperature is too low The device is standing in sunlight | Check whether the socket the device is connected to, has electricity Change the set cooling temperature The device optimally functions at a room temperature between 7°C and 35°C The device optimally functions at a room temperature of 17°C and higher Move the device into the shade |
| Cooling is not functioning properly | Doors or windows are open Central heating or other sources of heat The filter is dirty or clogged The inlets or outlets are blocked | Close open doors and windows Turn off the heating Clean the filter Remove obstructions |
| The device makes a lot of noise | The device is not placed on a stable and flat surface | Place the device on a stable and flat surface |
| Compressor does not function | The device is overheated | Wait a couple of minutes until the temperature has lowered and restart the device |
| Remote control does not work | The batteries are emptyThe distance between device and remote control is too bigThe remote control is not aimed at the device | Replace the batteriesStand closer to the deviceAim the remote control at the device |
| Display indicates‘E1’ | The outlet temperature sensor does not function properly | Have the outlet temperature sensor checked by a professional |
| Display indicates‘E2’ | The room temperature sensor does not function properly | Have the room temperature sensor and switches checked by a professional |
WARRANTY CONDITIONS
Bestron offers a 60-month warranty on this equipment against defects resulting from manufacturing and/or material errors, subject to the following conditions.
-
No labour or material costs will be charged during this warranty period.
-
Any repairs carried out under the warranty will not extend the warranty period.
-
Faulty parts, or in the event of exchange, the faulty equipment itself, will automatically become the property of Bestron.
-
The warranty is valid for the first buyer only and is non-transferable.
-
The warranty is not valid for damage caused by: Accidents
-
Improper use
Wear and tear Neglec
-
Faulty installation
-
Connection to a different mains voltage than indicated on the type plate
-
Unauthorised changes
-
Repairs carried out by unqualified third parties
-
Use in violation with the applicable statutory, technical or safety standards
-
Careless transport without suitable packaging or other protection
-
Warranty cannot be claimed
-
For damage during transport
-
If the serial number of the appliance is removed or changed
-
Items excluded from warranty are:
Cords Lamps
Glass parts Filte
-
The warranty does not entitle the purchaser to compensation for any damage other than replacement or repair of the faulty parts. Bestron cannot in any event be held liable for any indirect or consequential losses caused by or in relation to the equipment it has provided.
-
Claims under a warranty may only be submitted to your (online) retailer or directly to the Bestron Service Department. Never send items without being asked to. We may refuse the parcel and you will be liable for the costs. Contact us first and we tell you how the appliance should be packaged and sent. Each claim under a warranty must be accompanied by the relevant receipt.
SERVICE
If an unexpected problem occurs, please contact the BESTRON service department: www.bestron.com/service
COMPLIMENT!
NEED HELP? CHAT WITH US! WHATSAPP CUSTOMER SERVICE

BESTRON.COM/WHATSAPP