
Thermoadvanced Plus - Thermometer Miniland - Free user manual and instructions
Find the device manual for free Thermoadvanced Plus Miniland in PDF.
| Product type | Non-contact infrared talking thermometer |
| Brand | Miniland |
| Model | Thermoadvanced Plus |
| Dimensions | 89 x 53 x 35 mm |
| Weight | 56 g (without batteries) |
| Power supply | 3 V DC (2 AAA 1.5 V batteries) |
| Body measurement range | 32.0 °C – 42.9 °C |
| Forehead measurement accuracy | ± 0.2 °C (35.5–42.0 °C); otherwise ± 0.3 °C |
| Object measurement range | 20.0 °C – 60.0 °C |
| Object measurement accuracy | ± 1.0 °C |
| Main functions | Forehead measurement, object measurement, clock, memory of 9 measurements, color backlight (blue/red), voice announcement (6 languages), smartphone connectivity via eMyBaby app |
| Care and cleaning | Clean the probe with a cotton swab moistened with alcohol; do not immerse, do not use harsh detergents |
| Safety | Do not use if casing is damaged; keep out of reach of children; do not shake or drop; do not use near microwaves or other powerful emitters |
| Spare parts and repairability | Batteries replaceable by user; device not user-repairable (do not open); estimated lifespan: 2 years |
| General information | Instructions available in multiple languages; CE compliance (medical device); compatible with eMyBaby app (iOS/Android) |
Frequently Asked Questions - Thermoadvanced Plus Miniland
User questions about Thermoadvanced Plus Miniland
0 question about this device. Answer the ones you know or ask your own.
Ask a new question about this device
Download the instructions for your Thermometer in PDF format for free! Find your manual Thermoadvanced Plus - Miniland and take your electronic device back in hand. On this page are published all the documents necessary for the use of your device. Thermoadvanced Plus by Miniland.
USER MANUAL Thermoadvanced Plus Miniland
thermoadvanced minilandbaby.com plus
Español 10
English 23
Português 39
Français 52
Deutsch 65
Italiano 79
Polski 92
Русский 105
natural_image
Illustration of a mobile phone and tablet device with a microphone icon (no text or symbols)ÍNDICE
4.1.2. PANTALLA LCD
natural_image
Line drawing of a hand holding an object (no text or symbols)
natural_image
Line drawing of a human face with a hand holding an object near the forehead (no text or symbols)
natural_image
Line drawing of a human face with a hand holding an object near the nose (no text or symbols)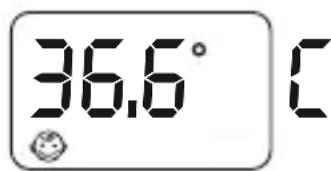
NOTA
natural_image
Line drawing of a hand holding a circular object, possibly a device or tool, with no visible text or symbols.
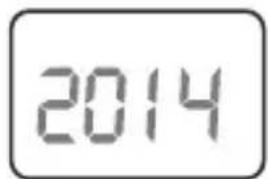
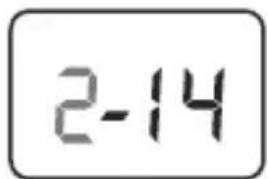
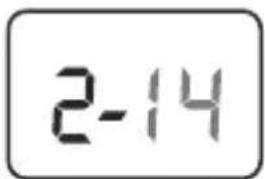
N° de memorización
Temperatura Hora Fecha
natural_image
Line drawing of a hand holding a circular object (no text or symbols)

natural_image
Line drawing of a hand holding a handheld device (no text or symbols visible)natural_image
Line drawing of a hand holding an ear with a device, no text or symbols present5.7. CAMBIO ENTRE FAHRENHEIT O CELSIUS
- Introduction
- Contents
- Safety instructions
- Quick start guide
- Product features
- Normal body temperature ranges
- Instructions for use
- Advanced settings
- Smartphone & tablet connectivity
- Product care
- Troubleshooting
-
Specifications & symbols
-
Information on the disposal of the batteries and the product
1. INTRODUCTION
Congratulations on the purchase of this infrared, non contact, clinical speaking thermometer. Before using this device, please read all the instructions in this manual carefully. Please keep in a safe place as it contains important information. The features described in this user's guide are subject to modifications without prior notice.
2. CONTENTS
1 Infrared non contact speaking thermometer.
1 Storage and travel bag.
2 AAA Batteries.
1 Instruction manual and guarantee.
If any of the above is missing, please contact your retailer.
3. SAFETY INSTRUCTIONS
FEVER! If the reading exceeds 38^ C (100.4°F) and / or the patient feels uncomfortable, the user should get in contact with a doctor.
- This device is not a toy; do not allow children to play with it.
- Keep the thermometer out of the reach of children.
- Read the instructions carefully before use and save them for future reference.
- Use of this thermometer is not intended as a substitution for consultation with your physician. Reading results are for reference only. Contact a medical professional if you have or suspect any health concerns.
- Make sure the batteries are inserted with the correct polarity.
- Consumed batteries should be removed.
- Don't throw battery into a fire, the battery is likely to explode.
- Never attempt to open any part or dismantle the controls. Responsibility for failure cannot be accepted if these instructions have been ignored.
-
Don't take apart, repair or change any parts of the unit at any time.
-
Don't use the thermometer if the casing is damaged (for example, the infrared casing is broken). The use of a damaged unit may cause injury, erroneous results or serious danger.
- Do not shake, tap or drop the thermometer.
- The infrared sensor must be kept clean, dry and undamaged at all times to ensure accurate readings.
- Do not operate the system in the vicinity of strong transmitter such as a microwave oven and shortwave appliances.
- This product needs special precautions regarding EMC (Electromagnetic Compatibility) and needs to be installed and put into service according to the EMC information provided, and this unit can be affected by portable and mobile RF (Radio-Frequency) communications equipment.
- To ensure eMyBaby app readings are accurate, keep the thermometer at least of 30 cm from other wireless devices.
- Don't store the thermometer in extreme temperatures below -20^ / -4^ or over 55^ / 131^ ) or extreme humidity (below 15% RH or over 90% RH). This could cause inaccurate readings.
- This device is intended for occasional reading and monitoring the temperature of the human body or objects, in a domestic environment. Do not use the product for other purposes.
- This machine should not be used adjacent to or stacked with other electrical equipment and that if adjacent or stacked use is necessary, this machine should be observed to verify normal operation in the configuration in which it will be used.
IMPORTANT
- Changes and modifications carried out by anyone other than the MINILAND technical service will not be covered by the product guarantee.
• The warranty excludes misuse: - Unauthorized disassembly and modification of the product.
- If the product is dropped during application or transportation.
- An incorrect use of the product.
4. QUICK START GUIDE
4.1. FOREHEAD TEMPERATURE MEASUREMENT
- If the display is in standby, press any button to wake it up.
- Hold the thermometer over the center of the forehead, at a distance approximately 3-5 cm midway between eyebrow and hairline.
- Press and hold the forehead button [?] , the spotlight will come ON.
- Hold the forehead button as long as you want the spotlight to stay on. Once the spotlight is over the area you wish to measure, release the forehead button, the thermometer will beep once and to start the reading and will beep twice more once the reading has been taken. The LCD will display the temperature. You will also hear the result via the speaker if the TALK function is enabled.
- FEVER! If the reading exceeds 38^ (100.4°F) and / or the patient feels uncomfortable, the user should get in contact with a doctor.
- You can press the forehead button [?] to start a new reading or press Set/Mem button [♣] to return to standby mode.
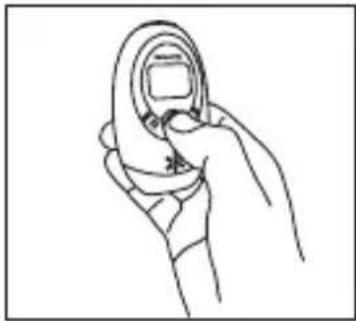
4.2. OBJECT TEMPERATURE READING (E.G. WARM MILK)
- If the display is in standby, press any button to wake it up.
- Hold the thermometer so that the probe's position is at a distance between 3-5 cm from the liquid and/or surface you want to take the temperature of.
- Press and release the object button [💡] to take a reading. The thermometer will beep once and then twice again indicating the reading is finished. The LCD will display the temperature. You will also hear the result via the speaker if the TALK function is enabled (see section 12.2. LANGUAGE SUPPORT).
- Press the object button [💡] to start a new reading or press Set/Mem button [💡] to return to standby mode.
5. PRODUCT FEATURES
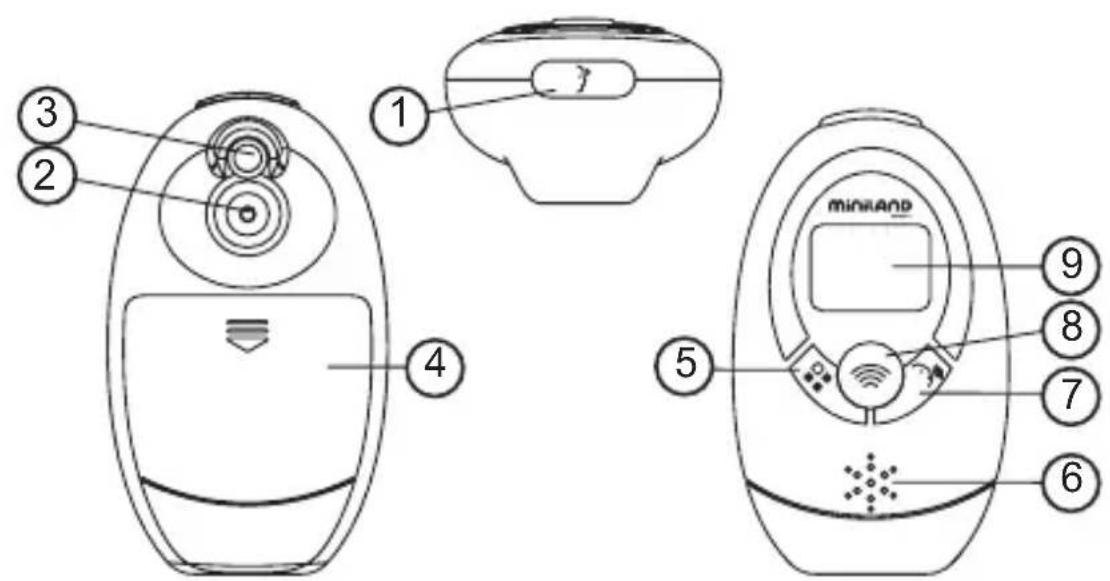
5.1. PARTS
- Forehead temperature measurement button
- Infrared sensor
- Spotlight
- Battery cover
- Set/Memory button
- Loudspeaker
- Talk button
- Object temperature measurement button
- LCD
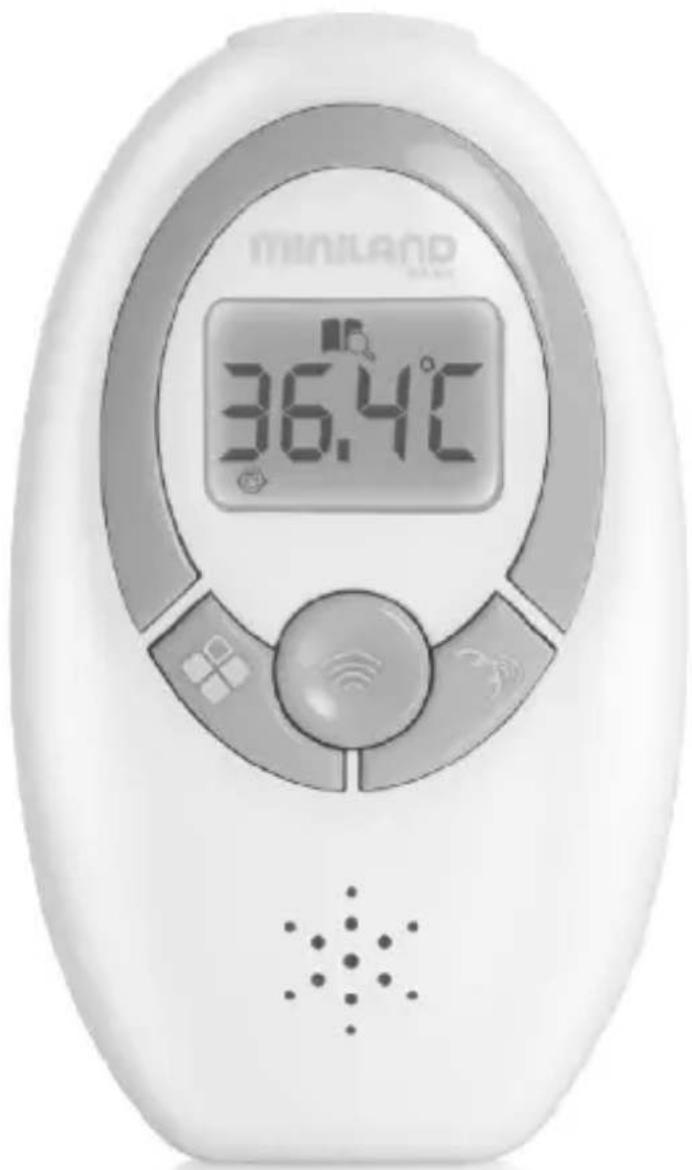
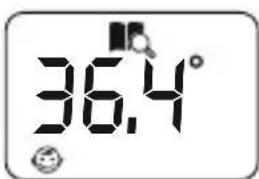
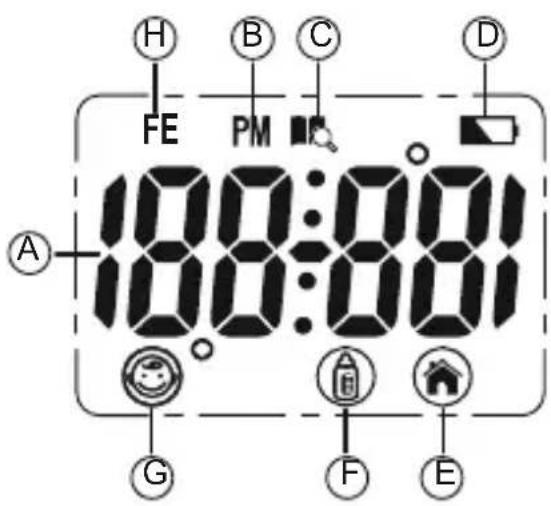
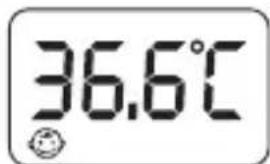
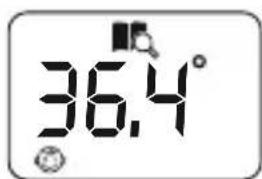
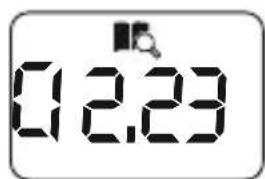
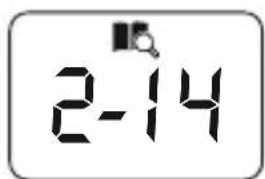
5.2. LCD DISPLAY
A. Temperature display
B. PM (time format)
C. Memory icon
D. Low battery icon
E. Room temperature measurement icon
F. Object temperature measurement icon
G. Forehead temperature measurement icon
H. Fever symbol
5.3. FEATURES
5.3.1. ROOM TEMPERATURE, DATE & TIME DISPLAY
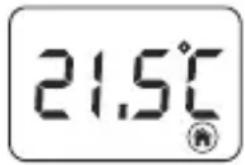
The LCD display will alternate between showing the time, date and then the room temperature.
5.3.2. READING OF TEMPERATURE RANGES
| Range in Celsius Range in Fahrenheit | ||
| Room 5.0°C to | 59.9°C 41.0°F to 139.8°F | |
| Object 20.0°C | to 60.0°C 68.0°F to 140.0°F | |
| Body 32.0°C to | 42.9°C 89.6°F to 109.3°F |
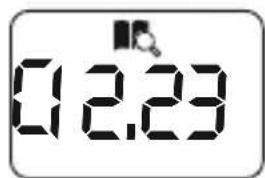
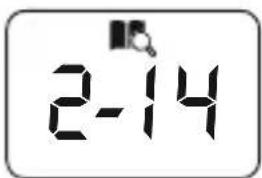
5.3.3. MEMORY
Maximum of 9 sets of temperature records can be stored in the device's memory.
5.3.4. AUDIO
Temperature, time and records can be heard using the TALK function (see section 12.2. LANGUAGE SUPPORT).
5.3.5. SPOTLIGHT
The spotlight is used to pinpoint the area where a temperature measurement is to be taken. The spotlight will stay on whilst the forehead button (1) is being pressed. The spotlight turns off after you release the button. The spotlight will automatically turn off if you press the forehead button (1) for more than 1 minute; after you release the button, the device reverts back to standby mode.
5.3.6 TEMPERATURE BACKLIGHT INDICATION
The display backlight will light up after a human body temperature reading has finished, as follows:
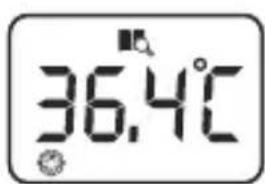
Blue backlight: below 32°C-37.9°C (89.6°F-100.3°F)
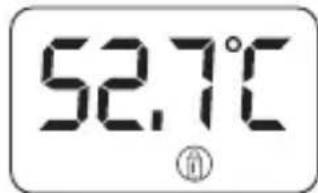
Red backlight: FEVER! 38.0°C-42.9°C (100.4°F-109.3°F)
6. NORMAL BODY TEMPERATURE RANGES
Normal body temperature is within a set range. A person's normal temperature range tends to decrease with age. The following table shows a list of normal temperature ranges against four age groups:
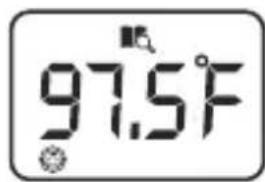
| 0-2 years 36.4°C-38.0°C 97.5°F-100.4°F | |
| 3-10 years 36.1°C-37.8°C 97.0°F-100.0°F | |
| 11-65 years 35.9°C-37.6°C 96.6°F-99.7°F | |
| >65 years 35.8°C-37.5°C 96.4°F-99.5°F |
The range varies from person to person and can be influenced by many factors such as the time of day, the level of activity, medication, emotion and so on. So we recommend that you practice with the thermometer on yourself and family members when you are healthy. This way you know how the thermometer works and can feel more confident of the readings you take when a family member is ill.
For body temperature readings between 32^ C and 37^ C ( 100.3^ F- 89.6^ F), the display will be backlit in blue and display the temperature.
FEVER: If the measured temperature is between 38°C and 42°C (100.4°F-109.3°F), the display will show the fever indicator (FE) and will be backlit in RED.
7. INSTRUCTIONS FOR USE
7.1. LANGUAGE SETUP
Whilst in standby mode, press the talk button to [ ] report the temperature, current time or room temperature.
After each forehead reading, the thermometer reports the temperature obtained in the language chosen.
Whilst in standby mode, press and hold the talk button [ ] for 2 seconds and release. Repeat to step through Spanish, English, German, French, Italian, Russian or mute function.
Remember that in waiting mode, the LCD alternatively displays time, date and room temperature.
7.2.2. PREPARATIONS
- To achieve an accurate reading, it is very important to check the infrared sensor is clean before using.
- Avoid using in a draught to assure an accurate reading.
- If there is a difference in temperature between the storage area and the place where the reading is to take place, leave the thermometer at room temperature for approximately 30 minutes, failure to do so may cause an inaccurate reading.
- Don't touch or blow the infrared sensor. A dirty infrared sensor may cause an inaccurate reading.
7.2.3. FOREHEAD TEMPERATURE MEASUREMENT
Make sure that the patient's forehead is clean before taking a reading to assure that it is accurate. If it is necessary to wipe the patient's forehead, please wait for 5-10 minutes after wiping it, before taking their temperature.
- External factors may affect the patient's forehead temperature, particularly when an individual has been exposed to very hot or very cold temperatures or has recently been swimming or bathing. If necessary, wait 30 minutes before taking the patient's temperature.
- A forehead and temple temperature differs from an internal temperature, which is taken orally or rectally. Vasoconstriction, an effect which constricts the blood vessels and cools the skin, can occur during the early stages of a fever. In this case, the temperature taken may be unusually low. If the reading does not match the patient's perception of his own body temperature, repeat the reading every 15 minutes. As a reference point, you can also measure the internal body temperature using a conventional oral or rectal thermometer.
- The baby's skin reacts very quickly to the ambient temperature. Therefore, do not take a baby's temperature with the thermometer during or after breast-feeding, because their skin temperature may be lower than the internal body temperature.
-
If the display is in standby, press any button to wake it up.
-
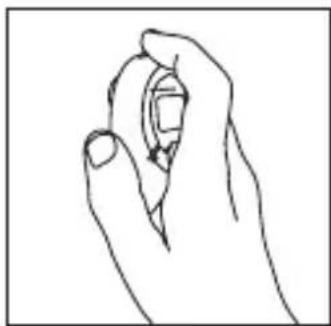
Place the thermometer in your hand with your finger resting on the forehead button [ ]
-
Hold the thermometer over the center of the forehead, at a distance approximately 3-5 cm midway between eyebrow and hairline.
-
Press and hold the forehead button [ ] , the spotlight will come ON allowing you to locate the correct position for a forehead reading. Hold the forehead button as long as you want the spotlight to stay on. If the position is correct, release the forehead button to start the reading and then the thermometer beeps once.
natural_image
Line drawing of a hand holding an object (no text or symbols)
natural_image
Line drawing of a human face with a hand holding an object near the eye (no text or symbols)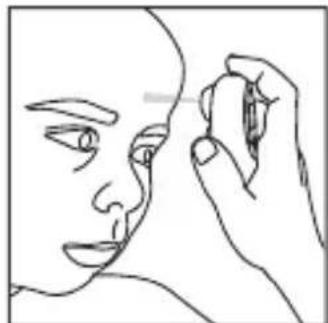
natural_image
Line drawing of a human face with a hand holding an object near the ear (no text or symbols)-
Keep the thermometer steady until you hear two beeps and the temperature is given. The backlight will light up blue or red according to the temperature taken.
-
The reading is complete and the thermometer may be removed from the head.
-
Read the temperature on the display.
- You can press the forehead button [?] to start a new reading or press Set/Mem button [💡] to return to standby mode.
7.2.4. OBJECT TEMPERATURE READING
- Don't use this mode to take someone's body temperature.
- When reading the temperature of an object, the current surface temperature is displayed. It can be different from the internal temperature, especially if the surface is exposed to direct sunlight or a draught.
-
If the display is in standby, press any button to wake it up.
-
Place the thermometer in your hand with your thumb resting on the object button [💡].
-
Hold the thermometer so that the probe's position is at a distance between 3-5 cm from the liquid and/or surface you want to take the temperature of.
natural_image
Line drawing of a hand holding a circular object with a square hole (no text or symbols)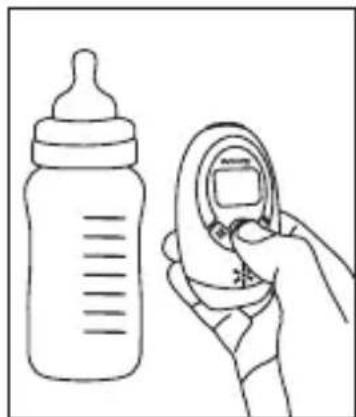
natural_image
Line drawing of a baby bottle and a hand holding a medical device (no text or symbols)-
Press and release the object button [💡] to take a reading. The thermometer will beep once and then twice again indicating the reading is finished.
-
Remove the thermometer from the object. The LCD displays the temperature.
- Press the object button [💡] to start a new reading or press Set/Mem button [💡] to return to standby mode.
7.2.5. ROOM TEMPERATURE READING
- The thermometer is constantly reading the room temperature.
• The room temperature can be viewed when in standby mode. - Press the Set/Mem button [💡] to return to standby mode.
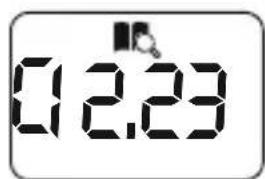
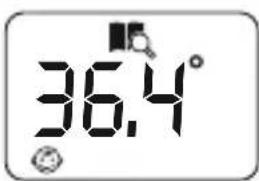
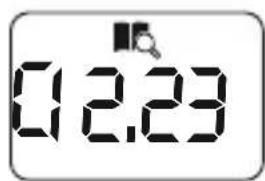
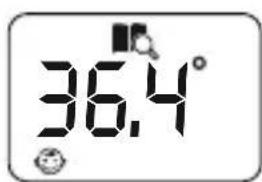
7.3. MEMORY MODE
Each forehead temperature result will automatically be stored in the memory. Once the 9th temperature has been taken the first set of data will be removed and the new recording will take the top position.
- Press Set/Mem button [♣] to check the memory number, temperature and date."-- -" will be displayed if no data is stored.
-
Press the Set/Mem button [💡] again whilst in memory mode to step between stored data. Press and hold Set/Mem button [💡] to scroll quickly between stored data.
-
Press the talk button [ ] to hear the currently selected stored temperature data. Press any button to stop the sound during the announcement.
- Maximum storage capacity is 9 sets of data showing memory number, temperature, time taken and date taken.
- Press the object button [💡] and forehead button [💡] at the same time to revert back to standby mode.
Note: Device will not store temperatures taken via the object button [💡].

Memory Number Temperature Time Taken Date Taken
8. ADVANCED SETTINGS
8.1. FAHRENHEIT/CELSIUS SETUP
When not in standby mode i.e. after taking a temperature reading or when displaying memory temperature, press and hold talk button [30] about 3 seconds this will change the mode to either °F or °C.
Press the Set/Mem button [💡] to revert back to standby mode.
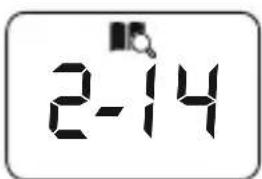
8.5 DATE AND TIME SETUP
-
Whilst in standby mode, press and hold Set/Mem button [♣] about 2 seconds to enter into setup mode. The current clock mode will flash indicating whether it is in 24hr or 12hr mode.
-
Press Set/Mem button [♣] again to swap between 24hr and 12hr mode and then press the talk button [♥] to set the clock mode.
-
The hour digits will flash indicating you are in setup mode.
-
The device will automatically exit setup mode 30 seconds after the last button has been pressed.


- Press the talk button [ ] to select between setting the HOUR, MINUTE, YEAR, MONTH, DAY and SLEEP functions.
- Press the object button [💡] at any time to exit setup.
MINUTE YEAR MONTH DAY
- Press the Set/Mem button [💡] to modify the selected function. Pressing and holding the Set/Mem button [💡] will scroll through the digits more quickly.
- Press the talk button [30] to confirm the settings and go to the next function.
When the sleep mode is activated, the thermometer will turn off automatically after approximately 3 min; when the sleep mode is deactivated, the thermometer remains permanently switched on until the battery runs out. To save power, we recommend to set sleep mode on.
8.5 SLEEP MODE SETUP
It is recommended that you use sleep mode as this will prolong the battery life. In sleep mode the display will automatically turn off after 3 minutes to save battery power if sleep mode is set to "ON".
- Whilst in standby mode, press and hold Set/Mem button [💡] about 2 seconds to enter into setup mode. The current clock mode will flash indicating whether it is in 24hr or 12hr mode.

- Press the talk button [ ] to step through the HOUR, MINUTE, YEAR, MONTH, DAY functions till you reach the SLEEP function (SLP).

- Press the Set/Mem button [💡] to modify the function.


- Press the talk button [30] to confirm the settings and exit setup.
9. SMARTPHONE & TABLET CONNECTIVITY 9.1. BABY TEMPERATURE CONTROL
This Thermoadvance has a special communications module that lets you connect to your device (smartphone or tablet), automatically sending the results of each reading to keep track of temperatures.
The Thermoadvanced plus is currently compatible with a number of modern devices but we cannot guarantee compatibility with all devices.
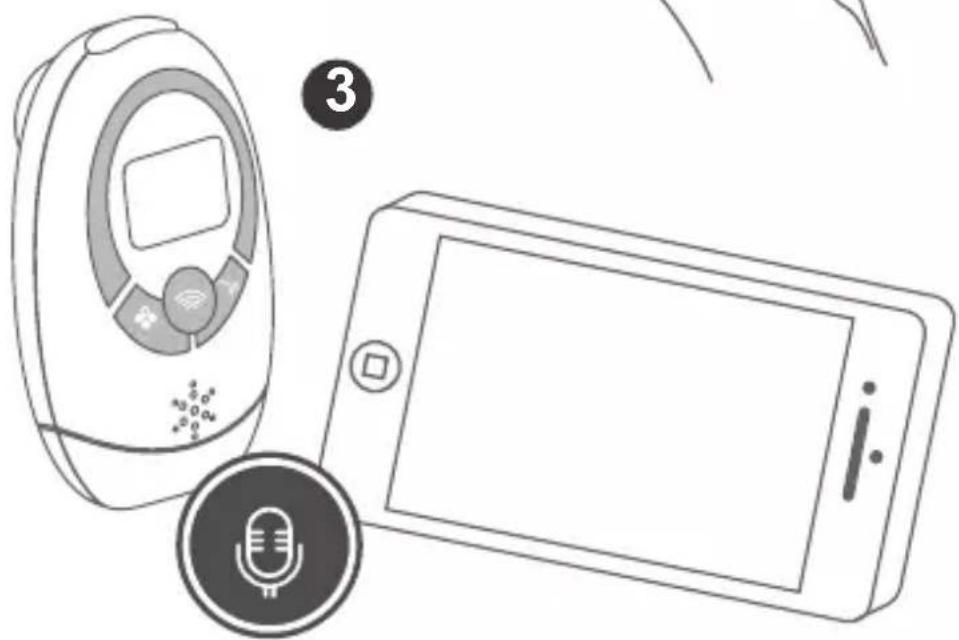
9.2. USING THE eMyBaby App (FIGURE A)
To use your new infrared thermometer with a smartphone or tablet, first set it to silent mode to optimize the communication between the device and your smartphone or tablet. To do this, press down the voice button (7) for around 2 seconds and the thermometer will change to a different language each time you press this button until it reaches the silent mode 1.

You will also need to install the free eMyBaby application. To do so, follow the instructions provided at the start of this manual.
Once the software has been installed correctly the eMyBaby icon will appear on the device.
Access the application and take the following steps to take a reading with your thermometer:
- If you have not already done so, you will need to create a profile for the baby whose temperature is to be read. To do so, go to the "My Baby" section on the main menu of the eMyBaby app and follow the steps provided to create your file.
- Now access the "Thermometer" section on the main menu and select the profile for the baby whose temperature is due to be read.
- Select "New measure" and select the add option using the thermometer.
- Now take the baby's temperature as instructed in item 7.2.3 of this manual ^2 .
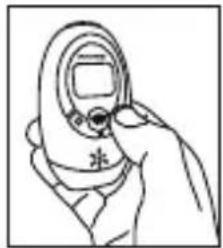
- After the second beep indicating the end of the temperature reading, place the thermometer loudspeaker (6) directly in front of your mobile or tablet microphone. Take into account that the communication is conducted using ultrasound, and as such the two devices should be as close to each other as possible ③.
- Your tablet or smartphone will automatically register the reading taken by the thermometer.
- Press the "Save temperature" button to register the reading and store it in your baby's temperature records.
Remember you can access your baby's temperature records from both the eMyBaby app and the www.emybaby.com website from the "Thermometer" section.
9.3. TIPS FOR USING THE eMyBaby App
- Make sure that your smartphone or tablet is running on the latest operating system. For information about software updates, see the instructions for your device.
- Make sure that your eMyBaby app is updated at regular intervals.
For information about app updates, see the instructions for your device. - For the communications module to function correctly, the mobile device has to be the sufficiently charged. Users should have a power supply unit or a charging device to hand.
- Make sure that there is always enough memory available to back up the reading data on your smartphone or tablet.
- If you receive a call or a text message during a reading, the reading could be cancelled or it can provide an inaccurate information. We recommend switching your device to flight mode.
- If you are in a noisy environment hold the Thermoadvance speaker as close as you can to your smartphone device. Under normal quiet use the Thermoadvance and smartphone device can be 30cm (12") apart.
- There is always the possibility that future updates to the eMyBaby app may render this guide outdated.
10. PRODUCT CARE
10.1. CARE AND MAINTENANCE
- Prevent the product getting wet, if it does get wet please dry thoroughly. Please note that corrosive liquids may cause damage.
- Please use and preserve at a normal temperature, the product life will be shortened if temperatures are excessively high or low.
- To ensure accurate measurements, keep the probe tip clean and free of scratches. Finger prints or dirt will affect the accuracy of the thermometer.
- In order to get an accurate reading, please clean the probe tip.
- To clean the sensor, gently wipe is surface with a cotton swab slightly moistened with alcohol and immediately wipe dry with a clean cotton swab.
- Use a soft dry cloth to clean the body of the thermometer. Never clean the thermometer with abrasive cleanser, thinner, benzene or submerge the thermometer into water or other liquids.
After cleaning, allow at least 20 minutes drying time before taking temperatures. Place the thermometer in the protective case or table stand holder. Store it in a dry, clean place at room temperature
10.2. CALIBRATION
The thermometer is initially calibrated at the time of manufacture. If the thermometer is used according to the instructions, periodic recalibration is not required. If any time you question the accuracy of the reading, please contact the retailer immediately.
Don't attempt to modify or reassemble the thermometer.
10.3. BATTERY & PRODUCT DISPOSAL INFORMATION
If your thermometer will not be used on a regular basis, remove the battery to prevent possible damage due to chemical leakage. If battery does leak, remove carefully. Do not allow bare skin to come in contact with the leaking fluid.
Used batteries should be removed.
Remember to dispose of the product responsibly.
Don't throw battery into a fire, the battery is likely to explode.
Do not mix products bearing the crossed out bin symbol with your general household waste.
For the correct collection and treatment of these products take them to the collection points designated by your local authority. Alternatively contact the retailer who sold you the product.
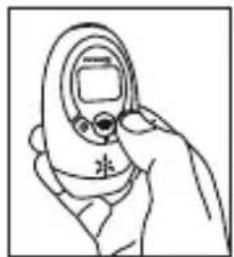
10.4. INSTALLATION/REMOVAL OF BATTERIES
When the low battery indicator [▶] appears on the LCD, or the thermometer does not function at all, you should replace the old batteries with new ones as soon as possible. This product uses two AAA 1.5V batteries, use the following procedure to replace or insert batteries:
- Open the battery cover following the direction of the arrow.
- Remove the old batteries and then insert the new batteries into the battery compartment. Make sure you install the new batteries properly; be sure to match the positive and negative ends of the battery to the marking in the batteries compartment of the thermometer.
-
Replace the battery compartment cover and press to close.
-
TROUBLESHOOTING
| PROBLEMS CHECKLIST SOLUTIONS | ||
| No response/Automatic reset when pull out insulator. | Battery used up. Change new | battery. |
| Battery in wrong polarity. Rem | ove battery, turn it over and re-insert. | |
| Poor battery contact. Remove | battery, clean contacts and re-insert. | |
| Battery symbol □ on LCD. | Low battery. Replace with new | battery. |
| Lo” on screen. The | measured temperature is lower than 32.0°C/89.6°F. Please check the operation method. | Follow the steps in the user manual for proper reading. |
| “Hi” on screen. The | measured temperature is higher than 42.9°C/109.3°F. Please check the operation method. | Follow the steps in the user manual for proper reading. |
| “ErrP” or “ErrH” on screen. | Hardware problem. Contact the | manufacturer or distributor. |
| “ErrE” on screen. | Environment temperature beyond the scope of: 10°C~40°C (50.0°F~104.0°F) for Objects. 15°C~40°C (59.0°F~104.0°F) for Forehead. | Condition the thermometer until it reaches environment temperature: 10°C~40°C (50.0°F~104.0°F) for Objects. 15°C~40°C (59.0°F~104.0°F) for Forehead. |
| The reading is not accurate or if there is any doubt with the result. | Please check if the infrared sensor is clean or not. | Clean the infrared sensor with cotton swab according to user manual. |
| Please check if the reading mode is correct or not. | Ensure you have read the manual and know how to use the thermometer properly. | |
| Please check if you have let the thermometer and patient stabilize in the room for at least 30 minutes. | Please keep the thermometer and patient in the room where the temperature is to be taken at least 30 minutes before using. | |
| Are you using the thermometer indoor. | Please take the reading indoor. | |
| Other malfunctions | Contact the MINILAND technical service. | |
12. SPECIFICATIONS & SYMBOLS
12.1 TECHNICAL SPECIFICATION
| Power supply DC 3V (2 x 1.5 AAA batteries) | ||
| Mode of operation | Ajusted mode | |
| Reference body site | Core | |
| Body reading range 32.0°C-42.9°C 89.6°F-109.3°F | ||
| Forehead reading accuracy | In range of 35.5°C-42.0°C95.9°F-107.6°F | ±0.2°C±0.4°F |
| For other range ±0.3°C | ±0.5°F | |
| Object measure range 20.0°C-60.0°C 68.0°F-140.0°F | ||
| Object measure accuracy | ±1.0°C ±2.0°F | |
| Room temperature range | 5.0°C-59.9°C 41.0°F-139.8°F | |
| Room temperature accuracy | ±1.0°C ±2.0°F | |
| Dimension 89 (L) x 53 (A) x 35 (F) mm | ||
| Weight 56 g (without battery) | ||
| Forehead operation condition | With relative humidity of 20%-85% | |
| 15.0 °C-40.0 °C | 59.0 °F-104.0 °F | |
| Object operation condition | With relative humidity 20%-85% | |
| 10.0 °C-40.0 °C | 50.0 °F-104.0 °F | |
| Storage environment | With relative humidity 15%-90% | |
| Atmospheric pressure: 700hPa-1060hPa | ||
| -20.0 °C-55 °C | -4.0 °F-131.0 °F | |
| Shelf life: 2 years | ||
12.2 LANGUAGE SUPPORT
| Function\Audio | English | Spanish | German | French | Italian | Russian |
| Temperature (°C) | √ √ | √ √ | √ √ | |||
| Temperature (°F) | √ × | × × × | × | |||
| Time | √ √ | √ × √ | × | |||
| Environmental Temperature(°C) | √ √ | √ × √ | × | |||
| Environmental Temperature(°F) | √ × | × × × | × |
12.3. NORMALIZED SYMBOLS
The following is a list of symbols that can be found on the product, packaging and instructions.

- Attention: Read the operating Instructions for use!
- Type BF Applied Part.
- Disposal in accordance with Directive 2012/19/EU (WEEE)
- Complies with the European Medical Device Directive (93/42/EEC) and amended by directive 2007/47/EC requirements. Notified body TÜV Rheinland (CE0197)
- The name and the address of the manufacturer.
- Name and adress of the Authorized Representative in the European Community.
IMPORTANT INFORMATION REGARDING ELECTRO MAGNETIC COMPATIBILITY (EMC)
With the increased number of electronic devices such as PC's and mobile (cellular) telephones, medical devices in use may be susceptible to electromagnetic interference from other devices.
Electromagnetic interference may result in incorrect operation of the medical device and create a potentially unsafe situation.
Medical devices should also not interfere with other devices.
In order to regulate the requirements for EMC (Electro Magnetic Compatibility) with the aim to prevent unsafe product situations, the EN60601-1-2 standard has been implemented. This standard defines the levels of immunity to electromagnetic interferences as well as maximum levels of electromagnetic emissions for medical devices.
This medical device conforms to this EN60601-1-2:2007 standard for both immunity and emissions. Nevertheless, special precautions need to be observed:
- The device needs to be installed and put into service in accordance with the information provided in the user manual.
· The use of accessories and cables other than those specified by Manufacturer, with the exception of cables sold by Manufacturer as replacement parts for internal components, may result in increased emission or decreased immunity of the device.
· The medical devices should not be used adjacent to or stacked with other equipment. In case adjacent or stacked use is necessary, the medical device should be observed to verify normal operation in the configuration in which it will be used. - Refer to further guidance below regarding the EMC environment in which the device should be used.
Wireless communications equipment such as wireless home network devices, mobile phones, cordless telephones and their base stations, walkie-talkies can affect this equipment and should be kept at least a distance d away from the equipment. The distance d is calculated by the MANUFACTURER from the 800 MHz to 2,5 GHz column of Table 6 of IEC 60601-1-2,
| Recommended separation distance between portable and mobile RF communications equipment and the thermometer | |||
| The thermometer are intended for use in an electromagnetic environment in which radiated RF disturbances are controlled. The customers or the users of these thermometer can help prevent electromagnetic interference by maintaining a minimum distancebetween portable and mobile RF communications equipment (transmitters) and the thermometer as recommended below, according to the maximum output power of the communications equipment. | |||
| Output Power of Transmitter in Watt | Separation distance according to frequency of transmitter in meter | ||
| 150 kHz to 80 MHz d = 1,2 √P | 80 MHz to 800 MHz d = 1,2 √P | 800 MHz to 2,5 GHz d = 2,3 √P | |
| 0.01 0.12 0.12 0.23 | |||
| 0.1 0.38 0.38 0.78 | |||
| 1 1.2 1.2 2.3 | |||
| 10 3.8 3.8 | 7.3 | ||
| 100 12 12 23 | |||
| For transmitters rated at a maximum output power not listed above, the recommended separation distance d in meters (m) can be estimated using the equation applicable to the frequency of the transmitter, where P is the maximum output power rating of the transmitter in watts (W) according to the transmitter manufacturer. Note: At 80MHz and 800MHz, the separation distance for the higher frequency range applies Note: These guidelines may not apply in all situations. Electromagnetic propagation is affected by absorption and reflection from structures, objects, and people. | |||
13. INFORMATION ON THE DISPOSAL OF THE BATTERIES AND THE PRODUCT
- Remember to remove the batteries and dispose of them in a responsible manner when disposing of the baby monitor.
- You should not mix products bearing the crossed-out rubbish bin symbol with your domestic rubbish.
- These products should be taken to the collection points allocated by the local authorities for appropriate treatment.
Alternatively you may contact the point of sale where you purchased the product.

ÍNDICE
natural_image
Line drawing of a hand holding an object (no text or symbols)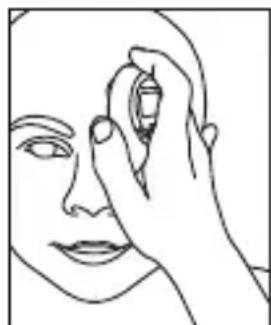
natural_image
Line drawing of a human face with a hand holding an object near the forehead (no text or symbols)
natural_image
Line drawing of a human face with a hand holding an object, no text or symbols present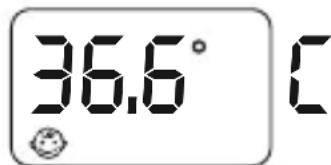
NOTA
natural_image
Line drawing of a hand holding a circular object with a square top (no text or symbols)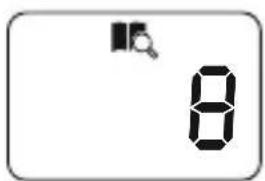
Número de memória
Temperatura Hora Data

natural_image
Line drawing of a hand holding a small electronic device (no text or symbols visible)natural_image
Line drawing of a hand holding an ear with a small screen (no text or symbols)5.7. ESCOLHER ENTRE FAHRENHEIT OU CELSIUS
4.1.2. PANTALLA LCD
natural_image
Line drawing of a hand holding an object (no text or symbols)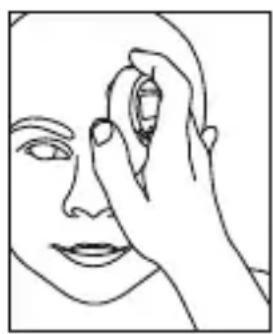
natural_image
Line drawing of a human face with a hand touching the forehead area (no text or symbols)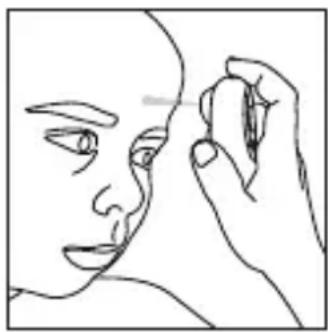
natural_image
Line drawing of a human face with a hand holding a pen, no text or symbols present
REMARQUE:
natural_image
Line drawing of a hand holding a circular device with a square button (no text or symbols)natural_image
Illustration of a baby bottle and a hand holding a baby tire, no text or symbols present
5.4 VÉRIFICATION DE LA MÉMOIRE
natural_image
Line drawing of a hand holding a circular object with a square top (no text or symbols)
natural_image
Line drawing of a hand holding a circular object (no text or symbols)
natural_image
Line drawing of a hand holding an open phone with a screen and ear (no text or symbols)5.6 MESSAGE VOCAL
natural_image
Line drawing of a hand holding an open mobile phone with a screen and antenna (no text or symbols)5.7 SÉLECTION DES DEGRÉS CELSIUS OU FAHRENHEIT
natural_image
Line drawing of a hand holding an object (no text or symbols)
natural_image
Line drawing of a human face with a hand holding an object near the forehead (no text or symbols)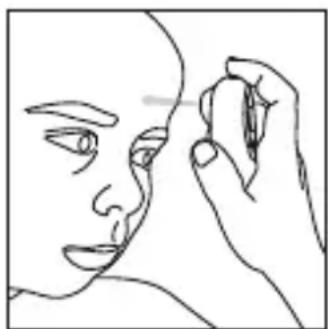
natural_image
Line drawing of a human face with a hand holding a pen, no text or symbols present
HINWEIS
natural_image
Line drawing of a hand holding a circular object (no text or symbols)
natural_image
Line drawing of a hand holding an ear with a small object on the ear (no text or symbols)4.1.2. DISPLAY LCD
natural_image
Line drawing of a hand holding an object (no text or symbols)
natural_image
Line drawing of a human face with a hand holding an object near the forehead (no text or symbols)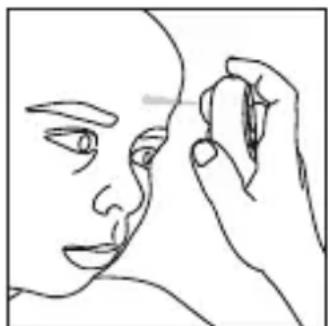
natural_image
Line drawing of a human face with a hand holding an object near the nose (no text or symbols)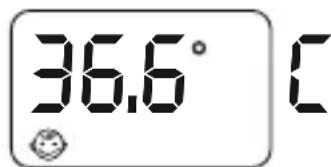
NOTA
natural_image
Line drawing of a hand holding a circular object, possibly a device or tool, with no visible text or symbols.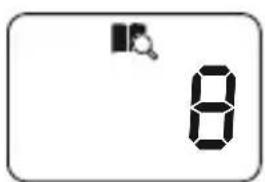
Numero di memoria
natural_image
Line drawing of a hand holding a small object, possibly a device or tool, with no visible text or symbols.12 hr
OFF

natural_image
Line drawing of a person holding a device with a screen (no text or symbols)natural_image
Line drawing of a hand holding an ear with a device, no text or symbols present5.7 COMMUTAZIONE TRA GRADI FAHRENHEIT E CELSIUS
4.1.2. WYŚWIETLACZ CIEKŁOKRYSTALICZNY
natural_image
Line drawing of a hand holding an object (no text or symbols)
natural_image
Line drawing of a human face with a hand touching the forehead area (no text or symbols)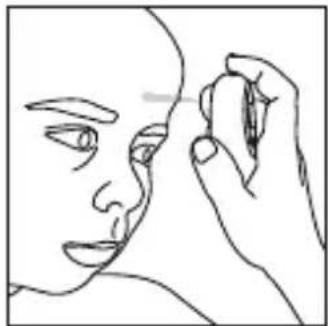
natural_image
Line drawing of a human face with a hand holding an object near the nose (no text or symbols)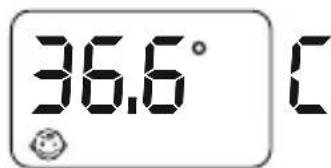
UWAGA
natural_image
Line drawing of a hand holding a circular object with a square top (no text or symbols)natural_image
Line drawing of a baby bottle and a hand holding a medical device (no text or symbols)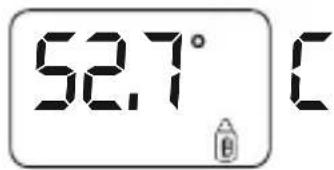
5.4. SPRAWDZANIE PAMIĘCI
natural_image
Line drawing of a hand holding a circular object with a square top (no text or symbols)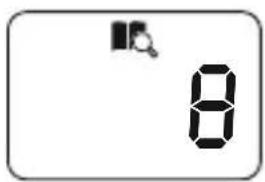
Numeru pamięci

natural_image
Line drawing of a hand holding a circular object (no text or symbols)natural_image
Line drawing of a hand holding a handheld device with a screen and antenna (no text or symbols)5.6. KOMUNIKAT GŁOSOWY
natural_image
Line drawing of a hand holding an earbell (no text or symbols)5.7. PRZEŁĄCZANIE MIĘDZY STOPNIAMI CELSJUSZA I FAHRENHEITA
4.1.2. ЖК-дисплей
natural_image
Line drawing of a hand holding an object (no text or symbols)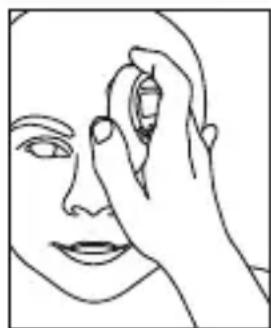
natural_image
Line drawing of a human face with a hand holding an object near the forehead (no text or symbols)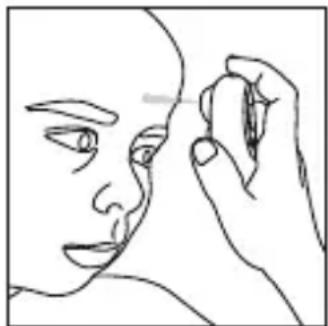
natural_image
Line drawing of a human face with a hand holding an object near the nose (no text or symbols)
ПРИМЕЧАНИЕ:
natural_image
Line drawing of a hand holding a circular object with a square top (no text or symbols)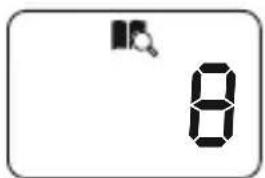
Номера ячейки

Температуры
Времени Дата
natural_image
Line drawing of a hand holding a small object, possibly a device or tool, with no visible text or symbols.12 hr
OFF
natural_image
Line drawing of a hand holding a handheld device (no text or symbols)natural_image
Line drawing of a hand holding an ear with a medical device (no text or symbols)flowchart
graph LR
    A["Visit our website on eMyBaby.com"] --> B["Android App on Google play"]
    A --> C["Download on the App Store"]
    B --> D["eMyBaby"]
    C --> D
ES Para descargar la aplicación eMyBaby,
en primer lugar, acceda a la tienda de aplicaciones correspondiente.
EN The eMyBaby app can be downloaded from the app store.
PT Para descarregar a aplicação eMyBaby, em primeiro lugar aceda à respectiva loja de aplicações.
FR Pour télécharger l'application eMyBaby,
accédez d'abord à la boutique d'applications correspondante.
DE Um die Anwendung eMyBaby runterzuladen,
AppStoregehen Sie bitte zuerst im entsprechend
IT Per scaricare l'applicazione eMyBaby è necessario, come prima cosa, accedere al market delle applicazioni.
PL W celu pobrania aplikacji eMyBaby
najpierw należy wejść do odpowiedniego sklepu z aplikacjami.
RU Для того, чтобы загрузить приложение eMyBaby,
в перв

1
EN Click on the icon in the Play Store, as shown in the picture:
EN Then search for the app in the store. Go to the search bar and write emybaby, as shown in the picture:
3
4
EN Once it is installed, the eMyBaby app icon will appear on your home screen. Click to open the app.
EN The app will open and the following picture will appear.
1
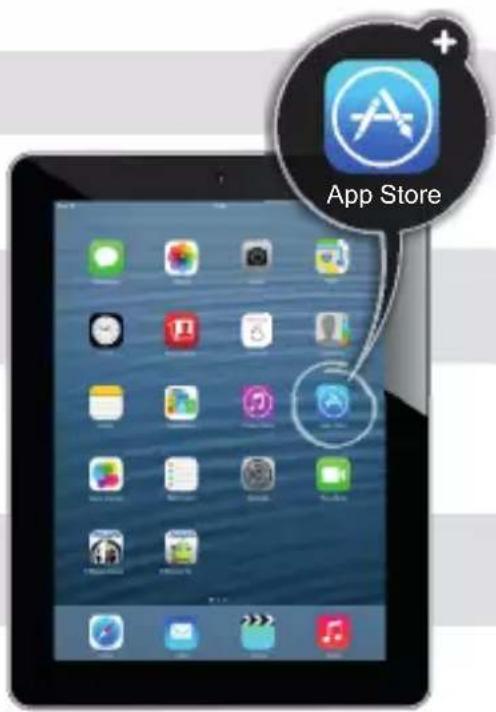
En el caso de tener un móvil o tablet de Apple, debe
ES descargar la aplicación desde la AppStore, cuyo icono se muestra en la imagen:
EN If you have an iPhone or iPad, you should go to the AppStore, to the following icon:
PT Caso tenha um telemóvel ou tablet da Apple, deve descarregar a aplicação a partir da AppStore, cujo ícone se apresenta na imagem:
Si vous avez un téléphone portable ou une tablette d'Apple, vous devez télécharger l'application à partir de l'AppStore, dont l'icône est montrée sur l'image:
DE Falls Sie über ein Handy oder Tablet von Apple verfügen, dann müssen Sie die Anwendung beim AppStore, dessen Symbol im folgenden Bild erscheint, runterladen:
Se si possiede uno smartphone o un tablet Apple, sarà necessario scaricare l'applicazione dall'AppStore; l'icona corrispondente è quella mostrata nell'immagine:
W przypadku telefonów komórkowych lub tabletów Apple należy pobrać aplikację z AppStore, którego ikonkę pokazano na obrazku:
В случае если у Вас мобильный телефон или планшет марки Вам необходимо загрузитьApple, приложение, иконку которого Вы видите на изображении, из AppStore:
2
Then search for the app in the store. Go to the search bar and write emybaby, as shown in the picture:
4
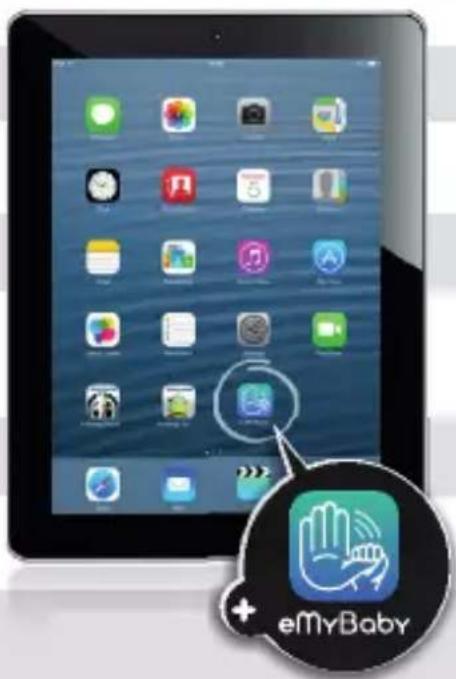
ES Tras la instalación, en su pantalla principal aparecerá el icono de eMyBaby. Púlselo.
When it is installed, the eMyBaby icon will appear on the home screen. Click on it.
Pt Após a instalação, no seu ecrã principal aparecerá o ícone da eMyBaby. Pressione-o.
FR Une fois installée, l'icône eMyBaby apparaîtra sur votre écran principal. Appuyez dessus.
Nach der Installierung erscheint auf Ihrem Hauptbildschirm
DE das App-Symbol von eMyBaby. Drücken Sie bitte dieses Symbol.
IT Quando l'installazione sarà completata, l'icona di eMyBaby comparirà sullo schermo. Fare click su di essa.
PL Po zainstalowaniu na ekranie głównym pojawi się ikonka eMyBaby. Należy ją wcisnąć.
RU После того, как Вы установите приложение, на Вашей главной странице появится иконка приложения eMyBaby. Нажмите ее.
5
EN The app will open and the following picture will appear.
miniLAND
BABY
Importador / Distribuidor · Importer / Distributor importador / Distribuidor · Importateur / Distributeur Importeur / Händler · Importatore / Distributore Importer / Dystrybutor · импортер / Дистрибьютор
Miniland S.A. P.Ind. La Marjal I C/ La Patronal 8-10
03430 ONIL (Alicante) SPAIN
Technical support: +34 966 557 775
Fax +34 965 565 454
www.minilandbaby.com · tecnico@miniland.es
© Miniland, S.A. 2013
Made in China. Keep this information.
Shenzhen Dongdixin Technology Co., Ltd
No. 3 Building XiliBaimang Xusheng Industrial Estate 518108,
Nanshan Shenzhen China

Shanghai International Holding Corp. GmbH (Europe)
Eiffestraße 80, 20537 Hamburg Germany
CE
0197
- thermoadvanced minilandbaby.com plus
- ÍNDICE
- PANTALLA LCD
- NOTA
- CAMBIO ENTRE FAHRENHEIT O CELSIUS
- INTRODUCTION
- CONTENTS
- SAFETY INSTRUCTIONS
- IMPORTANT
- QUICK START GUIDE
- FOREHEAD TEMPERATURE MEASUREMENT
- OBJECT TEMPERATURE READING (E.G. WARM MILK)
- PRODUCT FEATURES
- PARTS
- LCD DISPLAY
- FEATURES
- ROOM TEMPERATURE, DATE & TIME DISPLAY
- READING OF TEMPERATURE RANGES
- MEMORY
- AUDIO
- SPOTLIGHT
- TEMPERATURE BACKLIGHT INDICATION
- NORMAL BODY TEMPERATURE RANGES
- INSTRUCTIONS FOR USE
- LANGUAGE SETUP
- PREPARATIONS
- FOREHEAD TEMPERATURE MEASUREMENT
- OBJECT TEMPERATURE READING
- ROOM TEMPERATURE READING
- MEMORY MODE
- ADVANCED SETTINGS
- FAHRENHEIT/CELSIUS SETUP
- DATE AND TIME SETUP
- MINUTE YEAR MONTH DAY
- SLEEP MODE SETUP
- SMARTPHONE & TABLET CONNECTIVITY 9.1. BABY TEMPERATURE CONTROL
- USING THE eMyBaby App (FIGURE A)
- TIPS FOR USING THE eMyBaby App
- PRODUCT CARE
- CARE AND MAINTENANCE
- CALIBRATION
- BATTERY & PRODUCT DISPOSAL INFORMATION
- INSTALLATION/REMOVAL OF BATTERIES
- SPECIFICATIONS & SYMBOLS
- TECHNICAL SPECIFICATION
- NORMALIZED SYMBOLS
- IMPORTANT INFORMATION REGARDING ELECTRO MAGNETIC COMPATIBILITY (EMC)
- INFORMATION ON THE DISPOSAL OF THE BATTERIES AND THE PRODUCT
- ESCOLHER ENTRE FAHRENHEIT OU CELSIUS
- REMARQUE:
- VÉRIFICATION DE LA MÉMOIRE
- MESSAGE VOCAL
- SÉLECTION DES DEGRÉS CELSIUS OU FAHRENHEIT
- HINWEIS
- DISPLAY LCD
- COMMUTAZIONE TRA GRADI FAHRENHEIT E CELSIUS
- WYŚWIETLACZ CIEKŁOKRYSTALICZNY
- UWAGA
- SPRAWDZANIE PAMIĘCI
- KOMUNIKAT GŁOSOWY
- PRZEŁĄCZANIE MIĘDZY STOPNIAMI CELSJUSZA I FAHRENHEITA
- ЖК-дисплей
- ПРИМЕЧАНИЕ:
- 1
- 3
- 4
- 2
- 5
- miniLAND
- © Miniland, S.A. 2013
Brand : Miniland
Model : Thermoadvanced Plus
Category : Thermometer