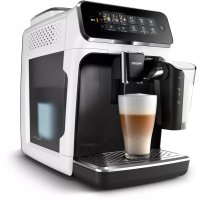
USER MANUAL Series 3200 EP3243 PHILIPS
800 series 1200 series 2200 series 3200 series
EN USER MANUAL
DA BRUGERVEJLEDNING
Adjusting machine settings 9
Removing and inserting the brew group 11
Cleaning and maintenance 12
AquaClean water filter 14
Setting the water hardness 16
Descaling procedure (30 min.) 16
Ordering accessories 17
Troubleshooting 17
Technical specifications 23
Machine overview (Fig. A)
A1 Control panel A10 Data label with type number
| A2 Cup holder A11 Water tank |
| A3 Pre-ground coffee compartment A12 Hot water spout |
| A4 Lid of bean hopper A13 Coffee grounds container |
| A5 Adjustable coffee spout | A14 Front panel of coffee grounds container |
| A6 Grind setting knob | A15 Drip tray cover |
| A7 Coffee bean hopper | A16 Drip tray |
| A8 Brew group | A17 'Drip tray full' indicator |
| A9 Service door |
| Accessories |
| A18 Classic milk frother (specific types only) | A19 LatteGo (milk container) (specific types only) |
Control panel (Fig. B)
Refer to figure B for an overview of all buttons and icons. Below you find the description.
Note: Some of the buttons/icons are for specific types only.
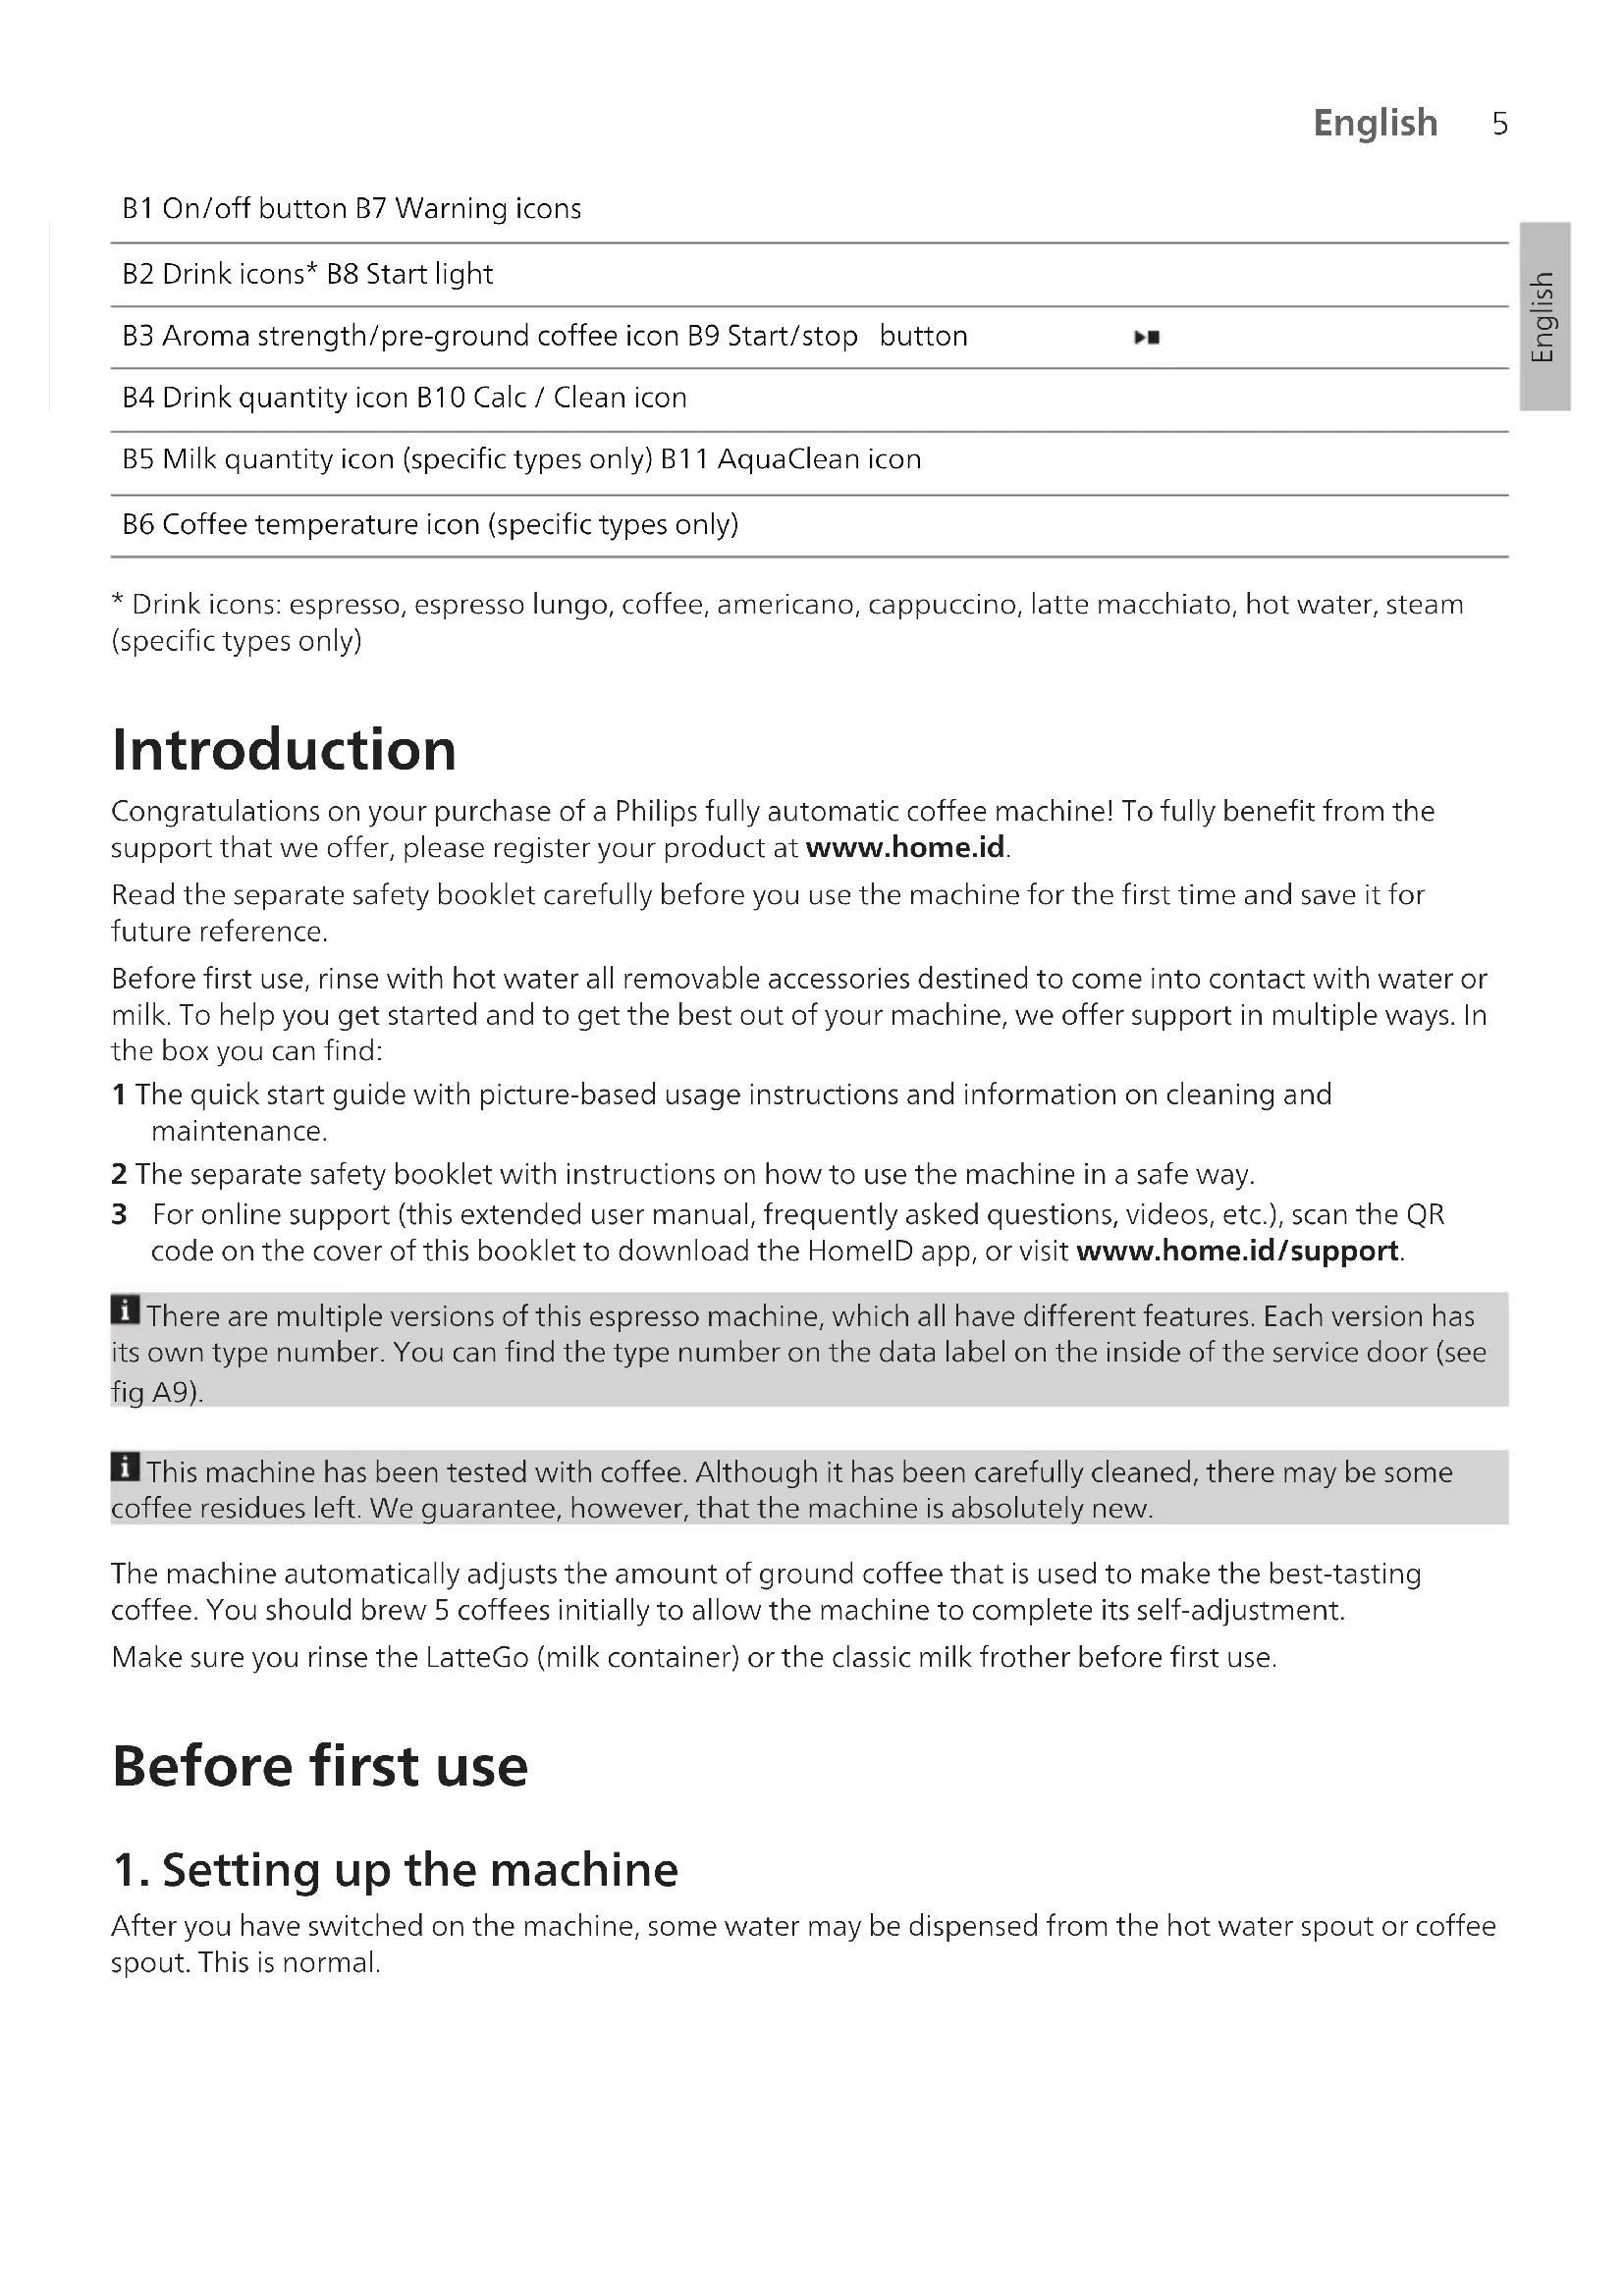
B1 On/off button, B7 Warning icons, B2 Drink icons*, B8 Start light, B3 Aroma strength/pre-ground coffee icon, B9 Start/stop button, B4 Drink quantity icon, B10 Calc / Clean icon, B5 Milk quantity icon (specific types only), B11 AquaClean icon, B6 Coffee temperature icon (specific types only)
- Drink icons: espresso, espresso lungo, coffee, americano, cappuccino, latte macchiato, hot water, steam (specific types only)
Introduction
Congratulations on your purchase of a Philips fully automatic coffee machine! To fully benefit from the support that we offer, please register your product at www.home.id.
Read the separate safety booklet carefully before you use the machine for the first time and save it for future reference.
Before first use, rinse with hot water all removable accessories destined to come into contact with water or milk. To help you get started and to get the best out of your machine, we offer support in multiple ways. In the box you can find:
1. The quick start guide with picture-based usage instructions and information on cleaning and maintenance. 2. The separate safety booklet with instructions on how to use the machine in a safe way. 3. For online support (this extended user manual, frequently asked questions, videos, etc.), scan the QR code on the cover of this booklet to download the HomeID app, or visit www.home.id/support.
There are multiple versions of this espresso machine, which all have different features. Each version has its own type number. You can find the type number on the data label on the inside of the service door (see fig A9). This machine has been tested with coffee. Although it has been carefully cleaned, there may be some coffee residues left. We guarantee, however, that the machine is absolutely new.
The machine automatically adjusts the amount of ground coffee that is used to make the best-tasting coffee. You should brew 5 coffees initially to allow the machine to complete its self-adjustment.
Make sure you rinse the LatteGo (milk container) or the classic milk frother before first use.
Before first use
1. Setting up the machine
After you have switched on the machine, some water may be dispensed from the hot water spout or coffee spout. This is normal.

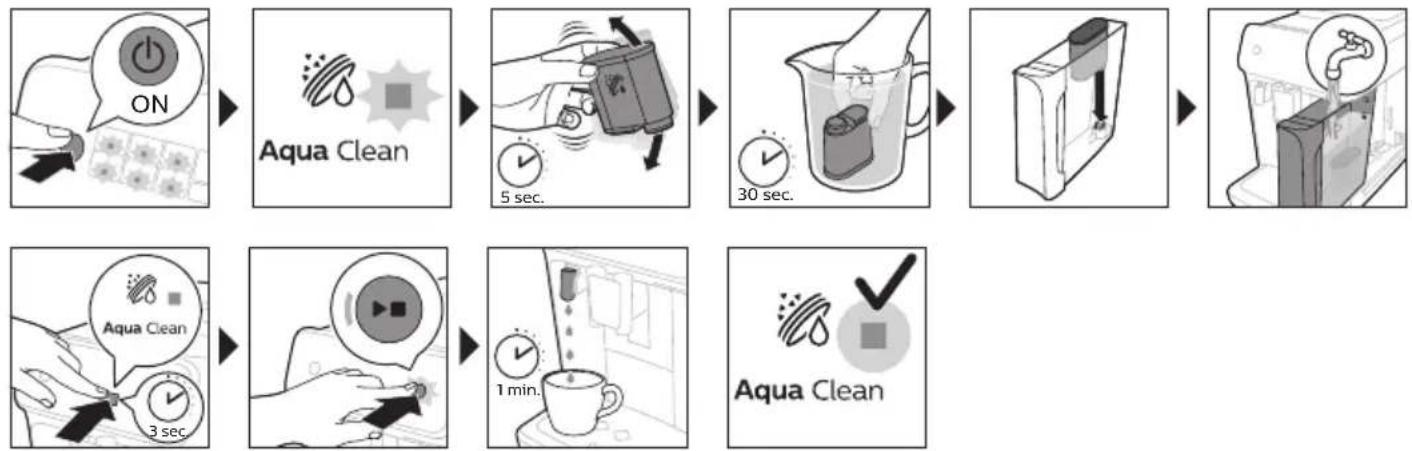
2. Activating the AquaClean water filter (5 min.)
i The AquaClean water filter is not included in all models: you can purchase it at your local retailer or on www.home-appliances.philips/parts-accessories. Availability varies per country.
For more information, see the chapter 'AquaClean water filter'.
3. Setting the water hardness
See the chapter 'Setting the water hardness' for step-by-step instructions. The default water hardness setting is 4: hard water.

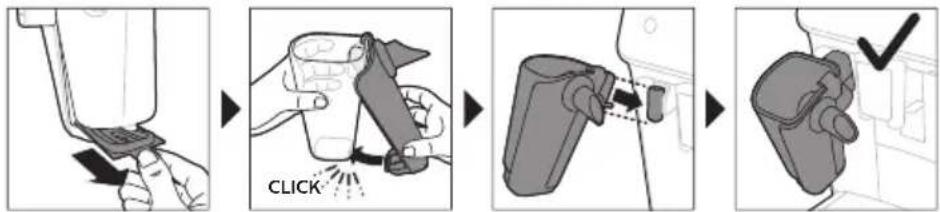
4. Assembling LatteGo (specific types only)
5. Assembling the classic milk frother (specific types only)
Brewing drinks
General steps
1. Fill the water tank with tap water and fill the bean hopper with beans. 2. Press the on/off button to switch on the machine.
- The machine starts heating up and performs the automatic rinsing cycle. During heating up, the lights in the drinks icons light up and go out slowly one by one.
- When all lights in the drink icons light up continuously, the machine is ready for use.
3. Place a cup under the coffee dispensing spout. Slide the coffee dispensing spout up or down to adjust its height to the size of the cup or glass you are using (Fig. 1).
Personalizing drinks
This machine allows you to adjust the settings of a drink to your own preference. After selecting a drink you can:
1 Adjust the aroma strength by tapping the aroma strength icon (Fig. 2). There are 3 strengths, the lowest is the mildest and the highest is the strongest. 2 Adjust the drink quantity by tapping the drink quantity (Fig. 3) and/or the milk quantity icon (specific types only). There are 3 quantities: low, medium and high.
i You can also adjust the coffee temperature to your own preference (see 'Adjusting the coffee temperature').
Brewing coffee with beans
1 To brew a coffee, tap the drink icon of your choice.
The aroma strength and quantity lights go on and show the previously selected setting. - You can now adjust the drink to your preferred taste (see 'Personalizing drinks').
2 Press the start/stop button.
The light in the drink icon flashes while the drink is being dispensed.
1 Specific types only: An americano is made of espresso and water. When you brew an americano, the machine first dispenses an espresso and then water.
3 To stop dispensing coffee before the machine is finished, press the start/stop button again.
To brew 2 coffees at the same time, tap the drink icon twice. The 2x light lights up.
Brewing milk-based drinks with LatteGo (milk container)
LatteGo consists of a milk container, a frame and a storage lid. To avoid leakage, make sure the frame and the milk container are properly assembled before you fill the milk container.
1 To assemble LatteGo, first insert the top of the milk container under the hook at the top of the frame (Fig. 4). Then press home the bottom part of the milk container. You hear a click when it locks into place (Fig. 5).
Note: Make sure that the milk container and the frame are clean before you connect them.
2 Slightly tilt LatteGo and put it on the hot water spout (Fig. 6). Then press it home until it locks into place (Fig. 7). 3 Fill LatteGo with milk up to the level indicated on the milk container for the drink you are brewing (Fig. 8). Do not fill the milk container beyond the maximum indication.
If you have personalized the milk quantity, you may need to fill the milk container with more or less milk than indicated for this drink on LatteGo. Always use milk coming directly from the fridge for optimal results.
4 Place a cup on the drip tray. 5 Tap the milk-based drink icon of your choice.
- You can now adjust the drink to your own preference (see 'Personalizing drinks').
6 Press the start/stop button.
- The light in the drink icon flashes while the drink is being dispensed. When you brew a cappuccino or latte macchiato, the machine first dispenses milk and then coffee.
- To stop dispensing milk before the machine has dispensed the preset amount, press the start/stop button.
7 To stop dispensing the complete drink (milk and coffee) before the machine is finished, press and hold the start/stop button.
Frothing milk with classic milk frother
Always use milk coming directly from the fridge for the best foam quality.
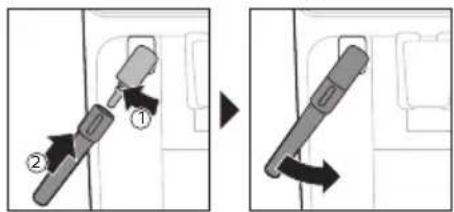
1 Tilt the black silicone handle on the machine to the left and slide the milk frother onto it (Fig. 9). 2 Fill a milk jug with approx. 100 ml milk for cappuccino and approx. 150 ml milk for latte macchiato. 3 Insert the milk frother approx. 1 cm into the milk. 4 Tap the steam icon (Fig. 10).
The light in the steam icon goes on and the start light starts pulsing.
5 Press the start/stop button to froth the milk (Fig. 11). The machine starts heating up, steam is forced into the milk and the milk is frothed. 6 When the milk foam in the milk jug has reached the required volume, press the start/stop button again to stop frothing milk.
i Never froth milk longer than 90 seconds. The frothing automatically stops after 90 seconds. i You do not have to move the milk jug during milk frothing to get the best milk froth quality.
Brewing coffee with pre-ground coffee
You can choose to use pre-ground coffee instead of beans, for example if you prefer a different coffee variety or decaffeinated coffee.
1 Press the on/off button to switch on the machine and wait until it is ready for use. 2 Open the lid of the pre-ground coffee compartment and pour 3 teaspoons of coffee powder (about 8 g) into it (Fig. 12). Then close the lid. 3 Place a cup under the coffee dispensing spout.
4 Select a single drink.
5 Press the aroma strength icon for 3 seconds (Fig. 13).
- The pre-ground coffee light goes on and the start light starts pulsing.
6 Press the start/stop button.
7 To stop dispensing coffee before the machine is finished, press the start/stop button again.
i With pre-ground coffee you can only brew one coffee at a time.
i Pre-ground coffee is not a setting that is saved as a previous selected strength setting. Each time you want to use pre-ground coffee, you need to press the aroma strength icon for 3 seconds. 1 When you select pre-ground coffee, you cannot select a different aroma strength.
Dispensing hot water
1 If attached, remove LatteGo or the milk frother. 2 Tap the hot water icon (Fig. 14).
The drink quantity lights go on and show the previous selected drink setting for hot water.
3 Adjust the hot water quantity to your preference by tapping the drink quantity icon (Fig. 3). 4 Press the start/stop button. The light in the hot water icon flashes and hot water is dispensed from the hot water spout (Fig. 15). 5 To stop dispensing hot water before the machine is finished, press the start/stop button again.
Adjusting machine settings
Adjusting the stand-by time
1 Press the on/off button to switch off the machine. 2 When the machine is switched off: press and hold the Calc / Clean icon (Fig. 16) until the Calc / Clean light and the Aroma strength lights go on (Fig. 17). 3 Tap the Aroma strength icon to select the required stand-by time: 15, 30, 60 or 180 minutes. Respectively 1, 2, 3 or 4 lights of the Aroma strength icon light up. 4 When you have finished setting the stand-by time, press the start/stop button. The machine switches off. 5 Press the on/off button to switch on the machine again.
Programming the highest default setting of your drinks
The machine has 3 default settings for each drink: low, medium, high. You can only adjust the quantity of the highest setting. The new quantity can be stored as soon as the start light starts to pulse.
Before you start programming the quantity of a milk drink, assemble LatteGo and pour milk in it. 1 To adjust the highest quantity setting, press and hold the icon of the drink you want to adjust for 3 seconds. - The upper light of the drinks quantity icon and the upper light of the milk quantity icon (specific types only) starts to pulse and the start/stop button starts to pulse, indicating that you are in programming mode. 2 Press the start/stop button. The machine starts to brew the selected beverage.
- The start light lights up continuously at first. When the machine is ready to store the adjusted volume, the start/stop light starts to pulse.
3 Press the start/stop button again when the cup contains the desired quantity of coffee or milk. - In case of cappuccino or latte macchiato, first the milk will be dispensed. Press the start/stop button when the cup contains the desired milk quantity. The machine automatically starts dispensing the coffee. Press the start/stop button again when the cup contains the desired quantity.
After you have programmed the new highest default quantity for a drink, the machine will dispense this new amount each time you select the highest quantity of this drink.
i You can only adjust the highest default quantity level. If you want to go back to the default quantity settings, see 'Restoring factory settings'.
Adjusting the coffee temperature
Machines without temperature icon
1 Press the on/off button to switch off the machine. 2 When the machine is switched off: press and hold the coffee quantity icon until the lights in this icon go on (Fig. 18). 3 Tap the quantity icon to select the required temperature: normal, high or max.
- Respectively 1, 2 or 3 lights are on.
4 When you have finished setting the coffee temperature, press the start/stop button. 5 Press the on/off button to switch on the machine again.
i If you do not switch off the machine yourself, it will switch off automatically after some time.
Machines with temperature icon (EP3221 only)
1 Tap the coffee temperature icon repeatedly to select the desired temperature.
Restoring factory settings
The machine offers you the possibility to restore the drinks default settings at any moment.
1 You can only restore the default settings when the machine is switched off.
1 Press the on/off button to switch the machine off. 2 Press and hold the espresso icon for 3 seconds.
- The middle lights in the drink setting icons light up. The start/stop light starts to pulse, indicating that the settings are ready to be restored.
3 Press the start/stop button to confirm you want to restore the settings. 4 Press the on/off button to switch on the machine again.
Adjusting grinder settings
You can change the coffee strength with the grind setting knob inside the bean container. The lower the grind setting, the finer the coffee beans are ground and the stronger the coffee. There are 12 different grind settings you can choose from.
The machine has been set up to get the best taste out of your coffee beans. Therefore we advise you not to adjust the grind setting until you have brewed 100-150 cups (approx. 1 month of use).
i You can only adjust the grind settings when the machine is grinding coffee beans. You need to brew 2 to 3 drinks before you can taste the full difference. Do not turn the grind setting knob more than one notch at a time to prevent damage to the grinder.
1 Place a cup under the coffee dispensing spout. 2 Open the lid of the coffee bean hopper. 3 Tap the espresso icon and then press the start/stop button. 4 When the grinder starts grinding, press down the grind setting knob and turn it to the left or right. (Fig. 19)
Deactivate the beeps of the control panel
1 Press the on/off button to switch off the machine. 2 When the machine is switched off, tap and hold the coffee icon (espresso lungo icon for EP3221) until the light in the icon goes on. The start light starts flashing. 3 Tap the coffee icon again to deactivate the beeps of the control panel. The light in the coffee icon goes out. 4 Press the start/stop button to confirm your choice. 5 Press the on/off button to switch on the machine again. The beeps of the control panel have now been deactivated.
Note: If the light in the coffee icon does not go on after tapping and holding the icon, this means that the beeps of the control panel already have been deactivated. To activate them again, tap the icon again and confirm by pressing the start/stop button.
The beeps in the on/off button and in the start/stop button cannot be deactivated.
Removing and inserting the brew group
Go to www.home.id/support for detailed video instructions on how to remove, insert and clean the brew group.
Removing the brew group from the machine
1. Switch off the machine. 2. Remove the water tank and open the service door (Fig. 20). 3. Press the PUSH handle (Fig. 21) and pull at the grip of the brew group to remove it from the machine (Fig. 22).
Reinserting the brew group
Before you slide the brew group back into the machine, make sure it is in the correct position.
1. Check if the brew group is in the correct position. The arrow on the yellow cylinder on the side of the brew group has to be aligned with the black arrow and N (Fig. 23). - If they are not aligned, push down the lever until it is in contact with the base of the brew group (Fig. 24). 2. Slide the brew group back into the machine along the guiding rails on the sides (Fig. 25) until it locks into position with a click (Fig. 26). Do not press the PUSH button. 3. Close the service door and place back the water tank.
Cleaning and maintenance
Regular cleaning and maintenance keeps your machine in top condition and ensures good-tasting coffee for a long time with a steady coffee flow.
Consult the table below for a detailed description on when and how to clean all detachable parts of the machine. You can find more detailed information and video instructions in the HomeID app and on www.home.id/support. See figure D for an overview of which parts can be cleaned in the dishwasher.
Detachable parts
When to clean How to clean
| Brew group Weekly Remove the brew group from the machine (see 'Removing and inserting the brew group'). Rinse it under the tap (see 'Cleaning the brew group under the tap'). |
| Monthly Clean the brew group with the Philips coffee oil remover tablet (see 'Cleaning the brew group with the coffee oil remover tablets'). |
| Classic milk frother After every use First dispense hot water with the milk frother attached to the machine for thorough cleaning. Then remove the milk frother from the machine and disassemble it. Clean all parts under the tap or in the dishwasher. |
| Pre-ground coffee compartment | Check the pre-ground coffee compartment weekly to see if it is clogged. | Unplug the machine and remove the brew group. Open the lid of the pre-ground coffee compartment and insert the spoon handle into it. Move the handle up and down until the clogged ground coffee falls down (Fig. 27). Go to www.home.id/support for detailed video instructions. |
| Coffee grounds container | Empty the coffee grounds container when prompted by the machine. Clean it weekly. | Remove the coffee grounds container while the machine is switched on. Rinse it under the tap with some washing-up liquid or clean it in the dishwasher. The front panel of the coffee grounds container is not dishwasher-safe. |
| Drip tray Empty the drip tray daily or as soon as the red 'drip tray full' indicator pops up through the drip tray (Fig. 28). Clean the drip tray weekly. | Remove the drip tray (Fig. 29) and rinse it under the tap with some washing-up liquid. You can also clean the drip tray in the dishwasher. The front panel of the coffee grounds container (fig. A13) is not dishwasher-safe. |
| LatteGo After every use Rinse LatteGo under the tap or clean it in the dishwasher. |
| Lubrication of the brew group | Every 2 months Consult the lubrication table and lubricate the brew group with the Philips grease (see 'Lubricating the brew group'). |
| Water tank Weekly Rinse the water tank under the tap. |
Cleaning the brew group
Regular cleaning of the brew group prevents coffee residues from clogging up the internal circuits. Visit www.home.id/support for support videos on how to remove, insert and clean the brew group.
Cleaning the brew group under the tap
1 Remove the brew group (see 'Removing and inserting the brew group'). 2 Rinse the brew group thoroughly with water. Carefully clean the upper filter (Fig. 30) of the brew group. 3 Let the brew group air-dry before you place it back. Do not dry the brew group with a cloth to prevent fibers from collecting inside the brew group.
Cleaning the brew group with the coffee oil remover tablets
Only use Philips coffee oil remover tablets.
1 Put a cup under the coffee spout. Fill the water tank with fresh water. 2 Put a coffee oil remover tablet in the pre-ground coffee compartment. 3 Tap the coffee icon and then press the aroma strength icon for 3 seconds to select the pre-ground coffee function (Fig. 2). 4 Do not add pre-ground coffee. Press the start/stop button to start the brewing cycle. When half a cup of water has been brewed, unplug the machine. 5 Let the coffee oil remover solution act for at least 15 minutes. 6 Insert the mains plug back into a wall socket and switch on the machine to complete the brewing cycle. Empty the cup. 7 Remove the water tank and open the service door. Remove the brew group (see 'Removing the brew group from the machine') and rinse it thoroughly under the tap. 8 Reinsert the brew group and water tank and place a cup under the coffee spout. 9 Tap the coffee icon and then press the aroma strength icon for 3 seconds to select the pre-ground coffee function (Fig. 2). Do not add pre-ground coffee. Press the start/stop button to start the brewing cycle. Repeat this twice. Empty the cup.
Lubricating the brew group
Lubricate the brew group every 2 months, to ensure that the moving parts continue to move smoothly.
1 Apply a thin layer of grease on the piston (grey part) of the brew group (Fig. 31). 2 Apply a thin layer of grease around the shaft (yellow part) in the bottom of the brew group (Fig. 32). 3 Apply a thin layer of grease to the rails on both sides (Fig. 33).
Cleaning LatteGo (milk container)
Cleaning LatteGo after every use
1 Remove LatteGo from the machine (Fig. 34). 2 Pour out any remaining milk. 3 Press the release button and remove the milk container from the frame of LatteGo (Fig. 35). 4 Clean all parts in the dishwasher or under the tap with lukewarm water and some washing-up liquid.
Cleaning the classic milk frother
Cleaning the classic milk frother after every use
Clean the milk frother each time you use it for hygiene reasons and to avoid the build-up of milk residues.
1 Place a cup under the milk frother.
2 Tap the steam icon and then press the start/stop button to start dispensing steam and to remove any milk that may be left inside the milk frother. 3 To stop dispensing steam after a few seconds, press the start/stop button again. 4 Clean the milk frother with a damp cloth.
Daily cleaning of the classic milk frother
1. Let the milk frother cool down completely. 2. Tilt the milk frother to the left (Fig. 36) and remove both the metal part and the silicone part (Fig. 37). 3. Disassemble the two parts (Fig. 38) and rinse them with fresh water or clean them in the dishwasher. Make sure that the small hole on the metal tube (Fig. 39) is completely clean and not clogged by milk residues. 4. Reassemble the two milk frother parts and reattach the milk frother to the machine.
AquaClean water filter
Your machine is AquaClean enabled. You can place the AquaClean water filter in the water tank to preserve the taste of your coffee. It also diminishes the need for descaling by reducing limescale build-up in your machine. The AquaClean water filter is not included in all models: you can purchase it at your local retailer* or on www.home-appliances.philips/parts-accessories.
*Availability varies per country.
AquaClean icon and light
Your machine is equipped with an AquaClean water filter light (Fig. 40) to indicate the status of the filter. Use the table below to see what actions are required when the light is on or when it is flashing.
| Aquac Clean | When you use the machine for the first time, the AquaClean light starts flashing orange. This indicates that you can start using the AquaClean water filter. If you do not activate an AquaClean water filter, the light will switch off automatically after a while. |
| Aquac Clean | Once you have installed the filter and activated it with the AquaClean icon, the AquaClean light turns blue to confirm that the AquaClean water filter is active. |
| Aquac Clean | When the filter is exhausted, the AquaClean light starts flashing orange again to remind you to replace the filter with a new one. |
| Aquac Clean | When the orange AquaClean light is off, you can still activate an AquaClean filter, you will need to descale the machine first. |
Activating the AquaClean water filter (5 min.)
The machine does not automatically detect that a filter has been placed in the water tank. Therefore you need to activate each new AquaClean water filter that you install with the AquaClean icon.
When the orange AquaClean light is off, you can still activate an AquaClean water filter, but you will need to descale the machine first.
Your machine has to be completely limescale-free before you start to use the AquaClean water filter.
Before activating the AquaClean water filter, it has to be prepared by soaking it in water as described below. If you don't do this, air might be drawn into the machine instead of water, which makes a lot of noise and prevents the machine from being able to brew coffee.
1. Make sure that the machine is switched on. 2. Shake the filter for about 5 seconds (Fig. 41). 3. Immerse the filter upside down in a jug with cold water and shake/press it (Fig. 42). 4. The filter is now prepared for use and can be inserted into the water tank. 5. Insert the filter vertically onto the filter connection in the water tank. Press it down to the lowest possible point (Fig. 43). 6. Fill the water tank with fresh water and place it back into the machine. 7. If attached, remove the LatteGo. 8. Place a bowl under the hot water spout/milk frother. 9. Press the AquaClean icon for 3 seconds (Fig. 44). The start light starts to pulse. 10. Press the start/stop button to start the activation process. 11. Hot water will be dispensed from the hot water spout/milk frother (3 min.). 12. When the activation process is finished, the blue AquaClean light goes on to confirm that the AquaClean water filter has been activated correctly.
Replacing the AquaClean water filter (5 min.)
After 95 liters of water have flowed through the filter, the filter will cease to work. The AquaClean light turns orange and starts to flash to remind you to replace the filter. As long as it flashes, you can replace the filter without having to descale the machine first. If you do not replace the AquaClean water filter, the orange light will go out eventually. In that case you can still replace the filter but you first need to descale the machine.
When the orange AquaClean light flashes:
1. Take out the old AquaClean water filter. 2. Install a new filter and activate it as described in chapter 'Activating the AquaClean water filter (5 min)'.
Note: Replace the AquaClean water filter at least every 3 months, even if the machine does not yet indicate that replacement is required.
Deactivating the AquaClean reminder
If you do not want to use Philips AquaClean water filters anymore, you can always deactivate the AquaClean reminders (AquaClean light flashing orange):
1. Press the on/off button to switch off the machine. 2. When the machine is switched off, press and hold the AquaClean icon until the light in this icon goes on. The start light starts flashing. 3. Tap the AquaClean icon again to deactivate the reminders. The light in the AquaClean icon goes off. 4. Press the start/stop button to confirm your choice. 5. Press the on/off button to switch on the machine again. The AquaClean reminders are now deactivated.
Note: The activation of a new AquaClean filter will automatically re-activate the AquaClean reminders.
Setting the water hardness
We advise you to adjust the water hardness to the water hardness in your region for optimal performance and a longer lifetime of the machine. This also prevents you from having to descale the machine too often. The default water hardness setting is 4: hard water.
Set the machine to the correct water hardness:
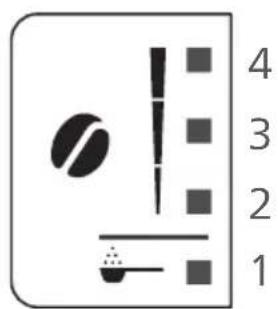
1. Press the on/off button to switch off the machine. 2. When the machine is switched off, tap and hold the aroma strength icon until all lights in the icon go on (Fig. 2). 3. Tap the aroma strength icon 1, 2, 3 or 4 times. The number of lights that are on should be the same as the number of the water hardness table. 4. When you have set the correct water hardness, press the start/stop button.
Note: Since you only set the water hardness once, the aroma strength function is used to select the water hardness. This does not affect the aroma strength of the drinks you make afterwards.
Descaling procedure (30 min.)
To clean and descale the machine, we recommend to use the Philips maintenance products if available in your country. Under no circumstances should you use a descaler based on sulfuric acid, hydrochloric acid, sulfamic or acetic acid (vinegar) as this may damage the water circuit in your machine and not dissolve the limescale properly. Failure to descale the appliance will also void your warranty. You can buy Philips descaling solution in the online shop at https://www.home-appliances.philips/parts-accessories.
When the Calc / Clean light starts to flash slowly, you need to descale the machine.
1 Make sure that the machine is switched on. 2 If attached, remove LatteGo or milk frother. 3 Remove the drip tray and the coffee grounds container, empty them and put them back into place. 4 Remove the water tank and empty it. Then remove the AquaClean water filter. 5 Pour the whole bottle of Philips descaler into the water tank and then fill it with water up to the Calc / Clean indication (Fig. 45). Then place it back into the machine. 6 Place a large container (1.5 l) under the coffee dispensing spout and the water spout. 7 Press the Calc / Clean icon for 3 seconds and then press the start/stop button. 8 The first phase of the descaling procedure starts. The descaling procedure lasts approximately 30 minutes and consists of a descaling cycle and a rinsing cycle. During the descaling cycle, the Calc / Clean light flashes to show that the descaling phase is in progress. 9 Let the machine dispense the descaling solution until the display reminds you that the water tank is empty. 10 Empty the water tank, rinse it and then refill it with fresh water up to the Calc / Clean indication.
11 Empty the container and place it back under the coffee dispensing spout and the water spout. Press the start/stop button again. 12 The second phase of the descaling cycle, the rinsing phase, starts and lasts 3 minutes. During this phase, the lights on the control panel go on and off to show that the rinsing phase is in progress. 13 Wait until the machine stops dispensing water. The descaling procedure is finished when the machine stops dispensing water. 14 The machine will now heat up again. When the lights in the drink icons light up continuously, the machine is ready for use again. 15 Install and activate a new AquaClean water filter in the water tank (see 'Activating the AquaClean water filter (5 min.)').
- When the descaling procedure is finished, the AquaClean light flashes for a while to remind you to install a new AquaClean water filter.
Tip: Using the AquaClean filter reduces the need for descaling!
What to do if the descaling procedure is interrupted
You can exit the descaling procedure by pressing the on/off button on the control panel. If the descaling procedure is interrupted before it is completely finished, do the following:
1 Empty and rinse the water tank thoroughly. 2 Fill the water tank with fresh water up to the Calc / Clean level indication and switch the machine back on. The machine will heat up and perform an automatic rinsing cycle. 3 Before brewing any drinks, perform a manual rinsing cycle. To perform a manual rinsing cycle, first dispense half a water tank of hot water by repeatedly tapping the hot water icon (Fig. 14) and then brew 2 cups of pre-ground coffee without adding ground coffee.
If the descaling procedure was not completed, the machine will require another descaling procedure as soon as possible.
Ordering accessories
To clean and descale the machine, we advise you to use the Philips maintenance products such as descaling solution, AquaClean water filter and coffee oil remover tablets if available in your country. These products can be purchased from your local retailer, from the authorized service centers or online at https://www.home-appliances.philips/parts-accessories. To find a full list of spare parts online, enter the model number of your machine. You can find the model number on the inside of the service door.
i Brita-filters are not compatible with this machine.
Troubleshooting
This chapter summarizes the most common problems you could encounter with the machine. Support videos and a complete list of frequently asked questions are available on www.home.id/support. If you are unable to solve the problem, contact the Consumer Care Center in your country. For contact details, see the warranty leaflet.
Warning icons
| Warning icon | Solution |
| A | The 'water tank empty' light is on
- The water tank is almost empty. Fill the water tank with fresh water to the maximum level indication.
- The water tank is not in place. Place back the water tank. |
| C | The 'empty coffee grounds container' light is on
- The coffee grounds container is full. Remove and empty the coffee grounds container while the machine is switched on. Wait at least 5 seconds before you reinsert the container. |
| A | The alarm light is on
- The coffee grounds container and/or the drip tray is not in place or not placed correctly. Place back the coffee grounds container and/or the drip tray and make sure they are in the correct position.
- The service door is open. Remove the water tank and make sure the service door is closed. |
| A | The alarm light is flashing
- The brew group is not in place or not placed correctly. Remove the brew group and make sure it is locked into place. See chapter 'Removing and inserting the brew group' for step-by-step instructions.
- The brew group is blocked. Remove the brew group and rinse it with water under the tap. Then lubricate the brew group and place it back into the machine. See chapter 'Cleaning and maintenance' for step-by-step instructions. |
| A | The alarm light is on and the start light flashes.
Some air is trapped inside the machine. To release the air from the machine, fill the water tank with water, place a cup under the classic milk frother and press the flashing start/stop button.
Be careful: small jets of hot water will be dispensed from the classic milk frother to release the air. |
| Aqua Clean | Aquaclean light is flashing: place or replace the AquaClean water filter and activate it. See chapter 'Aquaclean water filter' for step-by-step instructions. |
| Calc / clean | Descaling light is flashing slowly: Descale the machine (see 'Descaling procedure (30 min.)'). |
| Express
Coffee
Express
Coffee | The lights in the drink icons light up and go out one by one.
The machine is heating up and/or trying to release the air that was drawn into the machine. Wait until all drink lights light up continuously. |
| The lights of all warning icons are flashing.
Reset the machine by unplugging it and plugging it back in. Before switching the machine back on, follow these steps:
- Remove the AquaClean water filter from the water tank.
- Place back the water tank. Push it into the machine as far as possible to make sure it is in the right position.
- Open the lid of the pre-ground coffee compartment and check if this is clogged with coffee powder. To clean it, insert a spoon handle into the pre-ground coffee compartment and move the handle up and down until the clogged ground coffee falls down (Fig. 27). Remove the brew group and remove all ground coffee that has fallen down. Place back the clean brew group.
- Switch the machine back on.
If the problem is solved the AquaClean filter was not prepared well. Prepare the AquaClean filter before placing it back by following steps 1 and 2 in chapter 'Activating the AquaClean water filter (5 min)…
If the lights continue to flash, the machine could be overheated. Switch the machine off, wait 30 minutes and switch it on again. If the lights are still flashing, contact the Consumer Care Center in your country. For contact details, see the international warranty leaflet. |
Troubleshooting table
This chapter summarizes the most common problems you could encounter with the machine. Support videos and a complete list of frequently asked questions are available on www.home.id/support. If you are unable to solve the problem, contact the Consumer Care Center in your country. For contact details, see the warranty leaflet.
Problem Cause Solution
| The drip tray fills up quickly. | This is normal. The machine uses water to rinse the internal circuit and brew group. Some water flows through the internal system directly into the drip tray. | Empty the drip tray daily or as soon as the red 'drip tray full' indicator pops up through the drip tray cover. Tip: place a cup under the dispensing spout to collect rinsing water that comes out of it. |
| The 'empty coffee grounds container' light remains on. | You emptied the coffee grounds container while the machine was switched off. | Always empty the coffee grounds container while the machine is switched on. Remove the coffee grounds container, wait at least 5 sec. and then insert it again. |
| The machine prompts to empty the coffee grounds container even though the container is not full. | The machine did not reset the counter the last time you emptied the coffee grounds container. | Always wait approx. 5 seconds when you place back the coffee grounds container. In this way the coffee grounds counter will be reset to zero. |
Problem Cause Solution
| | Always empty the coffee grounds container while the machine is switched on. If you empty the coffee grounds container when the machine is switched off, the coffee grounds counter won't reset. |
| The coffee grounds container is too full and the 'empty coffee grounds container' light did not go on. | You removed the drip tray without emptying the grounds container. | When you remove the drip tray, also empty the coffee grounds container even if it contains only a few coffee pucks. In this way the coffee grounds counter will be reset to zero, re-starting to correctly count the coffee pucks. |
| I cannot remove the brew group. | The brew group is not in the correct position. | Reset the machine in the following way: close the service door and place back the water tank. Switch the machine off and back on again. Try again to remove the brew group. See chapter 'Removing and inserting the brew group' for step by step instructions. |
| I cannot insert the brew group. | The brew group is not in the correct position. | Reset the machine in the following way: close the service door and place back the water tank. Leave the brew group out. Switch the machine off and unplug it. Wait for 30 sec. and then plug the machine back in and switch it on. Then put the brew group in the correct position and reinsert it into the machine. See chapter 'Removing and inserting the brew group' for step by step instructions. |
| The coffee is watery. The brew group is dirty or needs to be lubricated. | Remove the brew group (see 'Removing the brew group from the machine'), rinse it under the tap and leave it to dry. Then lubricate the moving parts (see 'Lubricating the brew group'). |
| The machine is performing its self-adjustment procedure. This procedure is started automatically when you use the machine for the first time, when you change to another type of coffee beans or after a long period of non-use. | Brew 5 cups of coffee initially to allow the machine to complete its self-adjustment procedure. |
| The grinder is set to a too coarse setting. | Set the grinder to a finer (lower) setting. Brew 2 to 3 drinks to taste the full difference. |
| The coffee is not hot enough. | The temperature is set too low. Set the temperature to the maximum (see 'Adjusting the coffee temperature'). |
Problem Cause Solution
| A cold cup reduces the temperature of the drink. | Preheat the cups by rinsing them with hot water. |
| Adding milk reduces the temperature of the drink. | Regardless of whether you add hot or cold milk, adding milk always reduces the temperature of the coffee. Preheat the cups by rinsing them with hot water. |
| Coffee does not come out or coffee comes out slowly. | The AquaClean water filter was not prepared properly for installation. | Remove the AquaClean water filter and try to brew a coffee again. If this works, make sure that you have prepared the AquaClean water filter properly before you place it back. See chapter 'AquaClean water filter' for step-by-step instructions. |
| | After a long period of non-use, you need to prepare the AquaClean water filter for use again and then place it back. See step 1 - 3 of chapter 'Activating the AquaClean water filter'. |
| The AquaClean water filter is clogged. | Replace the AquaClean water filter every 3 months. A filter that is older than 3 months can become clogged. |
| The grinder is set to a too fine setting. | Set the grinder to a coarser (higher) setting. Note that this will impact the coffee taste. |
| The brew group is dirty. Remove the brew group and rinse it under the tap (see 'Cleaning the brew group under the tap'). |
| The coffee dispensing spout is dirty. | Clean the coffee dispensing spout and its holes with a pipe cleaner or needle. |
| The pre-ground coffee compartment is clogged | Switch off the machine and remove the brew group. Open the lid of the pre-ground coffee compartment and insert the spoon handle into it. Move the handle up and down until the clogged ground coffee falls down (Fig. 27). |
| The machine circuit is blocked by limescale. | Descale the machine. Always descale the machine when the descending light starts to flash. |
| The machine grinds the coffee beans, but coffee does not come out. | The pre-ground coffee compartment is clogged. | Switch off the machine and remove the brew group. Open the lid of the pre-ground coffee compartment and insert the spoon handle into it. Move the handle up and down until the clogged ground coffee falls down (Fig. 27). |
Problem Cause Solution
| The milk does not froth. Machines with LatteGo: LatteGo is incorrectly assembled. | Make sure that the milk container is properly assembled to the frame of LatteGo ('click'). |
| Machines with LatteGo: the milk container and/or frame of LatteGo are dirty. | Disassemble LatteGo and rinse both parts under the tap or clean them in the dishwasher (see 'Cleaning LatteGo after every use'). |
| Machines with classic milk frother: the milk frother is dirty. | Thoroughly clean the milk frother (see 'Cleaning the classic milk frother'). |
| The type of milk used is not suitable for frothing. | Different types of milk result in different amounts of froth and different froth qualities. We have tested the following milk types which proved to deliver a good milk froth result: semi-skimmed or full-fat cow's milk and lactose-free milk. |
| Milk is leaking from the bottom of the LatteGo milk container. | The frame and the milk container are not assembled properly. | First insert the top of the milk container under the hook at the top of the frame. Then press the bottom part of the container. You hear a click when it locks into place. |
| The machine seems to be leaking. | The machine uses water to rinse the internal circuit and brew group. This water flows through the internal system directly into the drip tray. This is normal. | Empty the drip tray every day or as soon as the 'drip tray full' indicator pops up through the drip tray cover. Tip: Place a cup under the dispensing spout to collect rinsing water and reduce the amount of water in the drip tray. |
| The drip tray is too full and has overflowed which makes it look like the machine is leaking. | Empty the drip tray every day or as soon as the 'drip tray full' indicator pops up through the drip tray cover. |
| The water tank is not fully inserted and air is drawn into the machine. | Make sure the water tank is in the correct position: remove it and insert it again pushing it as far as possible. |
| The brew group is dirty/clogged. Rinse the brew group. |
| The machine is not placed on a horizontal surface. | Place the machine on a horizontal surface so that the drip tray does not overflow and the 'drip tray full' indicator works properly. |
| The water tank is not fully inserted and air is drawn into the machine. | Make sure the water tank is in the correct position: remove it and insert it again pushing it as far as possible. |
Problem Cause Solution
| I cannot activate the AquaClean water filter and the machine asks for descending. | The filter has not been installed or replaced in time after the AquaClean water filter light started to flash. This means your machine is not completely limescale free. | Descale your machine first and then install the AquaClean water filter. |
| The new water filter does not fit. | You are trying to install another filter than the AquaClean water filter. | Only the AquaClean water filter fits into the machine. |
| The rubber ring on the AquaClean water filter is not in place. | Place back the rubber ring on the AquaClean water filter. |
| The machine is making a loud noise. | It is normal that your machine makes noise during use. | If the machine starts to make a different kind of noise, clean the brew group and lubricate it (see 'Lubricating the brew group'). |
| The AquaClean water filter was not prepared properly and air is now drawn into the machine. | Remove the AquaClean water filter from the water tank and properly prepare it for use before you place it back. See chapter 'AquaClean water filter' for step-by-step instructions. |
| The water tank is not fully inserted and air is drawn into the machine. | Make sure the water tank is in the correct position: remove it and insert it again pushing it as far as possible. |
Technical specifications
The manufacturer reserves the right to improve the technical specifications of the product. All the preset quantities are approximate.
Description Value
| Size (w x h x d) 246 x 372 x 433 mm |
| Weight 7 - 7.5 kg |
| Power cord length 800-1200 mm |
| Water tank 1.8 litres, removable |
| Coffee bean hopper capacity 275 g |
| Coffee grounds container capacity 12 pucks |
| LatteGo (milk container) capacity 250 ml |
| Adjustable spout height 85-145 mm |
| Nominal voltage - Power rating - Power supply See data label on inside of service door (fig. A9) |
Table of contents
Product overview (fig. A) 24
Control panel (fig. B) 24
Introduction 25
www.home.id/support.
https://www.home-appliances.philips/parts-accessories.
AquaClean water filter
Your machine is ready for AquaClean. The AquaClean water filter can be placed in the water tank to improve the coffee taste. It also reduces the need for descaling by reducing limescale buildup in the machine. The AquaClean water filter is not included in all models: you can purchase it from your local dealer* or at www.home-appliances.philips/parts-accessories.
Customize drinks
Order accessories
AquaClean water filter
A2 Water reservoir A11 Steam boiler for milk A3 Compartment for pre-ground coffee A12 Hot water spout A4 Coffee bean container A13 Coffee grounds container A5 Adjustable coffee grinder A14 Drip tray for coffee grounds A6 Grinder adjustment knob A15 Drip tray cover A7 Coffee bean container A16 Drip tray A8 Brew unit A17 Indicator for drip tray A9 Service door A18 Drip tray cover
A15 Drip tray cover A17 Indicator for drip tray A18 Drip tray cover
Accessories
A18 Classic milk frother (only for specific models)
A19 LatteGo (milk container) (only for specific models)
Control panel (Fig. B)
You will find a description of all buttons and icons below. The description is ordered by number.
Some of the buttons/icons are only for specific models.
B1 On/Off button B7 Pre-ground coffee icon
B2 Drink icon* B8 Light indicator for descaling
B3 Icon for aroma strength/pre-ground coffee
B9 Start/stop button
B4 Icon for drink quantity B10 Icon for milk/foam
B5 Icon for milk quantity (only for specific models)
B11 AquaClean icon
B6 Icons for temperature of coffee (only for specific models)
* Icons for drinks: espresso, double espresso, coffee, americano, cappuccino, latte macchiato, hot water, milk (only for specific models)
Brewing
Brewing coffee from pre-ground coffee
If you do not want to use pre-ground coffee instead of coffee beans, for example, if you prefer a different type of coffee or decaffeinated coffee.
1 Press the button for 2 cups/4 cups, to turn on the machine, and wait until it is ready for use. 2 Open the lid of the compartment for pre-ground coffee and pour in one level measuring spoon of ground coffee (about 8 g) (Fig. 12). Then close the lid. 3 Place a cup under the coffee spout. 4 Select the drink. 5 Press the aroma strength icon for 3 seconds (Fig. 13).
- The indicator light for pre-ground coffee lights up, and the indicator light for start begins to flash.
6 Press the start/stop button. 7 To stop the coffee brewing, before the machine is unplugged, press the start/stop button again.
With pre-ground coffee you can only brew one coffee at a time. Pre-ground coffee is not a setting, it is recorded as a previously selected strength setting. Every time you want to use pre-ground coffee, you must press the aroma strength icon for 3 seconds. When you select pre-ground coffee, you cannot select another aroma strength.
Dispensing hot water
1 If installed, remove the LatteGo and the milk frothing attachment. 2 Touch the icon (Fig. 14) for hot water.
- The indicator lights for the drink selection turn on and show the last selected hot water drink setting.
3 Set the amount of hot water according to the cup size, by touching the icon (Fig. 3) for the drink amount.
4 Press the start/stop button. - The indicator light in the hot water icon lights up and hot water flows from the spout (Fig. 15). 5 To stop the hot water dispensing, before the machine is unplugged, press the start/stop button again.
Adjusting the machine settings
1 Press the button for ON/OFF to switch on the machine. 2 When the machine is switched on: press and hold the button (Fig. 16) Calc / Clean until the indicators for "Calc / Clean" and "Water hardness" light up (Fig. 17). 3 Press the water hardness button to select the desired readiness time: 15, 30, 60 or 180 minutes. The corresponding 1, 2, 3 or 4 indicator lights of the water hardness button will light up. 4 When you are done setting the readiness time, press the start/stop button. The machine switches off. 5 Press the ON/OFF button to switch the machine on again.
Programming the maximum setting for your drinks
The machine has 3 settings for each drink: low, medium, high. You can only adjust the maximum setting. The new quantity can be saved. The start indicator light will start flashing.
Before you start setting the quantity of the drink with milk, place a cup and pour milk into it. 1 To adjust the maximum setting for the quantity, press and hold the button for the drink you want to adjust for a few seconds.
- The top indicator light of the drink quantity button, as well as the top indicator light of the milk quantity button (only for certain models) will start flashing. The start/stop buttons will start flashing to show that you are in programming mode.
2 Press the start/stop button. The machine starts preparing the selected drink.
- The start indicator light flashes continuously. When the machine is ready to save the set volume, the start/stop indicator light starts flashing.
3 Press the start/stop button again when the cup contains the desired quantity of coffee or milk.
- If you are preparing a cappuccino or latte macchiato, milk will be poured first. Press the start/stop button when the cup contains the desired quantity of milk. The machine automatically starts pouring the coffee. Press the start/stop button again when the cup contains the desired quantity.
After you have programmed the new maximum quantity for a given drink, the machine will pour the new set quantity every time you select the maximum quantity for that drink.
You can only adjust the maximum level for the quantity.
If you want to go back to the default quantity settings, see "Restoring the standard settings".
Removing the brewing unit from the machine
1 Switch off the machine. 2 Remove the water tank and open the service door (Fig. 20). 3 Press the button (Fig. 21) marked PUSH (press), and pull the handle for removing the brewing unit to detach it from the machine (Fig. 22).
Remove the block for preparation back
Before you insert the block for preparation back into the machine, make sure it is in the correct position.
1 Check that the block for preparation is in the correct position. The arrow on the top of the block for preparation must be aligned with the gray arrow on the side (Fig. 23). If they are not aligned, press it until it clicks into the base of the block for preparation (Fig. 24). 2 Insert the block for preparation back into the machine along the guides until it locks into place with a click (Fig. 25). Do not press the PUSH button. 3 Close the service door and put the water reservoir back.
Set the machine to the correct water hardness:
1 Press the on/off button to turn off the machine. 2 When the machine is off, press and hold the power button of the appliance until the indicator lights on the button turn on (Fig. 2). 3 Press the power button of the appliance 1, 2, 3, or 4 times. The number of lights should match the one in the water hardness table. 4 When you have set the correct water hardness, press the start/stop button.
4 lights >21 dH
3 lights >14 dH
2 lights >7 dH
Welcome to the purchase of the Philips automatic coffee machine! To fully enjoy all the services and support we offer, register your product at www.home.id.
Before first use of the coffee machine, carefully read the separate safety booklet and keep it for future reference.
Before first use, rinse with fresh water all removable accessories that come into contact with water or milk. To help you get the most out of your coffee machine, we offer support in several formats. The user manual includes:
1 User manual with graphic instructions for use, information about cleaning the coffee machine and care for it. 2 Separate booklet with safety instructions for the coffee machine. 3 To get online support (extended user manual, frequently asked questions, videos, etc.), scan the QR code on the cover of this booklet or visit www.home.id/support.
There are many versions of the coffee machine, which differ in their functions. Each version has an article number. The article number can be found on the information label located on the inside of the service door (Fig. A9). This coffee machine has been tested for making coffee. After that, it was carefully cleaned, but there may still be some coffee residues. However, we guarantee that you have purchased an absolutely new coffee machine.
The coffee machine automatically adjusts the amount of coffee beans for making perfect coffee. First, you need to complete the automatic adjustment of the coffee machine by brewing 5 cups of coffee. Before first use, rinse the water tank (or milk system with 2 parts) or classic milk frother.
- The indicator on the display lights up during the adjustment process.
If you want to make an Americano, the machine first pours espresso, then water. To make two cups of espresso, after the first cup is ready, press the start/stop button again and it will make two cups of espresso at once. Press the 2x button. The 2x indicator lights up.
Preparing milk-based drinks with the LatteGo milk system (milk container)
LatteGo consists of a milk container with 2 parts and a storage lid. To fill it correctly, assemble the milk system properly before filling the milk container.
1 To assemble LatteGo, insert the upper part of the milk container into the upper part of the housing (Fig. 4). Then press on the lower part of the milk container. When the container clicks into place, you will hear a click (Fig. 5).
Note: The milk container and the housing with the spout must be clean before use.
2 Slightly tilt LatteGo and place it on the hot water spout (Fig. 6). Then press it down until it locks (Fig. 7). 3 Fill LatteGo with milk up to the level indicated on the container (Fig. 8). Do not fill the milk container beyond the maximum capacity.
If you want to adjust the amount of milk individually, you can fill the milk container with a smaller or larger amount, as indicated on the LatteGo.
For the best taste, use cold milk.
4 Place a cup under the coffee spout. 5 Press the button for the desired milk-based drink.
- The amount of milk-based drink can be adjusted according to your preferences (see 'Creating your own drinks').
6 Press the start/stop button.
- The indicator on the drink icon lights up while the drink is being prepared. If you are preparing a cappuccino or latte macchiato, the machine first pours milk, then coffee.
- To stop the milk flow before the machine has dispensed the preset amount, press the start/stop button.
7 To stop the preparation of a hot drink (coffee with milk) before the machine has finished, press the start/stop button again.
Milk frothing with the classic milk frother
Pour obtenir une mousse de lait, utilisez du lait froid du réfrigérateur.
1. Inclinez le pichet à lait et versez le lait sur celui-ci (fig. 9). 2. Remplissez le pichet de lait jusqu'à environ 100 ml pour un cappuccino et environ 150 ml pour un latte macchiato. 3. Plongez le pichet dans le lait à environ 1 cm. 4. Appuyez sur le bouton (fig. 10).
- L'indicateur du bouton s'allume et l'indicateur de démarrage clignote.
5. Appuyez sur le bouton de démarrage/arrêt pour faire mousser le lait (fig. 11).
La machine commence à chauffer, la vapeur est injectée dans le lait, il mousse. 6. Lorsque le lait dans le pichet a atteint le volume souhaité, appuyez à nouveau sur le bouton de démarrage/arrêt pour arrêter de faire mousser le lait. Ne faites jamais mousser le lait plus de 90 secondes. La mousse s'arrête automatiquement après 90 secondes. 1. Pour obtenir une mousse de lait de la meilleure qualité, ne déplacez pas le pichet à lait pendant la moussage.
Préparation du café avec des grains fraîchement moulus
Au lieu de grains de café, vous pouvez choisir du café fraîchement moulu, par exemple si vous préférez un autre type de café ou un café décaféiné.
1. Appuyez sur le bouton "MARCHE/ARRÊT" pour allumer la machine et attendez qu'elle soit prête. 2. Ouvrez le couvercle du réservoir d'eau, versez de l'eau fraîche dans le réservoir jusqu'au niveau maximum (environ 8 g) (fig. 12). Refermez ensuite le couvercle. 3. Placez une tasse sous la buse à café. 4. Sélectionnez le réglage. 5. Appuyez sur le bouton de mouture pendant 3 secondes (fig. 13).
L'indicateur de mouture fraîchement moulue s'allume et l'indicateur de démarrage clignote.
6. Appuyez sur le bouton de démarrage/arrêt. 7. Pour préparer le café, avant que la machine ait terminé la préparation, appuyez à nouveau sur le bouton de démarrage/arrêt.
13. Avec du café fraîchement moulu, vous ne pouvez préparer qu'une seule tasse de café à la fois. 1. Le réglage du café fraîchement moulu n'est pas conservé comme le réglage de mouture sélectionné. Pour préparer du café fraîchement moulu, vous devez appuyer sur le bouton de mouture pendant 3 secondes. 1. Si vous avez sélectionné du café fraîchement moulu, vous ne pouvez pas sélectionner une autre mouture.
Eau chaude
1. Après avoir préparé un latte ou une mousse de lait, rincez-le. 2. Appuyez sur le bouton d'eau chaude (fig. 14).
- Les indicateurs de volume s'allument et affichent le réglage d'eau chaude précédemment sélectionné.
3. Le volume d'eau chaude est réglé selon vos préférences, appuyez sur le bouton de volume (fig. 3). 4. Appuyez sur le bouton de démarrage/arrêt.
The indicator on the water tank symbol lights up when the water tank is empty and water is poured from the water tank spout (Fig. 15).
5. When the water tank is filled, the first time the machine completes preparation, press the Start/Stop button again.
Setting the waiting time
Setting the waiting time
1. Press the "On/Off" button to turn off the machine. 2. When the machine is off, press and hold the Calc/Clean button (Fig. 16) until the Calc/Clean indicator and Aroma strength indicator light up (Fig. 17). 3. Press the strength button to select the desired waiting time: 15, 30, 60, or 180 minutes. Correspondingly, 1, 2, 3, or 4 strength indicators light up. 4. After setting the waiting time, press the Start/Stop button. The machine turns off. 5. Press the "On/Off" button to turn the machine back on.
Programming the maximum standard volume of drinks
The machine has 3 standard volume settings for each drink: small, medium, and large. You can also program a maximum volume. The new volume value can be saved when the Start indicator is lit.
1. First, program the drink volume from milk, keep the LatteGo and pour the milk.
1. To set the maximum volume value, press and hold the symbol of the desired drink for 3 seconds.
The upper indicator of the drink volume symbol and the upper indicator of the milk volume symbol (only for certain models) start blinking. During blinking, the Start/Stop button indicates that you are in programming mode.
2. Press the Start/Stop button. The machine starts preparing the selected drink.
- First, the Start indicator lights up continuously. When the machine is ready to save the set volume, the Start/Stop indicator starts blinking.
3. Press the Start/Stop button again when the cup contains the desired volume of coffee or milk.
When preparing cappuccino or latte macchiato, milk is poured first. Press the Start/Stop button when the cup contains the desired volume of milk. The machine automatically starts pouring coffee. Press the Start/Stop button again when the cup contains the desired volume.
After programming the new maximum standard volume of a drink, the machine will pour the new volume immediately when you select the maximum volume for that drink.
To reset to the maximum standard volume. To restore standard volume settings, see "Restoring factory settings".
Setting the coffee temperature
Coffee machine without temperature symbol
1 Press the "ON/OFF" button to turn off the coffee machine. 2 When the coffee machine is off, press and hold the volume symbol until it lights up (Fig. 18). 3 Press the volume symbol to select the desired temperature: low, medium, or high.
- Indicators 1, 2, or 3 light up accordingly.
4 After setting the coffee temperature, press the start/stop button. 5 Press the "ON/OFF" button to turn the coffee machine back on.
If you forget to turn off the coffee machine, it will turn off automatically after a certain time.
Machine with temperature symbol (only EP3221)
1 Press the coffee temperature symbol several times to select the desired temperature.
Restoring factory settings
The coffee machine can restore standard settings at any time.
Restoring standard settings is only possible when the coffee machine is turned off.
1 Press the "ON/OFF" button to turn off the coffee machine. 2 Press and hold the espresso symbol for 3 seconds.
- The middle indicators on the setting symbols light up. The start/stop indicator flashes, indicating readiness for reset. 3 Press the start/stop button to confirm the reset of settings. 4 Press the "ON/OFF" button to turn the coffee machine back on.
www.home.id/support. Parts that can be washed in the dishwasher, see Fig. D.
CLEANING AND MAINTENANCE
Cleaning method
Cleaning the milk system
Cleaning the milk system after each use
1. Turn off the appliance (fig. 34). 2. Pour in milk until the maximum level. 3. Press the cleaning button and remove the milk container from the appliance (fig. 35). 4. Clean all parts in the dishwasher or by hand with warm water and a mild detergent.
Cleaning the milk frother
Cleaning the milk frother after each use
Clean the milk frother after each use with hot water and a mild detergent to prevent the build-up of milk residues.
1. Place a cup under the milk frother. 2. Use the steam symbol: press the start/stop button to start the steam and let the milk flow into the cup until the maximum level. 3. Stop the steam after a few seconds, then press the start/stop button again. 4. Clean the milk frother with a damp cloth.
Deep cleaning of the milk frother
1. Let the milk frother cool down completely. 2. Tilt the milk frother to the left (fig. 36) and remove the metal and silicone parts (fig. 37). 3. Disassemble these parts (fig. 38) and rinse them with clean water or wash them in the dishwasher. Make sure that the small hole in the metal tube (fig. 39) is completely clean and not blocked by milk residues. 4. Reassemble the parts of the milk frother and reattach it to the appliance.
AquaClean water filter
The appliance is designed to work with the AquaClean water filter. The AquaClean water filter can be installed in the water reservoir to preserve the taste of the coffee. It also reduces the need to descale, slowing down the process of limescale formation. The AquaClean water filter is not included in all models: it can be purchased in local retail stores* or on the website www.home-appliances.philips/parts-accessories.
*Availability depends on the country.
Replacing the AquaClean water filter (5 min.)
If the filter is not replaced in time, the AquaClean indicator will turn orange and start blinking, reminding you that the filter needs to be replaced. While the indicator is blinking, you can replace the filter without first removing the scale from the coffee machine. If you do not replace the AquaClean water filter, the orange indicator will gradually fade. You can still replace the filter, but you must first remove the scale from the coffee machine.
When the AquaClean indicator blinks orange:
1. Remove the old AquaClean water filter. 2. Install a new filter and activate it as described in the section "Activating the AquaClean water filter (5x)." Replace the AquaClean water filter every time the indicator prompts, even if the coffee machine does not indicate the need for such a replacement.
Deactivating the AquaClean filter replacement reminders
If you will no longer use the AquaClean water filters, turn off the AquaClean reminders (the AquaClean indicator blinks orange):
1. Press the "ON/OFF" button to turn off the coffee machine.
2. While the coffee machine is off, press and hold the AquaClean symbol until its indicator starts blinking. The indicator will blink. Press the AquaClean symbol once more to deactivate the reminders. The AquaClean symbol indicator will go out. 4. To confirm the selection, press the start/stop button. 5. Press the "ON/OFF" button to turn the coffee machine back on. The AquaClean filter replacement reminders are now deactivated.
Since the water hardness is set only once, the water hardness setting is used only when selecting the water hardness. It does not affect the amount of coffee grounds used.
Accessories
For descaling the coffee machine, use only special Philips descaling agents, AquaClean water filters, and Philips descaling tablets (if available in your country). They can be purchased in local stores, authorized service centers, or on the website https://www.home-appliances.philips/parts-accessories. For a complete list of accessories, enter the model number of your coffee machine. The model number can be found on the inside of the service door.
The machine does not use filters.
Troubleshooting
This section describes the main problems that may occur when using the coffee machine. Videos and a complete list of frequently asked questions are available at www.home.id/support. If you cannot solve the problem, contact the customer service center in your country. Contact information is provided in the warranty booklet.
Warning symbols
| ПonepeDEX-
увалын
Знчok | Ришени
Piiшени
3нчok |
| Загорястся спороженны peз扼ыар дд вори
- Peэ扼ыар дд вори майке п ductи. Hanobnіть peэ扼ыар CBIXOю ворою do
makсимально познayк.
- Неравильно встановлесуpeз扼ыар дд вори. Установіть peэ扼ыар дд вори
на міце. |
| Загорястся спороженны kohteиега дд кавоі руши
- Рмість дд кавоі руши повна. Виіmaіteй оочиійte kohteиегдд Кавоі
ruши, лішіе колі машіну ввімкніту. Почекіті手续费а'meші 5 ceкунд, пechі nіж
Встановлівати kohteиег наазад. |
| Загорястся спдникатор тривоги
- Контейнера дд кавоі руши ta/aбо лоток дд Крапель з havODЯТься He Na Mіці
abo Неравильно встановлеси. Установіть kohteиег дд Кавоі руши ta/aбо
notok дд Крапель на міце ta пerekoнaitecя, ёо BOHи 3нaxODЯТься B
правильноу пожоженhi.
- Дөрцăта дд обсіуговьань від кріntі. Виіміть peэ扼ыар дд вори ta пerebірte,
чі зakріntі д\'ерцăта дд обсіуговьань. |
| Понередж-
увальни
Знayok | Ришени |
| A | Блимас i Indикатор TrpvВоги
-Блик 3аварювannahа поpe6byBaС He Na Mici aбо He nprabUVьн Встановлесno. Вийmitb
6лик 3аварювannahа поpekoahTecSа, сио яloro 3aФicCOBAHNo. ПокрOKOBi i nctpykci
ДИВ.y po3diЛ "ВиMaHnra Ta BCTaHOBLeHry 6Lokу 3abarpoVBHry". |
| -Блик 3аварювannahа 3abLOKOBaHNo. ВиIMiB 6лик 3abarpoVBAHry Ta npomniTE yoro
ВОДЮ pID КраHOM. Писяцу 3maCtITb 6Lok 3abarpoVBANry uystanOBiTo yorO
Ha3ad y MaShInu. ПокрOKOBi i nctpykciДИВ.y po3diЛ "ОчицEHry Ta doGlaJd". |
| A | ЗагорЯстся indикатор TrpvВоги, a indикатор nochату 6лимас.
Усераши Машини нахочилось поВитг. сиob виуctNTs nobitprу 3 машини,
наловпітpezerрвуар дя Bodи ВОДЮ, посту чашky пд класчHy спIHOBaH
МOLOKA ta HATNCHITb KONKу поТКу/ЗуNHENHry, сио 6лимас. |
| Будte оберекhi, 3 Класчного спIHOBaЧа молoka 6уdUTь вidДIЯпсь 6рИЗК
ragячоВODи, сиob виуctNTs nobitpry. |
| Aqua Clean | Блимас i Indикатор AquaClean. BcstABte abo 3amHITb Фiьtr dlya Bodи AquaClean i
akTINByte myo. ПокрOKOBi i nctpykciДИВ.y po3diЛ "Фiьtr dlya Bodи AquaClean". |
| Aqua Clean | Иndикатор видаLEння нахиу nobiJIbNO 6лимaс. ВиДALITb НAKIN i3 машини (ДИВ.
«П proцEDура видаLEння нахиу (30xb.)»). |
| Aqua Clean | Иndикатори 3нчкIB наоови noчрз i загорaitь ся та згсады.
Машина HarpINAeTBCS Ta HAMaRaeTBCS BnUyCTNTs nobitpry, яke BTaRHyJa. 3auekaite,
doKu bci Indикатори наоови He nouchnyb 6e3nepebpBHO cbITITSCY. |
| Aqua Clean | Блима�ь indикатор BCix nonepedxgyBaLBHnx 3nauKIB.
П配电�аустlb Машиу, BiD'EDnhabSi II BiD megexi ta 3HOBу niD'EDnhabSi II. Перш hIX
ЗнOBу yВIMKHHTM Машиу, ВиКонайе Тaki diI.
-ВиIMiBфiNbTp dlya Bodи AquaClean i3 pe3eByapara dlya Bodи.
-YctanOBiTb pe3eByap dlya Bodи Na MlcSe. ПрошТВХnITb IORO JAKOMORA daJIb
Mашиу, сиob виевHTSCb, сиO BiN pepe6byBaВ BP naBnHOMy noLoJoxHNi.
-BiДКрипу КрИshky BiDcikу dlya nonepednHb 3melenoi KabN ta nepeBipTe, сио对我о He
ЗбИTO kabOBIM nopoшkom. LIOb Myo OChSTNTs, BCTABTe puCyJLOXKу BVDcIK dlya
NonepednHb 3melenoi KabN pyuxaite II BrOpTy Ta BHNZ, ДOKи habits Meleha KaBa He
Bnnaide (MaI. 27). ВиIMiB 6Lok 3abarpoVBANry Ta BnDAJIbYycIO KabOBy ryU, сO
BnnaJa. UCTANOBiTb ChIcTN b6Lok 3abarpoVBANry Ha MlcSe.
-3HOB yBIMKnHITb Машиу.
Якso дообл demу виршени, сe ознayаe, сио Фiьtr PAcAuaClean He 6bу lo priroTOBLeHo
налжими чinHom. ПidroТуиTe Фiьtr PAcAuaClean поЕ vystANOBleHm Ha MlcSe, як
ОписANO B kPOKax 1 ta 2 y po3diЛ "Актуваigia Фiьtr dlya Bodи AquaClean (5xb)."。
Якso indикатори рpondЖуOTb 6lmmATn, машина могla поERpITncs. ВIMKNHITb
Машиу, zachkaite 30 xBvlni i BBIMKnHITb II 3HOBy.Якso indикатори СElsecle 6blmaIoTb,
ЗberHITbSdoLcIg ToClyrTOBvBaHnKJIcIeHTb y cBoi KpaIIHi. KoNTaKTHy iNΦopMaziio
ДИВ.y mixnapodHomy rapaHTiHOMy taIOnHi. |
Troubleshooting table
Before using the machine, review the main problems that may arise during operation. A video and a complete list of spare parts are available at www.home.id/support. If you cannot resolve the problem, contact the customer service center in your country. Contact information is provided in the warranty card.
Problem Cause Solution
| Лотok дlya краель
швдко заразов闳с. | Ле hopмално. Кавомашиа
помьа€ В京都 BNYtrichi
Контур ta 6лok Заварюанн.
Певни ob' em BodiВитika€
чeredз BNYtrichi кontур
6e3nocepeДьоВ loTOK дlya
Краель. | Спорожныт le loTOK дlya краель улpondа
abo колу червони iHДикатор яого
Задовеня пдявсянад кришкою
лотka. Лорада. Плдставе чашу пд
Буztл подач, соб зibати bodу, ява
Виллется 3 Нбог рд acnpomubanня. |
| Горпь iHДикатор
спороження
Контейнера дlya кавооï
гуши. | Контейнэр дlya кавооï ryssi
спороженл, колу кавомашиу
було вимкени. | Спорожныт le kon'teyнер дlya кавооï
ryssi, лише колу кавомашиу вимкени.
Вииміль контeyнер дlya кавооï ryssi,
Зачекайто принаими 5xbилinc i BCTabte
иого 3нову. |
| На диспlei кавомашини
3'Яваяrtься
повidiомлениPtrо
небхidнісь
спороження
Контейнера dlya кавооï
гуши, habiTь якшо Вин He
пobнii. | | Завжди чекайte 6лizько 5 сekунд, nepш
нix установити контeyнер дlya кавооï
ryssi. Тдлльнik кльковstig кавооï
ryssi 6уde scKinHyTo ha hylb. |
| | Спорожныт le kon'teyнер дlya кавооï
ryssi, лише колу кавомашиу вимкени.
Якшо спороженчы контeyнер дlya
Кавооь ryssi, колу кавомашиу
ВимкHyTo, лicilnbHK kльковstig кавооï
ryssi He 6уde scKinHyTo. |
| Контейнэр dlya кавооï
гушип epereOBнeni, a
iHДикатор спороження
Контейнера dlya кавооï
гуши He 3aTagorЯctься. | Ви вийллллллллллллллллллллллллллллллллллллллллллллллллллллллллллллллллллллллллллллллллллллллллллллллллллллl. | Колу вийmaэт le loTOK dlya краель,
talkoх спорожныт le kon'teyнер dlya
Кавооь ryssi (habiTь якшо у Ньму ε
кльka Kabobux 6prkketiv).Тддлльнik
Кльковstig кавооь ryssi 6уde scKinHyTo ha
hylb, i bIDlrik Kabobux 6prkketiv
прдobЖNTься празвлнho. |
| He bdaetbca biniHЯтNi
6lolk заварювань. | HenpaВильпс noLOJoxENHЯ 6Iloka
3abarpoVBaHnY. | Пробедыт kabOMашиу в поаТКови
stан. 3akpriTe DBerquTa Дя
обсluговьаньп та ВсtabTe peЗерByap
дя вodи. ВIMKHITb i 3HOBy BBIMKHITb
KabOMашиу. Спрбuyte виьятNi 6IloK
3abarpoVBaHnY. Покрокови IncstpyKuziДиВ.
у роздлi "Виьмань та Вс tabовлень
6Iloky 3abarpoVBaHnY". |
Problem Cause Solution
| He Vdaetbce BCTabvnti
6lOK 3aBapuOBaHnry. | Heprabinbne noLoxhen76lOkazabapuOBaHnry. | PpivBeDIt KabOMaunHy bNoatKobm
ctan. 3akpiIte DcepTa dlan
obScnyroBvBaHnry Ta BCTaBte pe3epByap
dlan BODn. POKn He BCTaHOBnIOte 6lOk
3aBapuOBaHnry. BImKnITb KabOMaunHy Ta
BHTaHITb shypr i3 po3eTKn. 3aueKaJte
30c, a Notim 3HOy BCTaBte shypr y
po3eTKy yBIMKnITb KabOMaunHy. Notim
po3aUyIte 6lOk 3aBapuOBaHnry B
npabInbHompy noLoxheni BCTaBte Ioro
Ha3ad y KabOMaunHy. POKpOKoBi
iHCTpykciDnB. y po3diIi "BIMaunHy Ta
BCTaHOBLeHNry 6lOky 3aBapuOBaHnry". |
| Kaba HndTo BODaHncta. 6lOk 3aBapuOBaHnry 6pudnai abo
notpe6ye 3MaUeHNry. | BnuMiTb 6lOk (DINB. «BnuMaunHy 6lOka
3aBapuOBaHnry 3 KabOMaunHy »)
3aBapuOBaHnry, npomni Te Ioro nID
kpaHOM i daIte Iohmy BvCOxHytn. PicIy
IbOro 3MaCTiB pYXOMi chaTINHn (DINB.
«3MaUyBaHnry 6lOka 3aBapuOBaHnry" ). |
| KabOMaunHa BvkoHcy
proeDpy aBTOMaTHNHO
halaStyBaHnry. Lc npoedypa
3aynskaCtbcra aBTOMaTHNHO nID
cac nepuoro BvKOpNCtAHnna
kabOMaunHn, pRn nepexodi na
iInshn TnP kabOBx zepen a6o
nicra Tpmbaloi nepepbn. | CnooyATy noTpioHo 3aBepuHn
npoEdupy aBTOMaTHNHO
halaStyBaHnry KabOMaunHn, 3bapuBssn
5 cuaok Kabn. |
| KabOMolky halaSToBAHnO dlan
hndTo rpy6oro nOmeLy. | HalaSTyIte pri6HniS chTyPiNb nOmeLy.
Pi3HnIzov B CMAKU MoJHa
PizIy nprirotyBaHnry 2-3 cuaok Kabn. |
| Kaba HeodoctaTbbo
rapya. | Bv6paHOn hndTo Hn3bky
tempepatypy. | UcTaHOBiTb Tempepatypy Ha MaKCSMUM
(dINB. «HalaSTyBaHnry Tempepatypn
KABN"). |
| XolodHa qauka 3HnxjCy
tempepatypu haNOIO. | Pepu Hix roTyBatn KabY, onoLooChiB
qaukn rparuO IO BoDOIO, 106 nporpiTI x. |
| PpNi DoJaBaHnI MOLoka | 3HnxjCyTBcay Tempepatypa haNOIO. | JaKe 6 Moloko He doJaBaIaN, rapey Ch
XoJIoDHe, BOHO 3aBxDi 3HnxjCy
Tempepatypu KabN. Pepu Hix roTyBatn
Kaby, onoLooChiB qauKn raparyO BODOIO,
106 nporpiTI x. |
| Kaba He BvXoDInb a6o
BvXoDInb Nobilho. | ΦiIbTp dlan BODn AquaClean ne
6buno pIidrotobJeNo halekhnim
ChINOM do BCTaHOBleHNry. | BnuMiTb φiIbTp dlan BODn AquaClean i
cnpo6uyte 3abapitn KabY ue paZ. JkIzO
ce cnpaQOE, nepekoHaJItecs, 10φiIbTp
dlan BODn AquaClean niDrTOBLeNo
halekhnim YUnHOM, pereH nIXe
BCTaHOBJIbOaTI NOrO H3aI, POkpOKoBi
iHCTpykciDnB. y po3diIi "ΦiIbTp dlan
BODn AquaClean". |
Problem Cause Solution
2.
3.17n
1
- 2.(18-) 3.DIN
4.17 5.
1
- 2.(20 - 3
A
2nnp7 3.D
npiinni
97 17 17 17 17 17 17 17 17 17 17 17 17
179.nnnn7 nnnn 7777777777777777777777777777. www.home.id/support 777777777777777
D
mon7
| הכלהה וְרִשׁן (בִרִשׁן)
הכלהה וְרִשׁן (בִרִשׁן)
...
(בִרִשׁן)
...
(בִרִשׁן)
...
(בִרִשׁן)
...
(בִרִשׁן)
...
(בִרִשׁן)
...
(בִרִשׁן)
...
(בִרִשׁ∼
...
(בִרִשׁ∼
...
(בִרִשׁ∼
...
(בִרִשׁ∼
...
(בִרִשׁ∼
...
(בִרִשׁ∼
...
(בִרִשׁ∼
...
(בִרִשׁ∼
...
(בִרִשׁ∼
...
(בִרִשׁ∼
...
(בִרִשׁ∼
...
(בִרִשׁ∼
...
(בִרִשׁ∼
...
(בִרִשׁ∼
...
(בִרִשׁ∼
...
()b
...
(בִרִשׁ∼
...
(בִרִשׁ∼
...
(בִרִשׁ∼
...
(בִרִשׁ∼
...
(בִרִשׁ∼
...
(בִרִשׁ∼
...
(בִרִשׁ∼
......
(בִרִשׁ∼
......
(בִרִשׁ∼
......
(בִרִשׁ∼
......
(בִרִשׁ∼
......
(בִרִשׁ∼
......
(בִרִשׁ∼
......
(בִרִשׁ∼
......
()b
......
(בִרִשׁ∼
......
(בִרִשׁ∼
......
(בִרִשׁ∼
......
(בִרִשׁ∼
......
(בִרִשׁ∼
......
(בִרִשׁ∼
......
(בִרִשׁ∼
.....
(בִרִשׁ∼
......
(בִרִשׁ∼
......
(בִרִשׁ∼
......
(בִרִשׁ∼
......
(בִרִשׁ∼
......
(בִרִשׁ∼
......
(בִרִשׁ∼
......
(b)
......
(בִרִשׁ∼
......
(בִרִשׁ∼
......
(בִרִשׁ∼
......
(בִרִשׁ∼
......
(בִרִשׁ∼
......
(בִרִשׁ∼
......
(בִרִשׁ∼
...... |
DnNnnnnnnnnnn
| הכלהה הכלהה הכלהה הכלהה הכלהה הכ萘cr. הכ萘cr. הכ萘cr. הכ萘cr. הכ萘cr. הכ萘cr. הכ萘cr. הכ萘cr. הכ萘cr. הכ萘cr. הכ萘cr. הכ萘cr. הכ萘cr. הכ萘cr. הכ萘cr. . . . . . . . . . . . . . . . . . . . . . . . . . . . . . . . . . . . . . . . . . . . . . . . . . .
.
.
.
.
.
.
.
.
.
.
.
.
.
.
.
.
.
.
.
.
.
.
.
.
.
.
.
.
.
.
.
.
.
.
.
.
.
.
.
.
.
.
.
.
.
.
.
.
.
.
?
.
.
.
.
.
.
.
.
.
.
.
.
.
.
.
.
.
.
.
.
.
.
.
.
.
.
.
.
.
.
.
.
.
.
.
.
.
.
.
.
.
.
.
.
.
.
.
.
.
.
.
.
.
.
.
.
.
.
.
.
.
.
.
.
.
.
.
.
.
.
.
.
.
.
.
.
.
.
.
.
.
.
.
.
.
.
.
.
.
.
.
.
.
.
.
.
.
.
.
、
.
.
.
.
.
.
.
.
.
.
.
.
.
.
.
.
.
.
.
.
.
.
.
.
.
.
.
.
.
.
.
.
.
.
.
.
.
.
.
.
.
.
.
.
.
.
.
.
.
⁄.
⁄.
⁄.
⁄.
⁄.
⁄.
⁄.
⁄.
⁄.
⁄.
⁄.
⁄.
⁄.
⁄.
⁄.
⁄.
⁄.
⁄.
⁄.
⁄.
⁄.
⁄.
⁄.
⁄.
⁄.
⁄.
⁄.
⁄.
⁄.
⁄.
⁄.
⁄.
⁄.
⁄.
⁄.
⁄.
⁄.
⁄.
⁄.
⁄.
⁄.
⁄.
⁄.
⁄.
⁄.
⁄.
⁄.
⁄.
⁄.
⁄.
\/.
⁄
⁄
⁄
⁄
⁄
⁄
⁄
⁄
⁄
⁄
⁄
⁄
⁄
⁄
⁄
⁄
⁄
⁄
⁄
⁄
⁄
⁄
⁄
⁄
⁄
⁄
⁄
⁄
⁄
⁄
⁄
⁄
⁄
⁄
⁄
⁄
⁄
⁄
⁄
⁄
⁄
⁄
⁄
⁄
⁄
⁄
⁄
⁄
⁄
⁄
⁄ |
n7nn nTn17
n77.07777777777777777777777777777777777777777777777
n7nnn nn n
1.() 2.n 3
n97 nnn7 nn70 ny no7nn ninn
Calc / Clean |D'0 7 TV D'IN INX 7N |D'NN7I D'IN 7N Philips 7U NNN 7N 7N 7N .nD'7 nIN INX 7N |D'NN7. (45 N)
1.7y
- INX
3.017r
4.Aqu
5
6.DD 7. 8nnoi
nnon 7nnn n nn n n n n n n n n n n n n n n n n n n n n n n n n n n n n n n n n n n n n n n n n n n n n n n n n n.
9.77 10.Calc
17n 7777777777777777777777777777777
11 12
13.[] 14.11
15
. (11175) AquaClean 10n n7yon' nX I7) aquaClean 7u uTN Dn Dn Dn Dn Dn Dn Dn Dn Dn Dn Dn Dn Dn Dn Dn Dn Dn Dn Dn Dn Dn Dn Dn Dn Dn Dn Dn Dn Dn Dn Dn Dn Dn Dn Dn Dn Dn Dn Dn Dn Dn Dn Dn Dn Dn Dn Dn Dn Dn Dn Dm Dm Dm Dm Dm Dm Dm Dm Dm Dm Dm Dm Dm Dm Dm Dm Dm Dm Dm Dm Dm Dm Dm Dm Dm Dm Dm Dm Dm Dm Dm Dm Dm Dm Dm Dm Dm Dm Dm Dm Dm Dm Dm Dm Dm Dm Dm Dm Dm Dm Dmn 7u
I 1
709" n nn nn nn nn nn nn
n7 n7n 7n .n7n n7n /7v9nn |n7 7v n7n 7v n7n n7n n7n n7n n7n n7n n7n n7n n7n n7n n7n n7n n7n n7n n7n n7n n7n n7n n7n n7n n7n n7n n7n n7n n7n n7n n7n n7n n7n n7n
1.DD
ynnn nn nnnn .nnn nn nn nnnn 7ynn Calc / Clean nnn nnnn Tyn nn nnnn nn nnnn .nnnn
2
PHILIPS and the Philips Shield
Emblem are registered trademarks of Koninklijke Philips N.V. and are used under license.
This product has been manufactured by and is sold under the responsibility of Versuni Holding B.V., and Versuni Holding B.V. is the warrantor in relation to this product.

642001030415 (8/2025) rev.00

www.home.id