Lumix DMWFL500 - Camera PANASONIC - Free user manual and instructions
Find the device manual for free Lumix DMWFL500 PANASONIC in PDF.
Questions des utilisateurs sur Lumix DMWFL500 PANASONIC
0 question sur cet appareil. Repondez a celles que vous connaissez ou posez la votre.
Poser une nouvelle question sur cet appareil
Download the instructions for your Camera in PDF format for free! Find your manual Lumix DMWFL500 - PANASONIC and take your electronic device back in hand. On this page are published all the documents necessary for the use of your device. Lumix DMWFL500 by PANASONIC.
USER MANUAL Lumix DMWFL500 PANASONIC
natural_image
Line drawing of a compact digital camera with lens and control panel (no text or symbols)Panasonic®
Operating Instructions
Bedienungsanleitung
Information for Your Safety 3
Precautions....4
Supplied accessories....4
Names of the Components 5
Displays Appearing on the Display Panel 6
Concerning the batteries 7
Inserting and Removing the Unit's Batteries (optional).... 10
Checking the Flash's Remaining Battery Charge 11
Mounting the Unit onto the Digital Camera, and Removing it.... 12
Taking Pictures using a Digital Camera with Communication Functions 13
How to select the flash mode.... 13
[TTL AUTO] 14
[AUTO] 15
[MANUAL] 16
[FP TTL AUTO] 17
[FP MANUAL] 18
Taking Pictures using a Digital Camera without Communication Functions 20
How to select the flash mode.... 20
[AUTO] 21
[MANUAL] 23
Other Applications 24
Taking pictures with bounce lighting 24
Taking pictures at close range 25
Selecting the lighting angle manually.... 25
How to use the Wide Panel.... 26
Many choices for different flash photography applications.... 27
Functions 28
Concerning Continuous Firing 30
Table of Guide Numbers (GN) 31
Troubleshooting 33
Cautions for Use 35
Specifications.... 37
Information for Your Safety
- This flash is designed to be used with digital cameras made by Panasonic.
It is compatible with DMC-L1K (with communication functions: P13 to 19), DMC-FZ30 etc. (without communication functions: P20 to 23). (as of July 2006) - The explanations in these operating instructions describe DMC-L1K as an example.
- Four Thirds ^TM is a trademark.
WARNING
TO REDUCE THE RISK OF FIRE OR SHOCK HAZARD AND ANNOYING INTERFERENCE, USE ONLY THE RECOMMENDED ACCESSORIES AND DO NOT EXPOSE THIS EQUIPMENT TO RAIN, MOISTURE, DRIPPING OR SPLASHING. DO NOT REMOVE THE COVER (OR BACK); THERE ARE NO USER SERVICEABLE PARTS INSIDE. REFER SERVICING TO QUALIFIED SERVICE PERSONNEL.
-If you see this symbol-
Information on Disposal for Users of Waste Electrical & Electronic Equipment (private households)

natural_image
Symbol of a trash bin crossed out by two diagonal lines (no text or numbers present)This symbol on the products and/or accompanying documents means that used electrical and electronic products should not be mixed with general household waste.

For proper treatment, recovery and recycling, please take these products
to designated collection points, where they will be accepted on a free of charge basis.
Alternatively, in some countries you may be able to return your products to your local retailer upon the purchase of an equivalent new product.
Disposing of this product correctly will help to save valuable resources and prevent any potential negative effects on human health and the environment which could otherwise arise from inappropriate waste handling. Please contact your local authority for further details of your nearest designated collection point. Penalties may be applicable for incorrect disposal of this waste, in accordance with national legislation.
For business users in the European Union
If you wish to discard electrical and electronic equipment, please contact your dealer or supplier for further information.
Information on Disposal in other Countries outside the European Union
This symbol is only valid in the European Union.
If you wish to discard this product, please contact your local authorities or dealer and ask for the correct method of disposal.
Precautions
- Concerning the unit’s handling
- Do not subject the unit to strong vibration or impact. Doing so may cause not only the unit to malfunction but also the flash head to break.
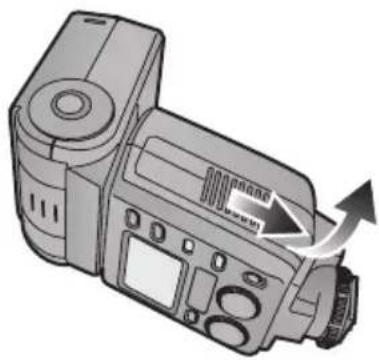
- Before carrying the unit around with you, ensure that the wide panel is properly retracted. (P26)
- Sand and dirt may cause the unit to malfunction. When using the unit in an environment such as a beach, take steps to protect it from sand and dirt.
- When taking photos on rainy days or on a beach, take care to keep the unit dry.
- The unit is not waterproof. If rain or drops of water splash onto the unit, wipe off the water with a dry cloth. If the unit does not operate normally, consult the dealer or your nearest servicentre.
- Read the operating instructions for your digital camera.
■ When the unit is not going to be used for a prolonged period
- Be absolutely sure to remove the batteries from the unit.
- If the batteries are left inside the unit, a faint current will flow continuously, even when the unit's power is off, gradually discharging the batteries. (For details on nickel metal hydride batteries, refer to P9.)
- Store the batteries in a cool, moisture-free location where the temperature is kept as constant as possible.
(Recommended temperature range:
15 °C to 25 °C;
recommended humidity range: 40% to 60%)
- If you plan to store the unit and/or its batteries inside a closet or cupboard, it is recommended that you put a desiccant (silica gel) in with them.
Supplied accessories
[Inspection to be performed when you unpack the unit]
When removing the unit from its packing box, check that the main unit and its supplied accessories are present, and also check their external appearance and functions to verify that they have not sustained any damage during distribution and transportation.
If you discover any trouble, contact your vendor before using the product.
For this flash, use only the flash case shown below.
![PANASONIC Lumix DMWFL500 - [Inspection to be performed when you unpack the unit] - 1](/content/2026/03/449280/images/51cd3c48b29aff882a8857d674a659e421f0e722600236342fab439f74df90ae.jpg)
natural_image
Simple 3D illustration of a cylindrical object with attached ribbons (no text or symbols)Flash case VFC4216
- The batteries are optional.
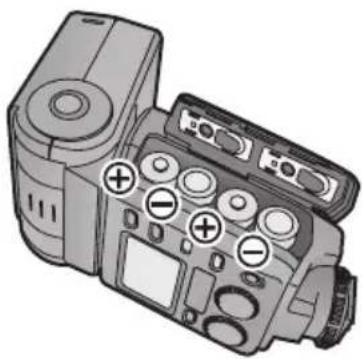
Names of the Components
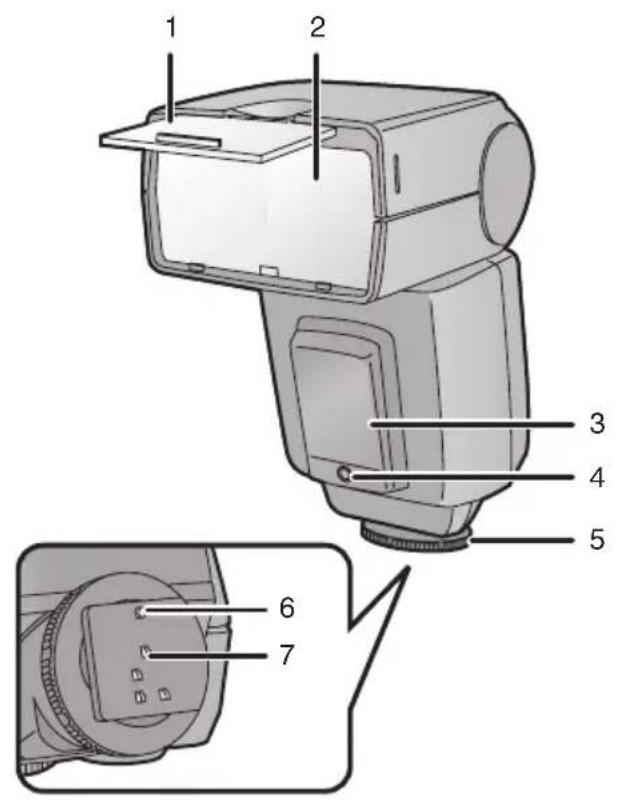
text_image
1 2 3 4 5 6 7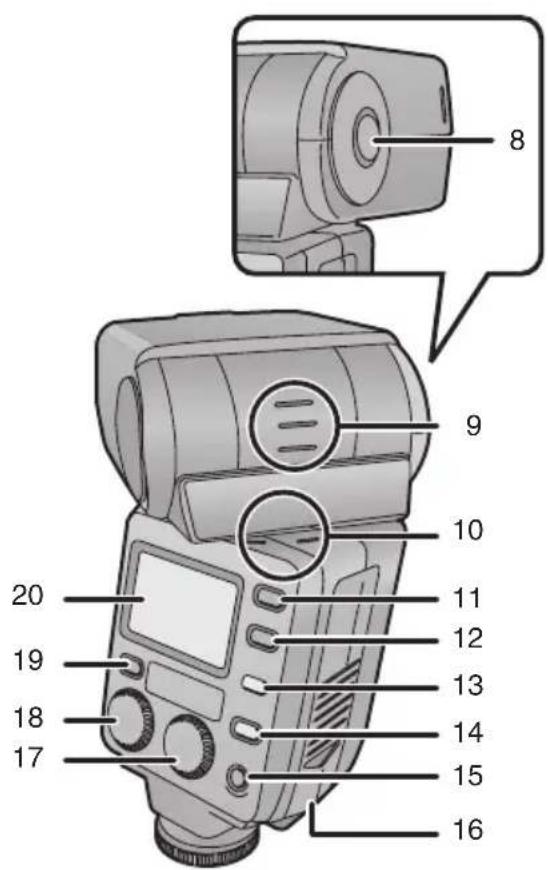
text_image
8 9 10 11 12 13 14 15 16 17 18 19 201 Wide panel (P26)
2 Flash head
3 AF assist lamp (P29)
- In dark locations where it is difficult to bring the subject into focus, you can direct light onto the subject to facilitate focusing. (The AF assist works only when this flash is used in combination with Panasonic's "Four ThirdsTM" digital single-lens reflex camera: it will not work with other cameras.)
4 Flash sensor
5 Lock ring (P12)
6 Lock pin (P12)
7 Terminal area (P12)
8 Bounce unlock button (P12, 24)
9 Bounce up/down angle display (P24)
10 Bounce left/right angle display (P24)
11 [MODE] button (P13, 20, 28)
12 [ZOOM] button (P21, 23, 25, 26)
13 [AUTO CHECK] lamp (P11, 14, 21)
14 [TEST/CHARGE] button (P11, 13 20)
15 [POWER] button (P11, 13 20 28)
16 Battery cover (P10)
17 [F] dial (P19, 21, 28)
18 [GN/ISO] dial (P16, 21, 23, 28)
19 [LIGHT] button (P28)
- The display panel will light for about 15 seconds. It can also be lighted by operating a digital camera with communication functions.
20 Display panel (P6)
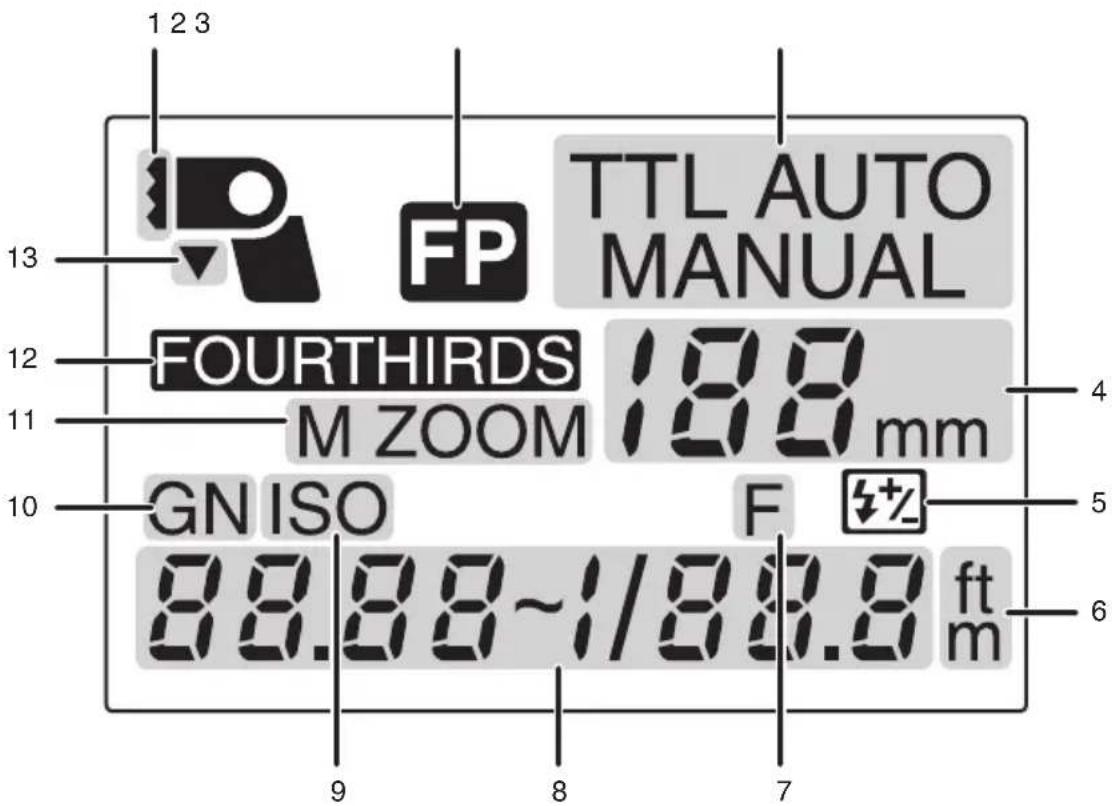
text_image
1 2 3 FP TTL AUTO MANUAL 13 12 FOURTHIRDS 19.8 mm 11 M ZOOM 10 GN ISO F % 88.88~1/88.8 ft m 9 8 71 Wide panel display (P26)
2 FP firing (P17, 18)
3 Flash mode (P13, 20)
4 Zoom value (P25)
5 Flash intensity adjustment (P19)
6 Distance display (P29)
7 Aperture
8 Setting displays
(guide number, ISO sensitivity, aperture, flash working range, correct distance, flash intensity adjustment)
9 ISO sensitivity
10 Guide number (GN) (P31)
11 ZOOM mode (P25)
12 Lighting angle display (P29)
- [FOUR THIRDS]:
The lighting angle is displayed by the focal length of the "Four Thirds" digital camera format lens.
• [135]:
The lighting angle is converted into the focal length of the 135 camera (35 mm film conversion) and displayed.
13 Close-up flash (P25)
Concerning the batteries
■ Types of batteries that can be used
AA Alkaline dry batteries (LR6)
AA Rechargeable nickel metal hydride batteries (Ni-MH)
- The use of batteries made by Panasonic is recommended.
- The performance of the batteries used may significantly differ depending on which battery brand is used, how long the batteries have been stored since they were manufactured and how they have been stored.
- The performance of the batteries decreases temporarily at low temperatures (below 10 °C), but will be restored when the temperature returns to room temperature.
- Malfunctioning may occur under certain ambient temperatures and operating conditions. However, this is not indicative of trouble.
- In order to ensure that the batteries will function for as long as possible, it is recommended that you turn off the unit's power during the intervals between taking photos. If the unit is to be used for prolonged periods, the use of rechargeable nickel metal hydride batteries is recommended.
- Once spent, batteries may recover their performance when left standing for a while, but they will quickly become unusable again. For this reason, always make a point of replacing spent batteries with fresh ones.
■ Types of batteries with which operation is not guaranteed
| AA Ni-Cd batteries |
| AA Nickel-manganese batteries (ZR6) |
| AA Lithium batteries (FR6) |
| AA Manganese batteries (R6) |
| AA Oxyride (oxy-nickel-hydroxide) dry batteries (LR6) |
| CR-V3 Lithium battery packs |
- Panasonic offers no guarantees that the unit will operate properly when any of the batteries listed above are used. Furthermore, use of these batteries may result in electrolyte leakage, power-on failures and other trouble.
■ Batteries with shapes that cannot be used
- Installing batteries with non-regular shapes in the unit may cause electrolyte leakage, heat generation and even rupturing of the batteries themselves.
- Some batteries sold on the market have part or all of their jackets missing: Under no circumstances should such batteries be used. (Refer to the figure below.)
- Batteries (bare batteries) with no external jackets or batteries with parts of their jackets missing
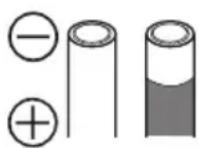
- Batteries whose electrode is flat

■ Handling the batteries
Mishandling of batteries may cause electrolyte leakage, heat generation and even rupturing of the batteries themselves. Heed with the following cautions.
- Do not expose batteries to water or seawater or allow their terminal areas to become wet.
- Do not remove their external jackets or damage them in any way.
- Do not drop the batteries, knock them into other objects or subject them to any other kind of strong impact.
- Stop using the batteries as soon as you notice any electrolyte leakage, deformation, discolouration or any other such trouble.
- Do not store batteries in locations where the temperature and/or humidity levels are high.
- Keep batteries out of the reach of infants and small children.
- When replacing the batteries, replace all four batteries with fresh batteries of the same type.
- Remove the batteries from the unit when you do not intend to use the unit for a prolonged period.
- Batteries may be hot immediately after the unit has been used. Before removing them from the unit, turn off the unit's power and wait until the temperature of the batteries has dropped.
- At low temperatures (under 10 °C), the performance of batteries will deteriorate and the number of flashes fired by the unit will be sharply reduced. The operating duration of batteries tends to be shorter particularly when alkaline dry batteries are used so warm them in your pocket before use. When warming batteries in your pocket, avoid direct contact with cigarette lighters and other metal objects as well as with pocket/body warmers.
- The number of flashes fired by the unit may also be sharply reduced if the ⊕ and ⊖ electrodes of the batteries are exposed to oils from the skin or other forms of dirt. Before installing the batteries, wipe the ⊕ and ⊖ electrodes carefully using a soft, dry cloth.
If electrolytes should leak from the batteries, wipe away all traces of the electrolyte in the battery compartment, and then insert fresh batteries or fully charged nickel metal hydride batteries.
If you should get electrolyte on your hands or clothes, rinse it off thoroughly with water. If you should get electrolyte in your eyes, you risk losing your sight. In such a case, do not rub your eyes but immediately wash them with clean water, and then seek medical advice.
■ Rechargeable nickel metal hydride batteries
Nickel metal hydride batteries can be made ready for use by recharging them using a dedicated charger. However, mishandling may cause electrolyte leakage, heat generation, the ignition of flames and even rupturing of the batteries themselves. Heed the following precautions.
- It may not be possible to properly recharge batteries with dirty ⊕ and ⊖ electrodes. Use a soft, dry cloth to carefully wipe the ⊕ and ⊖ electrodes as well as the terminal areas of the charger.
- Either when they are purchased or when they have not been used for a prolonged period, nickel metal hydride batteries may not have a sufficient charge. This is due to their characteristics and is not indicative of trouble. Their regular performance will be restored after they have been charged a number of times.
- It is recommended that the batteries be recharged only after their existing charge has been used up. If they are repeatedly charged without their existing charge first having been used up, it may be difficult for them to sustain their capacity. (A phenomenon referred to as the memory effect.)
- If the memory effect has occurred, use up the existing charge in the batteries until the unit cannot fire and then recharge them fully a number of times. This will restore their capacity.
- When nickel metal hydride batteries are not being used, their capacity will diminish due to the effects of natural discharging.
- Do not continuously charge nickel metal hydride batteries which already have a charge.
- Do not remove their external jackets or damage them in any way.
- Read the instructions accompanying the charger used when recharging the batteries.
Nickel metal hydride batteries have a specific service life. As they are increasingly used or as time goes by, their capacity will diminish gradually. When the length of time during which the unit can be used has dropped drastically, the batteries may have reached the end of their service life. Obtain fresh batteries.
- The length of the service life of batteries differs depending on their storage method, operating conditions and the environment in which they are used.
■ When the unit is not going to be used for a prolonged period
- If the batteries are left inside the unit, a faint current will flow continuously, even when the unit's power is off, gradually discharging the batteries. If they are left like this, they may overdischarge and may become unusable even when recharged.
- When storing the batteries for a prolonged period, it is recommended that they be charged once a year and that after their remaining charge has been used up, they be removed from the unit and stored again.
■ Service life of batteries
Number of flashes
(number of full flashes in MANUAL mode at intervals of 30 seconds)
| Batteries used Number of flashes | |
| Alkaline dry batteries (LR6) | At least 120 flashes |
| Nickel metal hydride batteries (Ni-MH) | At least 140 flashes |
Photo taking conditions
• Temperature: 23 °C
Flash interval
| Batteries used Flash interval | |
| Alkaline dry batteries (LR6) | Approx. 6 s |
| Nickel metal hydride batteries (Ni-MH) | Approx. 4 s |

- The number of flashes and flash interval differ slightly depending on the storage status of the batteries and the operating conditions.
Inserting and Removing the Unit's Batteries (optional)
- Check that the unit's power is off.
- Use alkaline dry batteries or rechargeable nickel metal hydride batteries.
1 Slide the battery cover to open it.
natural_image
Illustration of a DSLR camera with an arrow indicating rotation or movement (no text or symbols present)- There is tape adhered to the battery cover the first time that you use the unit. Peel it off.
2 When inserting the batteries, ensure that the ⊕ and ⊖ poles of the batteries are aligned correctly.
natural_image
Diagram of a DSLR camera module with labeled buttons and ports (no text or symbols beyond basic labels)3 Close the battery cover by sliding it back firmly as far as it will go.
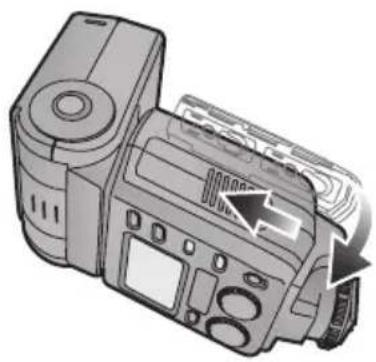
natural_image
Illustration of a digital camera module with no visible text or symbols
• After using the unit, take out the batteries.
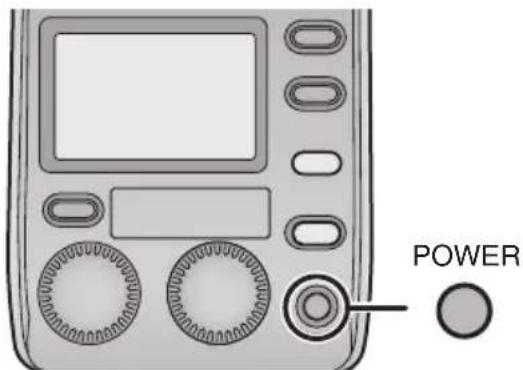
Checking the Flash's Remaining Battery Charge
- Install the batteries and then turn on the unit and check the battery remaining power.
1 Push the [POWER] button.
![PANASONIC Lumix DMWFL500 - Push the [POWER] button. - 1](/content/2026/03/449280/images/bc163dca1919bc73692c794631f30d6a736876e7145f026949fd6cda3a8864ad.jpg)
text_image
POWERPOWER- Charging now starts.
2 Check that the [TEST/CHARGE] button lights.
![PANASONIC Lumix DMWFL500 - Check that the [TEST/CHARGE] button lights. - 1](/content/2026/03/449280/images/896ffbc706c1f21bd72790408f0eb793eb267704ee643cafc97b352e9e988755.jpg)
text_image
AUTO FOURTHIRDS M ZOOM 25 mm ISO F 100 2.8 TEST/ CHARGE- After the batteries have been fully charged, the [TEST/CHARGE] button lights.
- If it takes as long for the [TEST/CHARGE] button to light as the period indicated in the table below, it means that the batteries are nearly worn out. Replace them with fresh batteries as soon as possible.
| Alkaline batteries More than 30 s |
| Rechargeable nickel metal hydride batteries More than 10 s |
- If the [TEST/CHARGE] button and [AUTO CHECK] lamp both flash at the same time, it means that the batteries are almost completely worn out and should be replaced with fresh batteries as soon as possible.
3 Push the [POWER] button to turn off the unit's power.
![PANASONIC Lumix DMWFL500 - Push the [POWER] button to turn off the unit's power. - 1](/content/2026/03/449280/images/d12e35053f8df9a3455156b14d9c75d684d6fef9fa2869c6b54c7a8e6e9e7810.jpg)
- When the [TEST/CHARGE] button is pushed, the unit may fire.
-
Turn off the power in the following situations:
-
When mounting the unit onto, or disengaging it from, the digital camera
- When you do not want the unit to fire
- When you are not going to use the unit
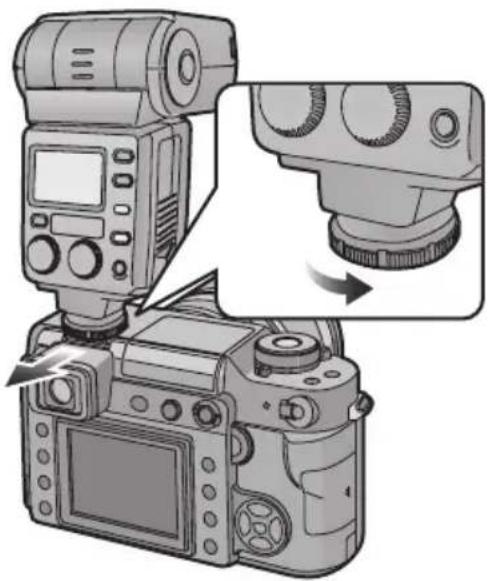
Mounting the Unit onto the Digital Camera, and Removing it
- Check that the power of the digital camera and unit is off. (Mounting the unit onto, or disengaging it from, the camera while the power is on may cause trouble and is not recommended.)
■ Mounting the unit
1 Secure the flash head at the horizontal front position.
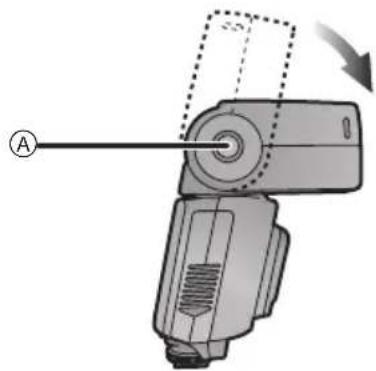
natural_image
Mechanical device diagram showing a lever mechanism with labeled point A and rotation arrow (no text or symbols beyond labels)Ⓐ: Bounce unlock button
- If the flash head is at the lock position, rotate it while pushing the bounce unlock button.
2 Loosen the lock ring.

natural_image
Diagram showing a camera module being adjusted to a digital camera, with no text or symbols present.- If the lock pin is protruding, turn the lock ring in the opposite direction from [◀LOCK] and retract the pin.
- Do not apply more force than is necessary to the lock ring.
- Do not touch the terminal areas with your fingers, metal objects, etc.
- Do not mount the unit onto the digital camera while the lock pin is protruding. Otherwise you may damage the unit.
3 Slide the unit firmly toward the back of the hot shoe until a clicking sound is heard.
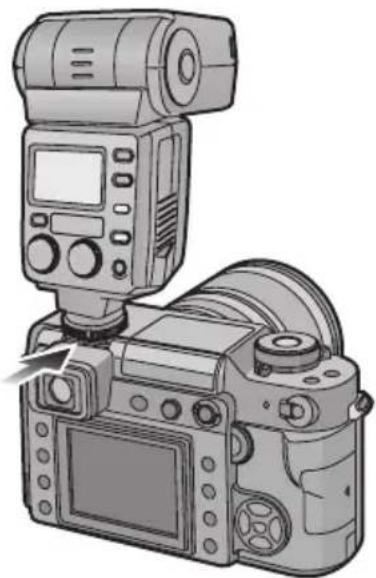
natural_image
Illustration of a DSLR camera with an adjustable flash unit and control panel (no text or symbols)4 Turn the lock ring in the [◄LOCK] direction until it stops turning.
■ Removing the unit Completely loosen the lock ring, and slide the unit off from the hot shoe.
natural_image
Diagram showing a DSLR camera setup with an LCD screen and a magnified view of the lens (no text or symbols present)Taking Pictures using a Digital Camera with Communication Functions
How to select the flash mode
- For details on each flash mode, turn to P14 to 18.
1 Turn on the power of the digital camera.
2 Push the [POWER] button on the unit.
text_image
POWER- The [TEST/CHARGE] button lights after the batteries have been fully charged.
3 Push the shutter button of the digital camera halfway down.
- The ISO sensitivity, aperture, shutter speed and other photo taking information are sent between the digital camera and the unit.
4 Push the [MODE] button, and select the flash mode.
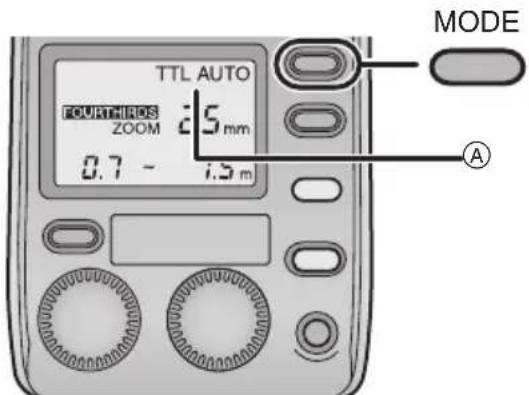
text_image
TTL AUTO FOURTHIROS 25 mm ZOOM 0.7 - 1.3 m MODE A(A): Flash mode
- The flash mode is shown on the display panel.
- The mode is changed each time the [MODE] button is pushed.
■ Concerning the flash modes
| Item Details of settings | |
| [TTL AUTO] | After measuring the appropriate flash intensity by discharging a pre-flash, the unit fires again for photo taking. (P14) |
| [AUTO] The | unit senses the light by its flash sensor in accordance with the aperture of the lens, and it adjusts the flash intensity. (P15)This mode can be used only for digital camera models with communication functions which support the [AUTO] mode. |
| [MANUAL] | The unit fires at the guide number (GN)*which has been set. (P16) |
| [FP TTL AUTO] | This mode enables flash photo taking even at the high shutter speeds of the digital camera by FP firing (repeatedly firing the flash at high speed). (P17)The unit initiates FP firing at the flash intensity set in the [FP MANUAL] mode. (P18) |
| [FP MANUAL] | |
* The guide number (GN) is a value which indicates the light quantity of a flash unit. The higher the value, the greater the quantity of light emitted by the unit.

- It may not be possible to use some of these modes depending on the photo taking modes which are supported by the digital camera.
- It is not possible to select a mode which cannot be used.
[TTL AUTO]
Push the [MODE] button, and select the flash mode. (P13)
- The flash working range is shown on the display panel in line with the settings of the digital camera.
![PANASONIC Lumix DMWFL500 - [TTL AUTO] - 1](/content/2026/03/449280/images/7156c28cf17b8ac520d1196afa65a91d4b9470b0403cd08353100e402f277270.jpg)
text_image
TTL AUTO FOURTHIROS 25 mm ZOOM 0.7 - 7.5 m AⒶ: Flash working range
1 Check that the distance to the subject is within the flash working range.
- If the subject is outside the range, adjust the aperture of the lens or change the distance to the subject.
- The flash working range changes depending on the type and settings (ISO sensitivity, aperture and focal length) of the digital camera used.
2 Push the shutter button all the way down, and take the picture.
3 Check that the [AUTO CHECK] lamp is flashing.
![PANASONIC Lumix DMWFL500 - [TTL AUTO] - 2](/content/2026/03/449280/images/b331819beea562862c8060c29dc7571b344670d140665d3de93c6ef87afc46d9.jpg)
text_image
TTL AUTO FOURTHIRDS 25 mm ZOOM 0.7 ~ 7.5 m AUTO CHECK- If the [AUTO CHECK] lamp continues to flash for about 5 seconds, it means that the unit has fired successfully.
[AUTO]
Push the [MODE] button, and select the flash mode. (P13)
- The flash working range is shown on the display panel in line with the settings of the digital camera.
![PANASONIC Lumix DMWFL500 - [AUTO] - 1](/content/2026/03/449280/images/a20c30a5582ba4b8f63e2c056e331d4f4f940a11a10365b4527f724f662e9d9a.jpg)
text_image
AUTO FOURTHIRDS 25 mm ZOOM 0.7 - 7.5 m AⒶ: Flash working range
- If the settings on the digital camera (ISO sensitivity and aperture) are outside the combinations of the ISO sensitivity and aperture which can be adjusted, the flash working range is not displayed and the user is warned by the flashing of [ISO] and [F] on the display. In a case like this, change the digital camera settings.
1 Check that the distance to the subject is within the flash working range.
- If the subject is outside the range, adjust the aperture of the lens or change the distance to the subject.
- The flash working range changes depending on the type and settings (ISO sensitivity, aperture and focal length) of the digital camera used.
2 Push the shutter button all the way down, and take the picture.
3 Check that the [AUTO CHECK] lamp is flashing.
![PANASONIC Lumix DMWFL500 - Check that the [AUTO CHECK] lamp is flashing. - 1](/content/2026/03/449280/images/0a7e420b246a798c9e789698e477a1a500b362107c450570689a462a1caec72c.jpg)
text_image
AUTO FOURTHIROS 25mm ZOOM 0.7 - 7.5m AUTO CHECK- If the [AUTO CHECK] lamp continues to flash for about 5 seconds, it means that the unit has fired successfully.
■ Combinations of the ISO sensitivity and aperture which can be adjusted in the [AUTO] mode
| ISO sensitivity | Aperture |
| 3200 F8 to F32 | |
| 1600 F5.6 to F32 | |
| 800 F4 to F32 | |
| 400 F2.8 to F32 | |
| 200 F2 to F32 | |
| 100 F1.4 to F22 | |
| 50 F1.4 to F16 | |
| 25 F1.4 to F11 | |
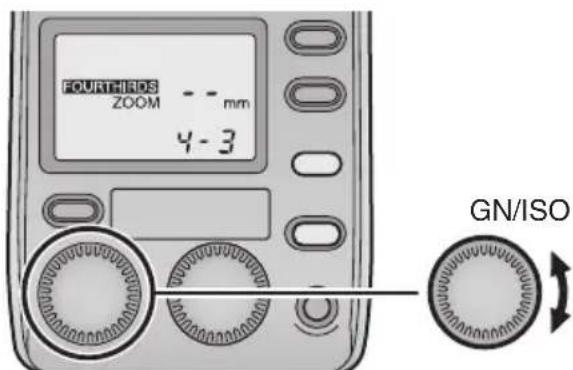
[MANUAL]
Push the [MODE] button, and select the flash mode. (P13)
- The optimum camera to subject distance and guide number (GN) matching the digital camera settings are shown on the display panel.
![PANASONIC Lumix DMWFL500 - [MANUAL] - 1](/content/2026/03/449280/images/a6acb8b0e8d5669b0abc24dd3b4a8225f9f7a10be7f583538eb78d5ef1e57493.jpg)
text_image
MANUAL FOURTHIROS 2.5 mm M ZOOM GN 4.0 2.5 m AⒶ: Optimum camera to subject distance
1 Turn the [GN/ISO] dial and set the guide number (GN) so that the camera to subject distance is set to the distance the subject.
![PANASONIC Lumix DMWFL500 - [MANUAL] - 2](/content/2026/03/449280/images/f58110820ca28de668b4cd34a8ce2614ab5450f764e1c92ec0ca258d5f168e3b.jpg)
text_image
MANUAL FOURTHIROS 25 mm M ZOOM GN 4.0 2.5 m GN/ISO- The [F] dial can also be used for this setting.
- If the optimum camera to subject distance is closer than 0.6 m (or 0.5 m for close-up photos), the lighting range of the flash will shift. In this case, the user is warned by the flashing of the number on the display.
- The optimum camera to subject distance changes depending on the digital camera settings (ISO sensitivity, aperture, focal length and shutter speed).
2 Push the shutter button all the way down, and take the photo.
![PANASONIC Lumix DMWFL500 - [MANUAL] - 3](/content/2026/03/449280/images/6a17921c61637d136c03c3014adeb7170cb09dc511281f05d561286ad40c20d5.jpg)
- If the ISO sensitivity is [100], the optimum camera to subject distance can be calculated by dividing the guide number (GN) by the aperture. (P31)
[FP TTL AUTO]
Push the [MODE] button, and select the flash mode. (P13)
- This mode enables flash photo taking even at the high shutter speeds of the digital camera by FP firing (repeatedly firing the flash at high speed).
- The flash working range is shown on the display panel in line with the settings of the digital camera.
![PANASONIC Lumix DMWFL500 - [FP TTL AUTO] - 1](/content/2026/03/449280/images/a93098e902fb2ba6719472bed43fe7b3c162d95fe43e3efb5cff5bebc8e9ea66.jpg)
text_image
TTL AUTO FP FOURTHIROS 25mm ZOOM 0.7 - 7.5m AⒶ: Flash working range
1 Check that the distance to the subject is within the flash working range.
- If the subject is outside the range, adjust the aperture of the lens or change the distance to the subject.
- The flash working range changes depending on the type and settings (ISO sensitivity, aperture and focal length) of the digital camera used. The range is narrower than in the [TTL AUTO] mode.
2 Push the shutter button all the way down, and take the photo.
3 Check that the [AUTO CHECK] lamp is flashing.
![PANASONIC Lumix DMWFL500 - Check that the [AUTO CHECK] lamp is flashing. - 1](/content/2026/03/449280/images/b0d347d676ad92803d0dbe2936b1c587112a332a50a7ffcf0ede28b625e197c2.jpg)
text_image
TTL AUTO FP FOURTHIRDS 25mm ZOOM 0.7 - 7.5m AUTO CHECK- If the [AUTO CHECK] lamp continues to flash for about 5 seconds, it means that the unit has fired successfully.
The following kinds of photos can be taken using high shutter speeds.
- Photo taking with the shadows softened by backlight photography

natural_image
Black-and-white photo of a person interacting with a large rock outdoors, surrounded by trees and foliage (no visible text or symbols)- Portrait photos taken outdoors with an open aperture and with the background defocused

natural_image
Black-and-white portrait of a smiling woman with braided hair and earrings, wearing a decorative top (no visible text or symbols)[FP MANUAL]
Push the [MODE] button, and select the flash mode. (P13)
- The optimum camera to subject distance and guide number (GN) matching the digital camera settings are shown on the display panel.
![PANASONIC Lumix DMWFL500 - [FP MANUAL] - 1](/content/2026/03/449280/images/d7374d432f49db5e8220b1854e6fb1da72077cc5bf91f34954d9b3077d97188b.jpg)
text_image
FP MANUAL FOURTHIROS 25mm ZOOM GN 4.0 2.5m AⒶ: Optimum camera to subject distance
1 Turn the [GN/ISO] dial and set the guide number (GN) so that the camera to subject distance is set to the distance to the subject.
![PANASONIC Lumix DMWFL500 - [FP MANUAL] - 2](/content/2026/03/449280/images/8b7400c8565ce778eeb82c5426217d8a8cfc215dbb01193f581581c1d00cebb1.jpg)
text_image
FP MANUAL FOURTHIRS 25 mm ZOOM GN 4.0 2.5 m GN/ISO- The [F] dial can also be used for this setting.
- If the optimum camera to subject distance is closer than 0.6 m (or 0.5 m for close-up photos), the lighting range of the flash will shift. In this case, the user is warned by the flashing of the number on the display.
- The optimum camera to subject distance changes depending on the digital camera settings (ISO sensitivity, aperture, focal length and shutter speed).
2 Push the shutter button all the way down, and take the photo.
■ Adjusting the flash intensity
The flash intensity can be adjusted in steps. Set the flash intensity adjustment to [ON] before adjusting the flash intensity. (P29)
- 📁 appears on the display panel.
1 Turn the [F] dial, and set the flash intensity adjustment value.
![PANASONIC Lumix DMWFL500 - Turn the [F] dial, and set the flash intensity adjustment value. - 1](/content/2026/03/449280/images/e1a016874a0d7747dcafae533009bc0c53515f58ff4ae8a44bd0c2aa0e678688.jpg)
text_image
TTL AUTO FOURTHIROS ZOOM 25 mm 0.3 A FⒶ: Flash intensity adjustment value
- The flash intensity adjustment value is always displayed except when it is [0]. If the flash intensity adjustment value is [0], the flash working range is not displayed.
The image is too blurry to recognize any text content.
The flash intensity adjustment range and the actual flash intensity may differ depending on the flash mode.
- Flash intensity adjustment range
- If [TTL AUTO], [AUTO] or [FP TTL AUTO] is selected, the flash intensity can be adjusted over a range of ±3.0 steps.
$$ 0 + 0. 3 + 0. 7 + 1. 0 + 3. 0 \quad \dots $$
$$ 0 \rightarrow - 0. 3 \rightarrow - 0. 7 \rightarrow - 1. 0 \dots - 3. 0 $$
- If [MANUAL] or [FP MANUAL] is selected, the flash intensity can be adjusted over a range of ±0.7 steps.
$$ 0 + 0. 3 + 0. 7 \rightarrow $$
$$ 0 \rightarrow - 0. 3 \rightarrow - 0. 7 $$
- The actual flash intensity may vary when the flash intensity adjustment value has been set on both the digital camera and the unit.
- If [TTL AUTO], [AUTO] or [FP TTL AUTO] is selected, the unit fires at the adjustment value obtained by adding together the adjustment values set on the digital camera and the unit. (The value set on the unit only is displayed as the flash intensity adjustment value.)
[Example]
| Unit | Digital camera | |
| Adjustment value setting | +0.3 | +0.3(+1/3 EV) |
| Unit's flash intensity adjustment value display | +0.3 | |
| Actual adjustment value used for firing | +0.6(+2/3 EV) | |
- If [MANUAL] or [FP MANUAL] is selected, the unit fires at the adjustment value set on the unit only.
[Example]
| Unit | Digital camera | |
| Adjustment value setting | +0.3 | +0.3(+1/3 EV) |
| Unit's flash intensity adjustment value display | +0.3 | |
| Actual adjustment value used for firing | +0.3(+1/3 EV) | |
Taking Pictures using a Digital Camera without Communication Functions
How to select the flash mode
- For details on each flash mode, turn to P21 to 23.
1 Push the [POWER] button on the unit.
- The [TEST/CHARGE] button lights after the batteries have been fully charged.
2 Push the [MODE] button to select the flash mode.
![PANASONIC Lumix DMWFL500 - Push the [MODE] button to select the flash mode. - 1](/content/2026/03/449280/images/edcbba047840c0148993ebb33826aa9edf51cb1ad8cd9946e7fb6422e1f063ff.jpg)
text_image
AUTO FOURTHIRDS 25.0m ZOOM ISO F 100 5.6 MODE A(A): Flash mode
- The flash mode is shown on the display panel.
- The mode is changed each time the [MODE] button is pushed.
■ Concerning the flash modes
| Item Details of settings | |
| [AUTO] The unit senses the light by its flash sensor in accordance with the aperture of the lens, and it adjusts the flash intensity. (P21) | |
| [MANUAL] The unit fires at the guide number (GN)* which has been set. (P23) |
* The guide number (GN) is a value which indicates the light quantity of a flash unit. The higher the value, the greater the quantity of light emitted by the unit.
[AUTO]
Push the [MODE] button, and select the flash mode. (P20)
1 Turn the [GN/ISO] dial to set the ISO sensitivity.
![PANASONIC Lumix DMWFL500 - [AUTO] - 1](/content/2026/03/449280/images/8177d5d1632b978c88074f11bd1dae7a9600553aad0f2cc3ebe82daa7f838b2a.jpg)
text_image
AUTO FOURTHIROS 25mm ZOOM ISO F 100 5.6 GN/ISO2 Push the [ZOOM] button to set the zoom value to the focal length of the lens.
![PANASONIC Lumix DMWFL500 - [AUTO] - 2](/content/2026/03/449280/images/521ccb7a8b7926ca01ceae2eccdddc23382f985e16b602cdef0ce86e3f6270ef.jpg)
text_image
AUTO FOURTHIRDS 25mm ZOOM ISO F 100 5.6 ZOOM3 Turn the [F] dial and set it to the aperture of the lens.
![PANASONIC Lumix DMWFL500 - [AUTO] - 3](/content/2026/03/449280/images/f5907c9a92e0f51129751a84e7dd4d028658f8b700e96e6ca5d52f668c027ba9.jpg)
text_image
AUTO FOURTHIADS ZOOM 25 mm ISO F 100 5.6 F- If the combination of the ISO sensitivity and aperture are outside the usable range, a warning is given in the form of the flashing ISO sensitivity and aperture displays. In a case like this, change the ISO sensitivity and aperture.
4 Push the shutter button all the way down, and take the photo.
5 Check that the [AUTO CHECK] lamp is flashing.
- If the [AUTO CHECK] lamp continues to flash for about 5 seconds, it means that the unit has fired successfully.
![PANASONIC Lumix DMWFL500 - [AUTO] - 4](/content/2026/03/449280/images/e9a30118a926e1b52e42e603baf5948518188a884e622c112378644961dc8922.jpg)
text_image
AUTO FOURTHIROS 25 mm ZOOM ISO F 100 5.6 AUTO CHECK■ Flash working range in [AUTO] mode
| ISO sensitivity | Lighting angleFocal length (mm)(35 mm film conversion) | |||||||||||||||
| 3200 | 1600 | 800 | 400 200 | 100 | 50 25 | 8(16) | 10(20) | 12(24) | 14(28) | 17(35) | 25(50) | 35(70) | 42(85) | |||
| F8 | F5.6 F4 | F2.8 | F2 F1.4 | - | - | 1.1|12.8 | 1.2|14.2 | 1.7|20.0 | 1.9|21.4 | 2.2|25.7 | 2.5|28.5 | 2.8|32.1 | 3.1|35.7 | |||
| F | 1 | 1 | F 8 | F | 5 . | 6 F | 4 | F- 2 | 0.8,9.0 | 0.98 | F10.0 | 1.22|14.0 | 1.3F | 115.0 | 1.6. | 418.0 | 1.7|20.0 | 2.0|22.5 | 2.2|25.0 |
| F16 | F11 F8 | F5.6 | F4 F2.8 | F2 F1.4 | 0.5|6.4 | 0.6|7.1 | 0.8|10.0 | 0.9|10.7 | 1.1|12.8 | 1.2|14.2 | 1.4|16.0 | 1.5|17.8 | ||||
| F | 2 | 2 | F 1 | 6 | F 1 | 1 | F | 8 F | 0.554.5 | 0.5. | 65.0 | 0.6F|7.0 | 0.64 | F7.5 | 0.82|9.0 | 0.8B|10.0 | 1.0F | 211.2 | 1.1|12.5 |
| F32 | F22 | F16 | F11 | F8 | F5.6 | F4 | F2.8 | 0.5|3.2 | 0.5|3.5 | 0.5|5.0 | 0.5|5.3 | 0.5|6.4 | 0.6|7.1 | 0.7|8.0 | 0.7|8.9 | |
| - | F32 | F22 | F16 | F11 | F8 | F5.6 | F4 | 0.5|2.2 | 0.5|2.5 | 0.5|3.5 | 0.5|3.7 | 0.5|4.5 | 0.5|5.0 | 0.5|5.6 | 0.5|6.2 | |
| - | - | F32 | F22 | F16 | F11 | F8 | F5.6 | 0.5|1.6 | 0.5|1.8 | 0.5|2.5 | 0.5|2.7 | 0.5|3.2 | 0.5|3.6 | 0.5|4.0 | 0.5|4.5 | |
| - | - | - | F32 | F22 | F16 | F11 | F8 | 0.5|1.1 | 0.5|1.2 | 0.5|1.7 | 0.5|1.8 | 0.5|2.2 | 0.5|2.5 | 0.5|2.8 | 0.5|3.1 | |
| - | - | - | - | F32 | F22 | F16 | F11 | 0.5|0.7 | 0.5|0.8 | 0.5|1.2 | 0.5|1.3 | 0.5|1.5 | 0.5|1.7 | 0.5|1.9 | 0.5|2.2 | |
| Aperture values that can be set | Working range when taking pictures in [AUTO](m) | |||||||||||||||
17
- The areas framed by the bold lines indicate the flash working range when the wide panel is used. (P26)
- When the flash head is facing toward the front, the number displayed at the near-distance side is 0.6 m or more, and when it is pointed downward, it is 0.5 m or more.
- The flash intensity can be adjusted in 1/3 steps by varying the ISO sensitivity and aperture from the digital camera settings.
[MANUAL]
Push the [MODE] button, and select the flash mode. (P20)
- The guide number (GN) and light quantity ratio appear on the display panel.
![PANASONIC Lumix DMWFL500 - [MANUAL] - 1](/content/2026/03/449280/images/aade35592c9751191eb078463aaa4d839ba02151fb81bcb4ff09d3aefe54b19d.jpg)
text_image
MANUAL FOURTHIROS 12 mm ZOOM GN 20 1/2 AⒶ: Light quantity ratio
- The "light quantity ratio" is the ratio of the flash intensity to the full flash.
1 Push the [ZOOM] button to set the zoom value to the focal length of the lens.
![PANASONIC Lumix DMWFL500 - Push the [ZOOM] button to set the zoom value to the focal length of the lens. - 1](/content/2026/03/449280/images/a2854588c60ed948163a13ab791a64123b909aea431ed2f2cd8ba41af8c4e8eb.jpg)
text_image
MANUAL FOURTHIDS 12 mm ZOOM GN 20 1/2 ZOOM2 Turn the [GN/ISO] dial, and set the guide number (GN).
![PANASONIC Lumix DMWFL500 - Turn the [GN/ISO] dial, and set the guide number (GN). - 1](/content/2026/03/449280/images/1e327f9c182cfc5268b860e933e8af1074929258848dcf98ee502384d4f376bb.jpg)
text_image
MANUAL FOURTHIRDS 12 mm ZOOM GN 20 112 GN/ISO- The [F] dial can also be used for this setting.
3 Push the shutter button all the way down, and take the photo.
■ How to determine the aperture and guide number
When the camera to subject distance and aperture have been decided upon
- The following formula is used to obtain the guide number (GN), which is then set in the unit.
"Aperture (F)" × "Camera to subject distance (m)" ÷ "ISO sensitivity coefficient"
When the aperture is to be set
- The following formula is used to obtain the aperture, which is then set in the digital camera.
"Guide number (GN)" × "ISO sensitivity coefficient" ÷ "Camera to subject distance (m)"
How to obtain the optimum camera to subject distance
"Guide number (GN)" × "ISO sensitivity coefficient" ÷ "Aperture (F)"
ISO sensitivity coefficient
| ISO sensitivity | Compensation coefficient |
| 3200 5.6 | |
| 1600 4.0 | |
| 800 2.8 | |
| 400 2.0 | |
| 200 1.4 | |
| 100 1.0 | |
| 50 0.71 | |
| 25 0.5 |
- For a list of guide numbers (GN), turn to P31.
Other Applications
Taking pictures with bounce lighting
- Bounce light photography is a technique which uses the reflected light from a ceiling or a wall onto which the light emitted from a flash unit has been directed.
- If the flash is aimed directly at the front of the subject when the portrait of a person is to be taken, for instance, strong shadows may form or the person's skin and other areas may appear whitish and indistinct.
- However, if the bounce light technique is used at times like this, the strong shadows can be minimized and the subject captured naturally.
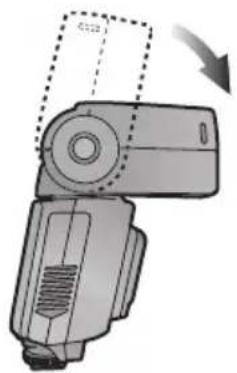
1 While holding down the bounce unlock button, turn the flash head so that it is pointing in the desired direction.
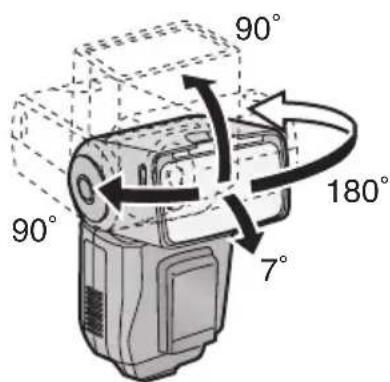
text_image
90° 90° 180° 7°- At the locked position, change the direction while holding down the bounce unlock button.
2 Point the flash at the ceiling or other reflective surface, and take the photo.
natural_image
Illustration showing a camera emitting a beam of light from a target, with a person observing and another person observing (no text or symbols)- The flash working range and optimum camera to subject distance do not appear on the display panel.
- When the lighting angle is set to [ZOOM] (auto), the zoom value appears on the display panel as [--] and 25 mm [135 camera (35 mm film conversion): 50 mm] is set.
- The lighting angle can be changed manually. (P25)

- When the [TEST/CHARGE] button is pushed, the [AUTO CHECK] lamp lights, and whether or not the firing is appropriate can be verified. (This is possible only when [AUTO] is established as the flash mode.)
- If the surface (such as the ceiling or walls) off which the light from the flash is to be reflected is coloured, this may affect the photo images. Choose a surface which is white or off-white as the reflecting surface.
Taking pictures at close range Selecting
- When the camera to subject distance is 0.5 m to 1.5 m, the light emitted from the flash will be skewed. For this reason, while holding down the bounce unlock button, point the flash head downward (7 degrees), and then take the picture.
Point the flash head down as far as it will go (7 degrees downward).
natural_image
Mechanical device diagram showing a lever mechanism with no visible text or symbols• [appears on the display panel.

- Vignetting may be caused by the light from the flash when the lens has a long overall length or a large diameter. Take a test photo first, and then take the picture.
- Use the flash in this way only for close-up photos. If you keep the flash head pointed down during regular photo taking, the light emitted from the flash at the top of the screen will be insufficient.
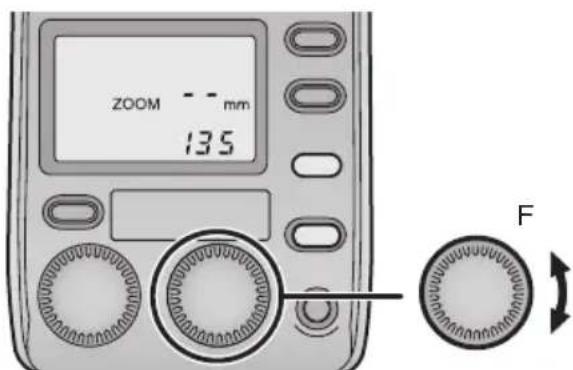
the lighting angle manually
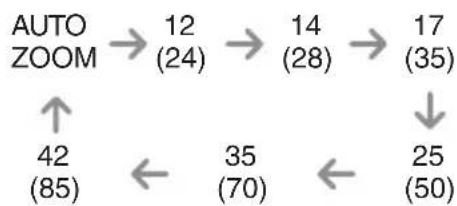
• The lighting angle can be adjusted manually.
Push the [ZOOM] button, and select the lighting angle.
![PANASONIC Lumix DMWFL500 - Push the [ZOOM] button, and select the lighting angle. - 1](/content/2026/03/449280/images/99721972ac3267a84692e4d3f582614dcafd6506af2feefb53364649050da724.jpg)
text_image
TTL AUTO FOURTHIRDS 25 mm M ZOOM 0.7 - 1.2 m ZOOM AⒶ: Lighting angle
• [M ZOOM] appears on the display panel.
Any of the following ZOOM settings can be selected:
12 mm, 14 mm, 17 mm, 25 mm, 35 mm, 42 mm [With a 135 camera (35 mm film conversion): 24 mm, 28 mm, 35 mm, 50 mm, 70 mm, 85 mm]
Each time the [ZOOM] button is pushed, the settings are selected in the following sequence:
flowchart
graph TD
    A["AUTO ZOOM"] --> B["12 (24)"]
    B --> C["14 (28)"]
    C --> D["17 (35)"]
    D --> E["25 (50)"]
    E --> F["35 (70)"]
    F --> G["42 (85)"]
    G --> H["↑"]
- [AUTO ZOOM] can be used only when a digital camera with communication functions is used.
- When the wide panel is used, any of the following settings can be selected: [AUTO ZOOM], [10 (20)] or [8 (16)].

- When a value higher than the focal length of the lens used is selected, the edges of the images will darken.
How to use the Wide Panel
- Use the built-in wide panel for flash photography when the focal length of the lens is wider than 12 mm.
- Set wide panel switching to [ON]. (P29)
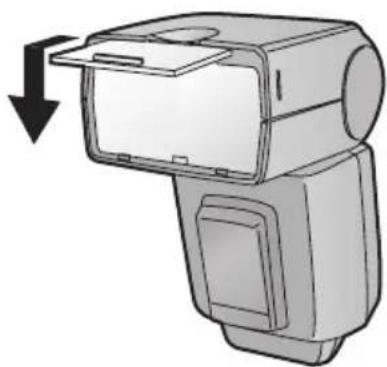
1 Pull out the wide panel and then push it down.
natural_image
Diagram of a device with a downward arrow indicating compression or disassembly (no text or symbols present)• [‘]appears on the display panel.
2 Push the [ZOOM] button, and select the lighting angle.
![PANASONIC Lumix DMWFL500 - Push the [ZOOM] button, and select the lighting angle. - 1](/content/2026/03/449280/images/c9284a921b5917b18ddbbe6bfa5c0993402c64b4de92b60f6423989a4ffee562.jpg)
text_image
TTL AUTO FOURTHIROS 10 mm ZOOM 1.2 - 11.2 m ZOOM AⒶ: Lighting angle
- 8 mm or 10 mm [16 mm or 20 mm for a 135 camera (35 mm film conversion)] can be selected.
[NO TEXT]
- The angle cannot be displayed for a digital camera which does not have communication functions.
- When using the wide panel, the guide number (GN) is reduced. This means that the working range is reduced when taking photos in the [TTL AUTO], [AUTO] or [FP TTL AUTO] mode and that the optimum camera to subject distance is reduced when taking photos in the [MANUAL] or [FP MANUAL] range.
• After taking the photos, retract the wide panel. - Do not push the wide panel upward. Otherwise it may be damaged.
Many choices for different flash photography applications
- Many different flash photography applications can be chosen by the digital camera settings.
- It may not be possible to use some functions depending on the functions and shape of the digital camera used.
- For further details, refer to the operating instructions of your digital camera.
- Select [TTL AUTO] or [FP TTL AUTO] as the flash mode.
Red-eye reduction flash

natural_image
Black-and-white photo of a smiling young girl sitting at a desk, writing with her pencil (no visible text or symbols)- The light emitted by the flash reduces red eye where the eyes of the subjects appear red.
Slow synchronization

natural_image
Two women posing in front of a large illuminated Ferris wheel at night (no text or symbols visible)- Light from the unit can be emitted using the slow shutter. This enables shots of people to be taken clearly against the backdrop of night scenes.
2nd curtain synchronization
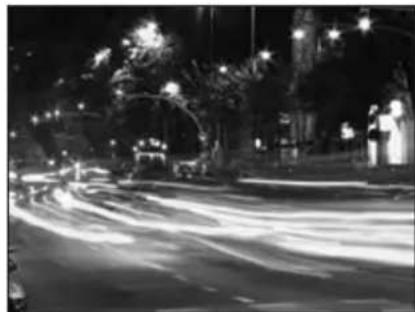
natural_image
Night street scene with light trails from traffic and streetlights, no visible text or symbols- When taking slow-shutter shots of moving subjects, the flash is activated just before the shutter closes.
Light sources emanating from behind the subject are captured to achieve a dynamic feeling.
Functions
• You can set each function in advance.
1 Push the [POWER] button.
2 Press the [MODE] button for 2 or more seconds to switch to the function settings.
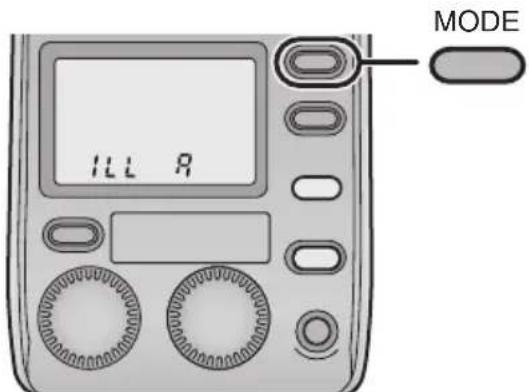
text_image
IIL R MODE3 Turn the [GN/ISO] dial to select the menu item.
text_image
FOURTHIRDS ZOOM -- mm 4-3 GN/ISO4 Turn the [F] dial to select the setting.
text_image
ZOOM -- mm 135 F5 Push the [MODE] button to exit the settings.
■ Returning the function settings to the default status (status at the time of purchase)
When the [MODE] button and [LIGHT] button are pushed together for two or more seconds, all the settings except for the distance display (m/ft) are returned to their defaults.
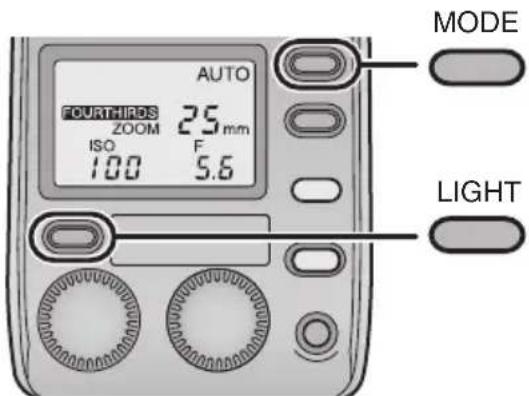
text_image
AUTO FOURTHIROS 25mm ZOOM ISO F 100 5.6 MODE LIGHT- The setting for the distance display (m/ft) remains unchanged.
Press the [MODE] button for 2 or more seconds to switch to the function settings. (P28)
| Item Setting | ||
 | AF assist lamp | A: The AF assist lamp lights, and focusing is facilitated.OFF: The AF assist lamp does not light. |
- AF assist will not work with digital cameras which are not part of Panasonic's "Four Thirds" system.
| FOURTHIRDS ZOOM | Lighting angle | 4-3: The lighting angle is indicated by the focal length of the lens for the format used with the “Four Thirds” digital camera.135: The lighting angle is converted into the focal length of a 35 mm film camera. |
- 135 camera: This is a synonym for a 35 mm film camera format.
| ftm | Distance display | ft: Distances are indicated in feet.m: Distances are indicated in meters. |
 | Flash intensity adjustment | ON: The flash intensity is adjusted.OFF: The flash intensity is not adjusted. |
 | Wide panel switching | ON: The wide panel takes effect. The unit recognizes that the wide panel is extended.OFF: The wide panel has no effect. |
Concerning Continuous Firing
When the flash is fired continuously, its flash head becomes hot, and this may possibly lead to deterioration or malfunction of the unit. Keep continuous firing within the number of times given below, and then allow the unit to rest for at least 10 minutes.
Restriction on number of flashes during continuous firing
| Flash intensity | Flash interval | Restriction on number of flashes |
| 1/1(FULL) | 1 s 10 | |
| 1/2 0.5 s 20 | ||
| 1/4 0.3 s 40 | ||
| 1/8 to 1/128 0.2 s or less 80 |
Continuous firing is synchronized up to the number of frames listed below. If the restriction on the number of flashes during continuous firing is exceeded, allow the unit to rest for at least 10 minutes.
Number of frames for which continuous firing is possible (serial photography speed: 8 frames per second)
| Light quantity No. | of frames |
| 1/4 2 | |
| 1/8 5 | |
| 1/16 10 | |
| 1/32 16 | |
| 1/64 30 | |
| 1/128 40 |
Table of Guide Numbers (GN)
[TTL AUTO]/[AUTO]
| Lighting angle (mm) | FOUR THIRDS 8 10 | 12 14 | 17 25 35 | 42 | |||||
| When a 135 (35 mm film conversion) camera is used | 16 20 | 24 28 | 35 50 | 70 85 | |||||
| [TTL AUTO]/[AUTO] | Full flash 18 20 | 28 30 | 36 40 | 45 | 50 |
[MANUAL]
| Lighting angle (mm) | FOUR THIRDS 8 10 | 12 14 | 17 25 35 | 42 | ||||||
| When a 135 (35 mm film conversion) camera is used | 16 20 | 24 28 | 35 50 | 70 85 | ||||||
| [MANUAL] | 1/1 18 20 28 30 | 36 40 | 45 50 | |||||||
| 1/2 13 14 20 21 | 26 28 | 32 35 | ||||||||
| 1/4 9 . | 0 | 1 0 | 1 | 4 | 1 | 5 | 1 | 8 | 2 | |
| 1/8 6 . | 4 | 7 . | 1 | 9 | . | 9 | 1 | 1 | 1 | |
| 1/16 | 4.5 | 5.0 | 7.0 | 7.5 | 9.0 | 10 | 11 | 13 | ||
| 1/32 | 3.2 | 3.5 | 4.9 | 5.3 | 6.4 | 7.1 | 8.0 | 8.8 | ||
| 1/64 | 2.3 | 2.5 | 3.5 | 3.8 | 4.5 | 5.0 | 5.6 | 6.3 | ||
| 1/128 | 1.6 | 1.8 | 2.5 | 2.7 | 3.2 | 3.5 | 4.0 | 4.4 |
[FP TTL AUTO]
| Lighting angle (mm) | FOUR THIRDS 8 10 | 12 14 | 17 25 35 42 | ||||||
| When a 135 (35 mm film conversion) camera is used | 16 20 | 24 28 | 35 50 | 70 85 | |||||
| Shutter speed | 1/125 | 13 14 | 20 21 | 26 28 32 | 35 | ||||
| 1/160 | 11 13 | 18 19 | 23 25 28 | 32 | |||||
| 1/200 | 10 11 | 16 17 | 20 23 25 | 28 | |||||
| 1/250 | 9 | . 0 | 1 | 0 | 1 | 4 | 1 5 | 1 | |
| 1/320 | 8.0 | 8.9 | 13 | 13 | 16 | 18 | 20 | 22 | |
| 1/400 | 7.1 | 7.9 | 11 | 12 | 14 | 16 | 18 | 20 | |
| 1/500 | 6 | . 4 | 7 | . | 1 | 9 | . 9 | 1 | |
| 1/640 | 5.7 | 6.3 | 8.8 | 9.4 | 11 | 13 | 14 | 16 | |
| 1/800 | 5.0 | 5.6 | 7.9 | 8.4 | 10 | 11 | 13 | 14 | |
| 1/1000 | 4.5 | 5.0 | 7.0 | 7.5 | 9.0 | 10 | 11 | 13 | |
| 1/1250 | 4.0 | 4.4 | 6.2 | 6.7 | 8.0 | 8.9 | 10 | 11 | |
| 1/1600 | 3.6 | 4.0 | 5.6 | 5.9 | 7.2 | 7.9 | 8.9 | 9.9 | |
| 1/2000 | 3.2 | 3.5 | 5.0 | 5.3 | 6.4 | 7.1 | 8.0 | 8.9 | |
| 1/2500 | 2.8 | 3.1 | 4.4 | 4.7 | 5.7 | 6.3 | 7.1 | 7.9 | |
| 1/3200 | 2.5 | 2.8 | 3.9 | 4.2 | 5.1 | 5.6 | 6.3 | 7.0 | |
| 1/4000 | 2.2 | 2.5 | 3.5 | 3.7 | 4.5 | 5.0 | 5.6 | 6.3 | |
| 1/5000 | 2.0 | 2.2 | 3.1 | 3.3 | 4.0 | 4.5 | 5.0 | 5.6 | |
| 1/6400 | 1.8 | 2.0 | 2.8 | 3.0 | 3.6 | 4.0 | 4.5 | 5.0 | |
| 1/8000 | 1.6 | 1.8 | 2.5 | 2.7 | 3.2 | 3.5 | 4.0 | 4.4 |
[FP MANUAL]
- Listed below are the guide numbers (GN) for 1/1 (FULL) flashes.
| Lighting angle (mm) | FOUR THIRDS 8 10 | 12 14 | 17 25 35 42 | ||||||
| When a 135 (35 mm film conversion) camera is used | 16 20 | 24 28 | 35 50 | 70 85 | |||||
| Shutter speed | 1/125 13 14 20 | 21 26 | 28 32 35 | ||||||
| 1/160 11 13 18 | 19 23 | 25 28 32 | |||||||
| 1/200 10 11 16 | 17 20 | 23 25 28 | |||||||
| 1/250 9 . | 0 | 1 | 0 | 1 | 4 | 1 | 5 | 1 8 2 | |
| 1/320 8.0 8.9 13 | 13 16 | 18 20 | 22 | ||||||
| 1/400 7.1 7.9 11 | 12 14 | 16 18 | 20 | ||||||
| 1/500 6 . | 4 | 7 . | 1 | 9 . | 9 | 1 | 1 | 1 | |
| 1/640 5.7 6.3 8. | 8 9.4 | 1 13 14 | 16 | ||||||
| 1/800 5.0 5.6 7. | 9 8.4 | 10 11 13 | 14 | ||||||
| 1/1000 4.5 5.0 7. | 0 7.5 | 9.0 | 10 11 13 | ||||||
| 1/1250 4.0 4.4 | 6.2 6 | 7 8.0 | 8.9 10 | 11 | |||||
| 1/1600 | 3.6 | 4.0 | 5.6 | 5.9 | 7.2 | 7.9 | 8.9 | 9.9 | |
| 1/2000 | 3.2 | 3.5 | 5.0 | 5.3 | 6.4 | 7.1 | 8.0 | 8.9 | |
| 1/2500 | 2.8 | 3.1 | 4.4 | 4.7 | 5.7 | 6.3 | 7.1 | 7.9 | |
| 1/3200 | 2.5 | 2.8 | 3.9 | 4.2 | 5.1 | 5.6 | 6.3 | 7.0 | |
| 1/4000 | 2.2 | 2.5 | 3.5 | 3.7 | 4.5 | 5.0 | 5.6 | 6.3 | |
| 1/5000 | 2.0 | 2.2 | 3.1 | 3.3 | 4.0 | 4.5 | 5.0 | 5.6 | |
| 1/6400 | 1.8 | 2.0 | 2.8 | 3.0 | 3.6 | 4.0 | 4.5 | 5.0 | |
| 1/8000 | 1.6 | 1.8 | 2.5 | 2.7 | 3.2 | 3.5 | 4.0 | 4.4 | |
- In the [FP MANUAL] mode, the following formula can be used to obtain the guide numbers (GN) when any setting except 1/1 is used for the light quantity.
How to obtain the guide number when the light quantity setting is other than 1/1
- Guide number (GN) = Guide number for 1/1 × light quantity ratio coefficient
Light quantity ratio coefficient
| Light quantity ratio | 1/1 | 1/2 | 1/4 | 1/8 | 1/16 |
| Light quantity ratio coefficient | 1.0 | 0.71 | 0.5 0.35 | 0.25 |
![PANASONIC Lumix DMWFL500 - [FP MANUAL] - 1](/content/2026/03/449280/images/2f51fed0f7e18b2e3b4aecfb9e6abd445ba0864cc938fff9643a1438b525570f.jpg)
- The tables show the values when the ISO sensitivity is [100].
■ Q&A for the unit
| Question (Q) Answer | (A) |
| The unit becomes hot. When | the unit is fired continuously immediately after the [TEST/CHARGE] button has lighted, the batteries will generate heat, but this does not pose any problems in terms of performance or quality. In cases like this, wait until the flash head and batteries cool off before resuming use. |
| I can’t install the unit on my digital camera. | Is the lock pin protruding?You cannot install the unit on your digital camera if this pin is protruding.Turn the lock ring in the opposite direction from [◄LOCK] until it stops and retract the pin before proceeding to install the unit on the digital camera. |
| I can’t select the flash modes even by pushing the [MODE] button. | When connecting the unit to some digital camera models capable of communication, you can select the flash’s mode only from the digital camera. |
| The colouring of the images differs from what I see. | Adjust the white balance of the digital camera. (Setting to the [AUTO] mode is recommended.) |
| The flash working range does not appear on the display panel. | The flash working range is not displayed in the following cases:When the lens has been detachedWhen bounce light photography is performedWhen the light intensity is adjustedWhen the ISO sensitivity or aperture setting is outside the range |
| The display panel is extinguished even though the unit’s power is on. | Is the digital camera’s power-saving function working?The flash is coupled to the digital camera so that when the digital camera’s power-saving function is working, the flash’s display panel will be extinguished.Push the digital camera’s shutter button halfway down to release the function. |
| The flash’s power does not go off even though I turned off the power of my digital camera which comes with communication functions. | When the power of a digital camera with communication functions is switched off, the flash is set to the power-saving mode. When the power of the digital camera is turned back on, the flash’s power is also turned on.When the flash’s power is to be turned off, turn off its power first.When the flash is used in combination with a digital camera without communication functions, it is automatically set to the power-saving mode when no operations have been performed for about 60 minutes. |
| I can’t switch to the lighting angle. | Has the wide panel been damaged?If the wide panel is damaged while it is extended, you will no longer be able to use the [ZOOM] button. In this case, you can use the [ZOOM] button if you set wide panel switching to [OFF]. |
■ Q&A for the panel display
| Question (Q) Answer (A) | |
| [ISO] and [F] are flashing or the numbers for the ISO sensitivity and aperture are flashing. | This means that the ISO sensitivity and aperture of the digital camera are outside the flash working range of the flash.Change the ISO sensitivity and aperture of the digital camera. |
| The optimum camera to subject distance is flashing. | The flash is too close to the subject.If the subject is too close, the lighting range of the flash will shift so take photos at a distance further than 0.6 m (or 0.5 m for close-up photos). |
| [ ] and the lighting angle are flashing. | Extend the wide panel. |
| [ ] does not go off. | The flash head has been set to point downward (7 degrees). Do not use this setting unless you are taking close-ups. |
| [ ] does not go off. The wide panel is extended.The guide number (GN) is reduced.Pay attention to the camera to subject distance. | |
Cautions for Use
■ Concerning the unit
- Avoid bringing the unit into close proximity with objects. Its heat and light may cause deformation or discolouration.
- When taking photos outside the flash working range, the proper exposure will not be achieved, and images which are whitish or too dark may be taken.
- At high shutter speeds, the effects obtained by the unit may not be sufficient.
Keep the unit away from insecticide sprays and other volatile substances.
- If the unit is exposed to these sprays or substances, its external case may deteriorate and/or its paint may peel off.
- Do not leave the unit in contact with any items made of rubber or PVC for prolonged periods of time.
Do not use benzine, paint thinners, alcohol or other such solvents to maintain the unit.
- Remove the batteries before proceeding with maintenance.
- Use of solvents may cause a deterioration in the unit's external case and/or the paint to peel off.
- Wipe away dust and fingerprints using a soft, dry cloth.
- Do not use kitchen detergents or chemical cleaning cloths.
- If rain or drops of water splash onto the unit, wipe off the water with a dry cloth.
Do not carry the unit when it is still attached to the camera body.
- Under no circumstances should the unit be stored in any of the following locations since doing so may cause trouble in operation or malfunctioning.
- In direct sunlight or on a beach in summer
- In locations with high temperatures and humidity levels or where the changes in temperature and humidity are acute
- In locations with high concentrations of sand, dust or dirt
• Where there is fire - Near heaters, air conditioners or humidifiers
- Where water may make the unit wet
• Where there is vibration -
Inside a vehicle
-
Multiple-light shots cannot be taken by using the flash in combination with other flash units.
- Do not drop the unit, knock it into other objects or subject it to any other kind of strong impact or shock.
- When the unit is not going to be used for a prolonged period, mold and other problems may cause failure of the unit. It is recommended that you check the unit's operation prior to use.
- Do not touch the unit's electrical contacts. Doing so can cause failure of the unit.
- To safeguard the flash head from overheating and deterioration, stop using the unit after 10 continuous firings at the full flash intensity, and allow the unit to rest for at least 10 minutes to ensure that the flash head cools off.
■ Concerning the batteries
Be sure to remove the batteries when you will not be using the camera for a long period of time.
- If the temperature is too high or low, the terminals may rust causing a malfunction.
If you drop the batteries accidentally, check to see if the body of the batteries or the terminals are damaged.
- Inserting a damaged battery in the camera will damage the camera.
Bring charged spare batteries when going out.
- Be aware that the operating time of the batteries becomes shorter in low temperature conditions such as at a ski resort.
Dispose of unusable batteries.
- Batteries have a limited life.
- Do not throw batteries into fire because they may cause an explosion.
Do not allow battery terminals to come into contact with metal objects (such as necklaces, hairpins, etc.).
- This can cause short circuiting or heat generation and you may be badly burned if you touch the batteries.
Do not attempt to recharge dry batteries.
Do not throw batteries into a fire or expose to excessive heat such as sunshine.
Power requirements: DC 6.0 V
| Batteries recommended for use | AA Alkaline dry batteries (LR6) × 4/ AA Rechargeable nickel metal hydride batteries (Ni-MH)× 4 |
| Charging time (from full flash until the [TEST/CHARGE] button lights) | Max. 7 s: AA Alkaline dry batteries Max. 5 s: AA Rechargeable nickel metal hydride batteries |
| Firing period Approx. 1 | /20000 s to 1/500 s (Varies depending on the flash intensity; FP firing excluded.) |
| No. of flashes (with full flash) | 120 flashes or more: AA Alkaline dry batteries 140 flashes or more: AA Rechargeable nickel metal hydride batteries (Differs depending on the photo taking conditions.) |
| Flash modes TTL AUTO/AUTO/MANUAL/FP TTL AUTO/FP MANUAL | |
| Bounce angle Upward | 0 to 90 degrees, downward: 0 to 7 degrees, toward the right: 0 to 90 degrees, toward the left: 0 to 180 degrees |
| Power-saving mode | Coupled to power-saving mode of a digital camera having communication capability |
| AF assist lamp | Only for combinations with digital camera having communication capability approximate distance enabling automatic lighting at low-brightness levels: 0 . 7 m to 7 m (Differs depending on the digital camera and type of lens used) |
| Guide number Automatically selected | |
| Lighting angle Automatically selected | |
Inhalt
natural_image
Symbol of a trash bin crossed out by two diagonal lines (no text or numbers present)
natural_image
Simple 3D illustration of a cylindrical object with attached curved arms (no text or symbols)natural_image
Illustration of a digital camera with an arrow indicating motion or change (no text or symbols present)natural_image
Diagram of a DSLR camera module with labeled buttons and ports (no text or symbols beyond basic labels)natural_image
Diagram of a digital camera module with no visible text or symbols
natural_image
Mechanical device diagram showing a lever mechanism with labeled point A and rotation arrow (no text or symbols beyond labels)natural_image
Illustration of a camera module being adjusted to form a digital camera (no text or symbols present)natural_image
Illustration of a DSLR camera with an adjustable flash unit and control panel (no text or symbols visible)natural_image
Diagram of a DSLR camera with an inset showing the camera's adjustment mechanism (no text or symbols present)text_image
TTL AUTO FOURTHIRDS 25 mm ZOOM 0.7 - 7.5 m Atext_image
AUTO FOURTHIRDS 25 mm ZOOM 0.7 - 7.5 m Atext_image
MANUAL FOURTHIRDS 2.5 mm M ZOOM GN 4.0 2.5 m Atext_image
TTL AUTO FP FOURTHIRDS 25mm ZOOM 0.7 - 7.5m Anatural_image
Black-and-white photo of a girl interacting with a large soap bubble outdoors, surrounded by fallen leaves and trees (no text or symbols visible)natural_image
Black-and-white portrait of a smiling woman with heart-shaped hair and earrings (no visible text or symbols)[FP MANUAL]
text_image
FP MANUAL FOURTHIROS 25mm ZOOM GN 4.0 2.5m Atext_image
FP MANUAL FOURTHEDS 25mm ZOOM GN 4.0 2.5m GN/ISOnatural_image
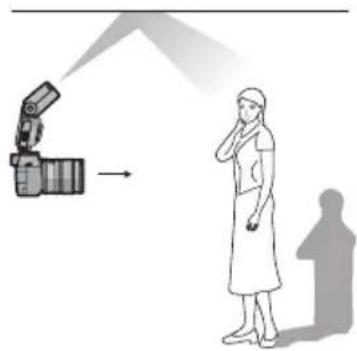
Illustration showing a camera emitting a beam of light from a person, with a shadowy human silhouette nearby (no text or symbols)natural_image
Technical illustration of a handheld device with a circular head and arrow indicating rotation (no text or symbols)text_image
TTL AUTO FOURTHIRDS 25 mm M ZOOM 0.7 - 1.2 m ZOOM Anatural_image
Diagram of a device with an arrow indicating downward motion, no text or symbols presentnatural_image
Black-and-white photo of a smiling young girl sitting at a desk, writing with her pencil (no visible text or symbols)natural_image
Two women posing in front of a large Ferris wheel at night (no text or symbols visible)natural_image
Night street scene with light trails from traffic and illuminated streetlights (no visible text or symbols)text_image
I L L R MODEnatural_image
Simple line drawing of a trash bin with two crossed lines indicating no waste or prohibition (no text or symbols)natural_image
Simple 3D illustration of a cylindrical object with attached ribbons (no text or symbols)natural_image
Illustration of a DSLR camera with an arrow indicating motion or change (no text or symbols present)natural_image
Diagram of a DSLR camera with multiple ports and buttons, no text or symbols presentnatural_image
Illustration of a DSLR camera with no visible text or symbols on the body (pure technical diagram)![PANASONIC Lumix DMWFL500 - [FP MANUAL] - 1](/content/2026/03/449280/images/8e6a3657b28cd248a38f11679c72083336f5002f164b6a1ca11fb3333841efff.jpg)
natural_image
Mechanical device diagram showing a lever mechanism with labeled point A and rotation arrow (no text or symbols beyond labels)natural_image
Illustration of a camera module being adjusted, showing the lens and screen (no text or symbols present)natural_image
Illustration of a DSLR camera with an attached digital camera and control panel (no text or symbols)natural_image
Diagram of a DSLR camera with an inset showing the camera's adjustment (no text or symbols present)text_image
TTL AUTO FOURTHIRDS 25 mm ZOOM 0.7 - 7.5 m Atext_image
AUTO FOURTHIRDS 25 mm ZOOM 0.7 - 7.5 m Atext_image
MANUAL FOURTHIRDS 25 mm M ZOOM GN 4.0 2.5 m Atext_image
MANUAL FOURTHOIS 25mm M ZOOM GN 4.0 2.5m GN/ISOtext_image
TTL AUTO FP FOURTHIRDS 25 mm ZOOM 0.7 - 7.5 m Atext_image
TTL AUTO FP FOURTHIRDS 25mm ZOOM 0.7 - 7.5m AUTO CHECKnatural_image
Black-and-white photo of a girl interacting with a large circular object outdoors, surrounded by trees and foliage (no text or symbols visible)natural_image
Black-and-white portrait of a smiling woman with styled hair and earrings, standing in front of an indoor background (no visible text or symbols)[FP MANUAL]
text_image
FP MANUAL FOURTHIRDS 25mm ZOOM GN 4.0 2.5m Atext_image
FP MANUAL FOURTHEDS 25mm ZOOM GN 4.0 2.5m GN/ISOnatural_image
Illustration of a person observing a camera setup with a light beam, accompanied by a shadowy human silhouette (no text or symbols)natural_image
Technical illustration of a handheld device with a circular component and arrow indicating rotation (no text or symbols)natural_image
Diagram of a device with a downward arrow indicating compression or disassembly (no text or symbols present)natural_image
Black-and-white photo of a smiling young girl sitting at a desk, writing with her hand (no visible text or symbols)natural_image
Two women posing for a photo in front of a large illuminated Ferris wheel at night (no text or symbols visible)natural_image
Night street scene with light trails from traffic and streetlights, no visible text or symbolsnatural_image
Symbol of a trash bin crossed out by two diagonal lines (no text or numbers present)![PANASONIC Lumix DMWFL500 - [FP MANUAL] - 1](/content/2026/03/449280/images/bdc522a03bca288402a0dda0285c58c83062807d79b375154e6e6c98b015c466.jpg)
natural_image
Simple line drawing of a cylindrical object with a curved top and attached arm (no text or symbols)Estuche del flash VFC4216
17 Disco [F] (P127, 129, 136)
18 Disco [GN/ISO] (P124, 129, 131, 136)
19 Botón [LIGHT] (P136)
natural_image
Illustration of a DSLR camera with an arrow indicating motion or change (no text or symbols present)natural_image
Diagram of a DSLR camera module with labeled buttons and ports (no text or symbols present)natural_image
Illustration of a digital camera with control panel and display screen (no text or symbols)![PANASONIC Lumix DMWFL500 - [FP MANUAL] - 2](/content/2026/03/449280/images/e40b1da80ff284e0cb5d02015d2d9b6804824d448b86ae2f4131c67bf54246c3.jpg)