Lumix HF008 - Camera PANASONIC - Free user manual and instructions
Find the device manual for free Lumix HF008 PANASONIC in PDF.



| Product type | Interchangeable fisheye lens |
| Brand | Panasonic |
| Model | Lumix HF008 |
| Mount | Micro Four Thirds |
| Focal length | 8 mm (35 mm equivalent: 16 mm) |
| Maximum aperture | F3.5 |
| Minimum aperture | F22 |
| Optical construction | 10 elements in 9 groups (1 ED lens) |
| Minimum focusing distance | 0.1 m (from the reference line) |
| Maximum magnification | 0.2× (35 mm equivalent: 0.4×) |
| Angle of view | 180° diagonal |
| Projection type | Equisolid (faithful surface) |
| Image stabilizer | Not available |
| Maximum diameter | Approx. 60.7 mm (hood part) |
| Total length | Approx. 51.7 mm (from the tip of the hood to the base) |
| Weight | Approx. 165 g |
| Front filter diameter | Not available |
| Rear filter diameter | Holder for 22 mm × 22 mm filter sheet |
| Supplied accessories | Storage bag, front and rear caps |
| Care and cleaning | Wipe with a soft, dry cloth; do not use solvents |
| Safety | Avoid shocks, condensation, and dusty or humid environments |
Frequently Asked Questions - Lumix HF008 PANASONIC
User questions about Lumix HF008 PANASONIC
0 question about this device. Answer the ones you know or ask your own.
Ask a new question about this device
Download the instructions for your Camera in PDF format for free! Find your manual Lumix HF008 - PANASONIC and take your electronic device back in hand. On this page are published all the documents necessary for the use of your device. Lumix HF008 by PANASONIC.
USER MANUAL Lumix HF008 PANASONIC
Operating Instructions
INTERCHANGEABLE LENS FOR DIGITAL CAMERA
Model No. H-F008
LUMIX

natural_image
3D rendered image of a camera lens component (no text or symbols visible)Before use, please read these instructions completely.



VQT2W39-2 X0610HN2022
Contents
Information for Your Safety....2
Precautions.... 5
Supplied Accessories 6
Attaching/Detaching the Lens....6
To use commercially available filters 8
Names and Functions of Components ...... 9
Cautions for Use....9
Troubleshooting 10
Specifications.... 11
Information for Your Safety
Keep the unit as far away as possible from electromagnetic equipment (such as microwave ovens, TVs, video games, radio transmitters, high-voltage lines etc.).
- Do not use the camera near cell phones because doing so may result in noise adversely affecting the pictures and sound.
- If the camera is adversely affected by electromagnetic equipment and stops functioning properly, turn the camera off and remove the battery and/or the connected AC adaptor. Then reinsert the battery and/or reconnect the AC adaptor and turn the camera on.
ENGLISH
The lens can be used with a digital camera compatible with the lens mount standard for the "Micro Four Thirds™ System".
- It cannot be mounted on the Four Thirds ^TM mount specification camera.
- The digital camera illustrations in these operating instructions show DMC-G2 as an example.
- The appearance and specifications of products described in this manual may differ from the actual products you have purchased due to later enhancements.
- Four Thirds™ and Four Thirds Logo marks are trademarks or registered trademarks of Olympus Imaging Corporation, in Japan, the United States, the European Union and other countries.
- Micro Four Thirds™ and Micro Four Thirds Logo marks are trademarks or registered trademarks of Olympus Imaging Corporation, in Japan, the United States, the European Union and other countries.
- G MICRO SYSTEM is a lens exchange type digital camera system of LUMIX based on a Micro Four Thirds System standard.
- Other names, company names, and product names printed in these instructions are trademarks or registered trademarks of the companies concerned.
-If you see this symbol-
Information on Disposal for Users of Waste Electrical & Electronic Equipment (private households)

natural_image
Symbol of a trash bin crossed with a diagonal line and a horizontal bar below (no text or labels)This symbol on the products and/or accompanying documents means that used electrical and electronic products should not be mixed with general household waste. For proper treatment, recovery and recycling, please take these products to designated collection points, where they will be accepted on a free of charge basis. Alternatively, in some countries you may be able to return your products to your local retailer upon the purchase of an equivalent new product. Disposing of this product correctly will help to save valuable resources and prevent any potential negative effects on human health and the environment which could otherwise arise from inappropriate waste handling. Please contact your local authority for further details of your nearest designated collection point.
Penalties may be applicable for incorrect disposal of this waste, in accordance with national legislation.
For business users in the European Union
If you wish to discard electrical and electronic equipment, please contact your dealer or supplier for further information.
Information on Disposal in other Countries outside the European Union
This symbol is only valid in the European Union.
If you wish to discard this product, please contact your local authorities or dealer and ask for the correct method of disposal.
Precautions
Lens Care
- Sand and dust can damage the lens. Make sure that no sand or dust gets inside the lens or the terminals when using the lens on a beach, etc.
- This lens is not waterproof. If drops of water get onto the lens, wipe the lens with a dry cloth.
- Do not press the lens with excessive force.
- When there is dirt (water, oil, and fingerprints, etc.) on the surface of the lens, the picture may be affected. Lightly wipe the surface of the lens with a soft, dry cloth before and after taking pictures.
- Do not place the lens mount facing downwards. Do not allow the lens contact point ① to become dirty.

natural_image
Technical illustration of a camera lens assembly with no visible text or symbols■ About Condensation (Fogging of the Lens)
- Condensation occurs when there are differences in temperature and humidity as described below. Condensation can cause the lens to become dirty and lead to mold and malfunctioning, so exercise caution in the following situations:
- When the camera is brought indoors from outside during cold weather
- When the camera is brought into an air-conditioned car
- When cold air from an air conditioner is directly blown onto the lens
- In humid places
- Put the camera into a plastic bag to allow it to acclimatise to the surrounding temperature in order to prevent condensation. If condensation occurs, turn the power off and leave it for about two hours. Once the camera acclimatises to the surrounding temperature the condensation will go away naturally.
Supplied Accessories
[Inspection to be performed when you unpack the unit] When removing the unit from its packing box, check that the main unit and the supplied accessories are there and also check their external appearance and functions to verify that they have not sustained any damage during distribution and transportation. If you discover any trouble, contact your vendor before using the product.
Product numbers correct as of May 2010. These may be subject to change.
 VFC4456 VFC4560 VFC4315 VFC4456 VFC4560 VFC4315 |   | 31 |
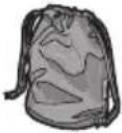
1 Lens Storage Bag
2Lens Front Cap
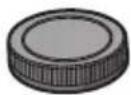
3Lens Rear Cap
(The lens front cap and lens rear cap are attached to the interchangeable lens at the time of purchase.)
Attaching/Detaching the Lens
- Refer also to the camera's operating instructions for attaching and detaching the lens.
■ Attaching the Lens
- Check that the camera is turned off.
1 Turn the lens rear cap to detach it.
(A): Lens Rear Cap

2Align the lens fitting marks Ⓑ (red marks) on the camera body and the lens and then rotate the lens in the direction of the arrow until it clicks.

natural_image
Mechanical component diagram showing a cylindrical assembly with a labeled arrow (no text or symbols present)- Do not press the lens release button © when you attach a lens.
- Do not try to attach the lens when holding it at an angle to the camera body as the lens mount may get scratched.
- Check that the lens is attached correctly.
■ Detaching the Lens
- Check that the camera is turned off.
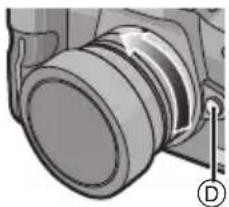
Press the lens release button Ⓓ while turning the lens as far as possible in the direction of the arrow to detach it.
- Attach the lens rear cap so that the lens contact point does not get scratched.
- Attach the body cap to the camera so no dirt or dust will get inside the main unit.
natural_image
Close-up of a camera lens assembly with no visible text or symbols■ Attaching and Detaching the Lens Front Cap
- Be careful not to lose the lens front cap.

natural_image
Diagram of a camera lens being inserted into a circular component, showing the lens and handle (no text or symbols present)■ Features of this lens
- This lens is an equisolid angle projection fisheye lens with a 180° field of view in a diagonal direction. Be careful about the legs of the tripod or arms and legs of the photographer entering the frame when taking pictures.
- As the fisheye lens captures images of a very wide angle, the characteristics of the lens causes subjects close to the perimeter of the image to appear extremely warped, or causes the size or relative position of the subjects to look different when pictures are taken. The image will look greatly different even with the slightest movement of the camera, so view the screen and check the composition of the picture when taking pictures.
To use commercially available filters
- There is a filter holder at the rear of this lens. To use it, insert a commercially available sheet filter, such as a gelatin filter or similar, into the filter holder.
1 Prepare the filter.
- Cut the filter to the size that can be used with this lens. (right image)
Size of the filter
Ⓐ: 21.5 mm to 22 mm
⑧: 3mm to 4mm

2 Insert the cut filter Ⓒ all the way into the filter holder Ⓓ.

⑤: Lens fitting mark
• To remove the filter, pull it out straight.
3 Mount the lens onto the digital camera.
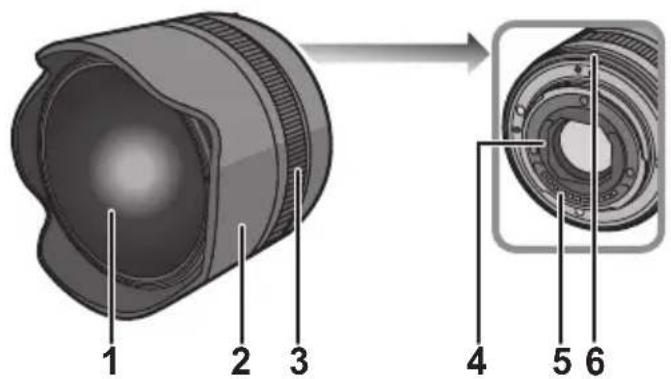
Names and Functions of Components
Lens

1 Lens surface
2 Lens hood
3 Focus ring
Rotate to focus when taking pictures with manual focus.
4 Filter holder
5 Contact point
6 Lens fitting mark
Note
- Since this lens is a fisheye lens with 180° diagonal field of view, the perimeter of the image may become dark (vignette) when a flash is used to take pictures.
Cautions for Use
■ About the Lens
Take care not to drop or knock the lens. Also take care not to put a lot of pressure on the lens.
- Take care not to drop the bag that you inserted the lens in as it may strongly shock the lens. The camera may stop operating normally and pictures may no longer be recorded. Also, the lens may be damaged.
When using pesticides and other volatile substances around the camera make sure that they do not get onto the lens.
- If such substances get onto the lens they can damage the exterior case or cause the paint to peel.
Do not carry the unit when it is still attached to the camera body.
- Under no circumstances should the unit be stored in any of the following locations since doing so may cause problems in operation or malfunctioning.
– In direct sunlight or on a beach in summer
– In locations with high temperatures and humidity levels or where the changes in temperature and humidity are acute
– In locations with high concentrations of sand, dust or dirt - Where there is fire
– Near heaters, air conditioners or humidifiers
– Where water may make the unit wet
– Where there is vibration - Inside a vehicle
- Refer also to the operating instructions of the digital camera.
-
When the unit is not going to be used for a prolonged period, we recommend storing with a desiccant (silica gel). Failure to do so may result in performance failure caused by mold, etc. It is recommended that you check the unit's operation prior to use.
-
Do not leave the lens in contact with rubber or plastic products for extended periods of time.
- Do not touch the lens contact point. Doing so can cause failure of the unit.
- Do not disassemble or alter the unit.
Do not use benzine, thinner, alcohol or other similar cleaning agents to clean the lens glass or exterior cabinet.
- Using solvents can damage the lens or cause the paint to peel.
- Wipe off any dust or fingerprints with a soft, dry cloth.
- Use a dry, dust cloth to remove dirt and dust on the focus ring.
- Do not use a household detergent or a chemically treated cloth.
Troubleshooting
A sound is heard when the camera is turned on or off.
- This is the sound of lens or aperture movement and is not a malfunction.
Specifications
INTERCHANGEABLE LENS FOR DIGITAL CAMERA
"LUMIX G FISHEYE 8 mm/F3.5"
| Focal length | f=8 mm (35 mm film camera equivalent: 16 mm) |
| Aperture type 7 diaphragm blades/circular aperture diaphragm | |
| Aperture range F3.5 | |
| Minimum aperture value F22 | |
| Lens construction | 10 elements in 9 groups (1 ED lens) |
| In focus distance | 0.1 m (0.33 feet) to ∞ (from the focus distance reference line) |
| Maximum image magnification | 0.2× (35 mm film camera equivalent: 0.4×) |
| Optical image stabilizer Not available | |
| Mount “Micro Four Thirds Mount” | |
| Angle of view 180° | |
| Projection method Equisolid angle projection | |
| Filter diameter Front: mounting not possible,Rear: sheet filter holder 22 mm × 22 mm | |
| Max. diameter | Approx. 60.7 mm (2.39 inch) (lens hood section) |
| Overall length Approx. 51.7 mm (2.04 inch)(from the tip of the lens hood to the base side of the lens mount) | |
| Mass | Approx. 165 g (5.82 oz) |
For Australia
Panasonic Warranty
-
Subject to the conditions of this warranty Panasonic or its Authorised Service Centre will perform necessary service on the product, without charge for parts or labour, if in the opinion of Panasonic the product is found to have a manufacturing defect within one (1) year or (12 months) (the "warranty period") from the date of purchase appearing on your purchase receipt.
-
This warranty only applies to Panasonic products purchased in Australia and sold by Panasonic Australia, it's Authorised Distributors, or Dealers, and only where the products are used and serviced within Australia or its territories. Warranty cover only applies to the services that are carried out by a Panasonic Authorised Service Centre and only if valid proof of purchase is presented when the warranty service is requested.
-
This warranty only applies if the product has been installed and/or used in accordance with the manufacturer's recommendations (as noted in the operating instructions) under normal use and reasonable care (in the opinion of Panasonic). The warranty does not cover damage, malfunction or failure resulting from use of incorrect voltages, incorrect installation, accident, misuse, neglect, build-up of dirt or dust, abuse, maladjustment of customer controls, mains supply problems, thunderstorm activity, infestation by insects or vermin, tampering or repair by unauthorised persons (including unauthorised alterations), exposure to abnormally corrosive conditions, or any foreign object or matter having entered the product.
-
This warranty does not cover the following items unless the fault or defect existed at the time of purchase:
(a) Consumable parts (b) Cosmetic parts (c) Worn or damaged parts
(d) Information stored on Hard Disk Drives, Optical Discs, USB Devices, SD Cards, Tapes (e) DTV reception issues caused by TV Aerial / Cabling / Wall socket(s)
- Some products may be supplied with Ethernet connection hardware. The warranty is limited on such products and will not cover:
(a) Internet and or DLNA connection / setup related problems (b) Access fees and or charges incurred for internet connection
(c) Incompatible software or software not specifically stipulated in the product operations manual; and (d) Any indirect or consequential costs associated with the incorrect use or misuse of the hardware, its connection to the internet or any other device.
- To claim warranty service, when required, you should:
Contact Panasonic's Customer Care Centre on 132 600 for Service Centre information.
- Confirm the opening and acceptance times with the Authorised Service centre that you choose. - Then send or take the product to a Panasonic Authorised Service Centre together with your
receipt. Any freight and insurance costs associated with the transport of the product to and/or from your nearest Authorised Service Centre must be arranged and paid for by you.
- The warranties hereby conferred do not extend to, and exclude, any costs associated with the installation, de-installation or re-installation of a product, including costs related to the mounting, de-mounting or remounting of any screen, (and any other ancillary activities), delivery, handling, freighting, transportation or insurance of the product or any part thereof or replacement of and do not extend to, and exclude, any damage or loss occurring by reason of, during, associated with, or related to such installation, de-installation, re-installation or transit.
Panasonic Authorised Service Centres are located in major metropolitan areas and most regional centres of Australia, however, coverage will vary dependant on product. For advice on exact Authorised Service Centre locations for your product, please telephone our Customer Care Centre on 132600 or visit our website and use the Service Centre Locator.
In addition to your rights under this warranty, Panasonic products come with consumer guarantees that cannot be excluded under the Australian Consumer Law. If there is a major failure with the product, you can reject the product and elect to have a refund or to have the product replaced or if you wish you may elect to keep the goods and be compensated for the drop in value of the goods. You are also entitled to have the product repaired or replaced if the product fails to be of acceptable quality and the failure does not amount to a major failure.
If there is a major failure in regard to the product which cannot be remedied then you must notify us within a reasonable period by contacting the Panasonic Customer Care Centre. If the failure in the product is not a major failure then Panasonic may choose to repair or replace the product and will do so in a reasonable period of time from receiving notice from you.
THIS WARRANTY CARD AND THE PURCHASE DOCKET (OR SIMILAR PROOF OF PURCHASE) SHOULD BE RETAINED BY THE CUSTOMER AT ALL TIMES
If you require assistance regarding warranty conditions or any other enquiries, please visit the Panasonic
Australia website www.panasonic.com.au or contact by phone on 132 600
If phoning in, please ensure you have your operating instructions available.
Panasonic Australia Pty. Limited
ACN 001 592 187 ABN 83 001 592 187
1 Innovation Road, Macquarie Park NSW 2113
www.panasonic.com.au
PRO-031-F11 Issue: 5.0
Inhalt
natural_image
Technical illustration of a camera lens assembly with no visible text or symbols| 31 | ||
| VFC4456 VFC4560 VFC4315 | ||
1Objektivtasche
natural_image
Close-up of a camera lens assembly with a circular component and a labeled arrow (no text or symbols present)natural_image
Mechanical component diagram showing a cylindrical assembly with a labeled section D (no text or symbols present)natural_image
Illustration of a camera lens being inserted into a circular component, with no visible text or symbols.natural_image
Symbol of a trash bin crossed with no text or numbers, representing waste sorting or disposal (no text present)natural_image
Mechanical component diagram of a camera lens assembly (no text or symbols visible)natural_image
Mechanical component diagram showing a cylindrical assembly with a curved arrow indicating rotation (no text or symbols)natural_image
Mechanical component diagram showing a cylindrical assembly with a labeled section D (no text or symbols present)natural_image
Illustration of a camera lens interacting with a cylindrical component (no text or symbols)natural_image
Symbol of a trash bin crossed with no visible text or labelsnatural_image
Technical illustration of a camera lens assembly with no visible text or symbolsnatural_image
Mechanical component diagram showing a cylindrical assembly with a curved arrow indicating rotation (no text or symbols)natural_image
Mechanical component diagram showing a cylindrical assembly with a labeled part (D), no text or symbols present.natural_image
Illustration of a camera lens being inserted into a cylindrical component (no text or symbols)natural_image
Symbol of a trash bin crossed with diagonal lines, no text or numbers presentnatural_image
Technical illustration of a camera lens assembly (no text or symbols visible)natural_image
Close-up of a camera lens assembly with a circular component and a labeled arrow (no text or symbols present)natural_image
Close-up of a mechanical component with a threaded shaft and circular housing, labeled D (no text or symbols present)natural_image
Illustration of a camera lens being inserted into a circular component, with no visible text or symbols.natural_image
Symbol of a trash bin crossed with no visible text or labelsnatural_image
Technical illustration of a camera lens assembly with no visible text or symbols■ 關於水汽凝結(鏡頭的霧化)
natural_image
Mechanical component diagram showing a cylindrical assembly with a curved arrow indicating rotation (no text or symbols)■ 取下鏡頭
- 檢查相機是否關閉。
natural_image
Close-up of a camera lens assembly with no visible text or symbols■ 安裝和取下鏡頭前蓋
- 請注意不要弄丟鏡頭前蓋。

natural_image
Illustration of a camera lens being inserted into a cylindrical component (no text or symbols)■ 本鏡頭的特點
⑤: 鏡頭安裝標記
- 要取下濾鏡,請將其平直拔出。
3 將鏡頭安裝到數位相機上。
元件的名稱及功能
■ 鏡頭
natural_image
Symbol of a trash bin crossed out by two diagonal lines (no text or numbers present)
natural_image
Technical illustration of a camera lens assembly with labeled component (no text or symbols present)
VFC4456 VFC4560 VFC4315

31
natural_image
Mechanical component diagram showing a cylindrical assembly with a curved arrow indicating rotation or force direction (no text or symbols)natural_image
Mechanical component diagram showing a cylindrical assembly with a labeled arrow (D), no readable text or symbols present.natural_image
Illustration of a camera lens interacting with a circular component, showing no text or symbols1-10-12, Yagumo-higashi-machi, Moriguchi City, Osaka, Japan Importer for UK:
Panasonic UK, a branch of Panasonic Marketing Europe GmbH
Maxis 2, Western Road, Bracknell, Berkshire, RG12 1RT Importer for EU:
Panasonic Marketing Europe GmbH
Authorized Representative in EU:
Panasonic Testing Centre
Winsbergring 15, 22525 Hamburg, Germany
Hergestellt von:
Panasonic Entertainment & Communication Co., Ltd.
1-10-12, Yagumo-higashi-machi, Moriguchi City, Osaka, Japan Importeur:
Panasonic Marketing Europe GmbH
Panasonic Testing Centre
Panasonic Testing Centre
Panasonic Testing Centre
Panasonic Testing Centre
Winsbergring 15, 22525 Amburgo, Germania
Panasonic Entertainment & Communication Co., Ltd.
Web Site/Site Web: http://www.panasonic.com
© Panasonic Entertainment & Communication Co., Ltd. 2010
- Operating Instructions
- INTERCHANGEABLE LENS FOR DIGITAL CAMERA
- Model No. H-F008
- LUMIX
- Contents
- Information for Your Safety
- ENGLISH
- Information on Disposal for Users of Waste Electrical & Electronic Equipment (private households)
- For business users in the European Union
- Information on Disposal in other Countries outside the European Union
- Precautions
- Lens Care
- ■ About Condensation (Fogging of the Lens)
- Supplied Accessories
- Attaching/Detaching the Lens
- ■ Attaching the Lens
- Turn the lens rear cap to detach it.
- ■ Detaching the Lens
- Press the lens release button Ⓓ while turning the lens as far as possible in the direction of the arrow to detach it.
- ■ Attaching and Detaching the Lens Front Cap
- ■ Features of this lens
- To use commercially available filters
- Prepare the filter.
- Names and Functions of Components
- Note
- Cautions for Use
- ■ About the Lens
- Do not carry the unit when it is still attached to the camera body.
- Do not use benzine, thinner, alcohol or other similar cleaning agents to clean the lens glass or exterior cabinet.
- Troubleshooting
- A sound is heard when the camera is turned on or off.
- Specifications
- For Australia
- Panasonic Warranty
- THIS WARRANTY CARD AND THE PURCHASE DOCKET (OR SIMILAR PROOF OF PURCHASE) SHOULD BE RETAINED BY THE CUSTOMER AT ALL TIMES
- Panasonic Australia Pty. Limited
- Inhalt
- ■ 關於水汽凝結(鏡頭的霧化)
- ■ 取下鏡頭
- ■ 安裝和取下鏡頭前蓋
- ■ 本鏡頭的特點
- 元件的名稱及功能
- Hergestellt von:
Brand : PANASONIC
Model : Lumix HF008
Category : Camera