
SRU9400 - Universal remote PHILIPS - Free user manual and instructions
Find the device manual for free SRU9400 PHILIPS in PDF.

User questions about SRU9400 PHILIPS
0 question about this device. Answer the ones you know or ask your own.
Ask a new question about this device
Download the instructions for your Universal remote in PDF format for free! Find your manual SRU9400 - PHILIPS and take your electronic device back in hand. On this page are published all the documents necessary for the use of your device. SRU9400 by PHILIPS.
USER MANUAL SRU9400 PHILIPS
Taking a First Look. 3
Setting Up the Remote Control 4
Installing Your Devices 4
Learning Keys. 5
Copying Keys 6
Programming Macros 6
Adjusting the Display Setting. 7
Using the Remote Control. 7
Selecting a Device 7
Using Touch Screen Keys and Hard Keys 7
Using Macros 7
Support 8
Troubleshooting 8
Need Help? 8
Helpline 91
Taking a First Look
Thank you for purchasing the Philips SRU9400 universal remote control. You can operate 5 appliances with this remote control: a TV, VCR, DVD, Settopbox and Amplifier.
- Get started by placing the batteries in the remote control, as explained on page 4. In most cases, you will then already be able to operate the 5 devices mentioned above, provided they are Philips devices.
-
Next, set-up the remote control. You can have it:
-
Operate non-Philips devices.
- Learn functions from other remote controls.
- Copy functions from one key to another key.
- Execute a series of keys with only one key press.
This is explained in the chapter 'Setting Up the Remote Control' on page 4.
- Enjoy the remote control. Refer to the illustration on page 2 and to the chapter 'Using the Remote Control' on page 7 for more information on using the remote control.
① Standby key
② Device indicators
③ Page keys
④Menu key
⑤Mute key
⑥ Back/Exit key
Volume Up key
Volume Down key
9 Color keys
10 Mode key
Touch screen keys
⑫ Set-up key
13 Guide key
14 Arrow keys and OK key
15 Info key
16 Channel Up key
17 Channel Down key
18 Previous Program key
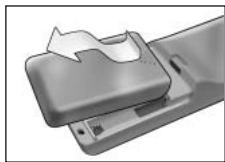
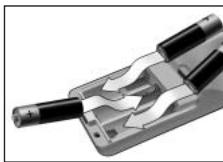
Placing the Batteries in the Remote Control
1 Press the battery cover at the back of the remote control inwards and slide it in the direction of the arrow.
2 Place the three L06 or AA type alkaline batteries into the battery compartment, as shown.
3 Slide the cover back on and click it firmly into place. After a few moments, the first page of the TV touch screen keys appears.
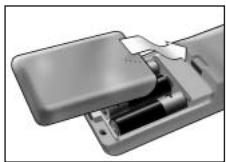
Replacing Batteries
When the batteries are almost empty, the Battery Low icon appears. Please replace the batteries with new L06 or AA type alkaline batteries and follow the local regulations for disposal of the empty batteries.
Setting Up the Remote Control
Installing Your Devices
To operate a non-Philips device with this remote control, you need to enter the brand-specific set-up code for that device. You can find a list of set-up codes at the back of these Instructions for Use.
1 Use the Mode key to select the device that you want to operate. The Device indicator lights up.
2 Press and hold setup for 3 seconds. The Set-up menu appears.
3 Press in the Set-up menu. A numeric pad appears.
4 Look up the brand of your device and the corresponding 4-digit set-up codes at the back of these Instructions for Use.
5 Enter the first 4-digit set-up code on the numeric pad.
If the IR-code set is activated, the Code key blinks twice. The last accessed page of the device appears on the touch screen.
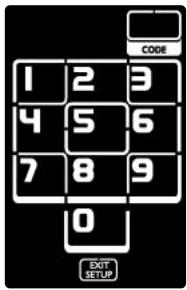
-or- If the IR-code set is not activated, the Code key blinks once. Check the set-up code and try entering it again.
6 Test if the keys work with your device.
If the device is not responding to the SRU9400, repeat the instructions from step 2 onwards, and try entering the next set-up code that is listed with the brand of your device.
Repeat instructions 1 to 6 for each device that you want to operate.
You can select a different device with the Mode key.
Searching for the IR-code set
If you cannot find the brand of your device and the corresponding setup code in the list, you can let the remote control search for the correct set-up code.
1 Use the Mode key to select the device for which you want to find the set-up code. Make sure this device is switched on. The Device indicator lights up.
2 Press and hold setup for 3 seconds. The Set-up menu appears.
Press in the Set-up menu. The Search and Exit Setup keys appear.
4 Press and hold the OK key. The remote control starts transmitting Standby/Power off commands for the selected device. The Device indicator blinks each time a new code is sent.
5 As soon as the device switches off, release the OK key. Make sure no other keys are pressed. The IR-code set for the selected device has been activated, and the last accessed page of the device appears on the touch screen.
6 Try out the device specific keys. If the activated IR-code set is correct, the device specific keys will function correctly. If there are keys that do not function properly, repeat instructions 2 to 5 to search for the set-up code again.
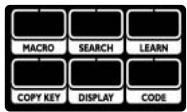
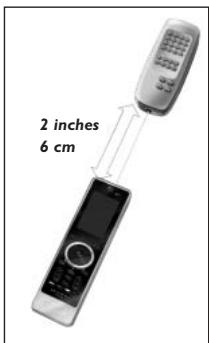
Learning Keys
You can let this SRU9400 remote control learn keys from your original remote control, for example, when a function of the original remote control is not covered by the touch screen keys.
1 Access the Set-up menu and press LEARN
Page 1 of the last selected device appears on the touch screen.
2 Place the SRU9400 remote control and the original remote control within 2 inches' or 6 centimeters' distance from each other.
3 Press the key on the SRU9400 remote control that will learn a key from the original remote control.
The Learn key remains on.
Tip You can access other keys of the selected device with the Page 2 key, or you can select a different device with the Mode key.
4 Press the key on the original remote control.
A high-pitched beep indicates that the SRU9400 successfully learned the key. The Learn key blinks twice and the Set-up menu reappears.
-or-
A low-pitched beep indicates that the SRU9400 did not learn the key. The Learn key blinks once and the Set-up menu reappears.
5 Repeat steps 1 to 4 for each key that you want the SRU9400 remote control to learn.
Copying Keys
If you want to use a certain device-function on this remote control for another device, you can copy that function, by copying the key. For example, when the volume of your devices (DVD, TV, VCR) is controlled through an amplifier, you can copy the volume functions of the amplifier-page to the DVD-page.
1 Access the Set-up menu and press COPY KEY.
Page 1 of the last selected device appears on the touch screen.
2 Press the source key of which you want to copy the function.
This can be any key, except Page 1, Page 2, Setup and Mode.
3 Select the device to which you want to copy the function of the source key with the Mode key.
Page 1 of the selected device appears on the touch screen.
4 Press the destination key to which you want to copy the source key. If the SRU9400 successfully copied the key, the Copy key blinks twice and the Set-up menu reappears.
-or-
If the SRU9400 did not copy the key, the Copy key blinks once and the Set-up menu reappears.
Programming Macros
You can program up to 4 macros for operating your devices.
What is a macro?
A macro is a sequence of key presses you can program. For example, for watching a DVD you would normally have to:
- Turn on the TV;
- Turn on the DVD;
- Turn on the surround sound system;
- Select the right input on your TV and surround sound system;
Press the Play button to start the DVD.
With a macro, the remote control executes all these steps with just one press.
You can access the macros at all times by pressing and selecting the number of the macro. For more information on accessing macros, refer to the chapter 'Using Macros' on page 7.
To program a macro:
1 Access the Set-up menu and press MACHO. The numbers 1 to 4 appear.
2 Select the number under which you want to store the macro. If there is already a macro under this number, it will be overwritten. The last selected device appears on the touch screen.
3 Press the key sequence that makes up the macro.
Notes You can program up to 12 steps in a macro. The macro is automatically stored when you try to program a 13th step, and the Set-up menu reappears.
You can access other keys of the selected device with the Page 2 key, or you can select a different device with the Mode key.
4 Press the OK key to end the macro.
The Macro key blinks twice, and the last accessed page of the device appears on the touch screen.
Adjusting the Display Setting
When you use the remote control, the display switches on.
After 6 seconds, it switches off again.
You can change this time out to one of the following options:
1 Access the Set-up menu and press The numbers 1 to 4 appear.

2 Select the desired display time out:
1 = 3 seconds;
2 = 6 seconds;
3 = 9 seconds;
4 = 12 seconds.
The Display key blinks twice to indicate that the new setting is stored and the Set-up menu reappears.
Note The display time out has an impact on the lifetime of the batteries: the longer the display stays on, the faster the batteries will drain.
Using the Remote Control
Selecting a Device
You can select a device that you have installed on the remote control with the Mode key:
The Device indicator lights up.
- The touch screen keys for the selected device appear.
- The hard keys operate the selected device.
Using Touch Screen Keys and Hard Keys
The most frequently used functions of your devices are covered in the touch screen keys and hard keys.
Only the functions for the selected device appear on the touch screen. You can access other device functions with the Page 2 key at the bottom of the touch screen.
Using Macros
This remote control can contain up to 4 different macros.
The macros on the remote control are accessible via MACRO. This key always appears on page 1 of the touch screen keys, no matter which device you are operating.

The numbers 1 to 4 appear on the touch screen.
2 Press the number of the macro that you want to execute.
The macro is executed and the Device indicator of the last selected device lights up.
Support
Troubleshooting
| Problem | Solution |
| One or more buttons are not working with my device. | • To operate a non-Philips device with the SRU9400, you have to install that device on the SRU9400 using the brand-specific set-up code.Refer to 'Installing Your Devices' on page 4. • If you can't find the correct set-up code for your device, the SRU9400 can search the entire database for the correct IR-codes.Refer to page 5. • The SRU9400 can also learn keys from your original remote control.Refer to 'Learning Keys' on page 5. |
| I cannot find the brand of my device in the code list SRU9400. | The SRU9400 can search the entire database for the correct IR-codes.Refer to page 5. |
| I cannot find my type of device on the SRU9400 or in the list of devices at the back of these Instructions for Use. | • 'TV mode' contains color TV, projectors, TV-VCR combinations, TV-DVD combinations, plasma TV and LCD TV • 'VCR mode' contains VCR and PVR/hard disk recorders • 'DVD mode' contains DVD, DVR and DVD-HDD combinations • 'STB mode' contains satellite boxes, cable boxes and DVB-T/digital terrestrial decoders. • 'Amp mode' contains amplifiers, A/V receivers, home theaters systems and audio systems. |
| I cannot wake-up the SRU9400 anymore. | The battery level is too low. Take out the batteries and insert new batteries. |
Need Help?
If you have any questions about the SRU9400, you can always contact us. You will find our contact details on page 91 of these Instructions for Use.
Read these Instructions for Use carefully before you contact us.
When you call our helpline, make sure the device is at hand so that our operators can help you determine whether your remote control is working properly.
The model number of your Philips universal remote control is SRU9400/10.
Date of purchase:
..../...../.... (day/month/year)
Table des matieres
Premiere approche 9
18 Tecla Previous Program
Colocar as Pilhas no Controlo Remoto
Aparecem as teclas Search e Exit Setup.
4 Pressione e mantenha premida a tecla OK.
UcTaHOBka yCToPiCTB. 46
Camaoobueyne KnaBn 47
Klavnla nepenoca yHKcni 48
IporpammmipobAHne MaKpocOB 48
PergunpoBka hactpoek dinpien 49
Pa60a c npylbTom dncTaHOnHoro ynpabHeHHa 49
Bb6op ycTpoiCTBa 49
PpimHeHHe cEHcOpbIX KlaBnIe 3KpaHa n annapaTHbIX KlaBnIe. 49
IcnoIb3ObaHne MaKpocOB 49
Poi#epKka. 50
Поск НencправноTei 50
Huxha nomo? 50
Helpline 91
PpeDbapuTeIbHoe 3HaKoMCTBO
Bnaoradammbac3a npno6peTeHne yHnBepcalbHoro nylbTa dnctAnuHNOHORO ynpabNeHH Philips SRU9400.CnMOsBu DaHoro Npblta MOxHO nppaBnTb pa60toI 5yctpoCTb:TEeBN3oPa, BVEoMaHrHtOdoHa, DVD-npOnrpBbATEnn, DeKoepa KaHApOBKa6eBnHO TeneBnDEHHN uYcInNTeH.
Pa60ta c npIbTOM hauHnAeTc yCTaHOBKn B HEm 3JIEMEHTOB NITAHIN, KAK ONMCAHO HA cTp.46. Iocne 3TORO, KAK npabINO, npblrTOB K pa60te C 5 YcTpoiCTBaAMN, yNOMaHtBIMN BbIe, pni ycNoBN IN N3rTOBNeHNKOMPNAHNI Philips.
3aTeM BbINONHReTc HAcTpOka NylbTa.Ero MoXHO HaCTpOnTb Ha:
pa6Oy cyCTpoiCTbAMn IPOIN3BOIDCTBa dpyIx KOMPAnH;
- KONINPOBAHNE cyHKmI dpynIX nyIbTOB nCTaHcNOHHOro ynpabJeHnA;
- nepehoc fynkunn OndH KnabuHn Ha npyIyO;
- BbIOpJIHeHne DeIeCTBm HeCKoJIbKINx KlaBIMn HaxaTmEoNDHO KnabINn. Pa3bIcHEnn npIbOAnTcB pa3dJe 'HaCtpoKa nyIbTa dNCTaHIOHOrO ynpaBHeHn' Ha cTp.46.
EcnHnHpaKpacHbI KOOBH na6Op He aKTbBnPoBaH, KlaBnHa Code (KoD) mrraet OIN pa3.
PpOBepaTcKoHacTpOuKnIeJaTaTcEe OHa NOnbItKa BBOda.
6 YdoctOBepbTeB bpaOte KJIaBm C yCTpoiCTBOM.
EcnIyCTPOIcTBO HepeaHpyeHTa KOMAnDbSU9400, NOBtOpInTe DeiCTBnA, HauNHaC nynKTA 2, N nonpO6yIte BBeCTn cneJyouIIN3 yka3aHbIX B nepeHne IJr 3TO rOyctPOIcTBa KoJ hAcTpoIKy.
IbTOPnTe DeiCTBn 1-6 nJa KaJIOro yCTPOINCTBa, KOtOpblm Co6npaTeCb nJIb30BaTbcr.
C nomoubIoo KnaBnIIM Mode (Pexm) moXHO bIbpaTb dpyroe yCTpoIcTBO.

IOnck HnΦpaKpaChoro KoOboRoHa6opa
Ecn He ydaetc HauTn B nepeyne Mapky ycTpojCTBa n COOTBETCTBYOuN KOD HaCTPOJKN, NMeETc BA3MOXHOCTb 3aNyCTNTb NOICK HxKHO T KOJa C NOMOoiy npIbTa.
1 KlaBmWei Mode (PexkM) BbI6epnTe yctpoiCTBO, IJIa KOTOpO Ro HyxHO naTn KoD hAcTpoiKn. Y6eJntEcB, YTO yCTpoiCTBO BKJIouHeo. 3aropaeTcH Ndikatop yctpoiCTBa.
2 Haxmte n yedpxmbaTe SETUP B Teeyehne 3 ckyH. OtkpbbaeTc MeHIO Set-up (HaCTpOka).
3 B MeHIO Set-up (HaCTpoIka) BbIepeuTe SEARCH. BbIOJrTcN KaIaBnUu Search (Piouck) n Exit Se HacTPOIKU).
4 Haxmnte m yedeKnbaiTe KnaBnuy OK. Pnyt DnctanuOHoro YnpaJIeHnHaNHaet nepedaUY KOMaH Standby/Power off (DexKypHbI pexnM/OTKnIOueHne) Ha BbIpaHHOe ycTpoiCTBa. PnnoocblKe HOBO kOda KaXdbI pa3 MraEIT HNDkATOp ycTpoiCTBa.
5 KaK TOnbKO yCTPOIcTBO OTKNIOHaeTcRA, KNaBIMUo OK cNeJeYeOT NpYCTNb. V6eMlTeCb, YTO DpyrHe KNaBIMuTakKe He HAnKaTbI. NfPpaKpaChbIK KOIOBbI Ha6Op BbIbpaHHOrO yCTPOIcTBA AKTNIBnPoBaH, nHa CeHCOPHom 3kPaHne NOBIIeTcNocEJHn I3 DOCTyNbIX CTpaHIN UcTPOIcTBA.
6Поверяютcaункционьные клавиш устpoctBA. EcnnakTbivopoban npabinBnHnDpapkachbN KoobodnHa6Op,ФункционьпслКлавиш срабыIBaOT HaJNeKaxmIb6pa3OM. Ecnn HeKOTOpbe KnaBInuHЯрбToAOTdoNxHbMOb6PzOM.dn NaONCKa HactpoeUHOro KODa cJedyET nobTOPTb DeiCTBn 2-5.
Camoo6yehne KJIabu
1ДЯdoctynaKmakpocamHaxmute
Ha ceHcOpHOM 3KpaHe BbIOaTcuaΦpbl O T 1 Do 4.
2 Haxmnte Homep MaKpOca, KOtOpbI HyxHO BbINOHnTb. MaKpoc IcNoJIHReTcI, 3aRopaEtC HdNkKatOp yCTpoiCTBa, nocneHero n3 Bb6paHHbIX.
Pndepkka
Ponck HencpnbHocte
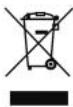
Disposal of your old product
Your product is designed and manufactured with high quality materials and components, which can be recycled and reused. When this crossed-out wheeled bin symbol is attached to a product it means the product is covered by the European Directive 2002/96/EC.
Please inform yourself about the local separate collection system for
electrical and electronic products.
Please act according to your local rules and do not dispose of your old products with your normal household waste. The correct disposal of your old product will help prevent potential negative consequences for the environment and human health.
FR
Guarantee certificate
Certificat de garantie
Garantiebewijs
Garantieschein
Dealer's name, address and signature