No 657 - Food Processor CARRERA - Free user manual and instructions
Find the device manual for free No 657 CARRERA in PDF.
| Product type | Food processor with meat grinder |
| Brand | Carrera |
| Model | No 657 |
| Main functions | Grinding, mixing, kneading, sausage making, kofta/kebbeh, shortbread biscuits |
| Included accessories | 3 perforated discs (fine, medium, coarse), sausage funnel, kofta/kebbeh nozzle, shortbread biscuit nozzle, pusher, filling guide, auger, blade, locking ring, cone, base, biscuit grid |
| Material | Metal parts (blade, discs) and plastic |
| Speeds | Speed setting (recommended levels 1-3 for the grinder) |
| Maximum usage time | 15 minutes, then cool to room temperature |
| Safety | Sharp blade, unplug before cleaning, do not put in dishwasher |
| Cleaning | Clean immediately after use with hot water, brush, no dishwasher |
| Maintenance | Dry completely before reassembling |
| Storage | Dry place, out of reach of children, store in the pusher |
| Compliance | CE marking |
| Disposal | Follow environmental regulations |
| Repairability | Repairs only by a specialized workshop |
Frequently Asked Questions - No 657 CARRERA
User questions about No 657 CARRERA
0 question about this device. Answer the ones you know or ask your own.
Ask a new question about this device
Download the instructions for your Food Processor in PDF format for free! Find your manual No 657 - CARRERA and take your electronic device back in hand. On this page are published all the documents necessary for the use of your device. No 657 by CARRERA.
USER MANUAL No 657 CARRERA
For having placed your trust in CARRERA – and for giving us the opportunity to prove you right with our meat grinder.
Everything is driven by one idea.
Each CARRERA appliance follows a clear concept. No consideration of existing gender roles, no pink for women or blue for men. Since when did quality and performance have a gender?
We create technology maximising user friendliness, handling and aesthetics and bringing performance to life. Directly when switching on the appliance and even after many years. Performance is not just delivered by the motor alone, but results from the skilful interplay of each individual component. We just call it the CARRERA boost.
Although we have not reinvented the wheel, we had the courage to do right what is crucial and to dispense with everything that is unimportant.
That is our style. And you will rediscover it in each further CARRERA appliance.
CONTENT
- Operating Elements 22
- Scope of Delivery 22
- Safety Instructions 23
- About these Instructions 25
- Operation 26
- Cleaning and Care 32
07.Storage 32 - Conformity 33
- Disposal 33
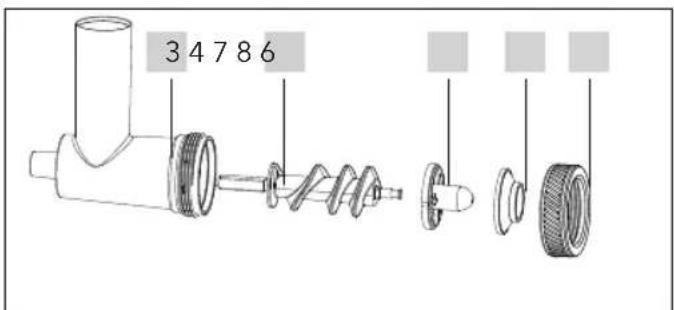
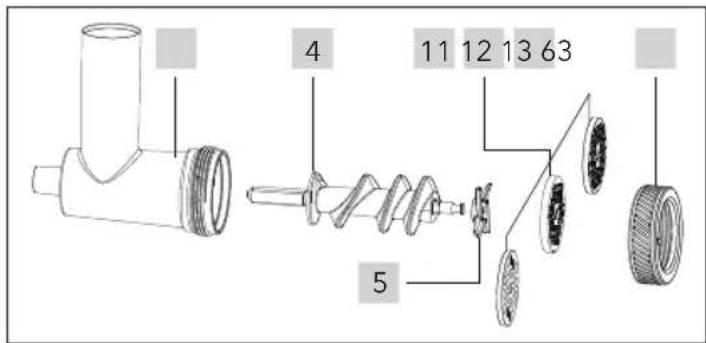
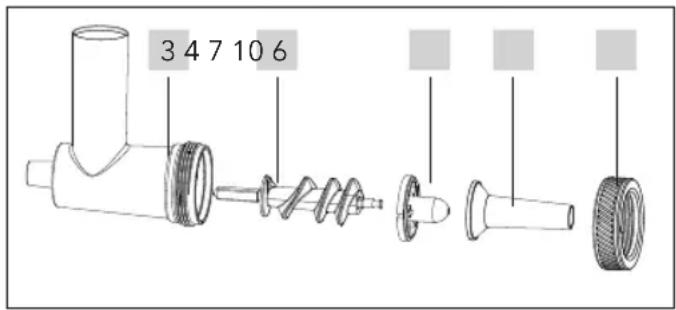
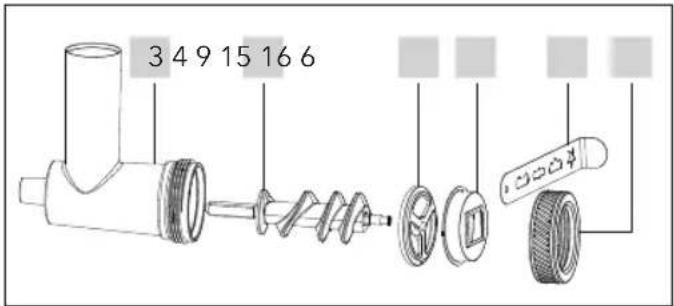
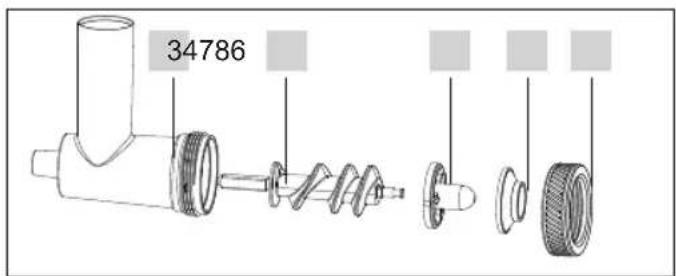
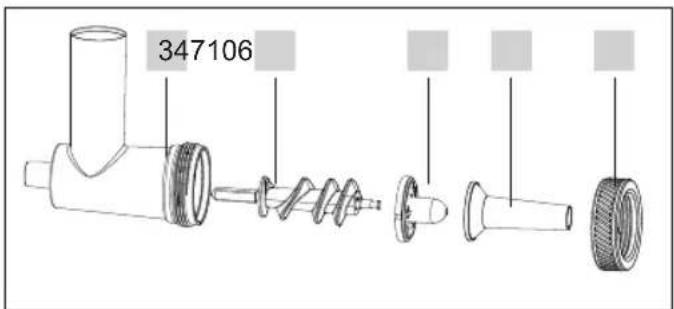
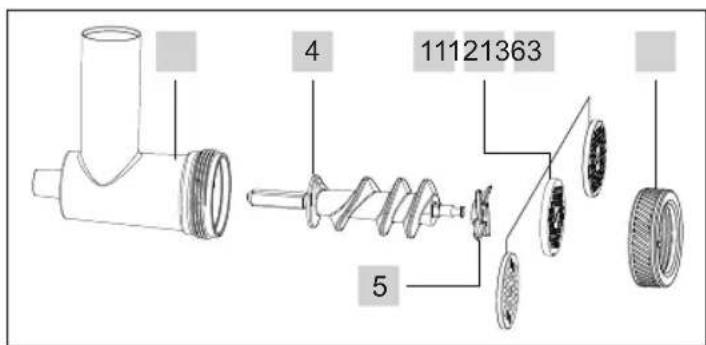
01. OPERATING ELEMENTS
1 Tamper lid
2 Tamper and storage box
3 Housing with filler tube
4 Screw conveyor
5 Knife
6 Ring nut
7 Kofta/kibbeh attachment and sausage stuffer attachment
8 Cone
9 Base plate
10 Sausage stuffer
11 Perforated disc (coarse)
12 Perforated disc (fine)
13 Perforated disc (medium)
14 Filling aid
15 Shortbread biscuit attachment
16 Shortbread biscuit shaper
02. SCOPE OF DELIVERY
- Carefully remove the appliance and the accessories from the packaging.
- Check the scope of delivery for completeness and transport damages.
- Keep the original packaging. You can use it to store the appliance if you do not intend to use it for a longer period of time.
When unpacking your appliance, make sure the parts shown in the illustration have been supplied.
03. SAFETY INSTRUCTIONS
Intended use
The food processor is intended exclusively for kneading dough and/or stirring and blending food. The meat grinder is intended exclusively for preparing the meals described in these instructions or similar dishes.
The appliance is designed exclusively for private home use or similar purposes of use, e.g.:
- in shops, offices and other working environments;
- in agricultural undertakings;
- by customers in hotels, motels and other typical living environments and
- in private guesthouses or holiday homes.
The appliance must only be used indoors.
Foreseeable misuse
Do not use the appliance to process any objects or substances other than food.
Instructions for safe use
- It is imperative to read the safety instructions of food processor No 657.
- Remove all packaging materials and stickers and dispose of them in compliance with the statutory provisions.
- Place the appliance on an even, dry and non-slip surface to ensure that it cannot tip over or slip off.
- Never leave the appliance unattended when in use.
- Before first use, thoroughly clean all parts which come into contact with food. Follow the instructions given in the chapter on cleaning (see chapter "CLEANING AND CARE"). The sharp knife must be handled with care.
- Cleaning and user maintenance must not be performed by children unless they are supervised.
- Disconnect the appliance from the mains whenever it needs to be assembled, disassembled or cleaned.
- Disconnect the appliance from the mains whenever it is unattended and whenever it needs to be assembled, disassembled or cleaned.
-
While operating the appliance, keep hair, clothes and all accessories away from it in order to avoid injuries and damages.
-
Switch off the appliance and disconnect it from the mains before changing any accessories or attachments that move during operation.
- Do not touch the movable parts of the appliance. Always wait for the appliance to come to a complete standstill before attaching and removing any parts.
- Make sure your fingers do not touch any movable parts or the openings of the attachments.
- Do not use the attachments or the appliance if they show any damages.
- Before inserting the meat into the meat grinder, remove all bones and cortices.
- When chopping nuts, only fill a small quantity into the meat grinder. Do not add more nuts unless the first load has reached the screw conveyor.
- Always use the tamper included in the scope of delivery. Never insert any tools or your fingers into the opening of the meat grinder.
- Do not operate the machine for longer than 15 minutes; allow the appliance to cool down to room temperature after each operation.

DANGER for children
Packaging material is not a toy. Children must not play with the plastic bags. There is a risk of suffocation.

WARNING! Risk of injury
Always pull the mains plug before cleaning the appliance or changing the accessories.
- Switch off the appliance before pulling the mains plug.
- The knife is sharp. Be careful when inserting, removing and cleaning it.

CAUTION! Material damages
Only operate the appliance with its original accessories.
- Do not use the appliance if the appliance or the power cord has any visible damage or if the appliance has previously been dropped.
-
To avoid any risk, do not make modifications to the product. Repairs must only be carried out by a specialist workshop and/or by the Service Centre.
-
Do not switch on the appliance unless the accessories attachment is properly fixed and firmly seated.
- Do not insert any objects (e.g. knives) into the opening of the meat grinder while the appliance is running.
- Always place the appliance on a sturdy, even, clean, dry and non-slip surface to ensure that it cannot tip over or slip off.
- Never place the appliance or the accessories on hot surfaces (e.g. cooktops) or close to heat sources or open fire.
- Never leave the appliance switched on longer than necessary for processing the food.
- Do not operate the appliance while empty.
- Do not use any harsh or abrasive cleaners.
04. ABOUT THESE INSTRUCTIONS
- Before using the appliance for the first time, read the Instructions for Use carefully and ensure you comply with the safety instructions!
- The appliance must only be used as described in these instructions.
The manufacturer or dealer is not liable for damages arising from any use contrary to the intended purpose. - Keep these instructions for reference.
- If you pass the appliance on to someone else, please include these instructions.
Warnings in these instructions
If necessary, the following warnings will be used in these operating instructions:

DANGER! High risk: Failure to observe this warning may result in injury to life and limb.

WARNING! Moderate risk: Failure to observe this warning may result in injury or serious material damage.

CAUTION: Low risk: Failure to observe this warning may result in minor injury or material damage.
NOTE: Circumstances and specifics that must be observed when handling the appliance.
05. OPERATION
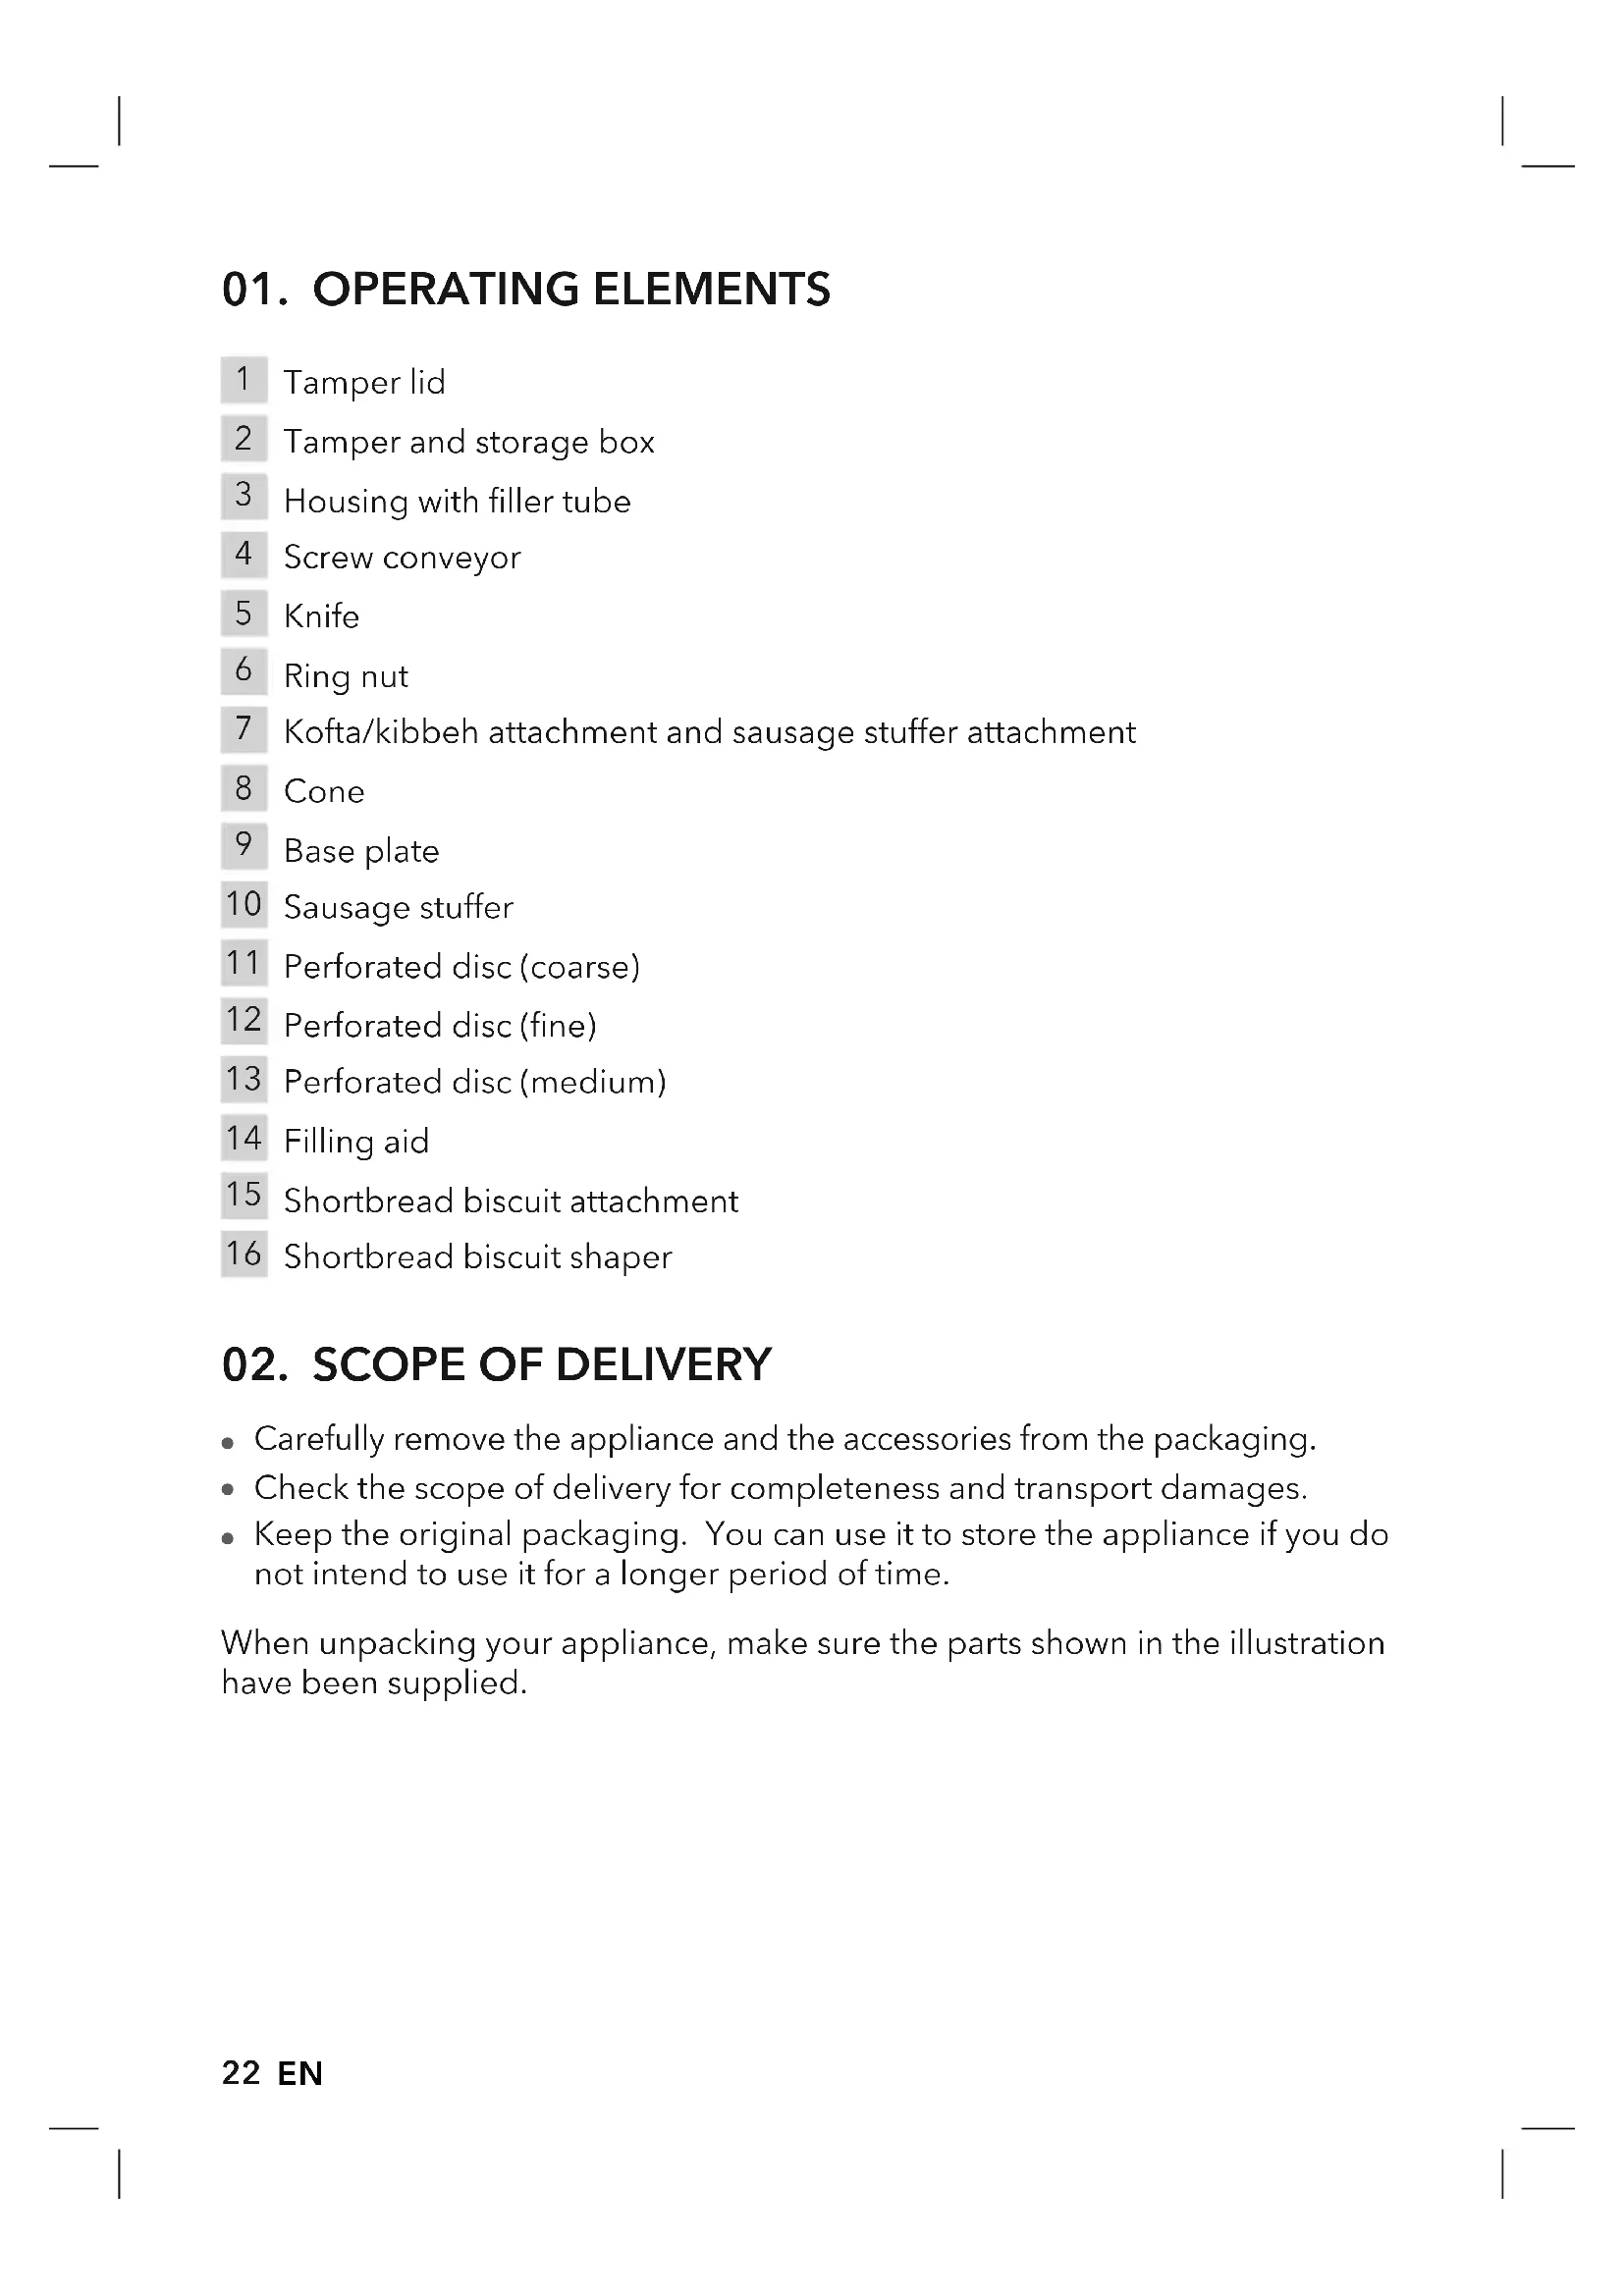
How to assemble the meat grinder
- Insert the screw conveyor 4 into the housing 3 .
- With the cutting edge facing outwards, place the knife 5 onto the screw conveyor. Be sure that the knife is properly fixed.
- Place one of the three perforated discs 1112 onto the screw conveyor so that the groove sits on the tappet.
NOTES:
Fine disc: raw meat, fish, small nuts, cooked meat for pies and meatballs.
Medium and coarse disc: meat, fish, vegetables, nuts, hard cheese, peeled or dried fruits for jams and sweet dishes.
- Screw the ring nut 6 onto the housing and tighten it.
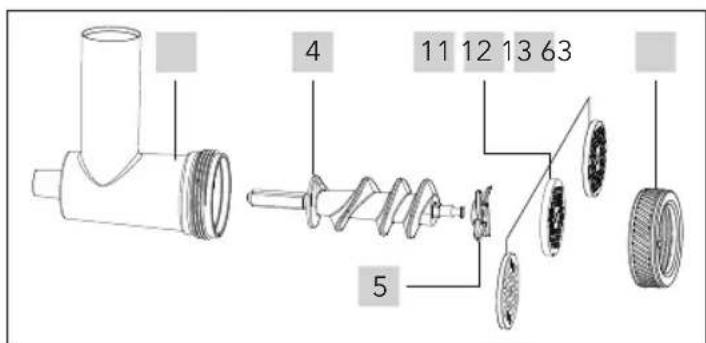
How to use the meat grinder with the food processor
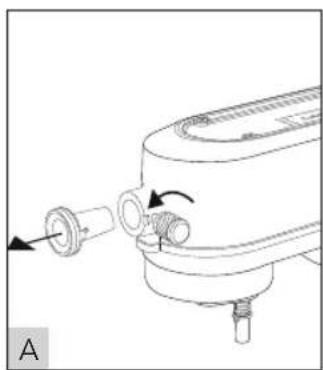
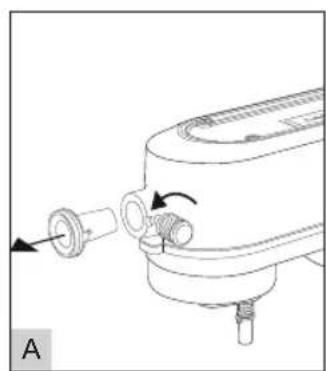
- Loosen the locking screw and remove the cap (see fig. A).
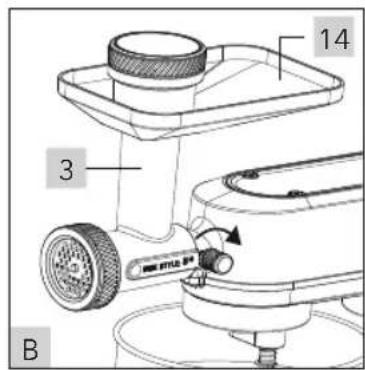
- Insert the assembled meat grinder into the accessories coupler then tighten the locking screw (see fig. B). In order for the shaft to engage with the coupler, it may be necessary to turn the meat grinder slightly.

- Place the filling aid 14 onto the filler tube 3 and a collecting container underneath the meat grinder to collect the processed ingredients.

CAUTION! Material damages
It is imperative to thaw frozen food before processing it.
Do not use excessive pressure when inserting the ingredients to be minced.
- Switch on the food processor and set the speed control to speed level 1; the screw conveyor rotates. You can increase the speed level depending on the food to be minced. However, speed level 3 must not be exceeded.
- Use the tamper 2 to carefully push the food to be minced down the filler tube.
NOTE:
Cut the meat into approx. 2.5 cm wide strips. While strips are automatically pulled in by the meat grinder, cumbersome tamping is required for meat cubes.
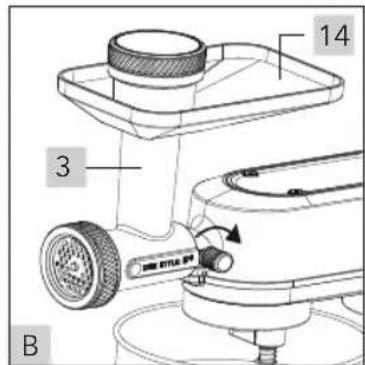
How to assemble the sausage stuffer
- Insert the screw conveyor 4 into the housing 3 .
- Place the sausage stuffer attachment 7 onto the screw conveyor so that the groove sits on the tappet.
- Place the sausage stuffer 10 onto the sausage stuffer attachment 7 then screw on and tighten the ring nut.
NOTE:
Sausage casings should be purchased from a trusted butcher.
Ask your butcher what casing is best suited for the size of the nozzle.
Soak the casing in cold water for 30 minutes.
How to use the sausage stuffer
- Loosen the locking screw and remove the cap (see fig. A).
- With the sausage stuffer attached, insert the meat grinder into the accessories coupler then tighten the locking screw (see fig. B). In order for the shaft to engage with the coupler, it may be necessary to turn the meat grinder slightly.
- Apply a small amount of cooking oil onto the sausage stuffer then thread the entire casing onto the nozzle, leaving a few centimetres' overhang.
- Place the filling aid 14 onto the filler tube 3.
- Fill the filling aid with the desired stuffing and switch on the appliance. Start at speed level 1.
- Using the tamper 2, carefully push the stuffing down the filler tube.
- Let the casing flow as it fills with the stuffing. When you reach the desired length, twist the casing alternatively in a clockwise and counter-clockwise direction.
- Knot the beginning and the end.
Basic recipe for pork sausage
Ingredients:
400 g lean pork
100 g pork belly
12 g salt
6 g noble sweet paprika
1 garlic clove
1½ onion
Sheep casings, approx. 2 m
A little cooking oil for greasing the sausage stuffer
Preparation:
- First mince the pork belly using the fine disc then grind the pork using the medium disc. Collect the minced meat in a bowl.
- Chop the onion into really small pieces (the finer the better).
- Crush the garlic clove using a press.
- Thoroughly mix the minced meat with the onion, garlic and spices.
- Fill the casing as described in "How to use the sausage stuffer".
How to assemble the kofta/kibbeh attachment
1.Insert the screw conveyor 4 into the housing 3.
2. Place the kofta/kibbeh attachment 7 onto the screw conveyor so that the groove sits on the tappet.
3. Place the cone 8 onto the kofta/kibbeh attachment then screw on and tighten the ring nut.
How to use the kofta/kibbeh attachment
- Loosen the locking screw and remove the cap (see fig. A).
- With the kofta/kibbeh attachment mounted, insert the meat grinder into the accessories coupler then tighten the locking screw (see fig. B). In order for the shaft to engage with the coupler, it may be necessary to turn the meat grinder slightly.
- Place the filling aid 14 onto the filler tube 3 .
- Fill the filling aid with the mixture and switch on the appliance. Start at speed level 1.
- Using the tamper 2 , carefully push the mixture down the filler tube.
- Cut the pressed mixture every 7.5cm
Recipe for Lebanese lamb kibbeh
Ingredients:
115 g bulgur wheat
325 g lamb cut into cubes, without bones
15 ml (1 tablespoon) sunflower oil
6 g noble sweet paprika
1 small, finely diced onion.
30 ml (2 tablespoons) pignolia
50 g flour
2.5 ml (1/2 teaspoon) ground spices including salt, freshly ground black pepper and your favourite spices
Preparation:
- In a covered pot of water, bring the bulgur wheat to a boil. Cook slowly for 15 minutes then drain and put aside.
- Use the fine disc to mince the lamb then put it aside.
- Heat oil in a pan and gently roast the onion cubes for 5-6 minutes until golden brown.
- Add the pignolia and gently roast for another 30-60 seconds.
Add one third of the minced lamb and gently roast for approx. 10 minutes.
Season the ingredients using half of the spice mix. - Blend the drained bulgur with the remaining lamb and season the mixture with the other half of the spice mix. Attach the dough hook to the food processor and blend the ingredients for 5 minutes at speed level 1. Add 50g flour and blend with the dough hook until the flour is mixed in.
- Push the bulgur mixture through the kibbeh attachment and cut it every 7.5cm .
- Close the ends and fill each portion with 1 teaspoon of the gently roasted minced meat. Close the filling hole and shape the portion into a ball.
- Heat the oil to approx. 160^ then fry the kibbeh balls in portions for 3-4 minutes on each side until golden brown. While frying the remaining balls, keep the finished ones warm in the oven.
- Serve the hot kibbeh balls along with a spicy yoghurt dressing and salad.
How to assemble the shortbread biscuit attachment
- Insert the screw conveyor 4 into the housing 3 .
- Place the base plate 9 onto the screw conveyor so that the lower, outer edge faces outwards and the protruding part engages with the shortbread biscuit attachment 15 . The groove must sit on the tappet.
- Place the shortbread biscuit attachment 15 onto the base plate then screw on and tighten the ring nut.

How to use the shortbread biscuit attachment
- Loosen the locking screw and remove the cap (see fig. A).
- With the shortbread biscuit attachment fixed, insert the meat grinder into the accessories coupler and tighten the locking screw (see fig. B). In order for the shaft to engage with the coupler, it may be necessary to turn the meat grinder slightly.
- Place the filling aid 14 onto the filler tube 3.
- Slide the shortbread biscuit shaper 16 into the shortbread biscuit attachment 15.
- Fill the filling aid with the dough and switch on the appliance. Start at speed level 1.
- Using the tamper 2, carefully push the dough down the filler tube.
- Cut the dough into the desired portions.
06. CLEANING AND CARE

CAUTION! Material damages
Do not wash any of the individual parts in the dishwasher.
Do not use any harsh or abrasive cleaners.
After each use
Clean the meat grinder and all used parts immediately after each use. This is extremely important when mincing meat or fish. Any residue sticking to the screw conveyor or its housing causes bacteria build-up that may be extremely harmful to health.
When you wait too long, cleaning becomes unnecessarily difficult and, in extreme cases, very cumbersome.
Heavy soiling may result in permanent damage to the parts.
- Thoroughly remove any residue with warm water.
- If required, use a bottle brush.
- If you cannot clean your meat grinder immediately, soak the individual parts in water and washing up liquid.
- If it is impossible to remove the residue with a bottle brush, mince an old bun or a dry and hard piece of bread with the meat grinder. This procedure even removes shortbread biscuit dough from the housing.
- After cleaning, before reassembling the meat grinder, the metal parts should be left to dry for a sufficiently long period of time.
07. STORAGE

DANGER for children
Keep the meat grinder and the individual parts in a dry place out of the reach of children. Store the individual parts inside the dedicated tamper with screw cap.
08. CONFORMITY
The CE mark was applied in accordance with the corresponding European directives.
The conformity declaration is held by the distributor:
(This is not a service address!)
09. DISPOSAL

Packaging
If you want to dispose of the packaging, make sure you comply with the environmental regulations applicable in your country.
He nCnoJIb3yIte yCTpoIcTBO, ecn yCTpoIcTBO nI npOBoD nITaHnA IMeOT 3aMeTHbIe NOBpeJdeHnA nI ecn yCTpoIcTBO ypaLo Ha nOJ.
Bo n36exaHne yrpo3 He BBOiTe HnKaKne n3MeHeHnaB yctpoiCTBO.PemOHbI yctpoiCTBa IopyuAte BceIda CneuHaBHO MaCTepCKo IJIN cepBnCHOMy ceHTpy.
- Праздуем Вкючть устpoистб, убeДиТecь, чTo Нацka npaВиьно установлеси и сиДиТ саБиьно.
Bo Bpemr kcnnyataun yctpoiCTBa HnKOrda He onyckaTe npedMeTbI (Hanp. Kxohhnh HOK) B OTBepCTne Mrcopy6Kn.
- YctaHaBnBaIte yCTPOINCTBO BcERda Ha CTa6NlBH0H, POBHO, YnCTOi, HeCKoJIb3KoI n cyXoI NOBepxHOCTn BO n36eKaHne NaDeHnI nn CKoJIbXeHNr yCTPOINCTBa.
- HnkoIa He yctaHabJbBaIte yCTpoNCTBO nIe erO qactn Ha ropqnx nobepx-HocTAX (HaNP. Ha HarpeBaTeJbHOM dncke 3JIeKtpueeCKo nnIITbl) IIN prAOM cNCTOuHnKaMn TeIIa Jn6O OTKpbIToro ORH.
- HNKoIa He ocTabJnTe yCTpoiCTBO BkJIoueHHbIM DoJIbWe, Yem 3TO HeO6xoDIMO dIra o6pa60TK npOdyKTA.
He nCnoJb3yIte yCTpoiCTBO B nyCTOM BnIe.
He npimehaIte oCtpbIe nIa6pa3nBbIe cpeIDCTBa IJra OUnCTKn.
04. К ДАHHOMY PYKOBODCTBY
- Ipeed nepBbIM 3aynckom TuaTeIbHO O3HaKombteCb C hactoIIM pyKOBoIDCTBOM no 3KcNpyatauHn co6JIoJaTe yKa3aHnno 6e3OnaChOCTn!
- YcTpoIcTBo MOxHOb6CnyKuBaTb TOJbKO B COOTBeCTBn C yKa3aHnA M, CoepXaUIMNcB HAcToaIeM pykoBoIcTBe. Ipon3BOInteJIb NII INCTpN6bIOTOp He HecytOTBeTCTBeHHOCTn 3a y6bITKn, AIBJIIOUncEca pe3yJIbTaTOM NcNoJIb3OBaHnA He No Ha3HaueHnIO.
- Coхразинту Habстяшee pykoBoDCTBO.
Bcnyae nepedaun yctpoiCTBa dpyim Iuam, npnoobnte K hemy hactoane pykoBOIDCTBO no 3Kcnnyatau.
PpeynpeintelhbIe yka3aHn
B cnyuae Heo6xOIMocTn B HacToaem pyKOBoDCTBe NO 3KcNJaTaUu INCNOJb3yOTcI cIeNyUoune npedynpeiTeNbHbIe yKa3aHnI:


ONACHOCTb! BbICOKn pIck: HecobJIOeHne daHHoro npedynpeKdEHN MoKeT NOBJIeYb 3a cOBOn npAmyo yrpo3y dIra JxN3Hn n 3DOpOBBy.
I PEPDyPEXKDEHNE! CpeHn pnc: HecobJeHne daHHoro npdeynpeK-DeHnMoKeT npBecTu K TeJIeChbIM NOBpeXdEHNaM NJI TAgKeJbIM ImUyeCTBeHHbIM y6bITkam.
OCTOPOXHO: Hn3kn pnck: HecobJeHne daHHoro npdeynpeKdHn moKeT npBecTN K JeRKM TeLeChbIM NOBpeKdHnAM IIN NMyuEcTBeHHbIM y6bITkam.
YKA3AHNE: Cntyaun n ocoeHHocn, KOtOpbIe cneJeT yuHTbBaT npN 3Kcnnyata- uynyctpoiCTba.
05. OБСЛУЖИBAHAнE
YcTaHOBKa Mrcopy6Kn
- Bctabte uHeK 4 B KOpnyc 3.
- BcTaBbTe HOX 5 Ha UHeK pExyUe KpOMKoHApxKy. O6paTInTe BHHMaHne Ha cTa6nIbHyO yCTaHOBky HOxa.
- BCTaBbTe OndHy n3 Tpex HOxEbbix peWetok 11 / 12 / 13 Ha UHeK TaKIM o6pa3OM, yTO6bl Na3 Nonan Ha UNoHky.
YKA3AHNIA:
MeIka HoXeBa peWetKa: Cbipoe Mco, pb6ka, MeIknue opexn, BapeHoe Mco IJra naHTeTOB n TeOTeJe.
CpeHn 60nbua HoxeBa peWetka: Mco, pb6a, OBOuN, opexN, TBepdbi cbip, ouHHeHbIe nn cyxne pykTbI dIra BapeHbI n cIaKnX 6IIO.
- Hakpynte kpynyu raKy 6 Ha Kopnyc n 3aTaNHTe.
IcnoJb3OBaHne MAcopy6Kn C KyxOHhbIM po6OTom-KOM6aHOM
- OTBnHTnte nKcnpuOuN BnHT uJaJIte KpbIuKy (cm.pnc.A).
- BcTaBbTe co6paHnyo MAcopy6ky B cUeHNo np6Op n 3aTaNHe oKcnpyuyn BnHT (cm. pnc. B). B cIyuae Heo6xOAnMoCTn NOBepHnTe MAcopy6ky, TTo6bl BaI nonaB CcENHO np6Op.
- BcTaBbTe npncnocO6JIeHne IJI o6JIeRueHn 3aRpy3Kn 14 Ha 3aIpaBOUHyo rOpNoBHy 3 n npHeMHyO eMKoCTb NOd MAcOpTyJa nonaJaN O6pa6OtaHNbIe pOdyKtbl.

OCTOPOXHO! MaTePnaJIbHbIy uIep6
3amopoxeHHbIe npOyKtbl 06a3aTeNbHO pa3MopaxNBAiTpepei n3MeJIbUeHnEM.
BboJn3MeJIbHaembl npOdyKT, n36eraIte cnJIbHbIX HaKATNI.
- BkIIOHTe po6OT-KOM6aHn uYCTAHOBITE peryJrTOp YacTObI BpaUeHnHa cKoPocTb 1; WneK NaHET BpaUaTbcra. B 3abucmOcTn OT n3MeJIbuaemOr npOdyKta MoXHO NOBICITb YAcTOTy BpaUeHn Do 3.
- 3aToJKNHe n3MeJIbUaEmbI npOdyKT ToJkaTeJIeM 2 B 3aPapBOChHyIO rOpJIOBnHy.
COBET:
Ma co Hape3aIte noLockamu wipnHoi npImepHo 2,5 cm. IolocKn 6ydyT «camocToTeJIbHO» BXoIITb B MAcopy6ky, Ky6nKn npndcTcnoCToHNo 3aTaJKNBaTb TOJkATEJeM.
YctahOBka Koj6achoro shnpua
- BCTaBbTe wHeK 4 B KOpnyc 3 .
- Bctabte hacaKy Ira KoIbacHoro 7 Ha 7HeK TaKIM o6pa3OM, TTo6bl na3 nonaHa 0nOHky.
- YcTaHOBInTe KoIbAcHbI 10 Ha HacaIky 7,HaKpyTInTe n 3aTaNHe Kpyrnyo raiky.
COBET:
KoJIb6aChyU oboJOnuKy Bbl MoXeTe KynITb Mmra3nHe MrcHbIX npOdyKTOB. Cnpocnte npOdaBca, KaKaI oboJOnuKa lyUwe Bcero nOdoIeT K pa3Mepy conla. Pa3MrgHTe oboJOnuKy, nOrpyxag ee Ha 30 mHyT b XoJOnHyIO BODy.
IcnoJb3OBAHne KoJI6aChOrO Wnpuca
- OTBnHTnTe 6KcnpuOuBnHT n ydaJInte KpbIwKy (cm. pnc. A).
- BCTaBbTe co6paHHyo Mmcopy6ky c KOLbAcHbIM 7npnueM B CcEHNo np6Op n 3aTaNHe _IKCNPU BnHT (cm.pnc.B).
B clyuae Heo6xOdImocTn NOBepHnte MAcopy6ky, yTo6bI BaI nonaI B cCenHO np6op. - HamaXbTe KoIbAcHbI I npu pacTnteIbHbIM MaclOM N NOHocTbIO HaJeHbTe oboJIoUky Ha HacaIky. OcTaBte HeCKoJIbKO JINWHIX caHTmEpTOB o6OJouKn.
- BcTaBbTe npncno6JeHne Ira HapOnHeHn 14 Ha 3aRpy3OHyI rOpNoBnHy 3.
- Hanolnite npncocobene he apwem n BkIouhte yctaHOky. HauHnte co ckopoctn 1.
- Octopoxno ToIkaite apuToIkaTeJeM 2 B 3a npabOuyu roPIOBHy.
- Побдente,чоблфарш Занолнл obolouky,а 3aTe mpeьзыаite koIbackn hyxHOnДинblпОпeрмehnoВ HAnpaBleHnNo YacOBоN CTpeJIke N npOTNB YacOBоN CTpeJKN.
- NpebeBxte Hauano KoHeu.
OchOBHO peeent dIJI npuroToBHeHn CBHHbIX KOJI6aCOK
HrpeMeHTbI:
400xuyDOrOCBNHO Mca
100 rCBNHOI rpydNHKn
12 r coJn
6 r cnaikon npnkn
13y6uKuechoka
1½nyka
Ppimepno 2 M 6apaHbIX KNUsOK
Hemhoro pactnteIbHoro Macla IJy cMa3Kn Unpuca
PnuroToBneHne:
- Chaujana n3MeJIbUHTe CBnHyIO rpydINHky B MmCopy6Ke C NOMOuBIO MeJkoHoxeBOI peWeTKn, 3aTeM n3MeJIbUHTe CBnHOE MRCO C NOMOuBIO cpeDHeHoxeBOI peWeTKn I NOMeCTNTE B MnCKy.
- Nopybnte lyk MeIknMn kybkamn (yem MeIbye kybkn, tem lyuwe).
- Pa3daBnte YecHOK YecHOKoJabNkoJ.
- XopoIoo nepemewaTe n3MeJIbueHHoe MRCO C LyKOM, YecHOKOM N CpeLnaMn.
- HanonHnTe KnKn B COOTBeTCTBn C pa3JeIom «McnoJb3OBaHne KoJ6acHoro shnpuca>.
YcTaHOBKa HacaIKeΦTe/Ke66e
- BctaBbTe uHeK 4 B KOpnyc 3.
- BcTaBbTe hacaKy KeTe/Ke66e 7 Ha uHeK TaKIM o6pa3OM, yTo6bI na3 nonaJI bUHky.
- YcTaHOBnte KOHyc 8 Ha HacaKy KeΦTe/Ke66e, HApTyTne n 3aTaNte KpyIyo raKy.

IcnoJb3OBaHne hacaKn KeΦTe/Ke66e
- OTBHTTE ΦHKCUPYIOUIN BINT IN CHIMITE KpbIUKy (CM, PNC, A).
- Bctabte co6paHnyo Mncopy6ky c hacaKoI IJI Ke6Be B cUeHNoI np6Op n 3aTHe TcHKCnpyuOuBnHT (cm. pnc. B). B cnyae Heo6xOdMocTn nobepHnte Mrcopy6ky, UTObI BaI nonaI B cUeHNoI np6Op.
- BCTaBbTe npncnoc6JeHne Ira HapOnHeHna 14 Ha 3arpy3OHyTO rOpNoBHy 3 .
- HanonHnTe npncno6JeHne n3MeJbHaembIM npOdyKTOM N BKJIIOHTe yCTaHOBky. HayHnTe co CKOpOCTn 1.
5.OCTOPOXHO TOKAnTe 4apu ToKATEJEM 2B3a npabOHyO rOpNoHv. - NopexbTe cnpeccobAHbI apu Ha KycouKn dInHOH 7,5 cm.
PeCNT nprirotobleny IINBaHcKnx Ke66e n3 6apaHHbI
HrpeMeHTbI:
115mykn6yIpy
325 r Hape3aHHoro Ky6nKam6apahbero Mca 6e3 kocTei
15 mI (1 cToJIOBa JIoKka) nOcOJIHeuHOro MaCJa
6 r cnaikon npnkn
1 MeIko Hape3aHHbIM MaIbI LyK
30 MJI (2 cToJIOBbIe JoxKn) KeJPOBbIX OpeWkoB
50 r mykn
2,5Ml (1/2 yauHoi JoxKu) MoIOToM Cmecn Cneu - coIb, YepHbIM MOIOTbIM nepeu IN dpyrHe cneuIN NO BKycy
PnuroToBneHne:
- Положи te myky 6улгyp в касчюл, залешte bodoи в BcknЯтnte. Пос cle 15 mHyT cneiTe kInrTok n OTLOxNiTe 6yIrgpВ CTOpOhy.
- Изменихов Мясорубке сюлбовим мелков HOжевошштки OTLOЖNTe B CTOPOHy.
- Pa3oRpeIe nOcOJIHeHoe MaCNo Ha cKOBOpOKe I NpOJxApIte JyK B TeUeHne 5-6 mHyT.
- Добавы Кедравье оршки и karinate следуюоче 30-60 секун. Добавы odny Trеть Фарша ИЗ бараньи и karinate пимерно 10 мину.T. Добавы по Вкуни Рожини Смеси спец.
- Cnityo Kauy 6yIpy cMeuBaIe Tc octaIbHOJ yacTbIO bapahbero fo apwa n doabte BTOpy IOIOBNHy cneuH. CmeuBaIe TE INrpeDIneHTbI B pOBoTe-KOMbaIHe C NOMOUsBO JIoNaTKn dJa 3aMeca Ha ckOpocTn 1 B TeueHne 5 MInHy.T. C NOMOUsBO cMecnteJIbHOJ IOnaTKn cMeuaTe c Maccou 6yIpy 50 r Mykn.
- Maccy 6byIpy npOnyctnTe uepe3 hacaIky Ke66e n oTpe3aIte KOTNeTKn dInHOH 7,5 cm.
- 3aBepHnTe KpaI n HanoJnTe 1 yaiHoN loxKoN noJXapeHHoro foapHa. 3aTeM 3aBepHnTe BTOPO KpaI n oOpMnpyTe KpyrIbIe KOITNeTKn.
- IoporpeTe macno dIy JxapKn Do TemnepaTypbI npImepHo 160 ^ C n o6kapnaBaiTe npznn Ke6Be B TeueHne 3-4 MNHT, Noka He cTaHyT 3oJIoNTbcIMN. KapeHbIe Ke6Be noLoXnTE B DuxOBky, UTo6bl CoXPaHnTB TemnepaTypy.
- Ke66e nodaabaTe ropaHm c octpbim NOrypTOBbIM dpceccnHrom n caJATOM.
YCTaHOBka HacaIKn IJny neueHbry
- BctaBbTe WHeK 4 B KOpnyc 3.
- BCTaBbTe OCHOBHyO pIITy 9 B uHeK peKyuee KpOMKO HApJy TaKIM o6pa3om, TTo6bl Topuaaay qactb BOwla B 3auepeHne C hacaKDOn IJI neueHbY 15. Pn 3TOM na3 DoJKeH cecTh Ha WnOHky.
- YcTaHOBInTe HacaKy IaI neeHbI 15 Ha onOpHyIO nnITy, HApKyTInTe n 3aTaNHTe KpyrnyIO raIKy.
IcnoJb3OBAHne HacaKn IJny neyeHbY
- OTBnHTte fHKcnpyUoHn BnHT n ydaJIne KpbIuKy (cm.pnc.A).
- BCTaBbTe cO6paHnyo Mrcopy6ky C hacaIKO Jn neueHbB CcENHO np6Op n 3aTaNTE fHKcnpyUoN BnHT (cm.pnc.B).B cnyae Heo6xOdMocTn NOBepHnte Mrcopy6ky,TO6bl BaI nonaI B cUeHNO np6Op.
- Bctabte npncno6neHne Ira HanoHHeHna 14 Ha 3aRpy3OHyIO rOpNoBnHy 3
4.BcyhtheOpmyIJIneHn16BHaCaKyIJIneHb815. - HanolnTe npucno6JeHne TecTOM n BkJIOHTe yCTaHOBky. HauHnte co ckopocTn 1
- OToPoxKHO 3aTajKnBaIte Tecto ToJIkaTeJem 2 B 3aIpaBOHyO rOpJIOBHy.
- OtpexbTe nponyeHHoe yepe3 Mncopy6ky neueHbe HxHoh dInHbI.
06. OuNTKA I yXoI

OCTOPOXHO! MaTePnaJIbHbIy uIep6
He MoTe HN OndHn N3 OTdJIbHbIX qaCTe HacaIKN B NOcydOMoeHNO MaunHe.
He npimehaTe octpbie nIa 6pa3nBhbIe cpeCTBa IJIA OUHCTKn.
Pocne KaKdoRo nCnoJb3OBaHn
Mrcopy6ky n BCE nCnOJb3OBaHHbIe DeTaN YnCTnTe cpa3y NocJe KaXDoR O nCNoJIb3OBaHn. 3To rBnAETcra Oco6eHNO Heo6xOIMMbIM B Cnyae N3MeJbueHn Mra Ca Npbl6bl. Ecn OctaTKn npOdykTA ocTaHyTCra Ha WHeKe NnHa Kopnyce, o6pa3yOTc8 SaKTePnn, KOTOpBIE MOryt BblBaTb cepbe3HyIO 60Je3Nb.
Ecn OTKlaBbTaB OunchKy Ha CnUWKOM DOJROe BpeM, OunchKa CtaHcT OueHcCLOX-HoN HpydoemKoN.
CunbHbIe 3aarpzHeHnM OryT Heo6paTmO NobpeuNTb DeTaJI.
- TsaTeIbHO cnoJIoCHnTE BCE OCTaTKn npOdykTa TeIIOB BoOn.
- B cnyuae Heo6xoDMOCTN BOCNOJIb3yI TECB 8eTKOJ DnA NCTKN 6ytblIOK.
- B cnlyae ecn HemeIeHHa Ounchka Mscopy6kn ABLaTcH HeBO3MOxHO, norgy3nte OTneBHe Ie TaJIb B pactBOp cpeCTBa IJI MaTbI NOcybl.
- B cnyuae ecn oocTKa c nomoubIO ueTKn dIyNCTK 6ytbIOK OKaKeTc8e3yCneHoi, npOnyctnte chepe3 mrcopy6ky cyxyo 6yIky IIN KycOK TBepDoro, cyxOxle6a. 3To nOMoxet ydaIITb n3 Kopnyca daXe OCTaTKn Tecta nocIe npnroTOBHeHH neueHb.
- После очinctи сдует поождать, пoka металлоческne DeТалл NOЛHOCTbIO BblCOxHyT,npexдe чem ChOBa co6paTb Mrcopy6ky.
07. XPAHEHNE

ONACHOCTbДЯdeTei
XpaHnte Mrcopy6ky n ee OTdeIbHbIe DeTaJI N C yxOM MeCTe, HeIOCTyNHom dIa ITei. OTdeIbHbIe DeTaJI N CLOXHTe B IpeDyCMOTpeHHbI dJIra 3TOrO TOJkaTeJIc pe3b6OBoN KpbIwKoI.
08.ДЕКЛAPALEО COOTBETCTBIM

OTMeTka CE npmeneHa B COOTBeTCTBnC dIpeKtNbAmN Ebponeckoro CO1O3a.
ДeКларачи O COOTBETCTBnH HaxOДNTcYДиСТрБьTOpa:
acllll bacc aac clll lacc alil gll
.8.
A
3 4 J1
7 1/2.2.
i/18 8 8.3.
a.s11/ aia511
A Jll jil) 111111111111111.1.
.2
y
1
3 14 3
2000 41 4
2 5.
7.5 6
3 gll 14 gll clw .3 gll pll
AaJr 1
A
aaii

4
g j 2. g a j 1 j 1 1 1 1 1 1 1 1 1
3 40
2 5.
= 5x^2 - 4x + 3
2.5.1, 2.5.1
Lai Lai Lai Su Ssu
aiai i 1
3 4 J1.1
7 2.
7 10 3
= 5x^2 - 250
ailll llll llll llll llll llll
30 2
05.
p 111 a
3 4 J1
5 2.
13/12/11 aaii iiaai j 3
山
= 1
a 1 1 1 1 1 1 1 1 1 1 1 1 1 1 1 1 1 1 1 1 1 1 1 1 1 1 1 1
6 4jai 4.1
pabll jaoa aaiia aaiia aaiia
A Jll j) 1111111111111111.1(
2
y j 1

04.
1
Jg 150
a aaaal aee eae ae aeaiee
S OBC = S COD + S BOC - S BOC
i 1
i
j 1
1
1
a 1
J 1 J 1 J 1 J 1 J 1 J 1 J 1 J 1 J 1
15 152
jibbi jbi
glial glial glial glial glial glial glial glial glial glial glial glial glial glial glial glial glial glial glial glial glial glial glial glial glial glial glial glial glial glial glial glial glial glial glial glial glial glial glial glial glial glial glial glial glial glial glial glial glial glial glial

y 1
aill jll lll 11 11 11 11
jll jll l 1
1gjjjglill j! glll: iic 1j.


AaI 1
y 11111111111
JbLbawd jglljks 1s yjyjyjyjyjyjyj
Jc 1 Jn nn nnnnnnnnnnnnnnnnnnnnnnnnnnnnnnnnnnnnnnnnnnnnnnnnnnnnnnnnnnnnnnnnnnnnnnnnnnnnnnnnnnnnnnnnnnnnnnnnnnnnnnnnnnnnnnnnn
aia 15ya jia jia jia / g aiaia
J 1
jll jiee e 111 1000 4 8 (j5kll) p 1
y 1 1 1 1 1 1 1 1 1 1 1 1 1 1 1 1 1 1 1 1 1
A业
j 1
.
pabll jj 10 j 10 j 10 j 10 j 10 j 10 j 10 j 10 j 10 j 10 j 10 j 10 j 10 j 10 j 10 j 10 j 10 j 10 j 10 j 10 j 10 j 10 j 10 j 10
- c 个数,且 2^c - 1 个数之
A
.
.
gaaal piaa
y
aalaaal glab1y gl aaylall oia aiaagall lglal
Jlalll jie c. aillal l 1 y jalil jjiall jjus jg j
gagall gaaallll jlaaegg gagall gaiall g aall
Jbll 1
J clill 2 aaiil jnnn nn nnnn nnnn nnnn nnnn nnnn nnnn nnnn nnnn nnnn nnnn nnnn nnnn nnnn nnnn nnnn nnnn nnnn nnnn nnnn nnnn nnnn nnnn nnnn nnnn nnnn nnnn nnnn nnnn nnnn nnnn nnnn nnnn nnnn nnnn
jilwizg 121 jzgl jL iia
1 1
PQ = 2 PQ = 1
1 1