SousVide Cooker Pro 8201 - Other kitchen appliances Solis - Free user manual and instructions
Find the device manual for free SousVide Cooker Pro 8201 Solis in PDF.
| Product type | Sous vide cooker |
| Brand | Solis |
| Model | SousVide Cooker Pro 8201 |
| Power supply | 220–240 V~ / 50 Hz |
| Power | 1200 W |
| Tank capacity | 6 liters |
| Dimensions (L x H x D) | 23.5 x 26.5 x 28.0 cm |
| Weight | Approximately 3.2 kg |
| Temperature range | 25 °C to 85 °C (77 °F to 185 °F) |
| Timer | 0 to 99 hours |
| Tank material | Stainless steel |
| Lid | With side handles and viewing window, removable and reversible |
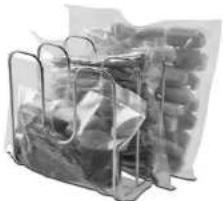
| Bag rack | Removable, for holding bags in water |
| Water circulation system | Yes, with integrated water inlet and outlet |
| Display | Screen with current and set temperature |
| Controls | Touch buttons: ON/OFF, Start/Stop, Timer, Temperature, +/– |
| Safety | Automatic shut-off at end of timer, error message E001 if water level is insufficient |
| Cleaning | Manual cleaning with warm water; automatic cleaning cycle possible; do not put in dishwasher |
| Descaling | Recommended monthly with diluted SOLIPOL® forte (1/4 descaler + 3/4 water) |
| Compatible accessories | Solis vacuum bags, Solis vacuum sealers (not included) |
| Intended use | Domestic, on a stable and dry work surface |
Frequently Asked Questions - SousVide Cooker Pro 8201 Solis
User questions about SousVide Cooker Pro 8201 Solis
0 question about this device. Answer the ones you know or ask your own.
Ask a new question about this device
Download the instructions for your Other kitchen appliances in PDF format for free! Find your manual SousVide Cooker Pro 8201 - Solis and take your electronic device back in hand. On this page are published all the documents necessary for the use of your device. SousVide Cooker Pro 8201 by Solis.
USER MANUAL SousVide Cooker Pro 8201 Solis
natural_image
Exterior view of a Sois industrial microwave oven with digital display and control buttons (no readable text or symbols)natural_image
Stacked plastic containers with glass outlines, no visible text or symbols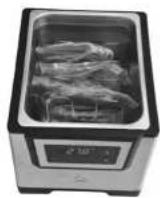
Solis of Switzerland AG
natural_image
Stacked plastic containers with a transparent plastic cover (no visible text or symbols)
Solis of Switzerland SA
Solis-Haus • CH-8152 Glattbrugg-Zurich • Suisse
natural_image
Stacked plastic containers with glass lids, no visible text or symbols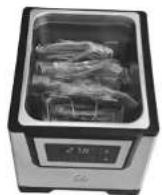
Dimensioni ca. 23,5x26,5x28,0 cm
Solis of Switzerland SA
Solis-Haus • CH-8152 Glattbrugg-Zurigo • Svizzera
Telefono +41 44 874 64 54 • Fax +41 44 874 64 99
info@solis.ch • www.solis.ch • www.solis.com
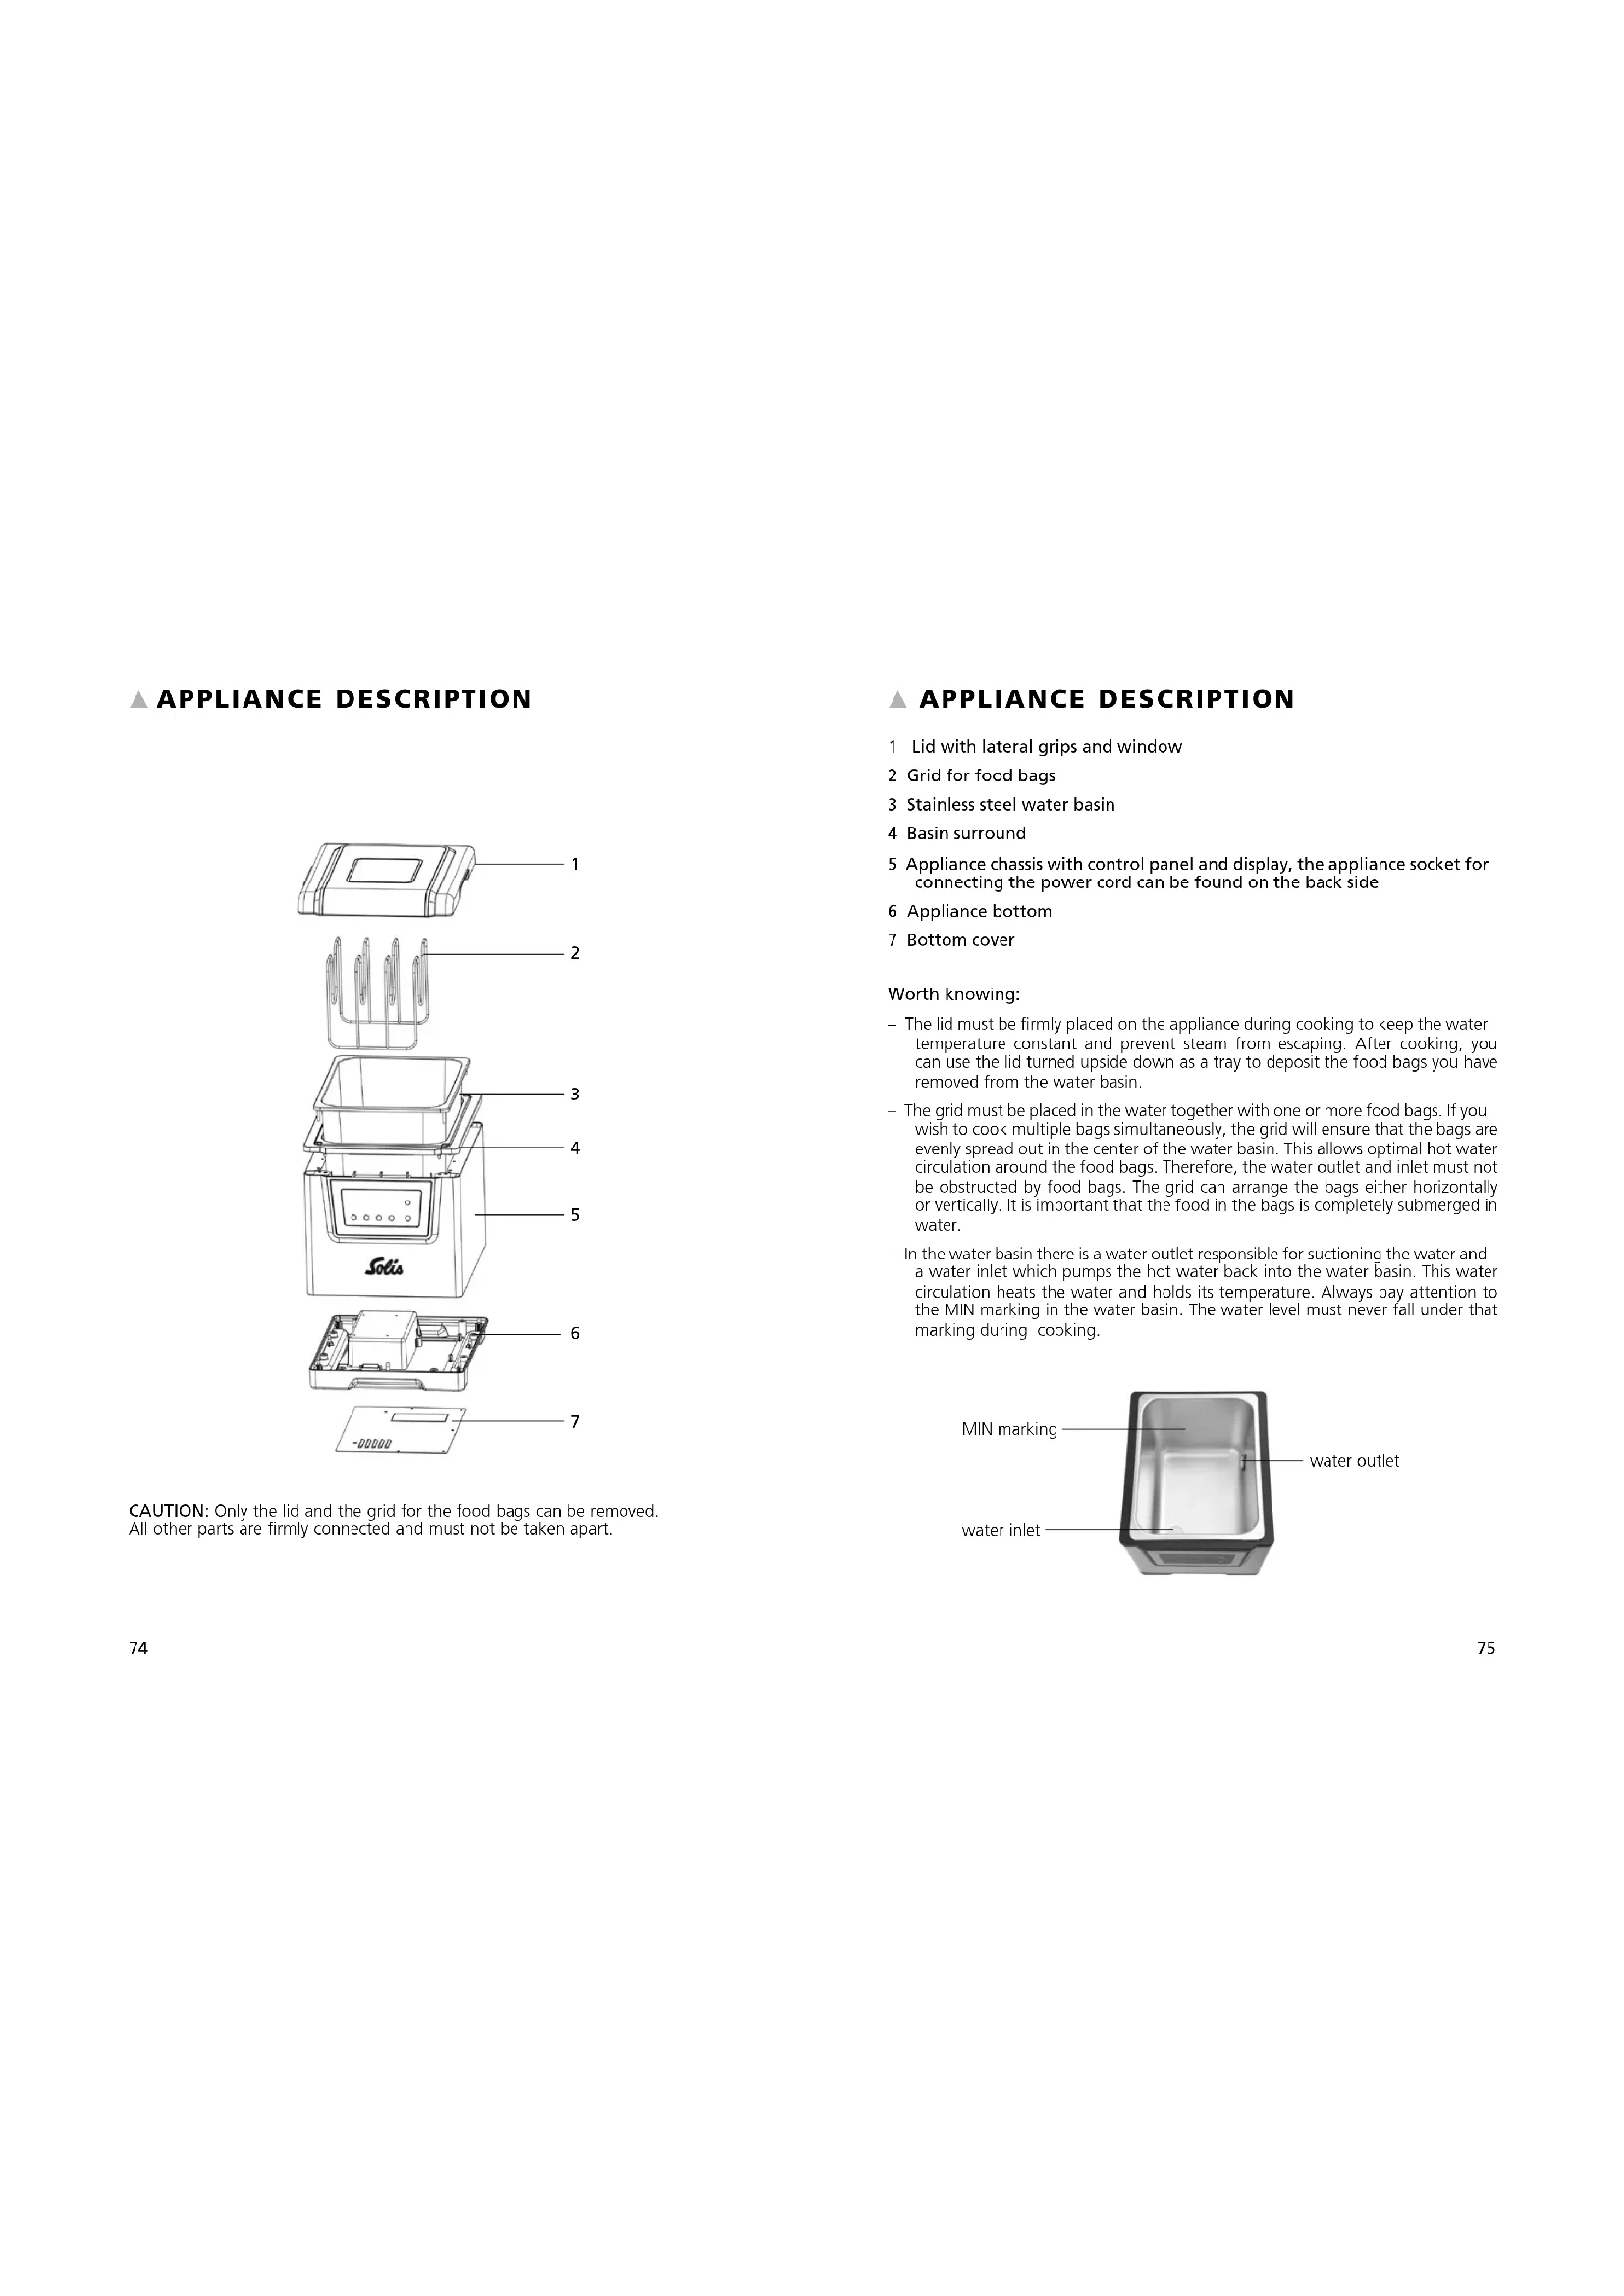
▲ APPLIANCE DESCRIPTION

text_image
1 2 3 4 5 Solis 6 7 -00000CAUTION: Only the lid and the grid for the food bags can be removed. All other parts are firmly connected and must not be taken apart.
▲ APPLIANCE DESCRIPTION
1 Lid with lateral grips and window
2 Grid for food bags
3 Stainless steel water basin
4 Basin surround
5 Appliance chassis with control panel and display, the appliance socket for connecting the power cord can be found on the back side
6 Appliance bottom
7 Bottom cover
Worth knowing:
- The lid must be firmly placed on the appliance during cooking to keep the water temperature constant and prevent steam from escaping. After cooking, you can use the lid turned upside down as a tray to deposit the food bags you have removed from the water basin.
- The grid must be placed in the water together with one or more food bags. If you wish to cook multiple bags simultaneously, the grid will ensure that the bags are evenly spread out in the center of the water basin. This allows optimal hot water circulation around the food bags. Therefore, the water outlet and inlet must not be obstructed by food bags. The grid can arrange the bags either horizontally or vertically. It is important that the food in the bags is completely submerged in water.
- In the water basin there is a water outlet responsible for suctioning the water and a water inlet which pumps the hot water back into the water basin. This water circulation heats the water and holds its temperature. Always pay attention to the MIN marking in the water basin. The water level must never fall under that marking during cooking.

text_image
MIN marking water outlet water inlet▲ IMPORTANT SAFETY PRECAUTIONS
Please read through this user manual thoroughly before using your Solis Sous-Vide Cooker Pro, so that you become familiar with your appliance and can use it safely. We thoroughly recommend that you keep these instructions and, if you pass the appliance on, that you also hand these instructions to the new owner.
For your own safety, please observe the following safety measures when using electrical appliances:
- To prevent electric shock, neither the appliance chassis connected to the power supply nor the power cord and power plug resp. connection adapter must come into contact with water or other liquids. Risk of electric shock! Should the outside of the appliance resp. the power cord or the power plug/connection adapter come into contact with liquid, use dry rubber gloves to immediately pull the power plug from the socket.
- Do not operate or unplug the appliance with wet or moist hands or feet.
- Before using the appliance, check that the voltage stated on the type plate matches your mains voltage.
- Do not leave the power cable hanging over table edges so that it can be pulled. Make sure that it does not come into contact with hot surfaces, such as hotplates or a radiator, or that they come into contact with the appliance.
- Keep the appliance away from hot gas, hot ovens and other heat-emitting appliances or heat sources. Never use the appliance on a hot or wet surface. Never place the appliance near moisture, heat and naked flames. Keep the appliance away from moving parts or appliances.
-
Never carry the appliance by the power cord and do not place anything on the power cord. Never pull on the power cord to disconnect the appliance from the power mains. Only pull on the plug.
-
We recommend that you do not use an extension cable with this appliance. Do not place the appliance directly underneath a power socket.
- During use, the appliance has to be placed on a solid, dry, stable and moisture resistant surface, f.e. a table or a worktop.
- The appliance is not designed for outdoor use. Do not use in vehicles or on boats.
- Keep a minimum distance of 20 cm between the appliance and walls, curtains or other heat and steam sensitive materials and objects. Ensure free air circulation above the appliance.
- Never cover the appliance with cloths or the like while it is in use or in a still warm state.
- Unplug the appliance when it is not in use or unattended, and before cleaning. We recommend the use of a residual current device (RCD safety switch) to ensure additional protection during the use of electrical appliances. It is advisable to use a safety switch with a rated residual operating current of 30 mA maximum. For professional advice consult an electrician.
- Do not make any adjustments to the appliance, cable, plug or accessories.
- Incorrect use may cause injury!
- Never take hold of an appliance that has fallen into water or another liquid. Always pull the power plug before removing it. Do not use the appliance again until you have had its ability to function safely checked by Solis or a Solis approved service centre.
- Never place the appliance in such a way that it might fall into water or, on its outside, come into contact with water or another liquid (f.e. in or next to a sink).
- Never submerge the appliance, power cable or plug in water, or bring it into contact with water or other liquids.
- Place the appliance so that it is never exposed to direct sunlight.
-
Never put sharp or pointed objects and tools into the appliance openings. The appliance may become damaged – danger of electric shock!
-
Do not shake or relocate the appliance while it is in operation. Never move the appliance if it is filled with water and switched on! The hot water might escape and cause scaldings!
- Only use the appliance as described in this manual. Only use with the provided accessories or accessories recommended by Solis, incorrect accessories can lead to damage of the appliance, resp. to fire, electric shock or personal damage.
- Never start the appliance using a remote or timer.
- This appliance is only for domestic use and is not suitable for commercial use.
- Remove and discard all packaging materials and potential stickers or labels before using the appliance for the first time.
- Check the appliance before each use and ensure that the appliance, power cord and plug resp. connection adapter are not damaged.
- To prevent electric shock, do not use the appliance if cord or power plug are damaged or if the appliance has other faults, has fallen down, is damaged in any other way or is leaking water. Never attempt repairs yourself, but take your appliance to Solis or a Solis approved service centre in order to get it inspected or mechanically and electrically repaired.
- People with limited physical, sensorial or mental capabilities as well as unknowing or inexperienced people and children must not use the Sous-Vide Cooker Pro except when supervised or thoroughly instructed on how to use the appliance by a person responsible for their safety. Additionally, they must be aware of the dangers arising from the appliance and know how to operate it safely. Cleaning and maintenance of the appliance must not be done by unsupervised children. Under no circumstances must the appliance be used or cleaned by children under the age of 8.
- During use keep the appliance with power cord away from children – risk of burns!
-
Children must be supervised, so that they do not play with the appliance.
-
CAUTION: The temperatures of the appliance parts and the water are very high during cooking and some time afterwards! The lid gets hot during cooking! Therefore, lift the lid with both hands using the grips on the sides and avoid the hot steam which has collected under the lid and will escape when opening the lid. Hot drops of water might also drop down from the inside of the lid. Using cooking gloves or potholders is recommended.
- Never hold the appliance directly under a water faucet to fill it with water. Use a jug to pour water into the water basin.
- When not using or cleaning the appliance, always switch it off with the ON/OFF button, pull the power plug and remove the connection adapter from the appliance. Let the appliance and the contained water cool down completely before pouring the water out resp. cleaning or moving the appliance.
- Only connect the power plug to the power outlet resp. switch on the appliance if the water basin is filled at least to the MIN marking with fresh tap water. Only fill the water basin with pure tap water, not any other liquids. Please make sure that the bottom and outside of the appliance are completely dry before connecting the power cord.
- Please make sure that the water basin is not overfilled and remember that the water level will rise once the food filled vacuum bags are put in. We recommend checking the amount of water beforehand by placing the vacuum sealed food bags in the water with the grid. The food in the bag should be completely submerged in water. Then, remove the food bags with the grid once again and proceed as described under "Operation".
- During use, the lid has to be placed on the appliance, closing it. Do not place anything on the lid while the appliance is in use or in storage.
- To switch off, touch the ON/OFF button for 1 second and then pull the power plug.
-
NOTE: When using the appliance for the first time, a little bit of smoke might develop. This is normal for appliances that heat up during use and will stop after a short period of time.
-
Pull the plug after every use. Only then, the appliance is fully switched off.
- Keep the appliance clean. Always switch the appliance off and pull the plug from the power socket and the connection adapter from the appliance socket before cleaning and storing the appliance. Please refer to the notes given in the section "Cleaning and maintenance" on page 90 of this manual.
- Always fully unwind the power cord before connecting the connection adapter to the appliance socket and the power plug to the power socket.
▲ BEFORE FIRST USE
- Before using your Solis Sous-Vide Cooker Pro for the first time, please remove all advertisement stickers.
-Clean the stainless steel water basin with a soft, moist cloth. - Also wipe the lid with a soft, moist cloth.
- Place the Sous-Vide Cooker Pro on an even, dry and heat and moisture resistant work top and allow sufficient air circulation around the appliance.
- Vacuum seal the food you wish to cook in Solis bags with a vacuum sealer.
-Check the bag for a perfect seal to ensure the vacuum is kept. - Fill the water basin at least to the MIN marking with fresh tap water. Use a water jug to do that, never place the Sous-Vide Cooker Pro in a sink and never hold it under the water faucet.
CAUTION: The appliance will not start if the water level does not reach the MIN marking. The display will state the error code "E001".
NOTE: Please do not over fill the water basin and remember that the water level will rise once the food filled vacuum bags are placed in the water. We recommend checking the water level beforehand by placing the vacuum sealed food bags in the water with the grid before starting the appliance. The food in the bag should be completely submerged in water. Then, remove the food bags with the grid and proceed as described under "Operation".
- Make sure that the appliance bottom, the socket for the connection adapter and the outside of the appliance are completely dry.
- Fully unwrap the power cord and plug the connection adapter into the appliance socket on the chassis backside.
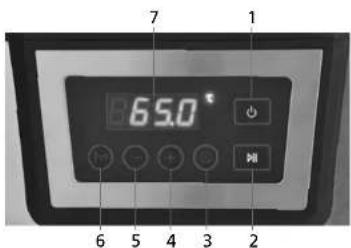
▲ THE FUNCTION BUTTONS
text_image
7 1 65.0° 6 5 4 3 21 ON/OFF button ⏻: Touch the ON / OFF button for 1 second to switch the appliance on or off. The display will light up once the appliance is switched on. Also, the red ⏻ symbol on the ON / OFF button will light up constantly once the appliance is switched on.
2 Start/Stop button ▶: With this button, you can start or stop the cooking process.
3 Timer button①: With this button, you can set the operation time of the Sous-Vide Cooker Pro. Settings between 00:00 and 99:00 are possible.
CAUTION! If you do not use the Timer button, the appliance will start cooking but not automatically switch off after a certain amount of time.
4 + button: With this button, you can increase the temperature resp. the time. Constantly touching the button will quickly change the setting.
5 - button: With this button, you can decrease the temperature resp. the time. Constantly touching the button will quickly change the setting.
6 Temperature button ^ C/ ^ F: With this button, you can choose units ( ^ C or ^ F) and set the water temperature. Touch the button once and the display starts flashing. Repeatedly touching the button will switch between ^ C and ^ F. While the display is flashing, you can set the desired water temperature with the buttons – and +. Temperatures between 25 ^ C and 85 ^ C (77 ^ F and 185 ^ F) are possible.
7 Display: Once the appliance is switched on, the current water temperature will show up on the display. While adjusting the temperature, the currently set temperature is shown. While adjusting operation time, the currently set time is shown. After that, the display will return to the current water temperature. The temperature unit (Celsius or Fahrenheit) is shown to the right of the display.
NOTE: All buttons are touch sensitive sensor buttons. They do not have to be pressed, touching them is sufficient.
▲ OPERATION
STARTING AND ADJUSTING THE APPLIANCE
- If you have completed all steps under "BEFORE FIRST USE", connect the power cord to a suitable wall outlet. The appliance beeps and the red ⏻ symbol in the ON / OFF button starts flashing.
- Touch the ON / OFF button for one second to switch the appliance on. When the appliance is switched on, you hear a signal sound, the red ⏻ symbol in the ON / OFF button lights up constantly and the display states the current water temperature.
NOTE: Should the water level exceed the MIN marking with the error code "E001" being displayed nonetheless, stir a little bit of table salt into the water.
-
Now set the desired cooking temperature:
-
Touch and release the Temperature button ^*G^ . Now the display flashes and the temperature can be set.
- Using the + and - buttons, you can set the desired temperature. Touching the + or - button for more than just a moment will quickly increase or decrease the temperature shown in the display. You can set a target temperature between 25 °C and 85 °C (77 °F and 185 °F).
-
Stop touching the button once the desired temperature is shown on the display. After 5 seconds, the display will return to showing the current water temperature in the water basin.
-
Now set the desired cooking time:
-
Touch the Timer button Ⓤ. Now the display flashes and the cooking time can be set.
- Using the + and - buttons, you can set the desired cooking time. Touching the + or - button for more than just a moment will quickly increase or decrease the time shown in the display. You can set a temperature between 00:00 (unlimited cooking time) and 99:00 (99 hours). Stop touching the button once the desired cooking time is shown in the display. After 5 seconds, the display will return to showing the current water temperature in the water basin.
NOTE: It is not urgently required that the cooking time is set. When the clock is set to 00:00, the Sous-Vide Cooker Pro will work until you manually switch it off again.
5. Now start the cooking process:
-Press the Start / Stop button▶II. A signal sounds to indicate that the heating process is being started. The ▶II symbol in the button constantly lights up blue, the current water temperature can constantly be told from the display.
6. The set water temperature is reached – place food in the water:
- Once the desired water temperature is reached, another signal sounds and the display and the symbol in the Start/Stop button ▶II flashes blue to remind you of placing the vacuum-bagged food in the water using the grid.
- Carefully open the lid with cooking gloves or potholders, use both hands and lid grips.
- Mind the hot steam and the hot water drops which have collected on the inside of the lid and tip the lid away from your body to prevent hot steam from fuming into your face.
- Place the food bags in the grid and carefully lower the grid into the hot water (do not reach into the water – you might scald yourself!). Check if the food in the vacuum bags is fully submerged in water. Top up with some hot water if the food is not fully covered with water.
natural_image
Stacked plastic containers with glass outlines, no visible text or symbols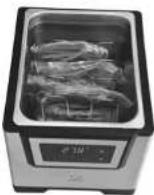
- Carefully place the lid back on the appliance and touch the Start/Stop button with dry hands. The appliance now keeps the temperature constant for the set cooking time. The display and the ▶II symbol on the Start / Stop button constantly light up blue.
7. Check remaining cooking time
- Once you have set the cooking time, you can always touch the Timer button and the display briefly shows the remaining cooking time. After that, the display returns to the current water temperature.
8. Cooking time has elapsed
- Once the cooking time has elapsed, a signal sounds, the display states "END" and the appliance switches off. As described previously, carefully open the lid and remove the food filled vacuum bags with a pair of household tongs. For short transport, you can place the bags on the lid turned upside down. -Carefully cut the bags open and remove the cooked food.
9. Switching off and unplugging the appliance
- Once the cooking process is completed, switch the appliance off with the ON / OFF button (touch for 1 second) and pull the power plug. After a pre-set cooking time has elapsed, the ON / OFF button has to be pressed twice. Always pull the connection adapter out of the appliance socket so that the power cord is no longer connected to the appliance. - Let the appliance and the water cool down completely before pouring away the water and cleaning the appliance.
NOTES:
To stop or pause the cooking process during the set time, touch the Start / Stop button ▶ for one second. Touching the Start / Stop button again will resume the cooking time countdown. You can change the cooking time or water temperature at any time, proceed as described in steps 3 and 4.
To check the settings during the cooking process, briefly (1/2 second) touch the Timer or Temperature buttons.
To completely switch the appliance off, touch the ON / OFF button for one second.
COOKING CHART
The following chart is intended to help you with getting used to your new appliance and give you directions as to which food should be cooked for what time at what temperature. Of course, you can implement your own preferences.
With the Temperature button you can set the water temperature very precisely to a degree of up to 0,1 °C.
The following chart was made for foods usually stored in the fridge, meaning they have a temperature of around +5 °C.
| Food Thickness | Tempe- | rature | Minimum time | Maximum time | |
| Beef: Filet, steak, entrecôte | raw 20 mm | 52°C 2 hours | 4 hours | ||
| medium | 20 mm | 55°C | 2 hours | 4 hours | |
| well done | 20 mm | 65°C | 2 hours | 4 hours | |
| Lamb, no bones | medium | 90 mm | 55°C | 20 hours | 30 hours |
| well done | 90 mm | 65°C | 20 hours | 30 hours | |
| Pork | Filet | 40 mm | 64°C | 2 hours | 4 hours |
| Neck | 15 mm | 60°C | 4 hours | 20 hours | |
| Chicken | Breast filet | 25 mm | 64°C | 2 hours | 4 hours |
| Fish | Fatty fish, slightly pink | 30 mm | 55°C 20 minutes | 40 minutes | |
| Fatty fish, well done | 30 mm | 60°C 20 minutes | 40 minutes | ||
| Low-fat fish, well done | 15 mm | 58°C 20 minutes | 40 minutes |
| Food Thickness Tempe- | rature | Minimum time | Maximum time | ||
| Vegetable Beans | Beetroot up to | 50 mm 84°C 1 | hour 6 hours | ||
| Carottes up to | 50 mm 84°C | 1 hour 6 hours | |||
| Knob celery up to | 50 mm 84°C 1 | hour 6 hours | |||
| Potato up to | 50 mm 84°C 1 | hour 6 hours | |||
| Asparagus up to | 70 mm 84°C | 30 minutes 1 hour | |||
| Onion up to | 70 mm 84°C 30 | minutes 1 hour | |||
| Broccoli up to | 70 mm 84°C | 30 minutes 1 hour | |||
| Cauliflower up to | 70 mm 84°C | 30 minutes 1 hour | |||
| Aubergine up to | 70 mm 84°C | 30 minutes 1 hour | |||
| Fennel up to | 70 mm 84°C 30 | minutes 1 hour | |||
These statements only refer to the thickness of the raw slices or pieces of food. The thickness of the food has a significant effect on the cooking time, even more than its weight.
An example:
As can be told from the chart, a beef steak with a thickness of 20 mm has to be cooked for a minimum of 2 hours and a maximum of 4 hours. The thicker the meat, the longer the cooking time needs to be.
If you wish to cook a beef steak with a thickness of 70 mm, the cooking process will take at least 5 hours at the stated temperature. However, a beef steak (or filet or entrecôte) being prepared in the Sous-Vide Cooker Pro should not be thicker than 70 mm.
TIPS FOR COOKING TIME:
Tender pieces of meat such as filets should not be overcooked (max. 4 or 6 hours), otherwise the meat quality might be impaired.
Tougher pieces of meat require more cooking time (6 to 8 hours or more) to make the meat tender.
Chewy or fatty pieces of meat, such as pot roast or leg of lamb, should be cooked at temperatures high enough to "melt" the collagen fibers into gelatin, meaning at least at 60°C for at least 24 hours. Very chewy kinds of meat might even need up to 72 hours to make the meat come out juicy and tender.
Poultry should be prepared in separate pieces, as the cavities in the poultry might cause the bag to "swim" due to the trapped air, and not be submerged in water.
Very fibrous kinds of vegetable require a higher temperature than meat. Longer cooking times cause fruit and vegetables to become very soft in consistency, making them ideal for making soups and purees.
In general, please make sure that no air gets trapped in the bag when vacuum sealing food, as this will buoy up the bags, making them float on the surface.
TIPS FOR SEASONING:
The cooking method of Sous-Vide conserves the aroma of the food. When you add spices and oils directly into the vacuum bags, the chosen spices and herbs will unfold even more intensive aroma.
Recommendation 1: Flavoring butter and spreading it in the vacuum bag Mix fresh or dried herbs, spices, salt and pepper and, in a blend with unsalted butter, turn them into herb butter. Spread the herb butter in the vacuum bag before filling it with food.
CAUTION: The front end of the vacuum bag should not come into contact with the butter, so that the bag can be sealed air tightly.
Recommendation 2: Making and freezing broth with herbs
Prepare vegetable, beef or chicken broth with herbs, spices, salt and pepper and maybe vegetables and meat. Let the broth cool down, pour the broth into an ice cube tray and freeze the broth in the refrigerator. If desired, you can add an ice cube of broth to the food in the vacuum bag. During cooking, the ice cube will melt and add its aroma to the food.
Recommendation 3: Making and refrigerating herbal oil
CAUTION: Do not use any native extra vergin olive oil, as this might develop a bitter or metallic aroma.
Blend herbs and spices with olive oil, cool the mixture in the refrigerator until it is semisolid and, by tablespoons, add it to the food in the vacuum bag.
NOTE: We recommend not blending wine or other spirits with the oil, as alcohol can develop a metallic taste in Sous-Vide appliances.
IMPORTANT: It is important that none of the spice mixtures come into contact with the edge of the bag, so that the vacuum bag can be sealed air tightly.
It is a handy tip to flip the edge of the bag inside out before filling the bag with spices and food to prevent it from coming into contact with the food and the spice mixture. If the vacuum bag can not be evacuated and sealed, use a fresh vacuum bag.
TIPS FOR CRISPLY FRIED MEAT OR FISH
The method of Sous-Vide cooking will not make the meat or fish caramelized or crispy. Therefore, should you prefer your meat or fish crispy, we recommend frying it at intense heat in the pan or on the grill with a little oil or placing it on the grating in the oven and grilling it in the grill function after Sous-Vide cooking. Alternatively, you can use a flambé burner to caramelize the surface.
It should, however, only be fried briefly (1–2 minutes), so that only the surface becomes crispy.
▲ CLEANING AND MAINTENANCE
- Switch the appliance off with the ON/OFF button (touch the button for 1 second) and pull the power plug from the socket. Completely remove the power cord from the appliance to prevent it from coming into contact with water.
- Wait for the appliance and the water to cool down before pouring the water into the sink. Clean the water basin with a cloth and, if necessary, some warm dish water. The sieve on the water outlet should be cleaned with a soft brush and some water. After that, carefully clean and dry the water basin.
- The lid and the grid should first be cleaned carefully with warm dish water and a soft cloth and then rinsed and dried. Always let the lid and the water basin dry completely before closing the lid.
- CAUTION: The Sous-Vide Cooker Pro and the lid can not be cleaned in the dish washer.
- Regularly - at least once a month or after a vacuum bag has ruptured - perform a cleaning cycle to clean the appliance inside as well. To do that, fill the water basin to the MIN marking with fresh tap water, add a little non-foaming dish soap, connect the power cord to the appliance and the power socket and start the appliance: Temperature setting 40^ , operating time 20 minutes. After that, pour the water into the sink and, if necessary, repeat the cleaning cycle.
- After that, allow the appliance and the water basin to dry completely before replacing the lid.
- In general, do not use any aggressive or scouring detergents or metal sponges to clean the water basin, the lid and the appliance, as they might damage the surfaces. Only fill the water basin with fresh tap water.
- The appliance outside as well as the appliance bottom should only be wiped with a wet cloth and dried. Never use alkaline detergents, only a soft cloth and a mild detergent.
- Never submerge the Sous-Vide Cooker Pro or the power cord in water and avoid bringing the outer chassis or the appliance bottom into contact with water.
WARNING:
The connection adapter has to be removed from the appliance socket before the Sous-Vide Cooker Pro is cleaned. In any case, the appliance socket has to be completely dry before the appliance is used again.
▲ DESCALING
- Depending on water hardness and frequency of use, the Solis Sous-Vide Cooker Pro should be descaled from time to time, approx. once a month, so that water circulation can continue unimpeded.
-We recommend using SOLIPOF ^ forte descaler by Solis, in a solution with water. -Pour 675 ml SOLIPOF ^ forte and 2'025 ml water into the water basin to reach the minimum amount of 2'700 ml at the MIN marking. The dilution ratio should always be a quarter of SOLIPOF ^ forte to three quarters of water. Plug the appliance in and switch it on, choose a temperature of approx. 50 °C and let the descaling solution circulate for approx. 20 minutes. Then, switch the appliance off and let the descaling solution sit for approx. 20 minutes. Then, pull the plug resp. connection adapter and pour the descaling solution out. - Fill the water basin at least to the MIN marking with fresh tap water, plug the appliance in and switch it on and let this solution circulate for approx. 20 minutes at 85^ . Then, switch the appliance off, unplug it and pour the water away.
- Repeat this rinsing process with fresh tap water a second time to remove all remains of the descaling solution.
- Damage caused by the use of improper descaling agent is not covered by warranty.
▲ STORAGE
- Check if the appliance is switched off and the power plug is pulled, resp. if the power cord is removed.
- Check if the appliance, the water basin, the grid and the lid are absolutely cool, clean and completely dry.
- Place the grid and possibly the power cord in the appliance and close the lid.
- Store the appliance standing upright in a dry, dark place, best in the original packaging. Do not place anything on the appliance.
- Always keep the appliance and the power cord out of the reach of children.
▲ TROUBLESHOOTING
If you wish to use the appliance but it won't start, we recommend the following:
- Check that the power plug is firmly connected to the power socket and the connection adapter is firmly connected to the appliance socket.
- Check the power cord for possible damage.
- Check if the power socket is functioning properly by plugging in another household appliance.
- Check if the control light on the ON/OFF button is constantly lit up. Touch the button for 1 second.
| Error code | Possible cause Solution | |
| E001 Water | basin is empty. Fill the water basin | up to the MIN marking with fresh tap water. |
| Not enough water in water basin. | Fill the water basin up to the MIN marking with fresh tap water. | |
| Appliance not positioned evenly. | Place the appliance on an even worktop. | |
| The system does not detect the water in the water basin. | Stir some table salt into the water. | |
| Electronic disfunction Bring the appliance to your Solis service center. | ||
| E002 Filter | is dirty. Clean the filters with a soft brush and some water. | |
| The vacuum bag obstructs the water inlet or water outlet. | Reposition the vacuum bag, using the included grid. | |
| The vacuum bag has ruptured and food is blocking the water inlet. | Pour out the water and perform a cleaning cycle as described in "Cleaning and maintenance". | |
| Electronic disfunction Bring the appliance to your Solis service center. | ||
| E009 Electronic disfunction Bring the appliance to your Solis service center. | ||
▲ TECHNICAL SPECIFICATIONS
Model-no. SC3200, type 8201
Product description Sous-Vide Cooker
Voltage/frequency 220–240 V\~/50 Hz
Output 1200 watts
Capacity 6 liters
Measurements approx. 23,5 x 26,5 x 28,0 cm (width x height x depth)
Weight approx. 3,2 kg
Technical changes reserved
▲ ACCESSORIES AND SUPPLIES FOR THE SOLIS SOUS-VIDE COOKER PRO
| Art.-no. Article | ||
| 922.21 Vacuum sealer | Solis Vac Premium |  |
| 922.20 Vacuum sealer | Solis Vac Prestige |  |
| 922.11 Vacuum sealer | Solis EasyVac Pro |  |
| 922.13 Vacuum sealer | Solis EasyVac Pro metal | 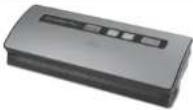 |
| 922.16 Vacuum sealer | Solis Vac Plus |  |
| 922.17 (swiss plug)922.18 (SCHUKO plug) | Vacuum sealerSolis Vac Professional |  |
| Art.-no. Article | ||
| 922.52 Vacuum bagging | film Solis(2 rolls 15 x 600 cm) | 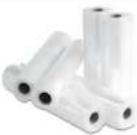 |
| 922.51 Vacuum bagging | film Solis(2 rolls 20 x 600 cm) | |
| 922.50 Vacuum bagging | film Solis(2 rolls 30 x 600 cm) | |
| 922.61 Vacuum bags Solis | (50 bags 20 x 30 cm) | 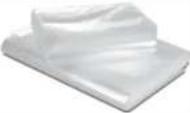 |
| 922.64 Vacuum bags Solis | (50 bags 30 x 40 cm) | |
| 703.01 SOLIPOL | ^ forte descaling agent(folding bottle containing 1'000 ml) | 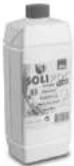 |
The accessories for your Solis Sous-Vide Cooker Pro are available from good specialist stores or Solis of Switzerland Ltd. Telephone: 0848 804 884, Telefax: 0848 804 890, email: info@solis-onlineshop.ch, www.solis-onlineshop.ch (Shipping only within Switzerland)

DISPOSAL

EU 2002/96/EC
Information for correct disposal of the product in accordance with the European Directive 2002/96/EC
At the end of its working life this equipment must not be disposed of as an household waste. It must be taken to special local community waste collection centres or to a dealer providing this service. Disposing of electrical and electronic equipment separately avoids possible negative effects on the environment and human health deriving from an inappropriate disposal and enables its components to be recovered and recycled to obtain significant savings in energy and resources. In order to underline the duty to dispose of this equipment separately, the product is marked with a crossed-out dustbin.
Solis of Switzerland Ltd reserves the right to carry out technical and visual changes and modifications to improve the product at any time.

HELPLINE:
091 802 90 10
(Only for customers in Switzerland)
This item stands out due to its long-life cycle and reliability. Despite this though, if a malfunction ever occurs, simply give us a call. Often a breakdown can be easily and quickly remedied with the right tip or technique without having to straight away send off the device for repair. We will give you all the advice and practical support you require.
Keep the original packaging in a safe place so that you may use it in the event that transportation or shipping of the product becomes necessary.
Solis of Switzerland Ltd
Solis-House • CH-8152 Glattbrugg-Zurich • Switzerland
Phone +41 44 874 64 54 • Fax +41 44 874 64 99
info@solis.ch • www.solis.ch • www.solis.com
▲ APPARAATBESCHRIJVING

text_image
1 2 3 4 5 Solis 6 7 -00000▲ APPARAATBESCHRIJVING
natural_image
Stacked plastic containers with a transparent plastic cover (no visible text or symbols)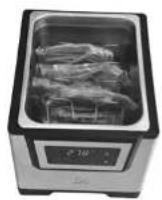
Solis of Switzerland AG
Solis-Haus • CH-8152 Glattbrugg-Zürich • Zwitserland
Telefoon +41 44 874 64 54 • Fax +41 44 874 64 99
info@solis.ch • www.solis.ch • www.solis.com