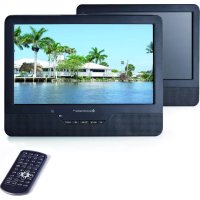
PDB1960 - Portable DVD Player Soundmaster - Free user manual and instructions
Find the device manual for free PDB1960 Soundmaster in PDF.
User questions about PDB1960 Soundmaster
0 question about this device. Answer the ones you know or ask your own.
Ask a new question about this device
Download the instructions for your Portable DVD Player in PDF format for free! Find your manual PDB1960 - Soundmaster and take your electronic device back in hand. On this page are published all the documents necessary for the use of your device. PDB1960 by Soundmaster.
USER MANUAL PDB1960 Soundmaster
natural_image
Line drawing of a device with front panel, screen, and control panel (no text or symbols)DEUTSCH ENGLISH FRANÇAIS ITALIANO DUTCH
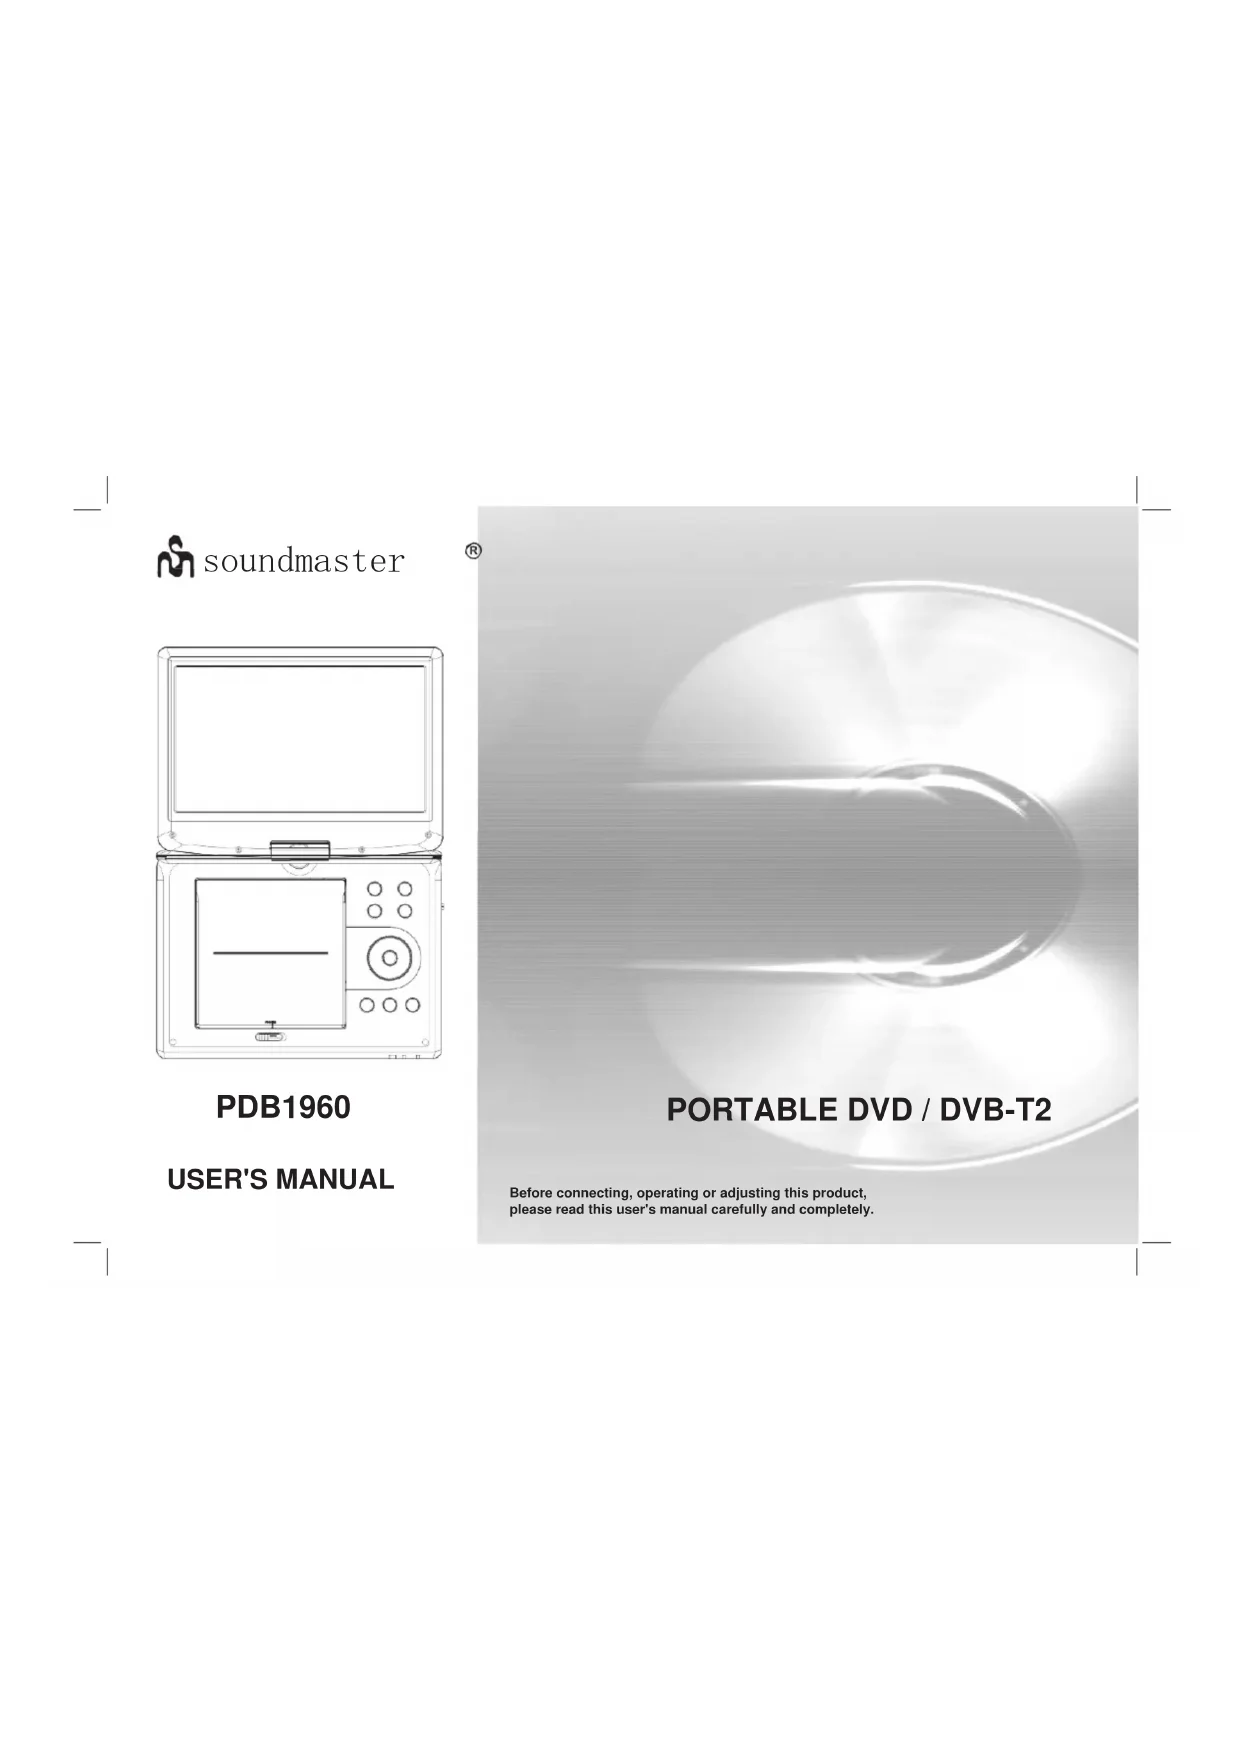
PDB1960 PORTABLE DVD / DVB-T2
Bedienungsanleitung
Vers. 2
text_image
Technical diagram of a mechanical device with numbered components and exploded viewtext_image
Installation Guide OSD Language Country Channel Search English Germany EXIT Confirmtext_image
Program Program Edit EPG Sort LCN By LCN On Return ConfirmSendereinstellungen
text_image
Program Guide 002 UKTV Brickides 19 Nov 16:30-17:00 Street Cafe 19 Nov 17:00-17:30 Good Food Bites 19 Nov 17:30-18:00 Gardens Unplugged 19 Nov 18:00-18:30 Water Gardens 19 Nov 18:30-18:59 Garden ER 19 Nov 18:59-19:01 UK Bright Ideas 19 Nov 19:01-00:59 UK Bright Ideas 20 Nov 00:59-06:59 UK Bright Ideas 20 Nov 06:59-07:01 UKTV Bright Ideas 20 Nov 07:01-07:25 Style Street 20 Nov 07:25-07:30 Too Good to Eat Fri. 19 Nov 2004 16:59 Street Cafe Amusement Salvador Series in which Dan Roland travels the world semping the best authentic street food. This edition comes from Salvador. Page: 1 / 1 OK Book INFO Book LIST Page Down Page Uptext_image
Options OSD Language Subtitle Language Audio Language Digital Audio English English English PCM Return ConfersOSD Language
natural_image
Line drawing of a portable electronic device with front panel and control panel (no text or symbols)PDB1960
USER'S MANUAL
®
PORTABLE DVD / DVB-T2
Before connecting, operating or adjusting this product, please read this user's manual carefully and completely.
Important Safety Instructions

Warning: To reduce the risk of electric shock, do not remove the cover or back. There are no user-serviceable parts inside. Refer servicing to qualified personnel.

Warning: To prevent fire or electric shock hazard, do not expose the unit to rain or moisture.
Do not expose the Adaptor and portable DVD to water (dripping or splashing) and no objects filled with liquids, such as vases, should be placed on the unit.
Keep the portable DVD away from direct sunlight and heat source such as radiators or stoves.
Do not block the ventilation openings. Slots and openings on the unit are provided for ventilation. The openings should never be blocked by placing your portable DVD on a cushion, sofa or other similar surface.
Do not place the portable DVD on unstable cart, stand, tripod, bracket or table. The unit may fall, resulting in possible damage or injury.
Never place heavy or sharp objects on the LCD panel or frame.
Only use the AC adapter included with portable DVD. Using any other adapter will void your warranty.
The plug of AC adaptor is used as the disconnect device, the disconnect device shall remain readily operable.
Unplug the power from the outlet when the unit is not in use.
Attention should be drawn to the environmental aspects of battery disposal.

CAUTION: Danger of explosion if battery is incorrectly replaced. Replace only with the same or equivalent type.

WARNING: The battery (battery or batteries or battery pack) shall not be exposed to excessive heat such as sunshine, fire or the like.

WARNING: Excessive sound pressure from earphones or headphones can cause hearing loss.

WARNING: Only use attachments/accessories specified provided by the manufacturer, the portable DVD is supplied by AC adapter, the AC adapter is used as disconnect device, the disconnect device shall remain readily operable.

Caution: Danger of explosion if battery is incorrectly replaced, replaced only with the same or equivalent type (Lithium battery)
WARNING
DO NOT INGEST BATTERY, CHEMICAL BURN HAZARD
This product contains a coin/button cell battery. If the coin/button cell battery is swallowed, it can cause severe internal burns in just 2 hours and can lead to death. Keep new and used batteries away from children. If the battery compartment does not close securely, stop using the product and keep it away from children.
If you think batteries might have been swallowed or placed inside any part of the body, seek immediate medical attention.
Safety Precautions
WARNING
RISK OF ELECTRIC SHOCK DO NOT OPEN

Warning: This digital video disc player employs a laser system. Use of controls, adjustments, or the performance of procedures other than those specified herein may result in hazardous radiation Exposure.

Warning: To prevent direct exposure to laser beam, do not open the enclosure. Visible laser radiation when open.

Warning: Never stare directly into the laser beam.

Caution: Do not install this product in a confined space such as a book case or similar unit.

Warning: when the unit using by child, parents must make sure to let the child understand all contents in Instruction book how battery using to guarantee using battery correctly all the time.

Warning: when find battery overheat, swell or dour, please stop using battery and contact service centre for getting replacement.

Warning: do not charging battery on the place of insufficient ventilation such as: mattress, sofa, cushion, soft mat.....

Warning: we will not take any responsibility if user incorrectly use battery, not following our warning instruction label on the battery case.

Warning: more than 250mm USB extension cord is prohibited to use for USB port
ENVIRONMENTAL PROTECTION

Do not dispose of this product with the normal household waste at the end of its life cycle. Return it to a collection point for the recycling of electrical and electronic devices. This is indicated by the symbol on the product, user manual or packaging The materials are reusable according to their markings. By reusing, recycling or other forms of utilization of old devices you make an important contribution to the protection of our environment.
Please contact your local authorities for details about collection points.

Used batteries are hazardous waste and NOT to be disposed of with the household waste! As a consumer you are legally obligated to return all batteries for environmentally responsible recycling – no matter whether or not the batteries contain harmful substances*)
Return batteries free of charge to public collection points in your community or shops selling batteries of the respective kind.
Only return fully discharged batteries
*) marked Cd = cadmium, Hg = mercury, Pb = lead
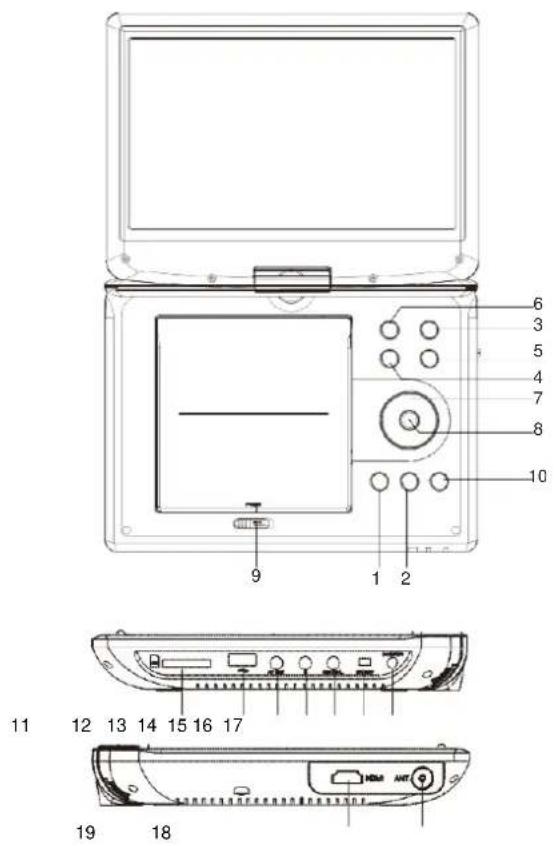
IDENTIFICATION OF CONTROLS
Main Unit
text_image
6 3 5 4 7 8 10 9 1 2 11 12 13 14 15 16 17 19 18- PLAY/PAUSE
- TOP
- SOURCE
- VOL
- VOL+
- MENU
- ▲ / ▼ / ◀ / ▶ (up/down/right/left)
Select an item in the menu. ENTER key confirms menu selection. when playing, VCD, DVD, if available: right: next track left: previous track up: fast forward down: fast reverse - ENTER
- OPEN
- SETUP
- SD/MMC
- USB
- AV OUT
- Earphone Socket
- COAXIAL
- ON/OFF
- DC IN 9-12V
- ANTENNA
- HDMI-Out (only with DVB-T2)
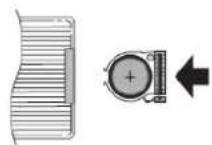
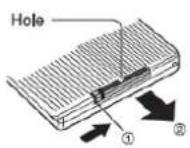
Insert Battery
- Open the Battery compartment 2. Insert battery (1 x CR2025 3V) as shown in the picture.

IDENTIFICATION OF CONTROLS
Main Unit

text_image
6 3 5 4 7 8 10 9 1 2 11 12 13 14 15 16 17 19 18- PLAY/PAUSE
- STOP
- SOURCE
- VOL
- VOL+
- MENU
- ▲ / ▼ / ◀ / ▶ (up/down/right/left) Select an item in the menu. ENTER key confirms menu selection. when playing, VCD, DVD, if available: right: next track left: previous track up: fast forward down: fast reverse
- ENTER
- OPEN
- SETUP
- SD/MMC
- USB
- AV OUT
- Earphone Socket
- COAXIAL
- ON/OFF
- DC IN 9-12V
- ANTENNA
- HDMI-Out (only with DVB-T2)
Insert Battery
- Open the Battery compartment 2. Insert battery (1 x CR2025 3V) as shown in the picture.

IDENTIFICATION OF CONTROLS
Remote control unit
text_image
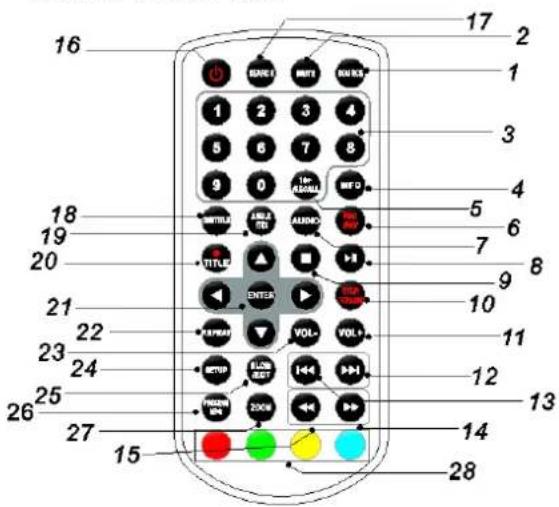
16 17 2 1 3 4 5 6 7 8 9 0 1st RANKL MINT MINTD 1 2 3 4 5 6 7 8 18 19 20 TITLE TITLE TITLE ENTER VOL+ VOL+ 10 21 22 23 24 25 26 27 15 14 28- SOURCE
DVD/CARD/USB/DVB-T.
- MUTE
Disable Audio output.
- 0-9 NUMBER BUTTON
Selects numbered items in a menu.
- INFO
To display the playtime and status information.
- 10+ BUTTON
In order to select a track 10 or greater, first press 10+, For example; select track 12, first press 10+, and then press number 2 button.
-
- PBC/FAV
PBC on/off switch(VCD) in DVD mode. Open Favorite Programs List Menu in DVB mode.
- AUDIO
DVD Press AUDIO repeatedly during playback to hear a different audio language or audio track, if available.
CD VCD's AUDIO repeatedly during playback to hear a different audio channel (Left, Right, Mix, Stereo).
- PLAY/PAUSE
Press PLAY/PAUSE once to pause playback, pressing PLAY PAUSE second time will resume the playback.
- STOPP
When this button is pressed once, the unit records the stopped point, from where playback will resume if PLAY( ) is pressed afterwards. But if STOP button is pressed again instead of PLAY( ▶) button, there will be no resume function.
- STEP/TV/RADIO
Step the motion in DVD mode. Switch between TV and Radio source in DVB mode
- VOL +
Adjust volume
- Forward Skip
Go to next chapter/ track.
- Reverse Skip
Go to previous chapter/ track to the beginning.
- BENTON
Press BUTTON allow skipping ahead at 5-level speed(X2->X4->X8->X16->X32->PLAY), press PLAY button return to normal playback.
IDENTIFICATION OF CONTROLS
Remote control unit
15. BURTON
Press ◀ BUTTON allow skipping back at 5-level speed(X2->X4->X8->X16->X32->PLAY), press PLAY button return to normal playback.
16.
Turn on/off the power.
17. SEARCH
Goto time point, title or chapter you want in DVD Mode.
18. SUBTITEL
Press SUBTITLE repeatedly during playback to hear a different subtitle languages.
19. ANGLE
DVD : Press ANGLE will change the view angle, on DVDs that support this feature.
20. /TOTLE (REC)
DVB Enter Record Return to DVD title menu
21. ENTER
Confirms menu selection.
22. REPEAT
Press REPEAT during playback to select a desired repeat mode.
DVD : you can play select repeat chapter/title/off.
VCD CD can select repeat single/all/off.
MP3: you can select repeat single/folder/off.
Press Slow button repeatedly to enter slow playback, and cycle between different speeds. The speeds are 1/2, 1/4, 1/8, 1/16, and normal.
26. PROGRAM
DVD VCD: The program function enables you to store your favourite tracks from the disc. Press PROGRAM button, then PROGRAM MENU will appear on screen, now you can use the number key to direct input the titles, chapters or tracks number and select PLAY option. TO resume normal playback, press PROGRAM and select clear program option on the program menu, press PROGRAM again to exit program menu. Open EPG in DVB mode.
27. ZOOM
DVD VCD: Use ZOOM to enlarge or shrink the video image.
-
Press ZOOM during playback or still playback to activate the Zoom function. The square frame appears briefly in the right bottom of the picture.
-
Each press of the ZOOM button changes the TV screen in the following sequence: 2X size → 3X size → 4X size → 1/2 size → 1/3 size → 1/4si.
JPEG: Use ZOOM to enlarge or shrink the picture.
-
Press 'ZOOM'
-
Used " " to enlarge, or " " to shorten the picture. Use the ▲▼ ◀▶ button to move through the zoomed picture.
Press SETUP button to get the setup menu. Use direction buttons to select the preferred item. After finishing settings, press SETUP again to normal display.
The following menu items can be changed:
GENERAL: selects the GENERAL PAGE menu.
AUDIO: selects the AUDIO PAGE menu.
VIDEO: selects the VIDEO PAGE menu.
PREFERENCE : selects the PREFERENCE PAGE menu.
PASSWORD: selects the PASSWORD PAGE menu.
General Setup Page
text_image
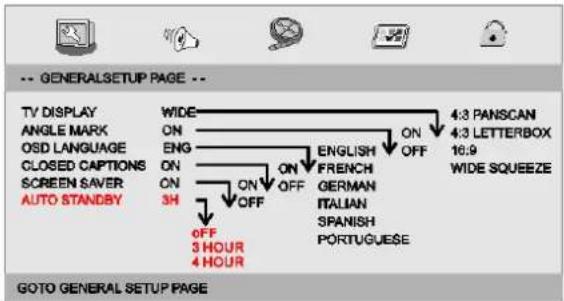
-- GENERALSETUP PAGE -- TV DISPLAY ANGLE MARK OSD LANGUAGE CLOSED CAPTIONS SCREEN SAVER AUTO STANDBY WIDE ON ENG ON ON 3H OFF 3 HOUR 4 HOUR ENGLISH FRENCH GERMAN ITALIAN SPANISH PORTUGUESE 4:3 PANSCAN 4:3 LETTERBOX 16.9 WIDE SQUEEZE GOTO GENERAL SETUP PAGETV DISPLAY: Selects the aspect ratio of the playback picture.
4:3 PANSCAN: If you have a normal TV and want both sides of the picture to be trimmed or formatted to fit your TV screen.
4:3 LETTERBOX: If you have a normal TV. In this case, a wide picture with black bands on the upper and lower portions of the TV screen will be displayed
16:9: Wide Screen Display
Wide Squeeze: Set screen mode to 4:3.
Angle Mark
Displays current angle setting information on the right hand corner of the TFT screen if available on the disc.
OSD Language
You can select your own preferred language settings.
Closed Captions
Closed captions are data that are hidden in the video signal of some discs. Before you select this function, please ensure that the disc contains closed captions information and your TV set also has this function.
Screen Saver
This function is used to turn the screen saver On or Off.
Auto Standby
This function is used to select auto standby settings after 3 or 4 hours. 3 HOURS: the unit will turn to standby mode after 3 hours if there is no interaction from user within this period of time.
4 HOURS: the unit will turn to standby mode after 4 hours if there is no interaction from user within this period of time.
OFF: the auto standby function is disabled, and unit will stay in "on" mode even if no interaction from user.
Audio Setup Page
Audio Setup Page
flowchart
graph TD
    A["Digital Output"] --> B["DUAL/MONO/DYNAMIC"]
    B --> C["R-MONO/MEX-MONO"]
    C --> D["SPD/FF"]
    C --> E["SPD/RAM"]
    C --> F["SPD/PPM"]
    G["Audio Setup Page"] --> H["Downlink"]
    G --> I["Distal Output"]
    G --> J["Dolby Digital"]
    K["Start"] --> L["OUT"]
    M["Start"] --> N["STRI"]
    O["Start"] --> P["SPD/FF"]
    Q["Start"] --> R["SPD/RAM"]
    S["Start"] --> T["SPD/PPM"]
SETUP Menu Setting
Audio Setup Page
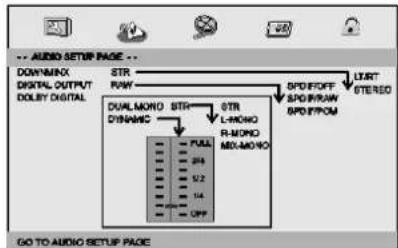
Downmix
This options allows you to set the stereo analog output of your DVD Player.
→ LT/RT: Select this option if your DVD Player is connected to a Dolby Pro Logic decoder.
→ Stereo: Select this option when output delivers sound from only the two front speakers.
Digital Output
The function is used to select the SPDIF Output:SPDIF Off,SPDIF /RAW,SPDIF/PCM.
→ SPDIF Off: Turns off the SPDIF output.
→ SPDIF/RAW: : If you have connected your DIGITAL AUDIO OUT to a multi-channel decoder/receiver.
→ SPDIF/PCM: Only if your receiver is not capable of decoding multi-channel audio.
Dolby Digital
The options included in Dolby Digital Setup are: 'Dual Mono' and 'Dynamic'.
Dual Mono
→ Stereo: Left mono sound will send output signals to Left speaker
→ and Right mono sound will send output signals to Right speaker.
→ L-Mono: Left mono sound will send output signals to Left speaker and Right speaker.
→ R-Mono: Right mono sound will send output signals to Left speaker and Right speaker.
→ Mix-Mono: Left and Right mixed mono sound will send output signals to Left and Right speakers.
Dynamic
Dynamic range compression.
Video Setup Page
Video Setup Page

text_image
-- VIDEO SETUP PAGE -- BRIGHTNESS 00 CONTRAST 00 HUE 00 SATURATION 00 GOTO VIDEO SETUP PAGEBrightness, Contrast, Hue, Saturation: setting the video quality.
Preference Page
Preference Page

text_image
-- PREFERENCE SETUP PAGE -- TV TYPE PAL AUDIO ENG SUBTITLE ENG DISC MENU ENG PARENTAL-1 KID SAF ENGLISH ENGLISH DEFAULT RESET 2 G 3 PG 4 PG13 5 PGR 6 R 7 NC17 8 ADULT 9 ENGLISH FRENCH GERMAN ITALIAN SPANISH PORTUGUESE OTHERS GOTO PREFERENCE PAGETV Type
Selecting the colour system that corresponds to your TV when AV outputs. This DVD Player is compatible with both NTSC and PAL.
SETUP-Menu-Setting
Preference Page
PAL - Select this if the connected TV is PAL system. It will change the video signal of a NTSC disc and output in PAL format.
NTSC-Select this if the connected TV is NTSC system. It will change the video signal of a PAL disc and output in NTSC format.
Auto:Chang the video signal output automatic according to the playing disk format.
Audio: Selects a language for audio (if available).
Subtitle: Selects a language for subtitle (if available).
Disc Menu: Selects a language for disc menu (if available).
Parental
Some DVDs may have a parental level assigned to the complete disc or to certain scenes on the disc. This feature lets you set a playback limitation level. The rating levels are from 1 to 8 and are country dependent. You can prohibit the playing of certain discs that are not suitable for your children or have certain discs played with alternative scenes.
Default: Back to the factory setting.
Password Setup Page
Password Setup Page
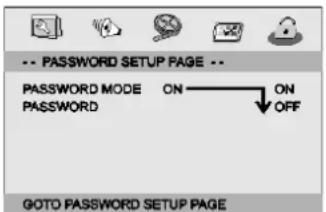
text_image
-- PASSWORD SETUP PAGE -- PASSWORD MODE ON PASSWORD OFF GOTO PASSWORD SETUP PAGEPassword mode: Set password mode on/off. If set to off, change parental level will not check password.
Password Setup Page
Password: select the menu password change page.
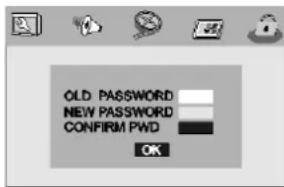
text_image
OLD PASSWORD NEW PASSWORD CONFIRM PWD OKOLD PASSWORD: Enter the OLD password, (Factory setting is 1369), and the cursor will jump automatically to NEW PASSWORD
NEW PASSWORD: Enter the NEW password. Enter 4 digits from the remote control unit numeric buttons, and the cursor will automatically jump to CONFIRM PASSWORD.
CONFIRM PASSWORD: Confirm the NEW password by entering it again. If the confirmation is incorrect, the cursor will stay in this column. After entering, the correct new password again, the cursor will jump automatically to OK.
Note: If the password has been changed, the parental and disc lock code will also be changed.
The default password(1369)is always active even the password has been changed.
Parameters and specifications
Electronical parameters
| Item | Standard requirement | |
| Manufacturer - AC adaptor | Wörlein GmbH, Gewerbestrasse 12,D-90556 Cadolzburg, www.soundmaster.deHRB-N0 771 bei Amtsgericht Fürth/Bay. | |
| AC adaptor - Model Identifier | GA04-0901500EU | |
| Power input | : AC 100-240V~50/60 Hz 0,5A max. | |
| Power output | : 9,0V 5A 13,5W | |
| Average active efficiency | : ≥ 85,2% | |
| Low load efficiency 10% | : ≥ 85,1% | |
| No load power consumption | : < 0,1W | |
| Power consumption | : <12W | |
| Operating humidity | : 5 % to 90 % | |
| Output | VIDEO OUT | : 1Vp-p (75o) |
| AUDIO OUT | :1.4 Vrms (1 KHz, 0 dB) | |
System
| Laser | :Semiconductor laser, wavelength 650 nm |
| Signal system | :NTSC / PAL |
| Frequency response | :20Hz to 20 kHz(3dB) |
| Signal-to-noise ratio | :More than 80 dB (ANALOG OUT connectors only) |
| Dynamic range | :More than 85 dB (DVD/CD) |

Note: Design and specifications are subject to change prior notice.
Battery-Parameter
Battery Specifications:
Output: 7.4V
Charge / Discharge Time:
Standard charge time: 3h \~ 4h
Storage and work circumstances:
| 1. Storage circumstances6 month1 week | Temperature-20 °C bis +45 °C-20 °C bis +65 °C | Humidity t65 ± 20 %65 ± 20 % |
| 2. Work circumstancesStandard chargeStandard discharge | Temperature r0 °C bis +45 °C-20 °C bis +65 °C | Humidity65 ± 20 %65 ± 20 % |
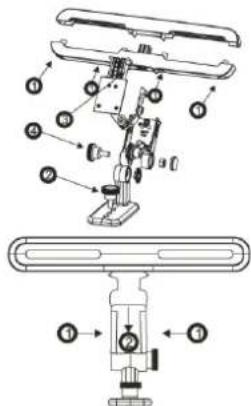
Car bracket holder
Install Mounting Kit on the car headrest Introduction.
- Install Mounting Kit on the car headrest Introduction
- Put the bracket to the knighthead of the car seat and set the 4 screws to fix the bracket.
- Turn the screw to fix the portable DVD player on the salver.
- .Set the button tongs into the bracket and cut it fine.
-
Turn the screw to adjust the angle of view.
-
Press this two buttons to disconnect the bracket.
- For the direction as indicated by the arrow, then draw the tongs.
text_image
Technical diagram of a mechanical device with numbered components and directional arrows indicating assembly or assembly steps.DVB-T2 First Time Installation
After all connections have been made properly, switch on TV and make sure the receiver is connected to the Main Power. Press Power Button to switch receiver on. If you are using the receiver for the first time or restored to Factory Default, the Main Menu will appear on your TV screen.
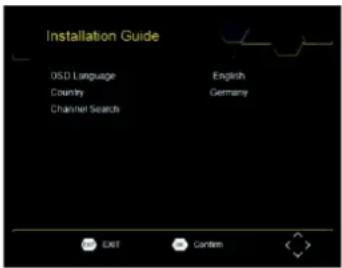
text_image
Installation Guide OSD Language Country Channel Search English Germany EXIT Contem(1) Select [OSD Language] and press RIGHT/LEFT key to select an language.
(2) Select [Country] and press RIGHT/LEFT key to select your country of residence.
(3) Select [Channel Search] and press RIGHT or OK key to begin Automatic channel search.
(4) Once channel tuning is complete, you are now ready to watch TV.
Caution: Only free-to-air programs can be received with this unit!
Basic Operation
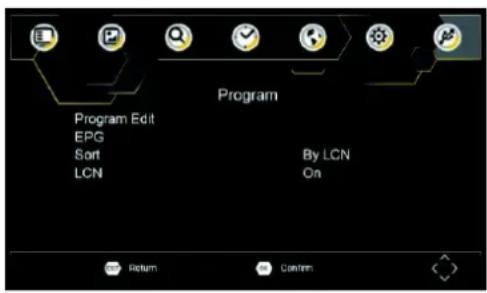
Program Manage Settings
To access the Menu, press the SETUP button and select [Program]. The Menu provides options to adjust the Program Manage Settings. Select an option and press OK or RIGHT to adjust that setting.
Press the EXIT button to exit the Menu.
text_image
Program Program Edit EPG Sort LCN By LCN On Return ConfirmProgram Edit
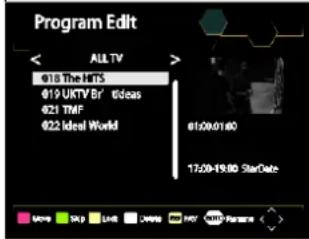
To edit your program preferences (lock, skip, favourite, move or delete), you will need to enter the Program Edit Menu. This Menu requires a password to access. Enter the default password '000000'.
text_image
Program Edit ALL TV #18 The HTS #19 UKTV Br / Ideas #21 TMF #22 Ideal World 01:00:01:00 17:00-19:00 StarDateDVB-T2 First Time Installation
Set Favourite Program/s
You can create a shortlist of favourite programs that you can easily access. Set Favourite TV or Radio program:
- Select the preferred program then press the PAVOURITE button. A star-shaped symbol will appear and the program is marked as a favourite.
- Repeat the previous step to select more Favourite programs.
- To confirm and exit the Menu, press the EXIT key.
Disable Favourite TV or Radio Program:
Press the FAV buton on the Remote Control with the heart-shaped symbol.
View Favourite Programs:
- Press the Fav button and the Favourite Menu will appear.
- Press UP/DOWN to select your Favourite Programs.
- Press OK to select your favourite program.
Delete a TV or Radio Program/s
- Select the Program and then press the BLUE button A
message will appear. Press OK to delete the program. - Repeat the previous step to select more programs to delete.
Skip TV or Radio Program/s
1 Select the program you would like to skip and press the GREEN button A skip symbol is displayed. The program is marked as a skip.
2 Repeat the previous step to select more programs.
3 To confirm and exit the menu, press EXIT key.
Disable a skip TV or Radio Program:
Press the GREEN button on the skip program with the skip symbol
Move a TV or Radio Program/s
- Select the preferred program then press the RED button. A move symbolwill appear.
- Press UP/DOWN to move the program.
- Press OK to confirm.
- Repeat the above steps to move more channels.
Lock Program/s
You can lock selected programs for restricted view. Lock a TV or Radio Program:
- Select the preferred program then press the YELLOW button. A lock-shaped symbol is displayed. The program is now marked as locked.
- Repeat the previous step to select more programs.
- To confirm and exit the menu, press the EXIT button.
- Press the YELLOW button to disable the locked program.
- To view the locked program, you will be required to enter either the default.
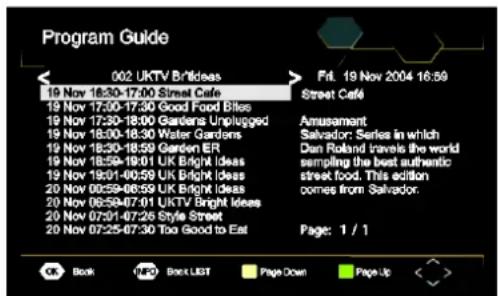
EPG (Electronic program guide)
The EPG is an on-screen TV guide that shows scheduled programs seven days in advance for every tuned channel. Press the EPG button on the Remote Control to access guide.
text_image
Program Guide 002 UKTV Br'Ideas 19 Nov 16:30-17:00 Street Café 19 Nov 17:00-17:30 Good Food Bills 19 Nov 17:30-18:00 Gardens Unplugged 19 Nov 18:30-18:30 Water Gardens 19 Nov 18:30-18:59 Garden ER 19 Nov 18:59-19:01 UK Bright Ideas 19 Nov 19:01-00:59 UK Bright Ideas 20 Nov 00:59-06:59 UK Bright Ideas 20 Nov 06:59-07:01 UKTV Bright Ideas 20 Nov 07:01-07:26 Style Street 20 Nov 07:25-07:30 Too Good to Eat Ftl. 19 Nov 2004 16:59 Street Café Amusement Salvador: Series in which Dan Roland travels the world sampling the best authentic street food. This edition comes from Salvador. Page: 1 / 1 OK Book INFO Post LIST Page Down Page UpYou can use the UP/DOWN key to select the preferred program. If there is more than one page of information, use the BLUE button for page up and the YELLOW button for page down.
DVB-T2 First Time Installation
Sort
Sort your channels from the following options: [LCN] - Sort the channels in ascending order.
[Name] - Sort the channels in alphabetical order.
[Service ID] - Sort the channels according to the station.
LCN (Logical channel number)
Set LCN on or off.
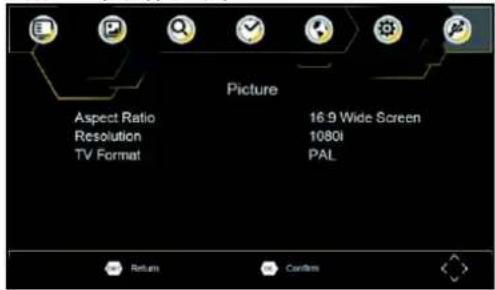
Video Setting
To access the Menu, press SETUP then select [Picture]. The Menu provides options to adjust the video settings. Press UP/DOWN to select an option and press RIGHT/LEFT to adjust that setting. Press EXIT to exit the menu.
text_image
Picture Aspect Ratio Resolution TV Format 16.9 Wide Screen 1080i PAL Return ConfirmsAspect Ratio
You must set the display format to either 4:3 PanScan, 4:3 Letter Box, 4:3 Full, 16:9 Wide Screen, 16:9 PillarBox or Auto to get the maximum display when watching TV.
Resolution
If the video does not appear correctly, change the setting. This setting is to match the most common setting for HDMI.
[480i]: for NTSC system TV
[480P]: for NTSC system TV
[576i] for PAL system TV
[576P]: for PAL system TV
[720P]: for NTSC or PAL system TV
[1080I]: for NTSC or PAL system TV
[1080P]: for NTSC or PAL system TV.
TV format
If the video does not appear correctly, you need to change the settings.
This should match the most common setting for TVs in your country.
[NTSC]: for NTSC system TV
[PAL]: for PAL system TV.
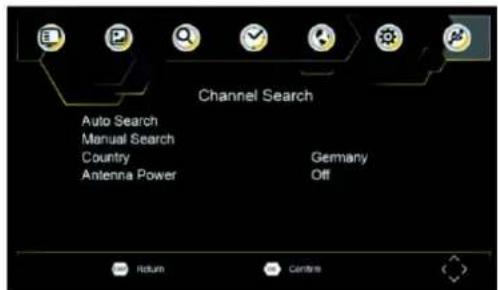
Channel Search
To access the menu, press SETUP and select [Search Channel]. The Menu provides options to adjust the Search Channel settings. Select an option and press RIGHT/LEFT to adjust the settings. Press EXIT to exit the Menu
text_image
Channel Search Auto Search Manual Search Country Antenna Power Germany Off Return CentersDVB-T2 First Time Installation
Auto Search
Search and install all channels automatically. This option overwrites all preset channels.
- Select [Auto Search] and press OK or RIGHT to start channel search.
- To cancel channel search, press EXIT.
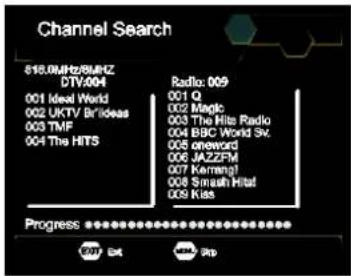
text_image
Channel Search $16.0MHz/8MHz DTV:004 001 Ideal World 002 UKTV Br Ideas 003 TMF 004 The HITS Radio: 009 001 Q 002 Magic 003 The Hite Radio 004 BBC World Sv. 005 oneword 006 JAZZFM 007 Kernang! 008 Smash Hitat 009 Kiss Progress OK Edit StopManual Search
Install new channels manually. This option adds new channels without changing the current channels list.
- Select [Manual Search] then press OK or RIGHT. The channel search screen will appear.
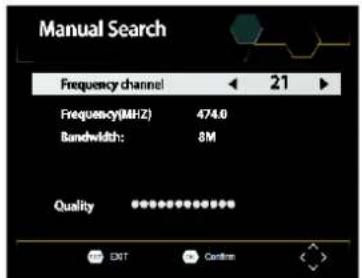
text_image
Manual Search Frequency channel ← 21 ► Frequency(MHz) 474.0 Bandwidth: 8M Quality ****** EXIT Confirm- Press the RIGHT/LEFT key to select the channel frequency.
- Press OK to start searching channels.
If a channel is found, it is saved and added to the channels list. If channels can't be found, then exit the menu.
Country
Select your country of residence.
Time Setting
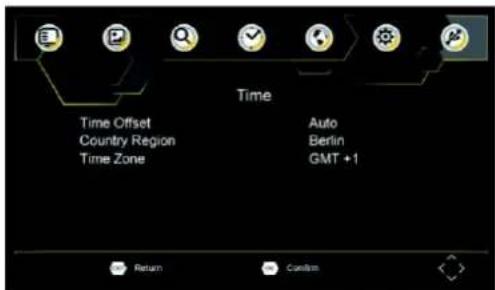
To access the Menu, press SETUP then select [Time]. The Menu provides options to adjust the time settings Press UP/DOWN to select an option and press RIGHT/LEFT to adjust the settings. Press EXIT to exit the menu.
text_image
Time Time Offset Country Region Time Zone Auto Berlin GMT +1 Return ConfirmTime offset
Select auto or manual for GMT offset adjustments.
Country Region
Select the Country Region when [Time Offset] is set to Auto.
Time Zone
Select the Time Zone Offset when [Time Offset] is set to Manual.
DVB-T2 First Time Installation
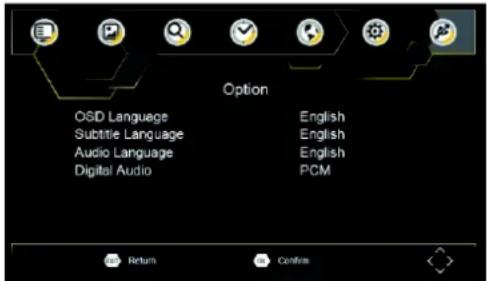
Option
To access the Menu, press SETUP and select [Option]. The menu provides options to adjust the OSD Language, Subtitle Language and Audio Language. Select an option and press RIGHT/LEFT to adjust the setting. Press EXIT to exit The Menu.
text_image
Options OSD Language Subtitle Language Audio Language Digital Audio English English English PCM Return ConfirmOSD Language
Select an OSD language.
Audio Language
Select the preferred audio language for watching TV channels. If the language is not available, the default program language will be used.
Subtitle Language
Select the preferred subtitle language.
Digital Audio
Set the desired audio format at the HDMI slot: PCM, Raw HDIM On, Raw HDMI Off, Off (if available).
System Setting
To access the Menu, press SETUP and select [System].The menu. Provides options to adjust the system settings. Press the UP/DOWN key to select an option and press RIGHT/LEFT to adjust the setting.
Press EXIT to exit the Menu.

text_image
System Parental Guidance Set Password Restore Factory Default Information Software Update Return ConsentsParental Guidance
You can restrict access to channels that are unsuitable for children. To restrict/lock the channel you will need to enter either the default password '000000' or your own password.
Set Password
Set or change the password for Locked programs. Enter your old Password the default password '000000'. You will then be asked to enter your new password. To confirm re-enter your new password. Once it is confirmed, EXIT to exit the Menu.
Reset your Set Top Box to the Default Factory Settings. In Main Menu select [Restore Factory Default] and press OK or RIGHT to select. Enter your password or the default password '000000' and press OK to confirm. This option will delete all preset channels and settings.
Information
View model, hardware and software information.
Software update
If the status is set "ON", it will begin searching for new software from broadcast according to your preferred time in "Start Time".
DVB-T2 First Time Installation
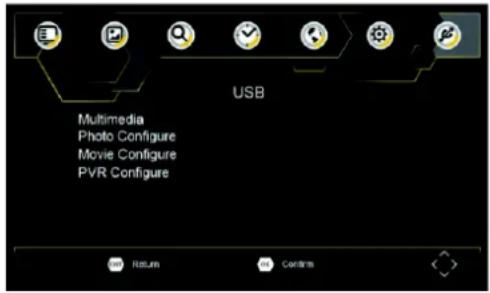
USB
To access the Menu, press the SETUP button and select USB.
text_image
USB Multimedia Photo Configure Movie Configure PVR Configure Return ConfersMulti-Media
Switch to USB mode and plug in USB to view files.
Photo Configure
Set the parameters for viewing photographs.
Movie Configure
Set the parameters for displaying movie subtitles.
PVR Configure
Set the parameters for record device.
USB-RECORDING
You have the option of using the USB recording function to record television programs and watch them at a later time or to use the timeshift function (time-shifted television). This function is only available with an existing USB stick and during operation!
Before use
- Insert a USB stick into the USB socket on the right side of the device.
- Press the SETUP button and select "USB"
- Select with the UP/DOWN the point „PVR Configuration“ and press the ENTER button.
Note: Under the item "Recording device" you will find information about the connected USB stick.
- Select „Format“ and press the ENTER button. In the following menu, select the format and start the process under the item "Format" by pressing the ENTER button.
Start a recording
- Set the desired TV station on the unit.
- Press on the remote control the REC button. The recording starts and the display shows a flashing point.
- To stop the recording, press on the remote control the button and after the ENTER button.
Watch a recording
- Press the SETUP button and select the point "USB".
- Select with the UP/DOWN button the point „Multimedia“ and press ENTER for confirmation.
- Mark the item "PVR" and press the ENTER button again. Under the point "HBPVR" you will find all recorded programs.
- Use the UP/DOWN button to select the desired program and press the ENTER key. The playback starts on the right side of the screen. To see the picture in full screen, press the RED button.
Timeshift
This function requires a connected USB stick on the back of the device!
1. While a TV program is playing, press the PLAY/PAUSE button on the remote control. The device pauses and continues recording the current program to USB.
2. To continue watching the program press the PLAY/PAUSE button again. To end the process, press the ■button. The current program can now be seen again.
Troubleshooting
| Problem | Potential Reasons | What to do |
| No picture | Power isn't connected | Connect the power |
| The power switch is not on | Switch on the power | |
| Screen shows No Signal | DVB-T cable not connected | Plug in the DVB-T cable |
| Incorrect setting | Reset setting | |
| No sound from speaker | Sound on mute | Turn off mute function |
| Incorrect sound track | Try another sound track | |
| Only sound, no image on the screen | No or incorrect connection with AV cable | Make sure cables are connected correctly |
| The program is a radio program | Presskey to shift into TV mode | |
| Remote Control is not responding | The battery is exhausted | Change battery |
| Remote Control is not facing or close enough to the Set Top Box | Adjust the position of the Remote Control and move closer to the unit | |
| The image stopped suddenly or mosaic | The signal is too weak | Strengthen the signal |
Technical Specifications
| Item | Sub Item | Parameter |
| Tuner | Input Frequency | 170~230MHz470~860MHz |
| RF Input level | -79dBm(T),-75dBm(T2) | |
| IF Bandwidth | 7MHz and 8MHz | |
| Modulation | QPSK,16QAM,64QAM,128QAM(T2),256QAM(T2) | |
| Video | Decoder Format | MPEG4 AVC/H.264 HP@L4HEVC/H.265 HT@L4 MPEG2MP@ML.HL |
| Output Format | 480i, 480p,576i, 576P, 720P, 1080i, 1080P,4:3and 16:9 | |
| Output Port | HDMI |

soundmaster

natural_image
Line drawing of a device with front panel, screen, and control panel (no text or symbols)PDB1960
MODE D'EMPLOIUSER'S
®
text_image
PORTABLE DVD / DVB-T2text_image
Technical diagram of a mechanical assembly with labeled components and directional arrows indicating assembly or movement.text_image
Installation Guide OSD Language Country Channel Search English Germany EXIT Confentext_image
Program Program Edit EPG Sort LCN By LCN On Return Confirmtext_image
Program Guide 002 UKTV Br#Ideas 19 Nov 16:30-17:00 Street Cafe 19 Nov 17:00-17:30 Good Food Bites 19 Nov 17:30-18:00 Gardens Unplugged 19 Nov 18:00-18:30 Water Gardens 19 Nov 18:30-18:59 Garden ER 19 Nov 18:59-19:01 UK Bright Ideas 19 Nov 19:01-40:59 UK Bright Ideas 20 Nov 00:59-06:59 UK Bright Ideas 20 Nov 06:59-07:01 UKTV Bright Ideas 20 Nov 07:01-07:25 Style Street 20 Nov 07:25-07:30 Too Good to Eat Fri. 19 Nov 2004 16:59 Street Cafe Amusement Salvador Series in which Den Roland travels the world sampling the best authentic street food. This edition comes from Salvador. Page: 1 / 1 OK Book PDF Print LIST Page Down Page Uptext_image
Options OSD Language Subtitle Language Audio Language Digital Audio English English English PCM Return ConfirmOSD Language
natural_image
Line drawing of a device with front panel, screen, and control panel (no text or symbols)PDB1960
MANUALE ISTRUZIONI
®
text_image
DVD / DVB-T2 PORTATILEtext_image
Installation Guide OSB Language Country Channel Search English Germany EXIT Confirmtext_image
Program Program Edit EPG Sort LCN By LCN On Return ConfirmModifica programma
text_image
Program Guide 002 UKTV BrdIdees 19 Nov 16:30-17:00 Street Cals 19 Nov 17:00-17:30 Good Food Slits 19 Nov 17:30-18:00 Gardens Unplugged 19 Nov 18:00-18:30 Water Gardens 19 Nov 18:30-18:59 Garden ER 19 Nov 18:59-19:01 UK Bright Ideas 19 Nov 19:01-00:59 UK Bright Ideas 20 Nov 00:59-06:59 UK Bright Ideas 20 Nov 06:59-07:01 UKTV Bright Ideas 20 Nov 07:01-07:25 Style Street 20 Nov 07:25-07:30 Too Good to Eat Fri, 19 Nov 2004 16:59 Street Cals Amusement Salvador Series in which Dan Roland travels the world sampling the best authentic street food. This edition comes from Salvador. Page: 1 / 1 OK Book PDF Book LIST Page Down Page UpLCN (Logical channel number)
Impostare LCN acceso o spento.
Impostazione video
text_image
Manual Search Frequency channel 21 Frequency(MHz) 474.0 Bandwidth: 6M Quality ****** EXIT Confirmtext_image
Time Time Offset Country Region Time Zone Auto Berlin GMT +1 Return Confirmtext_image
Technical diagram of a mechanical valve or actuator with labeled components and directional arrows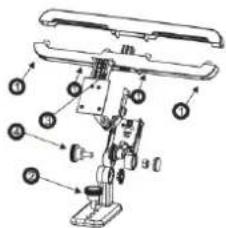
text_image
Technical diagram of a mechanical device with labeled parts in Chinesetext_image
Installation Guide USD Language Country Channel Search English Germany EXIT Confirmtext_image
Program Program Edit EPG Sort LCN By LCN On Return ConfirmProgramma bewerken
text_image
Program Guide 002 UKTV Br#Ideas 19 Nov 18:30-17:00 Street Cafe 19 Nov 17:00-17:30 Good Food Bites 19 Nov 17:30-18:00 Gardens Unplugged 19 Nov 18:00-18:30 Water Gardens 19 Nov 18:30-18:59 Garden ER 19 Nov 18:59-19:01 UK Bright Ideas 19 Nov 19:01-00:59 UK Bright Ideas 20 Nov 00:59-06:59 UK Bright Ideas 20 Nov 06:59-07:01 UKTV Bright Ideas 20 Nov 07:01-07:25 Style Street 20 Nov 07:25-07:30 Too Good to Eat Fri. 19 Nov 2004 16:59 Street Cafe Amusement Salvador Series in which Dan Roland travels the world sampling the best authentic street food. This edition comes from Salvador. Page: 1 / 1 OK Book PDF Book LIST Page Down Page Up <text_image
Options OSD Language Subtitle Language Audio Language Digital Audio English English English PCM Return ConfirmOSD-taal
Time-shifted televisie (Timeshift)
D 90556 Cadolzburg, Germany
Tel: +49 9103 71 67 0
Fax: +49 9103 71 67 12
E-Mail: info@soundmaster.de
Internet: www.soundmaster.de
Hereby, Wörlein GmbH declares that this device is in compliance with the essential requirements and other relevant provisions of Directive 2014/53/EU.
A copy of the declaration of conformity can be obtained from the above address.