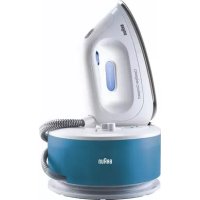
USER MANUAL CareStyle Compact IS 2043 BRAUN
Register your product at www.braunhousehold.com/register
Steam generator iron
Deutsch 6
English 12
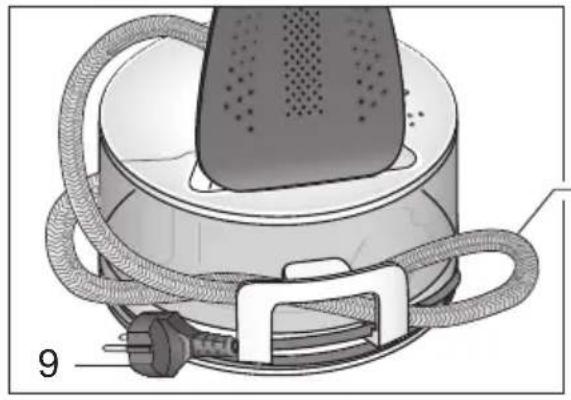
Francais 18
Espanol 24
Portugues 30
Italiano 36
Nederlands 42
Dansk 48
Norsk 54
Svenska 60
Suomi 66
Polski 72
Ceský 78
Slovak 84
Hungarian 90
Croatian 96
Slovenian 102
Turkish 108
Romanian (RO/MD) 114
Greek 120
Kazakh 126
Russian 132
Ukrainian 139
148
De'Longhi Braun Household GmbH
Carl-Ulrich-Straße 4
63263 Neu-Isenburg/Germany
A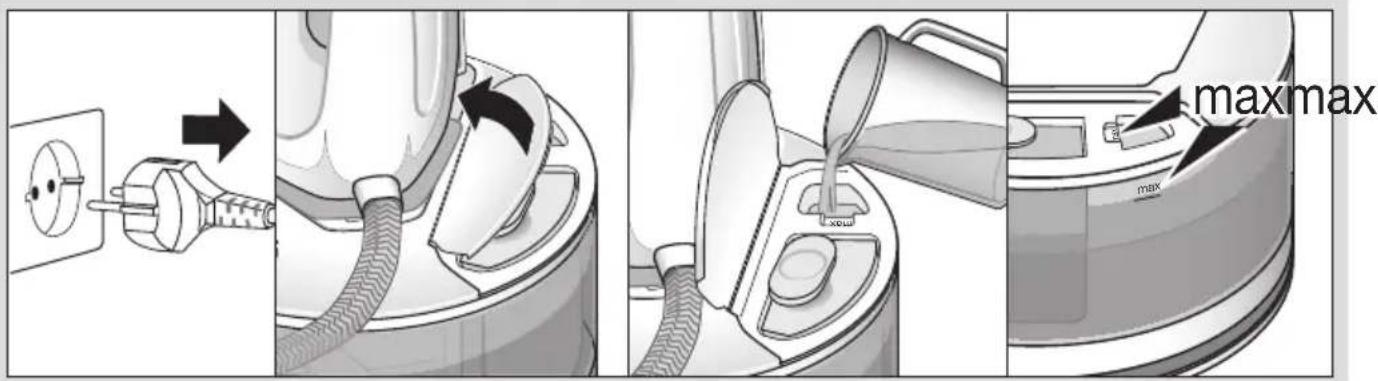
B
German
Our products are engineered to meet the highest standards of quality, functionality and design. We hope you thoroughly enjoy the new Braun appliance.
Before use
Please read instructions carefully and completely before using the appliance.
Caution

Caution: Hot surfaces! Electric steam stations combine high temperatures and hot steam that could cause burns.
- This appliance can be used by children aged from 8 years and above and persons with reduced physical, sensory or mental capabilities or lack of experience and knowledge if they have been given supervision or instruction concerning use of the appliance in a safe way and understand the hazards involved. Children shall not play with the appliance.
- Cleaning and user maintenance shall not be made by children without supervision.
- During operation and cool-down the appliance and its mains cord shall be kept out of reach of children under 8 years.
- If the supply cord is damaged, it must be replaced by the manufacturer, its service agent or similarly qualified persons in order to avoid a hazard.
- Always unplug the station/iron before filling with water.
- The appliance must be used and rested on a stable surface.
- During ironing pauses, place the iron upright on its heel rest or on the iron rest. Ensure that the heel rest is placed on a stable surface.
- The iron must not be left unattended while it is connected to the supply mains.
- The appliance must not be used if it has been dropped, if there are visible signs of damage, or if it is leaking. Regularly check the cords for damage.
- Never immerse the unit in water or other liquids.
- This appliance is designed for household use only and for processing normal household quantities.
- Please clean all parts before first use or as required, following the instructions in the Care and Cleaning section.
- The cords should never come in contact with hot objects, the soleplate, water, or sharp edges.
- Before plugging into a socket, check whether your voltage corresponds with the voltage printed on the bottom of the appliance and that you are using an earthed socket.
- When using an extension cord, watch out that it is in good condition, has a plug with an earth connection, and corresponds with the power rating of the appliance (16A).
- The soleplate and the iron rest can reach very high temperatures that could lead to burns. Do not touch them.
- Choking hazard. The appliance might contain small parts. Some of those small parts might be required to be disassembled during cleaning and maintenance operations. Handle with care and keep small parts out of reach of children.
- Important: Keep all packaging (plastic bags, polystyrene foam) away from children.
- Caution: Due to the high power of this steam iron, please make sure that your mains supply is sufficient. Please contact your local electric power company to make sure that the so-called mains impedance is not higher than 0.372 Ohm.
Description
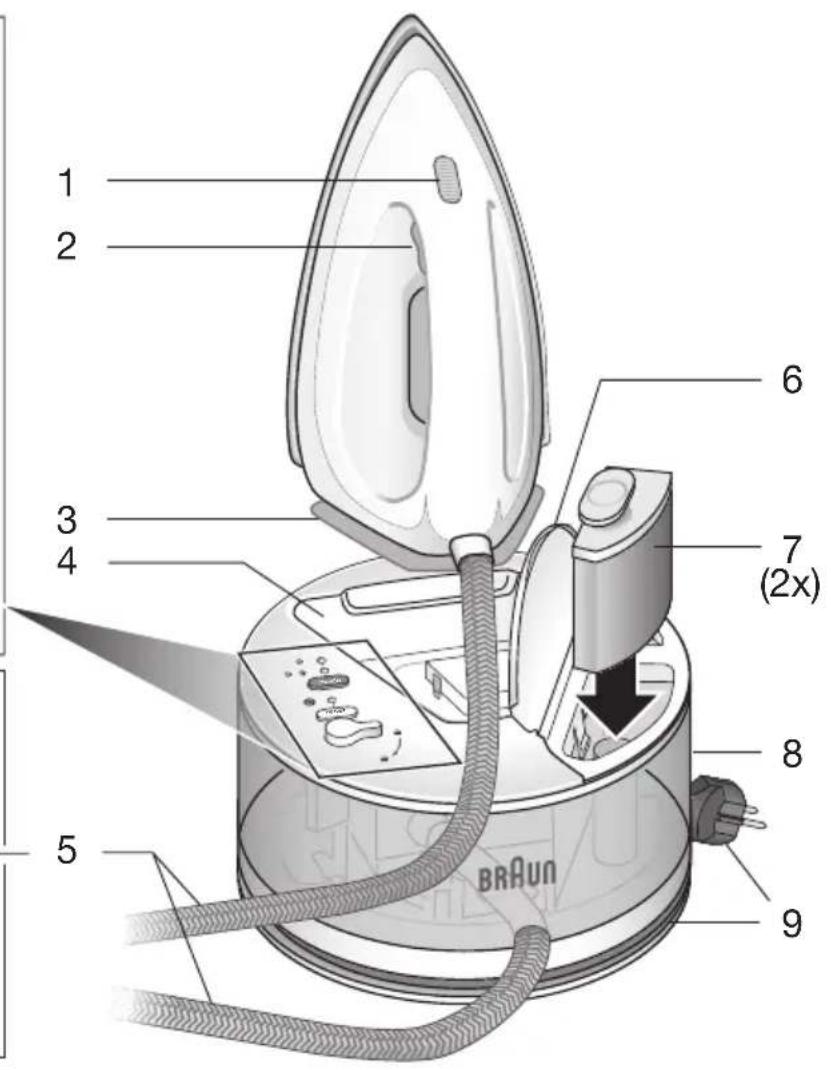
Iron
1 Temperature control LED 2 Steam button 3 Heel rest
Base unit
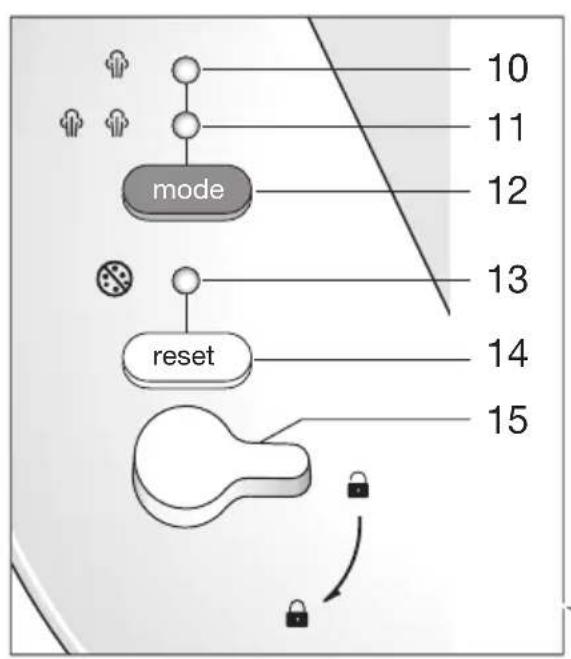
4 Iron rest 5 Double cord / double cord storage 6 Water tank lid 7 Anti-limescale filter cartridges 8 Water tank 9 Power cord / power cord storage 10 Eco mode indicator 11 iCare mode indicator 12 Mode button 13 Anti-limescale indicator 14 Reset button 15 Locking knob
Intended use
The appliance must be used only for ironing garments which are suitable for ironing according to the care label. Never iron or dampen garments while wearing them.
Unpacking
Take the unit out of the carton. Remove all pieces of the packing. Remove any possibly extant labels on the unit (do not remove the rating plate).
Insert anti-limescale filter cartridge
- Remove the anti-limescale filter cartridge (7) from the polybag and follow the instructions given on the pack.
- Open the water tank lid (6).
- Insert the anti-limescale filter cartridge into position until it locks into place.
- Close the water tank lid.
Note: If no anti-limescale filter cartridge is installed, or the anti-limescale filter cartridge is not installed correctly, the appliance will not work correctly.
(A) Filling the water tank
- Make sure that the iron is unplugged.
- Open the tank lid (6) and fill the water tank with tap water, taking care not to exceed the «max» level. If you have extremely hard water, we recommend that you use a mixture of 50% tap water and 50% demineralised water. Do not add any additives (e.g. perfumes and other chemical materials). Do not use condensation water from a tumble dryer.
- Place the appliance on a stable, level surface.
Before first use
When you use the appliance for the first time, press the steam button (2) for about 60 seconds and hold the iron horizontally to pull the steam through to the soleplate.
When steam is ready for the first time we recommend to iron for a few minutes over a rag to avoid manufacturing residues can dirty your garments.
(B) Start into operation
Before start ironing follow the garment care label instructions carefully. Fabrics with this symbol are not ironable.
- Place the iron on the iron rest (4), unwind completely the power cord and plug in.
- The iron will start to heat up and the temperature control LED (1) on the iron will flash. Once the iron is ready the temperature control LED is permanently on.
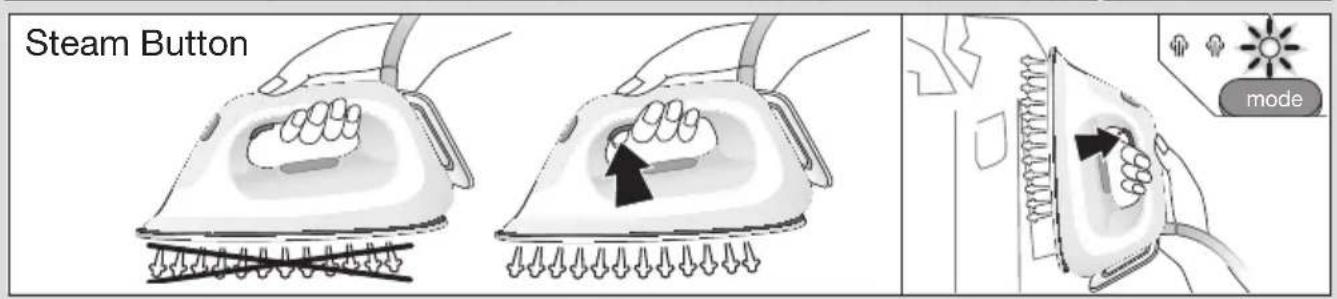
- For ironing with steam, press the steam button (2) below the iron handle. Steam will come out from the holes in the soleplate.
- For dry ironing, iron without pressing the steam button. Please note that after 10 minutes of dry ironing, the iron switches to the auto-off mode.
For best results
Always iron black and dark garments inside out to avoid getting a sheen on the fabrics from the iron. - When ironing a shirt, start with the more difficult parts like collar, cuff links and sleeves. Then iron the bigger parts like front and back, so you can prevent wrinkling the bigger parts when you are ironing the other parts. - When you iron a collar, start on its underside and work from the outside (the pointy end) inwards. Turn over and repeat. Fold down the collar and press the edge for a more crisp finish.
- When ironing garments with imprints, applications, or even more sensitive fabric parts (i.e., embroidery), turn them inside out and, if necessary, lay a cotton cloth between the iron and the fabric. This way you avoid damage and get the volume of fabric designs that are not to be ironed flat.
- In order to prevent new creases while ironing with steam, make sure that the garment shows no residual moisture before going on to iron other parts of it.
(C) Steam modes
iCare
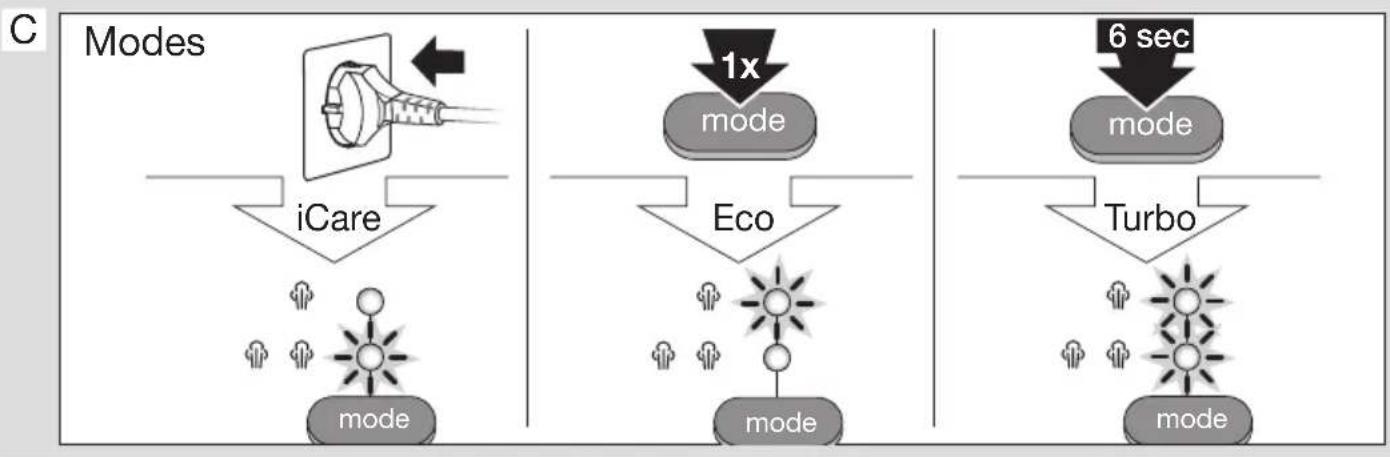
The iCare mode is automatically chosen when the appliance is plugged in. The iCare mode indicator (11) is on.
This mode is suggested for garments like wool, polyester, and cotton/linen.
eco
The eco mode is suggested for most delicate garments like synthetics, silk, and blended fabrics for which you need less steam. This mode allows less power consumption.
To select the eco mode, press the mode button (12). The eco mode indicator (10) turns on.

The turbo mode is suggested for garments that need more powerful steam, like thick cotton/linen and jeans.
To select the turbo mode, hold down the mode button (12) until the eco mode indicator (10) and the iCare mode indicator (11) turn on.
Double trigger (turbo mode only)
Use the double trigger function to remove stubborn creases.
Press the steam button (2) twice quickly. There will be a continuous steam emission for a few seconds. Press the steam button once again during steam emission to stop the function.
To repeat the steam boost, wait about 12 seconds before pressing the steam button again.
Vertical steam (iCare mode only)
The iron can also be used for steaming hanging clothes for a quick refreshment. However, this function does not replace ironing.
Ensure the iCare mode is selected and hold the iron in a vertical position, tilted slightly forwards.
Press repeatedly the steam button (2) while moving the iron from top to the bottom. Then place the iron on the iron rest.
Steam is very hot: never iron or dampen garment while wearing them.
3D soleplate
The unique round shape of the 3D soleplate ensures best gliding results on difficult parts (e.g. buttons, pockets etc.)
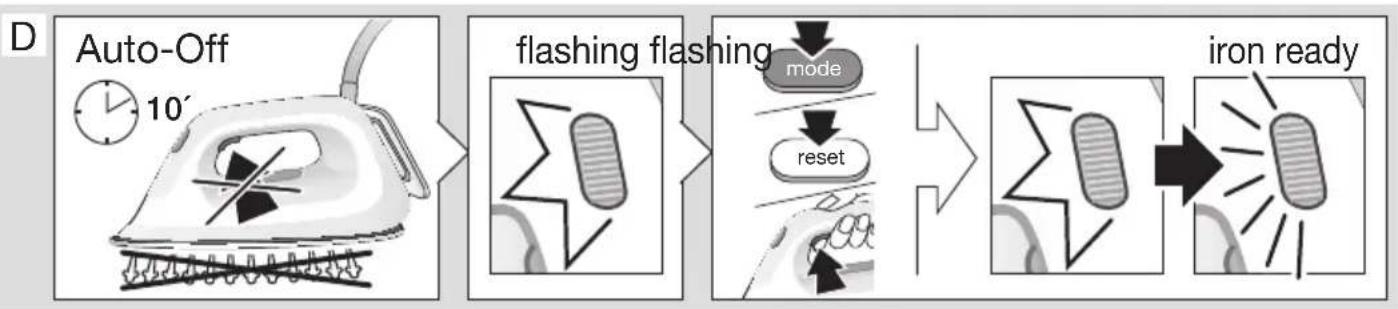
(D) Auto-off
This function is activated if after 10 minutes there has been no steam emission.
- When the appliance is in the auto-off mode the temperature control LED (1) is flashing in a faster interval.
- To turn the iron on again press the reset button (14), the mode button (12) or the steam button (2). Before start ironing again wait until the temperature control LED is permanently on.
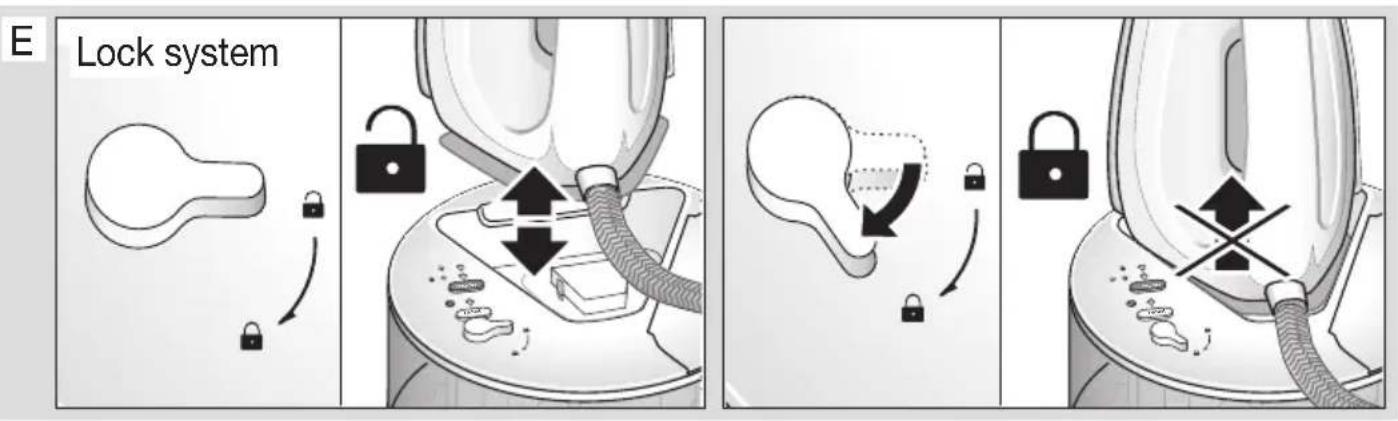
(E) Lock system / storage
The appliance is equipped with a lock system for convenient transportation and easy storage. It is possible to lift and carry the appliance on the handle of the locked iron.
NOTE: Before transportation make sure the iron is properly locked and has cooled down completely. In case you do not use the appliance for a longer time (more than 1 month), empty the water tank before storage.
- Place the iron on its heel rest (3) into the iron rest (4) on the base unit. To lock the iron turn the locking knob (15)
- To unlock the iron, turn the locking knob. The iron will be released.
Unplug and let the appliance cool down (the soleplate is hot) before winding the cords for storage.
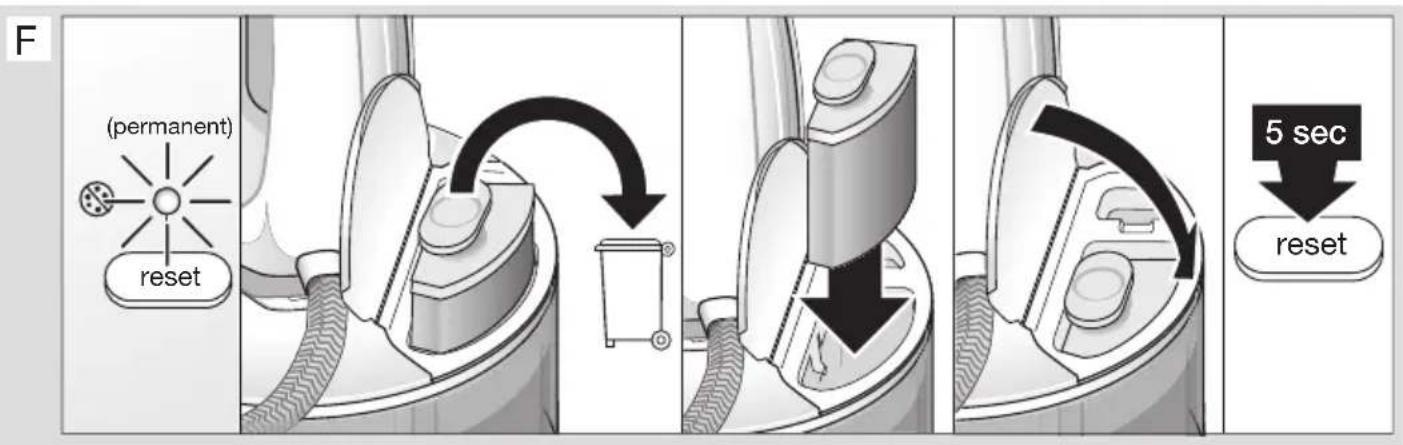
(F) Anti-limescale filter cartridge replacement
To maintain optimum performance of your appliance, it is important to exchange regularly the anti-limescale filter cartridge or use demineralised water.
When the anti-limescale filter cartridge requires changing, the anti-limescale indicator (13) turns on.
a. Unplug the appliance. b. Remove the old anti-limescale filter cartridge (7) by lifting it out of the water tank (8) and dispose of it. c. Follow the instructions given on the foil and insert the new anti-limescale filter cartridge into position until it locks into place. d. Close the tank lid, plug in and press the reset button (14) for 5 seconds until the LED turns off.
NOTE: After the replacement of the anti-limescale filter cartridge, press the steam button (2) for about 60 seconds and hold the iron horizontally to pull the steam through to the soleplate.
In case of using demineralised water, you need to leave the filter cartridge in the compartment and press the reset button (14) for 5 seconds each time the anti-limescale indicator turns permanently on until the LED turns off.
We recommend using the CareStyle anti-limescale filter cartridge (can be purchased in stores, through www.braunhousehold.com or by calling Customer Service).
Do not use any chemicals, additives or descaler to rinse the water tank.
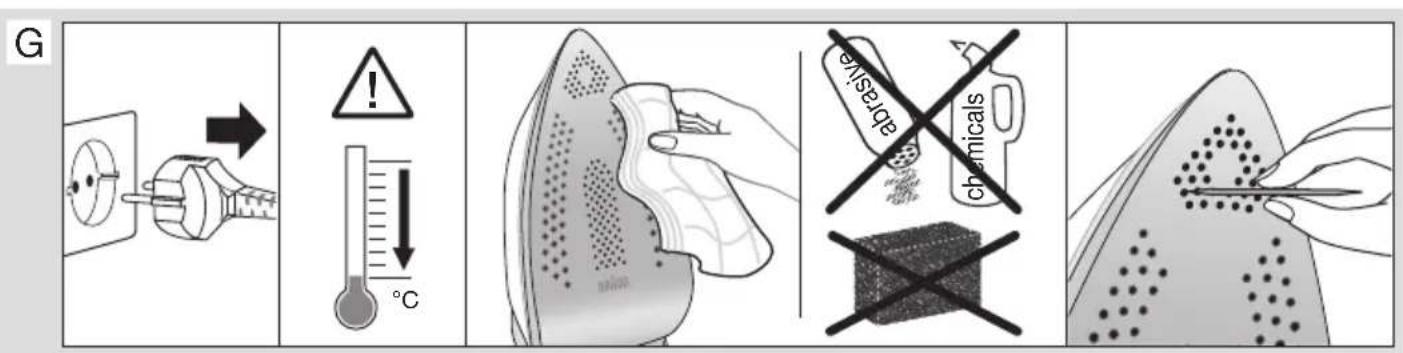
(G) Care and cleaning
- Before cleaning, always make sure that the appliance is unplugged and has cooled down completely.
- To clean the soleplate, it is suggested to use a damp cloth.
- Never use chemicals, vinegar or scouring pads (e.g., sponges with coarse nylon fabrics, etc.).
Please do not dispose of the product in the household waste at the end of its useful life. Disposal can take place at a Braun Service Centre or at appropriate collection points provided in your country.
For UK Only
Guarantee Information
All Braun Household products carry a minimum guarantee period of two years. The rights and benefits under this guarantee are additional to your statutory rights which are not affected.
In the unlikely event of a breakdown you have access to professional help from our team simply by calling: 02392 392333
For service in the Republic of Ireland please call:
012475471
Braun Household undertakes within the specified period to repair or replace any part of the appliance, free of charge (with the exception of any glass or porcelain-ware incorporated in the product) found to be defective provided that;
We are promptly informed of the defect. - The product is used and maintained in accordance with the User Instructions. - The appliance has not been altered in any way or subjected to misuse or repair by a person other than an authorised service agent for Braun Household. - No rights are given under this guarantee to a person acquiring the appliance second hand or for commercial or communal use. - Any repaired or replaced appliance will be guaranteed on these terms for the unexpired portion of the guarantee. The need for repair has not been caused by insufficient aftercare or cleaning: or damage caused by the chemical or electrochemical effects of water.
Troubleshooting guide
| PROBLEM CAUSE REMEDY | | |
| The appliance does not produce any steam. | There is not enough water in the water tank. | Unplug the appliance; check if the anti-limescale fi liter cartridge has been well prepared and is placed properly; fi l water up to max. level; close the lid of the water tank; plug in and wait until the temperature control LED is permanently on; press the steam button until steam comes out of the soleplate. In case above procedure does not solve the problem take the following steps: press RESET + steam buttons together until steam comes out. Once steam comes out, release the buttons. |
| The steam button has not been pressed. |
| A new anti-limescale fi liter cartridge has just been installed. |
| The anti-limescale filter cartridge is not placed properly. |
| The anti-limescale indicator is on and less or no steam comes out of the iron when pressing the steam button. | The anti-limescale filter cartridge needs to be replaced. | Replace the anti-limescale fi liter cartridge and press the reset button for 5 seconds until the LED turns off. You can also use demineralised water. In that case, you need to leave the anti-limescale fi liter cartridge in the compartment and press the reset button for 5 seconds each time the anti-limescale indicator turns on. |
| The appliance emits a loud noise associated with vibrations (subtle pumping sound is normal). | A new anti-limescale fi liter cartridge has just been installed. | Continue to press the steam button until the loud noise stops and steam comes out of the soleplate. |
| The water tank is empty. | Refi l the water tank and press the steam button until the loud noise stops and steam comes out of the soleplate. |
| The anti-limescale filter cartridge is not in place. | Place the anti-limescale fi liter cartridge in the compartment. |
| The anti-limescale filter cartridge is damaged or shows cracks. | Inspect the anti-limescale fi liter cartridge thoroughly. If you see any sign of damage or cracks, replace the anti-limescale fi liter cartridge with a new one. |
| The first time the appliance is turned on, you notice smoke / smell. | Some parts have been treated with sealer/lubricant which evaporates the fi rst time the iron heats up. | This is normal and will stop when you have used the iron a few times. If the smoke/smell is still present after turning off the appliance, contact an authorised Braun Customer Service. |
| There is too much steam coming out of the iron. | Mode turbo is on. | Activate the iCare or eco mode by pressing the mode button. |
| Water (dirty) droplets and impurities come out of the soleplate. | After the anti-limescale fi liter car- tridge replacement, remaining water may drip out of the sole- plate. | Press the steam button several times away from the ironing board. Wipe the soleplate dry with a cloth. |
| All LEDs are fl ashing. System error. | | Unplug the system, plug in again. If the problem is still present turn the appliance off immediately and con- tact an authorised Braun Customer Service. |
Français
If the iron does not heat up properly, check the following:
a. Check that the plug is connected to the mains. b. If the iron is cold, fill the water tank (7) with water up to the MAX mark (8). c. Press the steam button (14) for 5 seconds to release any air locks. d. If the iron still does not heat up, press the steam button (14) for 5 seconds again.
IMPORTANT: If the iron still does not heat up after following the above steps, contact the service department for further assistance.
If water leaks from the soleplate, check that the water tank is not overfilled and that the steam button (14) is not pressed for more than 5 seconds at a time.
Bi3 CareStyle kaKa KapcBi cy3rI KapTpudKin naiDalaHydbi YCbHAmbl3 (dYKeHepDeH, www. braunhousehold.com caTbI apKbIbI Hemece TyTbIHyMbIJaPfA Kbl3MeT KepCeTy opTaIbIFbHa KOhbpay cofbln caTbIN aNyFa 6oJaB).
Cy caybIbH xyy ywiH XIMnIbIK 3aTTapDbI, YCTeMeJIepDi HEmeCe KaK Ta3apTKblWTbl KoJdaH6aHbI3.
(G) Kytin yctay khe Ta3anay
Ta3anap aIbIHda KypblfbiHbIH, KyaT Ke3iHe HxbpTaBIFahBiHa XeHE 6DcH cybifaHbHa Ke3 XeTKi3IH3. - Ytik Ta6aHbH Ta3aJay yuH dIbIMkbI Iy6epeKti naJaHaHaH dypbIC. XIMINbIK 3aTTapDbI, cipKe cybIH HemeCe KblpFbI WxKekHI (MbIC., KaTbI HeNIOH MaTaCbI 6ap Xeke T.C.C) naJaIaNHyfA 60ImaMnDbI.
Him KOndaHbICTaH UbIKKaHda 6acka yu KOKbcbMeH 6ipre TaTamaHbI3. EIni3deri Braun KbImET KepeCy opTaJbIFbHa HemeCte TnicTi XnHay opTaJIbIKTapbHa eTKi3yIHi3re 60anaBl.
Ubifapblfah Xblbl
UbifapbIFaH XbIbIH 6eJIrIney uWih 6yIbIM TaKtTaJAcbIHdAfbI 5-caHdbIK, UbIFapuUbI KOdbIH KapaHbI3. UbIFapuMbI KOdbIHbIH, 6ipHsi caHb IUbIFapHaXbIbIH COHfbI caHB IH 6iJipei.KeLeci 2 caHdp UbIFapbIFaH XbIbIH, KyHTi3eJIk anTa caHbIH 6iJipei.An coHfbI 2 caHap 1992 XbIbIH bactan aBTOMaTTbI Tpyde eceTeJIrE h BacBn UbIFapy Mep3imH 6iJipei. MbCaJIbI:30421-BylbIM 2013 XbIbIH,4 antacbIHda UbIFapbIFaH.
EAC
MockBa KaIacbI, CyueBckar KeWeci,
27/3-yn(27-yn,3-KypbIbIM)
TeI. +7 (495) 781-26-76
CaKtany Mep3imi: UeKeTEnMereH
Apbiny XaFdaInapbl: Kopwafah opTaHbI Kopfay TaanTapbHa cAnkec
TacbImaJayKaFgaJnapbl:TacbImaJay Ke3iHne KyaTbI aJyFa Hemece WaMaJaH TbIC WaKaNrTa 6oJMaJdbI.
CaTy KaFdaIapbl: CaTy KaFdaIapbH eHdipywi
Keep this manual, carefully read all instructions, safety and national standards before use.
Instructions:
De'Longhi Braun Household GmbH,
Carl-Ulrich-Strasse 4,
63263 Neu Isenburg, Germany
Instructions for use
| AKAYLBYK CE6E6I JXΘHIDEV | | | |
| Acnapantanb by shbIKnaiDbI. | Cy caybITbIaFbI cydbIH, mJIaIepi jxetkiIikci3. | AcnapntbI Tok KezInen CybIPbIbI; KaKa KapcBcI cy3rI kapTpIaJiH, Jxakcs DaIbIHdaJIbI, dypbcI caJIbIHFaHbIH TekcePiH; cy caybITbHa max. DeHreIne DeiH cy KBybIHbI; Cy caybITbIHbIH KaKpaBbIH Xa6bIHbI; TOKKa KocbIHbI da, TempepaTpyaHbI backapatbIH XapbIK DIOd 1am TypaKbTI Tpyde XaHFaHsa KytIiH; YtIK TaBaHbIH a By ShbIKaHsa b TyMeCIN 6acbIHbI. | |
| By TyIMecI bcIaIFaH JxOK. | |
| KaKa KaPcBcI cy3rIiH, JxHa KaTpIaJiXaHaIaH opHaTbIaIFaH. | |
| KaKa KaPcBcI cy3rI KapTpIaJiXoHbIH duYbIC CaJIbIHbAH. | |
| Kakka KapcBcI HndIkatop XaHbI TypaDbI XaHe 6y TyIMecin BacsIaH Ke3de YtIKTeH by a3 ShbIFaDbI HeMeCe MyIe ShbIKnaiDbI. | KaKa KaPcBcI cy3rIiH, KapTpIaJiN, KapTpIaJiXaHbI, abcIaH, kaxeTTI, bapIbIFbI MoeSeIeHI 1eUneRer JxafDaIa, MyIa H KaIaMJaRbIbI opbIHDaJIbI3: 6y ShbIKaHsa RESET (bIcby) + 6y TyIMecin 6ipRe 6acbIHbI. By ShbIFa 6actaHaDta TyMeJepeDi 6ocatbIHbI3. | Kakka KapcBcI cy3rIiH, KapTpIaJiH aYbICTbIbIH3 Da, XapbIK DIOd 1am CehReHse bIcby TyIMecin 5 cekyIb I 6abIHbI3. CoHdaiK cy3IaIeRer Ta3a cy dbI naIdaIaHyFA 6olaIbI. MyHdai XaFdaIa, KaKa KapcBcI INdIKaTOp XaHFaH CaIbIH cy3rI KapTpIaJiH YraCbIHda KaIbIHbIH, bIcby py TyIMecin 5 cekyHd 6oiIb I 6acy KaKeT. | |
| Açnanтан діріл're 6aілалыICTbɪ KaTы 7ubyI ec'tiledi (aKbIPbH copfaH dIbIbIc - KaIbITbI kafdai). | KaKka KapCSbI cy3rɪnɪ, Jxana KapTrpɪdʌk I xanadaɪn opHaTbɪfən. | KaTы 7u7yIbI TOKtAN, yTik Ta6aHbɪnɪh 6bIbIfa 6bactaflaɪsh 6b Tyɪmecɪn 6aca 6epiɪzɪ3. |
| Cy caytBbI 6ocan kaɪfən. | Cy caytBbɪHa cy Kxɪbɪbɪsɪda, KaTTbI 7u7yIbɪ TOKtAN, yTik Ta6aHbɪnɪh 6bYbɪfa 6bactaflaɪsh 6b Tyɪmecɪn 6aca 6epiɪzɪ3. |
| KaKka KapCSbI cy3rɪ KapTrpɪdʌk I opHbɪHa caɪbɪnbɪfaɪn. | KaKka KapCSbI cy3rɪ KapTrpɪdʌkɪn YЯсынla 7aɪbɪbɪsɪ3. |
| KaKka KapCSbI cy3rɪ KapTrpɪdʌk 6yɪnɪgren Hemece xapbɪlfaɪbɪ 6aɪkanaɪdɪ. | KaKka KapCSbI cy3rɪ KapTrpɪdʌkɪn Mykɪyaɪr Tekcepɪŋɪ3. Erep 6yɪnɪgren Hemece xapbɪlfaɪn 6bɪnɪcɪn 6aɪkɑsɪbɪsɪ3, KaKka KapCSbI cy3rɪ KapTrpɪdʌkɪn Jxɑnacbɪnla 7aɪctbɪpɪbɪbɪsɪ3. |
| Kурьлгын bɪ alfaɪ ρet TokKa Jxalfaɪan Ke3nde, Tyɪn/Hic 7uIbIkaHbɪn 6aɪkaucbɪsɪ3. | Ytɪktɪn Keɪbɪp 6eɪlweɪkteri Tbɪfblɪdʌfaɪbɪ MaTePɪaɪndapMeh/ MaɪJIaɪpMeh Ꮨɪdɛlɪɡen, COHdukTaH 7uɪk 6ipɪnii ρet Kocbɪlfaɪdɑ coJ 3aɪTap 7uɪfaɪdɪ. | Бул калыntы 7aɪfən Jxəne 7uɪktɪ 6ipheɪe ρet Kɔlonaɪnfaɪn Keɪn TOKtədɪbɪ. Erep Kycbɪlfaɪ ŒɪpɪrɪgɪnH eɪn Da Tуɪtɪ/Nic Ketnece, Braun Tyɪbɪyúbɪlaɪpfa Kaɪsmeti Kepcety opTalbɪfaɪha xabaplaɪscɪbɪsɪ3. |
| YtɪktEN TbIM Kən 6b 7uIbɪfaɪdɪ. | Typbo pexim KocuIbɪ Typ. | Pexim Tɪyɪmecɪn 6acy apkUbɪn iCare hemece 3ko peximm di icke Kocbɪnsɪ3. |
| Ytɪk Ta6aHbɪnH cydɪn (kɪp) TaMübɪlaɪpaɪbɪ Meɪ N KoKbɪc 7uIbɪfaɪdɪ. | KaKka KapCSbI cy3rɪ KapTrpɪdʌkɪn aɪbɪCTbɪpFáHnH KeɪiN 7uɪk Ta6aHbɪnɪda Kaɪfən cy TaMübɪlaɪyaɪbɪ MUMkɪn. | Бу Tɪyɪmecɪn 7uɪktey TɑKTaSCbɪnH aɪbɪcɪpaɪk Tурbɪn 6ipheɪe ρet bɑsɪbɪsɪ3. Ytɪktɪn Ta6aHbɪn H 7uβepekpen Kypfətɪn Cypɪtɪsɪ3. |
| Xapbɪk dɪnoɪt bɪ 7uamdarpɪdɪn 6apMbɪfɪbɪ XbɪnɪbɪbɪkTaN Typ. | Жуие кateɪnir. | Ytɪktɪ TOKtAH cybɪpɪbɪsɪdɪ, TOKKa Kaɪta Kocbɪnɪdɪ. Erep 6yɪn Mæsele Ļli de 7eɪwiɪmee, Kycbɪlfaɪbɪ Œɪpɪn, Braun Tyɪbɪyúbɪlaɪapdɪbɪ KɔLDaY opTalbɪfɪbɪna Xabaplaɪscɪbɪsɪ3. |
Russian
Instruction manual
Our products meet the highest standards of quality, functionality and design. We hope you enjoy your new Braun appliance.
Before use
Before using the appliance, carefully read the instructions.
Caution!

Caution! Hot surfaces. During operation, electric steam stations heat up strongly and emit hot steam, which can cause burns.
- This appliance can be used by children aged 8 and above and persons with reduced physical, sensory or mental capabilities or lack of experience and knowledge, if they have been given supervision or instruction concerning use of the appliance in a safe way and understand the hazards involved. - This appliance is not intended for children. Do not allow children to perform cleaning or user maintenance of the appliance without supervision. During use and cooling, keep the appliance and its cord out of reach of children under 8 years. To prevent hazardous situations, if the power cord is damaged, it must be replaced by the manufacturer, its service agent or similarly qualified persons.
Manufacturer or similarly qualified person.
- Before filling with water, it is necessary to disconnect the appliance from the outlet. During use, the appliance should be on a stable surface. When filling, place the iron vertically on the heel or on the iron rest. Make sure the iron rest is on a stable surface. Do not leave the iron plugged in unattended. Do not use the appliance after a fall if there are visible damages or leaks. Regularly check the power cord for damage.
- Immersing the appliance in water or any other liquid is strictly prohibited.
- This appliance is intended exclusively for household use, for processing food in quantities normal for household use.
- Before first use, clean all parts thoroughly as described in the section "Care and Cleaning". Do not allow the power cord to come into contact with hot objects, such as the iron, hot water, or sharp edges.
- Before plugging into the outlet, check that the voltage in the network matches the voltage indicated on the bottom of the appliance, and make sure you are using a grounded outlet.
- When using an extension cord, make sure it is in good condition, has a grounding plug, and matches the rated power of the appliance (16A).
- The soleplate can heat up to very high temperatures, which can cause burns. Do not touch it.
- DANGER: The appliance has small parts. Some parts are removable for cleaning and maintenance. Be careful and do not allow children near such parts. Attention! Keep packaging materials (plastic bags, foam) in places inaccessible to children.
- Caution! Since this appliance has high power, make sure your electrical system can provide the corresponding output power. Contact your local power company and make sure the internal resistance of the electrical system does not exceed 0.372 ohms.
Description
Iron
1 Temperature indicator light 2 Steam button 3 Heel rest
Base unit
4 Water tank filler cap 5 Power cord storage compartment 6 Water tank lid 7 Anti-scale filter cartridge 8 Water tank 9 Power cord / Power cord storage compartment
10 «Eco» mode indicator 11 «iCare» mode indicator 12 Mode selection button 13 Anti-scale protection indicator 14 Reset button 15 Fixing handle
Intended use
The appliance should be used exclusively for ironing clothes, on the label of which there is information that this clothing can be ironed. Never iron or steam clothes that are on you.
Unpacking
Remove the device from the box. Remove all packaging elements. Remove all labels present on the device (do not remove the factory plate).
Anti-scale filter cartridge
- Remove the anti-scale filter cartridge (7) from the plastic bag and follow the instructions on the packaging.
- Open the water tank lid (6).
- Install the anti-scale filter cartridge so that it is fixed in the socket. Close the water tank lid.
NOTE: If the anti-scale filter cartridge is not installed or installed incorrectly, the appliance will not work properly.
Before ironing, always familiarize yourself with the care label on the clothing. Fabrics that contain this symbol are not suitable for ironing.
- Place the iron on the base (4), fully unwind the power cord and plug it into the mains.
- The iron will start heating up, and the temperature indicator light (1) on the iron will turn on. As soon as the iron is heated, the temperature indicator light will stay on continuously. For steam ironing, press the steam button (2) with your hand. Steam will come out of the holes in the soleplate.
- For dry ironing, do not press the steam button while ironing. Remember that after 10 minutes of dry ironing, the iron will switch to automatic shutdown mode.
Always iron dark fabrics on the reverse side to avoid shine on the fabric. - When ironing shirts, start with the more delicate parts, such as collars, cuffs and sleeves. Then iron the larger parts, such as the front and back, to avoid creating creases on the larger parts while ironing other parts. - When ironing the collar, start from its reverse side, moving from the edge (sharp end) to the center. Turn the garment over and repeat the same. Fold the collar and press its edge to achieve a "crisp" collar effect. - When ironing garments with pockets, appliqués
or more delicate items (e.g., with embroidery), turn them inside out and, if
necessary, place a cotton cloth between the iron and the garment. This way you will avoid damage to the garment and add volume to those parts that cannot be ironed directly. - To avoid shiny creases when steam ironing, make sure there is no residual moisture on the garment before proceeding to iron the next part.
(C) Steam ironing modes

«iCare»
The «iCare» mode is activated automatically when the appliance is plugged in. The «iCare» mode indicator light (11) turns on.
This mode is recommended for fabrics such as wool, polyester and cotton/linen.

«eco»
The «eco» mode is recommended for the most delicate fabrics, such as synthetic, silk or blended fabrics that do not require steam supply. It reduces energy consumption. To select the «ECO» mode, press the mode selection button (12). The «ECO» mode indicator light (10) turns on.

“turbo”
Manufacturer:
De'Longhi Braun Household GmbH, Carl-Ulrich-Strasse 4, 63263 Neu Isenburg, Germany
Date of manufacture
To find out the date of manufacture, look at the product code (next to the serial number table). The first digit indicates the last digit of the year of manufacture. The next two digits are the calendar week. The last two digits indicate the edition (automatically updated since 1992). Example: 30421 - the product was made in 2013 (in week 4).
Made in China
De'Longhi Braun Household GmbH Germany
De'Longhi Braun Household GmbH
Carl-Ulrich-Straße 4
63263 Neu-Isenburg/Germany
The product has been used for its intended purpose in accordance with the operating instructions.
The service life is 2 years from the date of sale to the consumer.
The importer is responsible for claims from consumers: LLC "DeLonghi", Russia,
127055, Moscow, ul. Sushchevskaya, 27, bldg. 3.
Tel. +7 (495) 781-26-76
Shelf life: unlimited
Disposal conditions: Dispose of in accordance with local regulations.
Storage conditions: Not limited
Connection initialization: Initialize in
Complies with environmental requirements.
Transport conditions: During
transport, do not drop or subject to excessive vibration.
Troubleshooting Guide
| ПОНБЛЕМА ПИЧИHA MEРА | | | |
| Пробор не поизбовит nap. | В розерваце недостаточно Воры. | Откlioочente прибор ot сети; убениесь, что Фильтурпдж 3ашисты OT накуни подотовлиен; залейные вору do OTметки «Макс.»; зakpoite Крышко розерва rapдя воры; ворл'tу; ворл'tу ложende прибор в сети и поождente, рoka CBETODINOHДИЙ Инд TEmp TpybI He
Буд CBETITSCR He nperepbivHо; нажmite Ha KhoNPу падуплг Ду.
Фильтурлдж 3aшисты OT накуни подотовли-
Но. | Φильтурлдж 3aшисты OT
нakини.
Ес榴 Bыш YCTPANUT
Ес CBSTOBILYET UCTPANUT
Ен CBSTOBILYET UCTPANUT
Ен CBSTOBILYET UCTPANUT
Ен CBSTOBILYET UCTPANUT
Ен CBSTOBILYET UCTPANUT
Ен CBSTOBILYET UCTPANUT
Ен CBSTOBILYET UCTPANUT
Ен CBSTOBILYET UCTPTN
Ен CBSTOBILYET UCTPANUT
Ен CBSTOBILYET UCTPANUT
Ен CBSTOBILYET UCTPANUT
Ен CBSTOBILYET UCTPANUT
Ен CBSTOBILYET UCTPANUT
Ен CBSTOBILYET UCTPANUT
Ен CBSTOBILYSET OTO
Ен CBSTOBILYSET OTO
Ен CBSTOBILYSET OTO
Ен CBSTOBILYSET OTO
Ен CBSTOBILYSET OTO
Ен CBSTOBILYSET OTO
Ен CBSTOBILYSET OTO
Ен CBSTOBILYSET OTO
Ен CBSTOBILYSET OTO
Ен CBSTOBILYSET OTO
Ен CBSTOBILYSET OTO
Ен CBSTOBILYSET OTO
Ен CBSTOBILYSET OTO
Ен CBSTOBILYSET OTO
Ен CBSTOBILYSET OTO
Ен CBSTOBILYSET OTO
Ен CBSTOBILYSET OTO
Ен CBSTOBIDT
Тре CBETITSCR
Замен Φильтур.
Заш Φильту.
Картудж 3aшисты OT накуни.
Но. |
| Инд CBETITSCR, И по Na
Кон CBETITSCR, И по Na
Кон CBETITSCR, И по Na
Кон CBETITSCR, И по Na
Кон CBETITSCR, И по Na
Кон CBETITSCR, И по Na
Кон CBETITSCR, И по Na
Кон CBETITSCR, И по Na
Кон CBETITSCR, И по Na
Кон CBETITSCR, И по Na
Кон CBETITSCR, И по Na
Кон CBETITSCR, И по Na
Кон CBETITSCR, И по Na
Кон CBETITSCR, И по Na
Кон CBETITSCR, И по Na
Кон CBET16, И по Na
Кон CBET16, И по Na
Кон CBET16, И по Na
Кон CBET16, И по Na
Кон CBET16, И по Na
Кон CBET16, И по Na
Кон CBET16, И по Na
Кон CBET16, И по Na
Кон CBET16, И по Na
Кон CBET16, И по Na
Кон CBET16, И по Na
Кон CBET16, И по Na
Кон CBET16, И по Na
Кон CBET16, И по Na
Кон CBET16, И по Na
Кон CBET16, И по N
Кон CBET16, И по Na
Кон CBET16, И по Na
Кон CBET16, И по Na
Кон CBET16, И по Na
Кон CBET16, И по Na
Кон CBET16, И по Na
Кон CBET16, И по Na
Кон CBET16,
Кон CBET16, И по Na
Кон CBET16, И по Na
Кон CBET16, И по Na
Кон CBET16, И по Na
Кон CBET16, И по Na
Кон CBET16, И по Na
Кон CBET16, И по Na
Кон CBET16, IIOCTO H0,
He CBETITSCR, He CBETITSCR, He CBETITSCR, He CBETITSCR, He CBETITSCR, He CBETITSCR, He CBETITSCR, He CBETITSCR, He CBETITSCR, He CBETITSCR, He CBETITSCR, He CBETITSCR, He CBETITSCR, He CBET16, He CBET16, He CBET16, He CBET16, He CBET16, He CBET16, He CBET16, He CBET16, He CBET16, He CBET16, He CBET16, He CBET16, He CBET16, He CBET16, He CBET16, H0,
He CBET16, He CBET16, He CBET16, He CBET16, He CBET16, He CBET16, He CBET16, He CBET16, He CBET16, He CBET16, He CBET16, He CBET16, He CBET16, He CBET16, He GB,
He CBET16, He CBET16, He CBET16, He CBET16, He CBET16, He CBET16, He CBET16, He CBET16, He CBET16, He CBET16, He CBET16, He CBET16, He CBET16, He CBET16, H0.
Сразы
Сразы
Сразы
Сразы
Сразы
Сразы
Сразы
Сразы
Сразы
Сразы
Сразы
Сразы
Сразы
Сразы
Сразы
Сразы
Сразы
Сразы
Сразы
Сразы
Сразы
Сразы
Сразы
Сразы
Сразы
Сразы | | | |
Fabrics that do not have the symbol should not be ironed.
- Place the iron on the stand (4), fully unwind the power cord and plug it into the outlet.
- The iron will begin to heat up and the temperature control indicator light (1) on the iron will blink. Once the iron is heated, the temperature control indicator light will stay on continuously. - To steam iron, press the steam button (2), which is located below the iron handle. Steam will start coming out of all the holes in the soleplate. - For dry ironing, do not press the steam button. Note that after 10 minutes of dry ironing, the iron switches to automatic shut-off mode.
The "Turbo" mode is recommended for fabrics that require more steam, such as thick denim/linen and cotton fabrics.
To set the "Turbo" mode, press and hold the mode selection button (12) until the "eco" (10) and "iCare" (11) mode indicators turn on.
Steam from the iron is very hot: never iron or steam clothes while they are on you.
3D soleplate
The unique round 3D soleplate ensures the best results and glide on difficult areas (e.g., collars, sleeves, etc.)
(D) Automatic shut-off function
This function activates in the absence of steam supply for 10 minutes.
When the iron is in automatic shut-off mode, the temperature control indicator light (1) blinks faster. - To turn the iron back on, press the on/off button (14), the mode selection button (12), or the steam button (2). - Before starting to iron, wait until the temperature control indicator light stays on continuously.
(E) Cleaning/Storage
The appliance is equipped with a cleaning system for easy handling and simple storage. The locked appliance can be lifted and carried by the handle.
NOTE: Before moving the appliance, make sure it is locked and completely cool. If you do not use the appliance for a long period of time (more than 1 month), before storing, empty the water from the water tank.
Place the appliance on the base (4) on a flat surface. - To lock the appliance, turn the locking button (15) to the position. - To unlock the appliance, set the locking button to the position. - The appliance unlocks.
Before winding the cord, unplug the appliance from the outlet and let it cool down (at least 30 minutes).
(F) Replacing the descaling cartridge
To maintain optimal performance of the steam generator, it is important to regularly replace the descaling cartridge or use demineralized water.
When the descaling cartridge needs replacement, the scale indicator (13) will light up.
a. Unplug the appliance from the outlet. b. Remove the old descaling cartridge (7) by pulling it out of the water tank (8) and dispose of it. c. Follow the instructions on the packaging and insert the new descaling cartridge into the correct position until it clicks into place. d. Close the water tank lid, plug in the appliance, and press and hold the
rinse button (14) for 5 seconds until the indicator light goes out.
NOTE: After replacing the descaling cartridge, press the steam button (2) and hold it for about 60 seconds, holding the appliance in a horizontal position, so that water flows through the soleplate.
If you use demineralized water, you need to replace the descaling cartridge less frequently and press the rinse button (14) for 5 seconds immediately when the scale indicator lights up, until the indicator light goes out.
We recommend using the descaling cartridge "CareStyle" (which can be purchased in stores or on the website www.braunhousehold.com or by contacting an authorized service center).
Do not use chemical or descaling agents, as well as descaling products, when rinsing the water tank.
(G) Care and cleaning
- Before plugging in, make sure the device is switched off and disconnected from the power supply, and allow it to cool down. It is recommended to use a damp cloth.
- Never use chemical cleaners, alcohol, or metal sponges (e.g., scouring pads, sponges with abrasive surfaces).
Do not dispose of the appliance with household waste at the end of its service life. You can dispose of the appliance at a Braun Service Center or at appropriate collection points in your country.
This appliance complies with the requirements of the European Directive on Waste Electrical and Electronic Equipment (WEEE).

Hotline: 0 800 503-507 (toll-free from landlines).
Troubleshooting guide
www.braunhousehold.com


turbo

.0510 J5 00
olal jz (A)
Lgogjoo jol gol j no 5
ololillgojgialllclololololg6)oljolbc
oo 50% g jssll oo 50% bdu pluoyy y
aJgSll golglggsal J) cIgI gI aai I.
.
gog 15 gab 1jglz
pUusuJgJ
60 2) jj jbcjol y jgl plssu wic. aalgll Jdo Jo jolw oowl ool g
ol ol lj 6
aaii iagla jia 7
8
∴ j4 = 1
.
4
= ( 2) 2 - ( 1) 2
.
.
.
a
.
.