971.13 - Heating Solis - Free user manual and instructions
Find the device manual for free 971.13 Solis in PDF.


User questions about 971.13 Solis
0 question about this device. Answer the ones you know or ask your own.
Ask a new question about this device
Download the instructions for your Heating in PDF format for free! Find your manual 971.13 - Solis and take your electronic device back in hand. On this page are published all the documents necessary for the use of your device. 971.13 by Solis.
USER MANUAL 971.13 Solis
Solis of Switzerland AG
1. Touche MARCHE/ARRET (ON/OFF)
Solis of Switzerland SA
Solis-Haus · CH-8152 Glattbrugg-Zurich · Suisse Telephone +41 44 874 64 54 · Telefax +41 44 874 64 99 info@solis.ch · www.solis.ch · www.solis.com
IMPORTANTI NORME DI SICUREZZA
Solis of Switzerland SA
Solis-Haus · CH-8152 Glattbrugg-Zurigo · Svizzera Telefono +41 44 874 64 54 · Fax +41 44 874 64 99 info@solis.ch · www.solis.ch · www.solis.com

IMPORTANT SAFETY PRECAUTIONS
Please read this manual thoroughly before operating your Solis Silent Heater to become familiar with the appliance and learn to operate it safely. We recommend safely keeping this manual and, should you pass the appliance on, handing it over to the new owner.
When using electric appliances, please regard the following cautionary measures for your own safety:
- To prevent electric shock, neither the heater nor the power cord and plug must come into contact with water or any other liquids. Water might penetrate the housing and damage the appliance! Should the appliance resp. power cord or plug come into contact with water, pull the plug from the socket immediately, using dry rubber gloves.
- Before starting up, check if the voltage stated on the appliance corresponds to your mains voltage.
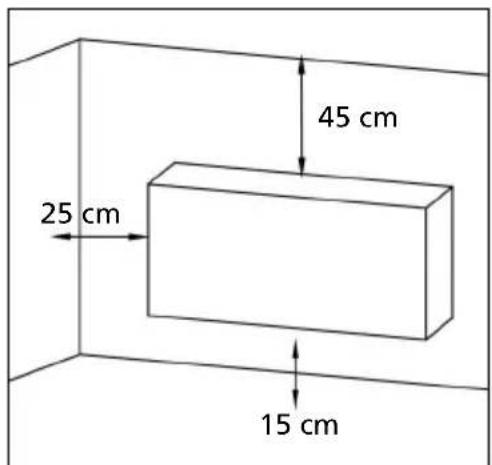
- During operation, the appliance has to stand on a firm, stable and dry surface with all four wheels to prevent it from falling over. Alternatively, you can mount the heater firmly to a wall not sensitive to heat. When mounting the appliance to a wall, keep the required safety distance of at least 15cm to the floor, 25cm to the next wall and 45cm above the heater to prevent the appliance from overheating and to permit free air circulation. When using the appliance standing on its feet, keep the safety distances around and above the appliance.
- Do not let the power cord hang over edges to prevent it from being pulled down. Please ensure that it does not come into contact with hot surfaces like f.e. an stove top or a heater or even the appliance itself. Always unroll the power cord completely before plugging in the plug.
- Keep the appliance safe from hot gas, hot ovens or other heat-emitting devices or heat sources. Never place the appliance near moisture, heat and naked flames. Keep the appliance safe from moving parts or devices.
- Never carry or pull the appliance by the power cord or place anything on the power cord.
- Never connect the appliance to a plug board or a power socket, to which other appliances are connected.
- We advise against using the appliance with an extension cord. Do not place the appliance directly under a power socket.
- Always pull the plug when the appliance is not in use or unsupervised, or if you wish to clean it. We recommend using a residual current device (RCD-safety-switch) to provide additional protection when using electric devices. It is advi
sable using a circuit breaker with a leakage current not exceeding 30mA . Your electrician can provide you with professional advice.
- Do not make any changes to the appliance, the power cord, the plug or the accessories.
- Check your heater before every use.
- To avoid electric shock, do not use the appliance if the power cord or power plug are damaged or if the appliance is malfunctioning, has fallen down or is damaged in some other way. Never perform repairs yourself, give the appliance to Solis or a service centre authorised by Solis instead to have it checked, repaired or mechanically and electrically maintained. Never open the appliance housing - risk of electric shock!
- Never reach out for an appliance that has fallen into water. Always pull the plug before removing the appliance from the water. Do not use the appliance again before having it checked for functionality and safety by Solis or a service centre authorised by Solis.
- Never place the appliance so that it might fall into water (f.e. next to a bath tub). Do not use the appliance in wet rooms or bathrooms and do not expose it to moisture – the appliance has to be absolutely dry at all times.
- Place the appliance so that it is not exposed to direct sunlight.
- Never insert sharp or pointed objects and tools into the appliance openings. The appliance might be damaged resp. danger of electric shock!
- Do not shake or relocate the appliance while it is in use.
- Only use the appliance as described in this manual. Only use the provided accessories, using wrong accessories might cause damage to the appliance.
- The appliance is only suited to domestic use and not to commercial use.
- The appliance is not designed for outdoor use. Do not use it in vehicles or on boats.
- People with limited physical, sensorial or mental capabilities (incl. children) or uninformed and inexperienced people must not use the Silent Heater, except when supervised and thoroughly instructed on how to use the appliance by a person responsible for their safety.
- Children must be supervised to prevent them from playing with the heater.
-
For your own safety, the appliance is equipped with a thermo switch. Should the Silent Heater overheat, it will automatically switch off to prevent damage being caused to the heater. As soon as your Silent Heater has cooled down, it will automatically restart.
-
Only use the appliance standing or hanging upright. If the appliance is turned, tilted or tipped over, the built-in safety mechanism will switch the heater off.
- Never cover the appliance during use - danger of overheating! There is an air inlet on the lower part of the heater and another air outlet on the upper part of the heater.
- Before relocating, disassembling or cleaning the appliance, always switch it off, first with the ON/OFF button and then with the power switch. Then, pull the plug from the socket. This also applies when the appliance is not in use.
- Never use the appliance in rooms with explosive resp. flammable substances or liquids, like f.e. aerosol containers (deodorant sprays, hairsprays etc.). Do not use the appliance in dusty rooms.
- Do not spray anything into the appliance.
Before using the heater, it is vital that you consider the following points:
- Do not place anything on the appliance.
- Never cover the heater with a blanket, wet or dry textiles or similar things. The appliance might overheat and be damaged, resp. cause electric shock, fires or personal injuries.
- Never cover the air outlets on the upper and lower side of the appliance or block the air circulation! Keep a sufficiently large distance to curtains, furniture and walls!
- Never switch the appliance off with the power plug. Always switch off by pressing the ON/OFF button first and then the power switch. After this, pull the plug from the socket.
- Never operate the appliance resp. pull the plug with wet hands.
- The heater gets hot during use, so you should never touch the air outlet or the front side. You might burn yourself.
- It is imperative that you let the appliance cool down before moving it! The appliance will be hot for some time after it is switched off!
- Do not use a programmable device, timer switch or the like to automatically switch on the appliance, as unsupervised use is not permitted. (Fire hazard!)
- Remove and discard all packaging materials and possible stickers before using the appliance for the first time.

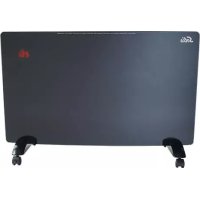
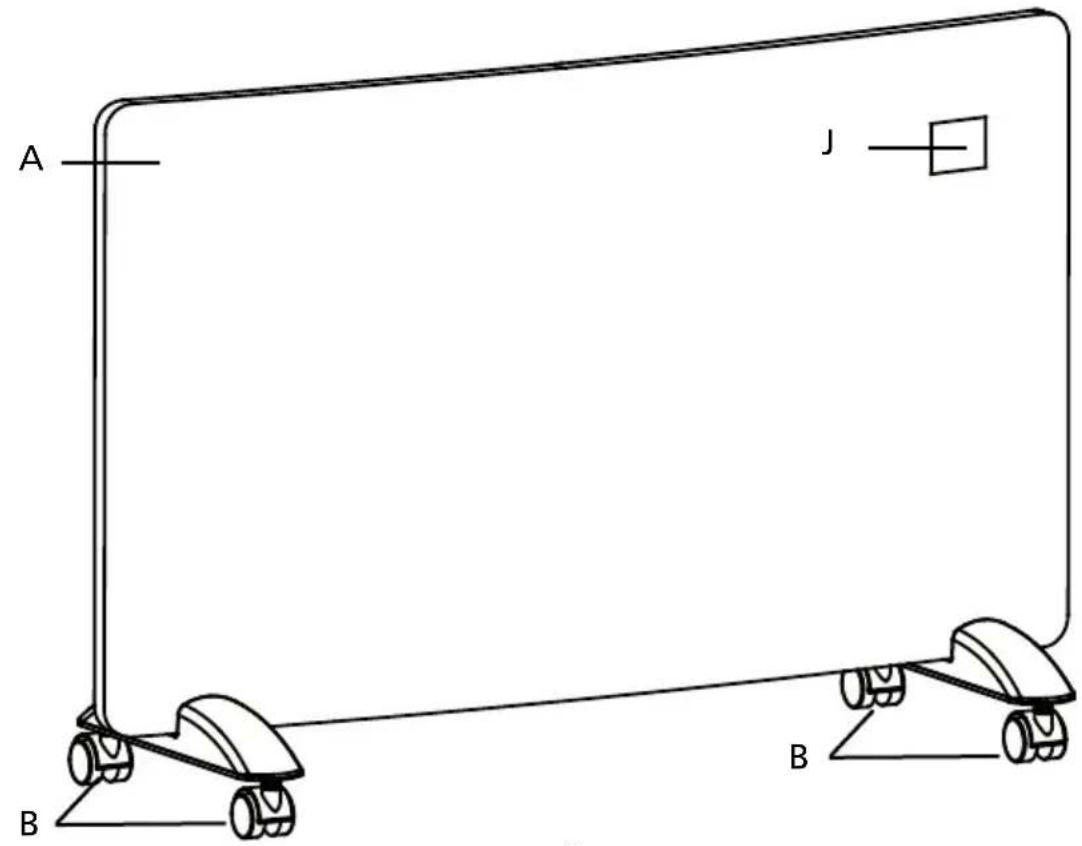
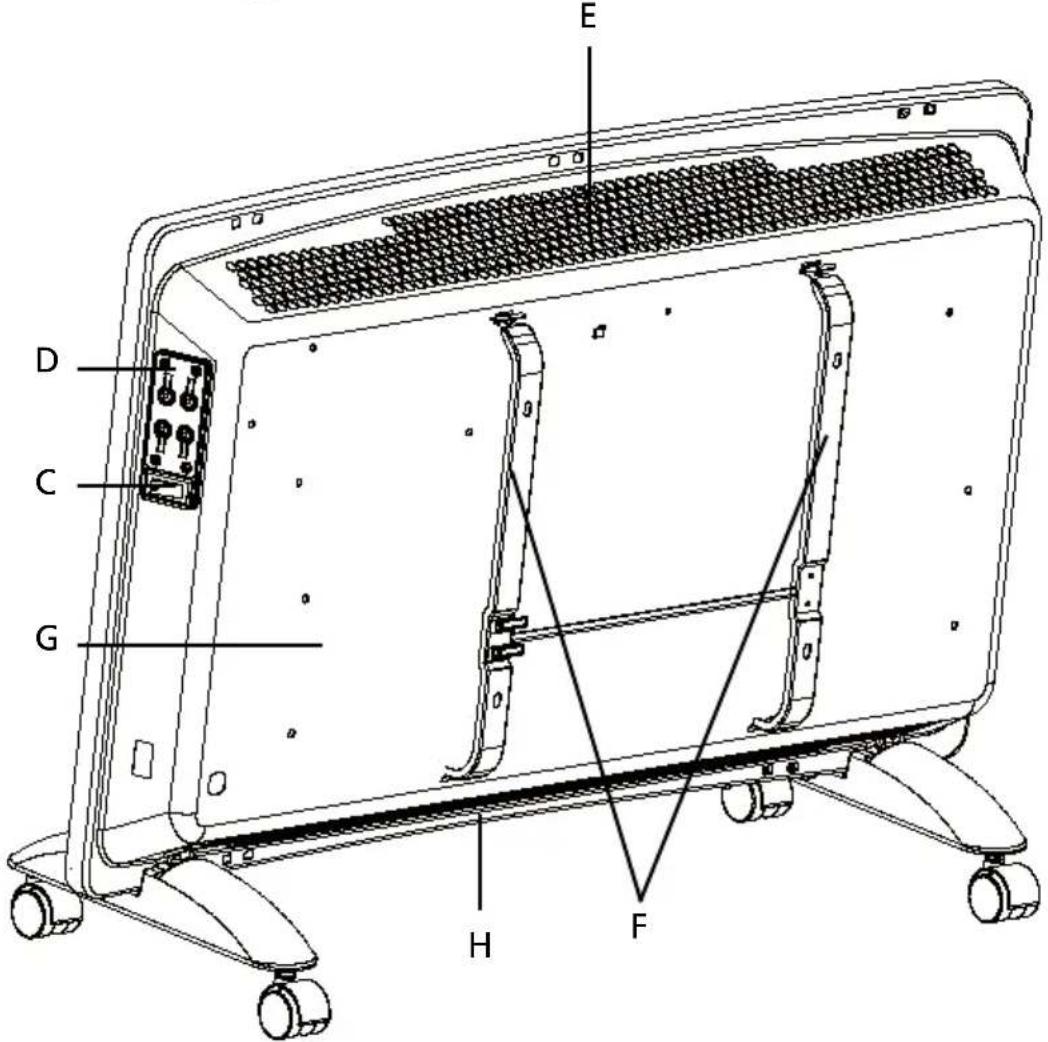
APPLIANCE DESCRIPTION
A Glass front
F Wall mount
B Wheels
G Rear side of appliance
C Power switch
H Air inlet
D Control panel
J LED display
E Air outlet
LED display mode indication:
- LO for low heating power
- HI for max. heating power
- AUTO for automatic heating function at the desired room temperature
Control panel and remote control
1 ON/OFF button for turning the appliance on and off
2 MODE button for setting heating power resp. automatic mode
3 TEMP button for temperature setting during automatic mode
4 TIMER button for setting operation time
The power switch can be found under the control panel on the appliance.
Please note: The function buttons on the remote control are identical to those on the control panel on the appliance itself.
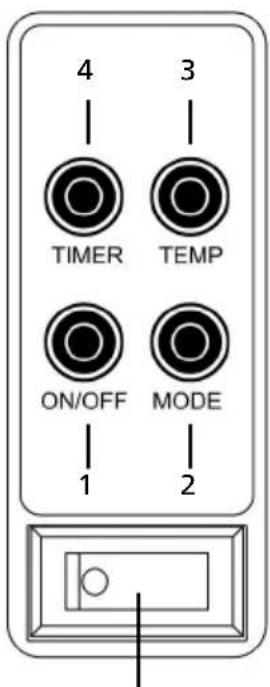
Power switch (only on appliance)
MOUNTING THE HEATER
WALL MOUNTING
- Minimum distances when mounting the appliance to a wall:
To next wall: at least 25 cm
To floor: at least 15 cm
Upwards: at least 45 cm
-
Please only use the provided wall mount.
-
Please keep to the minimum distances mentioned above to guarantee optimal performance and adequate air circulation and to prevent overheating.
-
The heater must only be mounted to walls not sensitive to heat.
Step 1: Removing the wall mount from the appliance backside
-
Turn out the two small screws at the upper end of the vertical mounting bar using a screwdriver. Push the upper and lower end of the two small holding struts (previously held in place by the screws) against each other. Now, you can remove the holding struts from the slots.
-
Pull the two lower mounting struts from the slots and remove the wall mount from the appliance backside.
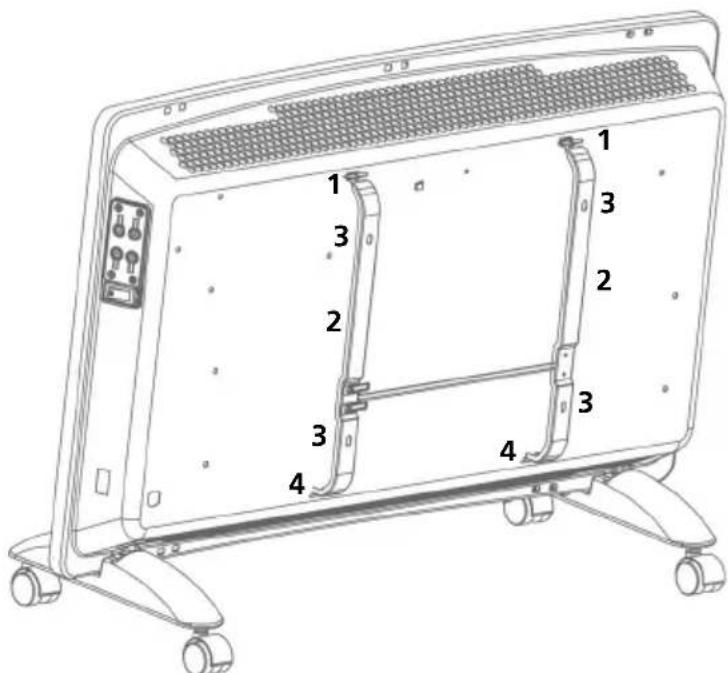
1 Upper holding struts with one small screw each
2 Vertical mounting bars
3 4 bores for the wall screws
4 Lower holding struts
Step 2: Fixing the wall mount to the wall
- Mount the wall mount to the wall by screwing the four screws (provided) through the four bores in the vertical mounting bars into the wall (2 per bar). If needed, use a spirit level to rightly fix the mount to the wall.
Step 3: Fixing the heater to the wall mount
- Lift the heater in an upright position and push the two lower slots on the appliance backside onto the two lower holding struts. Then, slightly push the heater downwards to fasten the holding struts to the appliance.
- Then, push the two upper slots on the appliance backside onto the upper holding struts of the wall mount and secure the wall mounting by screwing the small screws into the two upper holding struts, using a screwdriver.
FOR STATIONARY USE
- If you want to use the heater standing on the two feet with two wheels each, first unscrew the two wing screws on the lower appliance backside. Push the feet onto the metal part, both bores have to align. Fix the feet by screwing the two screws through the foot into the appliance. Fasten the screws until the heater stands upright on the feet, resp. the floor.
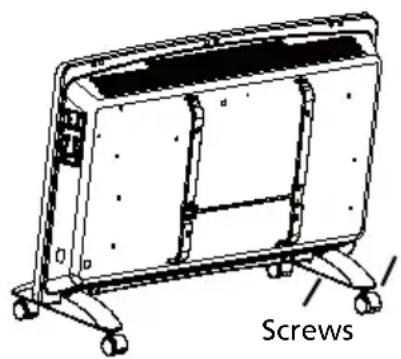
Foot with two wheels each
ELECTRIC CONNECTION
- Connect the appliance to a wall socket with an alternating current of 220-240V / 50-60Hz.
- When mounting the appliance to the wall, the electric connection has to be installed by a professional, unless you use a nearby wall socket to which the power plug can be connected.
STARTING UP
- Connect the power plug to a suitable power outlet.
- Turn on the appliance using the power switch (Position I).
- The LED display will state the current room temperature, the appliance is in standby mode. You can now operate the appliance, using the function buttons on the appliance or on the remote control.
THE FUNCTION BUTTONS ON THE SILENT HEATER AND THE REMOTE CONTROL
1. ON/OFF button
- Use this button to switch the appliance on and off. Only after pressing this button you can operate the following buttons. The heating function „LO“ will light up in the display.
2. MODE button
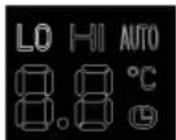
Use this button to set the heating function. Each press of the button will take you to the next mode.
- LO-In LO mode, low heating power is selected, the display will state LO for "low".
- HI-In HI mode, max. heating power is selected, the display will state HI for "high".
- AUTO - In AUTO mode, automatic heating power is selected. That means, the appliance will heat until the room temperature set by you is reached, then, it will automatically switch off. If the room temperature drops below the set value, the appliance will automatically restart. The display will state AUTO.
Caution: In AUTO mode, you have to set the desired temperature using the TEMP button.
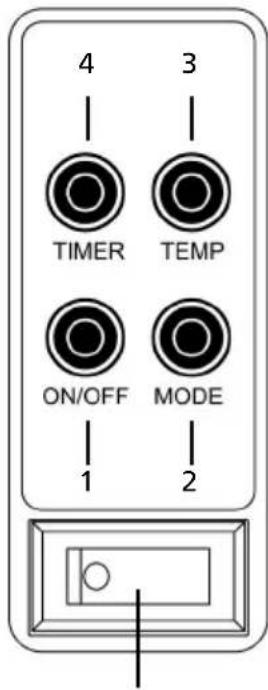
Power switch (only on appliance)
3. TEMP button
- Caution: You can only set the temperature in AUTO mode.
- You can choose a room temperature between 5^ C and 35^ C . At the max. temperature of 35^ C , the appliance will heat permanently.
- Press the TEMP button (or hold it), until the desired temperature lights up on the display. When you stop pressing the TEMP button, the set temperature will flash
on the display. Then, the setting is completed and the display will return to stating the current room temperature.
-
The thermostat built into the Solis Silent Heater measures the temperature in the room and starts the heating function. Once the set room temperature is reached, the heating function stops. If the room temperature drops below the set value, the heating function will restart.
-
Switching off the appliance will delete the programmed temperature.
-
Note : Please bear in mind that the thermostat can only measure the temperature immediately around the appliance.
Should you simultaneously measure the temperature with a thermometer some distance away from the heater (f. e. at the other end of the room), the readout on the thermometer might be a few degrees below the value displayed on the heater. Should the thermometer f.e. be placed directly above the heater, the value might be even higher than stated on the heater, as warm air rises up. The heating function of the Solis Silent Heater always corresponds to the temperature measured and displayed by the thermometer built into the heater.
4. TIMER button
- Once you have turned the Solis Silent Heater on with the ON/OFF button, you can use the TIMER button to determine operation time of the appliance. When you press the TIMER button once, either the factory setting „0" or the most recent setting will light up in the display. Now, press the TIMER button (or hold it), until the number of hours appropriate for you lights up. You can perform any setting between 1 and 24 hours, at intervals of 1 hour. Not pressing the button for 5 seconds will save the setting, the number of hours will not flash on the display any longer. The current room temperature will reappear on the display.
- When the set operation time has elapsed, the appliance will deactivate the heating function and return to standby mode.
- As long as the TIMER function is activated, the display will show a clock symbol.
- Switching off the appliance will delete the TIMER setting.
LED DISPLAY
- The LED display shows the current room temperature and the selected mode (LO, HI or AUTO). Note: While programming the operation time (TIMER) or temperature (TEMP), these two settings will flash. Once the timer is set, the clock symbol will light up as well.
TURNING OFF THE APPLIANCE
- If you want to deactivate the appliance, press the ON/OFF button first and then turn the power switch to the position „0". After that, pull the power plug from the power socket.
CLEANING
- Disconnect the appliance from the mains before each cleaning. Let it cool down completely.
- Clean the cooled down appliance with a slightly wet cloth.
- Please keep pointed and sharp objects away from the appliance to prevent damage.
- Never use abrasive or aggressive cleaners, also, do not use acetone or alcohol.
- Never bring the heater into contact with water and never submerge the heater in water.
- Occasionally, clean the grids of the air inlet and outlet openings on the top and bottom of the appliance. To do this, use a vacuum cleaner in its lowest setting.
TECHNICAL SPECIFICATIONS
Model-No. HC15-14AR, type 683
Product description convection heater
Voltage/Frequency 220-240V - / 50/60 Hz
Output 1.500 watt
Specifications (W× H× D) approx. 75× 45× 8,5cm
(without feet or wall mount)
Weight approx. 7,5kg (without feet or wall mount)
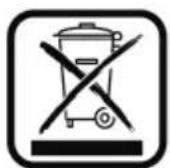
EU 2002/96/EC
Directions for proper disposal of the product according to EU directive 2002/96/EU
At the end of its working life this equipment must not be disposed of as an household waste. It must be taken to special local community waste collection centres or to a dealer providing this service. Disposing of electrical and electronic equipment separately avoids possible negative effects on the environment and human health deriving from an inappropriate disposal and enables its components to be recovered and recycled to obtain significant savings in energy and resources. In order to underline the duty to dispose of this equipment separately, the product is marked with a crossed-out dustbin.
Solis of Switzerland Ltd reserves the right to carry out technical and visual changes and modifications to improve the product at any time.

SOLIS HELPLINE: 091 802 90 10
(Only for customers in Switzerland)
This item stands out due to its long-life cycle and reliability. Despite this though, if a malfunction ever occurs, simply give us a call. Often a breakdown can be easily and quickly remedied with the right tip or technique without having to straight away send off the device for repair. We will give you all the advice and practical support you require.
Keep the original packaging in a safe place so that you may use it in the event that transportation or shipping of the product becomes necessary.
Solis of Switzerland Ltd
Solis-House · CH-8152 Glattbrugg-Zurich · Switzerland
Phone +41 44 874 64 54 • Fax +41 44 874 64 99
info@solis.ch · www.solis.ch · www.solis.com

BELANGRIJKE VEILIGHEIDSVOORSCHRIFTEN
BESCHRIJVING VAN HET APPARAAT
A Glazen paneel
F Muurbeugel
B Wielen
1. AAN/UIT knop (ON/OFF)
Solis of Switzerland AG
Solis-House • Glattbrugg-Zürich, Zwitterland
Telefoo +41 44 874 64 54 • Fax +41 44 874 64 99
info@solis.ch • www.solis.ch • www.solis.com