
VT60012 - Lighting V-TAC - Free user manual and instructions
Find the device manual for free VT60012 V-TAC in PDF.
| Product type | LED surface panel |
| Brand | V-TAC |
| Model | VT60012 |
| Usage | Indoor only |
| Light source | LED replaceable by a professional |
| Power supply | Mains 220-240 V AC |
| Installation | By a qualified electrician |
| Warranty | 5 years |
| Maintenance | Clean with a soft dry cloth |
| Prohibited chemicals | Do not use chemical detergents |
| Protection | Do not cover, ensure free air circulation |
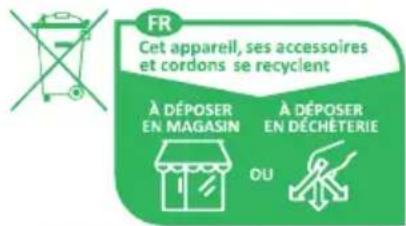
| Recycling | Product recyclable via collection points |
| Compliance | RoHS, WEEE 80133970 |
| Energy efficiency class | Varies according to the light source contained |
| Package contents | Panel, mounting bracket, screws, instructions |
| Safety | Cut off power before installation; do not look directly at the LED beam |
Frequently Asked Questions - VT60012 V-TAC
User questions about VT60012 V-TAC
0 question about this device. Answer the ones you know or ask your own.
Ask a new question about this device
Download the instructions for your Lighting in PDF format for free! Find your manual VT60012 - V-TAC and take your electronic device back in hand. On this page are published all the documents necessary for the use of your device. VT60012 by V-TAC.
USER MANUAL VT60012 V-TAC
WEEE Number: 80133970
INSTRUCTION MANUAL
LED BACKLIT SURFACE MOUNTED PANEL
natural_image
Circular object with a smooth, gradient surface, resembling a lid or cover (no text or symbols visible)
natural_image
White rectangular electronic device with a flat top and small indicator lights at the bottom (no visible text or symbols)
WARRANTY*

PRO SERIES

TECHNICAL DATA
| MODELSK | KUWATTSLUM | ENIAPPE | BEAM ANGLE | IP RATING | CRI | BODY TYPE | TOTAL CURRENT | INPUT VOLTAGE | LIFE SPAN | ON/OFF CYCLE | DIMENSION (LxWxH) | ||
| VT-60006 | 104921,10493110494178701,7871178721 | ROUND | 6W | 660Lm | Sphere 360° | >80 | PLASTIC | P2G6mA | AC:220-24050/60Hz | 20000H | >15000 | 121.2x30.6mm | |
| SQUARE | 120.8x120.8x30.7mm | ||||||||||||
| VT-60012 | 104951, 10496110497178731, 7874178751 | ROUND | 12W | 1200Lm | Sphere 360° | IP20 | >80 | PLASTIC | 71mA | AC:220-24050/60Hz | 20000H > | 15000 | 167.4x30.7mm |
| SQUARE | 167.3x167.3x30.7mm | ||||||||||||
| VT-60018 | 104981,10499110500178761,7877178781 | ROUND | 18W | 1850Lm | Sphere 360° | IP20 | >80 | PLASTIC | 103mA | AC:220-24050/60Hz | 20000H > | 15000 | 215.6x30.8mm |
| SQUARE | 1980Lm | 214x214x31mm | |||||||||||
| VT-60024 | 105141,10516123023178791,7880178811 | ROUND | 24W | 2500Lm | Sphere 360° | IP20 | >80 | PLASTIC | 160mA | AC:220-24050/60Hz | 20000H | >15000 | 288.6x31.2mm |
| SQUARE | 2640Lm | 285x285x30.7mm |
'This product contains a light source of energy efficiency class
INTRODUCTION & WARRANTY
Thank you for selecting and buying V-TAC product. V-TAC will serve you the best. Please read these instructions carefully before starting the installation and keep this manual handy for future reference. If you have any another query, please contact our dealer or local vendor from whom you have purchased the product. They are trained and ready to serve you at the best. The warranty is valid for 5 years from the date of purchase. The warranty does not apply to damage caused by incorrect installation or abnormal wear and tear. The company gives no warranty against damage to any surface due to incorrect removal and installation of the product. The products are suitable for 10-12 Hours Daily operation. Usage of product for 24 Hours a day would void the warranty. This product is warranted for manufacturing defects only.
WARNING
- Please make sure to turn off the power before starting the installation.
• Installation must be performed by a certified person. - If the external flexible cable or cord of this luminaire is damaged, it shall be exclusively replaced by the manufacturer or his service agent or a similar qualified person in order to avoid a hazard.
- Method of attachment of the cable or cord such that any replacement can only be made by the manufacturer, his service agent or similar qualified person.
- For Indoor use only.

MULTI-LANGUAGE
MANUAL QR CODE
Please scan the QR code to access the manual in multiple languages.
This marking indicates that this product should not be disposed of with other household wastes.
Caution, risk of electric shock.
flowchart
graph LR
    A["LED"] --> B["Sensor Icon"]
    B --> C["LED"]
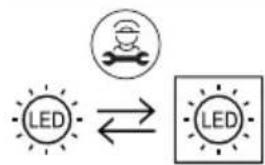
Replaceable (LED only) light source by a professional
Do not look directly at LED light beam. Product can only be supplied by rated voltage or voltage within the range provided. It's forbidden to use the product with damaged protective cover. Product must not be used in unfavorable conditions, e.g. dust, water, moisture, vibrations, explosive air atmosphere, fumes, or chemical fumes, etc. In the area of strong electromagnetic interference, the functioning of the product may be disrupted.
Any maintenance work must be performed when the power supply is cut off and the product has cooled down. Clean only with soft and dry cloths. Do not use chemical detergents. Do not cover the product. Ensure free air access. Product may heat up to a higher temperature.
MOUNTING
Read the manual before mounting. Mounting should be performed by a qualified electrician. Exercise caution. Product has a protective contact /terminal. Failure to connect the protective lead may lead to
electric shock. Mounting diagram: see pictures. Check for proper mechanical fastening and connection to electrical power prior to first use.
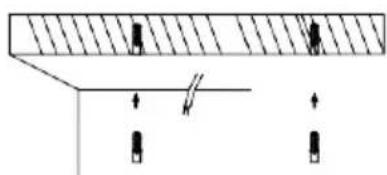
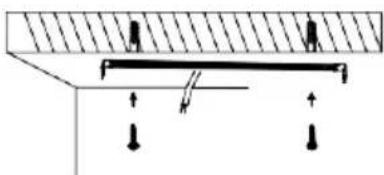
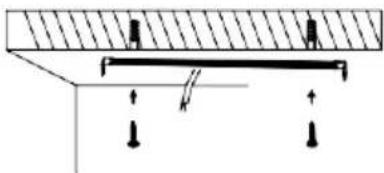
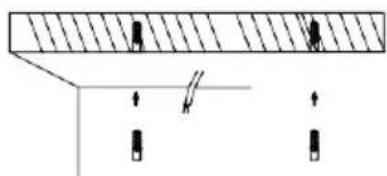
SURFACE PANEL INSTALLATION DIAGRAM
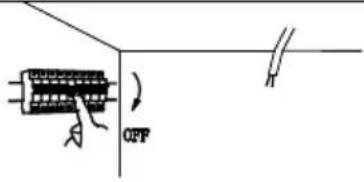 1.Switch OFF the power before starting the installation 1.Switch OFF the power before starting the installation | 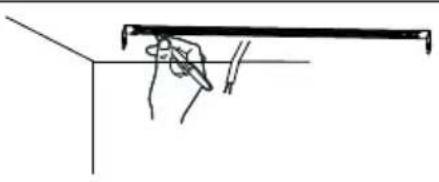 2.Confirm the installation position of the bracket 2.Confirm the installation position of the bracket | 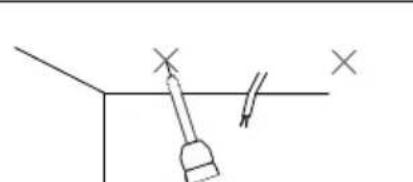 3.Drill a hole. 3.Drill a hole. |
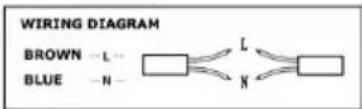
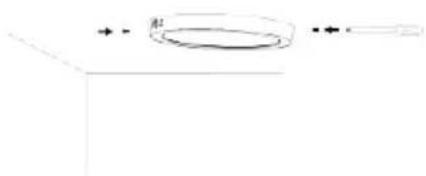
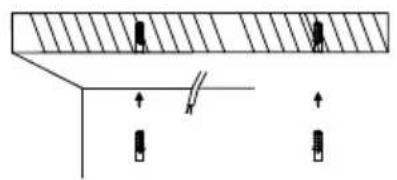 4.Plug in expansion bolt. 4.Plug in expansion bolt. | 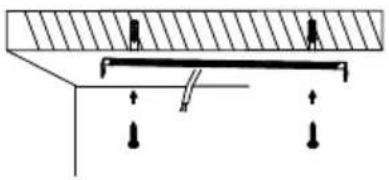 5.Fix the bracket ( Included) on the ceiling with screws. 5.Fix the bracket ( Included) on the ceiling with screws. | 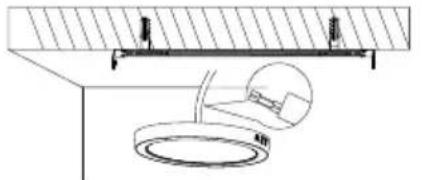 6.Connect the wiring as per wiring diagram 6.Connect the wiring as per wiring diagram |
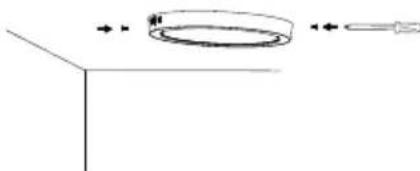
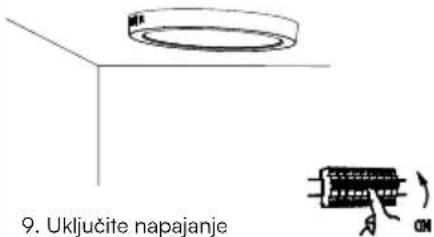
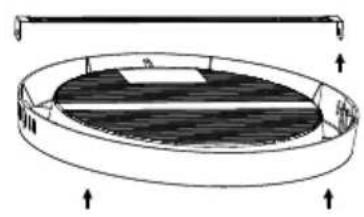 7.Fix the panel onto the bracket 7.Fix the panel onto the bracket | 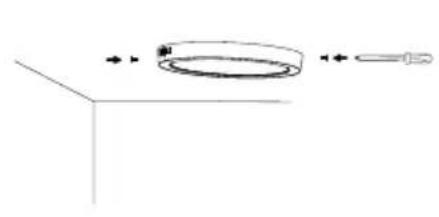 8.Fix the light and bracket with screws. 8.Fix the light and bracket with screws. | 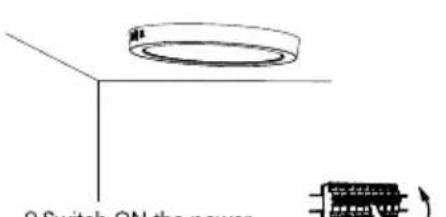 9.Switch ON the power and test the light. 9.Switch ON the power and test the light. |
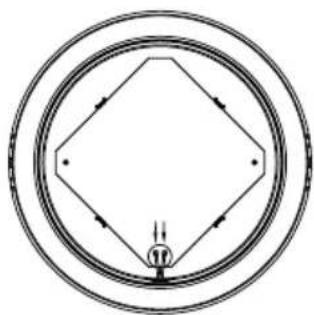
DISASSEMBLY DIAGRAM
(For Market surveillance team only)

natural_image
Simple line drawing of a hand holding a tool inside a circular frame (no text or symbols)- Power off, tap the central area of the diffusion plate with a pointed tool, and take out the cracked diffusion plate
flowchart
graph TD
    A["Start"] --> B{Decision}
    B --> C["Process Node"]
    C --> D["End"]
    style A fill:#f9f,stroke:#333
    style B fill:#ccf,stroke:#333
    style C fill:#cfc,stroke:#333
    style D fill:#fcc,stroke:#333
- Remove the power wire from the plug terminal
flowchart
graph TD
    A["Outer Circle"] --> B["Inner Diamond"]
    B --> C["Outer Circle"]
    C --> D["Inner Diamond"]
    D --> E["Outer Circle"]
    E --> F["Inner Diamond"]
    F --> G["Outer Circle"]
    G --> H["Inner Diamond"]
    H --> I["Outer Circle"]
    I --> J["Inner Diamond"]
    J --> K["Outer Circle"]
- If there is no hot melt column in the lamp body or the hot melt column is not hot melt, this step will be adjusted without treatment. If the hot-melt column has been fused to fix the aluminum substrate, cut the hot-melt part of the hot-melt point with diagonal pliers.
natural_image
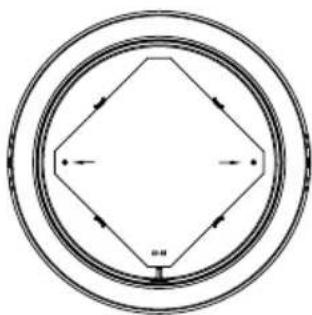
Pure electrical circuit lines without any symbols- Press the buckle outwards, remove the aluminum substrate pressing strip from the bayonet, and remove the pressing strip. This step is only required for 24W panel light, other items are not required.
natural_image
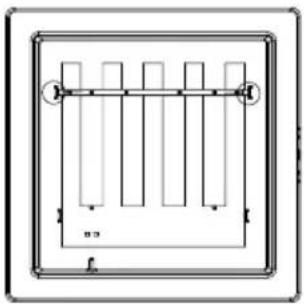
Pure geometric diagram with concentric circles and a central diamond shape, no text or symbols present.- Press the buckle outwards, remove the aluminum substrate from the buckle, and remove the light source board.

natural_image
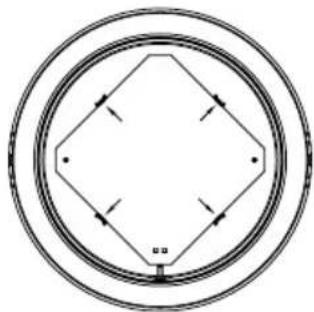
Pure geometric diagram of a diamond shape with a small tassel at the bottom (no text or symbols)- Take out two-cord cable (wire diameter 18-22AWG) and insert it into the plug-in terminal. Connect the external power supply for testing.
Note: Light source removal will void the warranty
RoHS


IN CASE OF ANY QUERY/ISSUE WITH THE PRODUCT, PLEASE REACH OUT TO US AT: SUPPORT@V-TAC.EU FOR MORE PRODUCTS RANGE, INQUIRY PLEASE CONTACT OUR DISTRIBUTOR OR NEAREST DEALERS. V-TAC EUROPE LTD. BULGARIA, PLOVDIV 4000, BUL.L.KARAVELOW 9B
WEEE Number: 80133970
РЪКОВОДСТВО ЗА УПОТРЕБА
natural_image
Circular object with a smooth, gradient surface, possibly a lid or cover (no text or symbols visible)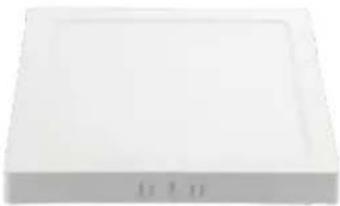
natural_image
White rectangular electronic device with a flat top and two small buttons at the bottom (no visible text or symbols)
WARRANTY


ТЕХНИЧЕСКИ ДАННИ
| МОДЕЛ | SKU | SHAPE | WATTS | LUMENS | ТЫЛ НА ЛЪЧА | Р РЕЙТИНГ | CRI | ТИП НА ТЯЛОТО | ОБЩО БЪЛГАРСКО | ВХОДНО НАПРОЖЕНИЕ | ПРОДЬ ЛЖИТЕЛ НОСТ НА ШИРОТ | ЦИКЪЛ НА ВКЛЮЧВАНЕ /ИЗКЛЮЧВА | РАЗМЕРИ (LxWxH) |
| VT-60006 | 104921,10493110494178701,7871178721 | КРЪГ | 6W | 660Lm | Сфера 360° | IP20 | >80 | PLASTIC | 36mA | AC: 220-24050/60Hz | 20000H | >15000 | 121.2x30.6mm |
| КВАДРАТ | 120,8x120,8x30,7 mm | ||||||||||||
| VT-60012 | 104951, 10496110497178731, 7874178751 | КРЪГ | 12W | 1200Lm | Сфера 360° | IP20 | >80 | PLASTIC | 71mA | AC: 220-24050/60Hz | 20000H | >15000 | 167.4x30.7mm |
| КВАДРАТ | 167,3x167,3x30,7 mm | ||||||||||||
| VT-60018 | 104981,10499110500178761,7877178781 | КРЪГ | 18W | 1850Lm | Сфера 360° | IP20 | >80 | PLASTIC | 103mA | AC: 220-24050/60Hz | 20000H | >15000 | 215.6x30.8mm |
| КВАДРАТ | 1980Lm | 214x224x31mm | |||||||||||
| VT-60024 | 105141,10516123023178791,7880178811 | КРЪГ | 24W | 2500Lm | Сфера 360° | IP20 | >80 | PLASTIC | 160mA | AC: 220-24050/60Hz | 20000H | >15000 | 288.6x31.2mm |
| КВАДРАТ | 2640Lm | 285x285x30,7 mm |
natural_image
Simple line drawing of a ring with a hand holding a tool, no text or symbols presentnatural_image
Pure electrical circuit lines without any symbolsnatural_image
Simple line drawing of a diamond-shaped frame with a vertical bar at the bottom (no text or symbols)natural_image
Circular object with a smooth, gradient gray surface, resembling a lid or cover (no text or symbols visible)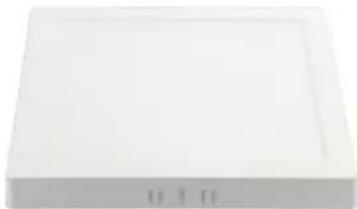
natural_image
White rectangular electronic device with two ports at the bottom (no visible text or symbols)
WARRANTY*

PRO SERIES

TEHNIČKI PODACI
| MODELSKU | OBLIK | WATTI | LUMENI | Kut svjetlosnog snopa | IP OCJENA | CRI | Tip tijela | Ulazna struja | Ulazni napon | Životni vijek | Ciklus uključivanja/ isključivanja | Dimenzija (DxŠxV) | |
| VT-60006 | 104921,104931 104941 78701,78711 78721 | Krug | 6W | 660Lm | Sfera 360° | IP20 | >80 | plastični | 36mA | AC:220-240 50/60Hz | 20000H | >15000 | 121.2x30.6mm |
| Kvadrat | 120.8x120.8x30.7mm | ||||||||||||
| VT-60012 | 104951,104961 104971 78731,78741 78751 | Krug | 12W | 1200Lm | Sfera 360° | IP20 | >80 | plastični | 71mA | AC:220-240 50/60Hz | 20000H | >15000 | 167.4x30.7mm |
| Kvadrat | 167.3x167.3x30.7mm | ||||||||||||
| VT-60018 | 104981,104991 105001 78761,78771 78781 | Krug | 18W | 1850Lm | Sfera 360° | IP20 | >80 | plastični | 103mA | AC:220-240 50/60Hz | 20000H | >15000 | 215.6x30.8mm |
| Kvadrat | 1980Lm | 214x214x31mm | |||||||||||
| VT-60024 | 105141,105161 230231 78791,78801 78811 | Krug | 24W | 2500Lm | Sfera 360° | IP20 | >80 | plastični | 160mA | AC:220-240 50/60Hz | 20000H | >15000 | 288.6x31.2mm |
| Kvadrat | 2640Lm | 285x285x30.7mm | |||||||||||
flowchart
graph LR
    A["LED"] --> B["Sensor Icon"]
    B --> C["LED"]
natural_image
Simple line drawing of a hand holding a tool near a vertical line (no text or symbols)natural_image
Simple line drawing of a hammer and fulcrum against a vertical line, with no text or symbols present.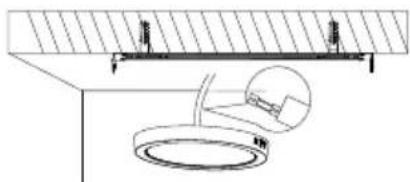
natural_image
Technical line drawing of a ceiling fixture with a circular component and a magnified inset showing internal components (no text or symbols)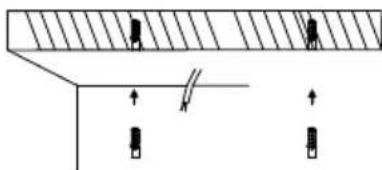
natural_image
Pure electrical circuit lines without any symbolsnatural_image
Pure mechanical diagram showing a beam supported by two supports with downward force arrows, no text or symbols present.natural_image
Diagram of a circular container with internal compartments and directional arrows, no text or symbols present- Pričvrstite ploču na nosač.
natural_image
Pure diagram of a cylindrical object with directional arrows, no text or symbols present- Pričvrstite svjetlo i nosač vijcima.
DIJAGRAM RASTAVLJANJA
(Samo za tim za nadzor tržišta)

natural_image
Simple line drawing of a hand holding a tool inside a circular frame (no text or symbols)natural_image
Pure electrical circuit lines without any symbols- Pritisnite kopču prema van, uklonite traku za pritiskanje aluminijske podloge s bajuneta i uklonite traku za pritiskanje. Ovaj korak je potreban samo za rasvjetnu ploču od 24 W. ostale stavke nisu potrebne.

natural_image
Pure geometric diagram with concentric circles and a central diamond shape, no text or symbols present.- Pritisnite kopču prema van, uklonite aluminijsku podlogu s kopče i uklonite ploču izvora svjetla.
natural_image
Pure geometric diagram of a diamond shape with a small tassel at the bottom (no text or symbols)- Izvadite dvožilni kabel (promjer žice 18-22AWG) i umetnite ga u utičnicu. Spojite vanjsko napajanje za testiranje.
PANEL S LED PODSVÍCENÍM PRO POVRCHOVOU MONTÁŽ

natural_image
Circular object with a smooth, gradient gray surface, resembling a lid or cover (no text or symbols visible)
natural_image
White rectangular electronic device with a flat top and small indicator lights at the bottom (no visible text or symbols)05 YEAR
WARRANTY


TECHNICKÉ ÚDAJE
| MODEL | SKU | SHAPE | WATTS | LUMENS | ÚHEL PAPRS KU | IP RATING | CRI | TYP TĚLA | CELKE M BĚŽ NÝ | VSTUP NÍ NAPĚTÍ | DÉLK A ŽIVOT | CYKLUS ZAPNUT /VYPNUT | ROZMĚRY (DxŠxV) |
| VT-60006 | 104921,10493110494178701,7871178721 | ROUND | 6W | 660Lm | Sféra 360° | IP20 | >80 | PLASTO VÉ | 36mA | Střídavý proud: 220-240 50/60Hz | 20000H | >15000 | 121,2x30,6 mm |
| SQUARE | 120,8x120,8x30,7 mm | ||||||||||||
| VT-60012 | 104951, 10496110497178731, 7874178751 | ROUND | 12W | 1200Lm | Sféra 360° | IP20 | >80 | PLASTO VÉ | 71mA | Střídavý proud: 220-240 50/60Hz | 20000H | >15000 | 167,4x30,7 mm |
| SQUARE | 167,3x167,3x30,7 mm | ||||||||||||
| VT-60018 | 104981,10499110500178761,7877178781 | ROUND | 18W | 1850Lm | Sféra 360° | IP20 | >80 | PLASTO VÉ | 103mA | Střídavý proud: 220-240 50/60Hz | 20000H | >15000 | 215,6x30,8 mm |
| SQUARE | 1980Lm | 214x214x31mm | |||||||||||
| VT-60024 | 105141,10516123023178791,7880178811 | ROUND | 24W | 2500Lm | Sféra 360° | IP20 | >80 | PLASTO VÉ | 160 mA | Střídavý proud: 220-240 50/60Hz | 20000H | >15000 | 288,6x31,2 mm |
| SQUARE | 2640Lm | 285x285x30,7 mm |
flowchart
graph TD
    A["LED"] --> B["Sensor Icon"]
    B --> C["LED"]
natural_image
Simple line drawing of a hand holding a tool inside a circular frame (no text or symbols)natural_image
Pure electrical circuit lines without any symbolsnatural_image
Simple line drawing of a diamond-shaped frame with a vertical bar at the bottom (no text or symbols)MANUEL D'INSTRUCTIONS
PANNEAU DE SURFACE RÉTRO-ÉCLAIRÉ PAR LED

natural_image
Circular object with a smooth, gradient surface, possibly a lid or cover (no text or symbols visible)
natural_image
White rectangular electronic device with a flat top and small indicator lights at the bottom (no visible text or symbols)
WARRANTY


DONNÉES TECHNIQUES
| MODELE | SKU | FORME | WATTS | LUMENS | ANGLE DU FAISCEAU | NOTE P | CRI | TYPE DE CORPS | TOTAL COURANT | TENSION D'ENTRÉE | DURÉE DE VIE | CYCLE MARCHE/ARRÊT | DIMENSIONS (LxLxH) |
| VT-60006 | 104921,10493110494178701,7871178721 | ROND | 6W | 660Lm | Sphère 360 | IP20 | >80 | PLASTIQUE | 36mA | AC:220-24050/60Hz | 20000H | >15000 | 121.2x30.6mm |
| CARRE | 120.8x120.8x30.7mm | ||||||||||||
| VT-60012 | 104951,10496110497178731,7874178751 | ROND | 12W | 1200Lm | Sphère 360 | IP20 | >80 | PLASTIQUE | 71mA | AC:220-24050/60Hz | 20000H | >15000 | 167.4x30.7mm |
| CARRE | 167.3x167.3x30.7mm | ||||||||||||
| VT-60018 | 104961,10499110500178761,7877178781 | ROND | 18W | 1850Lm | Sphère 360 | IP20 | >80 | PLASTIQUE | 103mA | AC:220-24050/60Hz | 20000H | >15000 | 215.6x30.8mm |
| CARRE | 1980Lm | 214x214x31mm | |||||||||||
| VT-60024 | 105141,10516123023178791,7880178811 | ROND | 24W | 2500Lm | Sphère 360 | IP20 | >80 | PLASTIQUE | 160mA | AC:220-24050/60Hz | 20000H | >15000 | 288.6x31.2mm |
| CARRE | 2640Lm | 285x285x30.7mm |
INTRODUCTION ET GARANTIE
flowchart
graph TD
    A["LED"] --> B["Switch Icon"]
    B --> C["LED"]
natural_image
Simple line drawing of a hand holding a tool above a vertical axis (no text or symbols)natural_image
Simple line drawing of a hammer and sickle on a surface with two X marks (no text or symbols)- percer un
natural_image
Pure technical diagram showing a structural beam with supports and a hatched top section, no text or symbols present.- insérer le boulon
natural_image
Pure diagram of a mechanical or structural assembly with no text, numbers, or symbolsnatural_image
Simple line drawing of a ceiling structure with a circular component underneath (no text or symbols)natural_image
Pure diagram of an oval-shaped object with internal lines and arrows, no text or symbols presentnatural_image
Simple line drawing of a cylindrical object with a small protrusion, no text or symbols presentnatural_image
Simple line drawing of a ring with a hand holding a tool, no text or symbols presentnatural_image
Pure electrical circuit lines without any symbolsnatural_image
Pure geometric diagram of a diamond shape with a vertical bar at the bottom (no text or symbols)natural_image
Circular white object with a smooth, gradient surface (no text or symbols visible)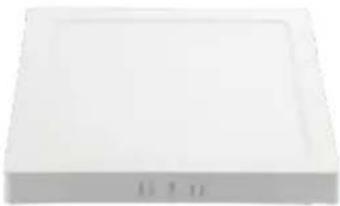
natural_image
White rectangular electronic device with a flat top and small indicator lights at the bottom (no visible text or symbols)


TECHNISCHE DATEN
| MODELL | SKU | SHAPE | WATTS | LUMENS | STRAHL ENWINKE L | IP RATING | CRI | KÖRPE R-TYP | GESAMT AKTUELL | EINGANGS SPANNUNG | LEBEN SDAUER | EIN/AUS-ZYKLUS | ABMESSUNG (LxBxH) |
| VT-60006 | 104921,10493110494178701,7871178721 | RUND | 6W | 660Lm | Sphäre 360° | IP20 | >80 | KUNSTSTO FF | 36mA | AC:220-24050/60Hz | 20000H | >15000 | 121.2x30.6mm |
| SQUARE | 120.8x120.8x30.7mm | ||||||||||||
| VT-60012 | 104951,10496110497178731,7874178751 | RUND | 12W | 1200Lm | Sphäre 360° | IP20 | >80 | KUNSTSTO FF | 71mA | AC:220-24050/60Hz | 20000H | >15000 | 167.4x30.7mm |
| SQUARE | 167.3x167.3x30.7mm | ||||||||||||
| VT-60018 | 104961,10499110500178761,7877178781 | RUND | 18W | 1850Lm | Sphäre 360° | IP20 | >80 | KUNSTSTO FF | 103mA | AC:220-24050/60Hz | 20000H | >15000 | 215.6x30.8mm |
| SQUARE | 1980Lm | 214x224x31mm | |||||||||||
| VT-60024 | 105161,10516123023178791,7880178811 | RUND | 24W | 2500Lm | Sphäre 360° | IP20 | >80 | KUNSTSTO FF | 160mA | AC:220-24050/60Hz | 20000H | >15000 | 288.6x31.2mm |
| SQUARE | 2640Lm | 285x285x30,7 mm |
natural_image
Simple line drawing of a hand holding a tool, no text or symbols presentnatural_image
Simple line drawing of a hammer and fulcrum against a horizontal axis, with no text or symbols present.- ein Loch

natural_image
Pure technical diagram of a structural beam with supports and hatched areas, no text or symbols present- den Spreizbolzen
natural_image
Pure mechanical diagram showing a beam supported by two vertical supports with downward force arrows, no text or symbols present.natural_image
Pure technical line drawing of a mechanical assembly without any text, numbers, or symbolsnatural_image
Simple line drawing of a cylindrical object on a 3D coordinate axis (no text or symbols)natural_image
Simple line drawing of a ring with a small object inside, no text or symbols presentnatural_image
Pure electrical circuit lines without any symbolsnatural_image
Pure geometric diagram of a diamond shape with a vertical bar at the bottom (no text or symbols)natural_image
Circular object with a smooth, gradient surface, possibly a lid or cover (no text or symbols visible)
natural_image
White rectangular electronic device with a flat top and small indicator lights at the bottom (no visible text or symbols)


TEXNIKA ΣΤΟΙΧΕΙΑ
| MONTELO | SKU | SHAPE | WATTS | LUMENS | ΓΟΝΙΑ ΔΕΣΜΗΣ | ΒΑΘΜ ΟΛΟΥΑ IP | CRI | ΤΥΠΟΣ ΣΩΜΑΤΟ Σ | ΣΥΝΟΛΟ ΤΡΕΧΟΥΣΑ | ΤΑΣΗ ΕΙΣΟΔΟΥ | ΔΙΑΡΚΘ Α ΖΩΗΣ | ΚΥΚΛΟΣ ΕΝΕΡΓΟΠΟΙΗ ΣΗΣ/ΑΠΕΝΕΡ | ΔΙΑΣΤΑΣΕΙΣ (LxWxH) |
| VT-60006 | 104921,10493110454178701,7871178721 | ΣΤΡΟΓΥΛΟ Σ | 6W | 660Lm | Σφαίρα 360° | IP20 | >80 | ΠΛΑΣΤΙΚΟ | 36mA | AC: 220-240 50/60Hz | 20000H | >15000 | 121.2x30.6mm |
| SQUARE | 120.8x120.8x30.7mm | ||||||||||||
| VT-60012 | 104951, 10496110497178731, 7874178751 | ΣΤΡΟΓΥΛΟΣ | 12W | 1200Lm | Σφαίρα 360° | IP20 | >80 | ΠΛΑΣΤΙΚΟ | 71mA | AC: 220-240 50/60Hz | 20000H | >15000 | 167.4x30.7mm |
| SQUARE | 167.3x167.3x30.7mm | ||||||||||||
| VT-60018 | 104961,10499110500178761,7877178781 | ΣΤΡΟΓΥΛΟΣ | 18W | 1850Lm | Σφαίρα 360° | IP20 | >80 | ΠΛΑΣΤΙΚΟ | 103mA | AC: 220-240 50/60Hz | 20000H | >15000 | 215.6x30.8mm |
| SQUARE | 1980Lm | 214x224x31mm | |||||||||||
| VT-60024 | 105141,10516123023178791,7880178811 | ΣΤΡΟΓΥΛΟΣ | 24W | 2500Lm | Σφαίρα 360° | IP20 | >80 | ΠΛΑΣΤΙΚΟ | 160mA | AC: 220-240 50/60Hz | 20000H | >15000 | 288.6x31.2mm |
| SQUARE | 2640Lm | 285x285x30.7mm |
flowchart
graph TD
    A["LED"] <--> B["LED"]
natural_image
Simple line drawing of a circular ring with a hand holding a small object, no text or symbols present.natural_image
Pure electrical circuit lines without any symbolsnatural_image
Simple geometric diagram of a diamond shape with a vertical line and a small protrusion at the bottom (no text or symbols)natural_image
Circular object with a smooth, gradient surface, possibly a lid or cover (no text or symbols visible)
natural_image
White rectangular electronic device with a flat top and small indicator lights at the bottom (no visible text or symbols)
WARRANTY

PRO SERIES

TECHNIKAI ADATOK
| MODELL | SKU | SHAPE | WATTS | LUMENS | SUGÁ R SZÖGE | IP RATING | CRI | TEST TÍPU S | Ö SSZES ÁRAM | BEMEN ETI FESZÜLT SÉG | ÉLET SZAK ASZ | BE/KIKA PCSOLÁ SI CIKLUS | MÉRET (LxSxBxH) |
| VT-60006 | 104921,104931 104941 78701,78711 78721 | KÖRKÉP | 6W | 660Lm | Gömb 360° | IP20 | >80 | PLASTIC | 36mA | AC: 220-240 50/60Hz | 20000H | >15000 | 121.2 × 30.6mm |
| SQUARE | 120.8x120.8x30.7mm | ||||||||||||
| VT-60012 | 104951, 104961 104971 78731, 78741 78751 | KÖRKÉP | 12W | 1200Lm | Gömb 360° | IP20 | >80 | MŰANY AG | 71mA | AC: 220-240 50/60Hz | 20000H | >15000 | 167.4 × 30.7mm |
| SQUARE | 167.3x167.3x30.7mm | ||||||||||||
| VT-60018 | 104981,104991 105001 78761,78771 78781 | KÖRKÉP | 18W | 1850Lm | Gömb 360° | IP20 | >80 | PLASTIC | 103mA | AC: 220-240 50/60Hz | 20000H | >15000 | 215.6 × 30.8mm |
| SQUARE | 1980Lm | 214x214x31mm | |||||||||||
| VT-60024 | 105141,105161 230231 78791,78801 78811 | KÖRKÉP | 24W | 2500Lm | Gömb 360° | IP20 | >80 | PLASTIC | 160mA | AC: 220-240 50/60Hz | 20000H | >15000 | 288.6 × 31.2mm |
| SQUARE | 2640Lm | 285x285x30.7mm |
natural_image
Simple line drawing of a hand holding a tool inside a circular frame (no text or symbols)natural_image
Pure electrical circuit lines without any symbolsnatural_image
Pure geometric diagram of a diamond-shaped frame with a vertical bar at the bottom (no text or symbols)natural_image
Circular object with a smooth, gradient surface, possibly a lid or cover (no text or symbols visible)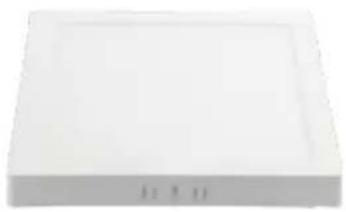
natural_image
White rectangular electronic device with a flat top and small side ports (no visible text or symbols)
WARRANTY®
PRO SERIES

DATI TECNICI
| MODELLO | SKU | FORMA | WATTS | LUMENS | ANGOL O DEL RAGGIO | VALU TAZIONE IP | CRI | TIPO DI CORPO | TOTALE CORRENTE | TENSIONE D'INGRESSO | DURA TA DELLA VITA | CICLO ON/OFF | DIMENSIONE (LxLxH) |
| VT-60006 | 104921,10493110494178701,7871178721 | TONDO | 6W | 660Lm | Sfera a 360° | IP20 | >80 | PLASTICA | 36mA | CA: 220-24050/60Hz | 20000H | >15000 | 121,2x30,6 mm |
| PIAZZA | 120,8x120,8x30,7 mm | ||||||||||||
| VT-60012 | 104951,10496110497178731,7874178751 | TONDO | 12W | 1200Lm | Sfera a 360° | IP20 | >80 | PLASTICA | 71mA | CA: 220-24050/60Hz | 20000H | >15000 | 167,4x30,7 mm |
| PIAZZA | 167,3x167,3x30,7 mm | ||||||||||||
| VT-60018 | 104981,10499110500178761,7877178781 | TONDO | 18W | 1850Lm | Sfera a 360° | IP20 | >80 | PLASTICA | 103mA | CA: 220-24050/60Hz | 20000H | >15000 | 215,6x30,8 mm |
| PIAZZA | 1980Lm | 214x214x31 mm | |||||||||||
| VT-60024 | 105141,10516123025178791,7880178811 | TONDO | 24W | 2500Lm | Sfera a 360° | IP20 | >80 | PLASTICA | 160mA | CA: 220-24050/60Hz | 20000H | >15000 | 288,6x31,2 mm |
| PIAZZA | 2640Lm | 285x285x30,7 mm |
natural_image
Simple line drawing of a circular ring with a hand holding a small object, no text or symbols present.natural_image
Pure electrical circuit lines without any symbolsnatural_image
Simple geometric diagram of a diamond shape with a vertical line and a small protrusion at the bottom (no text or symbols)natural_image
Circular object with a smooth, gradient surface, resembling a washer or cover (no text or symbols visible)
natural_image
White rectangular electronic device with a flat top and small base (no visible text or symbols)

WARRANTY


DANE TECHNICZNE
| MODEL | SKU | KSZTAŁT | WATTS | LUMENY | KĄT WIAZKI | IP RATING | CRI | TYP NADW OZIA | BIEŻACE OGÓLEM | NAPIĘCIE WEJŚCIOW E | ROZPIĘTOŚĆ ŻYCIA | CYKL WŁĄCZANI A/WYŁĄCZ ANIA | WYMIARY (dl. x szer. x wys.) |
| VT-60006 | 104921,10493110494178701,7871178721 | RUNDA | 6W | 660 lm | Sfera 360 | IP20 | >80 | PLASTIK | 36mA | AC:220-24050/60Hz | 20000H | >15000 | 121,2 × 30,6 mm |
| KWADRAT | 120,8x120,8x30,7 mm | ||||||||||||
| VT-60012 | 104951, 10496110497178731, 7874178751 | RUNDA | 12W | 1200 lm | Sfera 360 | IP20 | >80 | PLASTIK | 71mA | AC:220-24050/60Hz | 20000H | >15000 | 167,4 × 30,7 mm |
| KWADRAT | 167,3x167,3x30,7 mm | ||||||||||||
| VT-60018 | 104981,10499110500178761,7877178781 | RUNDA | 18W | 1850Lm | Sfera 360 | IP20 | >80 | PLASTIK | 103mA | AC:220-24050/60Hz | 20000H | >15000 | 215,6 × 30,8 mm |
| KWADRAT | 1980Lm | 214x214x31mm | |||||||||||
| VT-60024 | 105141,10516123023178791,7880178811 | RUNDA | 24W | 2500 lm | Sfera 360 | IP20 | >80 | PLASTIK | 160mA | AC:220-24050/60Hz | 20000H | >15000 | 288,6 × 31,2 mm |
| KWADRAT | 2640Lm | 285x285x30,7mm |
WPROWADZENIE I GWARANCJA
natural_image
Simple line drawing of a ring with a small object inside, no text or symbols presentnatural_image
Pure electrical circuit lines without any symbolsnatural_image
Simple geometric diagram of a diamond shape with a vertical line and a small protrusion at the bottom (no text or symbols)MANUAL DE INSTRUÇÕES
PAINEL DE MONTAGEM À SUPERFÍCIE COM RETROILUMINAÇÃO POR LED
natural_image
Circular object with a smooth, gradient surface, possibly a lid or cover (no text or symbols visible)
natural_image
White rectangular electronic device with a flat top and small indicator lights at the bottom (no visible text or symbols)05 YEAR
WARRANTY
PRO SERIES

DADOS TÉCNICOS
| MODELO | SKU | FORMA | ÁGUAS | LUMENS | ÂNGULO DO FEIXE | CLAS SIFICAÇÃO P | IRC | TIPO DE CORPO | TOTAL CORRENTE | TENSÃO DE ENTRADA | DURAÇÃO DA VIDA | CICLO ON/OFF | DIMENSÃO (CxLxA) |
| VT-60006 | 104921,10493110494178701,7871178721 | REDONDA | 6W | 660Lm | Esfera 360° | IP20 | >80 | PLÁSTICO | 36mA | AC:220-24050/60Hz | 20000H | >15000 | 121.2x30.6mm |
| QUADRADO | 120,8x120,8x30,7mm | ||||||||||||
| VT-60012 | 104951,10496110497178731,7874178751 | REDONDA | 12W | 1200Lm | Esfera 360° | IP20 | >80 | PLÁSTICO | 71mA | AC:220-24050/60Hz | 20000H | >15000 | 167.4x30.7mm |
| QUADRADO | 167,3x167,3x30,7mm | ||||||||||||
| VT-60018 | 104981,10499110500278761,7877178781 | REDONDA | 18W | 1850Lm | Esfera 360° | IP20 | >80 | PLÁSTICO | 103mA | AC:220-24050/60Hz | 20000H | >15000 | 215.6x30.8mm |
| QUADRADO | 1980Lm | 214x224x31mm | |||||||||||
| VT-60024 | 105141,10516123023178791,7880178811 | REDONDA | 24W | 2500Lm | Esfera 360° | IP20 | >80 | PLÁSTICO | 160mA | AC:220-24050/60Hz | 20000H | >15000 | 288.6x31.2mm |
| QUADRADO | 2640Lm | 285x285x30,7mm |
natural_image
Simple line drawing of a hand holding a tool, no text or symbols presentnatural_image
Simple line drawing of a hammer and sickle on a vertical surface with two cross marks (no text or symbols)- fazer um
natural_image
Pure technical diagram showing a structural beam with supports and hatched areas, no text or symbols present- ligar o parafuso de

natural_image
Pure mechanical diagram showing a beam supported by two vertical supports with downward force arrows, no text or symbols present.natural_image
Simple line drawing of a mechanical setup with a beam and a circular component (no text or symbols)- Fixar o painel no suporte.
natural_image
Simple line drawing of a cylindrical object on a flat surface (no text or symbols)natural_image
Simple line drawing of a ring with a small object inside, no text or symbols presentnatural_image
Pure electrical circuit lines without any symbolsnatural_image
Pure geometric diagram of a diamond shape with a vertical bar at the bottom (no text or symbols)MANUAL DE INSTRUCTIUNI
PANOU MONTAT LA SUPRAFAȚĂ CU ILUMINARE DIN SPATE CU LED

natural_image
Plain white circular object with a smooth curved surface (no text or symbols)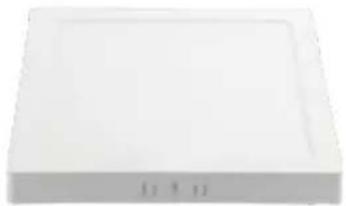
natural_image
White rectangular electronic device with a flat top and small side ports (no visible text or symbols)


DATE TEHNICE
| MODEL | SKU | FORMA | WATTS | LUMENI | UNGHIULFASCICULULUI | IPRATING | CRI | TIP DECAROSERIE | TOTALCURENT | TENSIUNEDEINTRARE | DURATADEVIAȚĂ | CICLULON/OFF | DIMENSIUNE(LxWxH) |
| VT-60006 | 104921,10493110494178701,7871178721 | ROUND | 6W | 660Lm | Sferă360° | IP20 | >80 | PLASTIC | 36mA | AC:220-24050/60Hz | 20000H | >15000 | 121.2 × 30.6mm |
| SQUARE | 120.8x120.8x30.7mm | ||||||||||||
| VT-60012 | 104931,10496110497178731,7874178751 | ROUND | 12W | 1200Lm | Sferă360° | IP20 | >80 | PLASTIC | 71mA | AC:220-24050/60Hz | 20000H | >15000 | 167.4 × 30.7mm |
| SQUARE | 167.3x167.3x30.7mm | ||||||||||||
| VT-60018 | 104961,10499110500178761,7877178781 | ROUND | 18W | 1850Lm | Sferă360° | IP20 | >80 | PLASTIC | 103mA | AC:220-24050/60Hz | 20000H | >15000 | 215.6 × 30.8mm |
| SQUARE | 1980Lm | 214x214x31mm | |||||||||||
| VT-60024 | 105141,10516123023178791,7880178811 | ROUND | 24W | 2500Lm | Sferă360° | IP20 | >80 | PLASTIC | 160mA | AC:220-24050/60Hz | 20000H | >15000 | 288.6 × 31.2mm |
| SQUARE | 2640Lm | 285x285x30.7mm |
natural_image
Simple line drawing of a ring with a small object inside, no text or symbols present.natural_image
Pure electrical circuit lines without any symbolsnatural_image
Simple line drawing of a diamond-shaped frame with a vertical bar at the bottom (no text or symbols)natural_image
Circular object with a smooth, gradient surface, resembling a mechanical or electronic component (no text or symbols visible)
natural_image
White rectangular electronic device with a flat top and small side buttons at the bottom (no visible text or symbols)05 YEAR
WARRANTY ^2


DATOS TÉCNICOS
| MODELO | SKU | SHAPE | WATTS | LUMENS | ANGULO DEL HAZ | CLASI FICACIÓN IP | CRI | TIPO DE CARRO CERÍA | TOTAL CORRIENTE | TENSIÓN DE ENTRADA | VIDA ÚTIL | CICLO ON/OFF | DIMENSIONES (LxAnxAl) |
| VT-60006 | 104921,10493110494178701,7871178721 | RONDA | 6W | 660Lm | Esfera 360 | IP20 | >80 | PLÁSTICO | 36 mA | CA:220-24050/60Hz | 20000H | >15000 | 121.2x30.6mm |
| CUADRADO | 120,8x120,8x30,7 mm | ||||||||||||
| VT-60012 | 104951,10496120497178721,7874178751 | RONDA | 12W | 1200Lm | Esfera 360 | IP20 | >80 | PLÁSTICO | 71 mA | CA:220-24050/60Hz | 20000H | >15000 | 167,4x30,7mm |
| CUADRADO | 167,3x167,3x30,7mm | ||||||||||||
| VT-60018 | 104961,10499110500178761,7877178781 | RONDA | 18W | 1850Lm | Esfera 360 | IP20 | >80 | PLÁSTICO | 103 mA | CA:220-24050/60Hz | 20000H | >15000 | 215,6x30,8mm |
| CUADRADO | 1980Lm | 214x214x31mm | |||||||||||
| VT-60024 | 100141,10516125025178792,7880178812 | RONDA | 24W | 2500Lm | Esfera 360 | IP20 | >80 | PLÁSTICO | 160 mA | CA:220-24050/60Hz | 20000H | >15000 | 288,6x31,2mm |
| CUADRADO | 2640Lm | 285x285x30,7mm |
natural_image
Simple line drawing of a ring with a small object inside, no text or symbols presentnatural_image
Pure electrical circuit lines without any symbolsnatural_image
Simple geometric diagram of a diamond shape with a vertical line and a small protrusion at the bottom (no text or symbols)- INSTRUCTION MANUAL
- INTRODUCTION & WARRANTY
- WARNING
- MOUNTING
- SURFACE PANEL INSTALLATION DIAGRAM
- DISASSEMBLY DIAGRAM
- РЪКОВОДСТВО ЗА УПОТРЕБА
- DIJAGRAM RASTAVLJANJA
- PANEL S LED PODSVÍCENÍM PRO POVRCHOVOU MONTÁŽ
- MANUEL D'INSTRUCTIONS
- INTRODUCTION ET GARANTIE
- WPROWADZENIE I GWARANCJA
- MANUAL DE INSTRUÇÕES
- MANUAL DE INSTRUCTIUNI
Brand : V-TAC
Model : VT60012
Category : Lighting