LLI9VE54X0 - Freezer ELECTROLUX - Free user manual and instructions
Find the device manual for free LLI9VE54X0 ELECTROLUX in PDF.
| Brand | Electrolux |
| Model | LLI9VE54X0 |
| Product type | Freezer |
| Dimensions (H x W x D) | 1782 x 913 x 746 mm |
| Weight (fully loaded) | about 250 kg |
| Power supply | 220-240 V, 50 Hz |
| Climate class | SN-T (from +10 °C to +43 °C) |
| Holdover time | 14 h |
| Freezer capacity | Not specified (large capacity model) |
| FastFreeze function | Yes (fast freezing, automatic stop after 12h) |
| Ice dispenser | Yes, built-in with ice cube tray (1.6 kg) |
| Water dispenser | Yes, with water filter |
| Touch screen | Yes, with digital display and controls |
| Wi-Fi connectivity | Yes (2.4 GHz, 802.11 bgn) |
| MultiSwitch drawer | Yes, with temperature settings (-2 °C to 7 °C) |
| Air filter (TasteGuard) | Yes, replace every 6 months |
| Water filter | Yes, replace every 6 months or 473 liters |
| Interior lighting | LED (energy class F) |
| Refrigerant | R600a (isobutane) |
| Noise level | Not specified (normal operating noises) |
| Maintenance and cleaning | Clean interior every 2 months; automatic defrost; do not use abrasive products |
| Safety | Child lock, open door alarm, electrical safety |
| Spare parts and repairability | Original parts available; repair by qualified professional |
| General information | User manual available in PDF at notice-facile.com |
Frequently Asked Questions - LLI9VE54X0 ELECTROLUX
User questions about LLI9VE54X0 ELECTROLUX
0 question about this device. Answer the ones you know or ask your own.
Ask a new question about this device
Download the instructions for your Freezer in PDF format for free! Find your manual LLI9VE54X0 - ELECTROLUX and take your electronic device back in hand. On this page are published all the documents necessary for the use of your device. LLI9VE54X0 by ELECTROLUX.
USER MANUAL LLI9VE54X0 ELECTROLUX
WE'RE THINKING OF YOU
Thank you for choosing this Electrolux product. We have created it to give you impeccable performance for many years, with innovative technologies that help make life simpler features you might not find on ordinary appliances. Please spend a few minutes reading to get the very best from it.
Visit our website to:

Get usage advice, brochures, trouble shooter, service information: www.electrolux.com
Register your product for better service: www.electrolux.com/productregistration

Buy Accessories, Consumables and Original spare parts for your appliance: www.electrolux.com/shop
CUSTOMER CARE AND SERVICE
Always use original spare parts.
When contacting our Authorised Service Centre, ensure that you have the following data available: Model, PNC, Serial Number.
The information can be found on the rating plate.

Warning / Caution-Safety information.

General information and tips.

Environmental information.
Subject to change without notice.
1. ⚠ SAFETY INFORMATION
Before the installation and use of the appliance, carefully read the supplied instructions. The manufacturer is not responsible if an incorrect installation and use causes injuries and damages. Always keep the instructions with the appliance for future reference.
1.1 Children and vulnerable people safety
- This appliance can be used by children aged from 8 years and above and persons with reduced physical, sensory or mental capabilities or lack of experience and knowledge if they have been given supervision or instruction concerning the use of the appliance in a safe way and understand the hazards involved.
- This appliance may be used by children between 3 and 8 years of age and persons with very extensive and complex disabilities, if they have been properly instructed.
- Children of less than 3 years of age should be kept away unless continuously supervised.
- Do not let children play with the appliance.
• Children shall not carry out cleaning and user maintenance of the appliance without supervision. - Keep all packaging away from children and dispose of it appropriately.
1.2 General Safety
- This appliance is for storing food and beverages only.
- This appliance is designed for single household domestic use in an indoor environment.
- This appliance may be used in offices, hotel guest rooms, bed & breakfast guest rooms, farm guest houses and other similar accommodation where such use does not exceed (average) domestic usage levels.
- WARNING: Keep ventilation openings, in the appliance enclosure or in the built-in structure, clear of obstruction.
-
WARNING: Do not use mechanical devices or other means to accelerate the defrosting process, other than those recommended by the manufacturer.
-
WARNING: Do not damage the refrigerant circuit.
- WARNING: Do not use electrical appliances inside the food storage compartments of the appliance, unless they are of the type recommended by the manufacturer.
- Do not use water spray and steam to clean the appliance.
- Clean the appliance with a moist soft cloth. Only use neutral detergents. Do not use abrasive products, abrasive cleaning pads, solvents or metal objects.
- Do not store explosive substances such as aerosol cans with a flammable propellant in this appliance.
- If the supply cord is damaged, it must be replaced by the manufacturer, its service agent or similarly qualified persons in order to avoid a hazard.
- If the appliance is equipped with an ice maker or a water dispenser, fill them with potable water only.
- If the appliance requires a water connection, connect it to potable water supply only.
- The inlet water pressure (minimum and maximum) must be between 1 bar (0,1 MPa) and 10 bar (1 MPa)
- The new hose-sets supplied with the appliance are to be used and that old hose-sets should not be reused.
- To avoid contamination of food, please respect the following instructions:
- Opening the door for long periods can cause a significant increase of the temperature in the compartments of the appliance.
- Clean regularly surfaces that can come in contact with food and accessible drainage systems.
- Clean water tanks if they have not been used for 48hr: flush the water system connected to a water supply if water has not been drawn for 5 days.
- Store raw meat and fish in suitable containers in the refrigerator, so that it is not in contact with or drip onto other food.
- Two-star frozen-food compartments are suitable for storing pre-frozen food, storing or making icecream and making ice cubes.
- One-, two- and three-star compartments are not suitable for the freezing of fresh food.
- If the refrigerating appliance is left empty for long periods, switch off, defrost, clean, dry and leave the door open to prevent mould developing within the appliance.
2. SAFETY INSTRUCTIONS
2.1 Installation

WARNING!
Only a qualified person must install this appliance.
- Remove all the packaging.
- Do not install or use a damaged appliance.
- Obey the installation instruction supplied with the appliance.
• Always be careful when you move the appliance because it is heavy. Always wear safety gloves. - Make sure the air can circulate around the appliance.
- Wait at least 4 hours before connecting the appliance to the power supply. This is to allow the oil to flow back in the compressor.
- Do not install the appliance close to radiators or cookers, oven or hobs.
- The rear of the appliance must stand against the wall.
- Do not install the appliance where there is direct sunlight.
- Do not install this appliance in areas that are too humid or too colds, such as the construction appendices, garages or wine cellars.
- When you move the appliance, lift it by the front edge to avoid scratching the floor.
2.2 Electrical connection

WARNING!
Risk of fire and electrical shock.

WARNING!
When positioning the appliance, ensure the supply cord is not trapped or damaged.

WARNING!
Do not use multi-plug adapters and extension cables.
• The appliance must be earthed.
- Make sure that the electrical information on the rating plate agrees with the power supply. If not, contact an electrician.
• Always use a correctly installed shockproof socket.
- Do not use multi-plug adapters and extension cables.
- Make sure not to cause damage to the electrical components (e.g. mains plug, mains cable, compressor).
- Contact the Service or an electrician to change the electrical components.
- The mains cable must stay below the level of the mains plug.
Connect the mains plug to the mains socket only at the end of the installation. Make sure that there is access to the mains plug after the installation.
Do not pull the mains cable to disconnect the appliance. Always pull the mains plug.
2.3 Use

WARNING!
Risk of injury, burns, electrical shock or fire.

The appliance contains flammable gas, isobutane (R600a), a natural gas with a high level of environmental compatibility. Be careful not to cause damage to the refrigerant circuit containing isobutane.
- Do not change the specification of this appliance.
- Do not put electrical appliances (e.g. ice cream makers) in the appliance unless they are stated applicable by the manufacturer.
-
If damage occurs to the refrigerant circuit, make sure that there are no flames and sources of ignition in the room. Ventilate the room.
-
Do not let hot items to touch the plastic parts of the appliance.
- Do not put soft drinks in the freezer compartment. This will create pressure on the drink container.
- Do not store flammable gas and liquid in the appliance.
- Do not put flammable products or items that are wet with flammable products in, near or on the appliance.
- Do not touch the compressor or the condenser. They are hot.
- Do not remove or touch items from the freezer compartment if your hands are wet or damp.
- Do not freeze again food that has been thawed.
- Obey the storage instructions on the packaging of frozen food.
2.4 Internal lighting

WARNING!
Risk of electric shock.
- This product contains a light source of energy efficiency class F.
- The type of lamp used for this appliance is for household appliances only. Do not use it for house lighting.
- Concerning the lamp(s) inside this product and spare part lamps sold separately: These lamps are intended to withstand extreme physical conditions in household appliances, such as temperature, vibration, humidity, or are intended to signal information about the operational status of the appliance. They are not intended to be used in other applications and are not suitable for household room illumination.
2.5 Care and cleaning

WARNING!
Risk of injury or damage to the appliance.
Before maintenance, deactivate the appliance and disconnect the mains plug from the mains socket.
This appliance contains hydrocarbons in the cooling unit. Only a qualified person must do the maintenance and the recharging of the unit.
Regularly examine the drain of the appliance and if necessary, clean it. If the drain is blocked, defrosted water collects in the bottom of the appliance.
2.6 Disposal

WARNING!
Risk of injury or suffocation.
- Disconnect the appliance from the mains supply.
- Cut off the mains cable and discard it.
- Remove the door to prevent children and pets to be closed inside of the appliance.
- The refrigerant circuit and the insulation materials of this appliance are ozone-friendly.
- The insulation foam contains flammable gas. Contact your municipal authority for information on how to discard the appliance correctly.
- Do not cause damage to the part of the cooling unit that is near the heat exchanger.
3. ENVIRONMENT CONCERNS
Recycle the materials with the symbol Put the packaging in applicable containers to recycle it. Help protect the environment and human health and to recycle waste of electrical and

electronic appliances. Do not dispose appliancesmarked with the symbol ☑with the household waste. Return the product to your local recycling facility or contact your municipal office.
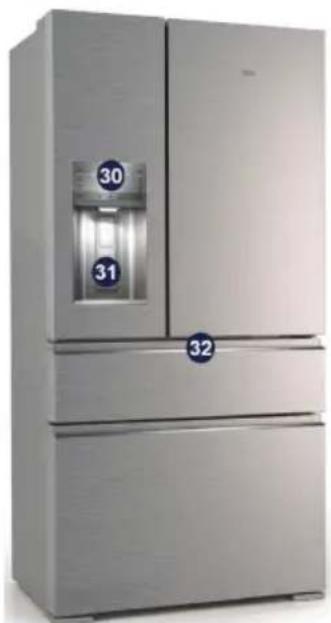
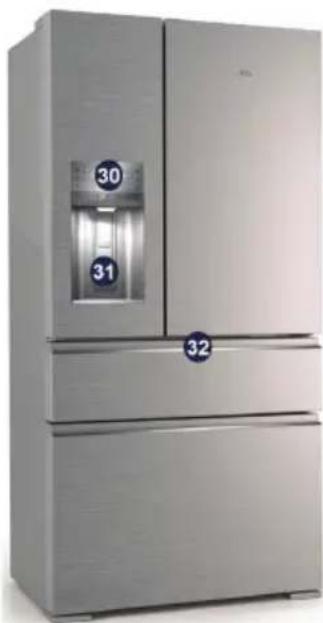
4. DESCRIPTION OF THE APPLIANCE
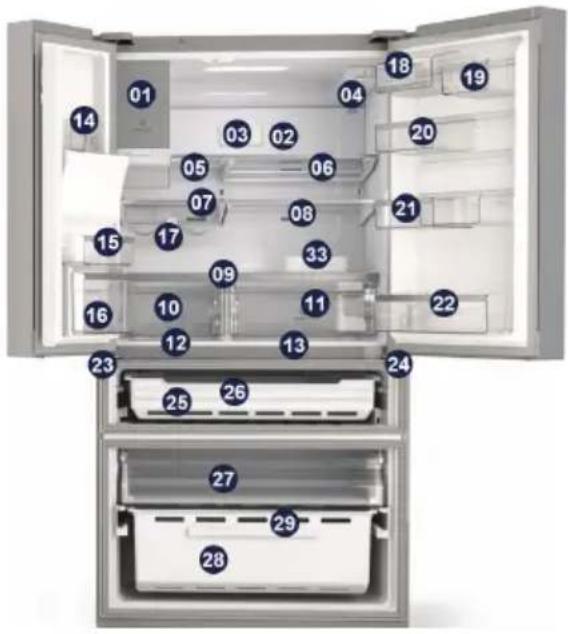
Fridge
Middle variable temperature drawer
Freezer
natural_image
Exterior view of a modern stainless steel refrigerator with dual doors and water level control (no visible text or symbols)Note: Due to constant improvement of our products, your refrigerator may be slightly different from the above illustration, but its functions and using methods remain the same.
natural_image
Simple diagram with a black circle and a warning symbol (no text or labels)1 Ice Maker
2 Multifow
3 Air Filter
4 Water Filter
5 Flip Up Shelf
6 Slide Under Shelf
7 Left Glass Shelf
8 Right Glass Shelf
9 Crisper Cover Shelf
10 Left Crisper
11 Right Crisper
12 Left Snack Zone
13 Right Snack Zone
14 Left Superior Fixed Bin
15 Left Bottom Fixed Bin
16 Tilt Bin
17 Wine Rack
18 Dairy Bin Flex 2/3
19 Door Bin Flex 1/3
20 Door Bin Flex 2/3
21 Sliding door bin flex
22 Bottle Bin
23 Left Middle Hinge
24 Right Middle Hinge
25 MultiSwitch/MultiChill drawer
26 MultiSwitch/MultiChill divider
27 Upper Freezer Drawer
28 Basket Freezer
29 Freezer Divide
30 User Interface
31 Padle
32 User Interface FlexiSpace
33 Egg Tray
Note: To get the best energy efficiency of this product, please place all shelves, drawers and baskets on their original position as the illustration above.

This appliance is sold in France. In accordance with regulations valid in this country it must be provided with a special device (see figure) placed in the lower campartment of the fridge to indicate the coldest zone of it.
5. INSTALLING YOUR NEW APPLIANCE
This section explains the installation of the new appliance before using it for the first time. We recommend reading the following tips.

WARNING!
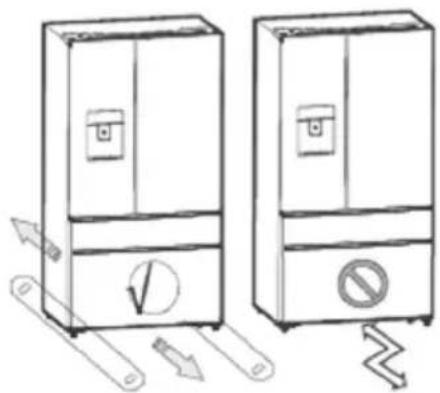
For proper installation, this refrigerator must be placed on a level surface of hard material that is the same height as the rest of the flooring. This surface should be strong enough to support a fully loaded refrigerator, or approximately 250 kg. When moving, be sure to pull out and push back the unit in straight.
natural_image
Two identical refrigerators with directional arrows indicating movement, no text or symbols present| Class Symbol Ambient | |
| Temperature rage (°C) | |
| Extend | SN +10 to +32 |
| Temperate | |
| Temperate N +16 to +32 | |
| Subtropical ST +16 to +38 | |
| Tropical T +16 to +43 | |
This appliance is not intended to be used as a built-in appliance.
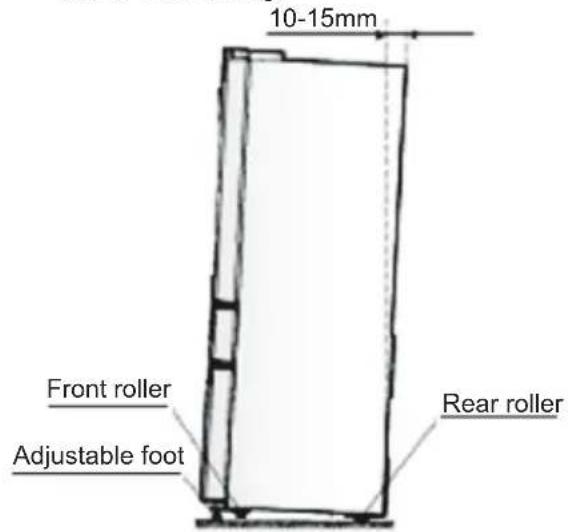
Leveling of appliance
For proper leveling and avoid vibration, this appliance is provided with adjustable feet in front. Please adjust the level by following below instructions:
- Roll the refrigerator into place.
- Turn the adjustable feet (with your fingers or a suitable spanner) until they touch the floor.
-
Tilt back the top backwards for about 10-15 mm by turning the feet 1\~2 turn further. This will allow the doors to selfclose and seal properly.
-
Whenever you want to move the appliance, remember to turn the feet back up so that the appliance can roll freely. Reinstall the appliance when relocating.

WARNING!
The rollers, which are not castors, should be only used for forward or backward movement. Moving the refrigerator sideways may damage your floor and the rollers.
Adjusting the doors
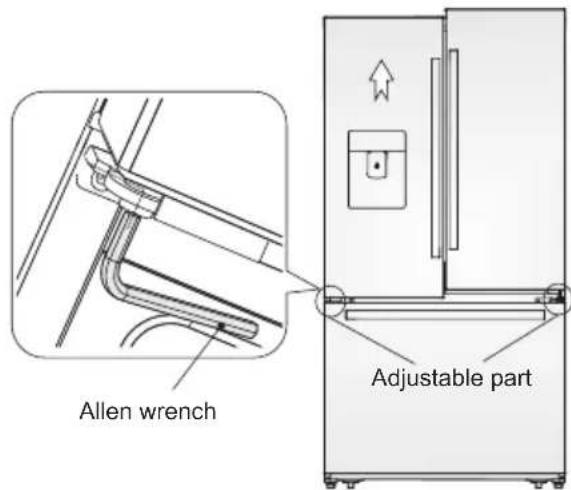
- Both left and right doors are equipped with adjustable axes, which are located in the lower hinges.
- Before adjusting its doors, please ensure that the refrigerator is level. Please review the previous section on "Leveling appliance". If you find the top of the doors are uneven, insert the Allen wrench into the hinge axis, and turn it clockwise to rise the door or anticlockwise to lower the door, and insert an E Ring into the gap.
Ventilation of appliance
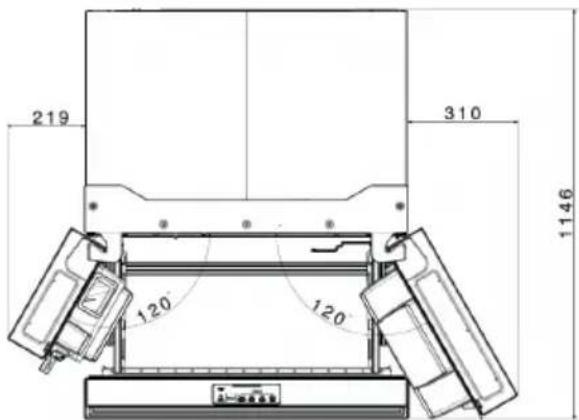
In order to improve efficiency of the cooling system and save energy, it is necessary to maintain proper ventilation around the appliance for heat dissipation. For this reason, sufficient space should be provided around the refrigerator and the area should be clear of any obstruction that affects the air circulation.
In case of different installation from freestanding, respecting space required in use dimensions, the functionality of the appliance is guaranteed but energy rating increase slightly.
W1
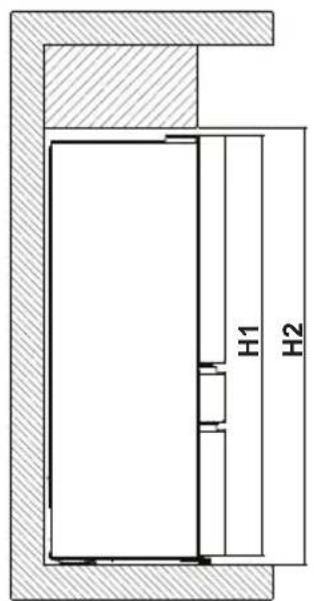
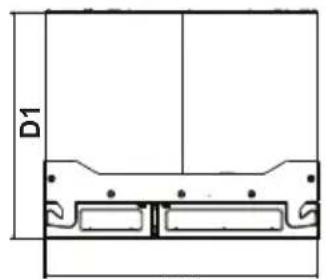
Overall dimensions *
H1 mm 1746
W1 mm 913
D1 mm 749
* The height, width and depth of the appliance without the handle and feet.
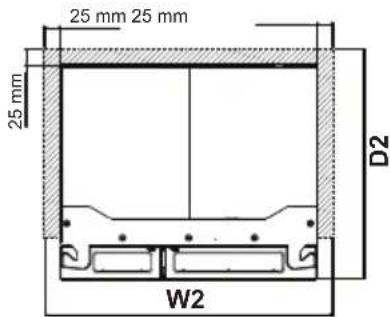
Space required in use **
H2 mm 1806
W2 mm 963
D2 mm 774
** The height, width and depth of the appliance including the handle, plus the space necessary for free circulation of the cooling air.
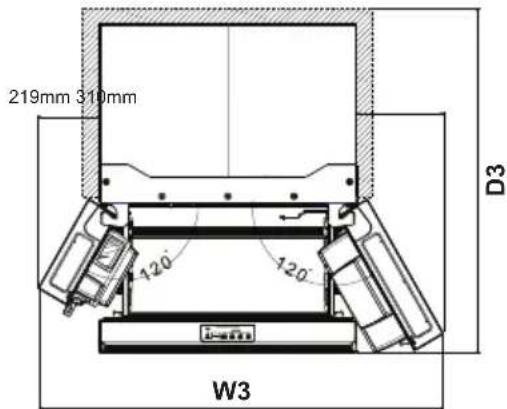
Overall space required in use ***
H2 mm 1806
W3 mm 1437
D3 mm 1171
*** The height, width and depth of the appliance including the handle, plus the space necessary for free circulation of the cooling air, plus the space necessary to allow door opening to the minimum angle premitting removal of all internal equipment.
6. DISPLAY CONTROLS
All functions and controls of the unit are accessible from a control panel conveniently located on the door of the refrigerator. While setting of middle drawer are done with dedicated controls place inside the drawer. A keypad of touch buttons and a digital display allow easy configuration of features andsettings in a simple and intuitive manner.
Important! Touch buttons require only a short press on a button to operate. The operation occurs when releasing your finger from the button, not while the button is pressed. There is no need for applying pressure on the keypad. Please refer to those related sections of this Manual for detailed instructions.
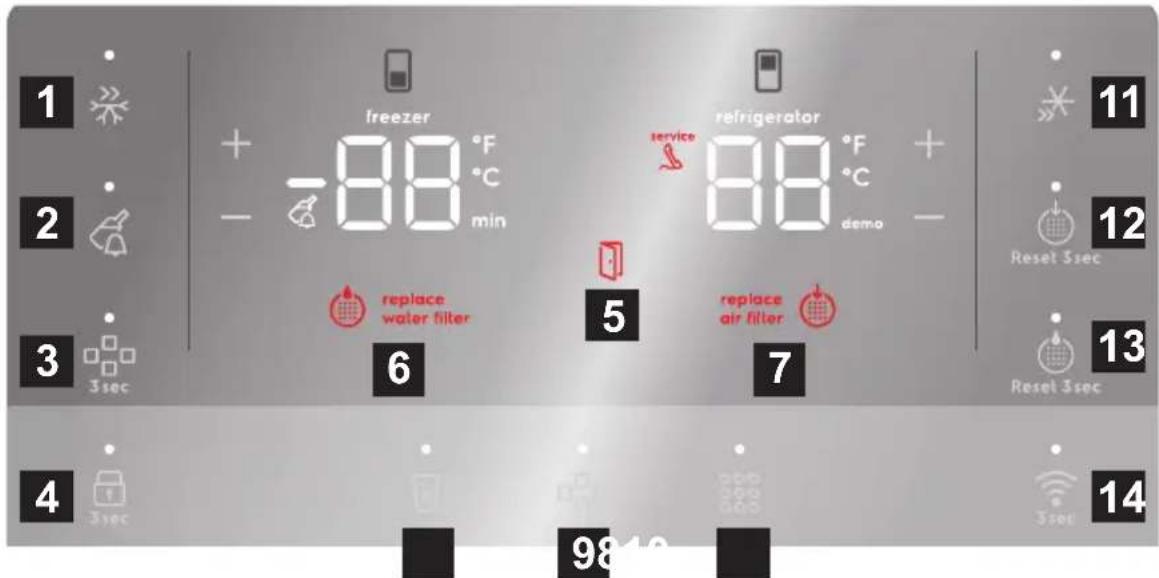

CAUTION!
When you set a temperature, you set an average temperature for the whole refrigerator cabinet. Temperatures inside each compartment may vary from the temperature values displayed on the panel, depending on how much food you store and where you place them. Ambient temperature may also affect the actual temperature inside the appliance.
1 Extra Freeze
Activates a faster rate for freezing food in the freezer. Use this feature when loading several items into the freezer at one time. Automatically deactivates after 12 hours.
To freeze fresh food activate the FastFreeze function at least 24 hours before placing the food to be frozen in the freezer compartment.
Store the fresh food evenly distributed in the first compartment or drawer from the top.
2 Cold Drink Timer
Quickly chills a drink inside the freezer compartment. To enable, touch the Cold Drink Timer Key. A time value will appear on the freezer temp display (in minutes) and can be changed using the +/- buttons. A tone will sound when the time has been input. Range is from 20-45 minutes in 5 minute intervals. Drinks will freeze if temperature setting is too low or timer setting is too long.

WARNING
When using the cold drink timer, make sure to remove drinks from freezer compartment when alarm sounds. Carbonated drinks may explode if left in freezer for too long.
3 Ice Maker
Press and hold for 3 seconds to turn on/off ice maker. When indicator is lit, ice maker is on. When indicator is not lit, ice maker is in the OFF state and will stop making ice. While off, ice dispensing can continue as long as there is ice in the bucket. When ice maker is off and ice is dispensing, indicator will blink.
4 Lock
The lock button can be used to lock the display preventing it from being used in certain situations. Press and hold for 3 seconds to enable/disable. While in the locked state, non changes can be made to settings on the display. Dispensing ice and water will be disabled. The indicator will flash and an auditable warning tone is played.
5 Door Open
Illuminates whenever the doors are open. If a door is left open for 5 minutes or more, an alarm will sound and the display will be illuminated until the doors are shut. Pressing any button will mute the alarm temporarily. Check to make sure no food is blocking the doorway.
6 Replace Water Filter
Display illuminates every 6 months or when filter needs replacing. Replace filter and then press and hold 'Reset Water Filter' for 3 seconds to deactivate warning on display. See "Replacing the Filter" section for more information.
7 Replace Air Filter
Display illuminates every 6 months or when filter needs replacing. Replace filter and then press and hold 'Reset Air Filter' for 3 seconds to deactivate warning on display. See "Replacing the Filter" section for more information.
8 Water
Press the “water” key to dispense water. An indicator light will be illuminated above the active feature.
9 Cube
Press the “cube” key to dispense cubed ice. An indicator light will be illuminated above the active feature.
10 Crush
Press the “crush” key to dispense crushed ice. An indicator light will be illuminated above the active feature.
11 Shopping made
Quick chill is a faster rate for chilling food in the refrigerator compartment. Use this feature when loading several items into the refrigerator at one time. Deactivates after 6 hours.
12 Reset Air Filter
After replacing filter, press and hold for 3 seconds to reset.
13 Reset Water Filter
After replacing filter, press and hold for 3 seconds to reset.
14 Wi-Fi Connectivity
Press and hold for 3 second to enable / disable wireless connection.
When LED is lit the product is connected.
When LED is flashin the product is connecting or during setup.
When LED is off Wi-Fi is off.
1. WI-FI CONNECTIVITY SETUP
This chapter describes how to connect the smart refrigerator to the Wi-Fi network and to link it to your mobile device.
By this functionality you can receive notifications control and monitor your refrigerator from your mobile device.
| Frequency/Protocol | Wi-Fi: 2.4 GHz /802.11bgn |
| Power | Wi-Fi 2.4 GHz: <20dBm |
| Encryption | WPA-PSK, WPA2-PSK,WPA3-Personal |
To connect the appliance to enjoy the full range of features and services you need:
- Wireless 2.4GHz network at home with internet connection enabled.
- Mobile device connected to wireless home network.
1.1 Installing the mobile application
When connecting the refrigerator to the application, stand near it with your mobile device (Android or iOS). Make sure that your mobile device is connected to the same wireless network you want to add your refrigerator to.
- Go to the relevant App Store on your device
- Download the dedicated application on your mobile device from Google Play (Android) or App Store (iOS) and install the application on your mobile device.
- Open the app and register to create an account.
1.2 Configuring the appliance wireless connection
Follow the instructions in the app to complete the onboarding process:
- Follow the app's guidance to onboard your refrigerator. The app will ask you to start the refrigerators WiFi which your do on the appliance.
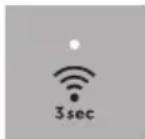
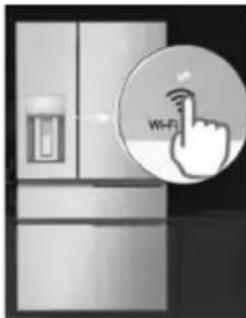
- Press and hold the Wi-Fi icon 📋 on your refrigerator for 3 seconds until you hear a beep – this will start the Wi-Fi system.
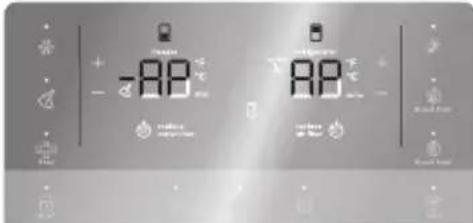
- After few seconds the refrigerator will display AP on the user interface and will be ready to move on to the next stage in the app.
-
Continue to follow the instructions in the app to complete the onboarding process.
-
When the refrigerator has connected, the Wi-Fi icon will stop flashing and will stay solid and the screen will display your desired temperatures again. Continue to follow the app guidance to complete the registration and name your refrigerator.
After the successful onboarding, the Connectivity indicator stops flashing and becomes solid. Display shows the set temperatures.
1.3 Disabling / Resetting the appliance wireless connection
- You can temporarily disable the Wi-Fi connection by pressing and holding for 3 seconds the Wi-Fi button. The Wi-Fi icon will switch off and you will hear a beep. Once the Wi-Fi connection is disabled, to automatically re-establish the connection you will have to press and hold for the 3 seconds the button again.
natural_image
Exterior view of a refrigerator with a Wi-Fi button icon (no text or symbols on the appliance)
IMPORTANT
After reset, the Connectivity indicator may be off. Wait a few seconds until it turns on.
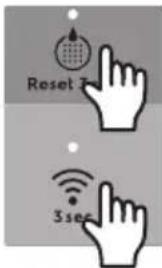
- You can reset the Wi-Fi configuratio by pressing and holding for 10 seconds the Wi-Fi button 📤 and the Reset Water Filter button together. Once the configuratio is reset, the refrigerator will beep and return to your desired temperatures. To then re-establish the connection, you will have to repeat all the steps at section 1.2 "Configurin the refrigerator wireless connection". Alternatively this can be done through the App.

NOTE
Control features and alarms may vary by model.
Alarms
High temperature, "HI" indicator
An increase in the temperature in the Fridge or Freezer compartment (for example due to earlier power failure) is indicated by:
- Flashing the HI on the correspondent compartment display
- Sound alar, every 10 seconds until the alert is acknowledgment
To reset the alarm press any button or opening the door.
• The buzzer switches off
- The display shows the highest temperature reached for 10 seconds. Then show again the set temperature.
After 60 minutes, if the high temperature condition is not improved at all, please contact an Authorised Service Center.
Water Filter
When illuminated, the water filter needs to be replaced. Change the water filter every 6 months or when 450 litres of water has been dispensed. To reset, press and hold button for 3 seconds. Tone will sound once it has been reset.
Air Filter
When illuminated, air filter needs to be replaced. Change the air filter every 6 months. To reset, press and hold button for 3 seconds. Tone will sounds once it has been reset.
Door
If a door has been left open for five minutes or more, an alarm will sound and the door open indicator will illuminate on the display. The alarm can be turned off by closing the door or pressing any key. Control panel will return to normal operations after the door is closed.
Error Tone
An alarm will sound if the user tries to make a selection that is not available.
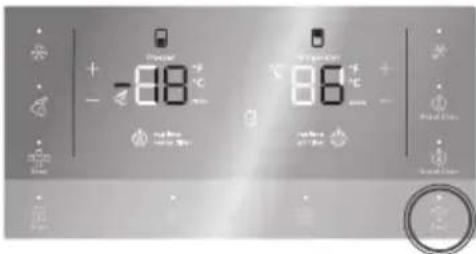
Mode Fahrenheit / Celsius degree
Press and hold for 5 seconds + and - from the refrigerator side.
After that, we will have a 'Tone Confirm' and display will change the temperature unit showing the other option directly on the numeric display. The temperature value will also change.
Demonstration mode
Pressing and holding + (freezer) and – (refrigerator) for 10 seconds will activate Demonstration mode.
- On detection of 10-sec-holding,
- Illuminate Icon "Demo"
- Play tone Confirm
- Pressing and holding + (freezer) and – (refrigerator) for 10 seconds again will deactivate Demo mode
- Illuminate Icon "Demo"
- Play tone Cancel
The software in this product contains components that are based on free and open source software. Electrolux gratefully acknowledges the contributions of the open software and robotics communities to the development project.
To access the source code of these free and open source software components whose license conditions require publishing, and to see their full copyright information and applicable license terms, please visit: http://electrolux.opensoftwarerepository.com (folder NIUS).
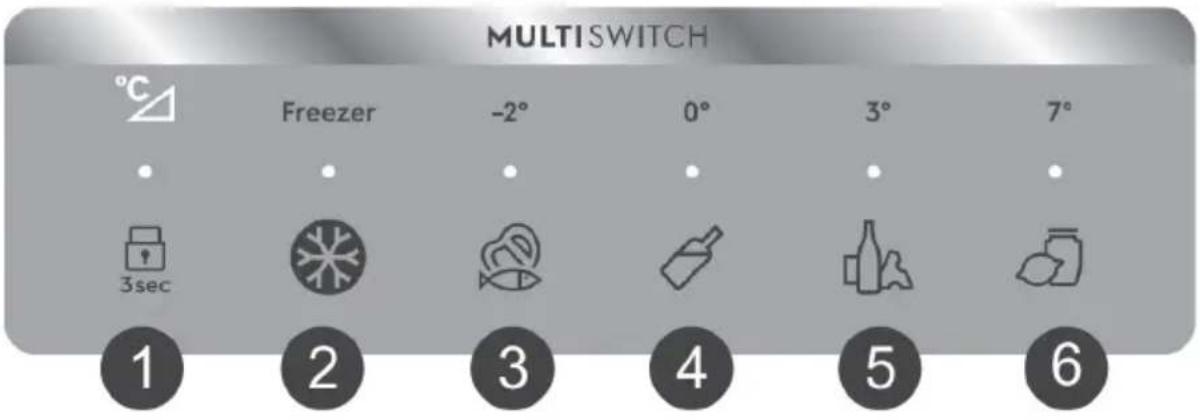

WARNING!
Do not use the MultiSwitch Drawer to store fresh produce as these Items may freeze and ause damage to the fruits and leafy vegetables stored in the drawer.
Using Your MultiSwitch Drawer Controls
1 The drawer automatically defaults to a locked state to prevent any unwanted use. To change the drawe's settings, it first needs to be unlocked. To unlock, press and hold the UNLOCK icon for 3 seconds. It will automatically lock after 10 seconds with/without any interaction.

WARNING!
Do not store glass bottles in the MultiSwitch Drawer when the Temperature setting is in Freezer, Meat/seafood, or Cold drink modes. The glass may break and shatter, causing physical harm and injury.
Freezer:
2 To change the drawer temperature when in the freezer temp setting, use the control panel display on the front door. Changing the temp on the display will change both the drawer temp setting And the freezer compartment.
Refrigerator:
3 ChoosingMeat and Fish will set drawer temperature to -2°C. A tone will sound to confirm choice. Use this setting for short term storage. Any meat to be kept longer than two days should be frozen.
4 ChoosingCold Drinks will set drawer temperature to 0°C. A tone will sound to confirm choice.
5 ChoosingDeli/Snacks will set drawer temperature to 3°C. A tone will sound to confirm choice.
6 ChoosingCellar will set drawer temperature to 7°C. A tone will sound to confirm choice.
7. USING THE DISPENSER
7.1 Using the ice maker after installation
Before making ice for the first time, be sure to prime the water supply system. Air in new plumbing lines can result in two or three empty ice maker cycles. Furthermore, if the system is not flushed, the first ice cubes may be discolored or have an odd flavor.
7.2 Priming the water supply system
- Begin filling the system by pressing and holding a drinking glass against the dispenser.
- Keep the glass in this position until water comes out of the dispenser. It may take about 1½ minutes.
- Continue dispensing water for about four minutes to flush the system and plumbing connections of any impurities (stopping to empty the glass as necessary).
natural_image
Diagram showing a device with a black arrow pointing to a component, no text or symbols presentDispenser

NOTE
The water dispenser has a built-in device that shuts off the water flow after three minutes of continuous use. To reset this shutoff device, simply release the dispenser paddle.

NOTE
After the initial 750 ml, water will remain room temperature until the tank has refilled and been given enough time to chill the next 750 ml of water. May take up to 8 hours to chill.
7.3 Ice maker operation & care
After the refrigerator is installed properly and has cooled for several hours, the ice maker can produce ice within 24 hours. The ice maker will fill the ice bin from the rear. Dispense some ice to force the ice forward in the bin. This will allow the bin to fill completely.
7.4 Ice Maker and Storage Bin Capacity
This ice maker should produce 1 Kilogram of ice per 24 hours. The ice bin will hold about 1,6 Kilogram of ice.
7.5 Turning the fresh food ice maker on and off

IMPORTANT
The ice maker is turned on at the factory so it can work as soon as the refrigerator is installed. If it is not possible to connect a water supply, set the ice maker's On/Off feature to Off; otherwise, the ice maker's fill valve may make a loud chattering noise when it attempts to operate without water.
Ice production is controlled by the ice maker's On/Off feature on the control panel. Pressing the On/Off feature turns the ice maker on & off.

NOTE
The ice maker also has a built-in plastic signal arm that automatically stops ice production when the ice bin is full. This signal arm should not be used to manually stop the ice maker.

IMPORTANT
Turning off the ice maker simply disables ice making. Existing ice can still be dispensed, and water can be dispensed.

IMPORTANT
On occasion, unusually small ice cubes may be noticed in the bucket or in dispensed ice. This could occur in normal operation of the ice maker. If happening frequently, it may be an indication of low water pressure or the water filter needs to be replaced. As the water filter nears the end of its useful life and becomes clogged with particles, less water is delivered to the ice maker during each cycle. Remember, if it's been six months or longer since last changing the water filter, replace it with a new one. Poor quality household water may require the filter to be changed more frequently.

CAUTION
If the water supply to the refrigerator is softened, be sure the softener is properly maintained. Chemicals from a water softener can damage the ice maker.
7.6 Ice maker/dispenser tips
- If refrigerator is not connected to a water supply or the water supply is turned off, turn off the ice maker as described in the previous section.
-
The following sounds are normal when the ice maker is operating:
-
Motor running
- Ice dropping into ice bin
- Water valve opening or closing
-
Running water
-
If a large quantity of ice is needed at one time, it is best to get cubes directly from the ice bin.
- Ice cubes stored too long may develop an odd flavor. Empty the ice bin as explained below.
- When dispensing cubed ice, it is normal to have a small quantity of little pieces along with the whole cubes.
• To avoid splashing, dispense ice into the container before adding liquids.
- It is normal for ice to fill to the top of the ice bin.
7.7 Cleaning the ice maker
Clean the ice maker and ice bin at regular intervals, especially prior to vacation or moving.
- Turn off the ice maker.
- Remove the ice bin by pulling straight out.
- Empty and carefully clean the ice bin with mild detergent. Do not use harsh or abrasive cleaners. Do not place in dishwasher. Rinse with clear water.
- Allow the ice bin to dry completely before replacing in the freezer.
- Replace the ice bin. Turn the ice maker on.
Remove and empty the ice bin if:
- An extended power failure (one hour or longer) causes ice cubes in the ice bin to melt and refreeze together after power is restored, jamming the dispenser mechanism. - Ice dispenser is used infrequently. Ice cubes will freeze together in the bin, jamming the dispenser mechanism.
natural_image
Line drawing of a hand opening a refrigerator with a lid, showing the interior and exterior view (no text or symbols)Removing Ice Bin
Remove the ice bin and shake to loosen the cubes or clean as explained above.

CAUTION
NEVER use an ice pick or similar sharp instrument to break up the ice. This could damage the ice bin and dispenser mechanism. To loosen stuck ice, use warm water. Before replacing the ice bin, make sure it is completely dry.

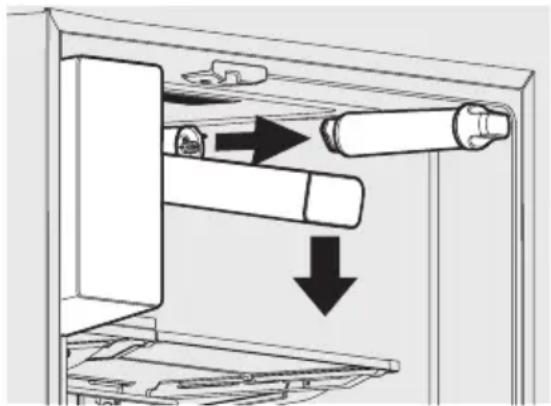
IMPORTANT
When removing or replacing the ice bin, avoid rotating the auger in the ice bin. If the auger is accidentally rotated, realign the auger by turning it in 45 degree turns (see below) until the ice bin fits into place with the drive mechanism. If the auger is not properly aligned when replacing the ice bin, the refrigerator will not dispense ice. The fresh food door also may not close properly causing warm air to leak into the fresh food compartment.
Adjusting Ice Bin Auger
8. STORAGE FEATURES

CAUTION
To avoid personal injury or property damage, handle tempered glass shelves carefully. Shelves may break suddenly if nicked, scratched, or exposed to sudden temperature change. Allow the glass shelves to stabilize to room temperature before cleaning. Do not wash in dishwasher.

NOTE
Features may vary according to model.
Shelf positions can easily be adjusted in the fresh food compartments as needed. The shelves have mounting brackets that attach to slotted supports at the rear of each compartment.
8.1 Change the Position of a Shelf
- Remove all food from shelf.
-
Lift the front edge up and pull the shelf out.
-
Replace by inserting the mounting bracket hooks into the desired support slots.
- Lower the shelf and lock into position.
To adjust flip shelf:
- Remove food from shelf.
- Lift the right side edge of shelf upwards and push to the left towards ice maker.
natural_image
Technical line drawing of a mechanical assembly with directional arrows indicating movement (no text or symbols)Flip Shelf
To adjust slide-under/flip shelf:
- Push front half shelf backward towards rear of cabinet until the rear half shelf drops down, then gently continue pushing front half shelf back and under the rear half shelf.
natural_image
Diagram of a hand holding a tool interacting with a transparent panel or fixture (no text or symbols visible)Flip Shelf
- With front half fully below back half, lift front of shelf to flip it upwards toward the back of the cabinet.
natural_image
Technical line drawing of a mechanical assembly with an arrow indicating direction (no text or symbols)Flip Shelf
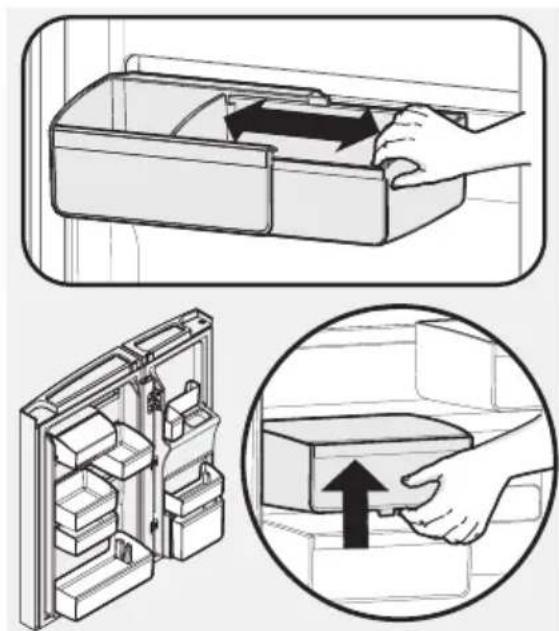
8.2 Drawers
The refrigerator includes a variety of storage drawers.
Auto Tastelock Crispers (with automatic humidity control)
Crisper drawers are designed for storing fruits, vegetables, and other fresh produce. Crispers have an auto humidity control (with replaceable membrane) on the side of each crisper under the humidity control cover. Order a replacement membrane at www.aeg.com.
To remove the auto humidity control membrane:
- Reach to back of humidity control cover.
- Pull up on cover.
- Pull cover towards back of cabinet and remove.
- Wash the humidity membrane with water and soap
- Replace cover by reversing the steps above. Repeat for both crispers.
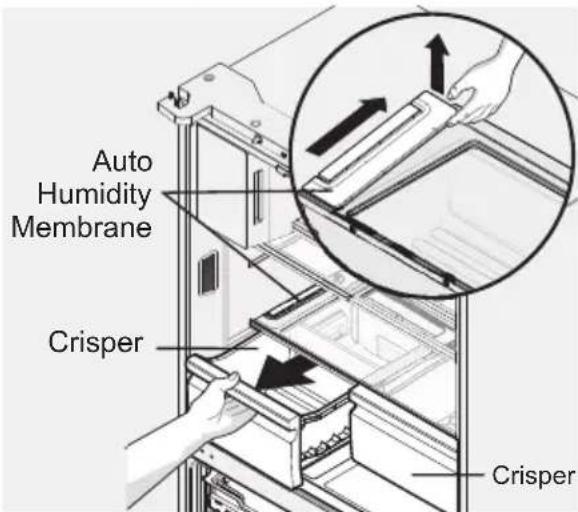
Removing Auto Humidity Control Membrane

NOTE
Producer does not recommend replacing the auto-humidity membrane unless it becomes damaged or ruined. Replacement membranes can be found on www.aeg.com
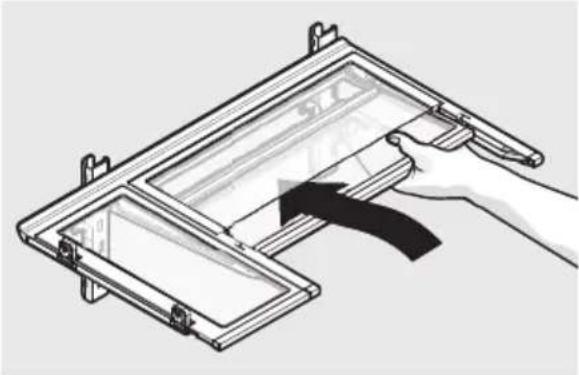
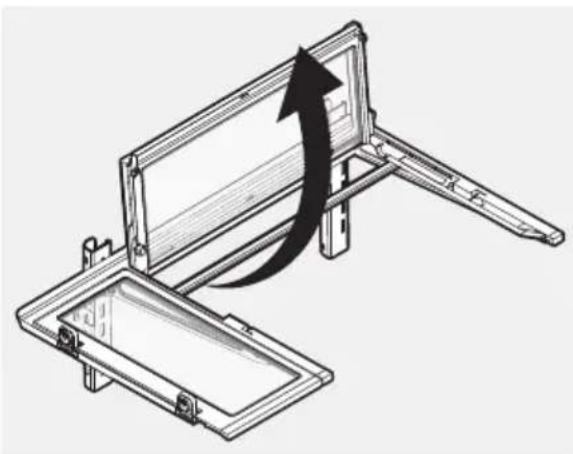
To remove the Tastelock drawer for cleaning:
- Pull the drawer out until it stops.
- Lift the front slightly and remove the drawer.
Removing Ultra Fresh Drawer
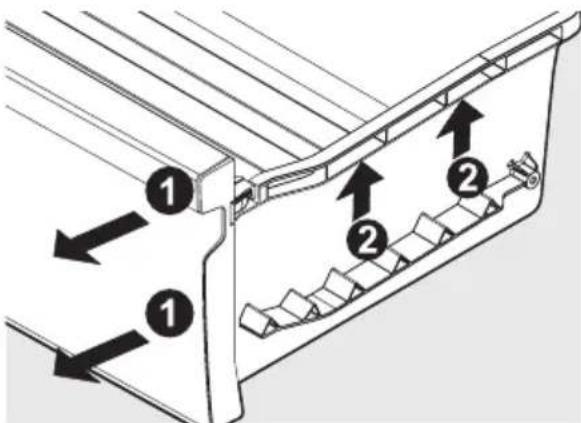
Tastelock - Recessed Snack Drawers
These drawers are ideal for storage of deli meats and cheeses. To open: slide back the cover to allow access to the drawers.
natural_image
Technical line drawing of a mechanical component with an arrow pointing to a specific area (no text or symbols present)Opening Snack Zone Recessed Snack Drawers
To move door bin along a rail:
- Tilt bin up so the back of the bin is off the door but the hook is still engaged.
- Slide bin along rail to desired position.
- Lower bin back into place.
To move door bin from rail to rail:
- Lift bin up disengaging the hook.
- Move bin to desired rail location.
- Push bin hook into rail engaging the hook.
8.3 Freezer Features (varies by model)
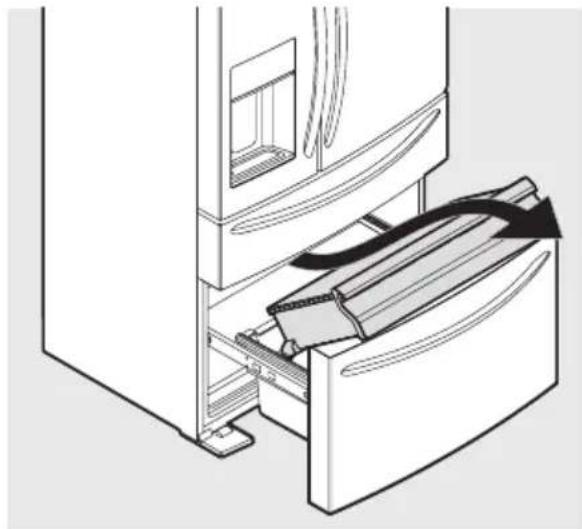
natural_image
Technical line drawing of a refrigerator with an open door and internal shelf, showing no text or symbolsFreezer Drawer
To remove upper freezer drawer:
- Open freezer compartment completely.
- Lift up and out to remove upper freezer drawer.
Reverse the steps to reinstall drawer.

IMPORTANT
There are wheels on the bottom of the drawer. Make sure all wheels are aligned on their respective tracks for proper function. If drawer is not aligned properly, it will cause problems with the door operation.

NOTE
If basket is not resting on stabilizer bar retainer clips, the drawer will not close properly.
To remove freezer basket:
- Open freezer compartment completely.
- Lift the basket up and remove.
Reverse the steps to reinstall drawer.
8.4 Dividers
Grab hand hold on lower divider and pull up slightly to slide to next position. (The divider cannot be removed.)
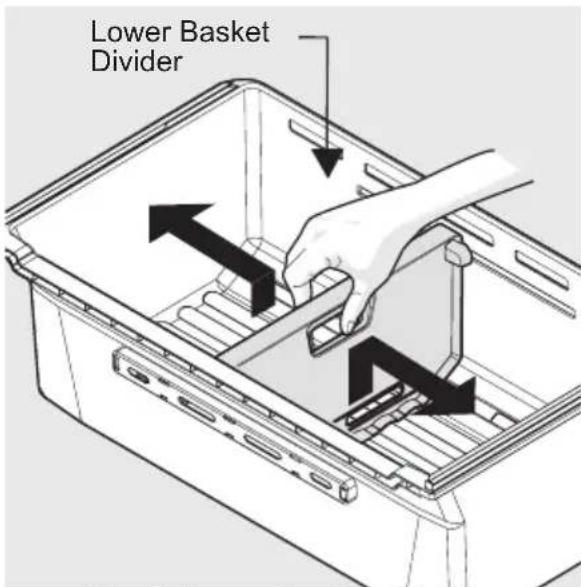
Plastic Lower Basket Divider
9. CONNECTING THE WATER SUPPLY
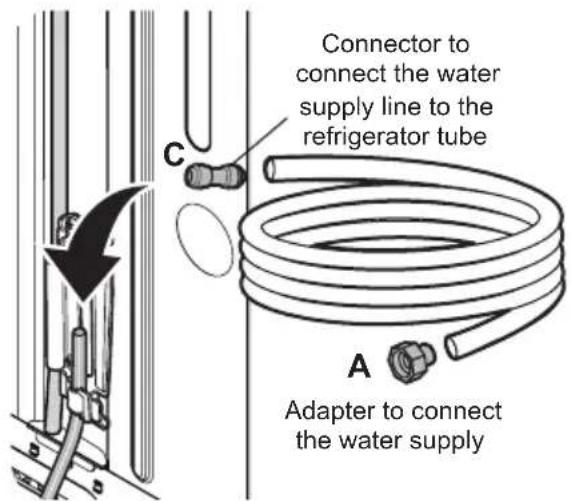
Water supply kit
Check the parts below for installing water supply.
Connector

Water Tube
Filter already
Installed
Connector

WARNING
To avoid electric shock, which can cause death or severe personal injury, disconnect the refrigerator from electrical power before connecting a water supply line to the refrigerator.
- When installing the water tubes, ensure they are not close to any hot surface.
- The water filter only "filters" water; it does not eliminate any bacteria or microbes.
- If the water pressure is not high enough to run the icemaker, call the
local plumber to get an additional water pressure pump.
- The filter life depends on the amount of use. We recommend you replace the filter at least once every 6 months, (look at "changing the filter").
- Use sealing tape to every connection of pipes/tubes to ensure there is no water leak.
- The water tube should be connected to the cold water line.
Installation Procedure
Join Connector to the tap water line
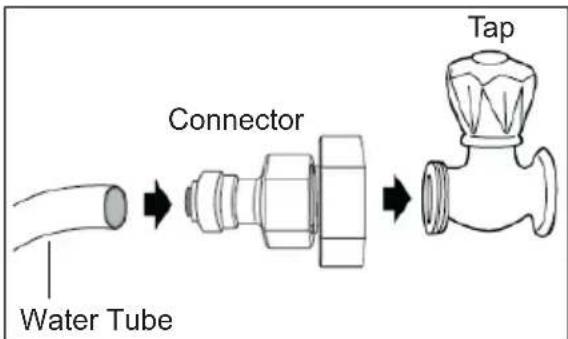
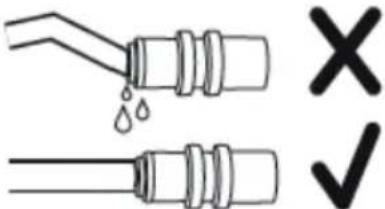
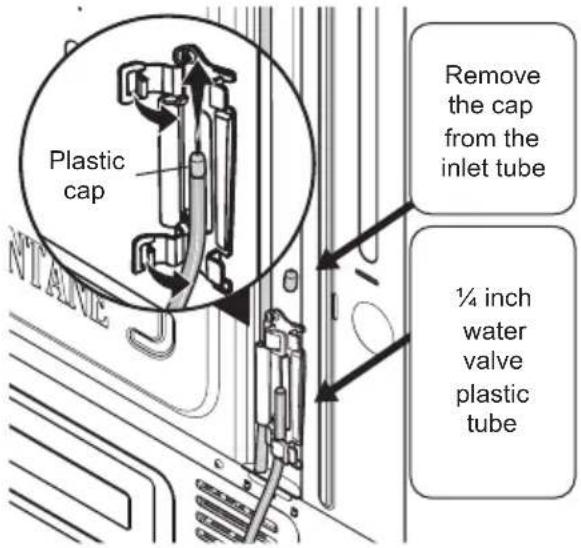
- Open the locking clips and grab water coming from the refrigerator. Remove plastic cap from water inlet fitting and discard cap. Replace the connected tubes into the clips and lock clips back in place to keep the tubing in the right position.
- After installation of refrigerator and water line system, select "WATER" on your control panel and press it for 1-2 minutes to supply water into the water tank and dispenser water.
10. CHANGING THE FILTER
10.1 Air Filter (select models)
The air filter is located in the top center of the fresh food compartment.
10.2 Replacing the Air Filter (TasteGuard)
To ensure optimal filtering of refrigerator odors, change the air filter every six months (Replace Air Filter on the Display indicates replacing the filter after six months).
-
Remove the air filter cover by squeezing the top and bottom of the cover together and removing from liner.
-
Remove the old filter and discard it.
-
Unpack the new filter and slide it into the housing. The open face must (carbon media) of the filter should be installed facing the air port (hole) in the multiflow.
-
Replace the air filter cover by squeezing the sides and snapping it back into place.
-
Press and hold the "Reset Air Filter" button on the Display for three seconds. When the indicator turns off, the status has been reset.
10.3 Ordering Replacement Air Filters
Use original spare parts only. Please contact an Authorised Service Centre
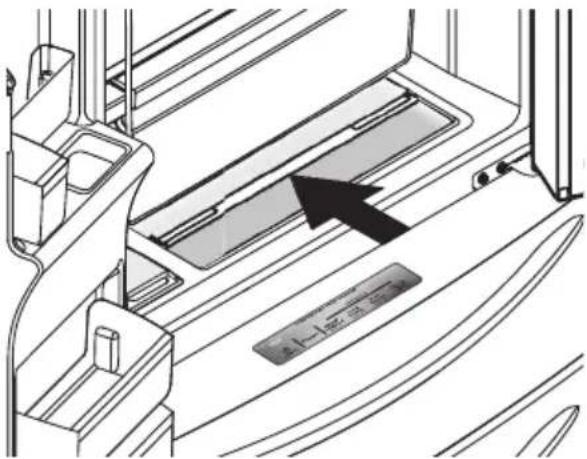
10.4 Water Filter
The refrigerator is equipped with a water filtering system. The water filtering system filters all dispensed drinking water, as well as the water used to produce ice.
The water filter is located at the top right side of the fresh food compartment.
10.5 Replacing the Water Filter
Change the water filter every six months to ensure the highest possible water quality. Replace Water Filter on the display indicates when to replace the filter after a standard amount of water (473 liters) has flowed through the system.
If the refrigerator has not been used for a period of time (during moving for example), change the filter before reinstalling the refrigerator.
To Remove: Pull cover forwards and cover will drop down and allow access to filter.
To Reinstall: Push cover up towards liner and then push towards rear of cabinet. Filter cover will snap back into place.
natural_image
Diagram of a refrigerator interior showing internal components and directional arrows (no text or symbols)10.6 Ordering Replacement Water Filters
Use original spare parts only. Please contact an Authorised Service Centre
To replace the water filter:
It is not necessary to turn the water supply off to change the filter. Be ready to wipe up any small amounts of water released during the filter replacement.
-
Turn off the ice maker by pressing and holding the Ice Maker button on the display until no longer illuminated.
-
Push down on front edge of filter cover. Cover will tilt down and expose water filter.
- Remove the old filter by rotating it counter-clockwise (to the left) 90 degrees to release it.
- Slide the old filter cartridge straight out of the housing and discard it.
- Unpackage the new filter cartridge. Slide it into the filter housing as far as it will go with the grip end horizontal.
- Push lightly inward on the filter while rotating it clockwise (to the right). The filter will then pull itself inward as it is rotated. Rotate the filter 90 degrees until it stops and the grip end is vertical. A very light click may be heard as the filter locks into place.
- Press a drinking glass against the water dispenser while checking for any leaks at the filter housing. Any spurts and sputters that occur as the system purges air out of the dispenser system are normal.
- Continue dispensing water for 3-4 minutes. It may be necessary to empty and refill the container several times.
- Turn on the ice maker by pressing and holding the Ice Maker button on the display until it is illuminated.
- Press and hold the Reset Water Filter button on the display for three seconds. When indicator is no longer illuminated, the water filter status has been reset.
- Replace filter cover by pushing up and snapping into place.
11. INSTALLATION

WARNING!
Refer to Safety chapters.

This User Manual provides general installation and operating instructions for this model. We recommend using a service or kitchen contracting professional to install the refrigerator. Use the refrigerator only as instructed in this User Manual. Before starting the refrigerator, follow these important first steps.
11.1 Location
- Choose a place that is near a grounded, non-GFCI, electrical outlet. Do Not use an extension cord or an adapter plug.
- If possible, place the refrigerator out of direct sunlight and away from the range, dishwasher, or other heat sources.
- The refrigerator must be installed on a floor that is level and strong enough to support a fully loaded refrigerator.
- Consider water supply availability for models equipped with an automatic ice maker.
- To ensure appliance's best functionality, you should not install the appliance in the nearby of the heat source (oven, stoves, radiators, cookers or hobs)

CAUTION
Do Not install the refrigerator where the temperature will drop below 10^ C or rise above 43^ C. The compressor will not be able to maintain proper temperatures inside the refrigerator.
Do Not block the toe grille on the lower front of the refrigerator. Sufficient air circulation is essential for the proper operation of the refrigerator.
11.2 Installation
Allow the following clearances for ease of installation, proper air circulation, and plumbing and electrical connections:
Sides & Top 40 mm Back 30 mm

NOTE
If the refrigerator is placed with the door hinge side against a wall, allow additional space so the door can be opened wider.
11.3 Positioning
This appliance is not intended to be used as a built-in appliance.
This appliance should be installed in a dry, well ventilated indoor position.
This appliance is intended to be used at ambient temperature ranging from 10^ C to 43^ C.
If, due to different installation, proper ventilation requirements are not respected, the appliance will function correctly but energy consumption might increase slightly.

The correct operation of the appliance can only be guaranteed within the specified temperature range.

If you have any doubts regarding where to install the appliance, please turn to the vendor, to our customer service or to the nearest Authorised Service Centre.

It must be possible to disconnect the appliance from the mains power supply. The plug must therefore be easily accessible after installation.

CAUTION
If you position the appliance against the wall, use back spacers provided or keep the minimum distance indicated in the installation instructions.

CAUTION
If you install the appliance next to a wall, refer to the installation instructions to understand the minimum distance between the wall and the side of the appliance where door hinges are to provide enough space to open the door when the internal equipment is removed (e.g. when cleaning).
11.4 Door opening
The refrigerator should be positioned to allow easy access to a counter when removing food. For best use of refrigerator drawers and freezer baskets, the refrigerator should be in a position where both can be fully opened.
11.5 Cabinet Leveling & Refrigerator Door Alignment (if necessary)
Guidelines for final positioning of refrigerator:
- All four corners of the cabinet must rest firmly on the floor.
- The front should be slightly elevated to ensure that doors close and seal properly.
- Doors should align with each other and be level.
Most of these conditions can be met by raising or lowering the adjustable front rollers.
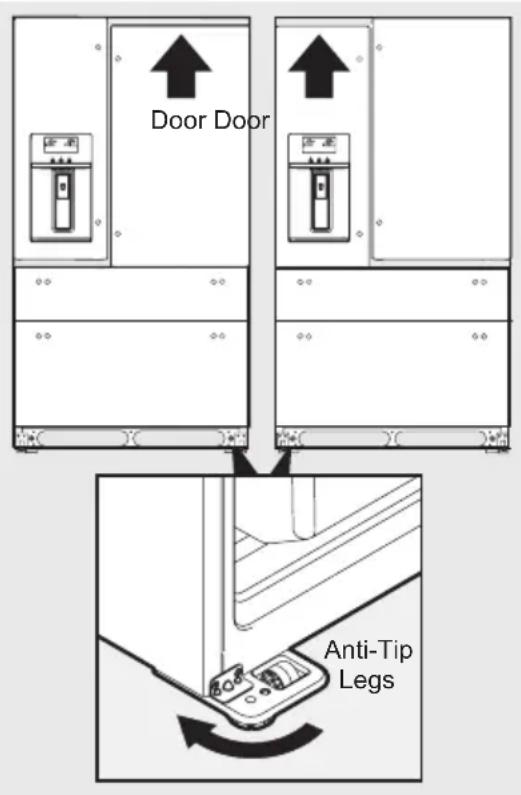
To level the cabinet using the front rollers:
- Slightly open freezer drawer.
- Lower anti-tip legs until they are both touching the floor. Once on the floor, use a pair of pliers to adjust.
To raise unit: turn leg clockwise.
To lower unit: turn leg counterclockwise.
- Ensure both doors are bind-free with their seals touching the cabinet on all four sides and that cabinet is stable.
To make final door height adjustments:
- Open freezer drawer to make lower hinge visible.
- Insert 6mm Allen wrench into the shaft of the lower hinge.
- Adjust the height by turning clockwise or counterclockwise. Turning clockwise will lower the door. Turning counterclockwise will raise the door. Default setting is to the lowest height.

11.6 Flipper Mullion
Adjust Flipper Mullion for proper connection with the mullion guide by ensuring the flipper mullion is folded and perpendicular to the fresh food door. If the mullion guide is not in the correct position, it could prevent the door from closing completely.
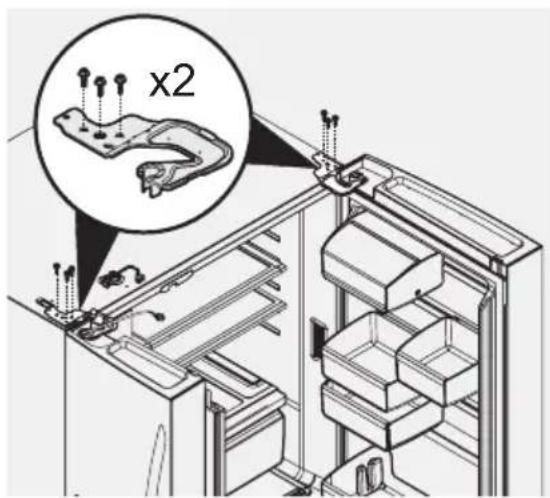
12. DOOR REMOVAL INSTRUCTIONS
12.1 Getting through narrow spaces
If refrigerator will not fit through an entrance area, doors can be removed. Check first by measuring the entrance.
To prepare for removing the doors:
- Make sure the electrical power cord is unplugged from the wall outlet.
- Remove any food from the door shelves and close the doors.
To remove the refrigerator doors:
- Open doors to 90°.
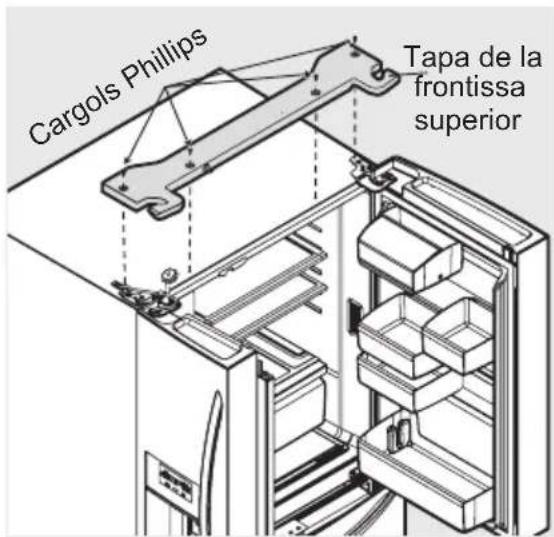
- Remove all five Phillips screws from top hinge cover and lift up.
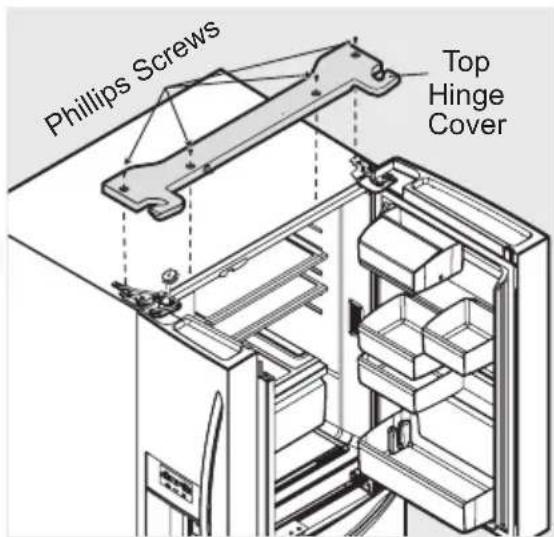
-
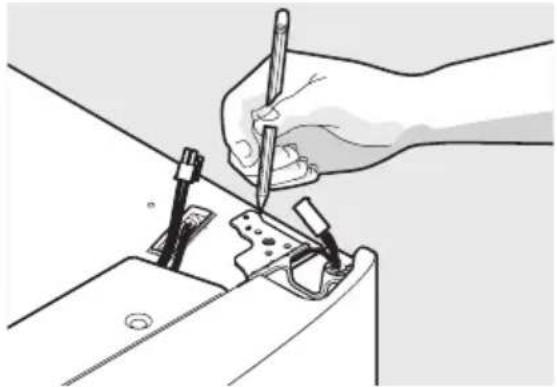
Trace lightly around the door's top hinges with a pencil. This makes reinstallation easier.
-
Lift off the top hinge cover.
natural_image
Line drawing of a hand using a pen to cut or mark a piece of paper (no text or symbols present)- Disconnect electrical harness running from door to hinge cover.
natural_image
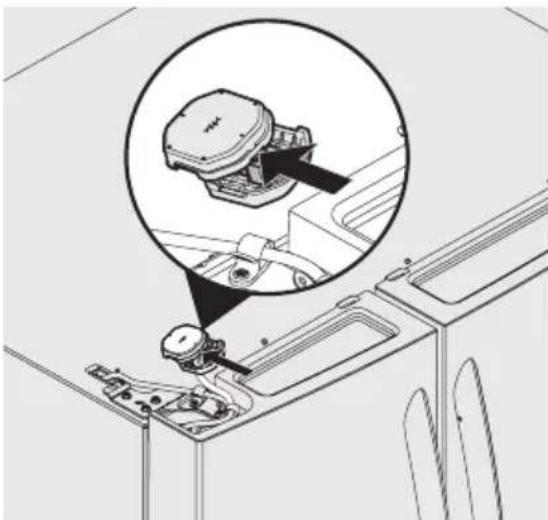
Technical line drawing of a mechanical assembly with an inset showing a component detail (no text or symbols)- Pull up on water line gently to remove from door.

NOTE
Use care while pulling the water tube from the door to be sure that tube does not kink.
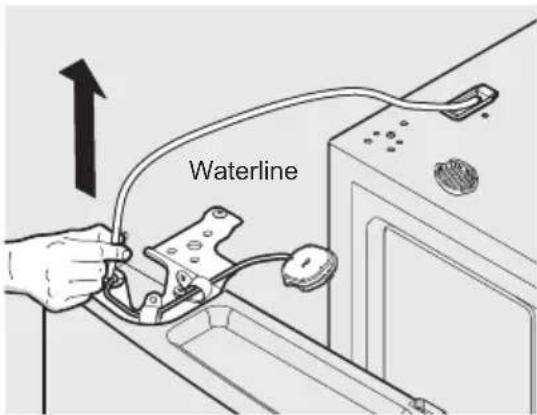

NOTE
Approximately four feet of water tube will be pulled from the refrigerator door.
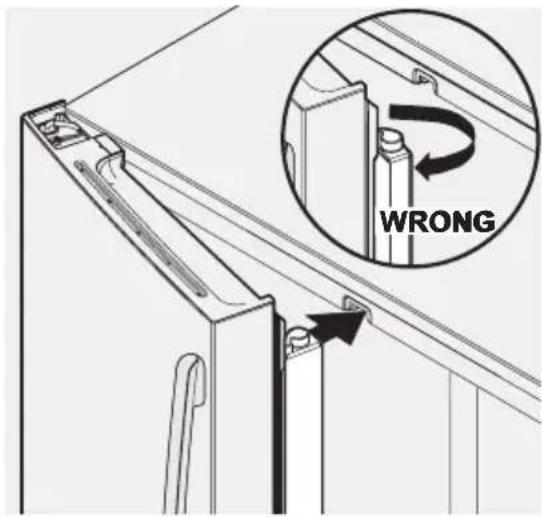
- Remove three 8mm bolts from both top hinges.
- To gain access to lower hinge, drawer will need to be extended. Unscrew the three lower hinge screws and slide the hinge inwards Lift up on door and remove from bottom hinge.

natural_image
Technical diagram of a door latch mechanism with an inset magnified view showing pin alignment (no text or symbols)Lower Hinge Removal

CAUTION
Be sure doors are set aside in a secure position where they cannot fall and cause personal injury, or damage to the doors or handles.
- To reinstall doors, reverse procedure.

IMPORTANT
Make sure water line tubing goes through hole at top of dispenser pocket. There is also a metal wrap on the tubing to prevent damage from the hinge rubbing against it. This needs to be fixed back around the tube in the proper location upon reinstallation (just as long as the tube is protected from the hinge).

NOTE
When reinserting the water tube and replacing the top hinge cover, use care to be sure the tube does not kink.
Once both doors are in place, ensure they are aligned with each other and level (Please see the Installation section for more details), and replace the top hinge cover.
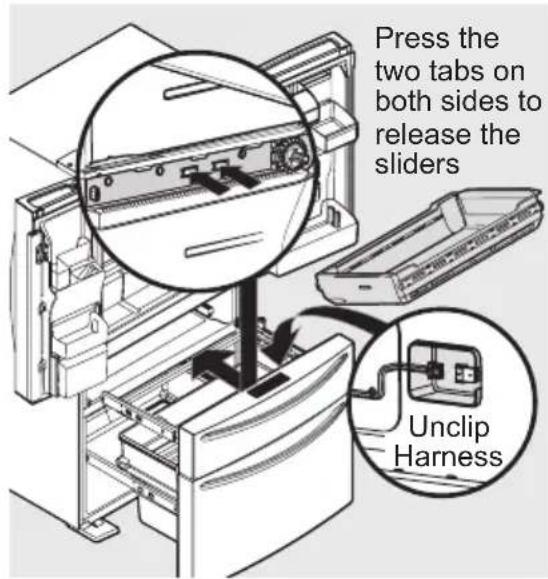
12.2 To remove the MultiSwitch/MultiChill drawer
- Fully open drawer.
- Remove basket from drawer.
- Unclip harness at front of drawer and move harness out of the way of drawer slides.
- Press liner clips and slide rail past clips on both sides to fully remove drawer from cabinet.
- Reverse the steps to reinstall the drawer.
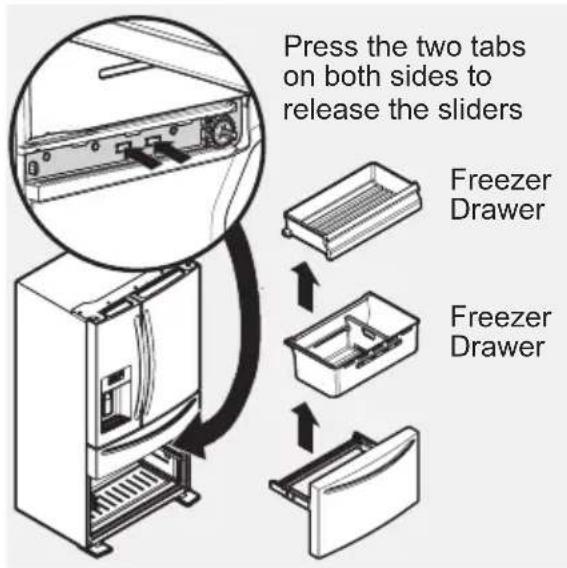
12.3 Removing Freezer Drawer

CAUTION
Drawer is heavy. Use caution when lifting.
- Open drawer and fully extend.
- Remove the freezer drawer.
- Remove the freezer basket.
-
Inside the cabinet, press the two tabs on both sides to release the sliders.
-
Remove the drawer with brackets and sliders.
12.4 Re-installing Freezer Drawer
- Place drawer with brackets and sliders inside the cabinet and click into place.
- Replace the basket.

NOTE
For additional instructions, see Storage Features section.
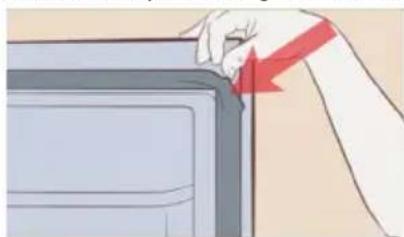
12.5 To remove the door seal

CAUTION
Please make sure that you have switched your appliance off at the mains before starting your repair.
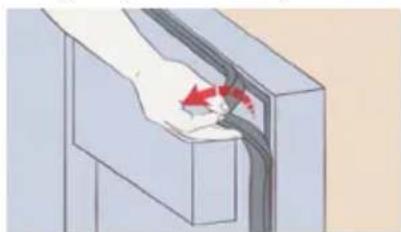
- Place your thumb underneath the seal, the best method is to start at the corner. Grab the bottom of it on the side, and pull the gasket back.
natural_image
Illustration of a hand inserting a red arrow into a computer monitor (no text or symbols)- Then proceed to run it around the underside of your seal-and it can then be gently lifted away around the door.
natural_image
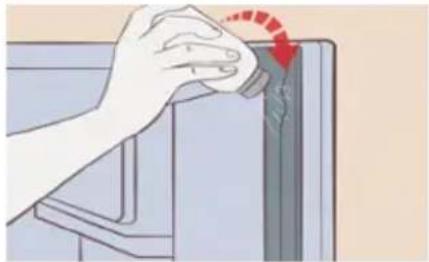
Illustration of a hand holding a cable or wire inside a rectangular frame, with red arrows indicating direction (no text or symbols)12.6 To fitting the door seal
- Take the new gasket, the best way to fit it is starting at the top corners of the refrigerator door. Push the lip of the new gasket into the channel between corners and work your way around the door. Before fitting the bottom corners and fit between. Lastly work evenly at the top then the bottom to the middle helping spread any excess evenly on the longest part of the seal.
natural_image
Illustration of a hand using a tool to adjust or remove a component, with a red arrow indicating rotation (no text or symbols present)- Apply powder. Use a bit of baby powder or talcum powder to prevent sticking.
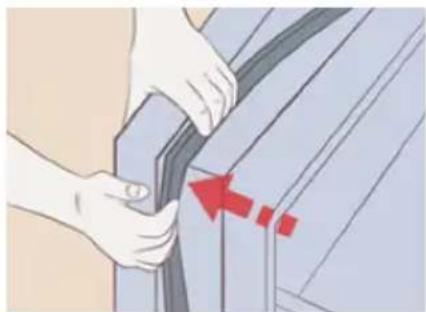
natural_image
Illustration of hands adjusting a car seatbelt with a red arrow indicating the angle (no text or symbols present)- Close the refrigerator door, and open it several times to inspect the gasket. You are looking for any warped areas of the gasket. Repeat this process several times
13. HELPFUL HINTS AND TIPS
13.1 Energy saving tips
We recommend that you follow the tips below to save energy.
- Freezer: The internal configuration of the appliance is the one that ensures the most efficient use of energy. - Fridge: Most efficient use of energy is ensured in the configuration with the drawers in the bottom part of the appliance and shelves evenly distributed. Position of the door bins does not affect energy consumption.
- Do not open the door frequently or leave it open longer than necessary.
- Freezer: The colder the temperature setting, the higher the energy consumption.
- Fridge: Do not set too high temperature to save energy unless it is required by the characteristics of the food.
- If the ambient temperature is high and the temperature control is set to low temperature and the appliance is fully loaded, the compressor may run continuously, causing frost or ice formation on the evaporator. In this case, set the temperature control toward higher temperature to allow automatic defrosting and to save energy this way.
- Ensure a good ventilation. Do not cover the ventilation grilles or holes.
13.2 Hints for fresh food refrigeration
- Fresh food compartment is the one marked (on the rating plate) with 📄
- Good temperature setting that ensures preservation of fresh food is a temperature less than or equal to +4°C.
- Higher temperature setting inside the appliance may lead to shorter shelf life of food.
• Cover the food with packaging to preserve its freshness and aroma.
• Always use closed containers for liquids and for food, to avoid flavours or odours in the compartment.
• To avoid the cross-contamination between cooked and raw food, cover the cooked food and separate it from the raw one. - It is recommended to defrost the food inside the fridge.
- Do not insert hot food inside the appliance. Make sure it has cooled down at room temperature before inserting it.
• To prevent food waste the new stock of food should always be placed behind the old one.
13.3 Hints for refrigeration
- Meat (all types): wrap in a suitable packaging and place it on the glass shelf above the vegetable drawer. Store meat for at most 1-2 days.
- Fruit and vegetables: clean thoroughly (eliminate the soil) and place in a special drawer (vegetable drawer).
- It is advisable not to keep the exotic fruits like bananas, mangos, papayas etc. in the refrigerator.
• Vegetables like tomatoes, potatoes, onions, and garlic should not be kept in the refrigerator. - Butter and cheese: place in an airtight container or wrap in an aluminium foil or a polythene bag to exclude as much air as possible.
- Bottles: close them with a cap and place them on the door bottle shelf, or (if available) on the bottle rack.
- Always refer to the expiry date of the products to know how long to keep them.
13.4 Hints for freezing
- Activate FastFreeze function at least 24 hours before placing the food inside the freezer compartment.
- Before freezing wrap and seal fresh food in: aluminium foil, plastic film or bags, airtight containers with lid.
- For more efficient freezing and thawing divide food into small portions.
- It is recommended to put labels and dates on all your frozen food. This will help to identify foods and to know when they should be used before their deterioration.
-
The food should be fresh when being frozen to preserve good quality. Especially fruits and vegetables should be frozen after the harvest to preserve all of their nutrients.
-
Do not freeze bottles or cans with liquids, in particular drinks containing carbon dioxide - they may explode during freezing.
- Do not put hot food in the freezer compartment. Cool it down at room temperature before placing it inside the compartment.
- To avoid increase in temperature of already frozen food, do not place fresh unfrozen food directly next to it. Place food at room temperature in the part of the freezer compartment where there is no frozen food.
- Do not eat ice cubes, water ices or ice lollies immediately after taking them out of the freezer. Risk of frostbites.
- Do not re-freeze defrosted food. If the food has defrosted, cook it, cool it down and then freeze it.
13.5 Hints for the storage of frozen food
- Freezer compartment is the one marked with * * * *
- Good temperature setting that ensures preservation of frozen food products is a temperature less than or equal to -18^ .
- Higher temperature setting inside the appliance may lead to shorter shelf life.
- The whole freezer compartment is suitable for storage of frozen food products.
- Leave enough space around the food to allow air to circulate freely.
- For adequate storage refer to food packaging label to see the shelf life of food.
- It is important to wrap the food in such a way that prevents water, humidity or condensation from getting inside.
13.6 Shopping tips
After grocery shopping:
- Ensure that the packaging is not damaged - the food could be deteriorated. If the package is swollen or wet, it might have not been stored in the optimal conditions and defrosting may have already started.
- To limit the defrosting process buy frozen goods at the end of your grocery shopping and transport them in a thermal and insulated cool bag.
- Place the frozen foods immediately in the freezer after coming back from the shop.
- If food has defrosted even partially, do not re-freeze it. Consume it as soon as possible.
- Respect the expiry date and the storage information on the package.
13.7 Switching off your appliance
If the appliance needs to be switched off for an extended period, the following steps should be taken to prevent mould on the appliance.
- Remove all food.
- Remove the power plug from the mains socket.
- Clean and dry the interior thoroughly.
- Ensure that all the doors are wedged open slightly to allow air to circulate.
Shelf life for freezer compartment:
| Type of food Shelf life (months) | |
| Bread 3 | |
| Fruits (except citrus) 6 - 12 | |
| Vegetables 8 - 10 | |
| Leftovers without meat 1 - 2 | |
| Dairy food: | |
| Butter | 6 - 9 |
| Soft cheese (e.g. mozzarella) | 3 - 4 |
| Hard cheese (e.g. parmesan, cheddar) | 6 |
| Seafood: | |
| Fatty fish (e.g. salmon, mackerel) | 2 - 3 |
| Lean fish (e.g. cod, flounder) | 4 - 6 |
| Shrimps | 12 |
| Shucked clams and mussels | 3 - 4 |
| Cooked fish | 1 - 2 |
| Meat: | |
| Poultry | 9 - 12 |
| Beef | 6 - 12 |
| Pork | 4 - 6 |
| Lamb | 6 - 9 |
| Sausage | 1 - 2 |
| Ham | 1 - 2 |
| Leftovers with meat | 2 - 3 |
14. CLEANING AND CARE
For hygienic reasons the appliance (including exterior and interior accessories) should be cleaned regularly at least every two months.

CAUTION!
The appliance must not be connected to the mains during cleaning. Danger of electrical shock! Before cleaning switch the appliance off and remove the plug from the mains socket.
Exterior cleaning
To maintain good appearance of your appliance, you should clean it regularly.
- Wipe the digital panel and display panel with a clean, soft cloth.
- Spray water onto the cleaning cloth instead of spraying directly on the surface of the appliance. This helps ensure an even distribution of moisture to the surface.
- Clean the doors, handles and cabinet surfaces with a mild detergent and then wipe dry with a soft cloth.

CAUTION!
- Don't use sharp objects as they are likely to scratch the surface.
- Don't use Thinner, Car detergent, Clorox, ethereal oil, abrasive cleansers or organic solvent such as Benzene for cleaning. They may damage the surface of the appliance and may cause fire.
Interior cleaning
- You should clean the appliance interior regularly. It will be easier to clean when food stocks are low. Wipe the inside of the fridge freezer with a weak solution of bicarbonate of soda, and then rinse with warm water using a wrung-out sponge or cloth. Wipe completely dry before replacing the shelves and baskets. Thoroughly dry all surfaces and removable parts.
- Although this appliance automatically defrosts, a layer of frost may occur on the freezer compartment's interior walls if the freezer door is opened frequently or kept open too long. If the frost is too thick, choose a time when the supply of food stocks are low and proceed as follows:
- Remove existing food and accessories baskets, unplug the appliance from the mains power and leave the doors open. Ventilate the room thoroughly to accelerate the thawing process.
- When defrosting is completed, clean your freezer as described above.

CAUTION!
Don't use sharp objects to remove frost from the freezer compartment. Only after the interior is completely dry should the appliance be switched back on and plugged back into the mains socket.
Door seals cleaning
Take care to keep door seals clean. Sticky food and drinks can cause seals to stick to the cabinet and tear when you open the door. Wash seal with a mild detergent and warm water. Rinse and dry it thoroughly after cleaning.

CAUTION!
Only after the door seals are completely dry should the appliance be powered on.

WARNING!
The LED light must not be replaced by the user! If the LED light is damaged, contact the customer helpline for assistance.
15. BEFORE CALLING
| Concern Potential Cause Common Solution | ||
| Automatic Ice Maker | ||
| Ice maker is not making any ice. | ·Ice maker is turned off. | ·Turn on ice maker. For the fresh food ice maker, press ice maker on-off button once. |
| ·Refrigerator is not connected to water line or water valve is not open. | ·Connect the unit to the household water supply and ensure the water valve is open. | |
| ·The water supply line is kinked. | ·Ensure that the supply line does not kink when the refrigerator is pushed into place against the wall. | |
| ·The water filter is not seated properly. | ·Remove and re-install the water filter. Be sure to seat it fully into the locked position. | |
| ·The water filter may be clogged with foreign material. | ·If water dispenses slowly or not at all, or if the filter is six months old or older, it should be replaced. | |
| Ice maker is not making enough ice. | ·Ice maker is producing less ice than expected. | ·The ice maker will produce approximately 1 kg of ice (fresh food ice maker) every 24 hours depending on usage conditions. |
| ·The water filter may be clogged with foreign material. | ·If water dispenses slower than normal, or if the filter is six months old or older, it should be replaced. | |
| ·The water supply line is kinked. | ·Ensure that the supply line does not kink when the refrigerator is pushed into place against the wall. | |
| ·Water pressure is extremely low. Cut-off and cut-on pressures are too low (well systems only). | ·Have someone turn up the cut-off and cut-on pressure on the water pump system (well systems only). | |
| ·Reverse osmosis system is in regenerative phase. | ·It is normal for a reverse osmosis system to be below 20 psi during the regenerative phase. | |
| Ice cubes are freezing together. | ·Ice cubes are not being used frequently enough or interruption of power for prolonged time.Ice cubes are hollow (shells of ice with water inside). The hollow cubes break open in the bin and leak their water onto existing ice, which causes it to freeze together. | ·Remove ice container and discard ice. The ice maker will produce fresh supply. Ice should be used at least twice weekly to keep the cubes separated.This generally occurs when the ice maker does not get enough water. This is usually the result of a clogged water filter or restricted water supply. Replace the water filter and if the condition still occurs, check to see if the water valve is not turned on all the way or if there is a kinked water supply line. |
| Dispenser (Ice & Water) | ||
| Dispenser will not dispense ice. | There is no ice in the bin to be dispensed.The refrigerator doors are not completely closed.Dispenser paddle has been pressed too long and the dispenser motor has overheated. | See the “Ice maker is not making any ice” section.Be sure the refrigerator doors are completely closed.The motor overload protector will reset in about three minutes and then ice can be dispensed. |
| Ice dispenser is jammed. | Ice has melted and frozen around auger due to infrequent use, temperature fluctuations, and/or power outages.Ice cubes are jammed between ice maker and back of ice container. | Remove ice container, thaw, and empty the contents.Clean container, wipe dry, and replace in proper position. When new ice is made, dispenser should operate.Remove ice cubes that are jamming the dispenser. |
| Dispenser will not dispense water. | Water filter not seated properly.Water filter is clogged.Household water line valve is not open. | Remove and reinstall the water filter. For Puresource Ultra II, be sure to rotate it to the right until it stops and the grip end is vertical.Replace filter cartridge. Be sure to rotate it to the right until it stops and the grip end is vertical.Open household water line valve. See CONCERN column AUTOMATIC ICE MAKER. |
| Water not cold enough. | As warmer tap water goes through the filter and enters the water supply system, the chilled water is pushed through to the dispenser.Once the chilled water is used up, it will take several hours to bring the freshly replaced water to a cooler temperature. | Add ice to cup or container before dispensing water.Note: Only first 750 ml are chilled. |
| Water has an odd taste and/or odor. | Water has not been dispensed for an extended period of time.Unit not properly connected to cold water line. | Draw and discard10-12 glasses of water to freshen the supply.Connect unit to cold water line that supplies water to the kitchen faucet. |
| Opening/Closing Of Doors/Drawers | ||
| Door(s) will not close. | Door was closed too hard, causing other door to open slightly.Refrigerator is not level.It rocks on the floor when moved slightly.Refrigerator is touching a wall or cabinet.Check gasket and cabinet interface for any obstructions. | Close both doors gently.Ensure floor is level and solid, and can adequately support the refrigerator. Contact a carpenter to correct a sagging or sloping floor.Ensure floor is level and solid, and can adequately support the refrigerator. Contact a carpenter to correct a sagging or sloping floor.Clean the refrigerator door gaskets and interface with warm, soapy water to remove any grease, dirt and grime from the surface. Wipe clean with a dry cloth. Inspect the gasket to make sure it is thoroughly clean. |
| Drawers are difficult to move. | Food is touching shelf on top of drawer.Track that drawers slide on is dirty. | Remove top layer of items in drawer.Ensure drawer is properly installed on track.Clean drawer, rollers, and track. See Care & Cleaning. |
| Running of Refrigerator | ||
| Compressor does not run. | Refrigerator is in defrost cycle.Plug at electrical outlet is disconnected.House fuse blown or tripped circuit breaker.Power outage. | This is normal for a fully automatic defrost refrigerator. The defrost cycle occurs periodically, lasting about 30 minutes.Ensure plug is tightly pushed into outlet.Check/replace fuse with a 15 amp time- delay fuse. Reset circuit breaker.Check house lights. Call local electric company. |
| Refrigerator seems to run too much or too long. | The variable speed compressor is designed to run 100% of the time except during the defrost cycle. At times it will run faster, such as after a defrost cycle. | It is normal for the compressor to run continuously except during defrost mode. |
| Digital Temperature Setting Display | ||
| Digital temperature displays an error. | Electronic control system has detected a performance problem. | Contact Electrolux Customer Care for assistance. |
| Water/Moisture/Frost Inside Refrigerator | ||
| Moisture collects on inside of refrigerator walls. | Weather is hot and humid.Flipper mullion | The rate of frost buildup and internal sweating increases.Adjust flipper mullion. (See “To adjust the flipper mullion” in the Installation section.) |
| Water collects on bottom side of drawer cover. | Vegetables contain and give off moisture. | It is not unusual to have moisture on the bottom side of the cover.Both crispers contain an automatic humidity control, which should adjust automatically to the varying levels of moisture inside the drawer without creating additional condensation or drying out the air inside the crisper drawer, works with various types of produce. If excess moisture is noticed, check to verify humidity membrane is not damaged and replace as necessary. |
| Water collects in bottom of drawer. | Washed vegetables and fruit drain while in the drawer. | Dry items before putting them in the drawer. Water collecting in bottom of drawer is normal. |
| Water/Moisture/Frost Outside Refrigerator | ||
| Moisture collects on outside of refrigerator or between doors. | • Weather is humid. • This is normal in humid weather. When humidity is lower, the moisture should disappear. | |
| Food/Drinks in Fresh Food Compartment/Multi Switch drawer | ||
| Food is freezing. • Temperature setting is too low.• Temperature sensor is covered by food (right side of fresh food area).• Food is covering the air ports. | • Move the setting to a higher degree.• Allow space for air flow to the sensor.• Allow space between the air ports and the food. | |
| Cold Drink Timer | ||
| Drinks are freezing. | • Temperature setting is too low.• Cold drink timer is set too long. | • Move temperature setting higher.• Reduce time of cold drink timer accordingly. |
16. DISPOSAL OF THE APPLIANCE
The refrigerator is built from reusable materials. It must be disposed of in compliance with current local waste disposal regulations. The appliance contains a small quantity of refrigerant (R600a) in the refrigerant circuit. For your safety please refer to the section of “the refrigerant and risk of fire” in this Instruction Manual before scrapping the
appliance. Please cut off the power cord to make the refrigerator unusable and remove the door seal and lock. Please be cautious of the cooling system and do not damage it by puncturing the refrigerant container and/or bending the tubing, and/or scratching of the surface coating.
Correct Disposal of this product
This symbol on the product or in its packing indicates that this product may not be treated as household waste. Instead, it should be taken to the appropriate waste collection point for the recycling of electrical and electronic equipment. By ensuring this product is disposed of correctly, you will help prevent potential negative consequences for the environment and human health, which could otherwise be caused by the inappropriate waste handling of this product. For more detailed information about the recycling of this product, please contact your local council your household waste disposal service, or the shop where you purchased the product.
17. TECHNICAL DATA
| Dimension |
| Height 1782 mm |
| Width 913 mm |
| Depth 746 mm |
| Rising Time 14 h |
| Voltage 220-240 V |
| Frequency 50 Hz |
The technical information are situated in the rating plate on the internal left side of the appliance and in the energy label.
The technical information is situated in the rating plate on the internal side of the appliance and on the energy label.
The QR code on the energy label supplied with the appliance provides a web link to the information related to the performance of the appliance in the EU EPREL database. Keep the energy label for reference together with the user manual and all other documents provided with this appliance.
It is also possible to find the same information in EPREL using the link https://eprel.ec.europa.eu and the model name and product number that you find on the rating plate of the appliance.
See the link www.theenergylabel.eu for detailed information about the energy label.
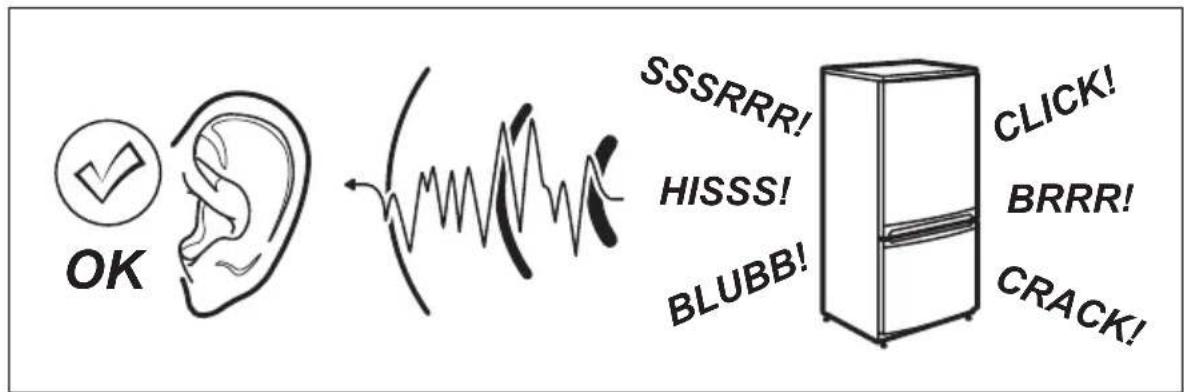
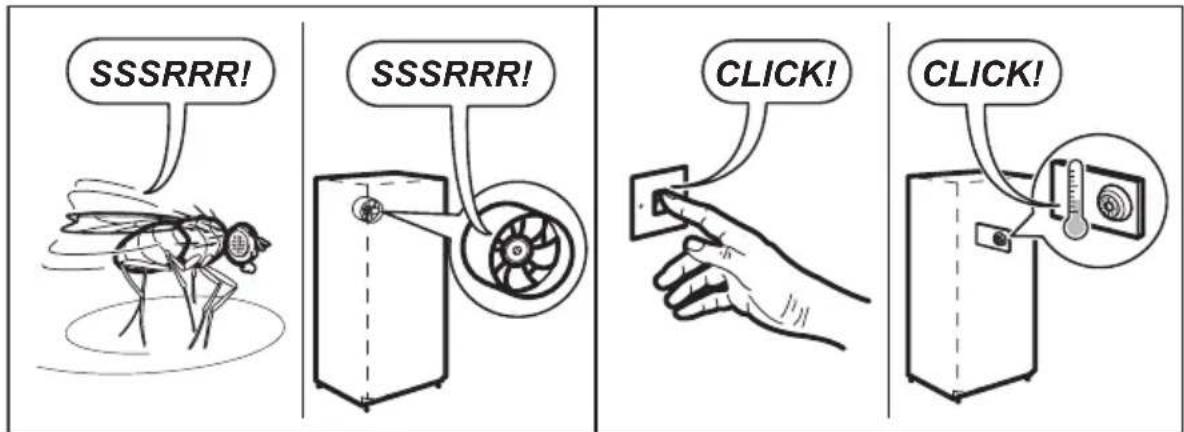
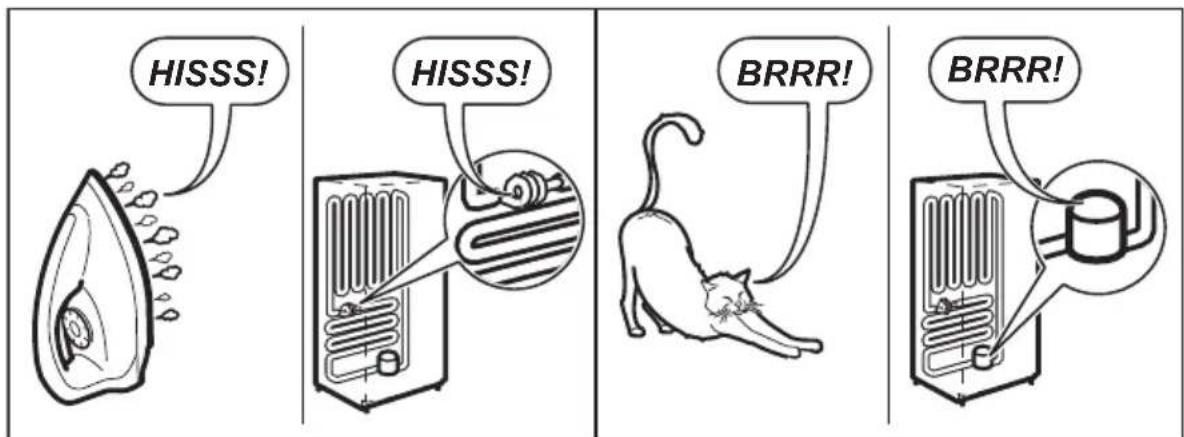
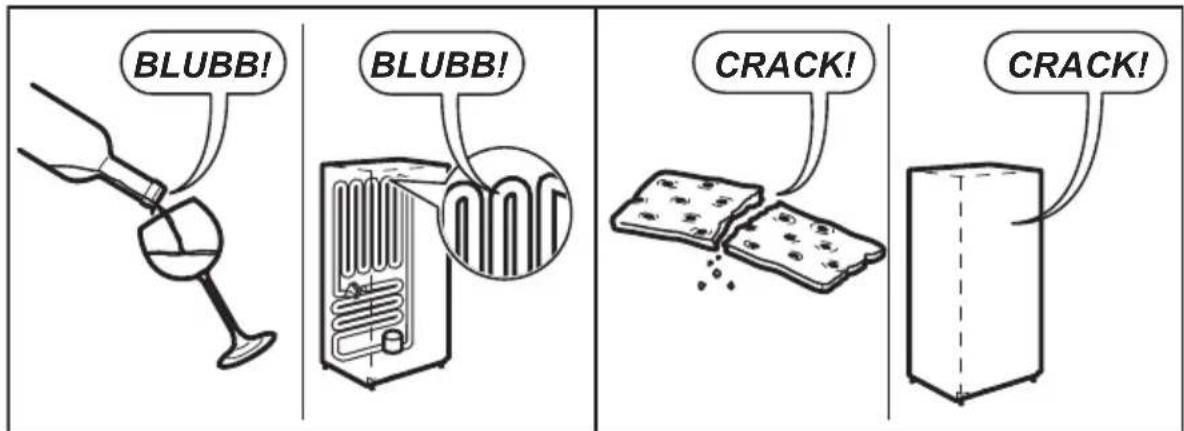
18. NOISES
There are some sounds during normal running (compressor, refrigerant circulation).
INDHOLD
- SIKKERHEDSOPLYSNINGER 40
- ANVISNINGER VEDR. SIKKERHED 42
- MILJ∅HENSYN 43
- BESKRIVELSE AF APPARATET 44
- INSTALLATION AF DIT NYE APPARAT 45
- DISPLAYSTYRINGER 47
- BRUG AF DISPENSEREN 52
- OPBEVARINGSFUNKTIONER 55
- TILSLUTNING AF VANDFORSYNING 58
- UDSKIFTNING AF FILTER 59
- INSTALLATION 61
- VEJLEDNINGER TIL LÅGEFJERNELSE 63
- NYTTIGE OPLYSNINGER OG RÅD 66
- RENG∅RING OG PLEJE 69
- INDEN DU RINGER 70
- BORTSKAFFELSE AF PRODUKTET 75
- TEKNISKE DATA 75
- LYDE 76
FOR PERFEKTE RESULTATER
Køleskab
Mellem variabel temperaturskuffe
Fryser
natural_image
Exterior view of a modern stainless steel refrigerator with dual doors and a water dispenser (no visible text or symbols)natural_image
Simple diagram with a black circle and a warning symbol (no text or labels)5. INSTALLATION AF DIT NYE APPARAT
natural_image
Illustration of two refrigerators with directional arrows indicating movement or control (no text or symbols present)| Klasse symbol Rumtemperatur (°C) | |
| Udvidet | SN +10 til +32 |
| temperering | |
| Tempereret N +16 til +32 | |
| Subtropis ST +16 til +38 | |
| Tropis T +16 til +43 | |
natural_image
Illustration of a refrigerator with a hand cursor pointing at the screen (no text or symbols)
VIGTIGT!
natural_image
Diagram showing a device with a black arrow pointing to a panel, no text or symbols presentBeholder

BEMÆRK
natural_image
Line drawing of a hand opening a refrigerator with granular material inside (no text or symbols)natural_image
Technical line drawing of a mechanical assembly with directional arrows indicating movement or force (no text or symbols)Vippehylde
natural_image
Diagram of a hand holding a tray with an arrow indicating direction (no text or symbols present)Flexi-hylde
natural_image
Technical line drawing of a mechanical assembly with an arrow indicating direction (no text or symbols)Flexi-hylde
8.2 Skuffer
natural_image
Illustration showing a hand placing a drawer into a storage unit, with an inset close-up of the interior (no text or symbols)Tilpassede Flex-lågebeholdere
natural_image
Technical line drawing of a refrigerator interior with a door handle and drawer slot (no text or symbols)Fryseskuffe
natural_image
Diagram of a mechanical device with arrows indicating direction of movement or force (no text or symbols)natural_image
Illustration of a hand using a tool to cut or mark a sewing machine component (no text or symbols visible)natural_image
Technical line drawing of a mechanical assembly with an inset close-up showing a component (no text or symbols)natural_image
Technical line drawing of a mechanical bracket assembly with a magnified inset showing pin alignment (no text or symbols)12.4 Sæt fryserskuffen i
natural_image
Illustration of a hand pressing down on a device component with a red arrow indicating the action (no text or symbols present)natural_image
Illustration of a hand holding a cable with red arrows indicating direction (no text or symbols)12.6 Monteringaf dørforsegling
natural_image
Illustration of a hand turning a button into a device with a red arrow indicating rotation (no text or symbols)- Påfør pudder. Brug lidt babypulver eller talkumpudder for at undgå, at forseglingen klæber.
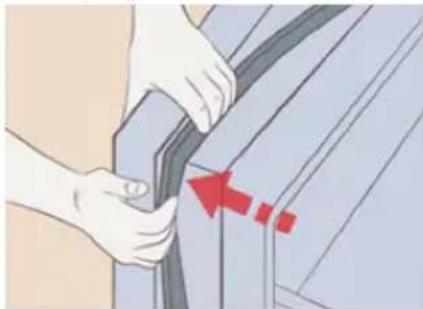
natural_image
Illustration of hands adjusting a car seatbelt with a red arrow indicating the angle (no text or symbols present)Jääkaappi
natural_image
Exterior view of a modern stainless steel refrigerator with dual doors and water control panel (no visible text or symbols)natural_image
Two simple symbols: a black circle and a warning sign with an exclamation mark (no text or labels)natural_image
Line drawing of two refrigerators with directional arrows indicating movement or control (no text or symbols)natural_image
Illustration of a refrigerator with a hand pointing to a Wi-Fi button (no text or symbols on the refrigerator itself)
HUOMIO
natural_image
Diagram showing a device with a black arrow pointing to a component, no text or symbols presentAnnostelija

HUOMAA
natural_image
Line drawing of hands inserting a box into an oven with granular material inside (no text or symbols)natural_image
Technical line drawing of a mechanical assembly with directional arrows indicating movement or force (no text or symbols)Kääntöhylly
natural_image
Diagram of a hand holding a tray with an arrow indicating direction, no text or symbols presentFlexiShelf
natural_image
Technical line drawing of a mechanical assembly with an arrow indicating direction (no text or symbols)FlexiShelf
8.2 Laatikot
Custom Flex -ovilokerot
natural_image
Technical line drawing of a refrigerator with an open drawer and internal compartments (no text or symbols)Pakastuslaatikko
natural_image
Diagram of a refrigerator interior showing internal components and directional arrows (no text or symbols)natural_image
Illustration of a hand using a tool to adjust or install a mechanical component (no text or symbols visible)natural_image
Technical line drawing of a mechanical assembly with an inset showing a component detail (no text or symbols)natural_image
Technical diagram showing a mechanical assembly with a magnified inset of a bracket and bolts (no text or symbols)Alasaranan poistaminen

HUOMIO
natural_image
Illustration of a hand holding a red arrow pointing to a device component (no text or symbols visible)natural_image
Illustration of a hand holding a cable with red arrows indicating force or pressure, inside a rectangular frame (no text or symbols)natural_image
Illustration of a hand using a tool to adjust or install a component, no text or symbols visiblenatural_image
Illustration of hands adjusting a car seatbelt with a red arrow indicating the angle (no text or symbols present)natural_image
Exterior view of a modern stainless steel refrigerator with dual doors and front panel (no visible text or symbols)natural_image
Simple diagram with a black circle and a warning symbol (no text or labels)
natural_image
Illustration of two refrigerators with directional arrows indicating movement or control (no text or symbols present)| Klasse Symbol Omgivelsestem- peratur-område (°C) | |
| Utvidet temperert sone | SN +10 to +32 |
| Temperert sone | N +16 to +32 |
| Subtropisk sone | ST +16 to +38 |
| Tropisk sone | T +16 to +43 |
natural_image
Illustration of a refrigerator with a hand pointing to a Wi-Fi button (no text or symbols on the appliance)
VIKTIG
natural_image
Diagram of a door panel with an arrow pointing to the interior panel (no text or symbols)Dispenser

MERK
natural_image
Line drawing of a hand opening a refrigerator with a tray holding a box filled with food items (no text or symbols)Fjerningsna isfank
natural_image
Technical line drawing of a mechanical assembly with two directional arrows indicating movement or force (no text or symbols present)Ripiño n yribalta
For å justere glidelås / fliphylle:
natural_image
Diagram of a hand holding a tray with an arrow indicating direction, no text or symbols presentFlexiShelf
natural_image
Technical line drawing of a mechanical assembly with an arrow indicating direction (no text or symbols)Ripiano flexi FlexiSherr
8.2 Skuffer
natural_image
Technical line drawing of a mechanical component with an arrow pointing to a section (no text or symbols present)Apertura Zona snack Apning av snack-sone Tibaketrukne snack-skuffer
natural_image
Illustration of a hand placing a rectangular object into a container (no text or symbols)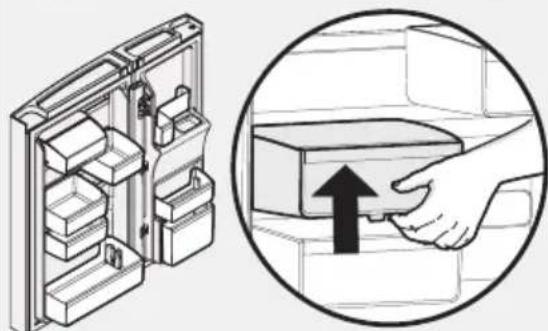
natural_image
Illustration of a refrigerator with internal compartments and a magnified view showing hand cleaning the door (no text or symbols)natural_image
Technical line drawing of a refrigerator interior with a door handle and drawer mechanism (no text or symbols)natural_image
Diagram showing a hand holding a rectangular object inside a refrigerator with an inset magnified view of the handle (no text or symbols present)natural_image
Diagram of a refrigerator interior showing internal components and directional arrows (no text or symbols)10.6 Bruk kun originale reservedeler
Bruk kun originale reservedeler. Kontakt et autorisert servicesenter
Slik bytter du vannfilter:
11.5 Flipper Mullion
natural_image
Illustration of a hand using a tool to adjust or install a mechanical component (no text or symbols visible)natural_image
Technical line drawing of a mechanical assembly with an inset showing a component detail (no text or symbols)natural_image
Technical line drawing of a mechanical bracket assembly with a magnified inset showing pin alignment (no text or symbols)natural_image
Illustration of a hand pressing down on a computer monitor with a red arrow indicating the handle (no text or symbols present)natural_image
Illustration of a hand holding a cable with a red arrow indicating force or direction (no text or symbols)12.6 Monteredørpakningen
natural_image
Illustration of a hand turning a button into a device (no text or symbols visible)natural_image
Illustration of hands adjusting a car seatbelt with a red arrow indicating the detail (no text or symbols present)INNEHÅLLSFÖRTECKNING
- SÄKERHETSINFORMATION 152
- SÄKERHETSINSTRUKTIONER 154
- MILJÖSKYDD 155
- BESKRIVNING AV PRODUKTEN 156
- INSTALLERA DEN NYA HUSHÅLLSAPPARATEN 157
- KONTROLLPANEL 159
- ANVÄNDA DISPENSERN 164
- FÖRVARINGSFUNKTIONER 167
- ANSLUTA VATTENTILLFÖRSELN 170
- BYTE AV FILTER 171
- INSTALLATION 173
- ANVISNINGAR FÖR AVLÄGSNANDE AV DÖRRARNA 175
- PRAKTISKA RÅD OCH TIPS 178
- RENGÖRING OCH SKÖTSEL 181
- INNAN DU RINGER 182
- KASSERING AV KYLSKÅPET 186
- TEKNISKA DATA 186
- LJUD 187
VI TÄNKER PÅ DIG
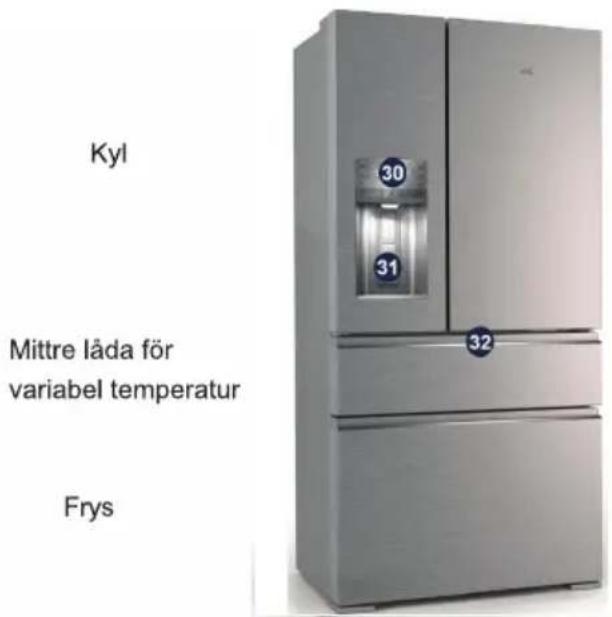
natural_image
Simple diagram with a black circle and a warning symbol (no text or labels)natural_image
Two identical refrigerators with directional arrows indicating movement or control (no text or symbols)natural_image
Illustration of a refrigerator with a Wi-Fi button icon (no text or symbols on the refrigerator itself)
VIKTIGT!

OBS!
natural_image
Diagram showing a device with a black arrow pointing to a screen or panel, no text or symbols presentDispenser

OBS!
natural_image
Line drawing of hands inserting a refrigerator into a drawer containing a tray of food (no text or symbols)Avlägsna isfack
natural_image
Technical line drawing of a mechanical assembly with two directional arrows indicating movement or force (no text or symbols present)Vända hylla
natural_image
Diagram of a hand holding a tray with an arrow indicating direction (no text or symbols present)FlexiShelf
natural_image
Technical line drawing of a mechanical assembly with an arrow indicating direction (no text or symbols)Ripiano flexi
8.2 Lådor
natural_image
Illustration of a hand placing a rectangular object into a container (no text or symbols visible)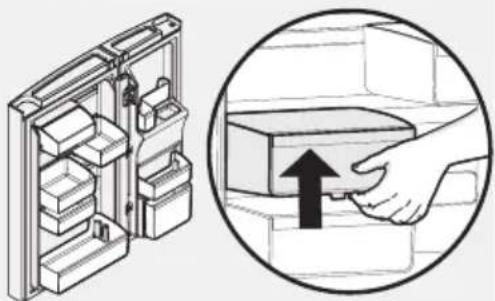
natural_image
Diagram showing a refrigerator interior with a hand inserting a box into a housing (no text or symbols present)CustomFlex dörrfack
natural_image
Technical line drawing of a mechanical device with a handle and internal components (no text or symbols)Fryslåda
natural_image
Diagram of a refrigerator interior showing internal components and directional arrows (no text or symbols)natural_image
Illustration of a hand using a tool to adjust or install a mechanical component (no text or symbols visible)natural_image
Technical line drawing of a mechanical assembly with an inset close-up showing a component (no text or symbols)natural_image
Technical diagram of a mechanical assembly with a magnified inset showing a bracket and pin alignment (no text or symbols)natural_image
Illustration of a hand holding a red arrow pointing to a device component (no text or symbols visible)natural_image
Illustration of a hand holding a cable or wire inside a rectangular frame, with no visible text or symbols.natural_image
Illustration of a hand turning a button into a device with a red circular arrow (no text or symbols)natural_image
Illustration of hands adjusting a car seatbelt with a red arrow indicating the angle (no text or symbols present)www.electrolux.com/productregistration

4. BESCHRIJVING VAN HET APPARAAT
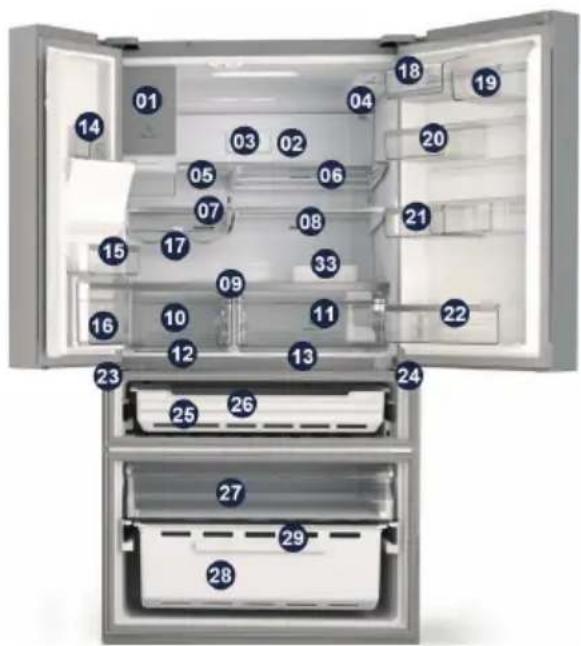
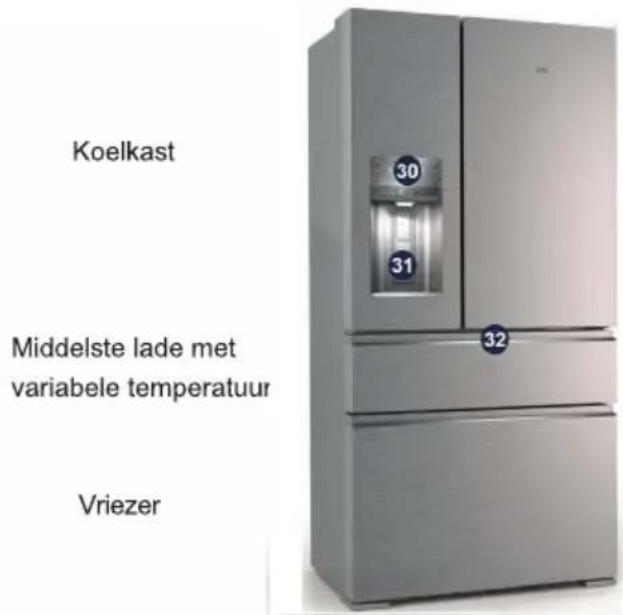
natural_image
Two simple icons: a solid black circle and a warning symbol with an exclamation mark (no text or labels)natural_image
Illustration of two refrigerators with directional arrows indicating movement or control (no text or symbols present)natural_image
Illustration of a refrigerator with a Wi-Fi button icon (no text or symbols on the refrigerator itself)
BELANGRIJK

OPMERKING
natural_image
Diagram showing a device with a black arrow pointing to a panel, no text or symbols presentWatertap

OPMERKING
natural_image
Line drawing of a hand opening a refrigerator with a tray holding a lid (no text or symbols)Ijsvak verwijderen
natural_image
Technical line drawing of a mechanical assembly with a bracket and directional arrows indicating motion (no text or symbols)Klapbaar plateau
natural_image
Diagram of a hand holding a tray with an arrow indicating direction (no text or symbols present)FlexiShelf
natural_image
Technical line drawing of a mechanical device with an arrow indicating motion or force direction (no text or symbols)FlexiShelf
8.2 Lades
natural_image
Technical line drawing of a mechanical device with internal components and a directional arrow indicating motion (no text or symbols)Vrieslade
10.3 Vervangende luchtfilters bestellen
natural_image
Diagram of a refrigerator interior showing internal components with arrows indicating movement (no text or symbols)10.6 Vervangende waterfilters bestellen
natural_image
Illustration of a hand using a tool to adjust or install a mechanical component (no text or symbols visible)natural_image
Diagram of a refrigerator interior showing a close-up view of the seatbelt mechanism (no text or symbols present)natural_image
Technical diagram of a mechanical assembly with a magnified inset showing a bracket and fasteners (no text or symbols present)natural_image
Illustration of a hand holding a red arrow pointing to a device component (no text or symbols visible)natural_image
Illustration of a hand holding a curved pipe or tube, with red arrows indicating direction (no text or symbols)natural_image
Illustration of a hand turning a button into a device with a red arrow indicating rotation (no text or symbols)natural_image
Illustration of hands adjusting a car door trim with a red arrow indicating the angle (no text or symbols present)16. AFVALVERWERKING VAN HET APPARAAT
www.electrolux.com/productregistration

Réfrigérateur
natural_image
Exterior view of a modern stainless steel refrigerator with dual doors and front panel (no visible text or symbols)natural_image
Two black circular icons: one with a dot and line, the other with a warning symbol (no text or labels)natural_image
Line drawing of two refrigerators with directional arrows indicating movement or control (no text or symbols)Espace total requis en service ***
H2 mm 1806
W3 mm 1437
D3 mm 1171

IMPORTANT
natural_image
Diagram showing a device with a black arrow pointing to a component, no text or symbols presentDistributeur

REMARQUE
natural_image
Line drawing of hands inserting a refrigerator into a drawer containing a tray of food (no text or symbols)natural_image
Technical line drawing of a mechanical assembly with directional arrows indicating movement (no text or symbols)Clayette rabattable
natural_image
Diagram of a hand using a tool to lift a transparent tray (no text or symbols visible)FlexiShelf
natural_image
Technical line drawing of a mechanical assembly with an arrow indicating direction (no text or symbols)FlexiShelf
8.2 Tiroirs
natural_image
Technical line drawing of a refrigerator with an air duct system inside (no text or symbols)natural_image
Diagram of a refrigerator interior showing internal components and directional arrows (no text or symbols)natural_image
Illustration of a hand using a tool to adjust or install a mechanical component (no text or symbols visible)natural_image
Technical line drawing of a mechanical assembly with an inset showing a component detail (no text or symbols)natural_image
Technical diagram of a door latch mechanism with an inset close-up showing pin alignment (no text or symbols)natural_image
Illustration of a hand holding a red arrow pointing to a container (no text or symbols visible)natural_image
Illustration of a hand holding a cable with red arrows indicating force or movement (no text or symbols)natural_image
Illustration of a hand holding a small object with a red arrow indicating rotation (no text or symbols)natural_image
Illustration of hands adjusting a car seatbelt with a red arrow indicating the angle (no text or symbols present)www.electrolux.com/productregistration
natural_image
Exterior view of a modern stainless steel refrigerator with three doors and front panels (no visible text or symbols)natural_image
Simple diagram with a black circle and a warning symbol (no text or labels)natural_image
Two identical refrigerators with directional arrows indicating movement, no text or symbols present
ACHTUNG
natural_image
Diagram showing a device with an arrow pointing to a screen or panel, no text or symbols presentSpender

HINWEIS
natural_image
Line drawing of a hand opening a refrigerator with a tray holding a lid (no text or symbols)natural_image
Technical diagram of a mechanical assembly with directional arrows indicating movement or force (no text or symbols present)Flip-Regal
natural_image
Diagram of a hand holding a tray with an arrow indicating direction (no text or symbols present)Flexi-Regal
natural_image
Technical line drawing of a mechanical assembly with an arrow indicating direction (no text or symbols)Flexi-Regal
8.2 Schubladen
natural_image
Technical line drawing of a mechanical component with an arrow indicating direction (no text or symbols present)natural_image
Technical line drawing of a refrigerator interior with a door handle and drawer mechanism (no text or symbols)Gefrierfach-Lade
natural_image
Diagram showing a hand inserting a rectangular component into a refrigerator (no text or symbols present)natural_image
Diagram of a refrigerator interior showing internal components and directional arrows (no text or symbols)natural_image
Illustration of a hand using a tool to adjust or install a mechanical component (no text or symbols visible)natural_image
Technical line drawing of a mechanical assembly with an inset showing a component detail (no text or symbols)natural_image
Technical diagram of a mechanical assembly with a magnified inset showing internal components (no text or symbols)natural_image
Illustration of a hand placing a red arrow on a device panel (no text or symbols visible)natural_image
Illustration of a hand holding a cable with red arrows indicating direction (no text or symbols)natural_image
Illustration of a hand turning a button into a device (no text or symbols visible)natural_image
Illustration of hands adjusting a car seatbelt with a red arrow indicating the angle (no text or symbols present)natural_image
Symbol of a trash bin crossed out by two diagonal lines (no text or numbers present)www.electrolux.com/productregistration
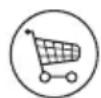
Frigorifero
natural_image
Exterior view of a modern stainless steel refrigerator with water dispenser and numbered compartments (no visible text or symbols)natural_image
Simple black circle and warning symbol on white background (no text or labels)natural_image
Illustration of two refrigerators with directional arrows indicating movement or control (no text or symbols present)| Classe Simbolo Intervallo di Temperatura ambiente (°C) | |
| Temperato esteso | SN da +10 a +32 |
| Temperatura N da +16 a +32 | |
| Subtropicale ST da +16 a +38 | |
| Tropicale T da +16 a +43 | |
natural_image
Technical diagram of a mechanical device with an inset showing a close-up of a bracket and a close-up of a door (no text or symbols present)natural_image
Illustration of a refrigerator with a hand cursor pointing at the right side of the screen (no text or symbols present)
ATTENZIONE
natural_image
Diagram showing a device with a black arrow pointing to a component, no text or symbols presentErogatore

NOTA
natural_image
Line drawing of hands inserting a box into an oven with granular material inside (no text or symbols)natural_image
Technical line drawing of a mechanical assembly with directional arrows indicating movement (no text or symbols)Ripiano a ribalta
natural_image
Diagram of a hand using a tool to lift a transparent tray (no text or symbols visible)Ripiano flexi
natural_image
Technical line drawing of a mechanical device with an arrow indicating motion or force direction (no text or symbols)Ripiano flexi
8.2 Casse
natural_image
Technical line drawing of a refrigerator interior with a door handle and drawer mechanism (no text or symbols)natural_image
Diagram of a refrigerator interior showing internal components with arrows indicating movement (no text or symbols)natural_image
Illustration of a mechanical tool with a cylindrical component and two separate parts (no text or symbols)Chiave torsometrica 8mm
natural_image
Illustration of an adjustable wrench with a handle and spout (no text or symbols)11.5 Flipper Mullion
natural_image
Illustration of a hand using a sewing machine to adjust or install a piece of hair (no text or symbols visible)natural_image
Line drawing of a car interior showing a hand valve and dashboard with an inset close-up of the device (no text or symbols)natural_image
Technical diagram showing a mechanical assembly with a magnified inset of a bracket detail (no text or symbols)natural_image
Illustration of a hand inserting a red arrow into a device panel (no text or symbols)natural_image
Illustration of a hand holding a cable with red arrows indicating force or direction (no text or symbols)natural_image
Illustration of a hand turning a button into a device (no text or symbols visible)natural_image
Illustration of hands adjusting a car seatbelt with red arrows indicating movement (no text or symbols)Nevera
Calaix de temperatura variable del centre
Congelador
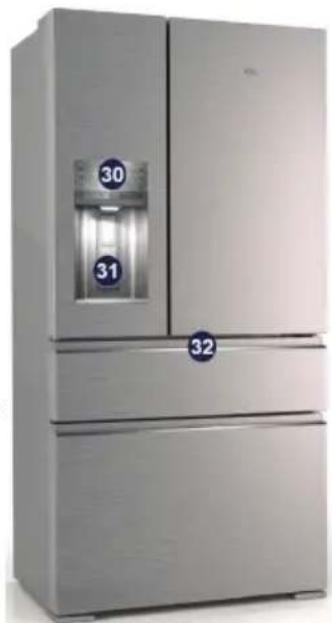
natural_image
Exterior view of a modern stainless steel refrigerator with water dispenser and numbered compartments (no visible text or symbols)natural_image
Simple diagram with a black circle and a warning symbol (no text or labels)natural_image
Illustration of two refrigerators with directional arrows indicating movement or control (no text or symbols present)| Classe Símbol Rang de temperatura ambient (°C) | |
| Temperat ampliat | SN De +10 a +32 |
| Temperat N De +16 a +32 | |
| Subtropical ST De +16 a +38 | |
| Tropical T De +16 a +43 | |
Espai total necessari ***
H2 mm 1806
W3 mm 1437
D3 mm 1171
natural_image
Exterior view of a refrigerator with a Wi-Fi button icon (no text or symbols on the appliance)
IMPORTANT

NOTA
natural_image
Diagram showing a device with an arrow pointing to a panel, no text or symbols presentDispensador

NOTA
natural_image
Line drawing of hands inserting a box into an appliance into a drawer (no text or symbols)natural_image
Technical line drawing of a mechanical assembly with directional arrows indicating movement (no text or symbols)Prestatge abatible
natural_image
Diagram of a hand inserting a component into a device frame (no text or symbols visible)Prestatge abatible
natural_image
Technical line drawing of a mechanical assembly with an arrow indicating direction (no text or symbols)Flip Shelf
8.2 Calaixos
Compartiments de la porta Flex
natural_image
Technical line drawing of a refrigerator with an open drawer and internal compartments (no text or symbols)Calaix del congelador
natural_image
Diagram of a mechanical device showing internal components with arrows indicating movement (no text or symbols)natural_image
Illustration of a screwdriver with a magnified inset showing the tip detail (no text or symbols)Cargol de cap Phillips
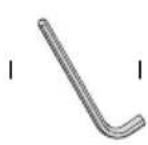
6 mm
Clau Allen
natural_image
Illustration of a mechanical tool with a cylindrical base and two different sizes (no text or symbols)8 mm
Clau de got
natural_image
Illustration of an adjustable wrench with a handle and spout (no text or symbols)Clau ajustable Clau fixa 38
12.1 Getting through narrow spaces
If refrigerator will not fit through an entrance area, doors can be removed. Check first by measuring the entrance.
To prepare for removing the doors:
- Make sure the electrical power cord is unplugged from the wall outlet.
- Remove any food from the door shelves and close the doors.
To remove the refrigerator doors:
- Open doors to 90°.
- Remove all five Phillips screws from top hinge cover and lift up.