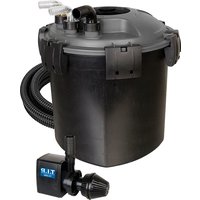
TFP 5000 UV 9 - Water filter T.I.P. - Free user manual and instructions
Find the device manual for free TFP 5000 UV 9 T.I.P. in PDF.
| Product type | Pressure filter for garden pond |
| Model | TFP 5000 UV 9 |
| Brand | T.I.P. |
| Dimensions (L x W x H) | 25 x 25 x 34 cm |
| Net weight | 4.0 kg |
| Pump power supply | 220-240 V~ / 50 Hz |
| Pump power consumption | 25 W |
| Max flow rate (Qmax) | 1500 l/h |
| Max delivery head (Hmax) | 1.8 m |
| Max immersion depth pump | 2.0 m |
| UV-C lamp | 9 W / G23 (UV-C tube) |
| Total power UV-C lamp | 12 W |
| Protection type pump / UV | IPX8 / IP44 |
| Cable length pump / UV | 10 m / 3 m |
| Connection inlet/outlet | Ø 19 mm |
| Recommended pond capacity | Up to 5000 L |
| Max water temperature | 35°C |
| Main functions | Mechanical filtration + UV-C, quick cleaning system (Back Wash) |
| Delivery contents | Filter tank, pump, BIOMEC filter mat, UV clarifier, hoses (inlet 3m, outlet 2m), cleaning crank, connection accessories |
| Maintenance | Regular cleaning of filter and pump; annual replacement of UV-C tube |
| Required electrical protection | Residual current circuit breaker 30 mA |
| Repair and spare parts | UV-C tube, seals, filter mat, rotor; T.I.P. after-sales service |
| Warranty | Legal warranty; wear parts excluded |
Frequently Asked Questions - TFP 5000 UV 9 T.I.P.
User questions about TFP 5000 UV 9 T.I.P.
0 question about this device. Answer the ones you know or ask your own.
Ask a new question about this device
Download the instructions for your Water filter in PDF format for free! Find your manual TFP 5000 UV 9 - T.I.P. and take your electronic device back in hand. On this page are published all the documents necessary for the use of your device. TFP 5000 UV 9 by T.I.P..
USER MANUAL TFP 5000 UV 9 T.I.P.
Translation of original operating instructions Pond pressure fi Iter

TFP 10000 UV 11, TFP 15000 UV 13:
TFP 10000 UV 11, TFP 15000 UV 13:
TFP 10000 UV 11, TFP 15000 UV 13:
Strictly ensure that you have read the use instructions before placing the pump in service!
Dear customer,
Congratulations for buying your new device from T.I.P.!.
Please read through these operating instructions carefully to make sure that you can fully benefit from all features.
We hope you will enjoy your new device!
Table of contents
- General safety instructions 1
- Scope of delivery 3
- Application areas 3
- Technical data 3
- Placing in service 4
- Maintenance and care 5
- Warranty 8
- Ordering spare parts 9
- Service 9

1. Safety instructions
1.1. General safety instructions
Please read through these operating instructions carefully and make yourself conversant with the control elements and the proper use of this product. We shall not be liable in the case of damage caused as a result of the non-observance of instructions and provisions of the present operating instructions. Any damage caused as a result of the non-observance of the instructions and regulations contained in the present operating instructions shall not be covered by the warranty terms. Please keep these operating instructions in a safe place and hand them on together with the device should you ever dispose of it.
With the contents of this manual unfamiliar people should not use this device.
The appliance must not be used by children.
The device may be used by persons with reduced physical, sensory or mental capabilities or lack of experience and / or knowledge if they have been supervised or instructed in the safe use of the equipment and have understood the resulting hazards. Children are not allowed to play with the device. Keep the appliance and its cord out of reach of children.
Do not use the pump if there are people or animals in the water.
The appliance must be supplied through a residual current device (RCD) having a rated residual operating current not exceeding 30mA .
If the supply cord is damaged, it must be replaced by the manufacturer, its service agent or similarly qualified persons in order to avoid a hazard.
The mains power connection of this device cannot be replaced. In case the line is damaged, the device must be scrapped.
Notes and instructions with the following symbols require particular attention:
Danger of injury or material damage if this instruction is not complied with.


Danger of electrical shock that can result in injury or material damage if this instruction is not complied with.
4
In addition to the basic safety instructions, also comply with the following instructions to prevent accidents:
Warning! Before performing any installation or maintenance tasks, disconnect the electrical devices immersed in the pond from the power source by pulling the plug out of the socket outlet. Do not operate the pump if there are people in the water. Switch off the main fuse of the main domestic power supply, before unplugging the mains cable, if the connection plug or the main power outlet are wet. Never transport or suspend the device by the mains cable.
- Never transport and/or hang up the devices on the power cord.
- Ensure that the voltage specified on the type plate of the device agrees with the mains voltage.
Prior to connecting the device to the mains supply, ensure that the mains cable and the device are not damaged in any way. - The mains cable of the device must form a loop that points downward (DRIP LOOP) to prevent water from running along the cable and into the socket outlet.
The device must have a residual current circuit breaker (RCCB) with a rated residual current of max. 30 mA connected on the line side. Consult a qualified electrician. - Do not bury the mains cable in the ground; follow the installation instructions specified in the applicable local regulations. Consult a qualified electrician.
Prior to placing the device in service, ensure that the installation has been properly executed.
Install the filter at least 2 meters away from the edge of the pond; ensure that it is attached in such a manner that it cannot accidentally fall into the water and that the installation area of the filter cannot be flooded. - Do not use or store the device in areas where there is danger of freezing. In winter the device should be removed, emptied and stored where it is protected against freezing.
The temperature of the pumped liquid must not exceed 35^ (max.) and must not under range 5^ . - Avoid using the devices with caustic and corrosive liquids.
- Devices with obvious damage must not be operated.
4
Attention! Use in garden ponds and the protected area of garden ponds is only permitted if the installation complies with the valid regulations. Consult a qualified electrician.
DO NOT use the pump in or on swimming pools!
1.2. UV-C-FILTER
- Attention! Only use the UVC filter together with the safety transformer included in the scope of delivery. If there is a defect, the complete UVC unit must be replaced.
- Warning! Unintentional use of the device or damage to the housing can result in the emission of dangerous UV-C radiation. UV-C radiation can cause damage to the eyes and skin even in small doses. Never look directly into the UV-C tube when it is switched on.
- Warning! Do not operate the UV-C emitter when it is removed from the appliance enclosure.
- Attention! This device consists partially of glass! Handle with care!
- Never connect the filter to the public water supply network.
- The UV filter is not designed for immersion in water. If the device should accidentally fall into the water, do not, under any circumstances, attempt to get it out of the water, until you have pulled the mains plug out of the mains socket outlet. Also unplug the mains plug if you determine that the exterior of the device is wet.
- Do not let the pump run dry (without water flow). To avoid an overheating of the lamp, please switch off the lamp if there is no direct water flow.
- Attention! Temporarily stop the operation of the UVC lamp, while treating the water or fish inside your pond with additional care products.
1.3. Pump
- Install the connection socket in the water-protected area and at least 2m away from the edge of the pond.
- Unplug the mains plug before performing any work on the pump, fountain or pond.
- Do not operate the pump if there are people in the water (disconnect the pump from the mains supply beforehand!)
- Important! If there is damage to the mains cables or the motor housing the complete pump is unusable and must be disposed of. Repair is not possible because the connecting cable is permanently cast in the motor housing.
- This pump is equipped with a permanent magnet, whose magnetic fields could influence pacemakers, interfere with electrical/electronic components and wipe data carriers.
People with pacemakers should always maintain a safety distance of at least 30~cm from the pump.


2. Scope of delivery
T.I.P. Pond pressure filters: Filter tank, pump, BIOMEC filter mats, bioballs (only TFP 10000 & TFP 15000), UV clarifier with ballast unit, 2m outlet and 3m inlet hose ( 19mm) , hose connection accessories, cleaning crank and operating instructions.
Check the device for transport damage and complete delivery. If there is damage the retailer must be notified without delay, at the latest however, within 8 days of the purchase date.

3. Application areas and mode of operation
The TFP 5000 UV 9/TFP 10000 UV 11/TFP 15000 UV 13 is a compact, installation and maintenance-friendly pressure filter designed for cleaning ponds. Three different filter media are integrated in this filter system.
- Mechanical filter. This provides a large filter mass which traps the solids and thus provides pure and healthy water for plants and animals.
Organic filter (only available on TFP 10000 UV 11 and TFP 15000 UV 13): This consists of bioballs with high porosity, which provide the ideal prerequisites for dense colonisation of bacterial colonies, which in turn reduce ammonia and nitrite. - UVC filter: This is a UVC lamp (it is protected by a quartz tube), which due to its positive effect removes the green patina that normally forms in ponds.
The device has been developed for private use and not for industrial or commercial purposes.
This filter system is used to support the biological self-cleaning of your garden pond. A satisfactory effect and function of this filter system is influenced by various operating conditions. Factors, such as many fish, few plants, a lot of direct sunlight and a high level of contamination can negatively influence the mode of operation and may significantly reduce the maximum pond water volume that can be effectively cleaned.

4. Technical data
| Model | TFP 5000 UV 9 | TFP 10000 UV 11 | TFP 15000 UV 13 |
| Voltage / frequency pump | 220-240 V~ / 50 Hz | 220-240 V~ / 50 Hz | 220-240 V~ / 50 Hz |
| Performance pump | 25 W | 35 W | 80 W |
| Degree of protection / protection class of pump | IPX8 / I | IPX8 / I | IPX8 / I |
| Max. flow rate (Qmax) | 1,500 l/h | 2,000 l/h | 4,500 l/h |
| Max. delivery height (Hmax) | 1.8 m | 2.0 m | 3.5 m |
| Max. submersible depth ∅ | 2.0 m | 2.0 m | 2.0 m |
| Power Cord Pump | 10 m / 05RN8-F | 10 m / 05RN8-F | 10 m / 05RN8-F |
| Voltage / frequency UV-C emitter | 220-240 V~ / 50 Hz | 220-240 V~ / 50 Hz | 220-240 V~ / 50 Hz |
| Power consumption of UV-C emitter complete | 12 W | 15 W | 15 W |
| Power consumption of UV-C tube | 9 W / G23 | 11 W / G23 | 13 W / G23 |
| Degree of protection / protection class of UV-C emitter | IP44 / I | IP44 / I | IP44 / I |
| Length of power cord of UV-C emitter | 3 m / H05RN-F | 3 m / H05RN-F | 5 m / H05RN-F |
| Weight (net) | 4.0 kg | 6.5 kg | 9.5 kg |
| Maximum temperature of the pumped liquid (Tmax) | 35°C | 35°C | 35°C |
| Recommended for ponds up to max. | 5,000 I | 10,000 I | 15,000 I |
| Filter dimensions (W x D x H) | 25 x 25 x 34 cm | 31 x 31 x 49,5 cm | 38 x 38 x 52 cm |
| Filter inlet / outlet | Ø 19 mm | Ø 19 mm | Ø 19 mm |
| Item number | 30297 | 30298 | 30299 |
5. Placing in service
Avoid when tightening screw excessive force that may cause damage. Please observe the illustrations, too, which are contained as an attachment at the end of the present operating instructions. The numeric and other details included in brackets below refer to these illustrations.
Find the most suitable place to set up the filter. Make sure that it is placed at a minimum distance of 2m from the waters edge.
The filter can be placed in the ground up to the height of the clamps.
Warning: The filter must always be installed so that the difference in height between the water outlet at the filter and the water surface does not exceed 1 m.
Do not use excessive force that can cause damage when tightening threaded unions.
See the illustrations at the end of these use instructions. The numbers and other information cited below in parentheses are based on these illustrations.

5.1. Assembly
Check the complete delivery content by removing all materials from the package. The UVC filter is pre-assembled. Verify complete and solid assembly by checking the threaded ring of the UVC emitter frame (1) for firm seat. Now fit the transparent hose connection (6) to the inlet (8) and the black connection (10) to the outlet (9) of the UVC emitter by screwing the corresponding hose nozzle (6 + 10) firmly onto the internal seal by hand.
UV-C should be fixed on a base with a weight of at least 18kg . Secure the lamp in a flood-proof location using the supplied clamping brackets. Connect the UV-C lamp to your filter system (hoses, pump, filter, ...) Observe the flow direction of the lamp [inlet (8) / outlet (9)]. Only connect pumps that do not exceed the maximum flow rate and the maximum pressure specified in the technical data.
The filter is supplied with all necessary accessories for commissioning.
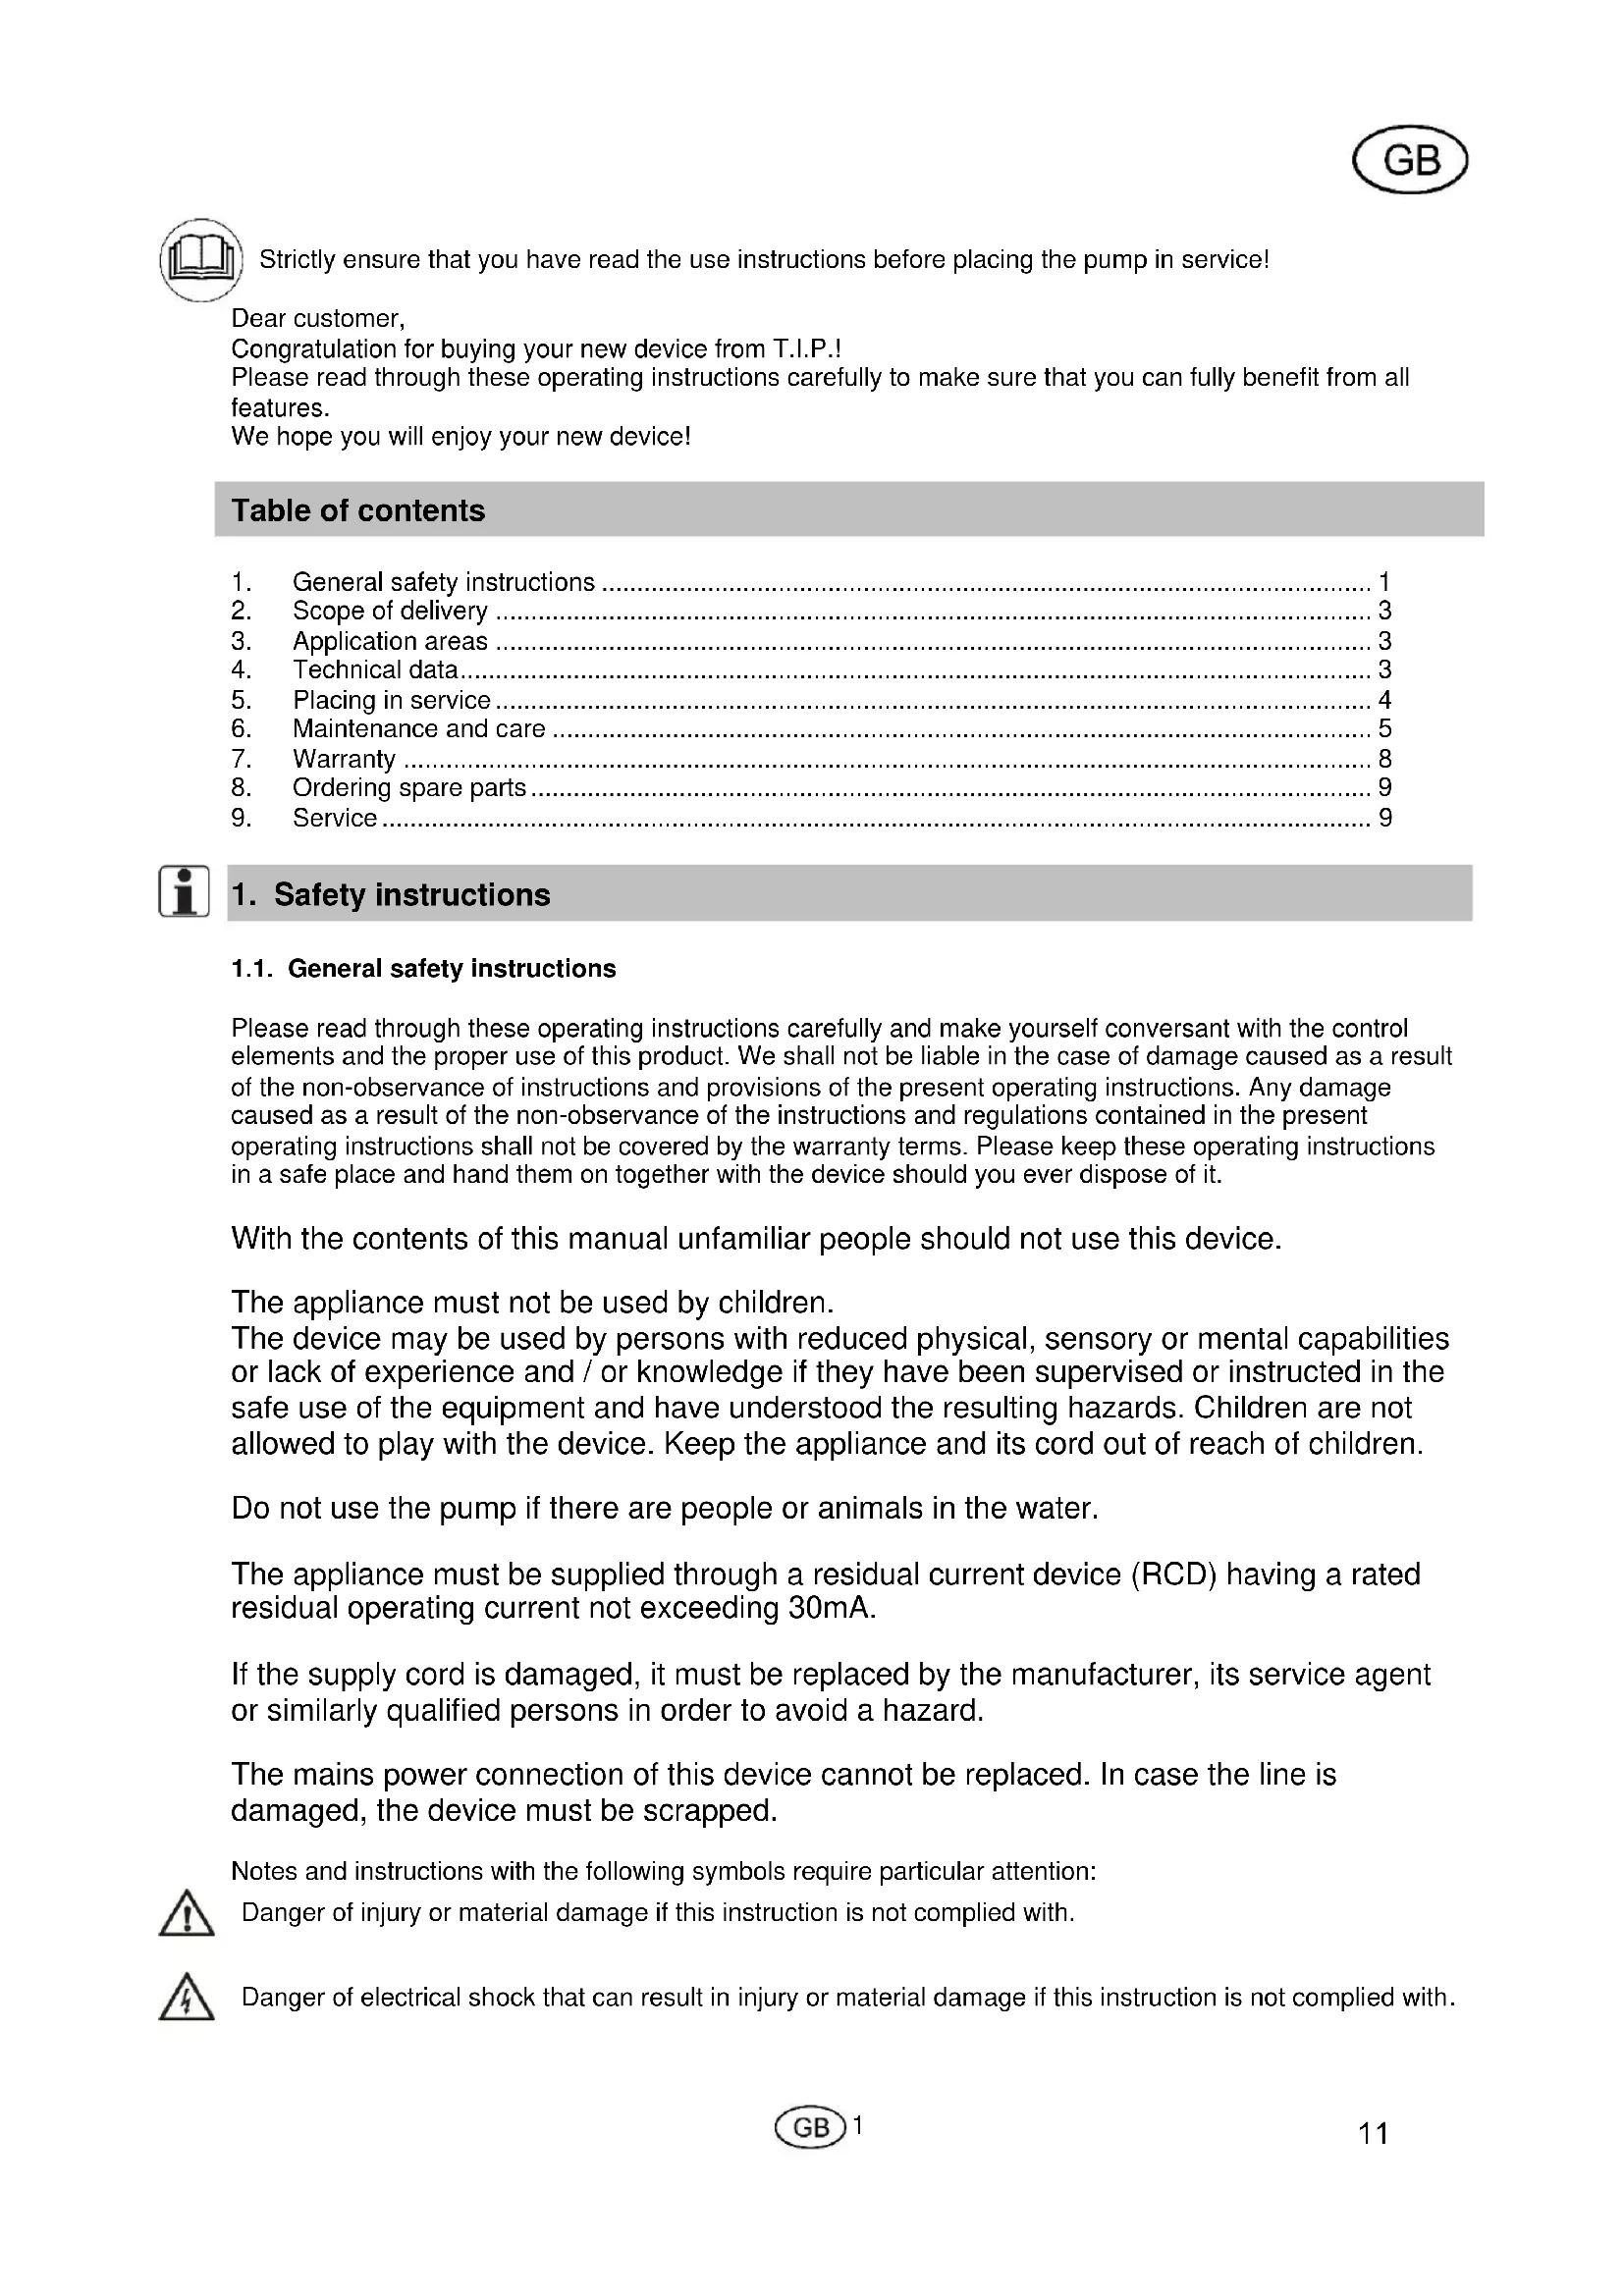
TFP 5000: Connect via the hose of the pump to the hose connection of the filter inlet (IN). Connect the drain hose to the hose connection of the filter outlet (OUT). See Figure 1 + 2

Fig 1
TFP 10000 and TFP 15000: Use the hose to connect the pump to the transparent hose connection of the filter inlet (arrow to filter, see Figure 3). Also connect the drain hose to the black hose connection of the filter outlet (arrow pointing away from the filter, fish pictured, see Figure 4).
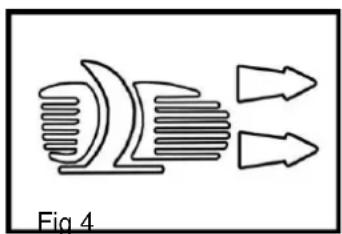
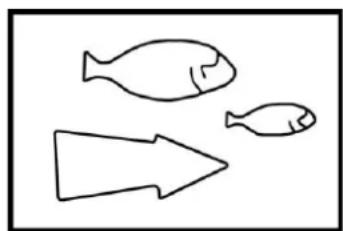
Fig 3
The filter is now ready for use. Switch on the pump and UVC lamp by plugging in the appropriate mains cable.
For this filter system we recommend continuous operation (24 hours a day), in the season months March to October.
Note: - The biological filtration develops naturally, it takes 5-6 weeks for it to take full effect. To accelerate settlement of bacteria, appropriate bacteria can be purchased in any pond shop.
Warning! The function of the filter system must be checked at regular intervals!
Initially, the filter system should be checked at least once a day. Leaves, grass, and animal hair, for example can quickly clog the filter.
Consequently select the cleaning intervals based on the type and the extent of contamination in your pond. Switch off the UVC lamp temporarily if you want to use products for water treatment and/or for fish. If you want to use another pump that exceeds the specified technical data, it is recommended to reduce the flow rate with a 2-way tap.
5.2. Putting into operation
Attention! Comply with the safety measures specified for the UVC emitter (see above)! Install the connection socket outlet in the water-protected area and at least 2m away from the edge of the pond! Connect the pond pump to the mains supply.
Check whether the hose is connected so that it is watertight and no leaks are visible on the radiator. Use commercially available hose clamps if necessary.
Connect the UVC emitter to the mains supply. You can check the function of the UVC tube by the bluish shimmer on the transparent hose adapter (6) on the emitter inlet (8).
5.3. Operation
For this filter system we recommend continuous operation (24 hours a day), in the season months March to October.

6. Maintenance and care

Attention! Before performing any installation or maintenance tasks, disconnect the electrical devices immersed in the pond from the power source by pulling the plug out of the socket outlet.

Attention! The power cord of this device cannot be replaced. If the cable is damaged, the complete lamp socket including the ballast must be replaced. It is not possible to replace the supply line, as the connecting cables are firmly sealed.

ATTENTION: Before performing any installation or maintenance tasks, disconnect the electrical devices from the power source by pulling the plug out of the socket outlet.

Attention! The power cord of this device cannot be replaced. If the cable is damaged the UVC clarifier contained in the filter, including the ballast unit, is unusable and must be properly disposed of. Repair is not possible because the connecting lines are permanently cast.
6.1. Cleaning the filter
The cleaning intervals depend on the degree of soiling of the pond. If the water jet decreases, or for TFP 10000 UV 11 and TFP 15000 UV 13 the dirt indicator at the top of the adjustment lever is orange, clean both the filter and the pump. All filters are equipped with a quick cleaning system (Back Wash).
The cleaning (Back Wash) of the different filter models is carried out as follows:
TFP 5000 UV 9:
- Switch off the pump and UVC clarifier before any maintenance or cleaning.
- Set the setting knob from "Filter" to "Clean"
- Remove the drain hose (hose connection of the filter marked OUT) from the pond and place it in a flower bed or sewage pipe. Caution: you should not return the water used for cleaning to the pond.
- Switch on the pump to clean the filter and start the cleaning process.
Further turn the crank handle to assist in cleaning the filter sponges. - Operate the filter in this position until clear water comes out of the drain hose.
After the filter has been completely cleaned, switch the pump off again, rotate the setting knob from "Clean" to "Filter", place the drain hose in your pond and switch the pump and UVC clarifier on again. - The filter now cleans your pond again at full power.
TFP 10000 UV 11, TFP 15000 UV 13:
- Switch off the pump and UVC clarifier before any maintenance or cleaning.
- Set the setting knob from "Filter" to "Clean" in the direction of the connection with the flower symbol.

- Remove the hose from the hose connection of the filter Fig. 4 (arrow pointing away from the filter, fish pictured) and attach it to the third hose connection of the filter Fig. 5 (arrow pointing away from the filter, flower pictured).
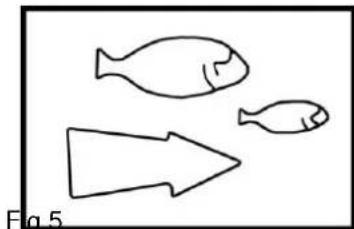
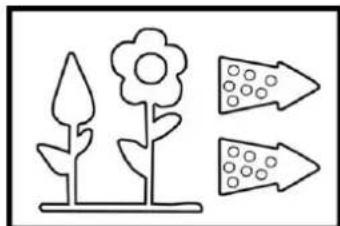
Fig 4
- Switch on the pump to clean the filter, starting the cleaning process.
Further turn the crank handle to assist in cleaning the filter sponges - Operate the filter in this position until clear water comes out of the drain hose.
After the filter has been completely cleaned, switch the pump off again, turn the setting knob from "Clean" to "Filter", fit the drain hose to the connection provided on the filter (arrow pointing away from the filter, fish pictured) and switch the pump and UVC lamp on again. - The filter now cleans your pond again at full power.
In addition, the filter must be completely cleaned at least twice a year.
- Switch off the pump and UVC clarifier and open the clamps.
- Remove the cover and remove the filter elements from the tank
- Wash out the inside of the tank.
Clean the bioballs (only TFP 10000 UV 11, TFP 15000 UV 13) and sponges in a tub with water from the pond (do not use tap water). Replace the sponges if they are damaged. - Do not use solvents or cleaning agents of any kind to clean the filter and filter media. Only use pond water.
- The UVC clarifier should always be cleaned during these thorough cleans.
6.2. Functional test of the UVC lamp
It is easy to check that the UV tube is working properly: there is a small hole in the filter cap, through this hole a bluish shimmer must be visible inside if the UVC tube is intact. If this is not the case, the tube is faulty. Please note that the tube only works when completely installed and cannot - due to a built-in safety mechanism - be tested outside the unit.
6.3. Cleaning the UVC lamp
If greater algae growth and/or limescale deposits are noticed, the correct operation of the UVC fixture must be checked. The UVC tube has a limited period of effectiveness (approx. 4000 hours) and should be replaced at the latest after one season (March to October). Appropriate replacement tubes are available at the service address specified below.
If the pond filter has been switched off for a longer period of time, ensure that the quartz glass piston that encloses the UVC tube is clean.
If the filter has not been operated for a longer period of time, under some circumstances it may be necessary to replace the sealing rings (particularly for the UVC clarifier). (The following numbers refer to Fig. 6)
TFP 5000 UV 9:
- Disconnect the UVC clarifier and pump from the power supply and secure them against being switched on again.
- Please observe the above safety measures
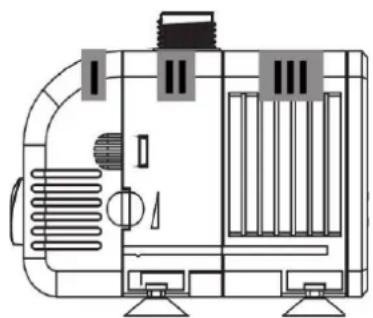
- Remove the three screws from the top UVC cover on the filter cover.
- Disassemble the UVC cover after removing the screws.
- Loosen the UVC socket with ballast unit by turning it slightly anti-clockwise (approx. 30^ ).
- Remove the lamp socket, taking care not to lose the O-ring on the quartz piston seat. Do not pull on the power cord in the process.
- Then carefully pull on the transparent seat of the quartz glass piston to remove it. Take care not to damage the O-ring.
-
Carefully clean the quartz glass piston (5) from the outside and remove any limescale deposits with a suitable solvent. Rinse off thoroughly before installation.
-
Check the quartz glass for damage.
- Reassemble the whole thing in the reverse order and be sure to install the various components correctly
- Switch on the UVC clarifier to check that it works as described above
TFP 10000 UV 11, TFP 15000 UV 13:
- Disconnect the UVC clarifier and pump from the power supply and secure them against being switched on again
- Please observe the above safety measures
- Remove the four screws from the top UVC cover on the filter cover.
After removing the screws, remove the UVC cover including the lamp socket and ensure that the O-ring on the lamp socket is not lost. Do not pull on the power cord in the process - Now it is possible to loosen the fixing nut at the beginning of the quartz glass piston and carefully remove the quartz glass piston. Take care not to damage the O-ring
- Carefully clean the quartz glass piston (5) from the outside and remove any limescale deposits with a suitable solvent. Rinse off thoroughly before installation.
- Check the quartz glass for damage.
- Reassemble the whole thing in the reverse order and be sure to install the various components correctly
- Switch on the lamp to check that it works as described above.
6.4. Replacing the UVC tube:

We recommend only having the UVC tube replaced by our qualified personnel.
Damage to the quartz glass piston or the clarifier unit due to improper assembly/disassembly is not covered by the warranty.
Caution! Do not touch UVC tube (3) directly with your hand; put on cotton gloves!
Do not dispose of old, broken UVC tubes in the household waste. Consult your local disposal company. Do not use any sharp-edged tools. If the quartz glass piston or O-rings are faulty, they must always be replaced.
TFP 5000 UV 9:
- Disconnect the UVC clarifier and pump from the power supply and secure them against being switched on again.
- Please observe the above safety measures
- Remove the three screws from the top UVC cover on the filter cover.
- Disassemble the UVC cover after removing the screws.
- Loosen the UVC socket with ballast unit by turning it slightly anti-clockwise (approx. 30^ ).
- Remove the lamp socket, taking care not to lose the O-ring on the quartz piston seat. Do not pull on the power cord in the process.
- Then remove the old UVC tube (3) by gently pulling on the base and replace it with a new original replacement tube (see item 9 "Service"). Make sure that all parts of the UVC unit are dry
- Check the quartz glass for damage.
- Reassemble the whole thing in the reverse order and be sure to install the various components correctly
- Switch on the lamp to check that it works as described above.
TFP 10000 UV 11, TFP 15000 UV 13:
- Disconnect the UVC clarifier and pump from the power supply and secure them against being switched on again
- Please observe the above safety measures
- Remove the four screws from the top UVC cover on the filter cover.
After removing the screws, remove the UVC cover including the lamp socket and ensure that the O-ring on the lamp socket is not lost. Do not pull too hard on the power cord in the process. - Now it is possible to loosen the fixing nut at the beginning of the quartz glass piston and carefully take off the quartz glass piston.
- Then remove the old UVC tube (3) by gently pulling on the base and replace it with a new original replacement tube (see item 9 "Service"). Make sure that all parts of the UVC unit are dry
- Check the quartz glass for damage.
- Reassemble the whole thing in the reverse order and be sure to install the various components correctly
- Switch on the lamp to check that it works as described above.
6.5. Cleaning of the pump
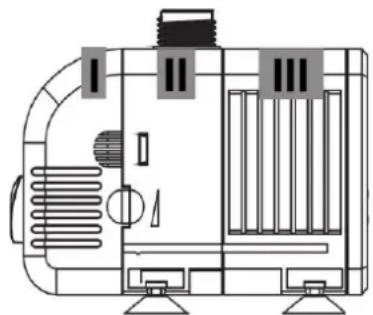
Regular maintenance is recommended, at the latest when the water flow decreases (the following numbers refer to Fig. 7)
- Disconnect the pump from the mains supply!
- Ensure that the filter cap of the pump is not clogged by leaves and dirt deposits; clean it if necessary.
- Press the sides of the front cover (2) and pull it off of the pump.
- Pull the filter sponge out of the filter cover.
- Turn the inflow cover (4) anticlockwise approx. 90^ .
- Make sure that the O-ring (10) is in the recess provided.
- Clean the rotor (8) and motor housing (11) under tap water, remove incrustations and check for wear by holding the shaft and rotating the rotor: the rotation must be regular.
- Reassemble the whole thing in the reverse order and attach the various components correctly.
The pump should be cleaned and kept dry at the end of the season as described in this section.

Winter - maintenance
- Protect your external pond filter from freezing!
- If there is danger of freezing, take the pump out of your garden pond.
- Completely clean the pump as specified in the instructions.
- Store the pump over winter in a frost-free location.

7. Warranty
The present device was manufactured and inspected according to the latest methods. The seller warrants for faultless material and workmanship in accordance with the legal regulations of the country in which the device was purchased. The warranty period begins with the day of the purchase and is subject to the provisions below:
Within the period of warranty, all defects which are to be attributable to defective materials or manufacturing will be eliminated free of charge. Any complaints are to be reported immediately upon their detection.
The warranty claim becomes void in the case of interventions undertaken by the purchaser or by third parties. Damage resulting from improper handling or operation, incorrect setting-up or storage, inappropriate connection or installation or Acts of God or other external influences are excluded from warranty.
Parts subject to wear, such as the UV-C tube, rotor and bearings are excepted from the guarantee. All parts were manufactured using maximum care and high-quality materials and are designed for a long lifecycle. It should be understood, however, that the wear and tear depends on the kind of use, the intensity of use and the internals of maintenance. Complying with the installation and maintenance information contained in the present operating instructions will therefore considerably contribute to a long lifecycle of these wearing parts. In case of complaints, we reserve the option of repairing or replacing the defective parts or replace the entire device. Replaced parts will pass into our property.
Claims for liquidated damages are excluded unless they are caused by willful acts or negligence on the side of the manufacturer.
The warranty does not provide for any claims beyond those referred to above. The warranty claim has to be evidenced by the purchaser in the form of the submission of the sales receipt. The present warranty commitment is valid in the country in which the device was purchased.
Please note:
- Should your device fail to function properly, please verify first whether an operating error or another cause is present which cannot be attributed to a defect of the device.
- In case you have to take or send in your defective device for repair, please be sure to enclose the following documents:
a. Sales receipt (sales slip).
b. A description of the occurring defect (a description as accurate as possible will expedite the repair work).
- In case you have to take or send in your defective device for repair, please remove any attached parts which do not belong to the original condition of the device. If any attached parts of this kind should be missing upon the return of the device, we shall not be liable for them.

8. Ordering spare parts
The fastest, most simple and cheapest way of ordering spare parts is through the internet. On our website (www.tip-pumpen.de) you will find a convenient spare part shop where you can order spare parts with just a couple of clicks. In addition, this is also the place where we publish comprehensive information and valuable tips on our products and accessories, introduce new devices and present current trends and innovations in the range of pump technology.

9. Service
In the case of warranty claims or malfunction, please contact your point of sale.
A current operating manual is available as required as a PDF file via e-mail: service@tip-pumpen.de.
For EC countries only
Do not throw electric appliances in your dustbin!
According to EU guideline 2012/19/EU concerning old electric and electronic appliances and its implementation in national law, such appliances must be collected separately and fed into an environment-friendlyly recycling system. Please consult your local waste management system for advice on recycling.
Chere cliente, cher client,
TFP 10000 UV 11, TFP 15000 UV 13:
TFP 10000 UV 11, TFP 15000 UV 13:
TFP 10000 UV 11, TFP 15000 UV 13:
E-mail: service@tip-pumpen.de
D-74915 Waibstadt
TFP 10000 UV 11, TFP 15000 UV 13:
TFP 10000 UV 11, TFP 15000 UV 13:
TFP 10000 UV 11, TFP 15000 UV 13:
TFP 10000 UV 11, TFP 15000 UV 13:
TFP 10000 UV 11, TFP 15000 UV 13:
TFP 10000 UV 11, TFP 15000 UV 13:
TFP 10000 UV 11, TFP 15000 UV 13:
TFP 10000 UV 11, TFP 15000 UV 13:
TFP 10000 UV 11, TFP 15000 UV 13:
TFP 10000 UV 11, TFP 15000 UV 13:
TFP 10000 UV 11, TFP 15000 UV 13:
TFP 10000 UV 11, TFP 15000 UV 13:
TFP 10000 UV 11, TFP 15000 UV 13:
TFP 10000 UV 11, TFP 15000 UV 13:
- Odvojite UV-C pročistač i pumpu od elektrěne mreže i osigurajte ih od ponovnog uključivanja
- Pridržavajte se gore navedenih sigurnosnih mjera
- Odvrnite Četiri vijka s gornjePokrova UV-C pročistača naPoklopcu filtra.
- Nakon odvrtanja vijaka demontirajePoklopac UV-C procista s grlom svjetiljke i povlačite elektrčni kabel
- Sada mozte otpustiti pritezne matice na poctku stapa od kvarcnog stakla i oprezno izvaditi stap od kvarcnog stakla. Pritom budite oprezni da ne ostete O-prsten
- Oprezno očistite stap od kvarcnog stakla (5) izvana i po potrebi uklonite sve naslage kamenca prikladnim otapalom. Prije montaže temeljito isperite.
- Provjerite postojle li ostecenja na kvarcnom staklu.
- Sve ponovno montirajte obrutim redosljedom i povrinite se za to da su razne komponente ispravno montirane
- Ukljucite svjetiljku kako biste provjerili funkcionalnost na gore opisan način.
6.4. Zamjena UV-C cijevi:

TFP 10000 UV 11, TFP 15000 UV 13:
- Odvojite UV-C pročistač i pumpu od elektrěne mreže i osigurajte ih od ponovnog uključivanja
-
Pridržavajte se gore navedenih sigurnosnih mjera
-
Odvrnite Četiri vijka s gornjePokrova UV-C pročistača naPoklopcu filtra.
- Nakon odvrtanja vijaka demontirajePoklopac UV-C prociasta s grlom svjetiljke i pobrinite se za to da se O-prsten na grlu svjetiljke ne izgubi. Pritom ne povlačite prejak elektrčni kabel.
- Sada możete opustiti pritezne matice na poćetku stapa od kvarcnog stavla i oprezno izvaditi stap od kvarcnog stavla.
Nakon toga demontirajte stare UV-C cijevi (3) laganim povlačenjem za postolje i zamijenite ih novim originalnim rezervnim cijevima (vidi točku 9 „Servisiranje“). Uvjerite se u to da su svi dijelovi UV-C sklopa suhi - Provjerite postojé li ostecenja na kvarcnom staklu.
- Sve ponovno montirajte obrutim redosljedom i povrinite se za to da su razne komponente ispravno montirane
- Ukljucite svjetiljku kako biste provjerili funkcionalnost na gore opisan način.
6.5. Čiśćenje pumpe
Preporucje se redovito održavanje, najkasnije kada se smanzi protok vode (sljedeci brojevi odnose se na sl. 7).
- Postujte sigurnosne mjere. Odvojite crpku od elektricne mreze!
- Pobrinite se za to da lišće i naslage prljavstine ne začepe filtarsku kapicu pumpe, po potrebji je očistite.
- Pritisnite bočno ČeoniPokrov (2) i skinite ga s crpke.
- Okrenite ulazniPoklopac (4) suprotno smjeru kazaljke na satu za oko 90^ .
- Izvadite rotor s rotorskom osovinom i lezajem (8) iz crpke (11).
- Uvjeriti se u to da O-prsten lezi u za to predvidenom izrezu.
- Očistite rotor i kucište motora pod tekučom vodom, uklonite zakorjele ostatke i provjerite istrošenost tak o da Čvsto primite vratilo i okrecefte rotor: okretanje mora biti Jednoliko.
- Sve ponovno montirajte obrutim redosljedom i propisno postavite razne komponente.
Pumpu bi trebalo očistiti na kraju sezone kao što je opisano u ovom odjeliku i spremiti na suho mjesto.

6.6. Zimsko održavanje
- Zašite vanjski jezerski filtrar od zamrzavanja!
U slučaju opasnosti od smrzavanja izvadite crpku iz vrtnog jezerca. - Crpku potpuno očistite prema uputama.
- Spremite crpku preko zime u prostoriju zašićenu od smrzavanja.

7. Jamstvo
Email: service@tip-pumpen.de