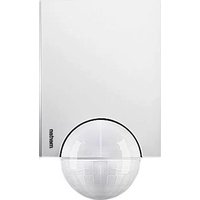
Argus 110 Basic - Motion detector Merten - Free user manual and instructions
Find the device manual for free Argus 110 Basic Merten in PDF.

| Product Type | Passive infrared motion detector |
| Brand | Merten |
| Model | Argus 110 Basic |
| Power Supply | AC 230 V ±10 %, 50 Hz |
| Own Consumption | < 1 W |
| Max. Switching Current | 16 A, AC 230 V, cos φ = 1 |
| Rated Power (Incandescent Lamps) | max. 2000 W |
| Rated Power (Halogen Lamps) | max. 1200 W |
| Rated Power (Fluorescent Tubes) | max. 1200 W (uncompensated) |
| Max. Capacitive Load | 35 µF |
| Detection Angle | 110° (horizontal) |
| Maximum Range | 12 m |
| Detection Area | 360° (inner perimeter), 110° (middle/outer perimeter) |
| Number of Detection Zones | 92 zones with 368 switching segments |
| Recommended Mounting Height | 2.5 m (between 2 m and 3 m) |
| Minimum Mounting Height | 1.7 m |
| Brightness Threshold Adjustment | Continuous from 3 to 1000 lux |
| Adjustable On Time | from 1 s to 8 min (6 levels) |
| Protection Rating | IP 55 (for tilt angle between 15° and 90°) |
| Operating Temperature | Not specified in manual, estimated -20°C to +50°C |
| Dimensions (approx.) | Not specified, estimated diameter 120 mm, height 100 mm |
| Weight (approx.) | Not specified, estimated 200 g |
| Housing Material | UV-resistant plastic (not explicitly specified) |
| Installation | Wall or ceiling mounting with wall junction box |
| Maintenance | Clean the lens with a soft, dry cloth; do not use abrasive products |
| Safety | Installation by a qualified electrician; comply with applicable standards; protection by 16 A circuit breaker |
| Spare Parts / Repairability | Masking segments supplied; mounting bracket optional (ref. 5652917..92/.93); repair by a professional |
Frequently Asked Questions - Argus 110 Basic Merten
User questions about Argus 110 Basic Merten
0 question about this device. Answer the ones you know or ask your own.
Ask a new question about this device
Download the instructions for your Motion detector in PDF format for free! Find your manual Argus 110 Basic - Merten and take your electronic device back in hand. On this page are published all the documents necessary for the use of your device. Argus 110 Basic by Merten.
USER MANUAL Argus 110 Basic Merten
Operating instructions 12
What you can do with the ARGUS 110/220 Basic
What you can do with the ARGUS 110/220 Basic
The ARGUS 110 Basic and ARGUS 220 Basic (hereafter called ARGUS) is an electronic movement detector for inside and outside use. It registers moving sources of heat, such as people, within a defined range (Figure
0
Inner security zone: area of detection 360^ , radius approx. 4 m.
Middle security zone:
Angle of detection 110^ ARGUS 110or 220^ ARGUS 220),area of detection approx. 9m× 18m
Outer security zone:
Angle of detection 110^ (ARGUS 110) or 220^ (ARGUS 220), area of detection approx. 12m × 24m .

Note:The specified ranges refer to average conditions and a mounting height of 2.5 m and should therefore be taken as guide values. The range can vary greatly depending on the weather.
The ARGUS switches a connected load whenever it detects a movement. These could be ohmic loads (e.g., 230 V incandescent and halogen lamps, capacitive loads (e.g., electronic transformers) or inductive loads (e.g., low-voltage halogen lamps with inductive transformer).
The various connection options are described in the section 'How to install the electrical connection', -

Note:The ARGUS is not suitable for use as a component of an alarm system since it is supplied from the mains and will switch the connected alarm whenever the mains supply fails and recovers, regardless of whether or not a movement is detected (false alarm).
12
How to choose an installation site
How to choose an installation site
Figure 2
Mounting height: between 2 m and 3 m, optimal is 2.5 m on a solid and flat surface.
Distance from sources of optical interference: approx. 5-6 m
If the luminaire to be switched is located within the area of detection of the ARGUS, there should be a distance of at least 5 m between the ARGUS and the luminaire. Mount the luminaire above the ARGUS, not below it. Otherwise, use the segments provided to shade it (see the section 'How to mask individual areas').
For optimum movement detection, mount the ARGUS sideways to the direction of motion (Figure 3).
The ARGUS has protection type IP 55 and is therefore suitable for use in outdoor areas as well. To make sure that the lighting is not switched on by environmental influences, you should make sure that the ARGUS is sheltered from rain and direct sunlight (for example, raindrops running down the lens could cause the movement detector to be switched)
(Figure 4)
Further information can be found in the 'Merten Technical Information', in the section 'ARGUS movement detector'.
How to mount the ARGUS
Risk of electrocution.
The ARGUS may only be installed and connected by skilled electricians. Please observe the relevant regulations in your own country.
Caution: if installation is not carried out correctly, water can penetrate into the ARGUS and damage it. Always mount the ARGUS with the spherical head pointing downwards.
13
How to mount the ARGUS
Installing several ARGUS devices:
To ensure complete coverage, position the individual movement detectors so that their detection areas overlap (Figure ①).
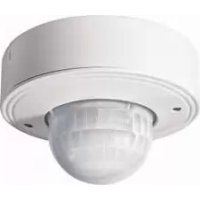
Mounting the ARGUS on the ceiling:
Figure 6
To mount on the ceiling, turn the sensor head as follows (change the direction of rotation when you have turned it as far as the stop):
Turn the sensor head upwards as far as it will go (A).
Turn the sensor head clockwise as far as it will go ③.
Align the sensor head ⑤:
Caution: If not installed correctly, the ARGUS can be damaged by condensation.
If the ceiling is inclined, always mount the ARGUS with the sphere facing downwards, so that condensation water can drain.
Mount the ARGUS at an angle of incineration of between 15^ and 90^ ; otherwise, protection type IP 55 is not guaranteed.
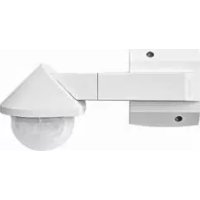
Mounting the ARGUS on inner/outer corners or on fixed pipes.
Figure 7: You can attach the ARGUS to inner/outer corners or fixed pipes using the Merten mounting bracket, art. no. 565291/1.92/.93. The connecting cable can be fed into the device from behind through the mounting bracket.
Mounting the ARGUS in wall connection boxes:
Figure 8:
In order to lead the connecting cable into the back of the device from above, attach the four spacers supplied to the wall-mounting bracket.
14
How to install the electrical connection
(2) Feed in the connection cable:
from behind:
- push the rubber sleeves supplied over the stripped connecting cable.
from below:
- cut the rubber insert supplied according to the cable thickness.
- Insert the rubber insert into the wall connection box
- Push through the connection cable
③ Mount the wall connection box using the screws supplied.
How to install the electrical connection
Note: Fuse the ARGUS using a 16 A automatic circuit-breaker
Figure 9
① Strip the connecting cable insulation by a length of 14 mm.
② Insert the external conductor into terminal "L"
Insert the neutral conductor into terminal N
4 Insert the connected external conductor into terminal
'Through-wiring' to other loads is permitted.
Note When switching inductive loads such as transformers, relays, contactors or fluorescent lamps, spikes occur which could lead to the load being switched on again (maintained light effect). Connect a capacitor (542895) parallel to the inductive load in order to reduce these spikes.
15
How to install the electrical connection
Installation options (Figure 9):
ARGUS constantly connected to the mains.
ARGUS monitors its area constantly.
ARGUS combined with two-way switch
depending on the switch position, either maintained light or automatic mode.
ARGUS combined with break contact
ARGUS is always ready for operation. By pressing the push-button (the power is briefly disconnected for 2-3 seconds), the ARGUS is switched on for the set time. Every further movement increases the switching duration.
ARGUS in parallel:
several ARGUS devices working together can switch a lamp group if the maximum switching capacity of one device is not exceeded. To achieve this, you must reduce the sensitivity of the devices. For technical and functional reasons, we do not advise forming larger device groups using more than four ARGUS devices.
ARGUS combined with two-circuit switch
depending on the switch position, either automatic mode or 'OFF'.
In position A, the luminaire is switched on by the ARGUS
automatic) and in position B, it is switched on continuously (manual).
ARGUS parallel to the staircase timer.
either the ARGUS or the staircase timer switches the lights on for a certain period.
How to mount the ARGUS upper section
How to mount the ARGUS upper section
Figure 10
① Place the ARGUS upper section onto the connection box and fasten it using the two screws provided (A). The electrical connection from the terminal box to the pins is established automatically when the screws are tightened.
② Position the cover plate at the markings on the side, and guide it upwards (B).
How to put the ARGUS into operation
Figure 10
① Connect the supply voltage
The load is switched on for approx. 10 s or for the set period The functional display lights up for approx. 10 s.
Using operating elements:
All settings, such as sensitivity and switching time, can be adjusted using the ARGUS operating elements: these are located underneath the cover plate, which protects them. To open:
Push up the cover plate until you feel it hit the stop (approx. 5 mm) and pull it off.
ARGUS displays and operating elements:
Figure 12
Functional display: lights up whenever movement is detected
B Brightness sensor: must not be covered
Setting the brightness threshold
Setting the switching duration
17
How to put the ARGUS into operation
Setting the ARGUS for the function test:
Set brightness threshold (Figure 1) to daytime operation (sun symbol/light stop).
② Set the switching duration (Figure 12) to 1 s (left stop).
Aligning the ARGUS:
Figure 13: Align the sensor head with the area to be monitored (change the direction of rotation when you have turned it as far as the stop).
Step from the edge of the detection area into it (Figure 5) to check whether the ARGUS switches the load and the functional display as required.
Setting the brightness threshold:
Here (Figure 12) you can infinitely adjust the ambient brightness level at which movements should be detected and a switching procedure should be triggered.
Set the brightness threshold (Figure 16):
- Right stop (sun symbol): Day and night operation (approx. 1000 lux), all movements in the area of detection will be detected, independent of the external brightness.
- Left stop (moon symbol): Night operation lapprox, 3 luxi, movements will only be detected in the hours of darkness.
Setting the switching duration:
Here (Figure 10) you can set how long the loads connected to the ARGUS remain switched on for. When the ARGUS detects a movement, the load (e.g. ceiling light) is switched on and stays switched on until the set period has elapsed. Every further movement restarts the switching duration.
18
How to mask individual areas

Note: The ARGUS ignores the light-sensitive switch after the load has been switched on. If the movement detector does not switch the load off again, the reason is probably that the ARGUS has detected further movements and has restarted the switching duration several times.
① Set the switching duration (Figure 1): - Left stop: switching duration approx. 1 s - Right stop: switching duration approx. 8 min
How to mask individual areas
If there are sources of interference in the area of detection of the ARCUS, e.g. trees, shrubs or light sources, and these accidentally trigger the switching of the load, you can mask these areas using the segments supplied (Figure 16):
① Place the inserts exactly on those areas of the sensor head (S) which should be masked from detection, and press them onto the sensor head (R).

Note:The twilight sensor at the front must not be covered by segments, since this reduces the light sensitivity.
Technical data

Caution Operation only possible with sinusoidal mains voltages. Phase control dimers or inverters with square-wave or trapezoidal voltage curves will damage the device.
Mains voltage: AC 230 V ±10%, 50 Hz.
Fuse the ARGUS using a 16 A automatic circuit-breaker.
16 A, AC 230 V, cos φ = 1
Max. switching current: Nominal capacity:
Incandescent lamps AC 230 V:
max. 2000 W
Halogen lamps AC 230 V: max. 1200 W
19
Technical data
Fluorescent lamps
AC 230 V: max. 1200 W, uncompensated
Capacitive load: max. 35 F
Power consumption: < 1W
Connecting terminals: for 2 × 1.5 ~mm^2 or 2 × 2.5 ~mm^2 rigid conductor, stripped length 14 ~mm
External diameter of a
cable: max. 14.5
Area of detection: 110^ (Argus 110) / 220^ (Argus 220)
Range: max. 12 m
Number of levels:
Number of zones:
ARGUS 110:92 zones with 368 switching segments ARGUS 220:112 zones with
448 switching segments
1.7 m
Minimum mounting height:
Recommended mounting
height
Light sensor:
2.5m
infinitelyadjustableexternally
approx. 3-1000 lux
Switching duration:
can be set externally at 6 levels
approx, 1 s -approx, 8 min
Possible settings for sensor
head
Wall mounting:
Ceiling mounting:
9° up, 24" down, 12" left/right, ±12" axial
4^ up, 29^ down, 25^ left/right, ± 8.5^ axial
IP 55 at an angle of inclination from 15^ to 90^
EC guidelines:
Low-voltage guideline 73/23/EEC and
EMC guideline 89/336/EEC
20
Technical data
21
directive CEM 89/336/CEE.
51