WLC003 - Camera Perel - Free user manual and instructions
Find the device manual for free WLC003 Perel in PDF.
| Product type | Trail camera (surveillance camera) |
| Brand | Perel |
| Model | WLC003 |
| Dimensions | 136 x 90 x 76 mm |
| Weight | 360 g |
| Power | 4 AA/LR6 batteries (expandable to 8) or 6 V 2 A mains adapter (not included) |
| Protection rating | IP66 |
| Image sensor | 8 MP |
| Photo resolution | 16 MP (interpolated), 12 MP (interpolated), 8 MP, 5 MP, 3 MP |
| Video resolution | 1920x1080 (25 fps), 1280x720 (30 fps), 720x480, 640x480, 320x240 |
| LCD screen | 2.4" TFT |
| Memory | TF card (microSD) class 6 or higher, max. 32 GB |
| IR flash range | 20 m |
| PIR detector range | 20 m |
| Detection angle | 60° frontal + 120° lateral |
| Trigger time | 0.45 s |
| Trigger interval | 5 s to 60 min |
| Programmable video length | 3 s to 10 min |
| Operating temperature | -20 °C to +60 °C |
| Storage temperature | -30 °C to +70 °C |
| Main functions | Photo and video capture, motion detection, IR night vision, time-lapse, password protection |
| Maintenance | Clean the lens with a soft, dry cloth. Use an odorless insecticide outdoors. Store in a dry place. |
| Safety | Do not expose to excessive moisture. Use good quality batteries. Do not open the housing. |
| Spare parts and repairability | Original accessories available from Velleman. Repair by a professional only. |
Frequently Asked Questions - WLC003 Perel
User questions about WLC003 Perel
0 question about this device. Answer the ones you know or ask your own.
Ask a new question about this device
Download the instructions for your Camera in PDF format for free! Find your manual WLC003 - Perel and take your electronic device back in hand. On this page are published all the documents necessary for the use of your device. WLC003 by Perel.
USER MANUAL WLC003 Perel
To all residents of the European Union Important environmental information about this product
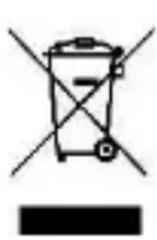
This symbol on the device or the package indicates that disposal of the device after its lifecycle could harm the environment. Do not dispose of the unit (or batteries) as unsorted municipal waste; it should be taken to a specialized company for recycling. This device should be returned to your distributor or to a local recycling service.
Respect the local environmental rules.
If in doubt, contact your local waste disposal authorities.
Thank you for choosing Perel! Please read the manual thoroughly before bringing this device into service. If the device was damaged in transit, don't install or use it and contact your dealer.
2. Safety Instructions

Read and understand this manual and all safety signs before using this appliance.
- This device can be used by children aged from 8 years and above, and persons with reduced physical, sensory or mental capabilities or lack of experience and knowledge if they have been given supervision or instruction concerning the use of the device in a safe way and understand the hazards involved. Children shall not play with the device. Cleaning and user maintenance shall not be made by children without supervision.
- This device is intended only for recording digital photos and videos, particularly for observing wildlife. It is not intended for any other use or for uses extending beyond those stated. This device is not intended for use in commercial or industrial environments.
WLC003
- When used outdoors, bad weather conditions or rapid changes in the weather could lead to errors in recording or faulty images.
- Insert the memory card before powering on the camera. The camera has no internal memory for saving images or videos and will not work if there is no memory card installed.
- Unlock the write protection before inserting the memory card.
- Do not insert or take out the memory card when the camera is switched on.
- It is recommended to format the memory card when used for the first time. Many memory cards formatted by other cameras have poor compatibility with different brands of cameras.
- When setting up the camera, allow approximately 10 to 20 seconds for the camera to acquire a signal.
- In setup the camera will shut down automatically after 3 minutes if no operation is done. Please turn on the power again to re-activate the camera.
3. General Guidelines
Refer to the Velleman® Service and Quality Warranty on www.VELLEMAN.eu.
- All modifications of the device are forbidden for safety reasons. Damage caused by user modifications to the device is not covered by the warranty.
- Only use the device for its intended purpose. Using the device in an unauthorised way will void the warranty.
- Damage caused by disregard of certain guidelines in this manual is not covered by the warranty and the dealer will not accept responsibility for any ensuing defects or problems.
- Nor Velleman nv nor its dealers can be held responsible for any damage (extraordinary, incidental or indirect) - of any nature (financial, physical...) arising from the possession, use or failure of this product.
- Keep this manual for future reference.
4. Overview
Refer to the illustrations on page 2 of this manual.
Camera
| 1 | display |
| 2 | menu |
| 3 | playback |
| 4 | left |
| 5 | up/video |
| 6 | down/capture |
| 7 | right |
| 8 | shot |
| 9 | OK |
| 10 | speaker |
| 11 | card slot |
| 12 | AV jack |
| 13 | USB jack |
| 14 | mode |
| 15 | IR LEDs |
| 16 | lens |
| 17 | front sensor |
| 18 | lateral sensor |
Tripod
| 1 | screw |
| 2 | locking nut |
| 3 | pivot bolts |
| 4 | drill holes |
| 5 | hex screw |
| 6 | wall plugs |
| 7 | screws |
5. Installation
5.1 Mounting on Concrete
- Choose an appropriate installation location:
○ Ensure that there are no electric lines, water or heating pipes installed at the proposed drilling location.
- The supplied wall plugs are only suitable for mounting on concrete and stone. Before starting the installation, please check your installation location carefully for its suitability for the plugs.
The recommended installation height is between 1 and 2m above the ground.
The assembly material used must be suitable for the respective location. If in doubt, consult a professional.
- Mark the drill holes using the wall bracket.
- Use a drill with a 6 mm drill bit to drill the required holes. Insert the wall plugs flush with the wall.
WLC003
- Screw the wall bracket to the wall using the supplied screws.
- Mount the camera on the tripod screw. Turn the camera in the desired direction and lock it with the lock nut.
- To align the camera into its final position, undo the two pivot bolts a little, align the camera and fix the position by tightening the two pivot bolts (see below for more information).
5.2 Alternate Mounting
Use the included mounting belt to fix the camera around a tree trunk.
5.3 Powering

WARNING - Do not puncture batteries or throw them in fire as they may explode. Do not attempt to recharge non-rechargeable batteries (alkaline). Dispose of batteries in accordance with local regulations. Keep batteries away from children.
- Open the camera and remove the battery cover. Install the batteries following to the correct polarity.
- If the camera is low on power, please connect the camera to a power adapter (not included, see technical specifications).
5.4 Inserting the Memory Card

Install the memory card before switching on the camera.
Unlock the write protection and insert a formatted memory card into the card slot. Do not force to avoid damaging the card. We recommend using a TF card, class 6 or higher, max. 32 GB.
At first use, wait for the memory card to reach ambient temperature. Therefore, the camera may present some delay.
To avoid damage, protect memory card from water, strong vibrations, dust, hot sources and direct sunlight.
Note that, if the memory card is full, the camera will stop recording automatically and the LEDs will go out.
5.5 Peripheral Connection
You can allow the camera to transfer the video signal to an external monitor or a television.
- Connect the camera to a monitor using the included AV cable.
- Switch on the monitor and set it to AV mode.
- Switch on the camera and proceed to test the system.
- Once connection is successful, the camera will enter playback mode and the screen turns black. The image will be shown on the monitor.
6. Operation
6.1 System Setup and Test
- Slide the mode switch to the TEST position.
- Press video or capture to switch between these two modes.
- Press menu to enter or to exit the setup menu.
- Press up or down to navigate through the menu or options, and press OK to confirm.
6.2 Aligning the Camera
Set the optimum exposure angle on the camera. Consider whether the use of the lateral motion sensors may be useful for attaining the desired observation results. You can activate or deactivate these sensors at all times.
- After having installed the camera, switch on the camera and move slowly from one side of the target area to the other. While doing this, monitor the motion display.
- If the LEDs turn blue, you are detected by one of the activated lateral sensors. If the LEDs red, you are detected by the front motion sensor. By this way you can align the camera to the best angle and distance.
6.3 Basic Working Mode
Slide the switch to the on position. After 15 seconds the camera will enter the standby mode.
When a motion is detected, the camera take photos or record video automatically according to the settings.
6.4 Basic Settings
Mode
Slide the mode switch to the on position and select the working mode. In capture mode, the camera will take pictures only. In video mode, the camera will record. In capture + video mode, the camera will take a picture first and then record.
Options: Photo Video Photo & Video
Photo Resolution
Set the still image resolution.
Options: 16MP 12MP 8MP 5MP 3MP
Photo Series
Set the number of continuous photo capturing. In photo mode, the camera will take photos continuously.
Options: 1 photo 2 photos in series 3 photos in series
Video Resolution
Set the video resolution. The bigger the resolution, the longer the video which can be stored.
Options: 1920x1080P 1280x720P 720x480P 640x480P 320x240P
TL Video Resolution
Set the time-lapse video resolution.
Options: 2592 × 1944P 2048 × 1536P
Video Length
Set the recording duration of a video clip.
Options: 3 s to 10 min
Audio Recording
Select this option to add audio to a video.
Options: On Off
Shot Lag
Set the recording delay time after the motion detection. Within the selected time, the camera will not record any image or video.
Options: 5 s to 60 min
IR Distance
Set the distance of IR induction.
Options: Near Middle Far
Side Motion Sensors
Switch the lateral motion sensors on or off.
Options: On Off
Motion Sensor Sensitivity
Set the sensitivity of the sensors.
| Recording environment | Recommended setting |
| indoor | low |
| outdoor, normal conditions | middle |
| outdoor, difficult conditions | high |
| outdoor, low temperatures | low |
| outdoor, mild temperatures | high |
Options: Low Middle High
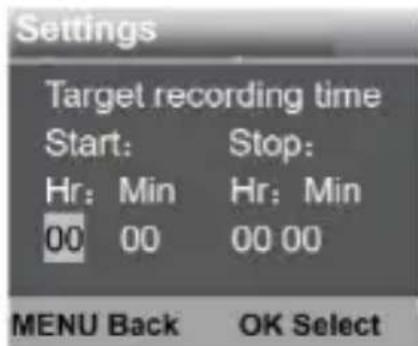
Target Recording Time
When setting a target recording time, the camera will only record in the set time slot.
Options: On Off
WLC003
Time Lapse
Normal: The camera will take pictures automatically as per set time interval. Example: Set the interval time to 1 hour. The camera will take a photo each hour.
TL Video: Set the interval time from 1 second to 24 hours. Example: Set the interval to 1 hour, the camera will take a photo each hour. These photos will be converted into a video.
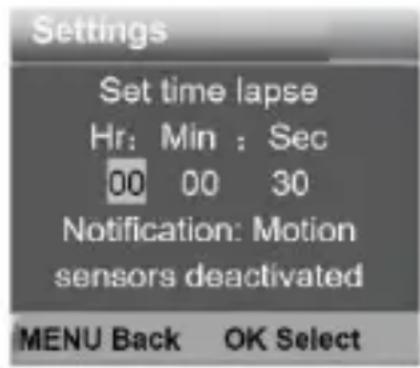
Off: Close the time lapse function.
Language
Options: English German Spanish French Italian Dutch Portuguese
Time/Date
Set the time (12 or 24 h) and date (dd/mm/yyyy, yyyyMMdd or mm/dd/yyyy) on the camera.
Options: Set Time&Date Time Format Date Format
Photo Stamp
Display the time and date on the captures.
Options: Time&Date Date Off
Password Protection
Secure the camera with a password of four digits from 0 to 9. When you cannot remember the password, please reset the camera to reset all parameters to the factory settings.
Options: On Off
WLC003
Beep
Activate or deactivate the beep when pressing a button.
Options: On Off
Format Memory Card
Formatting the memory card will delete all data permanently. Format the memory card before using a new memory card or a card that has been used in another device previously.
Options: Yes No
Serial No
Set the unique serial number for the camera. Choose a four-digit number, each digit ranging from 0 to 9 or from A to Z.
Options: On Off
Reset Settings
Restore the camera to factory default settings including password, serial number, etc.
Options: On Off
Version
Firmware information of the camera.
6.5 Additional Functions
Taking Photos, Recording Video and Playback
Slide the mode switch to the test position.
- Taking photos: Press the capture button to switch to the capture mode. Press the shot button to take a picture.
- Recording video: Press the video button to switch to the video mode. Press the shot button to start recording, press again to stop recording.
- Playback: Press the playback button to switch to the playback mode. Press up or down to select the picture or video. Press OK to start the playback, press again to pause, press the menu button again to stop the playback. Press the playback button to exit the playback mode.
Deleting Current/All File(s)
Options: Cancel Delete
Slide Show
Captures can be played in a slideshow. Press OK to stop the slideshow.
Write Protection
Lock or unlock the file as desired.
Options: Write-protect Current File Write-protect All Files Unlock Current File Unlock All Files
Night Mode
With insufficient ambient light, the IR LEDs will turn on automatically to provide necessary light. However, reflective objects such as traffic signs can cause overexposure if they are located within the recording range. Therefore, pictures taken in night mode may be blurry.
Also, make sure to provide the camera with adequate voltage when recording in night mode. Low voltage may cause instable recording results.
6.6 Downloading Files onto a Computer
Memory Card
- Insert the memory card into the card reader of your computer.
- Open the File Explorer on your computer and double-click on the removable memory card.
- Copy the files from the memory card to your computer.
Connecting the Camera to your Computer
- Connect the camera to your computer using the included USB cable. Switch on the camera and locate the appliance as MSDC.
- Open the File Explorer on your computer and double-click on the removable appliance. The files are stored in the DCIM folder.
- Copy the files from the memory card to your computer.
7. Care and Maintenance
Maintenance
- Be aware of pests nesting in the camera. A camera used outdoors is prone to insects slipping inside the interior of the camera. These pests might cause damage. Consider spraying the camera with odourless insecticide before setting up.
WLC003
- Keep all parts dry. While the camera is made to be waterproof, humidity can still damage the electronics. It is recommended to install the camera under a shelter.
Cleaning
- Keep the lenses clean for the best results. Occasionally wipe with a damp cloth to keep it looking new. Do not use harsh chemicals, cleaning solvents or strong detergents.
- Wipe all exterior surfaces of the appliance clean with a soft cloth dampened with a soap and water solution. Do not immerse or submerge any part of the appliance in water or any other liquid. Never use solvents or cleaning agents containing petroleum (petrol, kerosene, oil), paint thinner, turpentine, alcohol, or ammonia.
Storage
- Store the appliance and its accessories in its original package in a clean and dry area.
8. Technical Specifications
power supply 4 x 1.5 V AA/LR6, expendable to 8 x 1.5 V AA/LR6 (not incl.) external 6 V power supply, min. 2 A image sensor . 8 MP video clip 1920 x 1080 / 25 fps (interpolated) 1280 x 720 / 30 fps 720 x 480 / 30 fps 640 x 480 / 30 fps 320 x 240 / 30 fps still image size 16 MP . 4608 x 3456 (interpolated) 12 MP . 4000 x 3000 (interpolated) 8 MP . . . . . . . . . . . . . . . . . . . . . . . . . . . . . . . . . . . . . . . . . . . . . . . . . . . . . . . . . . . . . . . . . . . . . . . . . . . . . . . . . . 5 MP .. 2592 x 1944 3 MP .. 2048 x 1536 IP rating.. IP66 file format... JPG/AVI lens angle.. f=3.3mm - F/NO1.8 - FOV=100° - auto IR filter LCD display.. 2.4" TFT
WLC003
memory
external TF card, class 6 or higher, max. 32 GB
internal 8 M x 16 SDRAM
IR LEDs 46x 850 nm
IR flash range 20 m
triggering distance 20 m
PIR sensing angle . main PIR 60^ + side PIR 120^
triggering time 0.45 s
programming trigger interval 5 s-60 min
programmable video length 3 s-10 min
shooting distance
daytime 1.5 m-infinite
nighttime 1.5 m-20 m
adjustable time lapse 3s-24 h
operating temperature -20 °C to +60 °C
storage temperature -30 °C to +70 °C
dimensions 136 x 90 x 76 mm
weight 360g
Use this device with original accessories only. Velleman nv cannot be held responsible in the event of damage or injury resulting from (incorrect) use of this device. For more info concerning this product and the latest version of this manual, please visit our website www.VELLEMAN.eu. The information in this manual is subject to change without prior notice.
© COPYRIGHT NOTICE
The copyright to this manual is owned by Velleman nv. All worldwide rights reserved. No part of this manual may be copied, reproduced, translated or reduced to any electronic medium or otherwise without the prior written consent of the copyright holder.
HANDLEIDING
1. Inleiding
Opties: 2592x1944P → 2048x1536P
video-length
8. Specifications techniques
diody LED IR. 46x 850 nm
zasieg bplysku IR 20 m
Opçoes: 16MP → 12MP → 8MP → 5MP → 3MP
Serie de Fotos
Imported for PEREL by Velleman nv
Legen Heirweg 33, 9890 Gavere, Belgium
www.velleman.eu