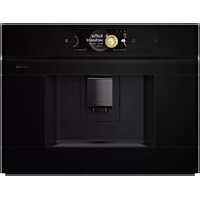
HEZCMT3050 - Coffee maker BOSCH - Free user manual and instructions
Find the device manual for free HEZCMT3050 BOSCH in PDF.
| Feature | Details |
|---|---|
| Product type | Cooking accessory |
| Compatibility | Compatible with Bosch cooking appliances |
| Material | Stainless steel |
| Dimensions | Specific dimensions not provided |
| Weight | Specific weight not provided |
| Usage | Facilitates cooking and food preparation |
| Maintenance | Hand washing recommended |
| Safety | Use according to manufacturer\'s instructions |
| Warranty | Limited warranty according to manufacturer\'s conditions |
| Additional information | Check compatibility with your appliance before purchase |
Frequently Asked Questions - HEZCMT3050 BOSCH
User questions about HEZCMT3050 BOSCH
0 question about this device. Answer the ones you know or ask your own.
Ask a new question about this device
Download the instructions for your Coffee maker in PDF format for free! Find your manual HEZCMT3050 - BOSCH and take your electronic device back in hand. On this page are published all the documents necessary for the use of your device. HEZCMT3050 by BOSCH.
USER MANUAL HEZCMT3050 BOSCH
Important Safety Instructions. 2
Installation with a Warming Printer 3
Before You Begin. 3
General Dimensions 3
Cabinet Cutout Dimensions. 3
Flush Install Dimensions. 4
Installation with a Warming Printer 4
Stand-Alone Installation. 8
Before You Begin 8
General Dimensions. 8
Cabinet Cutout Dimensions. 8
Flush Install Dimensions. 9
Stand-Alone Installation. 9
Safety
Definitions
WARNING
This indicates that death or serious injuries may occur as a result of non-observance of this warning.
CAUTION
This indicates that minor or moderate injuries may occur as a result of non-observance of this warning.
NOTICE: This indicates that damage to the appliance or property may occur as a result of non-compliance with this advisory.
Note: This alerts you to important information and/or tips.
This Bosch® appliance is made by
BSH Home Appliances Corporation
1901 Main Street, Suite 600
Irvine, CA 92614
Questions?
1-800-735-4328
www.bosch-home.com/us
We look forward to hearing from you!

IMPORTANT SAFETY INSTRUCTIONS
READ AND SAVE THESE INSTRUCTIONS
INSTALLER: Please leave these instructions with this unit for the owner. Show the owner the location of the circuit breaker or fuse. Mark it for easy reference.
OWNER: Please retain these instructions for future reference.
WARNING
When properly cared for, your new appliance has been designed to be safe and reliable. Read all instructions carefully before use. These precautions will reduce the risk of burns, electric shock, fire and injury to persons. When using kitchen appliances, basic safety precautions must be followed, including those in the following pages.
WARNING
DO NOT repair or replace any part of the appliance unless specifically recommended in the manuals. Improper installation, service or maintenance can cause injury or property damage. All other servicing should be done by an authorized servicer.
WARNING
State of California Proposition 65 Warning:
This product can expose you to chemicals including vinyl chloride, which is known to the State of California to cause cancer and birth defects or other reproductive harm. For more information go to www.P65Warnings.ca.gov.
APPLIANCE HANDLING SAFETY
CAUTION

It is recommended to have two installers to install the coffee maker. Failure to do so may result in property damage or personal injury.
Hidden surfaces may have sharp edges. Use caution when reaching behind or under appliance.
It is the responsibility of the owner and the installer to determine if additional requirements and/or standards apply to specific installations.
ELECTRIC SAFETY
Before you plug in an electrical cord, be sure all controls are in the OFF position.
For appliances equipped with a cord and plug, DO NOT cut or remove the ground prong. It must be plugged into a matching grounding type receptacle to avoid electrical shock. If there is any doubt as to whether the wall receptacle is properly grounded, the customer should have it checked by a qualified electrician.
If required by the National Electrical Code (or Canadian Electrical Code), this appliance must be installed on a separate branch circuit.
Be sure your appliance is properly installed and grounded by a qualified electrician. Installation, electrical connections and grounding must comply with all applicable codes.
RELATED EQUIPMENT SAFETY
Remove all tape and packaging before using the appliance. Destroy the packaging after unpacking the appliance. Never allow children to play with packaging material.
Never modify or alter the construction of the appliance. For example, do not remove leveling legs, panels, wire covers or anti-tip brackets/screws.
GROUNDING INSTRUCTIONS
WARNING
Improper grounding can result in a risk of electric shock.
This appliance must be grounded. In the event of an electrical short circuit, grounding reduces the risk of electric shock by providing an escape wire for the electric current. This appliance is equipped with a cord having a grounding wire with a grounding plug. The plug must be plugged into an outlet that is properly installed and grounded.
Installation with a Warming Printer
Before You Begin
Trim Kits
Trim kits are designed for use ONLY with the Built-in Coffee Maker models BCM8450UC.
IMPORTANT: The Built-in Coffee Maker installation instructions can be found in the Built-in Coffee Maker Assembly. The coffee maker must be installed according to the instructions in the Installation Instructions. If the instructions are not followed, this may result in unsatisfactory installation or unit performance.
Tools Needed
- Phillips head screwdriver
- Torx T-20 screwdriver
- Measuring tape
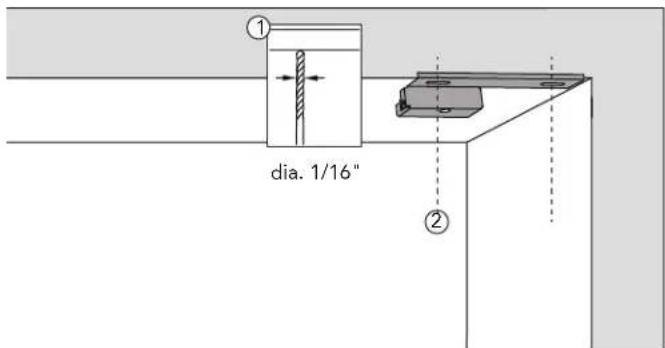
- Drill with bits (1/16")
Screws Included with the Coffee Maker Trim Kit
8x
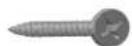
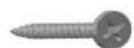
8 × 34 " Wood Screw (Phillips)
7x
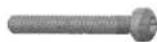
M4 × 25mm Screw (T20 Torx)
14x

10 x 1/2 Screw (T20 Torx)
Items Used Included with BCM8450UC Coffee Maker
1x

Spacer
4x
Shims
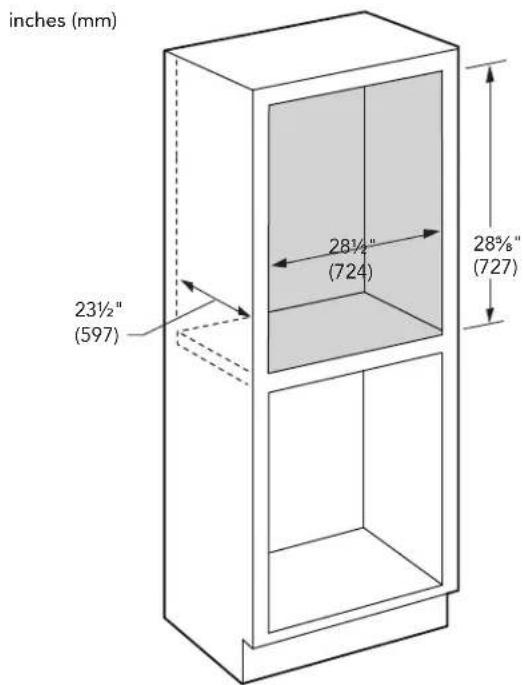
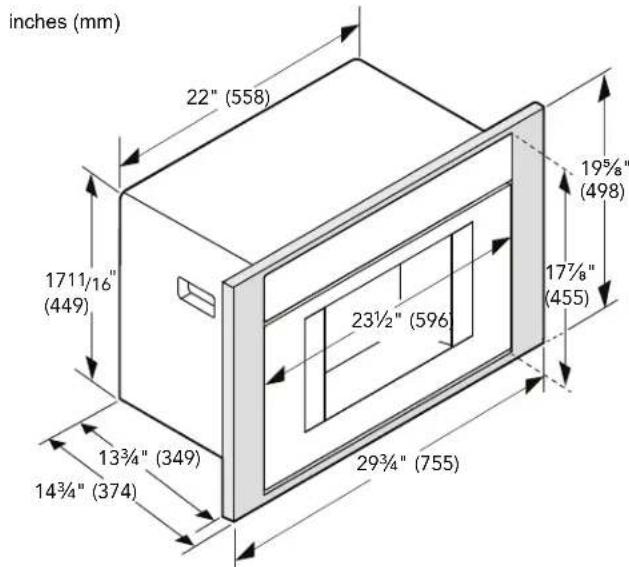
General Dimensions

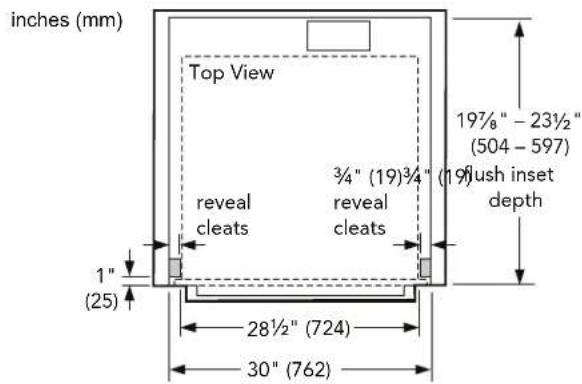
Cabinet Cutout Dimensions
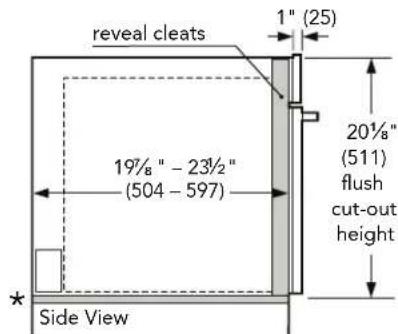
Flush Install Dimensions
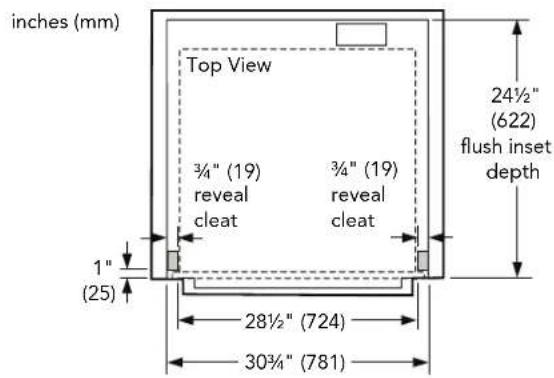
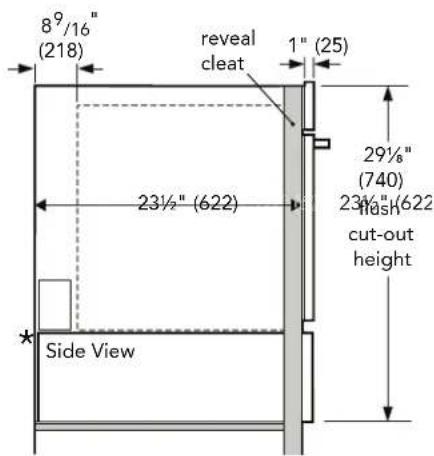
NOTE: * Flush installation requires a 5/16" (8 mm) high x 2812'' (724 mm) wide × 2212'' (571 mm) deep baseplate underneath the unit body.
Installation with a Warming. Drawer
Mounts above a HWD5051UC Warming Printer.
- Install Warming Printer according to the Warming Printer Installation Instructions.
- Install the Left Cabinet Mounting Bracket at the top left of the cabinet opening using two (2) 3/4'' Phillips head wood screws. Ensure the bracket is flush to the cabinet side and cabinet face.
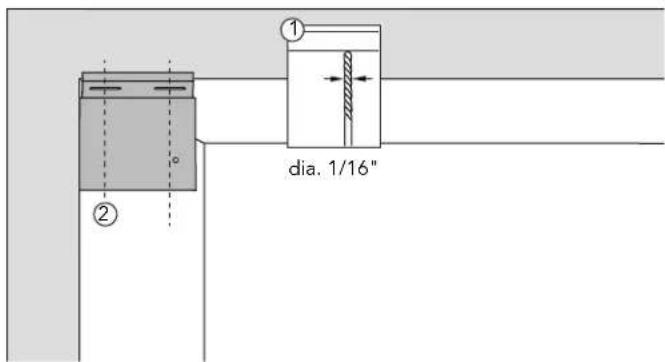
3. Install the Right Cabinet Mounting Bracket at the top right of the cabinet opening using two (2) 34 Phillips head wood screws. Ensure the bracket is flush to the cabinet side and cabinet face.
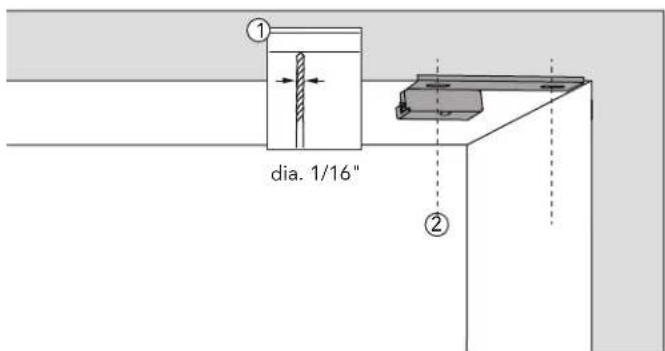
- Measure 112'' (38 mm) from top edge of warming drawer and make mark on both sides of cabinet.
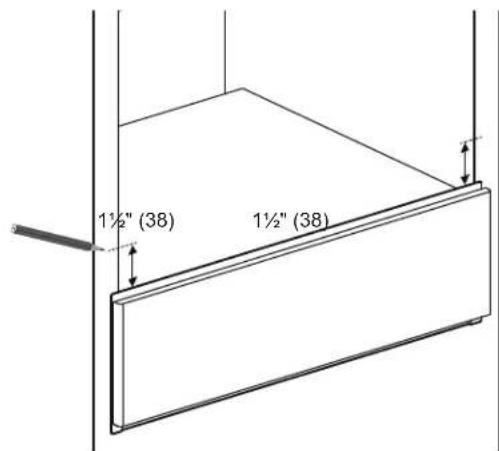
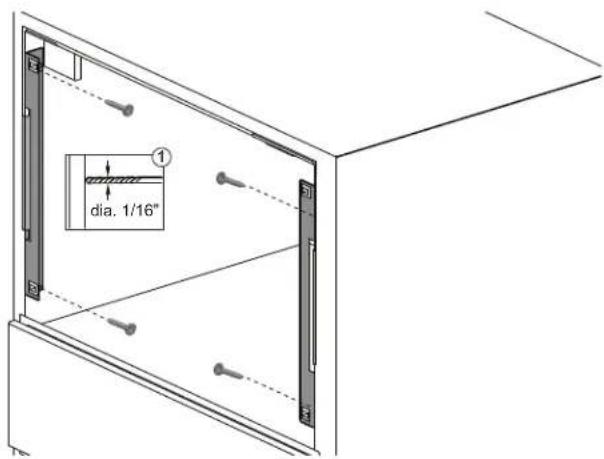
- Install the Left and Right Side Cabinet Brackets flush to the cabinet face with two (2) 3/4'' Phillips head wood screws per side. Install side trim mounting bracket so that the bottom edge of the bracket is aligned with the pencil mark.
- Secure the Left Side Mounting Bracket to the Left Side Warming Printer Clearance Bracket using three (3)× 1 / 2^ T-20 Torx head screws.
- Secure the two (2) Warming Printer Clearance Brackets to the top of the installed warming printer using the outer holes with six (6) 1/2'' T-20 Torx head screws.
- Secure the Left Side Mounting Bracket to the Left Cabinet Mounting Bracket using one (1) 12 T-20 Torx screw.

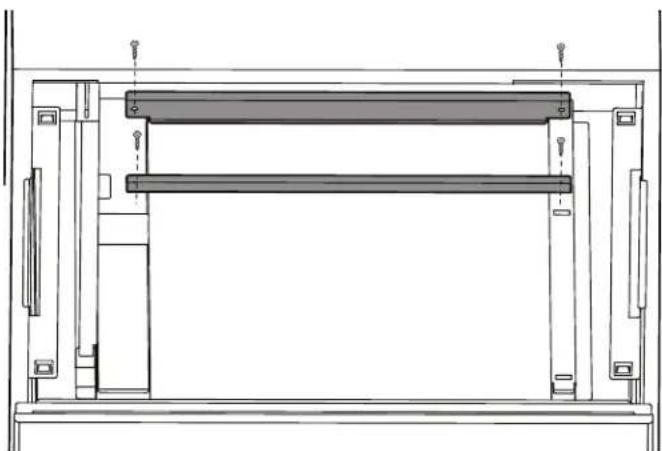
- Secure the two (2) Transformer Support Brackets to the Warming Printer Clearance Brackets with four (4) 12 T-20 Torx head screws.
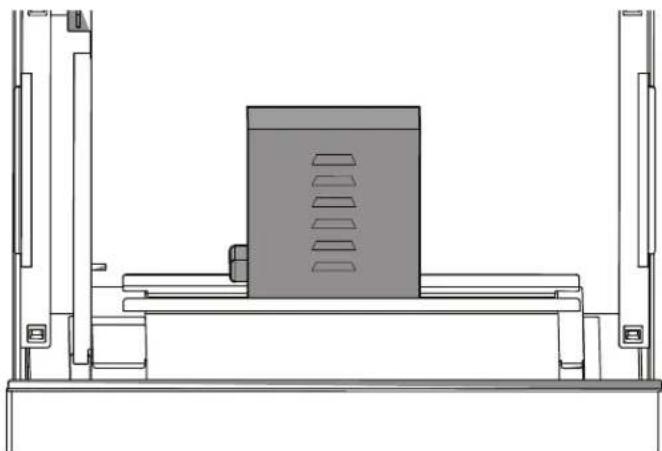
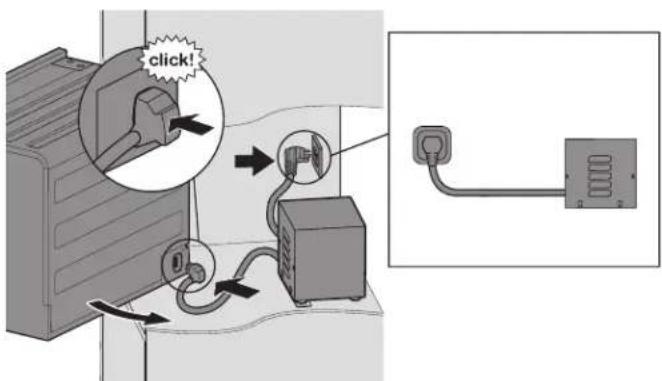
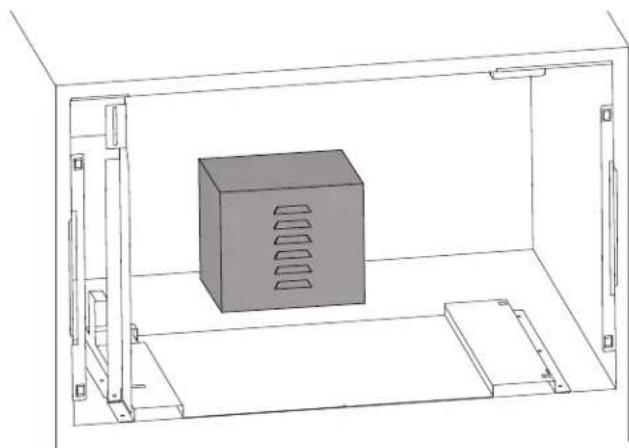
- Set the Coffee Maker Transformer on top of the Transformer Support Brackets.
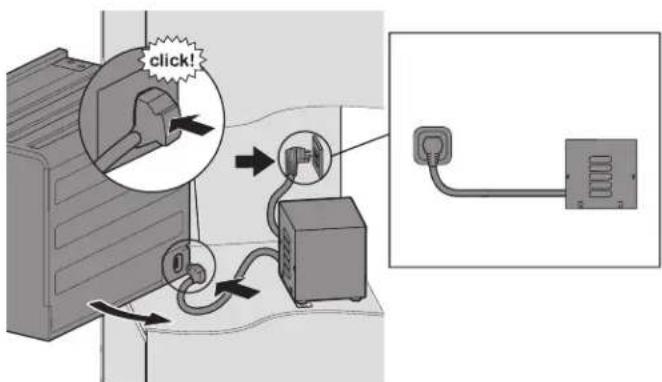
- Plug the transformer plug into the back of the coffee maker, as instructed in the Coffee Maker Installation Instructions. Slide coffee maker in cabinet on top of the Base Plate and move coffee maker to the left so the left side is flush with the Left Support Bracket.
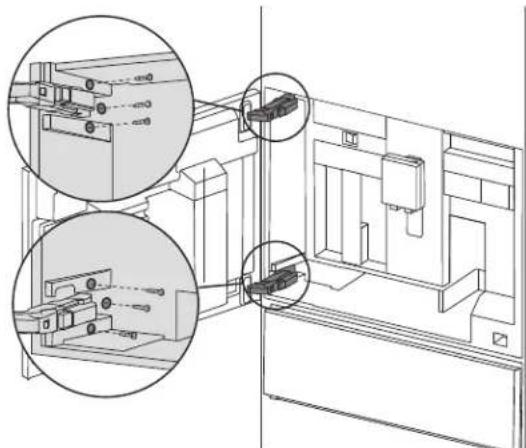
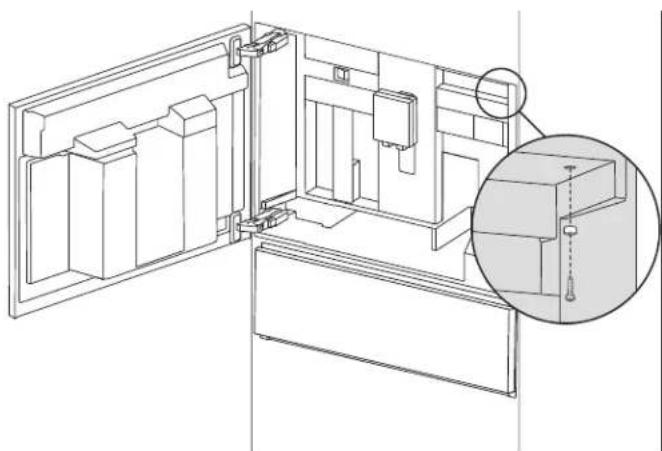
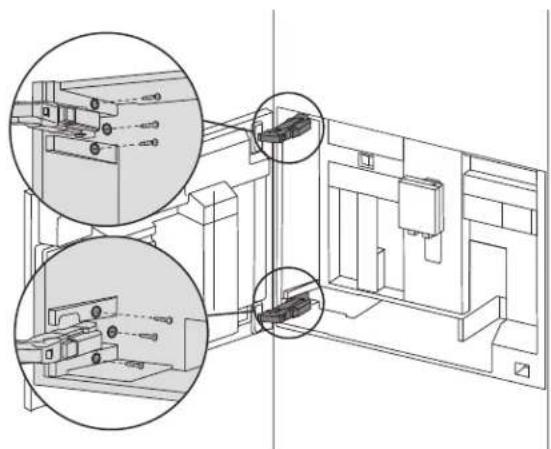
- Open the coffee maker door. Secure the Left Support Bracket from the inside of the coffee maker using six (6) x 1'' T-20 Torx head screws.
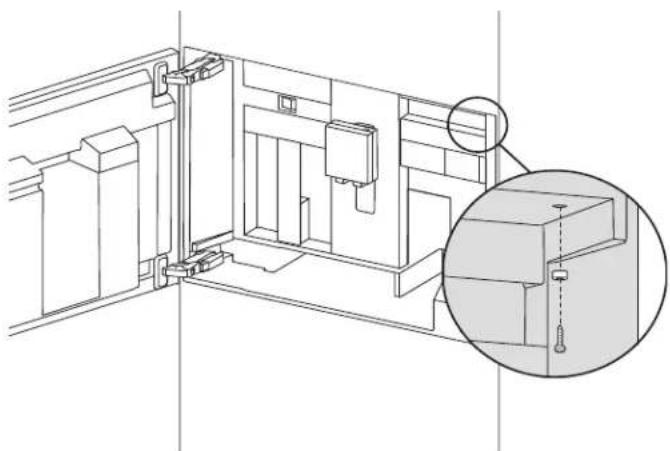
- Use a 1" T-20 Torx screw with spacer (shipped with coffee maker) to secure the top right corner of the coffee maker.
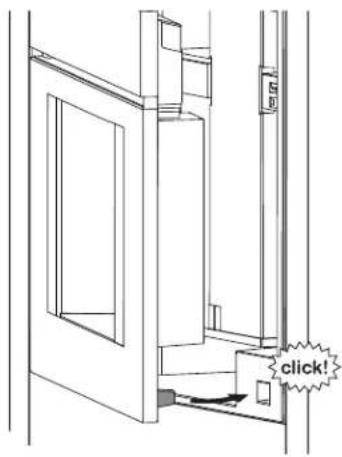
- If the door does not shut smoothly, check to see if the Door Latch is hitting on the top or bottom or the receiver.
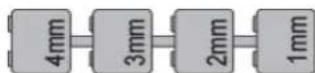
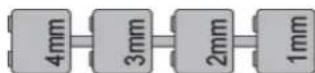
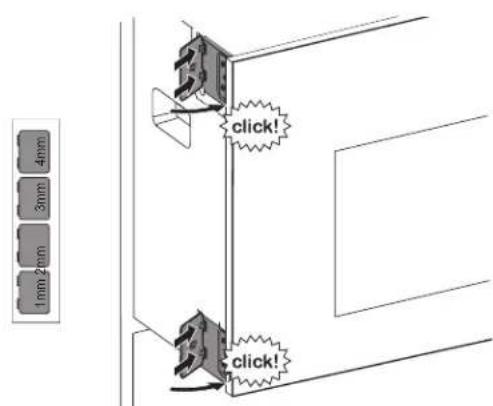
- If the latch is hitting on the bottom, pull the coffee maker out and install the 1mm Shim, included with the coffee maker, at the bottom left side of the coffee maker.
If the receiver is hitting on the top, install the 1mm Shim on the top left of the coffee maker.
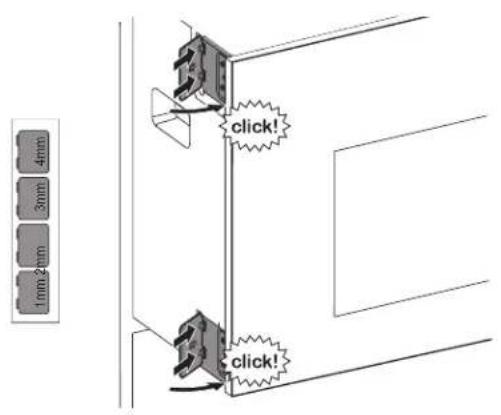
- Reinstall the coffee maker. If the receiver hits again increase the shim size until the Door Latch no longer hits.
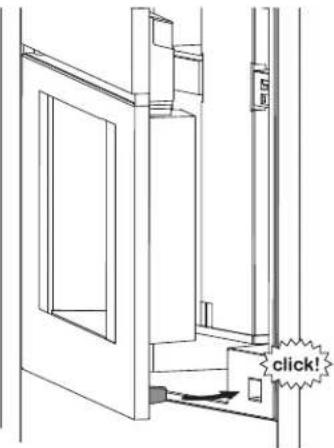
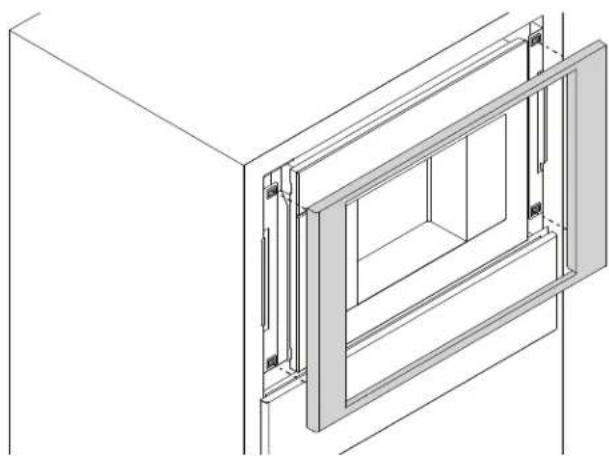
- Press the Built-in Coffee Maker Trim Kit into the Left and Right Side Cabinet Brackets.
Stand-Alone Installation
Before You Begin
Trim Kits
Trim kits are designed for use ONLY with the Built-in Coffee Maker models BCM8450UC.
IMPORTANT: The Built-in Coffee Maker installation instructions can be found in the Built-in Coffee Maker Assembly. The coffee maker must be installed according to the instructions in the Installation Manual. If the instructions are not followed, this may result in unsatisfactory installation or unit performance.
Tools Needed
- Phillips head screwdriver
- Torx T-20 screwdriver
- Measuring tape
- Drill with bits (1/16")
Screws Included with the Coffee Maker Trim Kit
8x
8 × 34 " Wood Screw (Phillips)
7x

M4 × 25mm Screw (T20 Torx)
10x

10 x ½ Screw (T20 Torx)
Items Used Included with BCM8450UC Coffee Maker
1x

Spacer
4x
Shims
General Dimensions
Cabinet Cutout Dimensions

Flush Install Dimensions
NOTE: * Flush installation requires a 5/16" (8 mm) high x 2812'' (724 mm) wide × 2212'' (571 mm) deep baseplate underneath the unit body.
Stand-Alone Installation
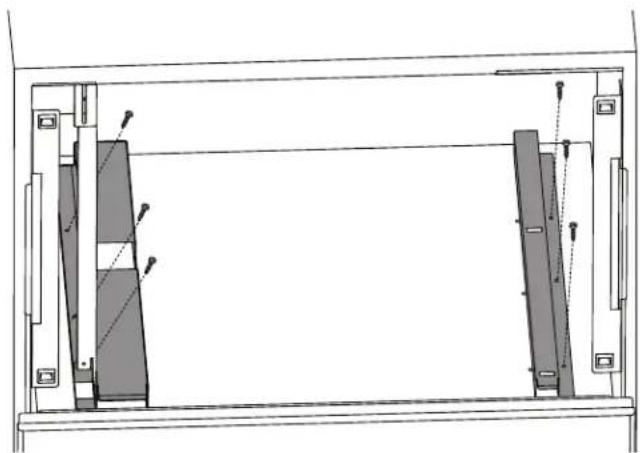
- Install the Left Cabinet Mounting Bracket at the top left of the cabinet opening using two (2) 3/4'' Phillips head wood screws. Ensure the bracket is flush to the cabinet side and cabinet face.

- Install the Right Cabinet Mounting Bracket at the top right of the cabinet opening using two (2) 3/4'' Phillips head wood screws. Ensure the bracket is flush to the cabinet side and cabinet face.
- Measure 158 (41 mm) from cabinet base and make mark on both sides of cabinet.
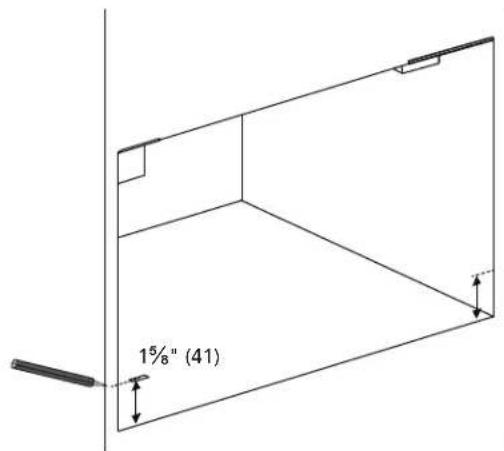
- Install the Left and Right Side Cabinet Brackets flush to the cabinet face with two (2) 3/4'' Phillips head wood screws per side. Install side trim mounting bracket so that the bottom edge of the bracket is aligned with mark.
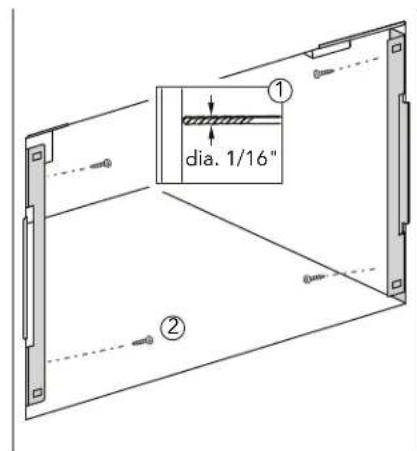
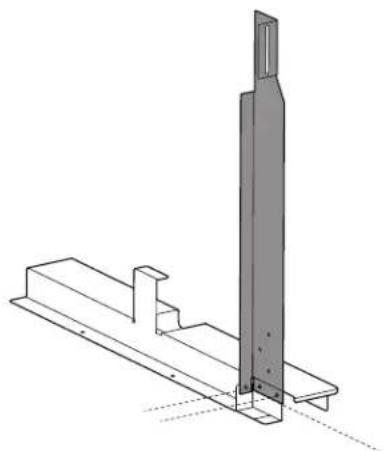
- Secure the Left Side Mounting Bracket to the Base Plate using three (3) T-20 x 1/2 Torx head screws.

- Center the Base Plate in the cabinet cavity using the center locating notch. Secure the Base Plate to the cabinet floor with six (6) 34 Phillips head wood screws.
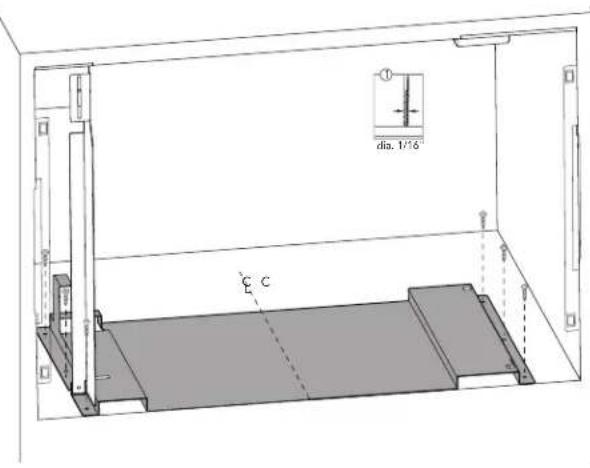
- Secure the Left Side Mounting Bracket to the Left Cabinet Mounting Bracket at the top left of the cabinet using one (1) T-20 x 1/2 Torx head screw.
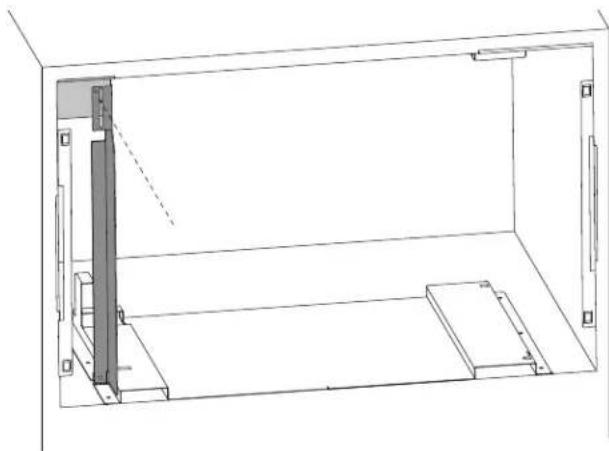
- Set the Coffee Maker Transformer behind the Base Plate. Install and plug transformer according to the Coffee Maker instructions.
- Plug the transformer plug into the back of the coffee maker, as instructed in the Coffee Maker Installation Instructions. Slide coffee maker in cabinet on top of the Base Plate and move coffee maker to the left so the left side is flush with the Left Support Bracket.
- Open the coffee maker door. Secure the Left Support Bracket from the inside of the coffee maker using six (6) x 1" T-20 Torx head screws.
- Use a 1" T-20 Torx screw with the spacer (shipped with coffee maker) to secure the top right corner of the coffee maker.
- If the door does not shut smoothly, check to see if the Door Latch is hitting on the top or bottom or the receiver.
- If the latch is hitting on the bottom, pull the coffee maker out and install the 1mm Shim, included with the coffee maker, at the bottom left side of the coffee maker.
If the receiver is hitting on the top, install the 1mm Shim on the top left of the coffee maker.
- Reinstall the coffee maker. If the receiver hits again increase the shim size until the Door Latch no longer hits.
- Press the Built-in Coffee Maker Trim Kit into the left and right Side Cabinet Brackets.
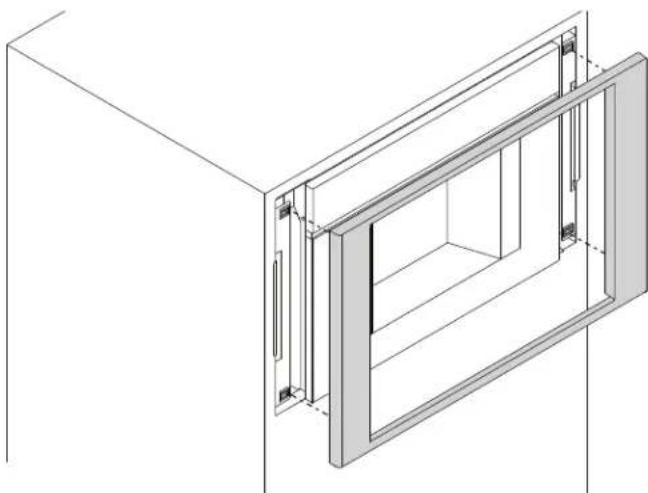
Table des
Matières
Sécurité 13
1901 Main Street, Suite 600
Irvine, CA 92614
Des questions?
1-800-944-2904
www.bosch-home.com/us
8x #8x34"Visa bois (Phillips)
7x M4×25mm Vis (T20 Torx)
14× #10×1/2Vis(T20 Torx)
1901 Main Street, Suite 600
Irvine, CA 92614
Preguntas?
1-800-944-2904
www.bosch-home.com/us
Esperamos oir de usted!

10x #10x1/2 Tornillo (T20 Torx)