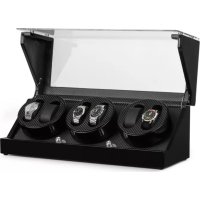
Klagenfurt - Watch winder Klarstein - Free user manual and instructions
Find the device manual for free Klagenfurt Klarstein in PDF.

| Product type | Watch winder |
| Brand | Klarstein |
| Model | Klagenfurt |
| Article number | 10029403 |
| Power supply | 100-240 V AC, 50/60 Hz, 1.6 A (power adapter included) |
| Maximum watch diameter | 75 mm |
| Maximum bracelet width | 40 mm |
| Maximum bracelet circumference | 26 cm |
| Number of rotors | 12 |
| Preset rotation programs | 360, 672, 864, 960, 1080, 1200, 1440, 1800, 2181 TPD |
| Manual rotation setting | From 16 to 9999 TPD (in steps of 16) |
| Rotation direction | Clockwise (CW), counterclockwise (CCW), alternating (CW+CCW) |
| RGB lighting | 7 colors: red, green, blue, cyan, yellow, purple, white |
| Functions | Individual start/stop per rotor, rotor selection |
| Safety | Use only the supplied adapter. Do not expose to water, moisture or extreme temperatures. Do not manually turn the winder. |
| Care | Clean with a soft, dry cloth. Unplug before cleaning. |
| Material | Not specified (plastic/wood likely) |
Frequently Asked Questions - Klagenfurt Klarstein
User questions about Klagenfurt Klarstein
0 question about this device. Answer the ones you know or ask your own.
Ask a new question about this device
Download the instructions for your Watch winder in PDF format for free! Find your manual Klagenfurt - Klarstein and take your electronic device back in hand. On this page are published all the documents necessary for the use of your device. Klagenfurt by Klarstein.
USER MANUAL Klagenfurt Klarstein
ONNNNNNNNNNNNNNNNNNNNNNNNNNNNNNNNNNNNNNNNNNNNNNNNNNNNNNNNNNNNNNNNNNNNNNNNNNNNNNNNNNNNNNNNNNNNNNNNNNNNNNNNNNNNNNNNNNNNNNNNNNNN
KLARSTEIN
www.klarstein.com


Member of Berlin Brands Group
Handwerkerstr. 11
15366 Dahlwitz-Hoppegarten
Deutschland
Berlin Brands Group UK Ltd
PO Box 1145
Oxford,OX1 9UW
United Kingdom
Dear Customer,
Congratulations on purchasing this device. Please read the following instructions carefully and follow them to prevent possible damages. We assume no liability for damage caused by disregard of the instructions and improper use. Scan the QR code to get access to the latest user manual and more product information.

CONTENT
Safety Instructions 10
Switches and Key Functions 10
Operation 11
Disposal Considerations 12
Manufacturer & Importer (UK) 12
TECHNICAL DATA
| Item number 10029403 | |
| Power supply (power supply unit) 100-240 V | AC, 50/60 Hz, 1,6 A |
| Maximum watch diameter 75 mm | |
| Maximum width (bracelet and buckle) 40 mm | |
| Maximum circumference (bracelet) 26 cm |
SAFETY INSTRUCTIONS
Children aged 8 and over, mentally, sensory and physically handicapped persons may only use the device if they have been thoroughly familiarised with its functions and safety precautions by a supervisor responsible for them and understand the associated risks.
- Only use the supplied power supply unit.
- Do not turn the watch winder manually as this may damage the watch winder.
- Do not place the watch winder in direct sunlight and do not expose it to water, moisture or extreme temperatures to damage the box.
SWITCHES AND KEY FUNCTIONS
Switch on the back side
| Mains connection for the adapter | |
| On/Off switch |
Display and key functions
| 360 turns RGB | |||
| ROTOR | ↑ | TPD | |
| ROTOR | Press the ROTOR button several times to select one of the 12 watch winders. You can choose between [00]-[12]. The arrangement of the rotors is as follows: | ||
| (1) Row 1 left (2) Row 1 middle (3) Row 1 right | |||
| (4) Row 2 left (5) Row 2 middle (6) Row 2 right | |||
| (7) Row 3 left (8) Row 3 middle (9) Row 3 right | |||
| (10) Row 4 left (11) Row 4 middle (12) Row 4 right | |||
| 09 | The rotor display shows which watch winder you have selected. |
| 1 | To start or stop the rotor, press this button. Each rotor can be started and stopped separately. When the rotor display shows [00], all rotors are started and stopped simultaneously. |
| 2 | Press the button repeatedly to select the direction of rotation: clockwise only (CW), counterclockwise only (CCW), clockwise + counterclockwise (CW + CCW). |
| TPD | Press the TPD button repeatedly to select one of the preset turning programs: 360, 672, 864, 960, 1080, 1200, 1440, 1800 or 2181 TPD (turns per day |
| ▲ | Adjust rotations per day manually: Press and hold the TPD button, then press and hold the TPD button until [00] is displayed. Then press the arrow buttons to adjust the TPD value in increments of 16 in the range of 16-9999 TPD (turns per day). Press and hold the arrow buttons to adjust the value faster. |
| ▼ | |
| Press the Light button repeatedly to change the light color as follows: Red > Green > Blue > Cyan Blue > Yellow > Purple > White. |
OPERATION
Note: If you do not use the device for a long time, switch it off. Make sure the unit is turned off before removing the holder. Do not turn or shake the appliance during operation.
Starting up
- Connect the mains adapter to the rear of the device and plug the plug into the socket.
- Open the front cover and carefully pull out the watch holder with your thumb and index finger.
- Attach the watch to the watch holder and push it back into the unit.
- Close the cover again and press the On/Off button.
Note: When you open the cover, all rotors stop and the display automatically lights for 30 seconds.
DISPOSAL CONSIDERATIONS

If there is a legal regulation for the disposal of electrical and electronic devices in your country, this symbol on the product or on the packaging indicates that this product must not be disposed of with household waste. Instead, it must be taken to a collection point for the recycling of electrical and electronic equipment. By disposing of it in accordance with the rules, you are protecting the environment and the health of your fellow human beings from negative consequences. For information about the recycling and disposal of this product, please contact your local authority or your household waste disposal service.
MANUFACTURER & IMPORTER (UK)
Manufacturer:
Chal-Tec GmbH, Wallstrasse 16, 10179 Berlin, Germany.
Importer for Great Britain:
Berlin Brands Group UK Ltd
PO Box 1145
Oxford,OX1 9UW
United Kingdom
Estimado cliente,
Berlin Brands Group UK Ltd
PO Box 1145
Oxford,OX19UW
United Kingdom
Chere cliente, cher client,
Berlin Brands Group UK Ltd
PO Box 1145
Oxford,OX1 9UW
United Kingdom
Gentile cliente,
PRODUTTORE IMPORTATORE (UK)
Produtlore:
Chal-Tec GmbH, Wallstraße 16, 10179 Berlin, Germania.
Berlin Brands Group UK Ltd
PO Box 1145
Oxford,OX1 9UW
United Kingdom


KLARSTEIN