
PLV 1500 B1 - Scarifier PARKSIDE - Free user manual and instructions
Find the device manual for free PLV 1500 B1 PARKSIDE in PDF.

| Product type | Electric lawn scarifier / aerator |
| Brand / Model | Parkside PLV 1500 B1 |
| Motor power | 1500 W |
| Voltage / Frequency | 230 V~, 50 Hz |
| Protection class | II (Double insulation) |
| Protection type | IPX4 |
| Tool working speed | 3600 min⁻¹ |
| Working width (roller) | 36 cm |
| Depth adjustment | 5 levels: -3 / -6 / -9 / -12 mm + transport position (+10 mm) |
| Collection bag volume | 50 L |
| Weight (with accessories) | Approx. 11.5 kg |
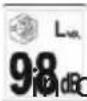
| Sound pressure level (LpA) | 82 dB(A) (K=3 dB) |
| Measured sound power level (LWA) | 95.5 dB(A) (K=1.92 dB) |
| Guaranteed sound power level | 98 dB(A) |
| Handle vibration (ah) | 3.3 m/s² (K=1.7 m/s²) |
| Interchangeable rollers | Aerator roller (spring tines) and scarifier roller (steel blades) |
| Folding handlebar | Yes, with wall mount for storage |
| Safety | Electronic start lock + start lever |
| Overload protection | Automatic motor shut-off, restart after cooling (~1 min) |
| Usage | Household use only, not in rain, wear PPE |
Frequently Asked Questions - PLV 1500 B1 PARKSIDE
User questions about PLV 1500 B1 PARKSIDE
0 question about this device. Answer the ones you know or ask your own.
Ask a new question about this device
Download the instructions for your Scarifier in PDF format for free! Find your manual PLV 1500 B1 - PARKSIDE and take your electronic device back in hand. On this page are published all the documents necessary for the use of your device. PLV 1500 B1 by PARKSIDE.
USER MANUAL PLV 1500 B1 PARKSIDE
Electric Scarifi er/Aerator
Translation of the original instructions
NL BE
Before reading, unfold the page containing the illustrations and familiarise yourself with all functions of the device.
FR BE
GB/IE Translation of the original instructions Page
Scope of delivery. 23
Functional description 23
Overview 23
Technical data. 23
Safety precautions 24
Symbols used in the manual 24
Symbols on the implement. 24
General notes on safety 25
Residual Risks 30
Assembling instructions. 30
Assembling the handle bar. 31
Mounting and emptying the collection bag 31
Operation 31
Setting the working positions. 31
Switching on and off 32
Working with the implement. 32
Transport 33
Cleaning/maintenance 33
General cleaning and maintenance work. 33
Exchanging the cylinder. 34
Storage 34
Disposal and protection of the environment 34
Spare Parts/Accessories. 34
Guarantee 35
Repair Service. 36
Service-Center 36
Importer 36
Trouble shooting 37
Translation of the original EC declaration of conformity ....164
Exploded Drawing 172
Introduction
Congratulations on the purchase of your new device. With it, you have chosen a high quality product. During production, this equipment has been checked for quality and subjected to a final inspection. The functionality of your equipment is therefore guaranteed.

The operating instructions constitute part of this product. They contain important information on safety, use and disposal.
Before using the product, familiarise yourself with all of the operating and safety instructions. Use the product only as described and for the applications specified. Keep this manual safely and in the event that the product is passed on, hand over all documents to the third party.
Intended purpose
This implement is used:
- As a lawn aerator and to rake leaves, moss and weeds out of the lawn and to collect these leaves and plant residues.
- As a verticuttor to cultivate the grass sward and thereby regenerate the lawn.
Any other use that is not specifically approved in these Instructions can result in damage to the implement and could be a serious danger to the user.
The implement must only be operated by adults. Never allow people who are not familiar with the instructions or children to use the machine. Local regulations may specify an age limit for the user.
Never operate this implement while it is raining and in a wet environment. The
owner or operator is responsible for accidents or harm to people and their property.
The manufacturer cannot be held liable for damage caused by incorrect operation of the implement or if it is not used in conformity with its intended purpose.
General description
The illustration of the principal functioning parts can be found on the front and back foldout pages.
Scope of delivery
Carefully unpack the implement and check that all the subsequently listed parts are complete:
- Appliance housing with scarifying drum and impact protection
Aerator roller - Upper handlebar
- Lower bar
2 central bars
Collection bag with rods - Mains cable strain relief
- 2 cable clamps
- Mounting accessories
- Wall bracket
- Instruction Manual
Functional description
The verticutor and lawn aerator has two easily exchangeable work cylinders:
An aerator cylinder made of hard plastic with vertically rotating sprung tines, and a verticulator cylinder with vertically mounted high-grade steel knives.
The implement features a high-quality plastic case with collection bag and a handle
bar with a folding function. Please refer to the subsequent descriptions for the actual functions of the individual control elements.
Overview
A
1 Electronic switch lock
2 Start handle
3 Upper handlebar
4 Quick-release lever, screw and washers for bar fastening
5 2 central bars
6 Lower bar
7 Quick-release lever and washers for bar fastening
8 Appliance housing
9 Carrying handle
10 Depth adjustment lever
1.1 Machine cable terminal
12 Collection bag
13 Impact protection fl ap
15 Machine cable
16 Aerator roller with spring tines
17 Scarifying drum with blade
D
18 Power cable
E
19 Wing screw for roller fastening
20 Hexagon receptacle roller
G
21 Wall bracket
22 Screws, wall bracket
Technical data
Electric scarifi er/
Aerator... PLV 1500 B1
Motor input 1500 W
Rated voltage 230 V\~,50 Hz
Protection Class ... II (Double insulation)
Degree of protection.. IPX4
Rotating speed of the tool
(n) 3600 min-1 (r.p.m)
Cylinder width 36 cm
GB E
Depth adjustment 5-way
-3/-6/-9/-12 mm
+ transport position 10 mm
Volume collection bag. 50 l
Weight (incl. accessories) approx. 11.5 kg
Acoustic pressure level
(LpA) 82 dB (A); KpA = 3 dB
Sound power level (LwA)
Measured ... 95.5 dB (A); KwA = 1.92 dB
Guaranteed .98dB(A)
Vibration (a_n) 3.3 m/s^2; K = 1.7 m/s^2
The noise and vibration values were established by the standards and stipulations listed in the Conformity Declaration.
The stated vibration emission value was measured in accordance with a standard testing procedure and may be used to compare one power tool to another. The stated vibration emission value may also be used for a preliminary exposure assessment.

Warning: The vibration emission value may differ during actual use of the power tool from the stated value depending on the manner in which the power tool is used.
Safety precautions aimed at protecting the user should be based on estimated exposure under actual usage conditions (all parts of the operating cycle are to be considered, including, for example, times during which the power tool is turned off and times when the tool is turned on but is running idle).
Safety precautions
This section covers the basic safety instructions when working with this implement.
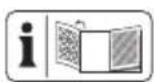
Symbols used in the manual

Warning symbols with information on damage and injury prevention

Instruction symbols with information on preventing damage

Pull out the mains plug.

Wear gloves when handling the roller.

Help symbols with information on improving tool handling
Symbols on the implement
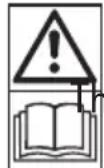
Caution!
ese Instructions must be read.
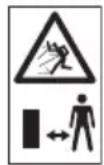
Danger of injury due to flung-out material! Keep bystanders well away from the implement.
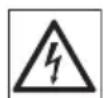
Danger of electric shock if the power cable is damaged! Always ensure that the power cable is kept well away from the implement and its cutting tools.

Wear eye and ear protection.
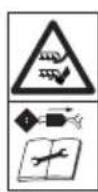
Caution! - Sharp tools. Ensure that the hands and feet are kept well away from the cutting tools. The cutting cylinder continues to rotate briefly after the motor has been switched off. Always disconnect the plug from the mains prior to maintenance work or if the power cable is damaged.

Do not expose the device to moisture. Never operate the device in rain.

Attention! The rollers continue to move.
Noise level ratings L WAI B(A).

Protection Class II (Double insulation)

Electrically powered implements must not be disposed of with the domestic waste
Switching on/off

Transport and working positions
General notes on safety

This implement can cause serious injuries if it is not properly used. Please read these
Operating Instructions carefully and familiarize yourself with all the control elements before operating this implement. Keep these Operating Instructions in a readily accessible place so that this information is always at your disposal.

In the event of an accident or malfunction during operation, switch off the device immediately and pull out the mains plug. Injuries must be properly treated or medical assistance sought. Read the "Troubleshooting" section to correct any malfunctions or contact our Service Centre.
Operating the implement:

WARNING! The implement can cause serious injuries. How to a avoid accidents and injuries:
Preparations:
- Read the instructions carefully. Familiarise yourself with the controls and how to use the machine correctly.
Note that the user is responsible for any accidents or risks to others and their property.
The implement is not suitable for use by children.
Children and persons with limited physical, sensory or mental capabilities or inadequate experience and knowledge, or persons who are not familiar with the instructions, should
GB E
never be allowed to use the machine
- Never start up the implement while other people, but especially children and domestic pets, are in the vicinity.
- Check the area on which the implement is to be used. Remove all stones, sticks, wire and other foreign bodies that could be caught up and flung out.
Never use the implement to level out uneven patches.
Always wear appropriate protective work clothes and firm shoes with non-slip soles, strong long trousers, ear defenders and goggles. Never operate the implement while bare footed or when wearing open sandals. Avoid wearing loose clothing with hanging cords or ties. The protective devices and your personal protective equipment will protect yourself and other people and ensure that the equipment can be smoothly operated - Never operate the implement if it is damaged, incomplete or has been modified without the consent of the manufacturer. Never work with damaged or missing protective devices (e.g. starting lever, unlocking knob, impact protector). Never disengage protective devices (e.g. by tying the starting lever). This ensures that the equipment remains safe.
- Before starting the equipment, ensure that no objects or branches are pushed into the blade opening, that the equip
ment is standing stably and that the workspace is tidy and not blocked.
Check the condition of your extension cable and the connecting cable of your equipment. Use the necessary protective equipment. There is a risk of injury.
- If your equipment vibrates or emits unusual noises when switched on, disconnect the plug from the socket and check the cutting cylinder. Ensure that no remains of chopped matter are blocking the cutting cylinder or jammed between the blades. If you find no problems, return the equipment to a customer service centre.
- If the blades no longer cut correctly or if the motor is overloaded, check all the parts of your equipment and replace the worn parts. If a more extensive repair is required, contact a customer service centre.
- Use the machine in the recommended position and on a solid, flat surface only.
- Do not operate the machine on paved or gravelled areas where material flung out can cause injuries.
Use:
-
CAUTION - A very sharp tool. Avoid cutting your fingers or toes. While working always keep your feet and fingers well away from the cutting cylinder and the ejector opening. There is the danger of serious injury!
-
Do not operate the implement while it is raining, in poor weather conditions and when the surrounding area and lawn are wet. Operate the implement only during daylight hours or with bright lighting. There is a risk of accidents.
-
Do not operate the implement if you are tired or are lacking in concentration and after having drunk alcohol or taken medicine. Always take a work break in due time. Approach the work with common sense. A moment of carelessness when using the equipment can result in serious injury.
-
Familiarize yourself with the terrain and remain focused on the potential hazards that you could miss on account of the motor noise.
-
Always maintain a secure footing while working, especially on a sloping terrain. Always work across slopes - never up and down! Be particularly careful when changing the travelling direction. Do not scarify or aerate on overly steep slopes. This enables you to control the equipment better in unexpected situations.
-
Avoid an abnormal body posture and maintain your balance at all times. Walk, do not run.
Always guide the implement at a walking pace with both hands on the handle. Be especially careful when you turn the implement around or draw it towards you. Danger of stumbling!
- Start or operate the start lever with care corresponding to the instructions in this instruction manual and keep your feet at a safe distance from the prongs.
- Do not tilt the implement when starting, other than it has to be lifted. In this case tilt the implement only to the extent that is absolutely necessary and always lift the implement on the side that is opposite to the operator.
- Never operate the implement without the attached collection bag or impact protector. Danger of injury! Never place your hands or feet on or below rotating parts. Always keep away from the ejector opening.
- Do not operate the implement in the vicinity of infl ammable liquids or gases as this could give rise to the danger of a fire or explosion.
Always disconnect the plug from the mains socket before working. - Hold the prongs if the machine needs to be tipped over for transport over areas other than grass and if the machine is moved from and to the area to be treated.
- Keep connection and extension cables away from the prongs.
- Never transport the machine while the drive is running.
Work intervals:
After the implement has been turned off, the cutting cylinder will continue to rotate for a few seconds. Keep hands and feet well away.
GB E
- Do not touch the spring tines before the implement has been disconnected from the mains and the spring tines have come to a complete standstill. Risk of injury owing to a sharp implement!
- Only remove plant parts when the implement is standing completely still. Ensure that the grass ejector opening is clean and free.
-
Switch off the power when the implement is to be transported, lifted or tilted and when traversing other surfaces than grass.
Children must never play with the device.
Always switch off the implement and disconnect the power plug. Make sure that all moving parts have come to a complete stop: -
Whenever you leave the implement
- Before you clean the ejector opening or unblock or unclog the implement
- When the implement is not being used.
- Before checking, cleaning or working on the machine;
- When the power cable is damaged or has become tangled
After contact with a foreign object. Examine the machine for damage and carry out the necessary repairs before restarting and working with the machine.
If the machine starts to vibrate abnormally, an immediate check must be carried out,
- search for signs of damage;
- have any necessary repairs carried out on damaged parts;
-
examine for loose parts and tighten these.
-
Store the implement in a dry place well out of reach of children.
!
CAUTION! The following states how to avoid damage to the implement and any resulting harm to people:
Take care of your implement:
- Switch off the power when the implement is to be carried across steps.
- Before switching on the machine, always check whether all screws, nuts, bolts and other fasteners are tightly secured and that the protection devices and protective gratings are in place. Worn or damaged labels must be replaced. Never operate the implement if safety devices (e.g. impact protector, parts of the cutting facility or bolts are missing, worn out or damaged. Check especially the power cable and starting lever for damage. To avoid imbalance, all tools and bolts must be exchanged as complete sets.
- Only use spare parts and accessories that have been supplied or recommended by the manufacturer. The use of alien parts results in the immediate loss of all guarantee claims.
- Ensure that all nuts, bolts and screws are firmly tightened and
that the implement is in a safe working state.
-
Never try to repair the implement yourself, other than you have been trained accordingly. All work that has not been listed in these Instructions must only be carried out by authorised servicing agencies.
-
Treat the implement with the greatest care. Always keep the tool clean for better and safer work. Follow the maintenance instructions.
-
Never overload the implement. Always work within the specified capacity range. Do not use low-power machines for heavy-duty work. Do not operate the implement for purposes for which it is not intended.
-
Check the collection unit regularly for wear or loss of function.
-
Replace worn or damaged parts for safety reasons.
-
When using the machine with several prong attachments, beware that moving one prong attachment can lead to the other prong attachments rotating.
-
When setting the machine, make sure your fingers do not become caught between the moving prong attachments and stationary parts of the machine.
-
Allow the motor to cool down before parking the machine for a longer period.
-
When servicing the prong attachments, beware that the prong attachments can be moved even when the drive is switched off.
-
Replace worn or damaged parts for safety reasons. Use only original spare parts and accessories.
If the machine is stopped to service, inspect, store or replace an accessory part, switch off the drive, disconnect the machine from the mains and make sure that all moving parts have come to a complete stop. Allow the machine to cool down before carrying out inspections, settings etc. Treat the machine with care and keep it clean.
Electrical safety:
4
CAUTION! The following states how to avoid accidents and injuries due to electric shock:
- Before each use, carry out a visual inspection of the power and extension cables for signs of damage or ageing. Damaged mains power cables increase the risk of electric shock.
- Connect the implement to a power socket with a RCD (Residual Current Device) that has a rated current of not more than 30mA . Avoid operating the machine in poor weather conditions, especially if there is a risk of lightning.
Always keep the extension cable well away from the cutting tools.
Should the power cable become damaged during work, then instantly disconnect the power cable from the mains.
DO NOT TOUCH THE POWER CABLE BEFORE IT HAS BEEN DISCONNECTED FROM THE MAINS! Risk of electric shock. Do not use the machine, if the cable is damaged or worn.
- If the power cable for this equipment is damaged, it must be replaced by the manufacturer, a customer service agent of the same or a similarly qualified person in order to prevent hazards.
- Keep the extension cables away from the sprung tines. The tines may damage the cables and result in contact with live parts.
- Check that the mains voltage is the same as indicated on the rating plate.
- Avoid body contact with earthed parts (e.g. metal fences, metal posts). There is an increased risk of electric shock if your body is earthed.
- Only use approved extension cables of the type H05RN-F with a maximum length of 75m and which have been approved for open-air use. The stranded cord diameter of the extension cable must be at least 2.5mm^2 . Always unreel a cable drum to its full length so that the entire cable can be checked for damage.
Use the envisaged cable suspension when attaching an extension cable. -
Never pull the cable to disconnect the plug from the socket. Protect the cable from heat, oil and sharp edges.
-
If the connecting cable is damaged, first disconnect the extension cable from the socket. You can then disconnect the connecting cable of the equipment.
Residual Risks
There will always be residual risks even if you operate this electrical tool according to the instructions. The following hazards may occur in connection with the type and design of this electric tool:
a) a) Cutting injuries
b) Hearing damage if suitable ear protection is not worn.
c) Health injuries resulting from the effect of vibration on the hands and arms in the event that the device is used over a longer period of time or is not used and maintained properly.

Warning! During operation, this power tool produces an electromagnetic fi eld. Under certain circumstances, this fi eld may negatively affect active or passive medical implants. In order to reduce the danger of serious or fatal injuries, we recommend that individuals who wear medical implants should consult their doctor and the manufacturer of the implant before operating the machine.
Assembling instructions

Prior to any work on the implement always disconnect the plug from the power socket!

Ensure during assembly that the power cable is not squeezed and that it has sufficient play.

Assembling the handle bar
- Attach the lower bar (6) to the appliance housing (8) and fasten it using the two quick-release levers and washers (7). The smooth side of the washer should point towards the quick-release lever; the grooved side should point towards the device.
- Screw both central bars (5) with the screws, quick-release levers and washers (4) to the lower bar (6). The smooth side of the washer should point towards the quick-release lever; the grooved side should point towards the device.
- Screw the upper handlebar (3) with the screws, quick-release levers and washers (4) to both central bars (5) to fasten.
- Fasten the machine cable (15) to the bar using the machine cable terminals (11).

Mounting and emptying the collection bag

WARNING: Never operate the implement without the impact protector. Danger of Injury!

The collection bag is recommended for operation with the air roller (A 16)!
- Pull the collection bag over the rods.
- Put the plastic straps of the collection bag over the collection bag rods and clip into the plastic straps.
Mounting the collection bag on the implement:
- Lift the impact protector (13).
- Push the pins on the collection bag rods into the socket in the implement case.
- Release the impact protector so that it holds the collection bag (12) in its position.
Removing and emptying the collection bag:
- Lift the impact protector (13) and take out the collection bag (12).
Operation

Please observe local regulations concerning noise protection.
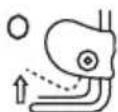
Setting the working positions
The implement has 5 principal position settings:
+10 mm : Transport position
This position sets the maximum safety spacing between the tool and the floor.
-3 mm : Working position
Set this position when working with a new implement.
-3 to -12 mm : Readjustment positions
The working position can be lowered with increased knife and sprung tire wear.
Wear can be identified from an increasingly poor result.
The readjusting depth amounts to approx. 3 mm per setting.

When the implement is delivered it is in the Transport Position (+10mm) setting.
- The implement must be switched off to set the working position.
- Adjust the depth adjustment lever (A 10) and allow it to lock into place in the desired position.

Selection of a readjustment position without the corresponding wear can overload the motor and damage the cylinder.

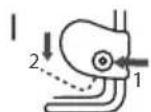
Switching on and off

Before switching on the implement ensure that it is not in contact with any objects. Keep your feet and hands well away from the cylinder and the ejector opening. Danger of injury!
- Place the implement on a level lawn surface.
- Connect the extension cord to the power cable (18).
- Connect the implement to the mains voltage.
- To switch on, press the electronic switch lock (1) on the handlebar and then pull the start handle (2) towards the handlebar. Release the electronic switch lock (1).
- To switch off release the starting lever (2).

Overload protection: The motor is automatically switched off when the implement is overloaded. Release the starting lever and reset the implement after a cooling down period of approx. 1 minute.

WARNING! The cylinder continues to run for a brief period after the implement has been switched off. Do not tilt or carry the implement while the motor is still running and do not touch the cylinder while it is still rotating. Danger of injury!
Working with the implement
To maintain a well cared-for lawn it should be aerated every 4 to 6 weeks.
Verticuting is a more intensive intervention than aerating and should only be carried out once a year, the best time being in spring after the lawn has been mown for the first time.

When working on slopes always proceed across the slope. Be particularly careful when walking backwards and pulling the implement. Danger of stumbling!

After work and to transport the implement disconnect the power plug and wait until the cylinder is standing still.

The shorter the grass, the better the lawn can be treated. Furthermore, the implement is less stressed and the service life of the cylinder is prolonged.
The implement can be operated with or without the collection bag.
We recommend working with the collection bag for aeration. We recommend working without the collection bag for scarifying.
- Mow the lawn to the required grass height.
- Do not use the scarifi er in long grass. It may otherwise wind around the scarifi er blade and result in damage to the equipment.
- Select the appropriate working or readjustment position (in the event of cylinder wear) so that the implement is not overloaded.
Commence work in the vicinity of the power socket and proceed away from the socket.
Always ensure that the extension cable is behind you, and after turning move it to the side that has already been treated. - Guide the implement at a walking pace down lanes that are as straight as possible. To ensure uninterrupted aerating or verticuting the individual lanes should always overlap by a few centimetres. Dwelling too long at the same place while the implement is running can damage the grass sward.
To ensure that the extension cable is not an impediment, turn the implement in such a manner that the cable strain release on the bar always faces the side that has been treated.
Always clean the implement after each use (see "Cleaning/Maintenance").
After having treated lawns with dense moss growth, it is advisable to reseed the lawn so that it can regenerate itself quicker.
Transport
-
Adjust the transport position (+10 mm) setting (see "Setting the Working Position") when transporting the implement.
-
Lift the implement to transport it over steps and sensitive surfaces (e.g. tiles) Use the handle (A 9).
Cleaning/maintenance

Work that has not been described in these Instructions must be carried out by a servicing agency authorised by us. Only use original parts.

Wear gloves when handling the cylinder.

Prior to all maintenance and cleaning work always switch off the implement, disconnect the plug from the power socket and wait until the cylinder is standing still.
Warning! Risk of injury by dangerous moving parts!
General cleaning and maintenance work

Do not jet water onto the implement and do not clean it under fl owing water. This would result in the danger of an electric shock and the implement could be damaged.
- When work has finished remove plant residues adhering to the wheels, inside the ventilation opening, the grass ejector opening and the cylinder. Do not use hard or pointed objects for this purpose as they could damage the implement.
- Completely empty the collection bag.
Always keep the implement clean. Do not use cleaning agents or solvents.
We cannot be held liable for damage caused by our implements if they were improperly repaired, if non-original parts have been used or if they were used not in keeping with their intended purpose.

Exchanging the cylinder

Switch off the implement, disconnect the mains plug and wait until the cylinder is standing still.

Wear gloves when handling the cylinder.
- Turn the implement over.
- Loosen the wing screw (19) and pull the bearing support upwards.
- Lift the roller (A 16/17) diagonally and pull the shaft out of the hexagon receptacle (20)..
- Insert the new cylinder (A 16/17) by reversing the sequence.
Storage
- Store the implement in a dry place well out of reach of children.
- Allow the motor to cool down before placing the implement in a closed room.
- Do not wrap nylon sacks around the implement as this could result in the formation of moisture.
Without wall bracket:

To save space when stored, the handlebar can be folded down after releasing the tightening levers.
Ensure that the cables are not squeezed.
With wall bracket:
You can suspend the folded-up device from the wall using the wall bracket.
G Screw the wall bracket (21) to the wall with the enclosed screws (22), using dowels (not included in delivery package) if necessary. Suspend the device from the lower bar (6). Check the tightness of the wall bracket fitting regularly.
Disposal and protection of the environment
Dispose of the implement, accessories and packaging in an environment-friendly manner.
Electrically-powered appliances must not be disposed of with the domestic waste.
Hand in the spent implement to a recycling centre. The plastic and metal parts can then be sorted out and graded for recycling. Our Service Center will be happy to answer any questions in this respect.
Spare Parts/Accessories
Spare parts and accessories can be obtained at www.grizzlytools.shop
If you have issues ordering, please use the contact form. If you have any other questions, contact the service centre (see "Service-Center" Page 36).
| Position instruction manual | Position exploded drawing | Description Order No. | ||
| 4 | 32,99,34,43 | (2x) | Quick-release | lever |
| 5 89 central bars | 91103152 | |||
| 6 90 lower bar | 91103153 | |||
| 12 | 83,84 collection bag | 91103150 | ||
| 16 | 70 aerator roller with spring tines | 91105140 | ||
| 17 | 69 scarifying drum with blade | 91105149 | ||
| 19 | 97 wing screw for roller fastening | 91105131 | ||
| 21 | 76,77 wall bracket | 91105142 | ||
Guarantee
Dear Customer,
This equipment is provided with a 3-year guarantee from the date of purchase. In case of defects, you have statutory rights against the seller of the product. These statutory rights are not restricted by our guarantee presented below.
Terms of Guarantee
The term of the guarantee begins on the date of purchase. Please retain the original receipt. This document is required as proof of purchase.
If a material or manufacturing defect occurs within three years of the date of purchase of this product, we will repair or replace - at our choice - the product for you free of charge. This guarantee requires the defective equipment and proof of purchase to be presented within the three-year period with a brief written description of what constitutes the defect and when it occurred.
If the defect is covered by our guarantee, you will receive either the repaired product or a new product. No new guarantee period begins on repair or replacement of the product.
Guarantee Period and Statutory Claims for Defects
The guarantee period is not extended by the guarantee service. This also applies for replaced or repaired parts. Any damages and defects already present at the time of purchase must be reported immediately after unpacking. Repairs arising after expiry of the guarantee period are chargeable.
Guarantee Cover
The equipment has been carefully produced in accordance with strict quality guidelines and conscientiously checked prior to delivery.
The guarantee applies for all material and manufacturing defects. This guarantee does not extend to cover product parts that are subject to normal wear and may therefore be considered as wearing parts (e.g. cylinders, v-belt or attachments) or to cover damage to breakable parts (e.g. switches, batteries, or parts made of glass).
This guarantee shall be invalid if the product has been damaged, used incorrectly or not maintained. Precise adherence to all of the instructions specified in the operating manual is required for proper use of the
GB E
product. Intended uses and actions against which the operating manual advises or warns must be categorically avoided. The product is designed only for private and not commercial use. The guarantee will be invalidated in case of misuse or improper handling, use of force, or interventions not undertaken by our authorised service branch.
Processing in Case of Guarantee
To ensure quick handling of you issue, please follow the following directions:
- Please have the receipt and item number (IAN 374133_2104) ready as proof of purchase for all enquiries.
- Please find the item number on the rating plate, an engraved plate on the front page of your manual (bottom left) or as a sticker on the back or bottom.
- Should functional errors or other defects occur, please initially contact the service department specified below by telephone or by e-mail. You will then receive further information on the processing of your complaint.
- After consultation with our customer service, a product recorded as defective can be sent postage paid to the service address communicated to you, with the proof of purchase (receipt) and specific cation of what constitutes the defect and when it occurred. In order to avoid acceptance problems and additional costs, please be sure to use only the address communicated to you. Ensure that the consignment is not sent carriage forward or by bulky goods, express or other special freight. Please send the equipment inc. all accessories supplied at the time of purchase and ensure adequate, safe transport packaging.
Repair Service
For a charge, repairs not covered by the guarantee can be carried out by our service branch, which will be happy to issue a cost estimate for you.
We can handle only equipment that has been sent with adequate packaging and postage.
Attention: Please send your equipment to our service branch in clean condition and with an indication of the defect.
Equipment sent carriage forward or by bulky goods, express or other special freight will not be accepted.
We will dispose of your defective devices free of charge when you send them to us.
Service-Center
GB Service Great Britain
Tel.: 0800 404 7657
E-Mail: grizzly@lidl.co.uk
IAN 374133_2104
IF Service Ireland
Tel.: 1890 930 034
{O,08 EUR/Min., {peak})
(0,06 EUR/Min., (off peak))
E-Mail: grizzly@lidl.ie
IAN 374133_2104
Importer
Please note that the following address is not a service address. Please initially contact the service centre specified above.
| Problem Possible | Cause Remedy | |
| Abnormal noises, clatter or vibrations | Foreign body on cylinder (A 16/17) | Remove foreign body |
| Damaged sprung tines (A 16) or cylinder knives (A 17) | Exchange cylinder | |
| Cylinder (A 16/17) incorrectly mounted | Install cylinder correctly (see "Changing the cylinder") | |
| Toothed-belt slip | Switch device off and pull power plug. Remove the soil and grass residues available. | |
| Implement does not start | No power | Check power socket, cable, line; repair only by qualifi ed electrician |
| Starting lever (A 2) defective | Repair by After-Sales Service | |
| Carbon brushes worn out | ||
| Motor defective | ||
| Motor fails | Blocked by foreign body Remove foreign body | |
| Grass is too long | Mow beforehand; see chapter "Operation" | |
| Clogged discharge Clean discharge | ||
| Overload protection tripped | Allow implement to cool down for about 1 minute | |
| Work result not satisfactory | Sprung tines of aerator cylin- der (A 16) worn out | Exchange cylinder (16/17) |
| Knives of verticutor cylinder (A 17) blunt or damaged | ||
| Toothed belt defective Repair | by After-Sales Service | |
| Transport Position or incor- rect Working Position se- lected | see chapter "Setting the Working Positions" | |
| Grass is too long | Mow beforehand; see chapter "Operation" | |
Sommaire
Introduction 38
Chere cliente, cher client,
Chere cliente, cher client,
FR Service France Tel.0800919270
E-Mail: grizzlyy@lidl.fr
IAN 374133_2104
BE Service Belgique
Tel.: 070 270 171
(0,15 EUR/Min.)
E-Mail: grizzly@lidl.be
IAN 374133 2104
Importateur
Montage-instructions

Montering/tomning at opsamlingsposed

(L_pA) 82dB(A),K=3dB
| GB IE | Translation of the original EC declaration of conformity |
| We hereby confirm that the Electric scarifi er/Aerator model PLV 1500 B1 Serial number 000001 - 205000 conforms with the following applicable relevant version of the EU guidelines: | |
| 2006/42/EC • 2014/30/EU • 2000/14/EC • 2011/65/EU* & (EU)2015/863 | |
| In order to guarantee consistency, the following harmonised standards as well as national standards and stipulations have been applied: | |
| EN 60335-1:2012/A2:2019 • EN 50636-2-92:2014 • EN 62233:2008 EN 55014-1:2017/A11:2020 • EN 55014-2:2015 EN 61000-3-2:2014 • EN IEC 61000-3-2:2019 EN 61000-3-3:2013 • EN 61000-3-3:2013/A1:2019 • EN IEC 63000:2018 | |
| We confirm the following in accordance with the 2000/14/EC emissions guideline: Sound power level: guaranteed: 98 dB(A) measured: 95,5 dB(A) Compliance evaluation process carried out in accordance with Appendix V / 2000/14/EC | |
| This declaration of conformity is issued under the sole responsibility of the manufacturer: | |
| CE Grizzly Tools GmbH & Co. KG Stockstädter Straße 20 D-63762 Großbostheim Germany 03.09.2021 | Christian Frank Documentation Representative |
- The object of the declaration described above satisfies the provisions of Directive 2011/65/EU of the European Parliament and the Council of 8 June 2011 on limiting the use of certain harmful substances in electrical and electronic appliances.

- FR BE
- Introduction
- Intended purpose
- General description
- Scope of delivery
- Functional description
- Overview
- A
- D
- E
- G
- Technical data
- Electric scarifi er/
- Aerator... PLV 1500 B1
- GB E
- Safety precautions
- Symbols used in the manual
- Warning symbols with information on damage and injury prevention
- Symbols on the implement
- General notes on safety
- Operating the implement:
- Preparations:
- Use:
- !
- Electrical safety:
- 4
- Residual Risks
- Assembling instructions
- Assembling the handle bar
- Mounting and emptying the collection bag
- WARNING: Never operate the implement without the impact protector. Danger of Injury!
- Mounting the collection bag on the implement:
- Removing and emptying the collection bag:
- Operation
- Setting the working positions
- +10 mm : Transport position
- -3 mm : Working position
- -3 to -12 mm : Readjustment positions
- Switching on and off
- Working with the implement
- Transport
- Cleaning/maintenance
- General cleaning and maintenance work
- Exchanging the cylinder
- Storage
- Without wall bracket:
- With wall bracket:
- Disposal and protection of the environment
- Spare Parts/Accessories
- Spare parts and accessories can be obtained at www.grizzlytools.shop
- Guarantee
- Terms of Guarantee
- Guarantee Period and Statutory Claims for Defects
- Guarantee Cover
- Processing in Case of Guarantee
- Repair Service
- Service-Center
- Importer
- Sommaire
- Importateur
- Montage-instructions
- Montering/tomning at opsamlingsposed
Brand : PARKSIDE
Model : PLV 1500 B1
Category : Scarifier