
Masterchef Gourmet QA518G10 - Food Processor MOULINEX - Free user manual and instructions
Find the device manual for free Masterchef Gourmet QA518G10 MOULINEX in PDF.
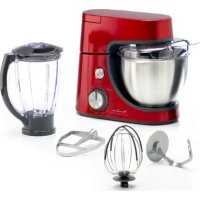


| Product type | Food processor |
| Brand | Moulinex |
| Model | Masterchef Gourmet QA518G10 |
| Power supply | 230 V / 50 Hz (standard estimate) |
| Speeds | Variable from 1 to 8/max + Pulse position |
| Stainless steel bowl capacity | Up to 1.8 kg of light dough |
| Blender bowl capacity | 1.5 L (thick mixtures) / 1.25 L (liquid mixtures) |
| Main functions | Mix, knead, beat, emulsify, whisk, homogenize, blend, mince, grate, slice, juice |
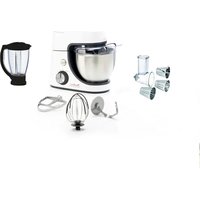
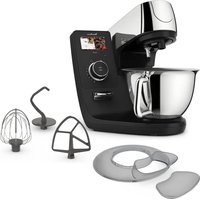
| Provided accessories | Stainless steel bowl, splash-proof lid, kneading hook, beater, multi-wire whisk, blender bowl, adaptor, mincer head, vegetable cutter, cones (grater, slicer), juicer, mini-chopper, grinder |
| Kneading hook | Up to 500 g flour, max time 13 min, speed 1 |
| Whisk | Up to 10 egg whites or 500 ml cream, max time 10 min |
| Mincer | Meat up to 3 kg, max time 10 min, speed 5-7 |
| Grate/Slice | Up to 2 kg, max time 10 min, speed 5 (slice) or 7 (grate) |
| Juicer | Up to 300 g per batch, max time 10 min, speed 5 |
| Mini-chopper | Herbs (10g/10s), dried fruit/meat (100g/10s), puree (150g/20s) |
| Grinder | Dried fruit (100g/5s) |
| Care and cleaning | Accessories dishwasher-safe (except mincer head, kneading hook, beater). Do not immerse motor unit or adaptor. |
| Safety | Starts only if trap door and head are locked; automatic stop if unlocked |
| Cord length | Approx. 1.2 m (adjustable according to diagram A7) |
| Spare parts and repairability | Accessories available on request; requires presentation of the manual |
| Weight | Approx. 6 kg (estimate for a versatile food processor) |
| Dimensions (L x W x H) | Approx. 40 x 25 x 35 cm (estimate) |
Frequently Asked Questions - Masterchef Gourmet QA518G10 MOULINEX
User questions about Masterchef Gourmet QA518G10 MOULINEX
0 question about this device. Answer the ones you know or ask your own.
Ask a new question about this device
Download the instructions for your Food Processor in PDF format for free! Find your manual Masterchef Gourmet QA518G10 - MOULINEX and take your electronic device back in hand. On this page are published all the documents necessary for the use of your device. Masterchef Gourmet QA518G10 by MOULINEX.
USER MANUAL Masterchef Gourmet QA518G10 MOULINEX
AVAILABLE ACCESSORIES
Warning: Please read the “safety guidelines” booklet and instructions carefully before initial use.
BEFORE FIRST USE
- Before using for the first time, wash all accessory parts in soapy water (except for the attachment (E): see § Cleaning). Rinse and dry.
- Place the appliance on a flat, clean and dry surface. Make sure that the selector button (A1) is in the «0» position and plug in your appliance.
- You have several options for starting your appliance: (see diagram A1):
- Intermittent operation (pulse):
- Turn the selector button (A1) to the «pulse» position. Using a succession of pulses can give you better control when preparing certain foods.

- Continuous operation:
- Turn the selector button (A1) to the desired position from «1 to 8/max», depending on the food you are preparing. You can change it as required during preparation.
- To stop the appliance, turn the button (A1) to "0".
Important: The appliance will start only if the cover (A5) and the head (A3) are locked. The appliance will stop immediately if you unlock the cover (A5) and/or the head (A3) during operation. Lock the cover and/or the head, turn the control button (A1) to the "0" position, and then start the appliance normally by selecting the desired speed.
1 - MIXING / KNEADING / BEATING / EMULSIFYING / WHISKING
You can prepare up to 1.8 kg of light dough and heavy dough made with up to 500 g of flour using the stainless bowl (B1) and its lid (B2) depending on the food.
ACCESSORIES USED: Stainless steel bowl (B1), Lid (B2), Kneader (C1) or mixer (C2) or balloon whisk (C3).
1.1 - ASSEMBLING THE ACCESSORIES
Follow the diagrams from 1.1 to 1.4.
1.2 - USAGE, TIPS AND DISMANTLING
- Start by turning the selector button (A1) to the desired position according to the recipe.
- You can add food through the hole in the lid (B2) during preparation.
- To stop the appliance, turn the button (A1) to "0".
Tips:
KNEADING (Maximum time of use: 13 minutes)
- Use the kneader accessory (C1) at speed "1". You can knead up to 500 g of flour (e.g. white bread, grain bread, short crust pastry, etc.).
MIXING (Maximum time of use: 13 minutes).
- Use the mixer (C2) at speed 1 to 8/max.
- You can mix up to 1.8 kg of light dough (light cake mixture, sponge cake, biscuit or cookie dough).
- Never use the mixer (C2) to knead heavy dough and fresh pasta dough (lasagne, rigatoni, bigoli, etc.).
- BEATING / EMULSIFYING / WHISKING (Maximum time of use: 10 minutes).
- Use the balloon whisk (C3) at speed 1 to 8/max.
- You can prepare: mayonnaise, aioli, sauces, whisked egg whites (up to 10 egg whites), whipped cream (up to 500 ml), meringues etc.
- Never use the balloon whisk (C3) to knead heavy dough or mix light dough.
Dismantling the accessory: Wait for the appliance to come to a complete stop and proceed in the reverse order of the assembly. Diagrams from 1.4 to 1.1.
2 - BLENDING/MIXING (DEPENDING ON MODEL)
Depending on the nature of the food, you can use the blender (D) to prepare up to 1.5 L of thick mixtures and 1.25 L of liquid mixtures.
ACCESSORIES USED: Blender jug (D or L).
2.1 - ASSEMBLING THE ACCESSORIES
Follow the diagrams from 2.1 to 2.3 and 10.
2.2 - USAGE, TIPS AND DISMANTLING (Maximum time of use: 3 minutes).
- Start by turning the selector button (A1) to the desired position (from speed 7 to 8 or pulse) according to the recipe. Use the Pulse position for better mixing control and for a better blending of your preparation.
- You can add food through the hole in the measuring cap (D2, L5) during preparation.
Tips:
- You can prepare:
- finely blended soups, cream soups, stewed fruit, milkshakes and cocktails.
- liquid batter (pancake, fritters, Yorkshire pudding, waffles, clafoutis and custard flans).
- You cannot make crushed ice.
- If ingredients stick to the sides of the bowl when mixing, stop the appliance and wait until the blades have stopped completely. Remove the blender and push the food down onto the blades using a spatula, and put your blender back on the appliance to continue processing.
Dismantling the accessory: Wait for the appliance to come to a complete stop before removing the blender jug and proceed in the reverse order of the assembly, diagrams from 2.3 to 2.1 and 10.
3 - MINCING (DEPENDING ON MODEL)
ACCESSORIES USED: Attachment holder (E), Assembled mincer head (F)
3.1 - FITTING THE MINCER ATTACHMENT
Follow the diagrams 9, 10, and then from 3.1 to 3.3.
3.2 - USAGE, TIPS AND DISMANTLING
- Run the appliance by turning the selector (A1) to speeds «5 to 7».
- Push the meat, piece by piece, down the feed tube, using the pusher (F7). Never push the ingredients down the feed tube with your fingers or any other utensil.
- You can chop up to 3 kg of meat. Maximum time of use: 10 minutes.
Tips:
- Prepare all of the foodstuffs to be minced (for meat, remove the bones, gristle and tendons and cut it into pieces of approximately 2 x 2 cm).
- Make sure that frozen meat is thoroughly thawed.
Dismantling the accessory: Wait for the appliance to come to a complete stop and proceed in the reverse order of the assembly diagrams 10, from 3.3 to 3.1 and then 9.
4 - GRATING / SLICING (DEPENDING ON MODEL)
ACCESSORIES USED: Attachment holder (E), Assembled vegetable slicer (G), Drums (depending on model)
4.1 - ASSEMBLING THE ACCESSORIES
Follow the diagrams 10, 9 and then from 4.1 to 4.2.
4.2 - USAGE, TIPS AND DISMANTLING
- Run the appliance by turning the selector (A1) to speed 5 to slice and to speed 7 to grate.
- Place the food in the feed tube on the body and press down with the pusher (G2).
Never push the ingredients with your fingers or any other utensil.
- You can prepare up to 2 kg of food, maximum time of use: 10 min.
- Use the drums to:
- Grate coarsely (G4) / grate finely (G5): carrots, celery, potatoes, cheese, etc.
- Slice thickly (G3): potatoes, carrots, cucumbers, apples, beetroot, etc.
- Potato shredder (G6): potatoes, parmesan, etc.
Dismantling the accessory: Wait for the appliance to come to a complete stop and proceed in the reverse order of the assembly, diagrams 10, 4.2, 4.1 and 9.
5 - EXTRACTING JUICE FROM FRUIT AND VEGETABLES (DEPENDING ON MODEL)
ACCESSORIES USED: Assembled juice extractor (H)
5.1 - ASSEMBLING THE JUICE EXTRACTOR
Follow the diagrams from 5.1 to 5.6.
5.2 - USAGE, TIPS AND DISMANTLING (maximum time of use: 10 minutes.)
- Cut the fruits and/or vegetables into pieces.
- Run the appliance by turning the selector (A1) to speed «5».
- Insert the ingredients down the feed tube in the lid (H2) push them slowly using the pusher (H1).
- Do not process 500g of food more than 5 times continuously, without allowing your appliance to cool down completely
- Important: clean the filter (H3) and the juice collector (H4) after every 300g of ingredients.
Tips:
- You can make juice from: carrots, tomatoes, apples, grapes, raspberries, etc. but it is not possible to extract juice from certain fruits and vegetables: bananas, avocado pears, blackberries, some varieties of apples, etc...
- Peel fruits with thick skins; remove stones and the core of pineapples.
- Drink the juices immediately after preparation.
Dismantling the accessory: Wait for the appliance and rotary filter to come to a complete stop before removing the accessory from the appliance. Proceed in the reverse order of the assembly, diagrams from 5.6 to 5.1.

6 - FINELY CHOPPING SMALL QUANTITIES (DEPENDING ON MODEL)
ACCESSORIES USED: Mini chopper lid (N1), Mini chopper bowl (N2)
6.1 - ASSEMBLING THE ACCESSORIES
Follow the diagrams 10, 6.1 and 6.2.
6.2 - USAGE, TIPS AND DISMANTLING
- You can finely chop with the mini chopper:
- Fresh herbs: 10g max. / 10 secs max. / speed «7»
- Dried fruits / Beef (boneless and trimmed meat): 100g max. / 10 secs max. / speed «1»
- Vegetable puree: 150g max. / 20 secs max. / «pulse» or speed «1»
- This grinder is not designed for hard products like coffee beans, hard spices nor liquids.
Dismantling the accessory: Wait for the appliance to come to a complete stop and proceed in the reverse order of the assembly, diagrams 10, 6.2 and 6.1.
7 - ADJUSTING THE CORD LENGTH (see A7)
8 - ROUGH CHOPPING SMALL QUANTITIES (DEPENDING ON MODEL)
ACCESSORIES USED: Assembled grinder.
- Chop in a few seconds by pulsing: dried figs, dried apricots, etc. Quantity / max time: 100g / 5s
CLEANING
- Unplug the appliance.
- Do not immerse the motor unit (A) or the attachment (E) in water or under running water. Wipe them with a dry or slightly damp cloth.
- Disassemble completely and rinse the accessories quickly after use.
Handle the blades with care to prevent injury. (diagram 10). - Wash, rinse and dry the accessories: they are dishwasher-safe, except for all the metal components in the mincer head: body (F), the kneader (C1) and the mixer (C2).
WHAT TO DO IF YOUR APPLIANCE DOES NOT WORK
Please refer to the chapter «before first use».
Your appliance still does not work? Contact an authorised service centre (see the list in the service booklet).
AVAILABLE ACCESSORIES
See page 59 and visit the brand website.
Caution: this booklet contains instructions for additional accessories. Please keep safe for future reference. Please contact the Customer Service for further information on how to purchase accessories.

BASIC RECIPES
Cake Batter
Ingredients: 200 g sugar, 200 g butter, 200 g eggs, 200 g flour, 2 tsp baking powder (3 g)
Pour all ingredients into the bowl and set up the mixer and the lid. Operate the appliance for 30 seconds at speed 1 and then for 2 minutes at maximum speed. Pour the batter into a greased and floured cake tin, then place in a preheated oven at 180°C for 1 hour.
Pancake Batter
If you have the blender accessory, we recommend that you use this accessory to prepare your pancake batter.
Using the blender:
Ingredients: 750 ml milk, 375 g flour, 4 eggs, 40 g sugar, 100 ml oil, 1 tbsp orange blossom water or flavoured alcohol
In the blender bowl, place the eggs, oil, sugar, milk and your chosen flavour. Select speed 3 and operate for 1 minute. Next, pour the flour from the measuring cap's opening and operate for 1 minute and 30 seconds. Let the batter rest for at least 1 hour at room temperature before cooking your pancakes.
Without a blender:
Ingredients: 250 g flour, 500 ml milk, 200 g eggs, 6 g salt
In the food processor bowl equipped with a balloon whisk, place the flour, eggs and 100 ml of milk. Place the lid and mix at speed 1 for 30 seconds and then at maximum speed for 45 seconds. Reduce the speed to position 6 and then pour the rest of the milk and mix for 45 seconds. Let the batter rest at least 1 hour at room temperature before cooking your pancakes.
Mayonnaise
Ingredients: 1 egg yolk, 20 g mustard, a pinch of salt, 200 ml oil
Into the bowl, place the egg yolk, mustard and salt. Set up the balloon whisk on your food processor, place the lid and start the appliance at maximum speed. Gradually add the oil through the lid opening for 2 minutes.
Bread Dough
Ingredients: 300 ml of cold water (out of the refrigerator), 500 g flour, 1 tbsp sugar, 1.5 tsp salt, 1.5 tbsp sunflower oil, 1.5 tbsp dry yeast
Into the food processor bowl, place the water, salt, sugar and oil. Next, add 350 g of flour and then the yeast. Set up the dough hook and knead for 5 minutes at speed 1. Add the remaining 150 g of flour and knead at speed 1 for 3 minutes. Let the dough rise (covered) at 35°C for 1 hour. The dough must double in volume. Shape your loaf and let it rise again for 1 hour at 35°C. Your loaf must double in volume. Cook in a preheated oven at 210°C for 10 minutes in a damp environment (place a bowl of water on the bottom of the oven) and finish cooking at 180°C for 15 minutes.
2 - MIXING / KNEADING (DEPENDING ON THE MODEL) Depending on the nature of the food, you can use the blender (D) to prepare up to 1.5 L of thick mixtures and 1.25 L of liquid mixtures.
ACCESSORIES USED: Blender jug (D or L).
2.1 - ASSEMBLING THE ACCESSORIES
Ingredients: 250g flour, 500g eggs, 200g egg whites, 6g salt
5 - JUICING FRUIT AND VEGETABLES (DEPENDING ON THE MODEL)
WHAT TO DO IF YOUR APPLIANCE DOES NOT WORK
ACCESSORIES USED: Attachment holder (E), Assembled mincer head (F)
ACCESSORIES USED: Stainless steel blade (B1), Lid (B2), Dough hook (C1), Whisk (C2) or Circular whisking attachment (C3).
1.1 - ASSEMBLY ORDER
Follow the diagrams from 1.1 to 1.4.
1.2 - USE
Turn the switch (A1) to the ON position according to the recipe. During operation, you can add products through the opening in the lid (B2). - To stop the appliance, turn the knob (A1) to the "0" position.
Tips:
KNEADING (Maximum operating time: 13 minutes).
- Use the dough hook (C1) at speed "1". You can knead up to 500 g of flour (wheat, coarse, durum wheat semolina, crumbly dough, etc.).
MIXING (Maximum operating time: 13 minutes).
- Use the whisk (C2) at speeds from "1 to 8/Maximum".
- You can mix up to 1.8 kg of light dough (cakes, yeast dough, etc.).
- Never use the mixer (C2) for kneading thick dough and fresh dough for pasta (lasagna, ravioli, gnocchi, etc.).
WHIPPING / EMULSIFYING / BEATING (Maximum operating time: 10 minutes).
- Use the round whisk (C3) at speeds from "1 to 6/Maximum" or "1 to 8" (depending on the model).
- You can prepare: mayonnaise, eggnog, sauces, whipped egg whites (up to 10 egg whites), whipped cream (up to 500 ml), etc.
- Never use the round whisk (C3) for kneading thick dough or for mixing light dough.
Disassembly order: Wait until the appliance has completely stopped, then perform the disassembly steps in reverse order of assembly, from diagram 1.4 to 1.1.
2-MIXING/BLENDING (DEPENDING ON THE MODEL)
Depending on the products used, with the blender (d) you can prepare up to 1.5 liters of thick mixture or up to 1.25 liters of liquid mixture.
MCNOlb3YEMbIE HACADKn: Yaasa 6JIeHepa (D,L).
2.1 - ASSEMBLY ORDER OF ACCESSORIES:
Follow the diagrams from 2.1 to 2.3 and 10.
2.2 - USE (Maximum usage time: 3 min.)
First, turn the switch (1) to the appropriate position according to the recipe (from speed "7" to "8" or Pulse (pulse mode). To improve control of the mixing process and improve the quality of mixing, use the "Pulse" (pulse mode). During operation, you can add products through the opening in the measuring cup (D2, L5)
Tips:
You can prepare: - Homogeneous soups, velouté sauces, compotes, milkshakes and other cocktails. - Liquid mixtures on an oil basis (pancakes, omelettes, casseroles, pancakes with custard cream). - If ingredients stick to the walls of the container, stop the appliance. Wait for a complete stop of the device, remove the blender, scrape the stuck products from the walls with a spatula and install the blender back to continue working.
Disassembly order of accessories: wait for a complete stop of the device before removing
the blender and perform the actions in reverse order of assembly, from diagram 2.3 to 2.1 and 10.

3 - USE OF THE MEAT GRINDER (DEPENDING ON THE MODEL)
ACCESSORIES USED: Attachment fastening (E), Meat grinder head and auger in assembly (F)
3.1 - INSTALLATION OF THE ATTACHMENT
Follow the diagrams 9, 10, and from 3.1 to 3.3.
3.2 - USE
- Start the appliance, select with the switch (A1) speed "4" or "7".
- Place the meat into the loading tube and push it through with the pusher (F7). Never push ingredients into the loading tube with your fingers or any other objects. You can cut up to 3 kg of meat. Maximum continuous operating time: 10 minutes.
Tips:
- Prepare the food for grinding (if it is meat, remove bones, tendons, and cut the meat into pieces of approximately 2 x 2 cm).
- Make sure that the meat is completely defrosted.
Disassembly order: Wait until the appliance has completely stopped, then perform the steps in reverse order of assembly: diagrams 10, from 3.3 to 3.1, and then 9.
4 - GRATING/SLICING (DEPENDING ON MODEL)
Attachments used: Attachment holder (E), assembled vegetable cutter (G), cylinders (depending on model)
4.1 - ASSEMBLY ORDER OF THE ATTACHMENT
Follow diagrams 10, 9, and then from 4.1 to 4.2.
4.2 - USE
Start the appliance by selecting speed "5" for slicing or "7" for grating with the switch (1). Place the food into the loading tube and push it down with the pusher (G2).
Never push ingredients with your fingers or any other objects.
You can prepare up to 2 kg of food. Maximum continuous operating time: 10 minutes. Purpose of the cylinders: - Coarse grater (G4) / Fine grater (G5): carrots, celery, potatoes, cheeses, etc. - Coarse slicer (G3): potatoes, carrots, cucumbers, zucchini, beets, etc. - Potato pancakes (G6): potatoes, parmesan, etc.
Procedure for disassembly: Wait for the device to come to a complete stop and perform the steps in the reverse order of assembly: diagrams 10, 4.2, 4.1, and 9.
5-EXTRACTING JUICES FROM FRUITS AND VEGETABLES (DEPENDING ON THE MODEL)
ATTACHMENTS USED: JUICE EXTRACTOR (H) IN THE SET.
5.1 -ASSEMBLY PROCEDURE
Follow the diagrams from 5.1 to 5.6.
5.2-USAGE (Maximum usage time: 10 minutes.)
-Cut the fruits/vegetables into pieces. - Start the device, selecting speed "5" with the switch (A1).
- Load them through the feed tube in the lid (H2), slowly pushing them inside with the pusher (H1). Do not process more than 500 g of products more than 5 times continuously, without allowing the device to cool completely between sessions. Important: Clean the strainer (H3) and the juice container (H4) after processing every 300 g of ingredients.
Tips:
- You can make juice from carrots, tomatoes, apples, grapes, raspberries, etc., however, from some types of fruits and vegetables, juice will not be obtained, such as bananas, avocados, pears, blackberries, and some varieties of apples.
- Wash fruits that have thick skin; remove seeds, and from pineapples remove the core.
- Drink freshly squeezed juices immediately.
Disassembly procedure: Before removing accessories from the device, wait for the device to come to a complete stop and for the rotating parts to stop. Perform the steps in the reverse order of assembly, from diagram 5.6 to 5.1.
USE OF ACCESSORIES: SELECTED MILL
- No more than a few seconds in pulse mode: dried apricots, dried apricots.
Quantity/Maximum processing time: 100g/5s
UH
Cleaning the appliance. Do not immerse the motor block (A) or the attachment (E) in water and do not rinse them under running water. Wipe them with a dry or slightly damp cloth. - Thoroughly disassemble and clean the accessories immediately after use.
To avoid injury, handle the blades carefully. (Diagram 10).
Remove, clean and dry the accessories: they can be washed in a dishwasher using the gentle cycle. The blender head consists of: housing (F), blade (C1), and shaft (C2).
TROUBLESHOOTING IF THE APPLIANCE DOES NOT WORK

See section "Before first use".
If it still does not work, contact an authorized service center (see list in the service booklet).
ACCESSORIES
See page 59 and the brand's website.
Note: The leaflet contains instructions for optional accessories. Keep it for future reference. Contact customer service for information on how to purchase accessories.
Expert: The command "Kazakhstan Railways" has been removed.
FOR HOUSEHOLD USE ONLY
- For household use only. All parts (see the block (E) marked "Tazalau") have been purchased. They are removed and cleaned. Place them on a dry surface. Do not place the drive shaft (A1) in the housing, but place it next to it. The blades are sharp: handle them carefully (see diagram A1).
- Switching on/off (pulse mode): Press the drain plug (A1) "Pulse" button ("Pulse mode") to turn it on. The switching on/off procedure is the same as described above. - Without pulse mode:
Press the drain plug (A1) repeatedly until the indicator "1 - dE H 8/Max" lights up. The pump will operate in pulse mode. - To stop the pump, press the button (A1) "0".
Note! The pump can only be used when the cover (A5) and the base (A3) are installed. When the pump is in operation, the cover (A5) and/or the base must be securely closed. Install the cover (A5) and/or the base, press the button (A1) "0", then use the pump for other purposes.
1 - OPERATION / PUMPING / CONSTRUCTION / ADJUSTMENT / SETTING
The cover (B2) can be used for containers with a capacity (B1) of up to 1.8 kg, and the pump can be used for other purposes.
Required accessories: container (B1), cover (B2), vacuum hose (C1), adapter (C2) or bottle cap (C3)
1.1-Required accessories list
See diagrams 1.1 and 1.4.
1.2-Operation
- Press the drain plug (A1) repeatedly until the indicator lights up. When the pump is in operation, the cover (B2) can be used for other purposes. To stop the pump, press the button (A1) "0".
Accessories:
PUMPING (with short operation time: 13 minutes.)
-In the container, place the vacuum hose (C1) "1" into the container. Add up to 500 g of food (e.g., fruits, vegetables, meat, etc.) to the container.
Preparation time: 13 minutes.
- The disinfectant solution (C3) is used at a concentration of 8 mg/l (for high contamination) for disinfection.
- You will need: a spray bottle, a brush, a cloth, a disinfectant and a scraper (for the scraper blade), a cleaning agent (500 ml is enough), etc. for cleaning.
The mixer (C2) is used for mixing and stirring (e.g., for paint, glue, plaster, etc.). - Cleaning / rinsing / drying (preparation time: 10 minutes). - The disinfectant solution (C3) is used at a concentration of 8 mg/l (for high contamination) for disinfection. - You will need: a spray bottle, a brush, a cloth, a disinfectant and a scraper (for the scraper blade), a cleaning agent (500 ml is enough), etc. for cleaning. - The disinfectant solution (C3) is not used for cleaning the filter and for separating the filters.
REQUIRED ACCESSORIES ORDER: After stopping the device with the switch, then follow the diagrams 1.4 and 1.1 in the correct order.
2 - PREPARATION (START-UP)
The device can be used with an energy source (D) of at least 1.5 liters for liquid additives or 1.25 liters for dry additives.
REQUIRED ACCESSORIES: Energy source (D, L).
2.1 - ORDER OF REQUIRED ACCESSORIES
Follow diagrams 2.1, 2.3 and 10. 2.2 - Preparation (preparation time: 3 minutes). Then press the start button (A1) and select the mode ("7th" or "pulse" (pulse mode)) as needed. Use the "Pulse" (pulse mode) to adjust the pressure and to adjust the cleaning time. During operation, the numbers on the display (D2, L5) can be changed.
Accessories:
The following accessories can be used:
- Spray nozzles, spray guns, hoses, water and other containers.
- Dry additives in the main container (e.g., powder, granules, tablets, tablets).
If the device is connected to the power supply, stop the device with the switch. Wait for the device to stop completely. Take the energy source, place the connected devices on a flat surface and replace the energy source with the cleaning agent.
CHARACTERISTICS OF THE VALVE: Install the valve in the direction of the arrow on the body, according to diagrams 2.3, 2.1 and 10.
3 - INSTALLATION OF THE VALVE
REQUIRED CHARACTERISTICS: A wrench (E) suitable for the valve, and the valve's actuator (F)

3.1 - INSTALLING THE BLOCK
Install according to diagrams 9 and 10, then install according to diagrams 3.1 and 3.3.
3.2 - INSTALLING THE VALVE ACTUATOR
- Using the wrench (A1), turn the valve stem clockwise by 5 to 7 turns to close the valve.
- Tighten the bolts (F7) with a wrench. Do not overtighten the bolts; tighten them only by hand or with a suitable tool.
- If the valve is not fully open, the maximum operating time is 10 minutes.
Recommendations:
- Do not use the valve for purposes other than intended (if the valve is for gas, remove any dirt, debris, or foreign objects; clean the valve with a dry cloth).
- Do not use the valve if it is damaged.
REQUIRED TOOLS: Place the device on a flat surface, in place of diagrams 10 and 9, then in place of diagrams 3.3 and 3.1, then in place of diagrams 9.
4 - OPERATION (FOR THE USER)
REQUIRED TOOLS: Protective gloves (E), protective goggles (G), pliers (for the user)
4.1 - TOOL PLACEMENT ORDER
In place of diagrams 10, 9, then in place of diagrams 4.1 and 4.2.
4.2 - USE AND ACCESSORIES
Using the screwdriver (A1), select the "5" or "7" setting by turning the knob.
Insert the battery into the compartment and connect it using the connector (G2).
Connect the device's terminals to the battery or to any other power source using the cables.
C3 2 kg weight limit, do not exceed: 10 minutes. For pliers:
- For cutting (G4) / for stripping (G5): wire, cable, potato, carrot, etc.
- For stripping (G3): potato, onion, garlic, apple, strawberry, etc.
- For potato peeling (G6): potato, parmesan, etc.
REQUIRED TOOLS PLACEMENT ORDER: Place the device on a flat surface, then in place of diagrams 10, 4.2, 4.1, and 9.
5 - CLEANING AND MAINTENANCE (FOR THE USER)
CONDITIONS OF USE: LIQUID SOAP (H)
5.1 - LIQUID SOAP DISPENSER
5.1 and 5.6 Refer to paragraphs. 5.2 - LIQUID SOAP DISPENSER FOR SHOWER (Optional with narrow nozzle: 10 minutes)
For people with limited hand mobility. - Use the lever (A1) to press the "5" button to select the desired soap. - Then use the lever (H1) to press the button to start the flow, and use the (H2) button to stop it.
- Between uses, the soap dispenser should be rinsed with water at least 5 times, with at least 500 g of water. Procedure: for every 300 g of ingredient used, rinse with water (H3) and liquid soap (H4) thoroughly.
Ingredients:
- Some ingredients can be used: soap, shampoo, gel, cream, conditioner, etc., but some ingredients cannot be used: banana, avocado, almond, carrot, some types of almonds, etc.
- Some ingredients and additives are recommended for cleaning: banana, avocado, black currant, some types of almonds, etc.
- Pour the liquid soap into the container.
REQUIRED ACCESSORIES INSTALLATION PROCEDURE: To obtain soap foam, connect the soap and water supply to the stopcock. Refer to the installation diagrams, from 5.6 to 5.1.
6-ACCESSORIES FOR MOUNTING ON WALL)
REQUIRED ACCESSORIES: MINIMUM TUBE CLAMP (N1), MINIMUM TUBE CLAMP (N2)
6.1 - ACCESSORIES INSTALLATION PROCEDURE
10,6.1 and 6.2 Refer to diagrams.
6.2 - INSTALLATION OF THE TAP
- MHH TpyaftbIUnen TpyayFa 60NaTbH TaFamap:
- WENTep: 10r MaKc. / 10ceK MaKc. / KbIJaMaDbIfb7
- KeNTiPIJIReH JeMICTep / cnblip eti (cynekci3 JxHe ciHpi aIbIHFaH et) : 100r MaKc. / 10ceK MaKc. / XblIaMdbIbIbI «1» -KeKHeHcTeP nIopeci: 150r MaKc. / 20ceK MaKc. / «nyIbC» HeMeCe KblIaMdbIbI«1
- OcbI ycaKaTbI W KoPe CnAaKtbl KaTbI eHIMdep ywiH apHaJImaHaH.
KEPEK-KAPAKTAPdbI 60JIWEKTEY TOPTIBI: Kypan 6deH TOKtaHaMa kyTiH3, OdaH KeiH 10, 6.2 XeHe 6, 1 XnHay DnarpaMmApbH Kepi opbHdAhl3.
7-BAYCbIMHbIH¥3blHdbIfbIH PETTEY (A7 cypeTin KapaHbI3)
8-IAFBbIH KECEKTEPDI TYPAY(YJIPIRE BAJNAHbICTbl)
KoIaHbIaTbIH KEPEK-KAPAKTAP: XnHaIFaH YcaKaTaFbIlI.
- Bipheue cekynd iwiHde cepniNici peximde: kentipiinreH iHxip, kentipiinreH epiKTepeJHe T.6. ycaTayfa 60nabbl. BapbHsa y3ak kondaHy yaKbITbI: 100 r/5c
TA3AJIAY
KypbIbIbHbI 3JIeKTp KEniCiHeH aXbIpaTbIHbI3. Ko3rTbIb6IorH (A) Hece XaIraTbIH 6IOkTI (E) cyfa 6aTbipMaHb3 XHe aFbIn TyprAh cy actbHa caImaHb3. KypanDbI KypraK Hece XapTbIna bINFaI Wy6epeKeNeh cyptHi3. - KondaHbICTaH KeiH ToJIbIbIMeH 6eJIWeKTeN, Ka6DbIKTapbIH XblJam WaiBbHb3.
KapakaT any MymkiHirih andbin any ywiH, ky3epiH a6aJnan ycTaHbI3. (Dnarpamma 10).
- Xa6dbikTapbIH KyybIN, WaiBIN, KypFaTbIHbI3: Xa6dbikTapbIH bIDbc XyaTbIH MaunHara canyra 6oJIaDbI, MmKcep bacbHdaFbl MeTann 6eJIweKtepiHeh bacacbH: Kopnycbl (F), nneriwi (C1) Xahe MnKcep (C2).
EREP KYPAJXYMBIC ICTEMCE,HE ICTEY KEPEK
KK
"KoIaHyFa DeiH" TapaybH KapaHb3
Kypblfbl ani de kymbic ictemei me? YakiJneTTI Kb3MeT KepcTeOpTaJIbIFbHa xa6apJaacBb13 (Tiimdi Kb3MeT KepcTe 6yKTeMecieH KapaHb13).
KEPEK-XAPAKTAP
59-6eTTi XəHe Be6caɪTbɪ KapaHbɪz.
EckepTy: 6yn KITanwada KocbIMwa Ka6dbkTapra KaTbICTbI HycKaynap 6epinreH. KeenekeTe kondaHy wih caKtan KObIHbI3. Ka6dbkTapbH cTbIn any TypaIbI aKnapat KaXeT 6oJcA, TyTbIHyWBfA KbI3MeT KepcTeOpTaJIbIFbHa xa6apnacBHB13.
gbsj g jglal jglbl alj jlaasall jc bgs jgljdlg jgljgljgljglj
.5.1 5.6 no aagolll
()aLgC
.(N2)"gao"dojooelg(N1)"gao"dojooelh:alaxuubl
Ld2b1 wSj-6.1
6.2, 6.1, 10 a
Joo-6.2
:()
aoue yjaiy jayy. jayss ay biaoyy aiy aoyy iayd ooy doy:
Llalbl al aas jc logabj jy jy jiljll
.(C3) jgljlaafo g(C2) bllg (C1) jzol. (B2) ubj. (B1) jw wblwclg: alosawl lal
u-1.1
1.1.4 1.1 a
Jusw-1-1.2
aBbI aOg cUdbio oouo jSgl ggl (A1) jll oJlsly
Lulill (B2) 1uill 3oogbla aiai Ioo o pall dlae
.0"gA1 A1
:
g13:JooWJgJgJg
jssjj 500 jss csc.1"acjll (C1) jos
...aaiaiaiaiaiaiaiaiaiaiaiaiaiaiai
3:JUaWU
"Max/8 1" aee (C2)

Therefore, B3 = 0(2+1) = 4

- AVAILABLE ACCESSORIES
- BEFORE FIRST USE
- MIXING / KNEADING / BEATING / EMULSIFYING / WHISKING
- ASSEMBLING THE ACCESSORIES
- USAGE, TIPS AND DISMANTLING
- TIPS
- BLENDING/MIXING (DEPENDING ON MODEL)
- USAGE, TIPS AND DISMANTLING (MAXIMUM TIME OF USE: 3 MINUTES)
- MINCING (DEPENDING ON MODEL)
- FITTING THE MINCER ATTACHMENT
- GRATING / SLICING (DEPENDING ON MODEL)
- EXTRACTING JUICE FROM FRUIT AND VEGETABLES (DEPENDING ON MODEL)
- ASSEMBLING THE JUICE EXTRACTOR
- USAGE, TIPS AND DISMANTLING (MAXIMUM TIME OF USE: 10 MINUTES.)
- FINELY CHOPPING SMALL QUANTITIES (DEPENDING ON MODEL)
- ADJUSTING THE CORD LENGTH (SEE A7)
- ROUGH CHOPPING SMALL QUANTITIES (DEPENDING ON MODEL)
- CLEANING
- WHAT TO DO IF YOUR APPLIANCE DOES NOT WORK
- BASIC RECIPES
- CAKE BATTER
- PANCAKE BATTER
- USING THE BLENDER
- WITHOUT A BLENDER
- MAYONNAISE
- BREAD DOUGH
- JUICING FRUIT AND VEGETABLES (DEPENDING ON THE MODEL)
- ASSEMBLY ORDER
- USE
- MIXING/BLENDING (DEPENDING ON THE MODEL)
- ASSEMBLY ORDER OF ACCESSORIES
- USE OF THE MEAT GRINDER (DEPENDING ON THE MODEL)
- INSTALLATION OF THE ATTACHMENT
- GRATING/SLICING (DEPENDING ON MODEL)
- ASSEMBLY ORDER OF THE ATTACHMENT
- EXTRACTING JUICES FROM FRUITS AND VEGETABLES (DEPENDING ON THE MODEL)
- ASSEMBLY PROCEDURE
- USAGE (MAXIMUM USAGE TIME: 10 MINUTES.)
- UH
- TROUBLESHOOTING IF THE APPLIANCE DOES NOT WORK
- ACCESSORIES
- EXPERT: THE COMMAND "KAZAKHSTAN RAILWAYS" HAS BEEN REMOVED
- FOR HOUSEHOLD USE ONLY
- OPERATION / PUMPING / CONSTRUCTION / ADJUSTMENT / SETTING
- REQUIRED ACCESSORIES LIST
- OPERATION
- PREPARATION (START-UP)
- ORDER OF REQUIRED ACCESSORIES
- INSTALLATION OF THE VALVE
- INSTALLING THE BLOCK
- INSTALLING THE VALVE ACTUATOR
- RECOMMENDATIONS
- OPERATION (FOR THE USER)
- TOOL PLACEMENT ORDER
- USE AND ACCESSORIES
- CLEANING AND MAINTENANCE (FOR THE USER)
- LIQUID SOAP DISPENSER
- INGREDIENTS
- ACCESSORIES FOR MOUNTING ON WALL)
- ACCESSORIES INSTALLATION PROCEDURE
- INSTALLATION OF THE TAP
- BAYCBIMHBIH¥3BLHDBIFBIH PETTEY (A7 CYPETIN KAPAHBI3)
- IAFBBIH KECEKTEPDI TYPAY(YJIPIRE BAJNAHBICTBL)
- TA3AJIAY
- EREP KYPAJXYMBIC ICTEMCE,HE ICTEY KEPEK
- KEPEK-XAPAKTAP
Brand : MOULINEX
Model : Masterchef Gourmet QA518G10
Category : Food Processor